2008 BMW 650I CONVERTIBLE navigation system
[x] Cancel search: navigation systemPage 160 of 264
On/off and tone
158
On/off and tone
The following audio sources have shared
controls and setting options:
>Professional
* radio or
Business radio
>CD player
>CD changer
*
Controls
The audio sources can be operated using:
>Buttons in the area of the CD player
>iDrive
>Buttons on steering wheel, refer to page11
>Programmable memory/direct selection
buttons, refer to page21
Buttons near CD player
The layout of the buttons can vary depending
on your vehicle's equipment.
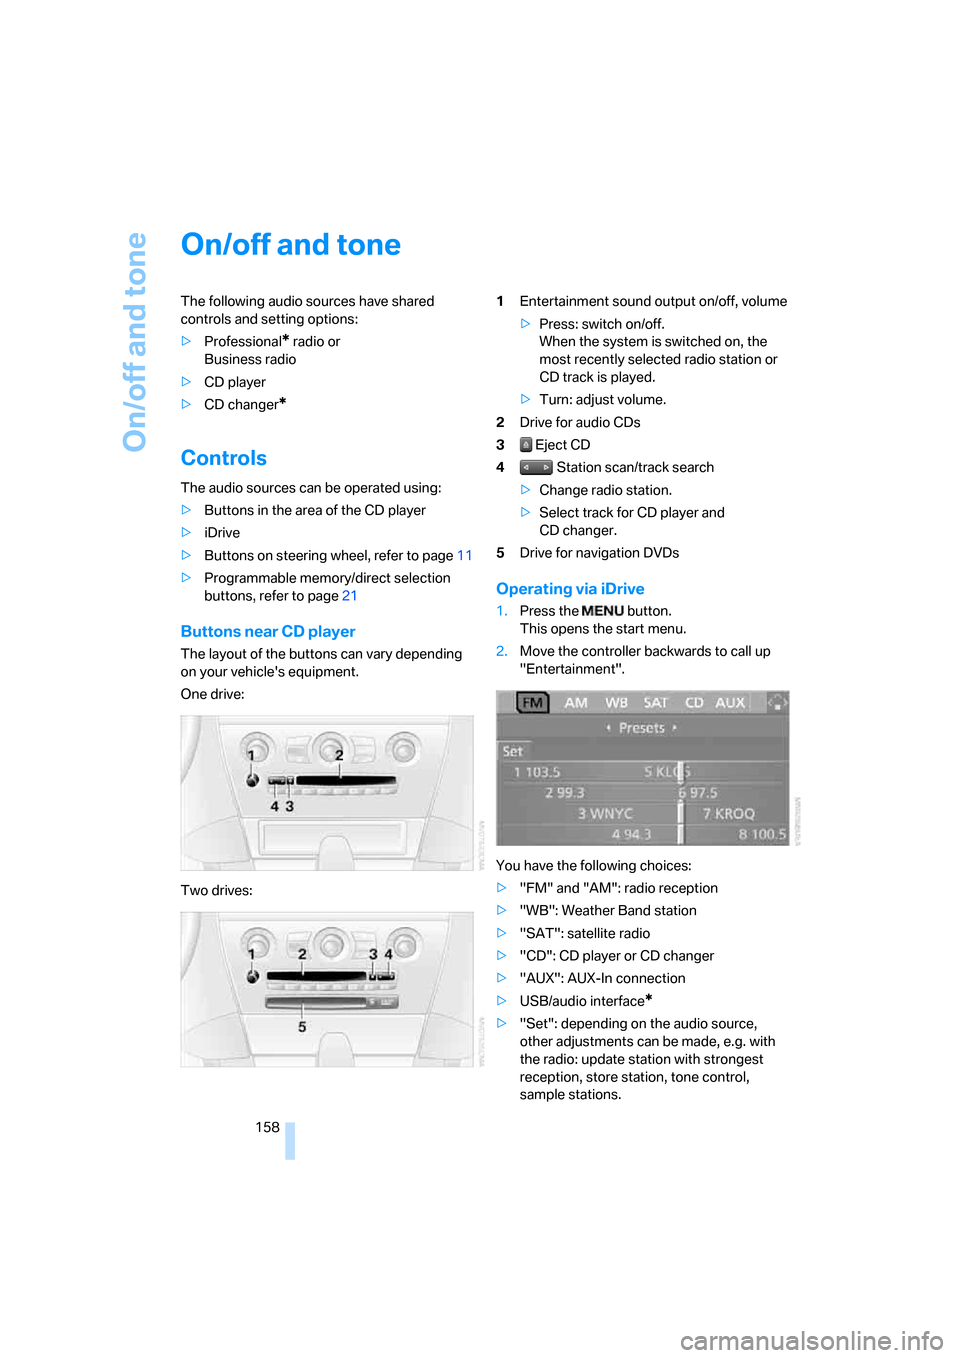
One drive:
Two drives:1Entertainment sound output on/off, volume
>Press: switch on/off.
When the system is switched on, the
most recently selected radio station or
CD track is played.
>Turn: adjust volume.
2Drive for audio CDs
3 Eject CD
4 Station scan/track search
>Change radio station.
>Select track for CD player and
CD changer.
5Drive for navigation DVDs
Operating via iDrive
1.Press the button.
This opens the start menu.
2.Move the controller backwards to call up
"Entertainment".
You have the following choices:
>"FM" and "AM": radio reception
>"WB": Weather Band station
>"SAT": satellite radio
>"CD": CD player or CD changer
>"AUX": AUX-In connection
>USB/audio interface
*
>"Set": depending on the audio source,
other adjustments can be made, e.g. with
the radio: update station with strongest
reception, store station, tone control,
sample stations.
Page 165 of 264
Navigation
Entertainment
Driving tips
163Reference
At a glance
Controls
Communications
Mobility
>"Manual":
To set stations that can be received in addi-
tion to those displayed, refer to Selecting
frequency manually.
Changing selection criteria
In addition to the stations currently displayed,
you can have stations with another selection
criterion displayed.
You can choose from the following selection
criteria:
>"All stations":
Stations that can currently be received in
the "FM" waveband.
>"Autostore":
The stations with the strongest received
signals in the "AM" waveband.
>"Presets":
Stations you have previously stored, refer to
page164.
>"Manual":
To set stations that can be received in addi-
tion to those displayed, refer to Selecting
frequency manually.
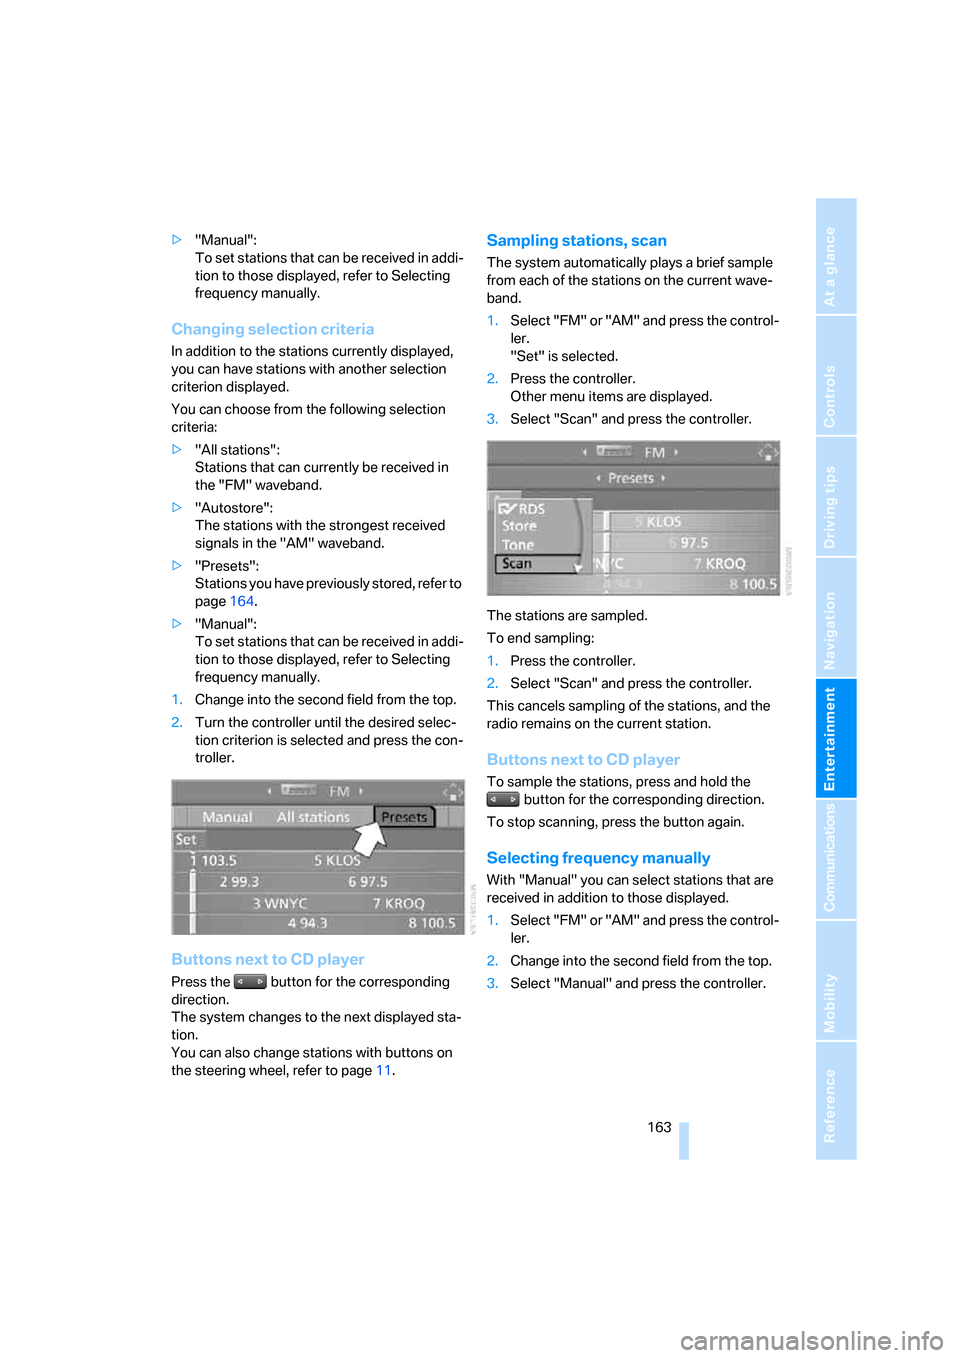
1.Change into the second field from the top.
2.Turn the controller until the desired selec-
tion criterion is selected and press the con-
troller.
Buttons next to CD player
Press the button for the corresponding
direction.
The system changes to the next displayed sta-
tion.
You can also change stations with buttons on
the steering wheel, refer to page11.
Sampling stations, scan
The system automatically plays a brief sample
from each of the stations on the current wave-
band.
1.Select "FM" or "AM" and press the control-
ler.
"Set" is selected.
2.Press the controller.
Other menu items are displayed.
3.Select "Scan" and press the controller.
The stations are sampled.
To end sampling:
1.Press the controller.
2.Select "Scan" and press the controller.
This cancels sampling of the stations, and the
radio remains on the current station.
Buttons next to CD player
To sample the stations, press and hold the
button for the corresponding direction.
To stop scanning, press the button again.
Selecting frequency manually
With "Manual" you can select stations that are
received in addition to those displayed.
1.Select "FM" or "AM" and press the control-
ler.
2.Change into the second field from the top.
3.Select "Manual" and press the controller.
Page 167 of 264
Navigation
Entertainment
Driving tips
165Reference
At a glance
Controls
Communications
Mobility
7.Press the controller.
The station is stored.
The stations of the last selection criterion are
displayed once again after a short time.
From radio readiness, the stations are saved for
the remote control used at the moment.
With programmable memory/
direct selection buttons
You can also store a station on the programma-
ble memory/direct selection buttons, also refer
to page21.
1.Select a station.
2. ... Press and hold desired but-
ton.
Changing a memory position
1.Select "Presets" and press the controller.
2.Select the desired station.
"Set" is selected.
3.Press the controller.
Other menu items are displayed.
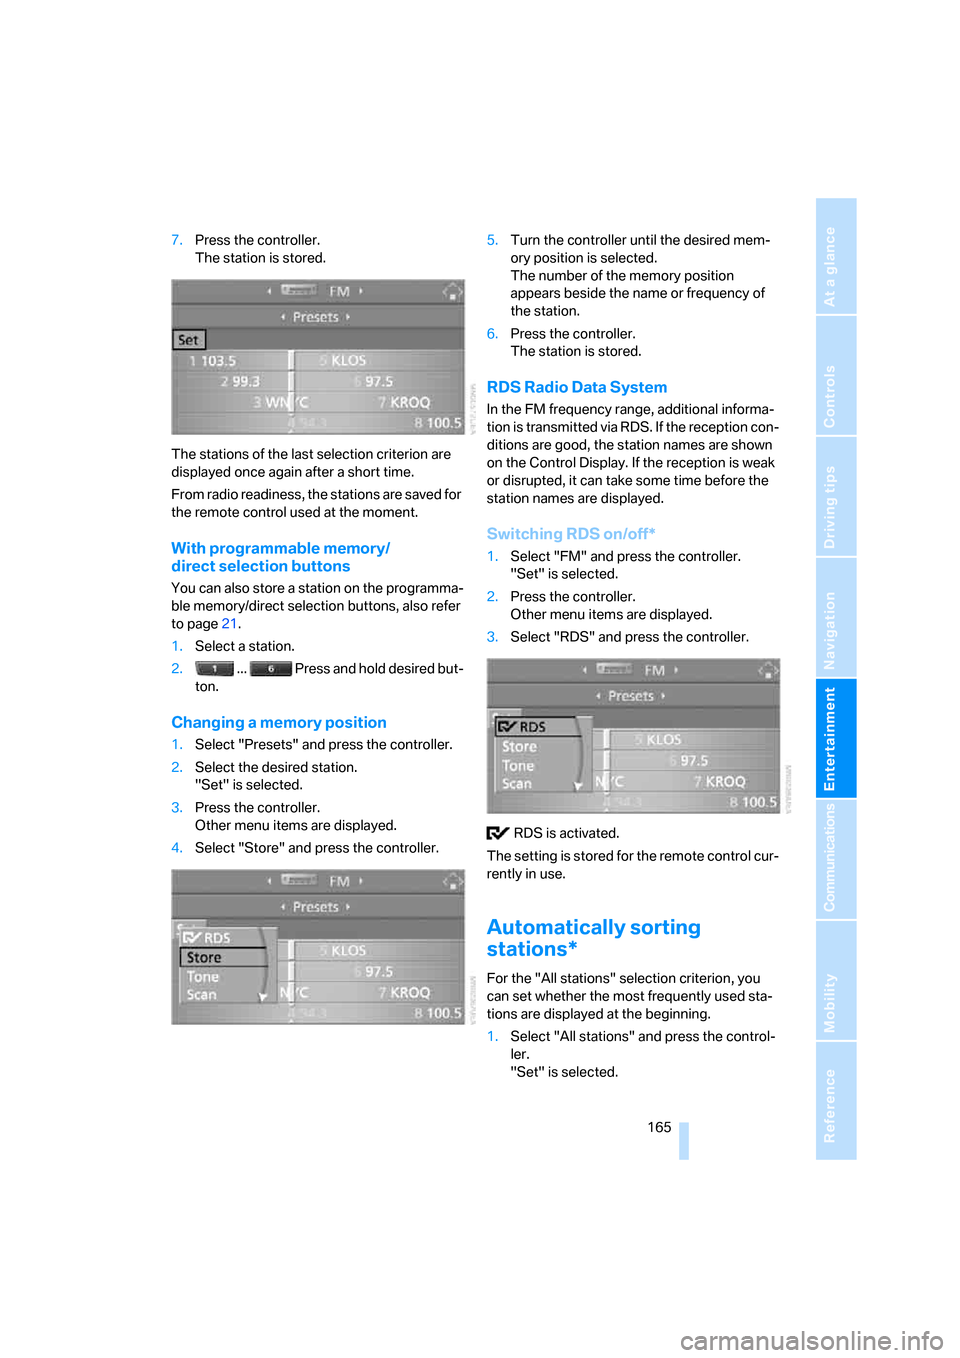
4.Select "Store" and press the controller.5.Turn the controller until the desired mem-
ory position is selected.
The number of the memory position
appears beside the name or frequency of
the station.
6.Press the controller.
The station is stored.
RDS Radio Data System
In the FM frequency range, additional informa-
tion is transmitted via RDS. If the reception con-
ditions are good, the station names are shown
on the Control Display. If the reception is weak
or disrupted, it can take some time before the
station names are displayed.
Switching RDS on/off*
1.Select "FM" and press the controller.
"Set" is selected.
2.Press the controller.
Other menu items are displayed.
3.Select "RDS" and press the controller.
RDS is activated.
The setting is stored for the remote control cur-
rently in use.
Automatically sorting
stations*
For the "All stations" selection criterion, you
can set whether the most frequently used sta-
tions are displayed at the beginning.
1.Select "All stations" and press the control-
ler.
"Set" is selected.
Page 173 of 264

Navigation
Entertainment
Driving tips
171Reference
At a glance
Controls
Communications
Mobility
Storing channel
1.Select the desired channel.
2.Press the controller.
Other menu items are displayed.
3.Select "Store" and press the controller.
"Presets" is displayed.
4.Turn the controller to select a memory posi-
tion and press the controller.
The channel is stored. The stations of the last
selection criterion are displayed again after a
short time.
Changing channel with buttons next to
CD player
Press the button for the corresponding
direction.
The system changes to the next enabled chan-
nel.
Notes
If no signal can be received for more than
4 seconds, a message is displayed on the Con-
trol Display.
Reception may not be possible for certain
reasons, e.g. environmental influences or
topographical conditions. The satellite radio
has no influence on this.
The signal may not be available in tunnels or
underground garages, next to tall buildings,
near trees, mountains or other sources of radio
interference.
Reception is usually possible again as soon as
the signal is available again.<
Page 179 of 264

Navigation
Entertainment
Driving tips
177Reference
At a glance
Controls
Communications
Mobility
Notes
BMW CD/DVD players and changers are
officially designated Class 1 laser prod-
ucts. Do not operate if the cover is damaged,
otherwise severe eye damage can result.
Do not use self-recorded CDs with adhesive
labels as these can come loose during playback
due to heat build-up and cause irreparable
damage to the system.
Only use round CDs/DVDs with a standard
diameter of 4.7 in/12 cm and do not play CDs/
DVDs with an adapter, e.g. Single-CDs, other-
wise the CDs or the adapter can jam and may no
longer be ejected.
Do not use a combined CD/DVD, e.g. DVD
Plus;
otherwise, the CD/DVD can jam and will no
longer eject.<
General malfunctions
BMW CD/DVD changers and players have been
optimized for performance in vehicles. In some
instances they may be more sensitive to faulty
CDs/DVDs than stationary devices would be.
If a CD/DVD cannot be played, first check
whether it has been inserted correctly.
Humidity
High levels of humidity can lead to condensa-
tion on the CD/DVD or the laser's scan lens and
temporarily prevent playback.
Malfunctions with individual CDs/DVDs
If malfunctions occur only with particular CDs/
DVDs, this can be due to one of the following
causes.
Home-recorded CDs/DVDs
Possible reasons for malfunctions with self-
recorded CDs/DVDs are, e.g., inconsistent
data-creation or recording processes, or poor
quality or advanced age of the CD/DVD blank.
Label CDs/DVDs only on the top, using a marker
designed for this purpose.
Damaged CDs/DVDs
Avoid fingerprints dust, scratches, and mois-
ture.
Keep CDs/DVDs in a sleeve.
Do not subject CDs/DVDs to temperatures over
1227/506, high levels of humidity or direct
sunlight.
CDs/DVDs with copy protection
Manufacturers often provide CDs/DVDs with
copy protection. This can mean that some CDs/
DVDs cannot be played or can only be played to
a limited extent.
Care
If necessary, clean the reflective scanning side
of the CDs/DVDs with a commercially available
cleaning cloth by wiping in straight lines from
the center outward.
Page 181 of 264
Navigation
Entertainment
Driving tips
179Reference
At a glance
Controls
Communications
Mobility
USB/audio interface
You can connect audio devices to the USB/
audio interface, e.g. an iPod or a USB device
(MP3 player, USB memory stick). You can then
operate these va iDrive.
The system can play back common audio files,
e.g. MP3, WMA, WAV (PCM) and ACC, as well
as playback lists in the M3U format.
Due to the large number of audio devices avail-
able on the market, operation via the vehicle
cannot be ensured for every audio device.
Ask your BMW center which audio devices are
suitable.
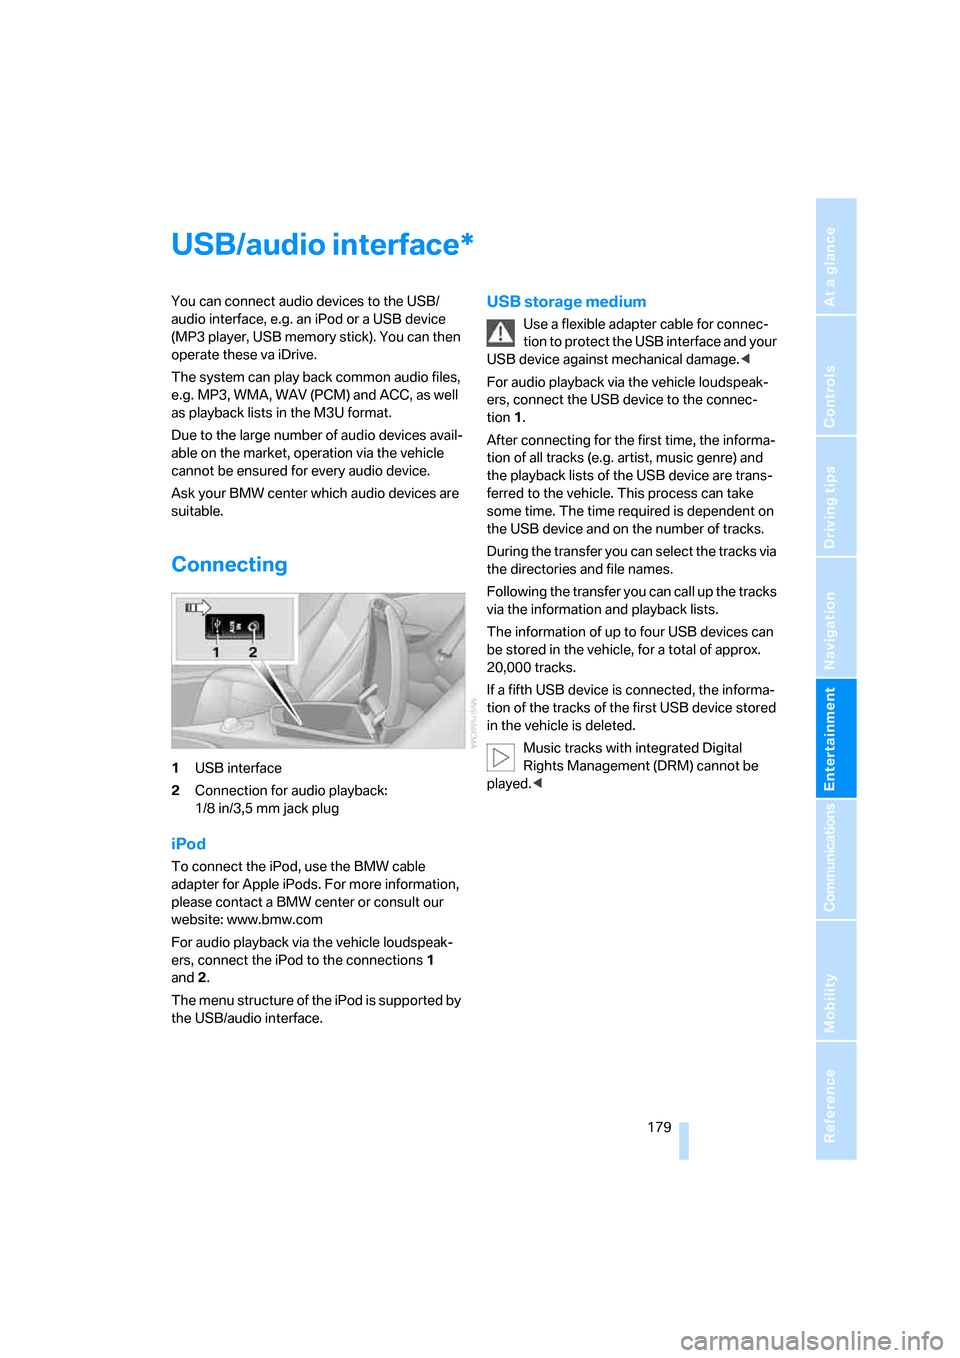
Connecting
1USB interface
2Connection for audio playback:
1/8 in/3,5 mm jack plug
iPod
To connect the iPod, use the BMW cable
adapter for Apple iPods. For more information,
please contact a BMW center or consult our
website: www.bmw.com
For audio playback via the vehicle loudspeak-
ers, connect the iPod to the connections1
and2.
The menu structure of the iPod is supported by
the USB/audio interface.
USB storage medium
Use a flexible adapter cable for connec-
tion to protect the USB interface and your
USB device against mechanical damage.<
For audio playback via the vehicle loudspeak-
ers, connect the USB device to the connec-
tion1.
After connecting for the first time, the informa-
tion of all tracks (e.g. artist, music genre) and
the playback lists of the USB device are trans-
ferred to the vehicle. This process can take
some time. The time required is dependent on
the USB device and on the number of tracks.
During the transfer you can select the tracks via
the directories and file names.
Following the transfer you can call up the tracks
via the information and playback lists.
The information of up to four USB devices can
be stored in the vehicle, for a total of approx.
20,000 tracks.
If a fifth USB device is connected, the informa-
tion of the tracks of the first USB device stored
in the vehicle is deleted.
Music tracks with integrated Digital
Rights Management (DRM) cannot be
played.<
*
Page 195 of 264
193
Entertainment
Reference
At a glance
Controls
Driving tips Communications
Navigation
Mobility
5.Change the phone number.
6.Select "Dial number" and press the control-
ler.
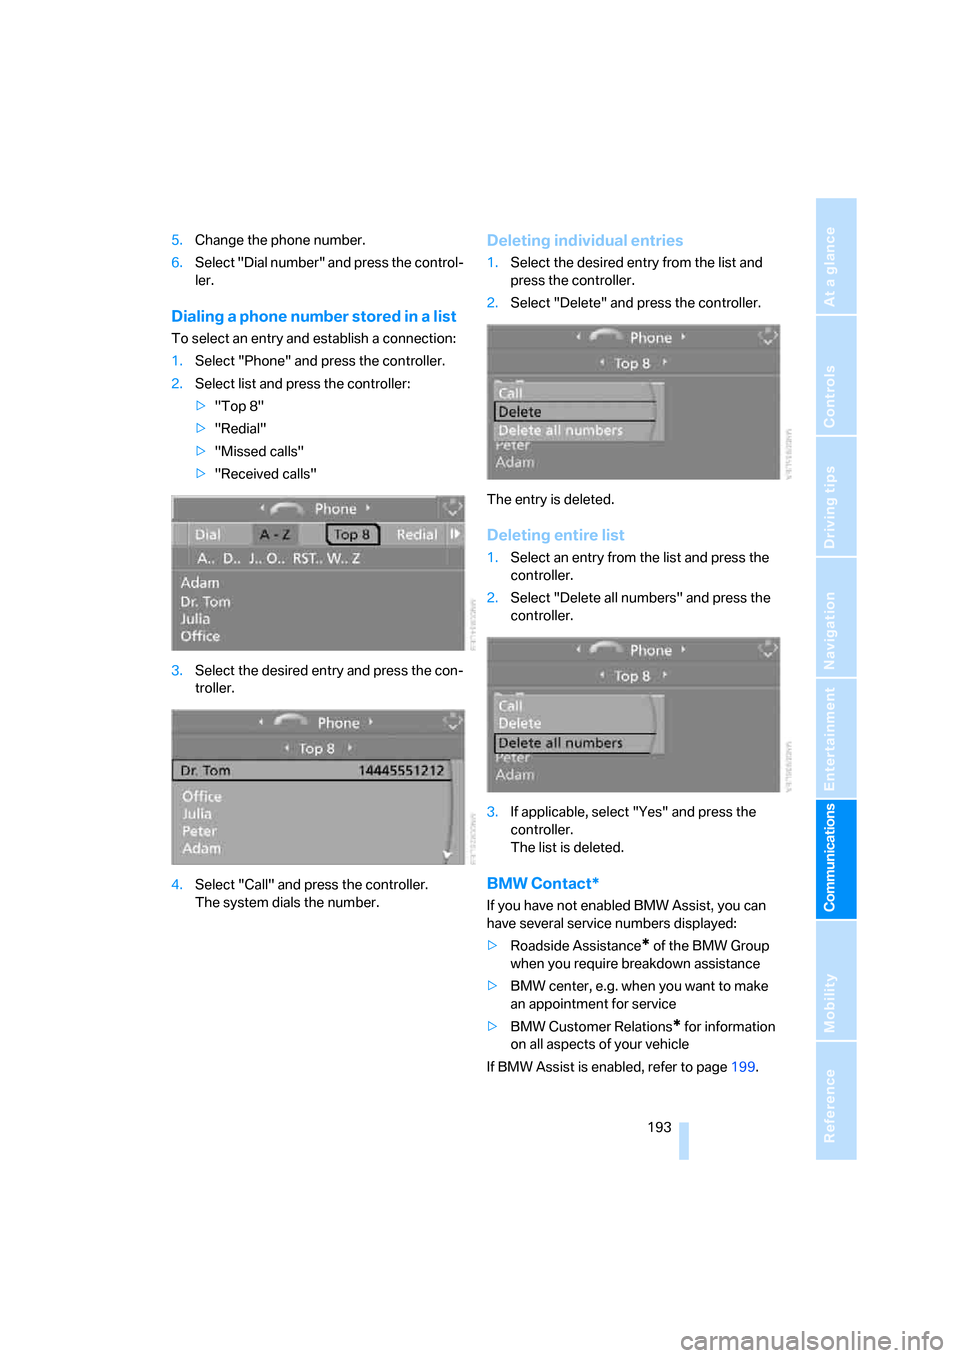
Dialing a phone number stored in a list
To select an entry and establish a connection:
1.Select "Phone" and press the controller.
2.Select list and press the controller:
>"Top 8"
>"Redial"
>"Missed calls"
>"Received calls"
3.Select the desired entry and press the con-
troller.
4.Select "Call" and press the controller.
The system dials the number.
Deleting individual entries
1.Select the desired entry from the list and
press the controller.
2.Select "Delete" and press the controller.
The entry is deleted.
Deleting entire list
1.Select an entry from the list and press the
controller.
2.Select "Delete all numbers" and press the
controller.
3.If applicable, select "Yes" and press the
controller.
The list is deleted.
BMW Contact*
If you have not enabled BMW Assist, you can
have several service numbers displayed:
>Roadside Assistance
* of the BMW Group
when you require breakdown assistance
>BMW center, e.g. when you want to make
an appointment for service
>BMW Customer Relations
* for information
on all aspects of your vehicle
If BMW Assist is enabled, refer to page199.
Page 197 of 264
195
Entertainment
Reference
At a glance
Controls
Driving tips Communications
Navigation
Mobility
Changing between mobile
phone and hands-free system
From mobile phone to hands-free
system*
You can continue calls begun outside the Blue-
tooth range of the vehicle via the hands-free
system when the engine is running or the igni-
tion is switched on. Depending on your mobile
phone, the system automatically switches over
to the hands-free mode.
For mobile phones that do not automatically
switch over to the hands-free mode:
>Depending on the mobile phone model
used, the conversation can be continued via
the hands-free system if necessary. Follow
the instructions displayed on the mobile
phone display, refer to the operating
instructions of your mobile phone.
>Press the button above the storage
compartment. Switching over may take
several seconds.
From hands-free system to mobile
phone
When you telephone via the hands-free system,
you can also continue the call via the mobile
phone if necessary, depending on the mobile
phone model. Act according to what is shown
on the mobile phone display, refer to the oper-
ating instructions of your mobile phone.
As an alternative, you can deactivate the Blue-
tooth link.
Depending on your mobile phone model, poor
reception of the wireless communications net-
work can result in the system switching from
the hands-free system to the mobile phone.
Operation by voice*
The concept
You can operate your mobile phone without
having to remove your hands from the steering
wheel. When making your entries, you will be
supported by announcements or questions in
many cases.
The same prerequisites as for operation via
iDrive apply, refer to page190.
Voice commands
Activating system
1.Briefly press the button on the steering
wheel.
An acoustic signal indicates that you can
say commands.
2.Say the command.
Ending/canceling operation by voice
Press the button on the steering wheel
or
In dialogs where text is spoken, not a command,
e.g. a name, canceling is only possible using the
button on the steering wheel.
Having possible commands read aloud
The system understands default commands
that must be spoken word for word.
You can have the possible commands spoken
by the system at any point:
Using alternative commands
There are often a number of commands to run a
function, e.g.:
The system recognizes digits from zero to nine.
You can say each digit individually or group
them into a sequence to accelerate the input.
{Cancel}.
{Help}.
{Dial name} or {Name}.