2008 BMW 650I CONVERTIBLE window
[x] Cancel search: windowPage 59 of 264

Controls
57Reference
At a glance
Driving tips
Communications
Navigation
Entertainment
Mobility
Follow the system manufacturer's
instructions on installation and use of
LATCH child restraint systems in order not to
impair their protective function.<
Anchor points for LATCH mounts
Before attaching the LATCH child's seat, pull
the belt away from the region of the child
restraint fixing system.
Make sure that both of the lower LATCH
mounts have properly clicked into place
and that the child restraint system is resting
snugly against the backrest. Otherwise, the
protective action may be impeded.<
Rear seats
The mounting points for the LATCH anchors
are located at the positions indicated by arrows
in the gap between the seat and the backrest.
Coupe: child restraint system with
tether strap
Only use the top tether-strap mounting
points to secure child restraint systems,
otherwise the mounting points could be dam-
aged.
to arrows.
Placement of tether strap
Make sure that the tether strap is not
routed over sharp edges and does not
twist on its way to the upper mounting point;
otherwise, the belt may not properly secure the
child restraint system in the event of an acci-
dent.<
1Direction of travel
2Head restraints
3Tether strap hook
4Mounting point
5Rear window shelf/luggage compartment
floor
6Backrest
7Tether strap of child restraint system
Before using the mounting points, fold the head
restraint
* into its raised position.
1.Slide the head restraint into the bottom
position.
2.Guide the tether strap over the head
restraint.
3.Attach the tether strap hook to the mount-
ing point.
Page 79 of 264

Controls
77Reference
At a glance
Driving tips
Communications
Navigation
Entertainment
Mobility
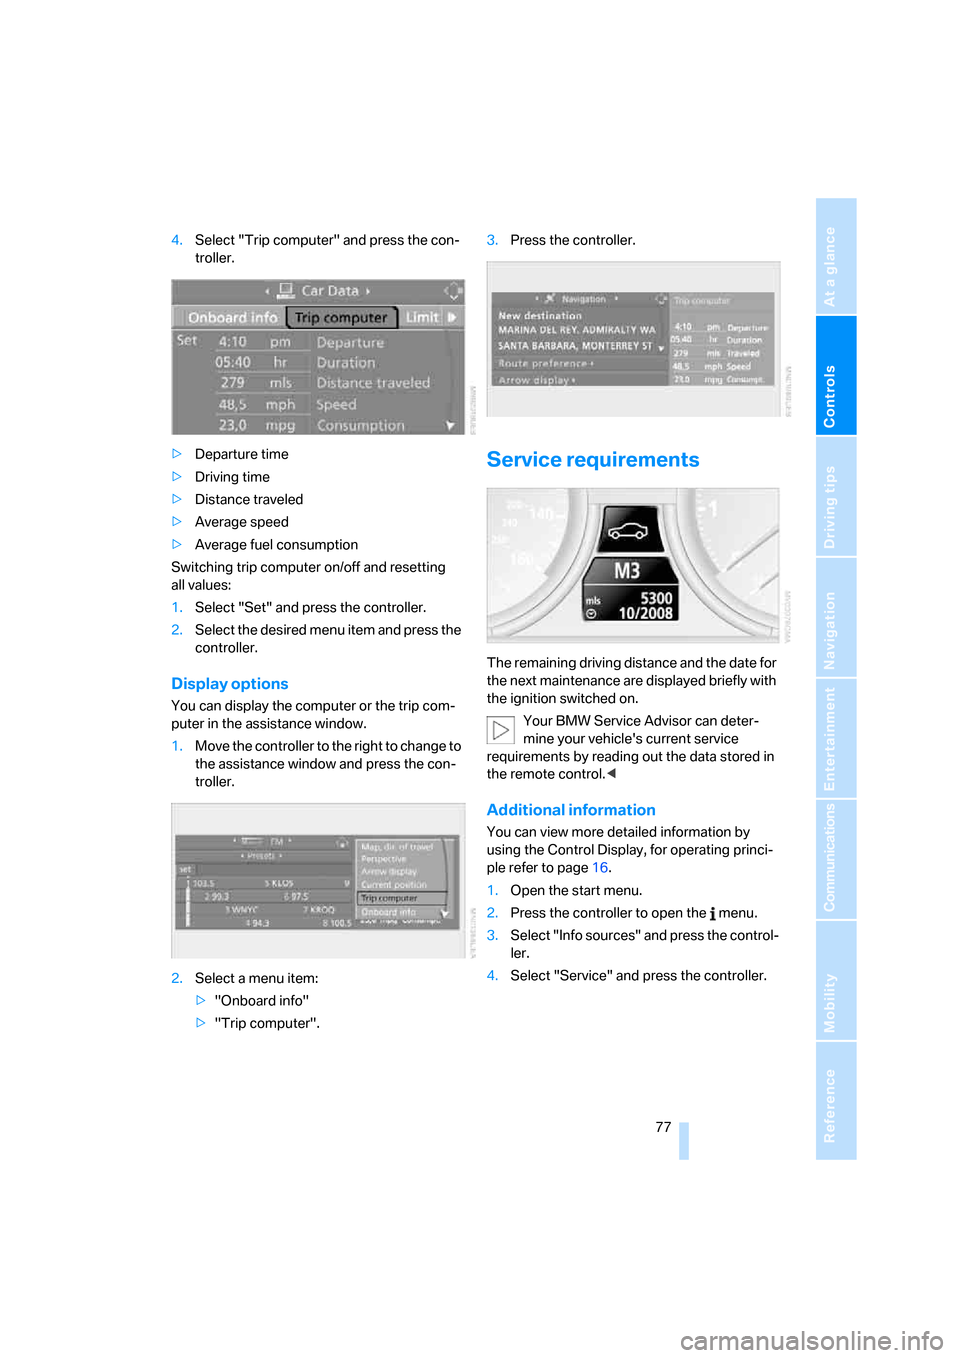
4.Select "Trip computer" and press the con-
troller.
>Departure time
>Driving time
>Distance traveled
>Average speed
>Average fuel consumption
Switching trip computer on/off and resetting
all values:
1.Select "Set" and press the controller.
2.Select the desired menu item and press the
controller.
Display options
You can display the computer or the trip com-
puter in the assistance window.
1.Move the controller to the right to change to
the assistance window and press the con-
troller.
2.Select a menu item:
>"Onboard info"
>"Trip computer".3.Press the controller.
Service requirements
The remaining driving distance and the date for
the next maintenance are displayed briefly with
the ignition switched on.
Your BMW Service Advisor can deter-
mine your vehicle's current service
requirements by reading out the data stored in
the remote control.<
Additional information
You can view more detailed information by
using the Control Display, for operating princi-
ple refer to page16.
1.Open the start menu.
2.Press the controller to open the menu.
3.Select "Info sources" and press the control-
ler.
4.Select "Service" and press the controller.
Page 101 of 264

Controls
99Reference
At a glance
Driving tips
Communications
Navigation
Entertainment
Mobility
Any improvement in detection depends on
many factors such as the object size and tem-
perature compared to the surroundings, or
other nearby objects, the visual recognition
skills of the driver, weather conditions, and
other factors.
Driving hints
With the system active, periodically but briefly,
glance at the thermal image on the Control Dis-
play to notice objects that could be people or
larger animals. The glance should be similar to
glancing at the rear view mirror. Do not stare at
the image for long periods while driving, as this
will remove attention from the road. If you notice
an object of interest ahead, be prepared to slow
down or stop, blow the horn, or take other
appropriate action.
System limits
The system is designed to supplement but not
replace forward vision through the windshield.
The driver is responsible for safe driving at
night. BMW Night Vision is not designed to be
used as a continuous viewing window for driv-
ing at night.
No system, no matter how sophisticated, can
operate without limitations. BMW Night Vision
operation is subject to physical and environ-
mental limitations that will reduce the ability of
the system to detect and display a clear thermal
image. Some of the situations in which these
limitations can occur are:
>on steep hilltops or depressions and in tight
curves
>in tunnels, as the contrast is inherently low
>when the camera lens is dirty>in dense fog, heavy rain or snowfall
>when displaying very hot objects such as
transformers, car exhausts etc.
>when the image briefly freezes during nor-
mal system adjustment.
BMW Night Vision's potential benefits
can be limited by the driving style of the
driver, the size and relative temperature of the
detected objects, dirt or contamination on the
camera lens, adverse weather like snow, rain or
fog, and other factors not mentioned here. It will
always be the driver's responsibility to drive at a
speed and in a manner that recognizes potential
hazards and adjust accordingly.
BMW Night Vision is not a substitute or replace-
ment for driver responsibility or for accommo-
dating the visibility conditions and the traffic sit-
uation. The forward view illuminated by the
headlamps must always be the basis for making
safe driving decisions, otherwise a safety risk
will result.<
Activating BMW Night Vision
1.Turn the light switch to position2 or3, refer
to page102.
2.With low beams switched on:
>Press the button. Depending on the
vehicle's equipment, the location of the
button may differ somewhat.
>Press one of the programmable buttons
on the steering wheel, refer to page55.
The image will be displayed on the Control Dis-
play after a few seconds. Depending on the last
mode selected, either the normal or full screen
image will be displayed.
Page 110 of 264

Climate
108
Climate
Automatic climate control
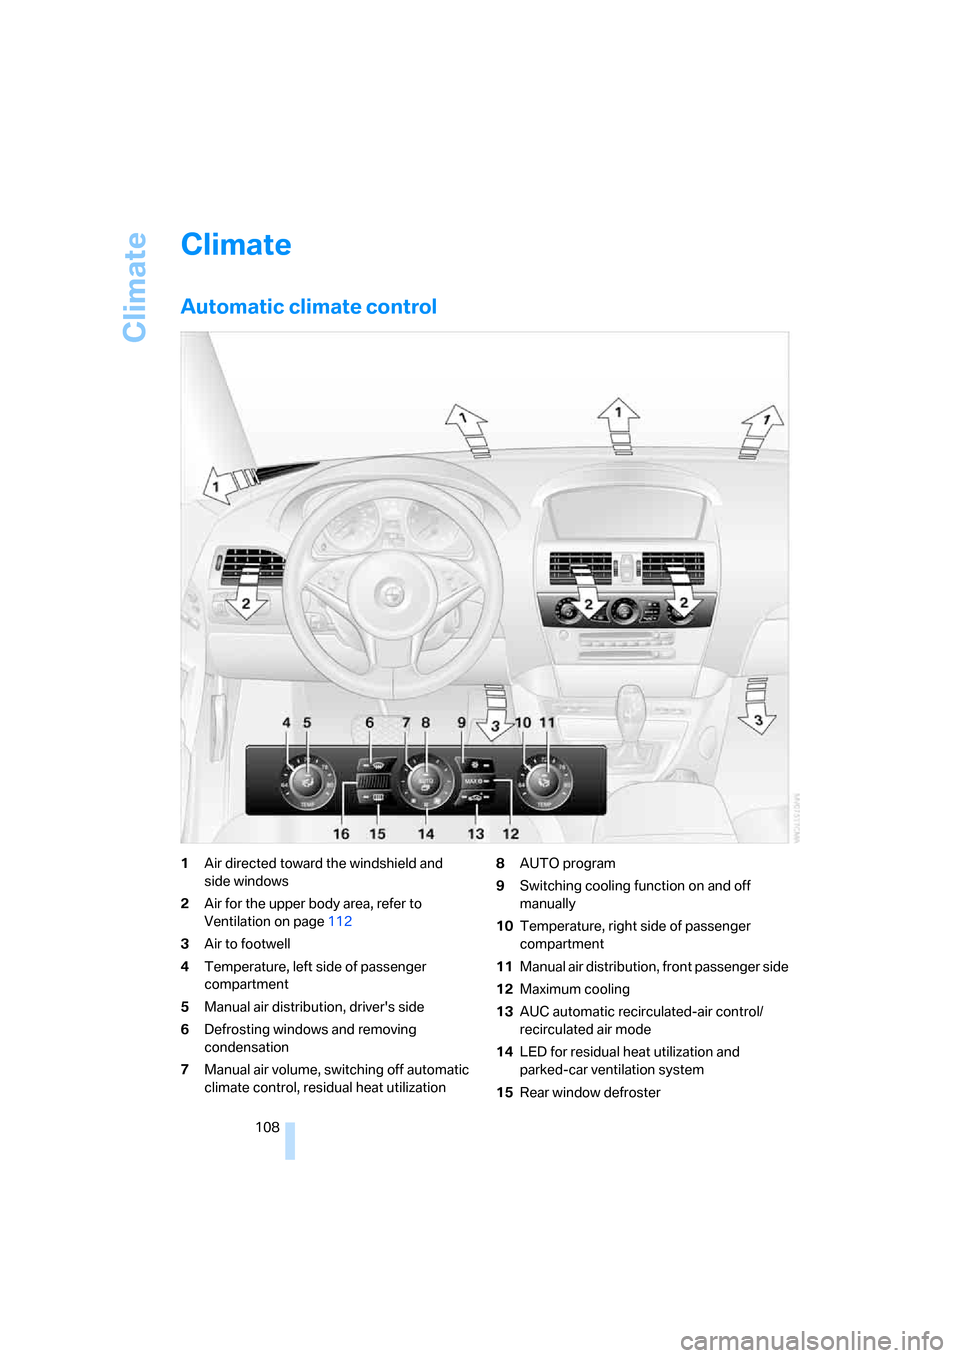
1Air directed toward the windshield and
side windows
2Air for the upper body area, refer to
Ventilation on page112
3Air to footwell
4Temperature, left side of passenger
compartment
5Manual air distribution, driver's side
6Defrosting windows and removing
condensation
7Manual air volume, switching off automatic
climate control, residual heat utilization8AUTO program
9Switching cooling function on and off
manually
10Temperature, right side of passenger
compartment
11Manual air distribution, front passenger side
12Maximum cooling
13AUC automatic recirculated-air control/
recirculated air mode
14LED for residual heat utilization and
parked-car ventilation system
15Rear window defroster
Page 111 of 264

Controls
109Reference
At a glance
Driving tips
Communications
Navigation
Entertainment
Mobility
16Air grill for interior temperature sensor –
please keep clear and unobstructed
The current setting for air distribution is dis-
played on the Control Display.
A congenial climate
The AUTO program offers the optimum air dis-
tribution and air volume for virtually all condi-
tions, refer to AUTO program below. Now you
only need to select an interior temperature that
you find pleasant.
The following sections contain more detailed
information on the available setting options.
Most settings are stored for the remote control
currently in use, also refer to Personal Profile
settings on page29.
AUTO program
The AUTO program handles the
adjustment of air volume and air
distribution to the windshield and
side windows, in the direction of
the upper body and in the footwell.
It also adapts your instructions for the tempera-
ture to outside influences throughout the year.
The cooling is switched on automatically with
the AUTO program. At the same time, a con-
densation sensor controls the program in such
a way that window condensation is prevented
as much as possible.
Intensity of AUTO program
You can adjust the intensity of the AUTO pro-
gram by repeatedly pressing the AUTO button.
The respective current setting is briefly dis-
played on the Control Display when the button
is pressed.
You can also adjust the intensity of the AUTO
program via iDrive.
iDrive, for operating principle refer to page16.
1.Press the button.
This opens the start menu.
2.Move the controller to the left to open "Cli-
mate".3.Select "Automatic programs" and press the
controller.
4.Select the desired intensity and press the
controller.
The marked intensity of the automatic
program is switched on.
Convertible program*
When the convertible top is opened, the con-
vertible program can also be selected. In the
convertible program, the automatic climate
control is optimized for driving with the convert-
ible top open. In addition, the air volume is
increased as the speed increases.
If the convertible program has been selected,
it is automatically active every time the top is
opened.
The effect of the convertible program can
be greatly enhanced if the wind deflector
is installed.<
Temperature
Set the desired temperature indi-
vidually on the driver's and front
passenger side.
The automatic climate control
achieves this temperature as quickly as possi-
ble at any time of year, if necessary with the
maximum cooling or heating capacity, and then
keeps it constant.
When switching between different tem-
perature settings in rapid succession, the
automatic climate control does not have suffi-
cient time to achieve the set temperature.<
Page 112 of 264

Climate
110 In the highest setting you activate the maximum
heating output, regardless of the outside tem-
perature.
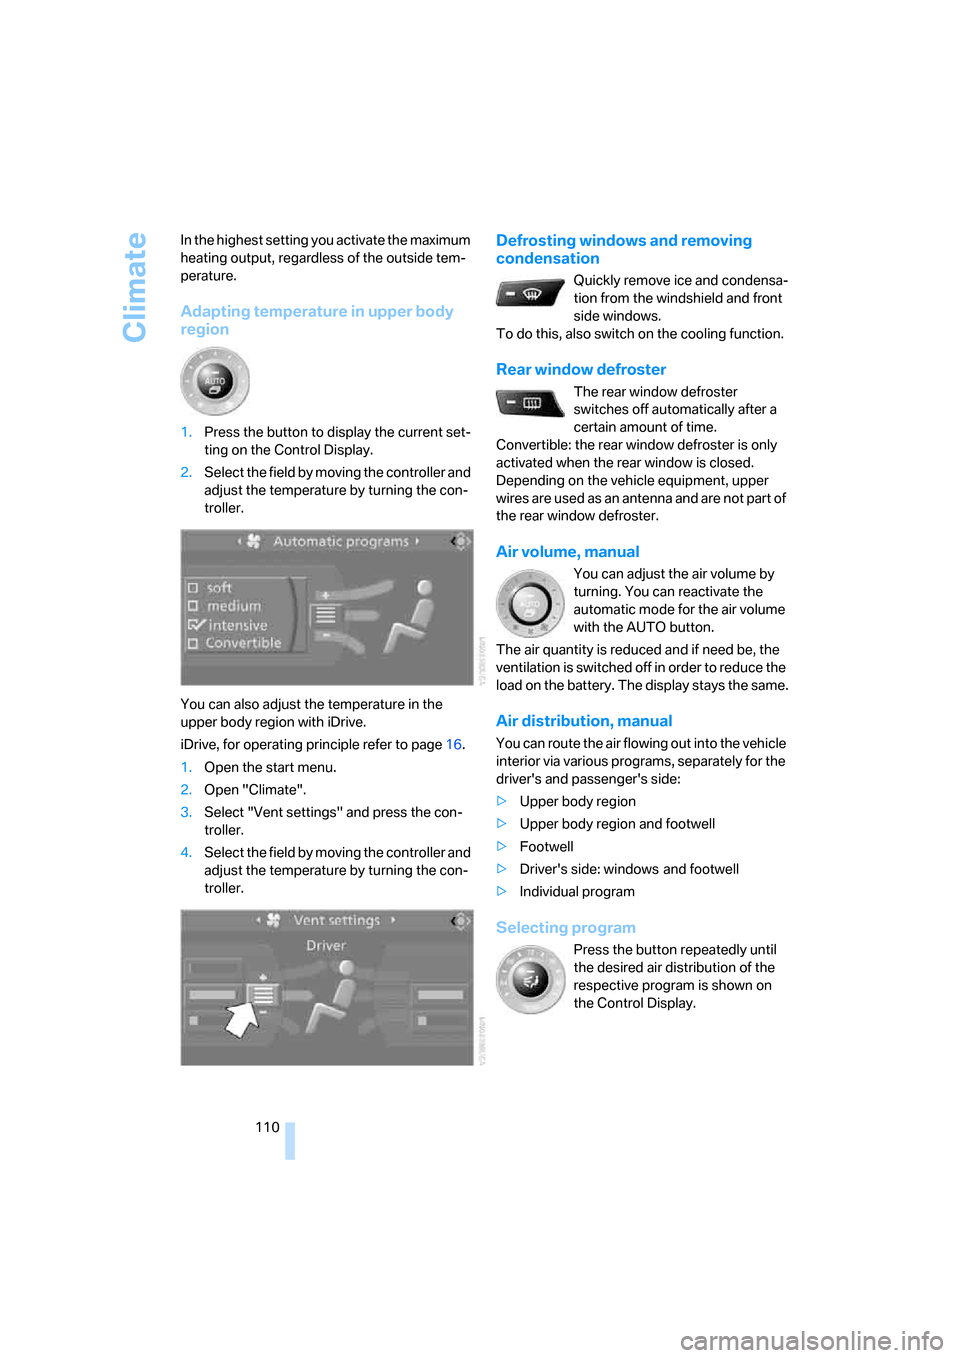
Adapting temperature in upper body
region
1.Press the button to display the current set-
ting on the Control Display.
2.Select the field by moving the controller and
adjust the temperature by turning the con-
troller.
You can also adjust the temperature in the
upper body region with iDrive.
iDrive, for operating principle refer to page16.
1.Open the start menu.
2.Open "Climate".
3.Select "Vent settings" and press the con-
troller.
4.Select the field by moving the controller and
adjust the temperature by turning the con-
troller.
Defrosting windows and removing
condensation
Quickly remove ice and condensa-
tion from the windshield and front
side windows.
To do this, also switch on the cooling function.
Rear window defroster
The rear window defroster
switches off automatically after a
certain amount of time.
Convertible: the rear window defroster is only
activated when the rear window is closed.
Depending on the vehicle equipment, upper
wires are used as an antenna and are not part of
the rear window defroster.
Air volume, manual
You can adjust the air volume by
turning. You can reactivate the
automatic mode for the air volume
with the AUTO button.
The air quantity is reduced and if need be, the
ventilation is switched off in order to reduce the
load on the battery. The display stays the same.
Air distribution, manual
You can route the air flowing out into the vehicle
interior via various programs, separately for the
driver's and passenger's side:
>Upper body region
>Upper body region and footwell
>Footwell
>Driver's side: windows and footwell
>Individual program
Selecting program
Press the button repeatedly until
the desired air distribution of the
respective program is shown on
the Control Display.
Page 113 of 264

Controls
111Reference
At a glance
Driving tips
Communications
Navigation
Entertainment
Mobility
Adjusting air distribution individually –
individual program
Your settings are stored in this program.
iDrive, for operating principle refer to page16.
1.Open the start menu.
2.Open "Climate".
3.Select "Vent settings" and press the con-
troller.
The driver's and front passenger side can
be adjusted separately with the fields on the
right or left side.
4.Select the driver's or front passenger side if
necessary.
Move the controller to the right or left
repeatedly until the driver's side or front
passenger side is selected.
5.Select the desired field by moving the con-
troller.
6.Turn the controller to adjust the air distribu-
tion.
Driver's side:
1Air directed toward the windshield and side
windows
2Air for the upper body
3Air to footwell
Front passenger side:
4Air for the upper body
5Air to footwell
Pressing the AUTO button cancels the
manual air distribution settings.<
The automatic mode for the air volume remains
effective with manual air distribution.
Switching cooling function on and off
The cooling function cools and
dehumidifies the incoming air
before reheating it as needed
according to the temperature setting. This
function is only available when the engine is
running.
The cooling function helps to avoid condensa-
tion on the window surfaces or to quickly
remove them.
Depending on the weather, the windshield may
fog over briefly when the engine is started.
The cooling function is switched on automati-
cally with the AUTO program.
Maximum cooling
Maximally cooled air is obtained as
quickly as possible at an outside
temperature above approx. 327/
06 and with the engine running.
At the lowest temperature, the automatic cli-
mate control switches into recirculating air
mode. The maximum air volume flows out of the
vents for the upper body. It is therefore neces-
sary for these vents to be open for maximum
cooling.
AUC Automatic recirculated-air
control/recirculated-air mode
You can respond to unpleasant
odors or pollutants in the immedi-
ate environment by temporarily
suspending the supply of outside air. The sys-
tem then recirculates the air currently within the
vehicle. In AUC mode, a sensor detects pollut-
ants in the outside air and controls the shut-off
automatically.
Press the button repeatedly to run through the
following control sequence:
>LED off: outside air flows into the vehicle
continuously.
>Right LED on, AUC mode: the system
detects pollutants in the outside air and
responds by blocking the supply of outside
air when required.
Page 114 of 264

Climate
112 >Left LED on, recirculated-air mode: the
supply of outside air into the vehicle is shut
off continuously.
Should the windows fog up in the recircu-
lated-air mode, press the AUTO button or
switch off the recirculated-air mode and
increase the air volume if necessary.
The recirculated-air mode should not be used
over a longer period of time, as the air quality
inside the vehicle deteriorates continuously.<
Residual heat
The heat stored in the engine is
used to heat the passenger com-
partment, e.g. while stopped at a
school to pick up a child.
1.Switch off the engine.
2.Turn to the right, refer to arrow.
The function can be switched on when the fol-
lowing conditions are met:
>up to 15 minutes after switching off the
engine
>engine at operating temperature
>sufficient battery voltage
>at an outside temperature below 777/
256
With the ignition lock at radio readiness or
higher the interior temperature, the air volume
and the air distribution can be set.
Switching automatic climate control
on and off
1.Turn to the left to minimum air volume.
2.After approx. 1 second, turn to the left
again.
You switch on the system again by pressing any
button of the automatic climate control.
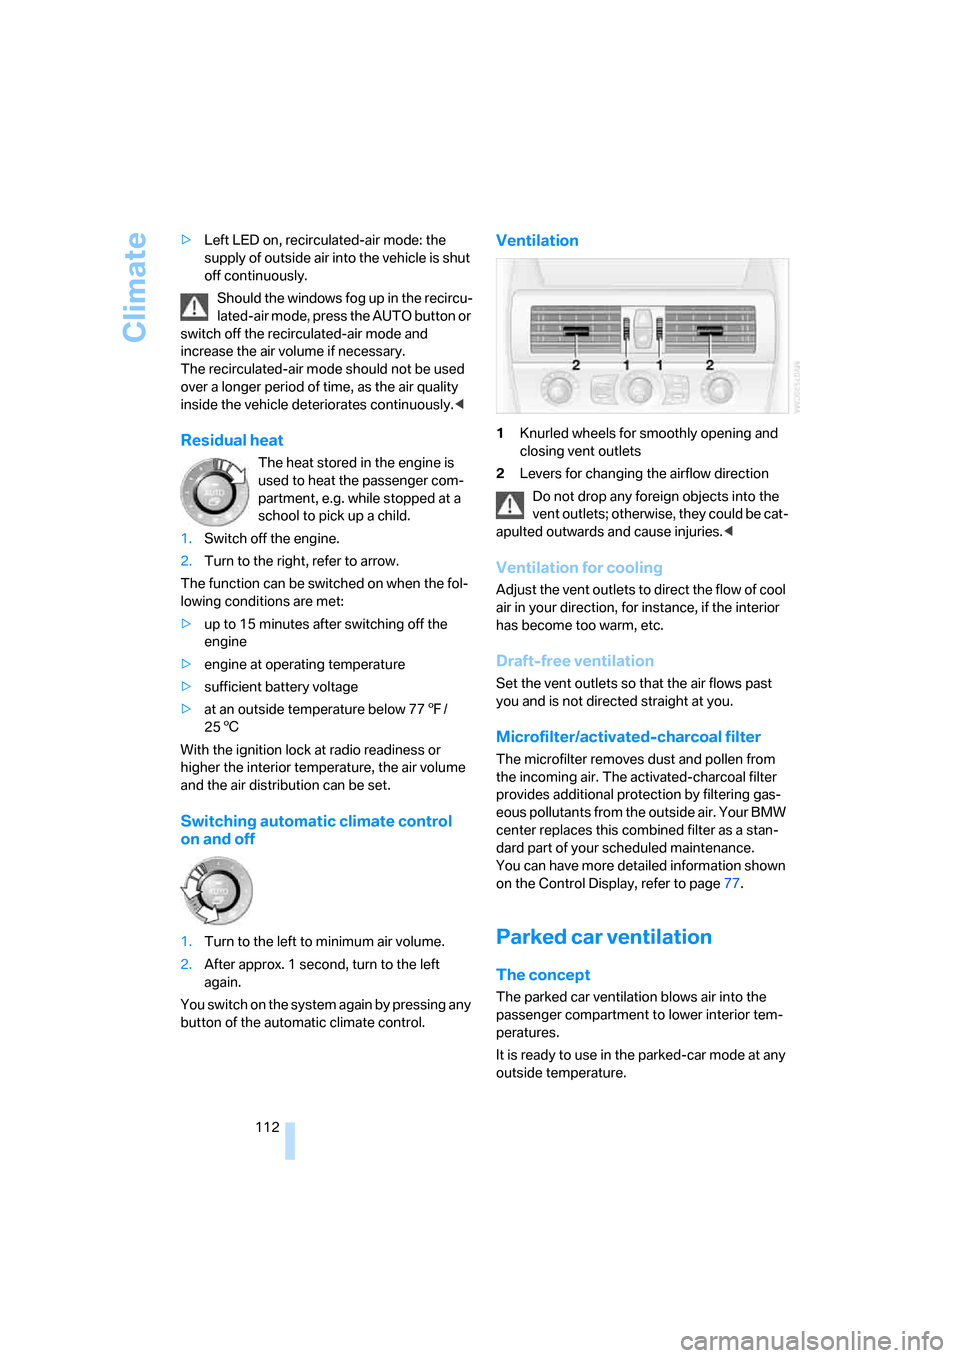
Ventilation
1Knurled wheels for smoothly opening and
closing vent outlets
2Levers for changing the airflow direction
Do not drop any foreign objects into the
vent outlets; otherwise, they could be cat-
apulted outwards and cause injuries.<
Ventilation for cooling
Adjust the vent outlets to direct the flow of cool
air in your direction, for instance, if the interior
has become too warm, etc.
Draft-free ventilation
Set the vent outlets so that the air flows past
you and is not directed straight at you.
Microfilter/activated-charcoal filter
The microfilter removes dust and pollen from
the incoming air. The activated-charcoal filter
provides additional protection by filtering gas-
eous pollutants from the outside air. Your BMW
center replaces this combined filter as a stan-
dard part of your scheduled maintenance.
You can have more detailed information shown
on the Control Display, refer to page77.
Parked car ventilation
The concept
The parked car ventilation blows air into the
passenger compartment to lower interior tem-
peratures.
It is ready to use in the parked-car mode at any
outside temperature.