2008 BMW 650I CONVERTIBLE page 60
[x] Cancel search: page 60Page 41 of 264
Controls
39Reference
At a glance
Driving tips
Communications
Navigation
Entertainment
Mobility
>Press the switch beyond the resistance
point:
The window opens automatically. Pressing
the switch again stops the opening move-
ment.
You can close the windows in the same manner
by pulling the switch.
Convertible: opening, closing
For information on window operation with com-
fort access, also refer to page37.
To close the side windows while the vehi-
cle is being driven, always close the rear
windows first or all four windows simulta-
neously; otherwise, the windows cannot close
tightly at higher speeds.<
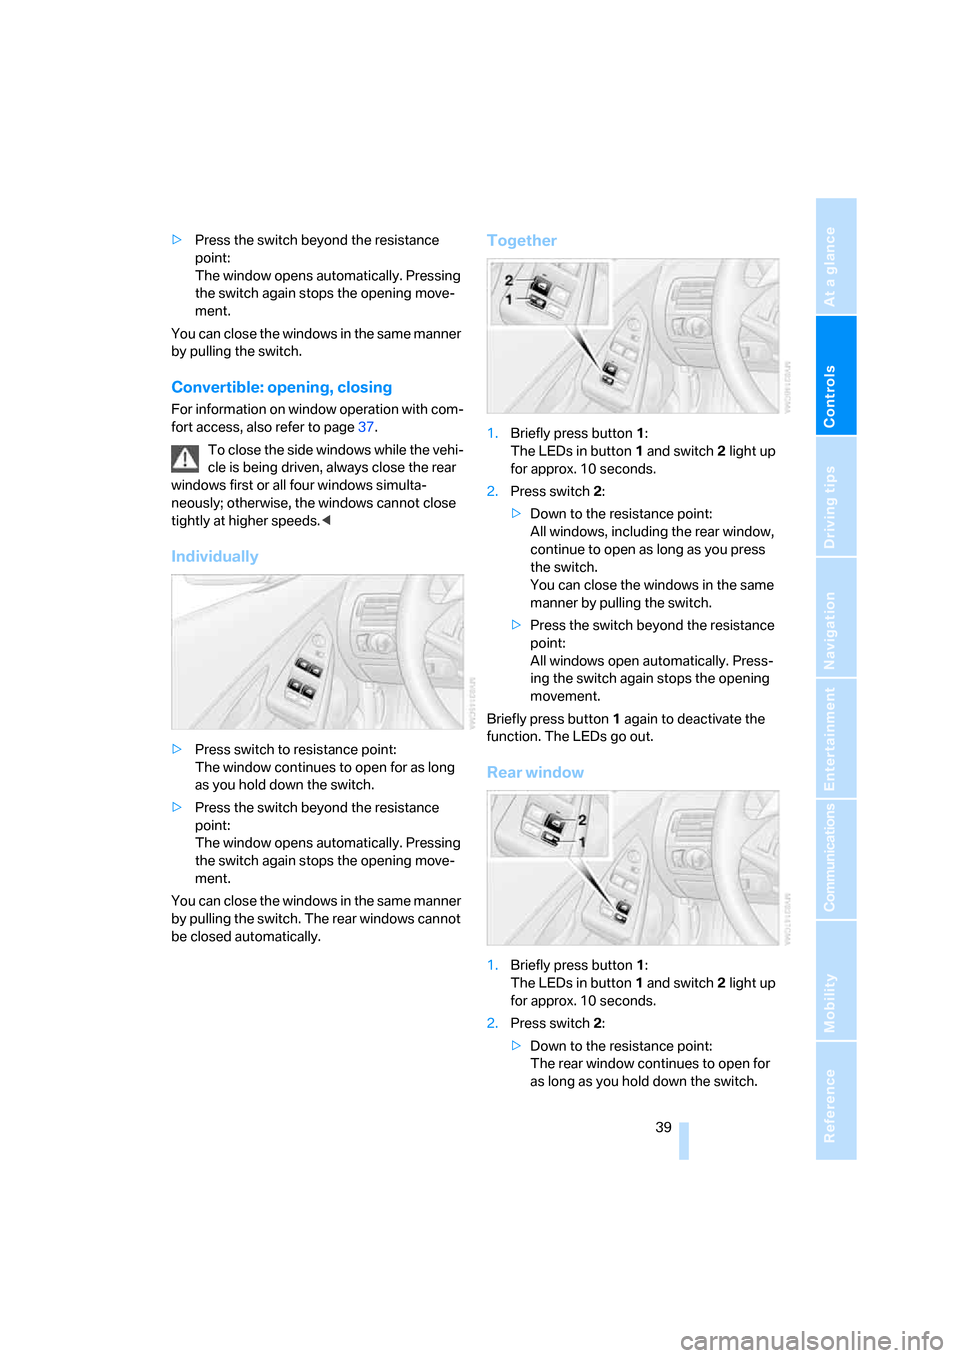
Individually
>Press switch to resistance point:
The window continues to open for as long
as you hold down the switch.
>Press the switch beyond the resistance
point:
The window opens automatically. Pressing
the switch again stops the opening move-
ment.
You can close the windows in the same manner
by pulling the switch. The rear windows cannot
be closed automatically.
Together
1.Briefly press button1:
The LEDs in button1 and switch2 light up
for approx. 10 seconds.
2.Press switch 2:
>Down to the resistance point:
All windows, including the rear window,
continue to open as long as you press
the switch.
You can close the windows in the same
manner by pulling the switch.
>Press the switch beyond the resistance
point:
All windows open automatically. Press-
ing the switch again stops the opening
movement.
Briefly press button 1 again to deactivate the
function. The LEDs go out.
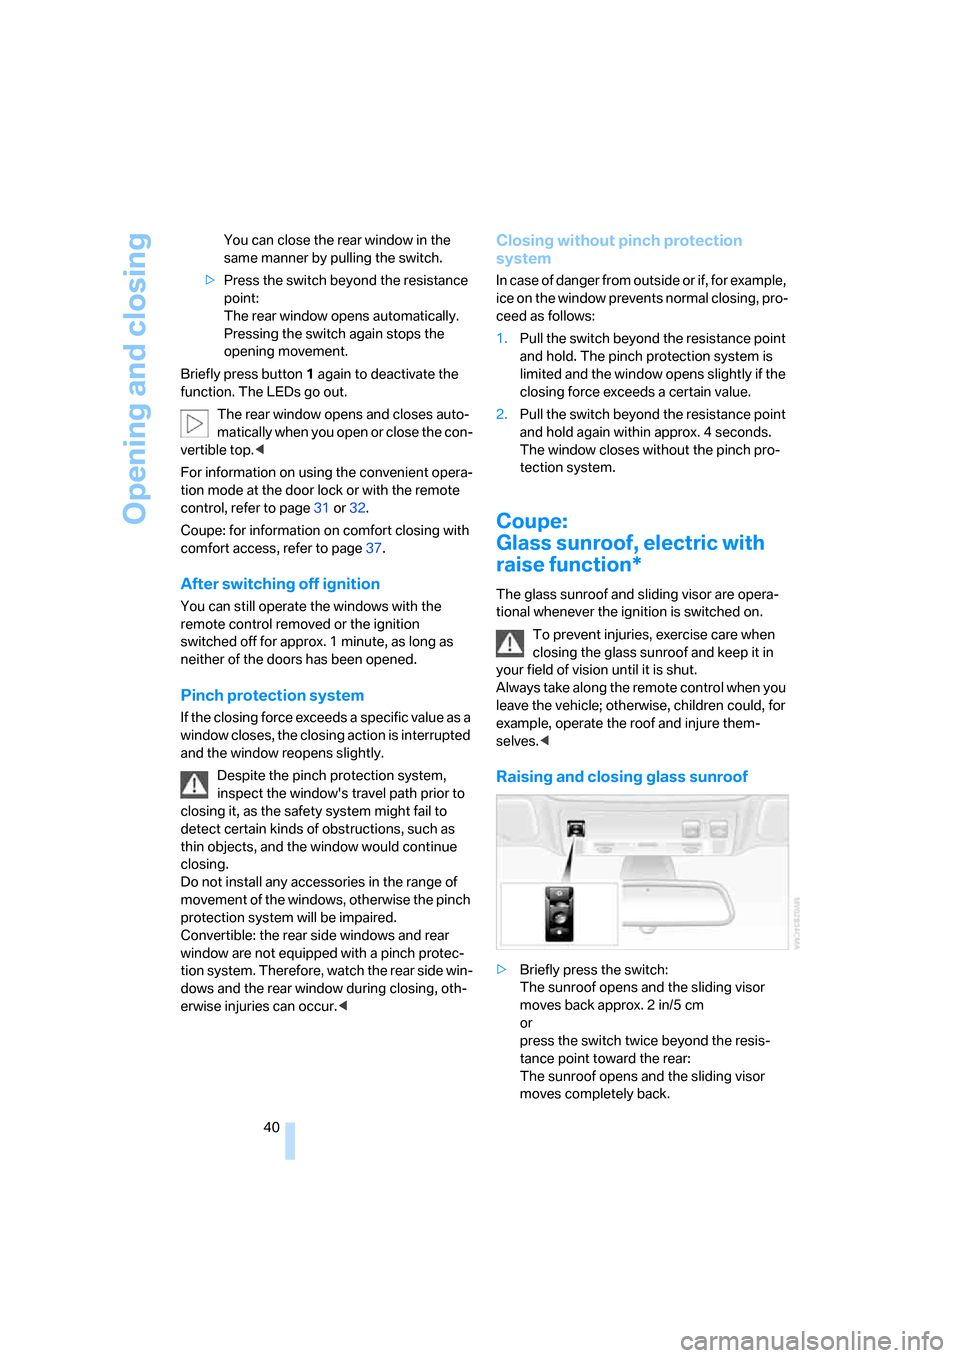
Rear window
1.Briefly press button1:
The LEDs in button1 and switch2 light up
for approx. 10 seconds.
2.Press switch 2:
>Down to the resistance point:
The rear window continues to open for
as long as you hold down the switch.
Page 42 of 264
Opening and closing
40 You can close the rear window in the
same manner by pulling the switch.
>Press the switch beyond the resistance
point:
The rear window opens automatically.
Pressing the switch again stops the
opening movement.
Briefly press button 1 again to deactivate the
function. The LEDs go out.
The rear window opens and closes auto-
matically when you open or close the con-
vertible top.<
For information on using the convenient opera-
tion mode at the door lock or with the remote
control, refer to page31 or32.
Coupe: for information on comfort closing with
comfort access, refer to page37.
After switching off ignition
You can still operate the windows with the
remote control removed or the ignition
switched off for approx. 1 minute, as long as
neither of the doors has been opened.
Pinch protection system
If the closing force exceeds a specific value as a
window closes, the closing action is interrupted
and the window reopens slightly.
Despite the pinch protection system,
inspect the window's travel path prior to
closing it, as the safety system might fail to
detect certain kinds of obstructions, such as
thin objects, and the window would continue
closing.
Do not install any accessories in the range of
movement of the windows, otherwise the pinch
protection system will be impaired.
Convertible: the rear side windows and rear
window are not equipped with a pinch protec-
tion system. Therefore, watch the rear side win-
dows and the rear window during closing, oth-
erwise injuries can occur.<
Closing without pinch protection
system
In case of danger from outside or if, for example,
ice on the window prevents normal closing, pro-
ceed as follows:
1.Pull the switch beyond the resistance point
and hold. The pinch protection system is
limited and the window opens slightly if the
closing force exceeds a certain value.
2.Pull the switch beyond the resistance point
and hold again within approx. 4 seconds.
The window closes without the pinch pro-
tection system.
Coupe:
Glass sunroof, electric with
raise function*
The glass sunroof and sliding visor are opera-
tional whenever the ignition is switched on.
To prevent injuries, exercise care when
closing the glass sunroof and keep it in
your field of vision until it is shut.
Always take along the remote control when you
leave the vehicle; otherwise, children could, for
example, operate the roof and injure them-
selves.<
Raising and closing glass sunroof
>Briefly press the switch:
The sunroof opens and the sliding visor
moves back approx. 2 in/5 cm
or
press the switch twice beyond the resis-
tance point toward the rear:
The sunroof opens and the sliding visor
moves completely back.
Page 43 of 264
Controls
41Reference
At a glance
Driving tips
Communications
Navigation
Entertainment
Mobility
>To close, briefly press the switch or push it
twice beyond the resistance point toward
the front:
The sunroof and sliding visor close.
Opening and closing sliding visor
>Push the switch up to the resistance point in
the desired direction:
The sliding visor continues to move for as
long as you hold the switch.
>Push the switch beyond the resistance
point in the desired direction:
The sliding visor moves automatically.
Briefly press the switch again in any direc-
tion to stop the movement.
For information on using the convenient opera-
tion mode at the door lock or with the remote
control, refer to page31 or32.
for information on comfort closing with comfort
access, refer to page37.
Pinch protection system
If the glass sunroof encounters resistance when
closing, the closing action is interrupted and the
glass sunroof opens.
If the sliding visor encounters resistance when
closing within the last approx. 8 in/20 cm, the
closing action is interrupted and the sliding
visor opens again slightly.
Despite the pinch protection system, you
should inspect the sunroof's travel range
prior to closing it, as the safety feature might fail
to detect certain kinds of obstructions, such as
very thin objects, and the sunroof would con-
tinue closing.<
Closing without pinch protection
system
In case of danger from outside, slide the switch
forward beyond the resistance point and hold.
The roof closes without the pinch protection
system.
Following interruptions in electrical
power supply
After an interruption in the power supply the
glass sunroof may not move. Then have the
system initialized. Should this occur, please
have the sunroof initialized at your BMW center.
Moving manually*
In the event of an electrical malfunction, you can
move the glass sunroof and the sliding visor
manually.
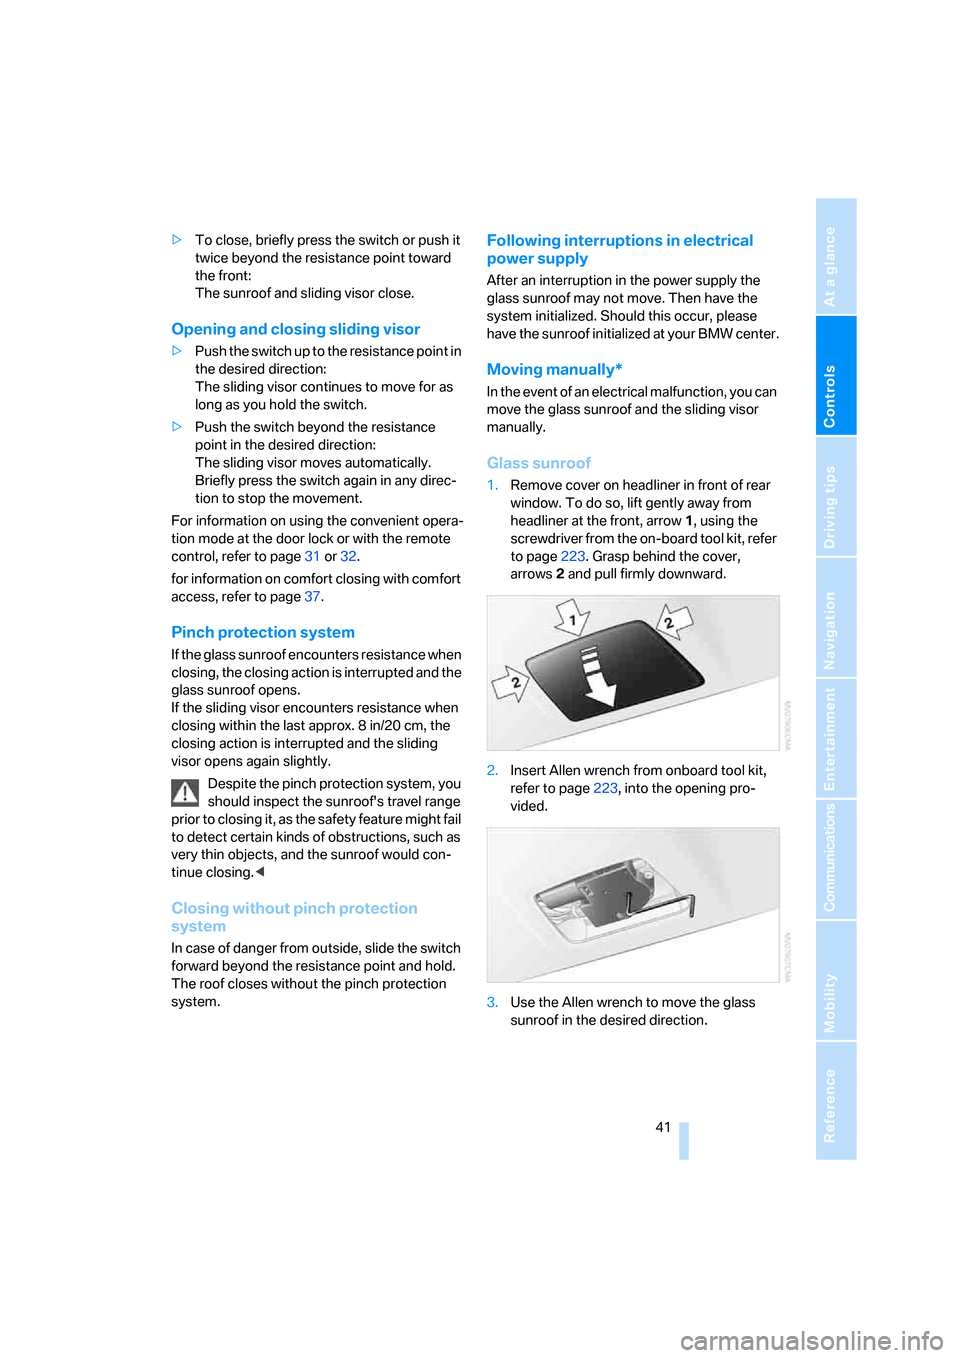
Glass sunroof
1.Remove cover on headliner in front of rear
window. To do so, lift gently away from
headliner at the front, arrow1, using the
screwdriver from the on-board tool kit, refer
to page223. Grasp behind the cover,
arrows2 and pull firmly downward.
2.Insert Allen wrench from onboard tool kit,
refer to page223, into the opening pro-
vided.
3.Use the Allen wrench to move the glass
sunroof in the desired direction.
Page 44 of 264
Opening and closing
42
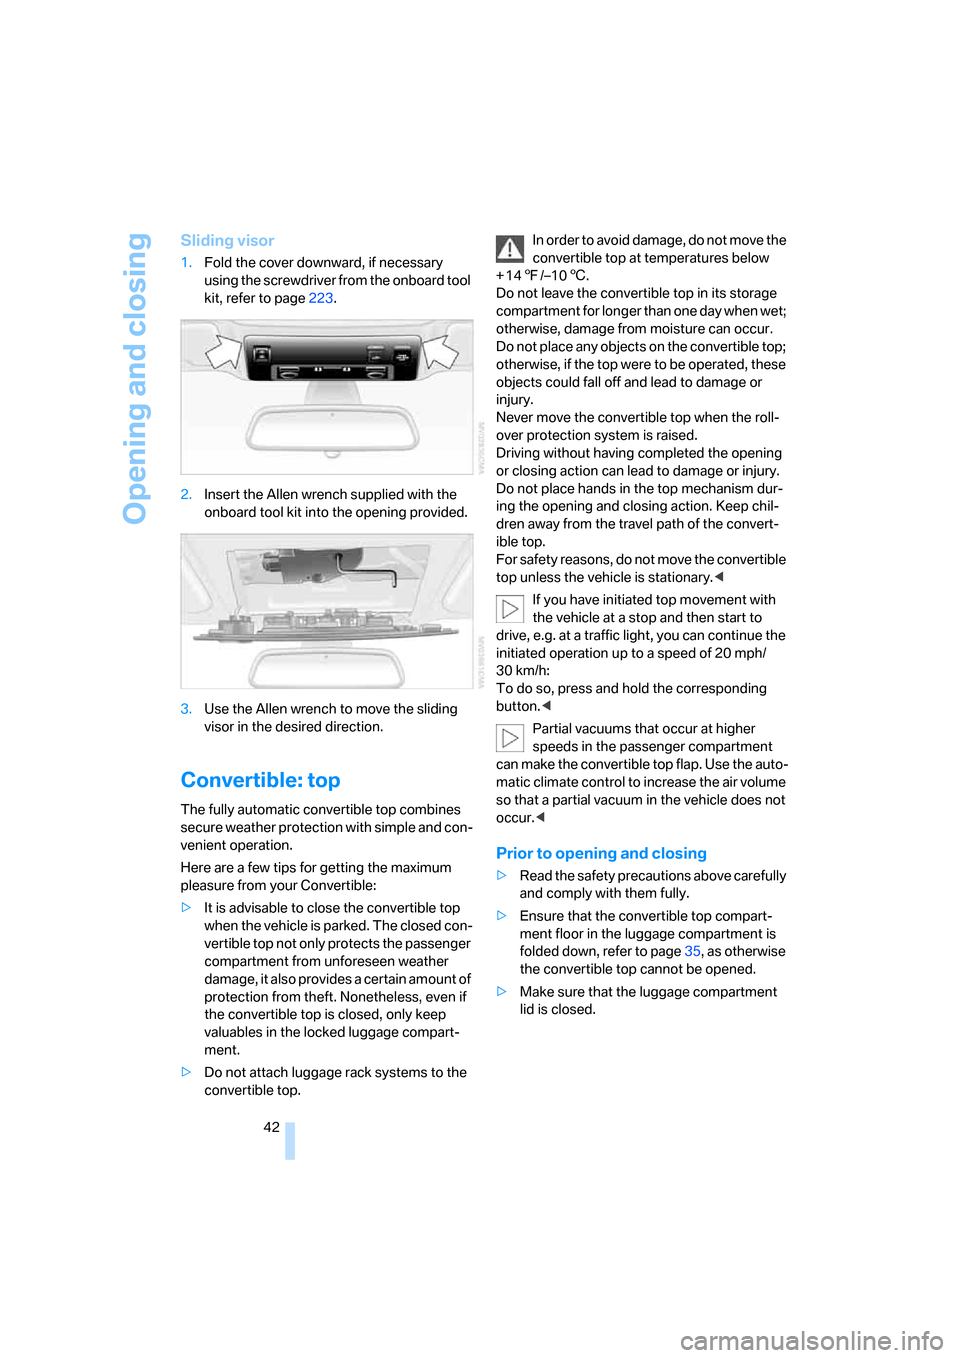
Sliding visor
1.Fold the cover downward, if necessary
using the screwdriver from the onboard tool
kit, refer to page223.
2.Insert the Allen wrench supplied with the
onboard tool kit into the opening provided.
3.Use the Allen wrench to move the sliding
visor in the desired direction.
Convertible: top
The fully automatic convertible top combines
secure weather protection with simple and con-
venient operation.
Here are a few tips for getting the maximum
pleasure from your Convertible:
>It is advisable to close the convertible top
when the vehicle is parked. The closed con-
vertible top not only protects the passenger
compartment from unforeseen weather
damage, it also provides a certain amount of
protection from theft. Nonetheless, even if
the convertible top is closed, only keep
valuables in the locked luggage compart-
ment.
>Do not attach luggage rack systems to the
convertible top.In order to avoid damage, do not move the
convertible top at temperatures below
+147/–106.
Do not leave the convertible top in its storage
compartment for longer than one day when wet;
otherwise, damage from moisture can occur.
Do not place any objects on the convertible top;
otherwise, if the top were to be operated, these
objects could fall off and lead to damage or
injury.
Never move the convertible top when the roll-
over protection system is raised.
Driving without having completed the opening
or closing action can lead to damage or injury.
Do not place hands in the top mechanism dur-
ing the opening and closing action. Keep chil-
dren away from the travel path of the convert-
ible top.
For safety reasons, do not move the convertible
top unless the vehicle is stationary.<
If you have initiated top movement with
the vehicle at a stop and then start to
drive, e.g. at a traffic light, you can continue the
initiated operation up to a speed of 20 mph/
30 km/h:
To do so, press and hold the corresponding
button.<
Partial vacuums that occur at higher
speeds in the passenger compartment
can make the convertible top flap. Use the auto-
matic climate control to increase the air volume
so that a partial vacuum in the vehicle does not
occur.<
Prior to opening and closing
>Read the safety precautions above carefully
and comply with them fully.
>Ensure that the convertible top compart-
ment floor in the luggage compartment is
folded down, refer to page35, as otherwise
the convertible top cannot be opened.
>Make sure that the luggage compartment
lid is closed.
Page 45 of 264

Controls
43Reference
At a glance
Driving tips
Communications
Navigation
Entertainment
Mobility
Opening and closing
For information on top operation with comfort
access, also refer to page37.
From radio readiness, refer to page58, with the
vehicle stationary:
To avoid putting excessive strain on the
battery, only move the convertible top
when the engine is running if possible.
Before closing the convertible top, remove for-
eign objects from the windshield frame, as
these might inhibit closing of the convertible
top.<
1Closing
2LED
3Opening
When the button for operating the con-
vertible top is pressed, the side windows
move downward slightly and the rear window is
lowered completely.
If you hold down the button after the LED2
goes out, then the windows travel upward
again.
If the convertible top is not completely open or
closed, then the luggage compartment lid can-
not be opened.<
LED
In the following situations, in addition to the
LED, a message is displayed on the Control
Display and an acoustic signal may sound:
>During convertible top operation, the LED
lights up green. It goes out as soon as the
opening or closing action is finished.
>If the LED flashes red when you release the
button, the opening or closing action has
not yet finished.>If the LED lights up red when the button is
pressed, either the convertible top com-
partment floor in the luggage compartment
is in the raised position or a malfunction has
occurred. The convertible top cannot be
moved.
Interruption
The automatic sequence of movements is
interrupted if the button for top operation is
released. The sequence can be continued in
the desired direction by pressing the appropri-
ate button.
If the opening or closing action is interrupted for
a longer period, the convertible top remains in
that position for approx. 15 minutes before it
slowly moves to a stable position.
A convertible top which is not completely
opened or closed presents a danger.
Do not interrupt and continue the closing action
several times in succession; otherwise, the top
mechanism can be damaged.<
If the convertible top is not completely
open or closed, then the luggage com-
partment lid cannot be opened.<
Convenient operation with remote
control and via door lock
Refer to pages31 and32.
Closing manually
Only close the convertible top manually if
absolutely necessary; never open it man-
ually. The convertible top compartment lid can-
not be locked in the event of an electrical mal-
function and would open while the vehicle is
being driven.
Improper handling can lead to damage.<
Before closing
1.Open luggage compartment lid.
2.Take the Allen wrench and the screwdriver
from the onboard tool kit, refer to page223.
3.Pry out the two buttons in the luggage com-
partment with the screwdriver and then pull
firmly. This unlocks the convertible top
compartment lid.
Page 49 of 264
Controls
47Reference
At a glance
Driving tips
Communications
Navigation
Entertainment
Mobility
Adjusting
Sitting safely
The ideal sitting position can make a vital con-
tribution to relaxed, fatigue-free driving. In the
interaction with the safety belts, the head
restraints and the airbags, the seat position
plays an important role in an accident. To
ensure that the safety systems operate with
optimal efficiency, we strongly urge you to fol-
low the instructions contained in the following
section.
For additional information on Transporting chil-
dren safely, refer to page56.
Airbags
Always maintain an adequate distance
between yourself and the airbags. Always
hold the steering wheel by its rim with hands at
the 9 o'clock and 3 o'clock positions to mini-
mize the risk of injuries to your hands and arms
in the event of airbag deployment.
No one and nothing is to come between the air-
bags and the seat occupant.
Do not use the cover of the front airbag on the
front passenger side as a storage area. Make
sure that the front passenger is sitting correctly
and does not rest feet or legs on the instrument
panel, otherwise leg injuries can occur if the
knee and front airbags are triggered.
Make sure that occupants do not rest their head
on the side or head airbags; otherwise, injuries
can occur if the airbags are triggered.<
Even if you adhere to all the instructions, inju-
ries resulting from contact with airbags cannot
be fully excluded, depending on the circum-
stances. The ignition and inflation noise may
provoke a mild hearing loss in extremely sensi-
tive individuals. This effect is usually only tem-
porary.
For airbag locations and additional information
on airbags, refer to page94.
Head restraints
A correctly adjusted head restraint reduces the
risk of injury to cervical vertebrae in an accident.
Adjust the head restraint so that its center
is approx. at ear level. Otherwise, there is
increased danger of injury in the event of an
accident.<
Head restraints, refer to page50.
Safety belt
Before every drive, make sure that safety belts
are being worn at all of the occupied seats. Air-
bags complement the safety belt as an addi-
tional safety device, but they do not represent a
substitute.
Your vehicle has four seats that are each
equipped with a safety belt.
Never allow more than one person to
wear a single safety belt. Never allow
infants or small children to ride in a passenger's
lap. Make sure that the belt lies low around the
hips in the lap area and does not press on the
abdomen. The safety belt must not lie across
the neck, rub against sharp edges, be routed
over solid or breakable objects or be pinched.
Wear the safety belt without twisting, snugly
across the lap and shoulders, as close to the
body as possible. Otherwise, the belt can slip
over the hips in the lap area in a frontal impact
and injure the abdomen. Avoid wearing clothing
that prevents the belt from fitting properly and
pull the shoulder belt upward periodically to
readjust the tension across your lap in order to
avoid a reduction in the restraining effect of the
safety belt.<
Safety belts refer to page52.
Page 50 of 264

Adjusting
48
Seats
Note before adjusting
Never attempt to adjust your seat while
operating the vehicle. The seat could
respond with unexpected movement and the
ensuing loss of vehicle control could lead to an
accident.
On the front passenger side as well, do not tilt
the backrest too far toward the rear. Failure to
observe this precaution can prevent the belt
from providing effective protection against
injury, as the passenger could slide under the
belt in an accident.<
Please follow the instructions on damage to
safety belts provided on page53 and the infor-
mation on the active front head restraints on
page50.
Convertible: with the wind deflector fitted,
do not incline the front seat backrests too
far backward if the seat is to be moved back to
the end position. Otherwise, the wind deflector
will be damaged.<
Adjusting seat
To ensure that the safety systems con-
tinue to provide optimized protection,
please follow the adjustment instructions on
page47.<
1Inclination
2Longitudinal direction
3Height
4Backrest
5Convertible: head restraints, refer to
page51With the sports seat
*, you can also adjust the
thigh support manually:
Pull the lever and adjust the thigh support in the
longitudinal direction.
Lumbar support*
You can also adjust the contours of the backrest
to obtain additional support in the lumbar
region.
The upper hips and spinal column receive sup-
plementary support to help you maintain a
relaxed, upright sitting position.
>Increase or decrease curvature:
Press front or rear of switch.
>Move curvature up or down:
Press top or bottom of switch.
Page 51 of 264

Controls
49Reference
At a glance
Driving tips
Communications
Navigation
Entertainment
Mobility
Seat, mirror and steering
wheel memory
You can store and select three different adjust-
ment settings for the driver's seat, exterior mir-
rors and steering wheel.
The adjustment of the lumbar support is not
stored in the memory.
Storing
1.Switch on radio readiness or ignition, refer
to page58.
2.Adjust the desired seat, exterior mirror and
steering-wheel positions.
3.Press the button:
The LED in the button lights up.
4.Press the desired memory button 1, 2 or3:
The LED goes out.
Requesting
Do not request a position from the mem-
ory while the vehicle is moving. There is a
risk of accident from unexpected movement of
the seat or steering wheel.<
Comfort mode
1.Open the driver's door after unlocking or
switch on radio readiness, refer to page58.
2.Briefly press the desired memory button1,
2 or3.
The system cancels the adjustment procedure
when you briefly press one of the seat adjust-
ment switches or one of the memory buttons.The adjusting procedure for the steering wheel
is interrupted if you briefly press the switch for
the steering wheel adjustment in any direction,
refer to page54.
Safety feature
1.Close the driver's door and switch ignition
on or off, refer to page58.
2.Press the desired memory button 1, 2 or3
and maintain pressure until the adjustment
process has been completed.
If the button was pressed inadvertently:
press the button again; the LED goes out.
Activating with remote control
The last positions of the driver's seat, external
rearview mirrors, and steering wheel are stored
for the remote key currently in use.
You can choose when the position is requested:
>Request when unlocking vehicle
>Request when opening driver's door
When using this feature, always make
sure that the footwell behind the driver's
seat is empty and unobstructed. If you fail to do
so, any persons or objects behind the seat
could be injured or damaged by a rearward
movement of the seat.<
The system cancels the adjustment procedure
when you briefly press one of the seat adjust-
ment switches or one of the memory buttons.
iDrive, for operating principle refer to page16.
1.Open the start menu.
2.Press the controller to open the menu.
3.Select "Settings" and press the controller.
4.Select "Vehicle / Tires" and press the con-
troller.