2008 BMW 650I CONVERTIBLE navigation system
[x] Cancel search: navigation systemPage 49 of 264

Controls
47Reference
At a glance
Driving tips
Communications
Navigation
Entertainment
Mobility
Adjusting
Sitting safely
The ideal sitting position can make a vital con-
tribution to relaxed, fatigue-free driving. In the
interaction with the safety belts, the head
restraints and the airbags, the seat position
plays an important role in an accident. To
ensure that the safety systems operate with
optimal efficiency, we strongly urge you to fol-
low the instructions contained in the following
section.
For additional information on Transporting chil-
dren safely, refer to page56.
Airbags
Always maintain an adequate distance
between yourself and the airbags. Always
hold the steering wheel by its rim with hands at
the 9 o'clock and 3 o'clock positions to mini-
mize the risk of injuries to your hands and arms
in the event of airbag deployment.
No one and nothing is to come between the air-
bags and the seat occupant.
Do not use the cover of the front airbag on the
front passenger side as a storage area. Make
sure that the front passenger is sitting correctly
and does not rest feet or legs on the instrument
panel, otherwise leg injuries can occur if the
knee and front airbags are triggered.
Make sure that occupants do not rest their head
on the side or head airbags; otherwise, injuries
can occur if the airbags are triggered.<
Even if you adhere to all the instructions, inju-
ries resulting from contact with airbags cannot
be fully excluded, depending on the circum-
stances. The ignition and inflation noise may
provoke a mild hearing loss in extremely sensi-
tive individuals. This effect is usually only tem-
porary.
For airbag locations and additional information
on airbags, refer to page94.
Head restraints
A correctly adjusted head restraint reduces the
risk of injury to cervical vertebrae in an accident.
Adjust the head restraint so that its center
is approx. at ear level. Otherwise, there is
increased danger of injury in the event of an
accident.<
Head restraints, refer to page50.
Safety belt
Before every drive, make sure that safety belts
are being worn at all of the occupied seats. Air-
bags complement the safety belt as an addi-
tional safety device, but they do not represent a
substitute.
Your vehicle has four seats that are each
equipped with a safety belt.
Never allow more than one person to
wear a single safety belt. Never allow
infants or small children to ride in a passenger's
lap. Make sure that the belt lies low around the
hips in the lap area and does not press on the
abdomen. The safety belt must not lie across
the neck, rub against sharp edges, be routed
over solid or breakable objects or be pinched.
Wear the safety belt without twisting, snugly
across the lap and shoulders, as close to the
body as possible. Otherwise, the belt can slip
over the hips in the lap area in a frontal impact
and injure the abdomen. Avoid wearing clothing
that prevents the belt from fitting properly and
pull the shoulder belt upward periodically to
readjust the tension across your lap in order to
avoid a reduction in the restraining effect of the
safety belt.<
Safety belts refer to page52.
Page 51 of 264

Controls
49Reference
At a glance
Driving tips
Communications
Navigation
Entertainment
Mobility
Seat, mirror and steering
wheel memory
You can store and select three different adjust-
ment settings for the driver's seat, exterior mir-
rors and steering wheel.
The adjustment of the lumbar support is not
stored in the memory.
Storing
1.Switch on radio readiness or ignition, refer
to page58.
2.Adjust the desired seat, exterior mirror and
steering-wheel positions.
3.Press the button:
The LED in the button lights up.
4.Press the desired memory button 1, 2 or3:
The LED goes out.
Requesting
Do not request a position from the mem-
ory while the vehicle is moving. There is a
risk of accident from unexpected movement of
the seat or steering wheel.<
Comfort mode
1.Open the driver's door after unlocking or
switch on radio readiness, refer to page58.
2.Briefly press the desired memory button1,
2 or3.
The system cancels the adjustment procedure
when you briefly press one of the seat adjust-
ment switches or one of the memory buttons.The adjusting procedure for the steering wheel
is interrupted if you briefly press the switch for
the steering wheel adjustment in any direction,
refer to page54.
Safety feature
1.Close the driver's door and switch ignition
on or off, refer to page58.
2.Press the desired memory button 1, 2 or3
and maintain pressure until the adjustment
process has been completed.
If the button was pressed inadvertently:
press the button again; the LED goes out.
Activating with remote control
The last positions of the driver's seat, external
rearview mirrors, and steering wheel are stored
for the remote key currently in use.
You can choose when the position is requested:
>Request when unlocking vehicle
>Request when opening driver's door
When using this feature, always make
sure that the footwell behind the driver's
seat is empty and unobstructed. If you fail to do
so, any persons or objects behind the seat
could be injured or damaged by a rearward
movement of the seat.<
The system cancels the adjustment procedure
when you briefly press one of the seat adjust-
ment switches or one of the memory buttons.
iDrive, for operating principle refer to page16.
1.Open the start menu.
2.Press the controller to open the menu.
3.Select "Settings" and press the controller.
4.Select "Vehicle / Tires" and press the con-
troller.
Page 53 of 264

Controls
51Reference
At a glance
Driving tips
Communications
Navigation
Entertainment
Mobility
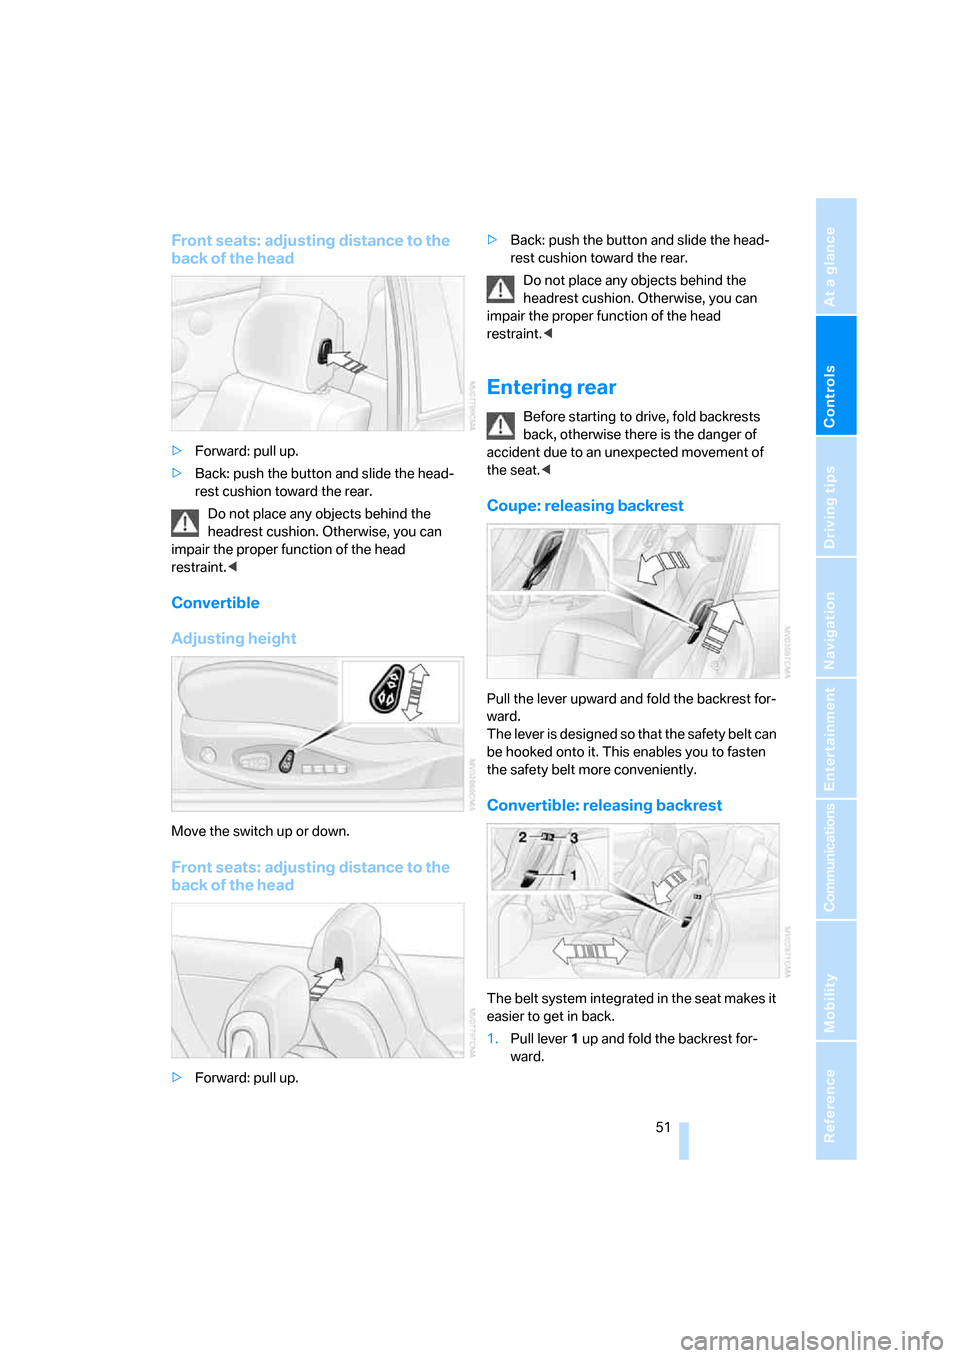
Front seats: adjusting distance to the
back of the head
>Forward: pull up.
>Back: push the button and slide the head-
rest cushion toward the rear.
Do not place any objects behind the
headrest cushion. Otherwise, you can
impair the proper function of the head
restraint.<
Convertible
Adjusting height
Move the switch up or down.
Front seats: adjusting distance to the
back of the head
>Forward: pull up.>Back: push the button and slide the head-
rest cushion toward the rear.
Do not place any objects behind the
headrest cushion. Otherwise, you can
impair the proper function of the head
restraint.<
Entering rear
Before starting to drive, fold backrests
back, otherwise there is the danger of
accident due to an unexpected movement of
the seat.<
Coupe: releasing backrest
Pull the lever upward and fold the backrest for-
ward.
The lever is designed so that the safety belt can
be hooked onto it. This enables you to fasten
the safety belt more conveniently.
Convertible: releasing backrest
The belt system integrated in the seat makes it
easier to get in back.
1.Pull lever 1 up and fold the backrest for-
ward.
Page 55 of 264

Controls
53Reference
At a glance
Driving tips
Communications
Navigation
Entertainment
Mobility
Damage to safety belts
When subjected to strain due to an acci-
dent or in the event of damage, replace
the safety belts, the belt tensioners, and any
child restraint systems and have the belt anchor
points checked. Have this work carried out only
by a BMW center or a workshop that works
according to BMW repair procedures with
appropriately trained personnel. Otherwise,
correct operation of this safety equipment is not
guaranteed.<
Heated seats*
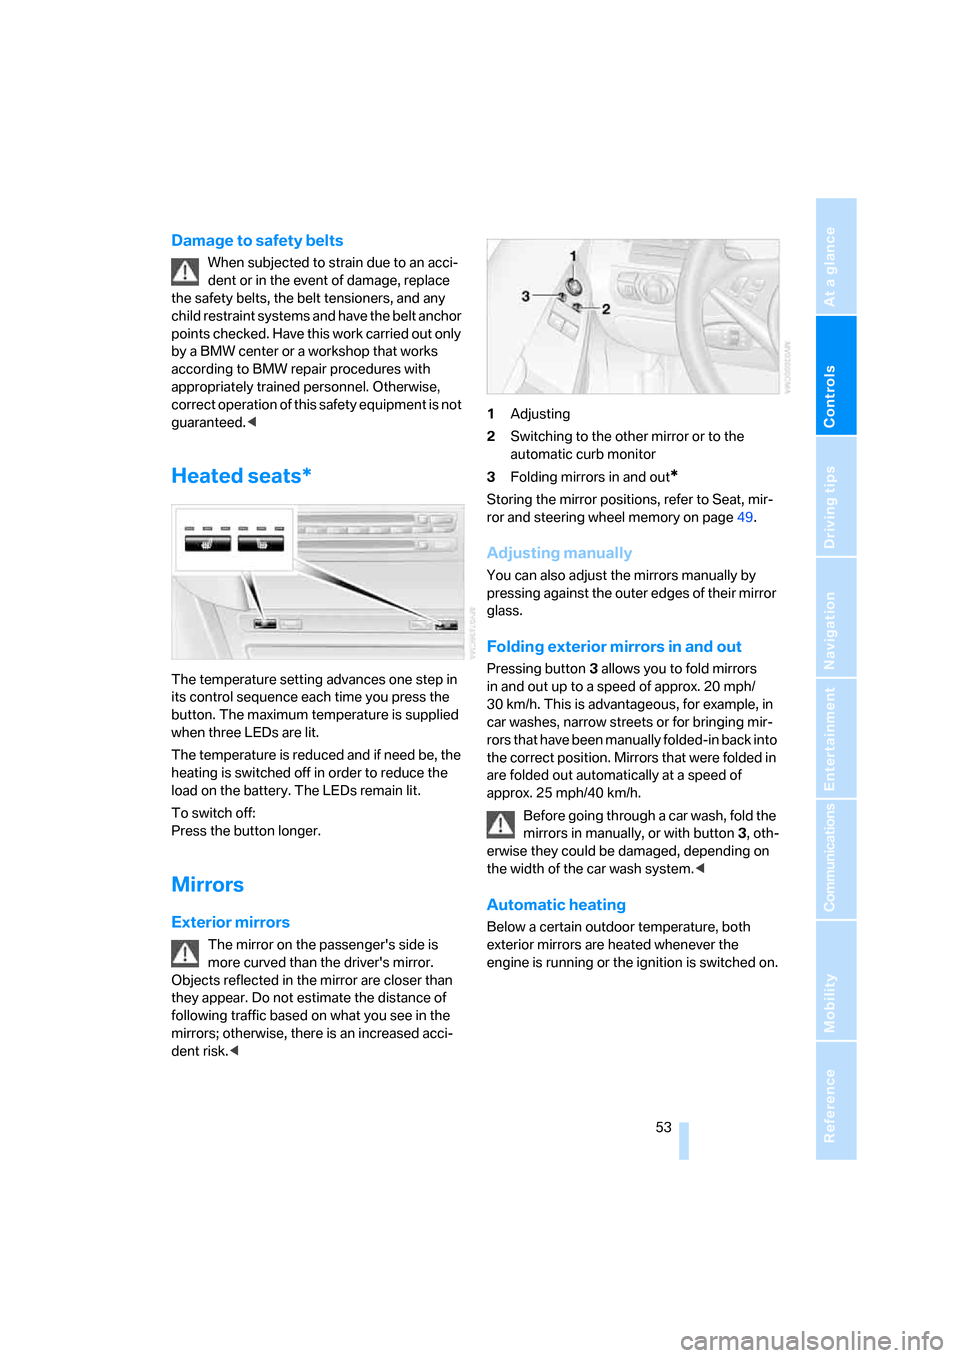
The temperature setting advances one step in
its control sequence each time you press the
button. The maximum temperature is supplied
when three LEDs are lit.
The temperature is reduced and if need be, the
heating is switched off in order to reduce the
load on the battery. The LEDs remain lit.
To switch off:
Press the button longer.
Mirrors
Exterior mirrors
The mirror on the passenger's side is
more curved than the driver's mirror.
Objects reflected in the mirror are closer than
they appear. Do not estimate the distance of
following traffic based on what you see in the
mirrors; otherwise, there is an increased acci-
dent risk.<1Adjusting
2Switching to the other mirror or to the
automatic curb monitor
3Folding mirrors in and out
*
Storing the mirror positions, refer to Seat, mir-
ror and steering wheel memory on page49.
Adjusting manually
You can also adjust the mirrors manually by
pressing against the outer edges of their mirror
glass.
Folding exterior mirrors in and out
Pressing button3 allows you to fold mirrors
in and out up to a speed of approx. 20 mph/
30 km/h. This is advantageous, for example, in
car washes, narrow streets or for bringing mir-
r o r s t h a t h a v e b e e n m a n u a l l y f o l d e d - i n b a c k i n t o
the correct position. Mirrors that were folded in
are folded out automatically at a speed of
approx. 25 mph/40 km/h.
Before going through a car wash, fold the
mirrors in manually, or with button 3, oth-
erwise they could be damaged, depending on
the width of the car wash system.<
Automatic heating
Below a certain outdoor temperature, both
exterior mirrors are heated whenever the
engine is running or the ignition is switched on.
Page 59 of 264

Controls
57Reference
At a glance
Driving tips
Communications
Navigation
Entertainment
Mobility
Follow the system manufacturer's
instructions on installation and use of
LATCH child restraint systems in order not to
impair their protective function.<
Anchor points for LATCH mounts
Before attaching the LATCH child's seat, pull
the belt away from the region of the child
restraint fixing system.
Make sure that both of the lower LATCH
mounts have properly clicked into place
and that the child restraint system is resting
snugly against the backrest. Otherwise, the
protective action may be impeded.<
Rear seats
The mounting points for the LATCH anchors
are located at the positions indicated by arrows
in the gap between the seat and the backrest.
Coupe: child restraint system with
tether strap
Only use the top tether-strap mounting
points to secure child restraint systems,
otherwise the mounting points could be dam-
aged.
to arrows.
Placement of tether strap
Make sure that the tether strap is not
routed over sharp edges and does not
twist on its way to the upper mounting point;
otherwise, the belt may not properly secure the
child restraint system in the event of an acci-
dent.<
1Direction of travel
2Head restraints
3Tether strap hook
4Mounting point
5Rear window shelf/luggage compartment
floor
6Backrest
7Tether strap of child restraint system
Before using the mounting points, fold the head
restraint
* into its raised position.
1.Slide the head restraint into the bottom
position.
2.Guide the tether strap over the head
restraint.
3.Attach the tether strap hook to the mount-
ing point.
Page 67 of 264

Controls
65Reference
At a glance
Driving tips
Communications
Navigation
Entertainment
Mobility
Deactivating rain sensor
Press the button again, arrow3. The LED goes
out.
Deactivate the rain sensor when passing
through an automatic car wash. Failure to
do so could result in damage caused by undes-
ired wiper activation.<
Cleaning windshield, headlamps and
BMW Night Vision camera*
Pull the lever, arrow4:
The system sprays washer fluid against the
windshield and activates the wipers for a brief
period.
With the vehicle lighting switched on, the head-
lamps and the BMW Night Vision camera are
also cleaned simultaneously at suitable inter-
vals.
Do not use the washers if there is any
danger that the fluid will freeze on the
windshield. If you do so, your vision could be
obscured. To avoid freezing, use a washer fluid
antifreeze, refer to Washer fluid. Do not use
washers when the washer fluid reservoir is
empty, as this will damage the washer pump.<
Windshield washer nozzles
Both windshield washer nozzles are automati-
cally heated with the engine running or the igni-
tion switched on.
Washer fluid
Washer fluid antifreeze is flammable.
For this reason, keep it away from ignition
sources and store only in the closed original
container out of reach of children. Otherwise,
there is the danger of bodily injury. Always fol-
low the instructions for use provided on the
containers.<
Filler neck for washer fluid
All washer nozzles are supplied from one reser-
voir.
Fill with water and – if required – with a washer
antifreeze, according to manufacturer's recom-
mendations.
In order to maintain the mixture ratio, mix
the washer fluid before filling.<
Capacity
Capacity approx. 5.3 US quarts/5 liters.
Cruise control*
The concept
The cruise control is available for use at speeds
of approx. 20 mph/30 km/h and higher. The
vehicle stores and maintains the speed that you
set using the lever mounted on the steering col-
umn. To maintain the specified speed, the sys-
tem brakes if the engine braking effect is not
sufficient on a downhill grade. Speed can drop
on uphill grades if the engine output is insuffi-
cient.
Do not use the cruise control under driv-
ing conditions that do not permit a con-
stant speed, e.g. when driving on winding
roads, in heavy traffic or in poor road conditions
such as snow, rain, ice, and loose road surface.
Otherwise, you could lose control of the vehicle
and cause an accident.<
Page 69 of 264

Controls
67Reference
At a glance
Driving tips
Communications
Navigation
Entertainment
Mobility
Especially on longer trips and in traffic conges-
tion, the system can reduce fatigue and tension,
while increasing your enjoyment of driving.
Please use it safely and responsibly.
In addition to holding a steady cruising speed, if
you encounter slower vehicles ahead, active
cruise control will, within limits, adjust your
vehicle's speed automatically so that you can
flow with the traffic without having to make con-
stant adjustments. If, for example, while cruis-
ing at the selected speed, you begin to
approach a slower vehicle ahead of you in the
same lane, the system will reduce your vehicle's
speed to the same as that of the vehicle ahead
to maintain your selected distance setting. You
can vary the following distance, which will vary
with speed. Based on your selected distance
setting, the system automatically decreases the
throttle setting and lightly applies the brakes if
necessary. In addition, if the vehicle ahead of
you slows to a complete stop, the system can
follow this action within the given scope and
can also accelerate from a complete stop if the
vehicle ahead of you drives off again shortly
thereafter. During braking, your vehicle brake
lamps will automatically illuminate to alert a fol-
lowing driver to take action. In addition, it may
be necessary for your vehicle to downshift the
automatic transmission to maintain the dis-
tance setting selected. As soon as the road in
front of you has no moving vehicles, the system
will accelerate to your desired speed. This set
speed is also maintained on downhill grades,
however the vehicle speed can drop below the
set speed when driving uphill if the engine out-
put is not sufficient.
Active cruise control cannot detect stop
signs, red lights, or any object that is
stopped or is blocking the road.
Active cruise control is not and must not be
used as a collision avoidance/warning system.
Since this active cruise control system is a new
technology and operates differently from con-
ventional cruise control systems which you may
be accustomed to, it is necessary that you read
all of the pages relating to this system before
use. Carefully read and observe the information on the system limitations beginning on page71
to obtain a good command of the system and its
range of applications.<
Brake pedal feel
When the system brakes and you also depress
the brake pedal, a somewhat different braking
feel results.
Professional* navigation system
If a navigation DVD is in the drive, refer to
page132, within limits the system adjusts the
accelerating and braking behavior of the vehicle
to the road you are driving on.
To ensure that the system is informed of
the current course of the road, always use
the latest navigation DVD if possible.<
When the vehicle position is unknown, e. g.
when you leave the map area, this influence of
the navigation system is not available.
Applications
Please try the system first during sparse traffic
and clear road conditions so that you can get
used to the system. After you have experience
and understand the system, only then use it
during normal traffic.
As with conventional cruise control systems,
active cruise control in no way reduces or sub-
stitutes for the driver's own personal experi-
ence, responsibility, alertness and awareness in
adjusting speed, braking or otherwise control-
ling the vehicle. The driver should decide when
to use the system on the basis of road, traffic,
visibility, and weather conditions. Active cruise
control is intended for use on highway-type
roadways where traffic is moving relatively
smoothly as well as in slow-moving traffic. Do
not use the system in city driving; in complex
driving situations; heavy traffic such as during
rush hour; on curvy, winding roads, slippery
roads or roads with sharp curves such as high-
way off-ramps; during inclement weather such
as snow, strong rain or fog; or when entering
interchanges, service/parking areas or toll
booths. It is also important to regulate your
Page 71 of 264

Controls
69Reference
At a glance
Driving tips
Communications
Navigation
Entertainment
Mobility
Selecting distance
>Briefly press rocker switch downward:
Increase distance.
>Briefly press rocker switch upward:
Reduce distance.
The selected distance is displayed in the instru-
ment cluster.
Use good judgment to select the appro-
priate following distance, given road con-
ditions, traffic, applicable laws and State driving
recommendations for safe following distance.
Otherwise, a violation of the law or risk of an
accident could result.<
Interrupting cruise control
Press the lever upward or downward, and with
the vehicle stopped also depress the brake
pedal. The marking in the speedometer
changes color and the distance indicator goes
out.
In addition, the system is automatically inter-
rupted:
>when you apply the vehicle brakes
>when you shift the transmission
>when DTC is activated or DSC is deacti-
vated
>when DSC comes on
>when you apply the handbrake
>when you release the safety belt and open
the driver's door with the vehicle stopped
>when the system does not recognize any
objects for an extended period of time, e. g.
on infrequently traveled roads without a
shoulder or guard rails, or if the radar sensor
is covered with dirt, refer to page71
If the system is interrupted, then it is nec-
essary for the driver to actively intervene
by braking and steering. Otherwise, there is a
risk of an accident.<
Resuming stored desired speed and
distance
While driving
Press button4.
The displays appear in the instrument cluster. Distance 1
Distance 2
Distance 3
Distance 4
This distance is always set when
you activate the system.