2008 BMW 650I CONVERTIBLE engine
[x] Cancel search: enginePage 72 of 264

Driving
70
While stopped
Before leaving the vehicle with the engine
running, engage position P of the auto-
matic transmission and apply the handbrake.
Otherwise the vehicle can roll.<
If a detected vehicle in front of you brakes to a
complete stop and your vehicle has also been
braked to a complete stop by the system:
>If the vehicle in front of you drives off while
the marking1 for the desired speed in the
speedometer is green, your vehicle will
accelerate without you having to do any-
thing.
>If the vehicle in front of you drives off while
the marking1 is orange, you briefly depress
the accelerator pedal or press button4.
Rolling bars in the distance indicator3
mean that the vehicle in front of you has
driven off.
If you are stopped behind a vehicle with the
brake pedal depressed and the system is inter-
rupted or deactivated:
1.Press button4 to activate a stored desired
speed or select a desired speed with the
lever, arrow1 or arrow2.
2.Release the brake pedal.
3.If the vehicle in front of you drives off, briefly
depress the accelerator pedal or press
button4.
Deactivating system
>Press the lever upward or downward twice
while driving.
>When stopped, do the same with the brake
pedal depressed.
>Switch off the ignition.
The displays turn off, and the stored desired
speed and distance are deleted.
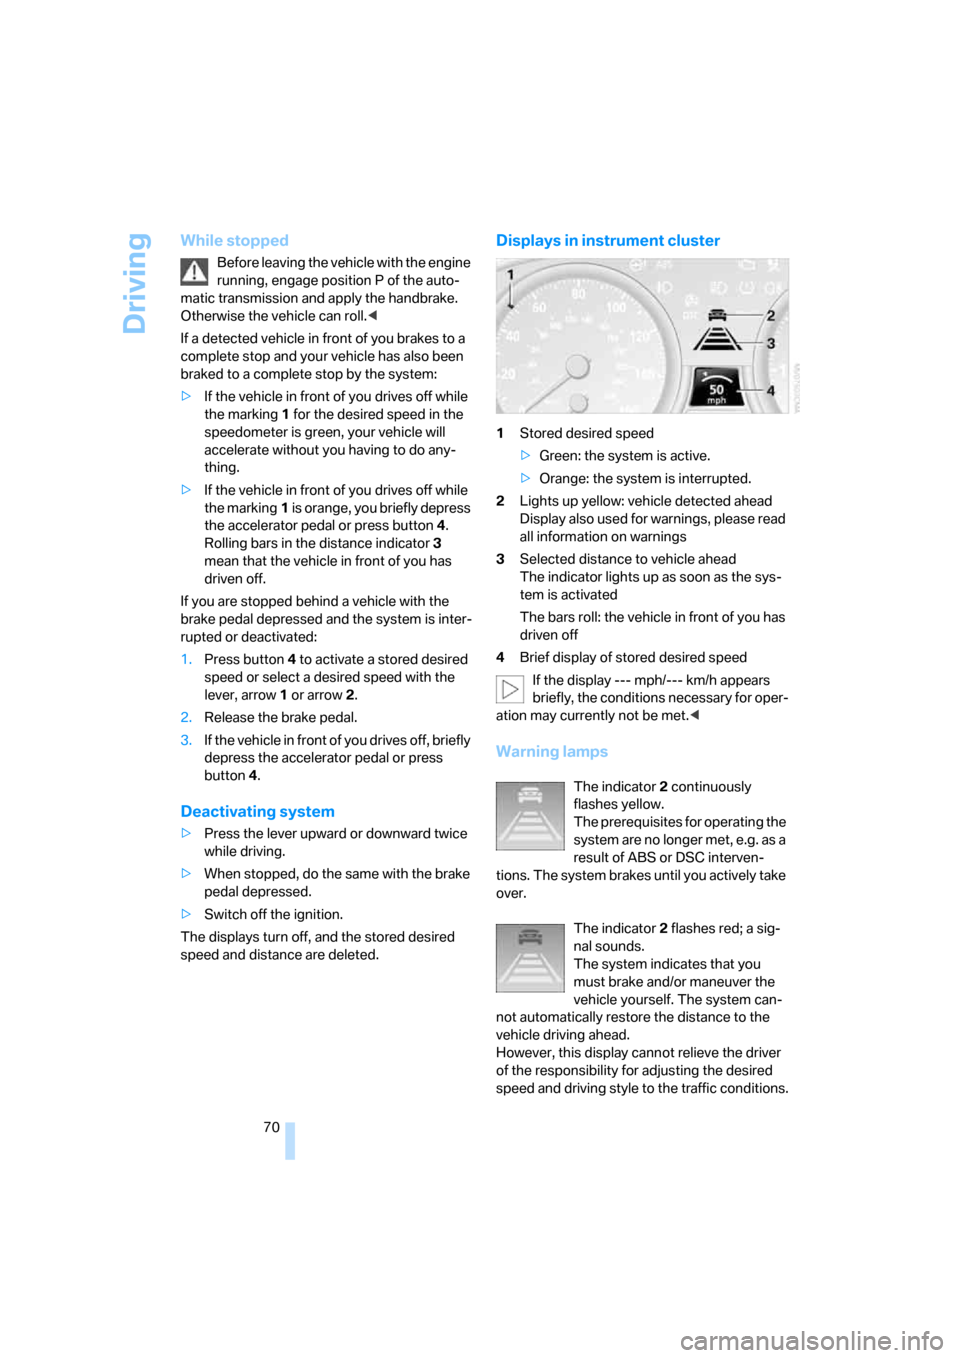
Displays in instrument cluster
1Stored desired speed
>Green: the system is active.
>Orange: the system is interrupted.
2Lights up yellow: vehicle detected ahead
Display also used for warnings, please read
all information on warnings
3Selected distance to vehicle ahead
The indicator lights up as soon as the sys-
tem is activated
The bars roll: the vehicle in front of you has
driven off
4Brief display of stored desired speed
If the display --- mph/--- km/h appears
briefly, the conditions necessary for oper-
ation may currently not be met.<
Warning lamps
The indicator2 continuously
flashes yellow.
The prerequisites for operating the
system are no longer met, e.g. as a
result of ABS or DSC interven-
tions. The system brakes until you actively take
over.
The indicator2 flashes red; a sig-
nal sounds.
The system indicates that you
must brake and/or maneuver the
vehicle yourself. The system can-
not automatically restore the distance to the
vehicle driving ahead.
However, this display cannot relieve the driver
of the responsibility for adjusting the desired
speed and driving style to the traffic conditions.
Page 74 of 264

Driving
72 The system cannot allow the vehicle to drive off
automatically in situations that make driving off
considerably more difficult, e.g. on steep uphill
grades, with a heavy trailer or before raised
areas in the road.
Near radio astronomy stations, the system
radar is deactivated at speeds under 20 mph/
30 km/h due to legal regulations.
Be certain to interrupt the system when
you pull into an exit lane for a highway
offramp.<
Also, vehicles traveling in a staggered manner
on a freeway may cause a delay in the system's
reaction to a vehicle in front of you or may cause
the system to react to a vehicle actually in the
lane next to you. Always be ready to take action
or apply the brakes if necessary.
In addition, the system is interrupted
whenever the driver applies the vehicle
brakes, shifts the transmission from drive/D to
neutral/N, or deactivates DSC. After any inter-
ruption, the system will no longer automatically
activate the vehicle brakes, which means the
driver must intervene and resume manual brak-
ing. You should then reactivate the system only
when you are fully aware of the prior speed and
distance settings.<
Active cruise control may brake when you
reduce the stored desired speed; however, the
driver must constantly monitor traffic and inter-
vene if necessary.
When you switch off the engine or ignition,
active cruise control is fully switched off, too,
and any settings you have selected are can-
celed.
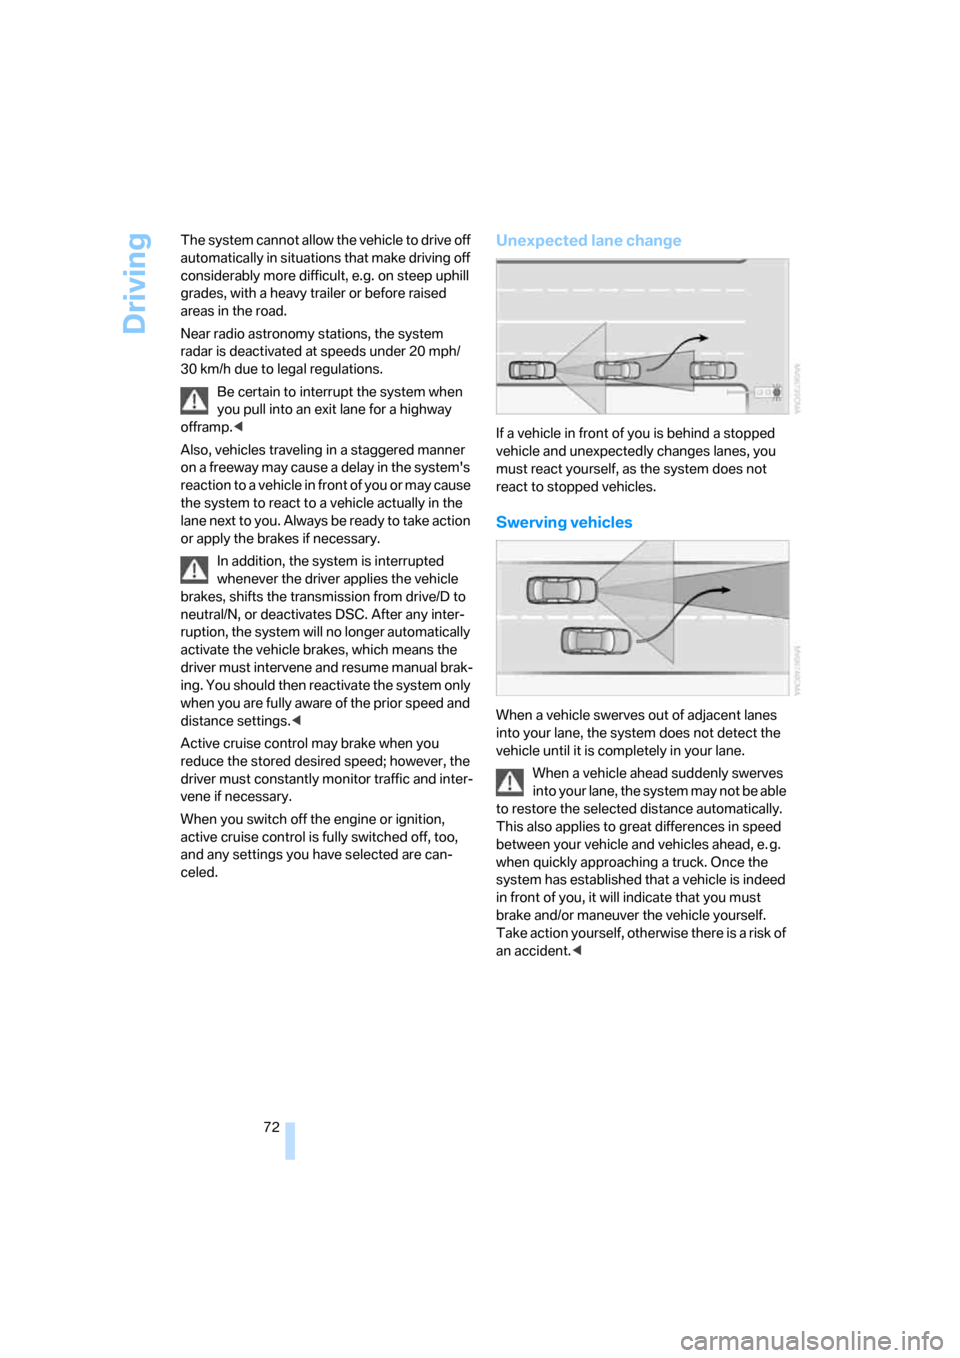
Unexpected lane change
If a vehicle in front of you is behind a stopped
vehicle and unexpectedly changes lanes, you
must react yourself, as the system does not
react to stopped vehicles.
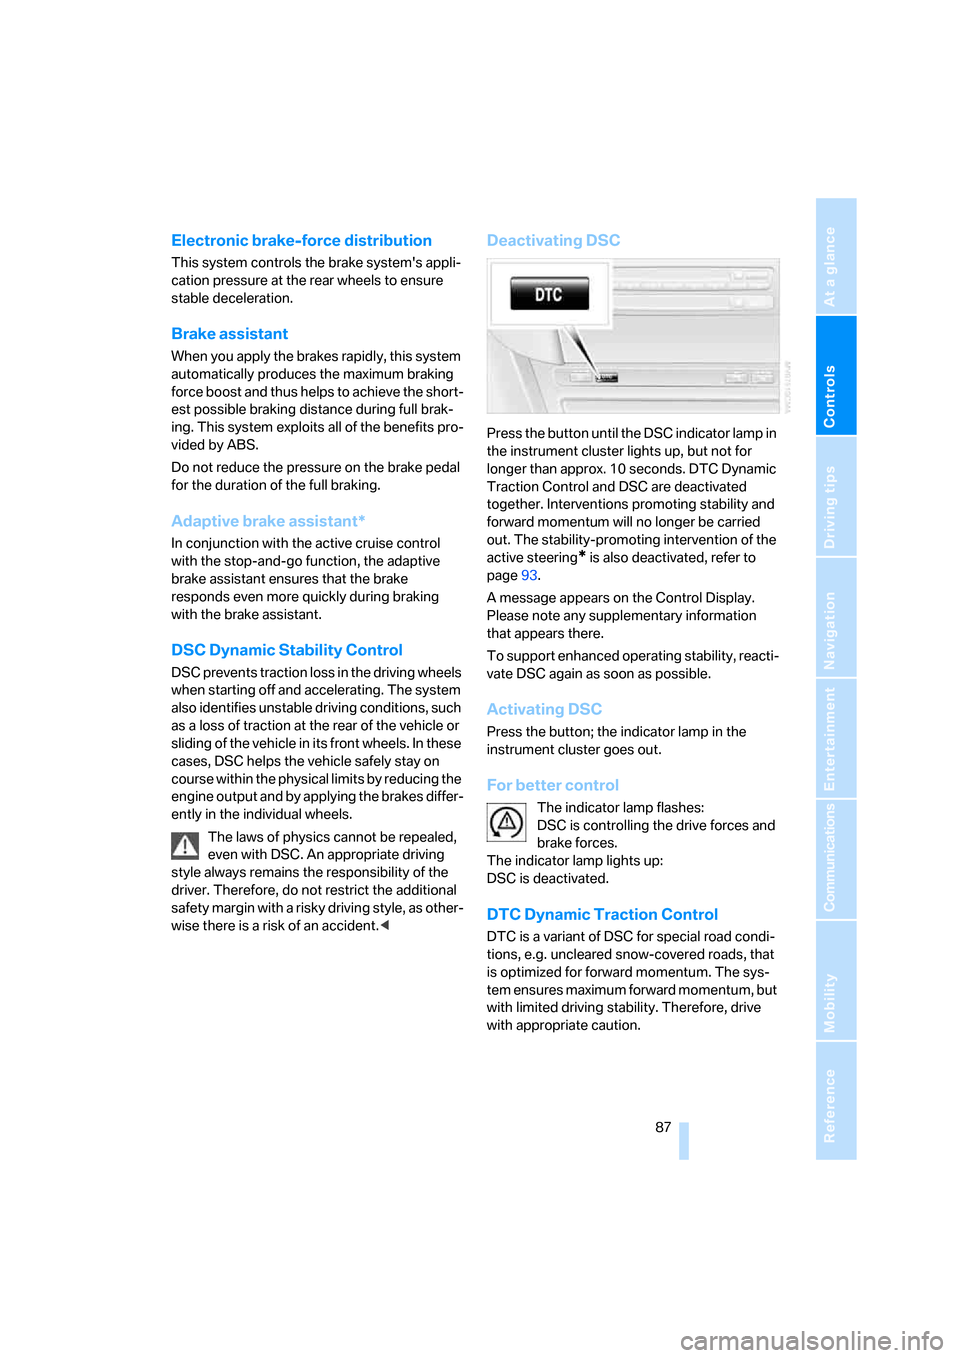
Swerving vehicles
When a vehicle swerves out of adjacent lanes
into your lane, the system does not detect the
vehicle until it is completely in your lane.
When a vehicle ahead suddenly swerves
into your lane, the system may not be able
to restore the selected distance automatically.
This also applies to great differences in speed
between your vehicle and vehicles ahead, e. g.
when quickly approaching a truck. Once the
system has established that a vehicle is indeed
in front of you, it will indicate that you must
brake and/or maneuver the vehicle yourself.
Take action yourself, otherwise there is a risk of
an accident.<
Page 76 of 264

Everything under control
74
Everything under control
Odometer, outside
temperature display, clock
1Time, outside temperature, and date
2Odometer and trip odometer
3Press button:
>with ignition switched on, trip odometer
is reset
>with ignition switched off, time, outside
temperature and odometer are briefly
displayed
From radio readiness, the outside temperature
and the time are displayed.
To request the date:
Press the CHECK button in the turn signal lever,
refer to page80.
To set time and date, refer to page82.
You can set the unit of measure 7 or 6 on the
Control Display, refer to Units of measure on
page84.
Outside temperature warning
If the display drops to +377/+36, a signal
sounds and a warning lamp lights up. A mes-
sage appears on the Control Display. There is
an increased danger of ice.
Ice can form even at temperatures above
+377/+36. Drive carefully, especially
on bridges and shaded roadways; otherwise,
your risk of accident increases.<
Tachometer
Avoid engine speeds in the white-striped
advance warning field, arrow1, if possible.
Be sure to avoid engine speeds in the red warn-
ing field, arrow2. At high revs in this range, the
flow of fuel is interrupted to protect the engine.
Coolant temperature
Should the coolant and therefore the engine
become too hot, a warning lamp lights up. In
addition, a message appears on the Control
Display.
Checking coolant level, refer to page220.
Page 77 of 264

Controls
75Reference
At a glance
Driving tips
Communications
Navigation
Entertainment
Mobility
Engine oil temperature*
During normal operation, the engine oil temper-
ature is between approx. 1607/706 and
approx. 3407/1706.
If the engine oil temperature is too high, a mes-
sage is shown on the Control Display.
Fuel gauge
Fuel tank capacity: approx. 18.5 US gal/
70 liters, including the reserve capacity of
approx. 2.6 US gal/10 liters. You can find infor-
mation on refueling on page208.
If the tilt of the vehicle varies for a longer period,
when you are driving in mountainous areas, for
example, the indicator may fluctuate slightly.
Reserve
After the reserve quantity has been reached, a
message briefly appears on the Control Display;
the cruising range is shown in the computer.
Below a range of approx. 30 miles/50 km, the
message remains on the Control Display.
Refuel as soon as possible once your
cruising range falls below 30 miles/
50 km, otherwise engine functions are not
ensured and damage can occur.<
Computer
Displays in instrument cluster
Press the button on the turn signal lever.
The following information is displayed in the
specified order:
>Cruising range
>Average speed
>Average fuel consumption
>No information
Cruising range
Displays the estimated cruising range available
with the remaining fuel. The range is projected
based on the driving style over the last 20 miles/
30 km.
Refuel as soon as possible once your
cruising range falls below 30 miles/
50 km, otherwise engine functions are not
ensured and damage can occur.<
Average speed
Periods with the vehicle parked and the engine
switched off are not included in the calculations
of average speed.
To reset the average speed: press the BC but-
ton in the turn signal lever for approx. 2 sec-
onds.
Average fuel consumption
The average fuel consumption is calculated for
the time during which the engine is running.
To reset the average fuel consumption: press
the BC button in the turn signal lever for approx.
2 seconds.
Page 87 of 264

Controls
85Reference
At a glance
Driving tips
Communications
Navigation
Entertainment
Mobility
Technology for comfort, convenience and
safety
PDC Park Distance Control*
The concept
The PDC assists you when you are parking.
Acoustic signals and an optical display
* alert
you to the approach of an object from behind
your vehicle. To measure the distance, there
are four ultrasonic sensors in each bumper.
The range of these sensors is approx. 7 ft/2 m.
However, an acoustic warning first sounds for
the sensors at the front and at the two rear cor-
ners at approx. 24 in/60 cm, and for the center
rear sensors at approx. 5 ft/1.50 m.
PDC is a parking aid that can indicate the
presence of objects when they are being
approached slowly, as is usually the case when
parking. Avoid approaching an object at high
speed; otherwise, the physical circumstances
could cause the system warning to be activated
too late.<
Switching on automatically
The system starts to operate approx. one sec-
ond after you shift into reverse or move the
selector lever into position R with the engine
running or the ignition switched on.
Wait this short time before driving off.
Switching on manually
Press the button; the LED lights up.
Switching off manually
Press the button again; the LED goes out.
Automatic deactivation
After driving approx. 165 ft/50 m or at over
approx. 20 mph/30 km/h, the system is
switched off and the LED goes out. You can
reactivate the system manually as needed.
Signal tones
An intermittent signal indicates the distance of
the vehicle from an object being approached.
Thus, an object detected to the left rear of the
vehicle will be indicated by a signal tone from
the left rear speaker, etc. As the distance
between vehicle and object decreases, the
intervals between the tones become shorter. If
the distance to the nearest object falls to below
roughly 1 ft/30 cm, then a continuous tone
sounds.
An intermittent tone is interrupted after approx.
3seconds:
>if you remain in front of an object that was
only detected by one of the corner sensors
>if you drive parallel to a wall
Malfunction
The LED in the button flashes and a message
appears on the Control Display. PDC is mal-
functioning. Have the system checked.
As a preventive measure, keep the sensors
clean and free of ice or snow in order to ensure
that they will continue to operate effectively. Do
not spray the sensors with high-pressure clean-
ers for long periods and maintain a distance of
at least 4 in/10 cm to them.
Page 88 of 264

Technology for comfort, convenience and safety
86
PDC with visual warning*
You can also enjoy the option of having the sys-
tem show the approach to an object on the
Control Display. Objects that are farther away
are already shown there before a signal tone
sounds. The setting is stored for the remote
control currently in use.
iDrive, for operating principle refer to page16.
1.Press the button.
This opens the start menu.
2.Press the controller to open the menu.
3.Turn the controller until "Settings" is
selected and press the controller.
4.Turn the controller until "Vehicle / Tires" is
selected and press the controller.
5.Change to upper field if necessary. Turn the
controller until "PDC" is selected and press
the controller.
6.Select "PDC display on" and press the con-
troller.
The PDC screen is activated.
The display appears on the Control Display as
soon as PDC is activated.
System limits
Even with PDC, final responsibility for
estimating the distance between the
vehicle and any obstacles always remains with
the driver. Even when sensors are involved,
there is a blind spot in which objects cannot be
detected. The system is also subject to the
physical limits that apply to all forms of ultra-
sonic measurement, such as those encoun-
tered with tow bars and trailer couplings, or thin
and wedge-shaped objects etc. Low objects
already displayed, e. g. curbs, can also disap-
pear from the detection area of the sensors
again before or after a continuous tone already
sounds. Higher, protruding objects, e.g. ledges,
cannot be detected. For this reason, drive with
care; otherwise, there is a danger of personal
injury or property damage.
Loud noises from outside and inside the vehicle
may prevent you from hearing the PDC signal
tone.<
Driving stability control
systems
Your BMW is equipped with an extended array
of systems designed to enhance and maintain
vehicle stability under extreme conditions.
ABS Antilock Brake System
ABS prevents the wheels from locking during
braking. Safe steering response is maintained
even during hard braking. This increases active
driving safety.
ABS is operational every time you start the
engine. For information on safe braking, refer to
page126.
CBC Cornering Brake Control
This system provides further enhancements to
vehicle stability and steering response when
braking while cornering or when braking during
a lane change.
Page 89 of 264

Controls
87Reference
At a glance
Driving tips
Communications
Navigation
Entertainment
Mobility
Electronic brake-force distribution
This system controls the brake system's appli-
cation pressure at the rear wheels to ensure
stable deceleration.
Brake assistant
When you apply the brakes rapidly, this system
automatically produces the maximum braking
force boost and thus helps to achieve the short-
est possible braking distance during full brak-
ing. This system exploits all of the benefits pro-
vided by ABS.
Do not reduce the pressure on the brake pedal
for the duration of the full braking.
Adaptive brake assistant*
In conjunction with the active cruise control
with the stop-and-go function, the adaptive
brake assistant ensures that the brake
responds even more quickly during braking
with the brake assistant.
DSC Dynamic Stability Control
DSC prevents traction loss in the driving wheels
when starting off and accelerating. The system
also identifies unstable driving conditions, such
as a loss of traction at the rear of the vehicle or
sliding of the vehicle in its front wheels. In these
cases, DSC helps the vehicle safely stay on
course within the physical limits by reducing the
engine output and by applying the brakes differ-
ently in the individual wheels.
The laws of physics cannot be repealed,
even with DSC. An appropriate driving
style always remains the responsibility of the
driver. Therefore, do not restrict the additional
safety margin with a risky driving style, as other-
wise there is a risk of an accident.<
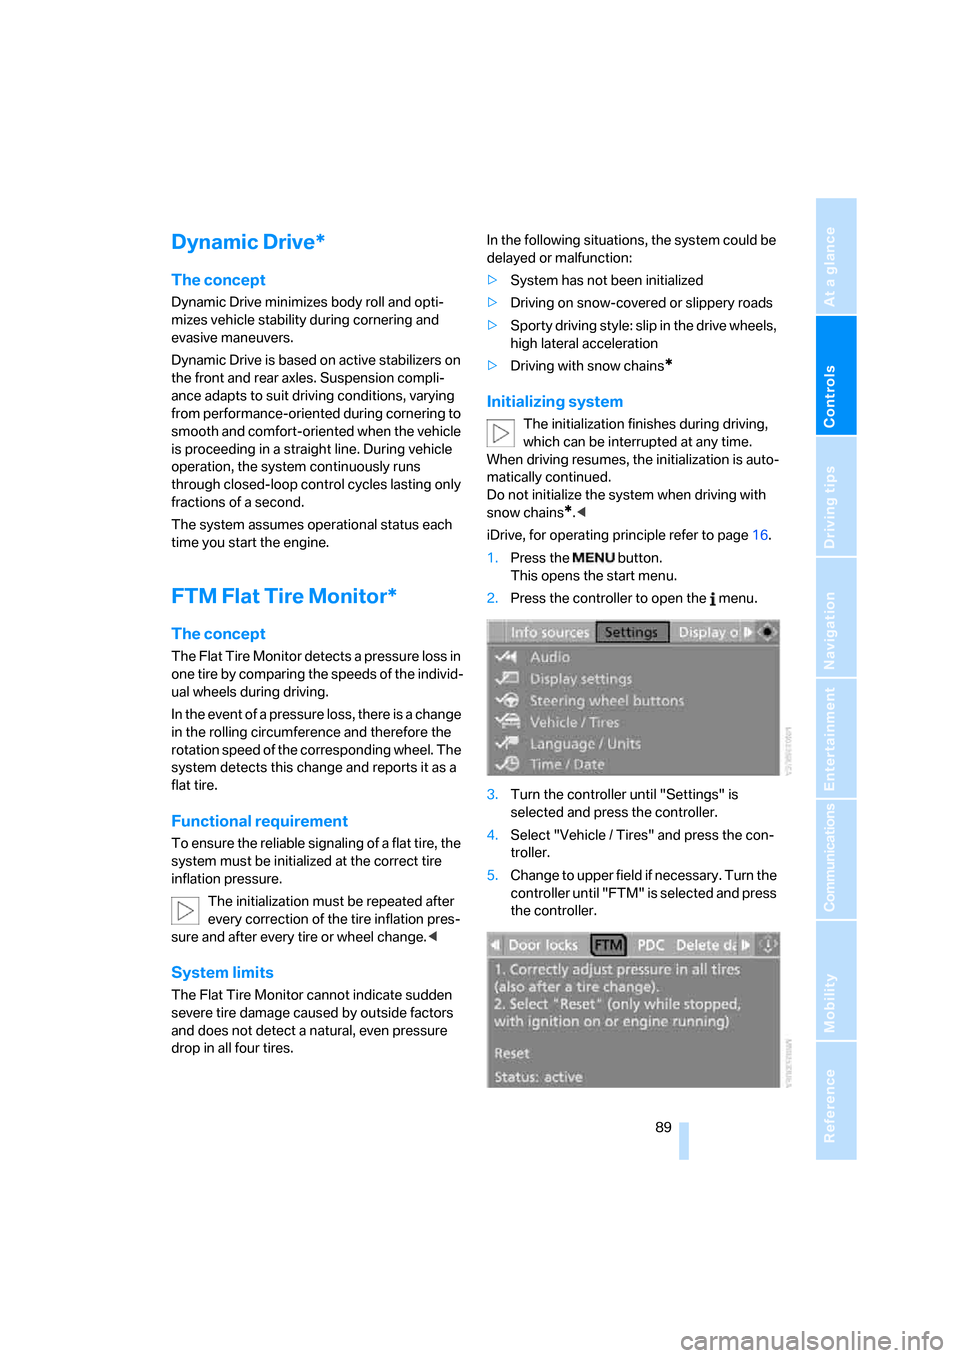
Deactivating DSC
Press the button until the DSC indicator lamp in
the instrument cluster lights up, but not for
longer than approx. 10 seconds. DTC Dynamic
Traction Control and DSC are deactivated
together. Interventions promoting stability and
forward momentum will no longer be carried
out. The stability-promoting intervention of the
active steering
* is also deactivated, refer to
page93.
A message appears on the Control Display.
Please note any supplementary information
that appears there.
To support enhanced operating stability, reacti-
vate DSC again as soon as possible.
Activating DSC
Press the button; the indicator lamp in the
instrument cluster goes out.
For better control
The indicator lamp flashes:
DSC is controlling the drive forces and
brake forces.
The indicator lamp lights up:
DSC is deactivated.
DTC Dynamic Traction Control
DTC is a variant of DSC for special road condi-
tions, e.g. uncleared snow-covered roads, that
is optimized for forward momentum. The sys-
tem ensures maximum forward momentum, but
with limited driving stability. Therefore, drive
with appropriate caution.
Page 91 of 264

Controls
89Reference
At a glance
Driving tips
Communications
Navigation
Entertainment
Mobility
Dynamic Drive*
The concept
Dynamic Drive minimizes body roll and opti-
mizes vehicle stability during cornering and
evasive maneuvers.
Dynamic Drive is based on active stabilizers on
the front and rear axles. Suspension compli-
ance adapts to suit driving conditions, varying
from performance-oriented during cornering to
smooth and comfort-oriented when the vehicle
is proceeding in a straight line. During vehicle
operation, the system continuously runs
through closed-loop control cycles lasting only
fractions of a second.
The system assumes operational status each
time you start the engine.
FTM Flat Tire Monitor*
The concept
The Flat Tire Monitor detects a pressure loss in
one tire by comparing the speeds of the individ-
ual wheels during driving.
In the event of a pressure loss, there is a change
in the rolling circumference and therefore the
rotation speed of the corresponding wheel. The
system detects this change and reports it as a
flat tire.
Functional requirement
To ensure the reliable signaling of a flat tire, the
system must be initialized at the correct tire
inflation pressure.
The initialization must be repeated after
every correction of the tire inflation pres-
sure and after every tire or wheel change.<
System limits
The Flat Tire Monitor cannot indicate sudden
severe tire damage caused by outside factors
and does not detect a natural, even pressure
drop in all four tires.In the following situations, the system could be
delayed or malfunction:
>System has not been initialized
>Driving on snow-covered or slippery roads
>Sporty driving style: slip in the drive wheels,
high lateral acceleration
>Driving with snow chains
*
Initializing system
The initialization finishes during driving,
which can be interrupted at any time.
When driving resumes, the initialization is auto-
matically continued.
Do not initialize the system when driving with
snow chains
*.<
iDrive, for operating principle refer to page16.
1.Press the button.
This opens the start menu.
2.Press the controller to open the menu.
3.Turn the controller until "Settings" is
selected and press the controller.
4.Select "Vehicle / Tires" and press the con-
troller.
5.Change to upper field if necessary. Turn the
controller until "FTM" is selected and press
the controller.