2008 BMW 650I CONVERTIBLE Symbols
[x] Cancel search: SymbolsPage 6 of 264

Notes
4
Notes
Using this Owner's Manual
We have made every effort to ensure that you
are able to find what you need in this Owner's
Manual as quickly as possible. The fastest way
to find specific topics is to use the detailed
index at the back of the manual. If you wish to
gain an initial overview of your vehicle, you will
find this in the first chapter.
Should you want to sell your BMW some day,
please remember to pass on the Owner's Man-
ual as well; it is an important component of your
vehicle.
Additional sources of information
Should you have any other questions, your
BMW center will be happy to advise you.
You can find information on BMW, e.g. technol-
ogy, on the Internet at www.bmwusa.com.
Symbols used
Indicates precautions that must be fol-
lowed precisely in order to avoid the pos-
sibility of personal injury and serious damage to
the vehicle.<
Indicates information that will assist you
in gaining the optimum benefit from your
vehicle and enable you to care more effectively
for your vehicle.<
Refers to measures that can be taken to
help protect the environment.<
*Indicates special equipment, country-spe-
cific equipment and optional extras, as well as
equipment and functions not yet available at the
time of printing.
"..." Identifies Control Display texts used to
select individual functions.
{...} Verbal instructions to use with the voice
command system.
{{...}} Identifies the answers generated by the
voice command system.
Symbols on vehicle components
Indicates that you should consult the rel-
evant section of this Owner's Manual for
information on a particular part or assembly.
Page 25 of 264

At a glance
23Reference
Controls
Driving tips
Communications
Navigation
Entertainment
Mobility
Voice command system
The concept
The voice command system allows you to con-
trol operation of various vehicle systems with-
out taking your hands off the steering wheel.
Individual menu items on the Control Display
can be spoken as commands. This frees you of
having to use the controller.
The voice command system transforms your
spoken commands into control signals for the
selected systems and provides support in the
form of instructions or questions.
The voice command system includes a special
microphone.
The microphone is located:
>Near the interior rearview mirror in the
Coupe, refer to page14
>On the steering column in the Convertible
Prerequisite
In order to enable identification of the com-
mands to be spoken, use iDrive to set the lan-
guage for the voice command system. Setting
iDrive language, refer to page84.
Symbols in Owner's Manual
Voice commands
Activating voice command system
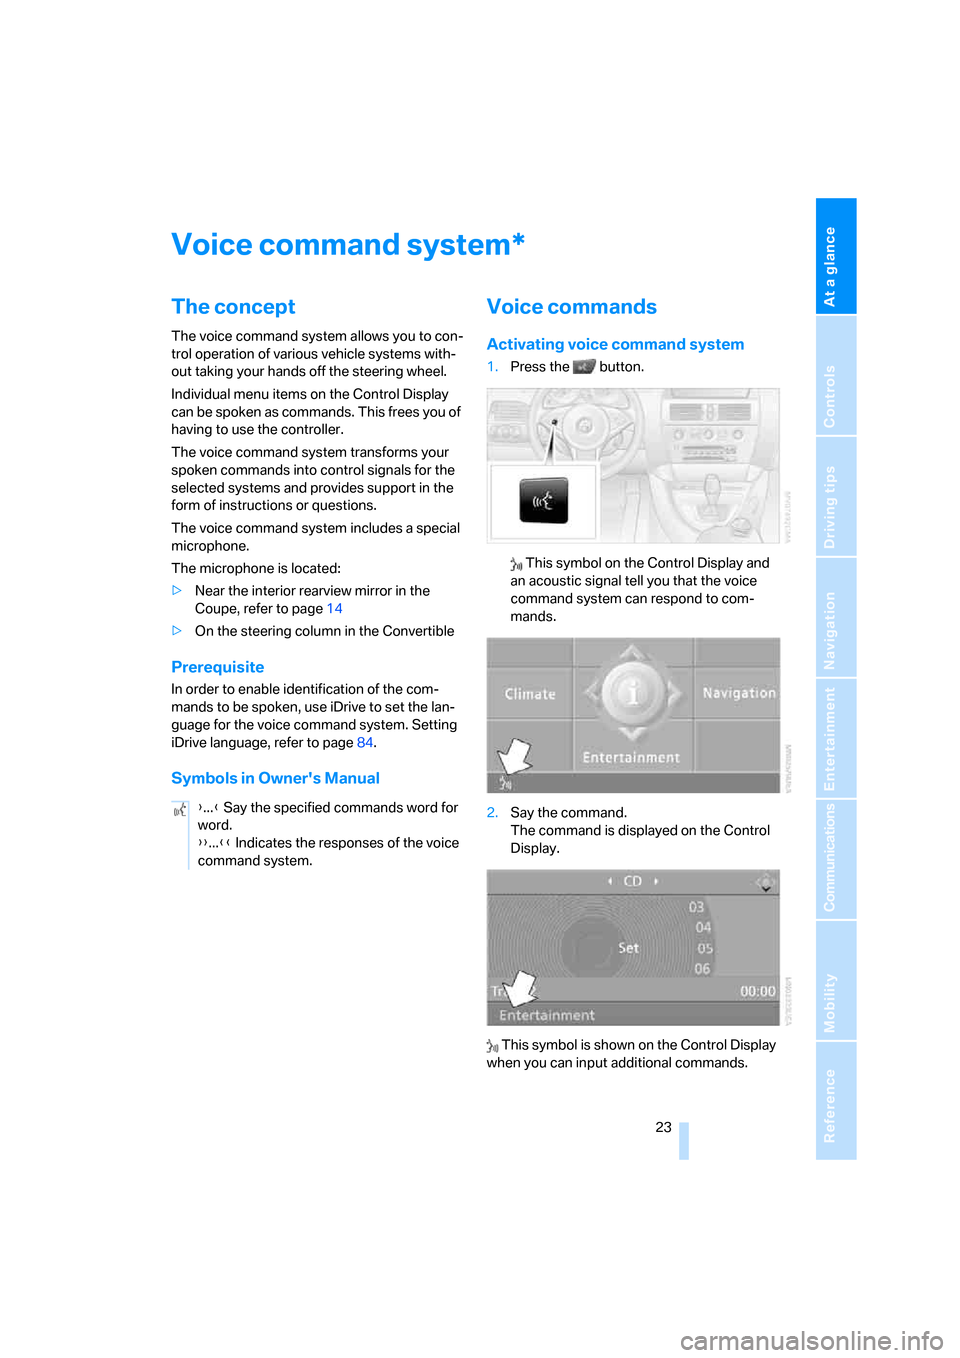
1.Press the button.
This symbol on the Control Display and
an acoustic signal tell you that the voice
command system can respond to com-
mands.
2.Say the command.
The command is displayed on the Control
Display.
This symbol is shown on the Control Display
when you can input additional commands.
*
{...} Say the specified commands word for
word.
{{...}} Indicates the responses of the voice
command system.
Page 80 of 264

Everything under control
78 5.Change to upper field if necessary. Turn the
controller until "Service requirements" is
selected and press the controller.
6.Select "Status" and press the controller.
The display shows a list of selected service and
maintenance procedures, as well as legally
mandated official inspections.
You can request more detailed information on
every entry.
Select the entry and press the controller.
To exit from the menu:
Select the arrow and press the controller.
Symbols
No service is currently required.
The deadline for service or an official
inspection is approaching. Please
arrange a service appointment.
The service deadline has already passed.
Entering deadlines for legally required
inspections*
Make sure the date on the Control Display is set
correctly, refer to page83; otherwise, the effec-
tiveness of CBS Condition Based Service is not
ensured.
1.Open the start menu.
2.Press the controller to open the menu.
3.Select "Info sources" and press the control-
ler.
4.Select "Service" and press the controller.
5.Change to upper field if necessary. Turn the
controller until "Service requirements" is
selected and press the controller.
6.Select "Status" and press the controller.
7.Select "State inspection" and press the
controller.
8.Select "Set service date" and press the
controller. The month is selected.
Page 83 of 264

Controls
81Reference
At a glance
Driving tips
Communications
Navigation
Entertainment
Mobility
Displaying the urgency of malfunctions
Depending on the equipment, the stored Check
Control messages are also displayed with the
following symbols:
No malfunctions detected in the moni-
tored systems.
Malfunctions detected in the monitored
systems. Depending on the malfunction,
supplementary information is shown on
the Control Display.
The symbols also indicate the status of the ser-
vice requirements display, refer to page77.
Displays after completion of trip
Malfunction reports generated during the trip
are shown consecutively when you switch off
the ignition.
Before the display disappears, you can display
the messages once again. Press the CHECK
button for approx. 2 seconds. If several mes-
sages are present, you can press the CHECK
button repeatedly.
The display:
>turns off automatically after a brief period
>can be turned off at any time by pressing
the CHECK button again for approx. 2 sec-
onds
Speed limit
You can enter a speed and a Check Control
message indicates when you have reached
this speed. This enables you, for example, to
receive warnings if you exceed a speed limit in
an urban area.
You are only warned of reaching this speed a
second time if your vehicle speed falls below it
again by at least 3 mph/5 km/h.
Displaying, setting or changing limit
iDrive, for operating principle refer to page16.
1.Open the start menu.
2.Open "Navigation".
Without navigation system
*: open "Car
Data".
3.Select "Car Data" and press the controller.
4.Select "Limit" and press the controller.
5.Select the speed value and press the con-
troller.
6.Turn the controller to set the limit. If neces-
sary, hold it against a slight resistance to
enter a greater difference.
7.Press the controller to apply the setting.
The limit is automatically switched on.
Applying your current speed as limit
Select "Select current speed" and press the
controller. The system applies your current
speed as the limit.
Activating limit
Select "On" and press the controller.
The limit is automatically switched on.
Page 142 of 264

Destination entry
140 The map for destination input can also be called
up from the map view:
Select the symbol and press the controller.
Selecting destination using
information
You can obtain a display of selected destina-
tions, e.g. hotels, sights or hospitals, and adopt
them into the destination guidance.
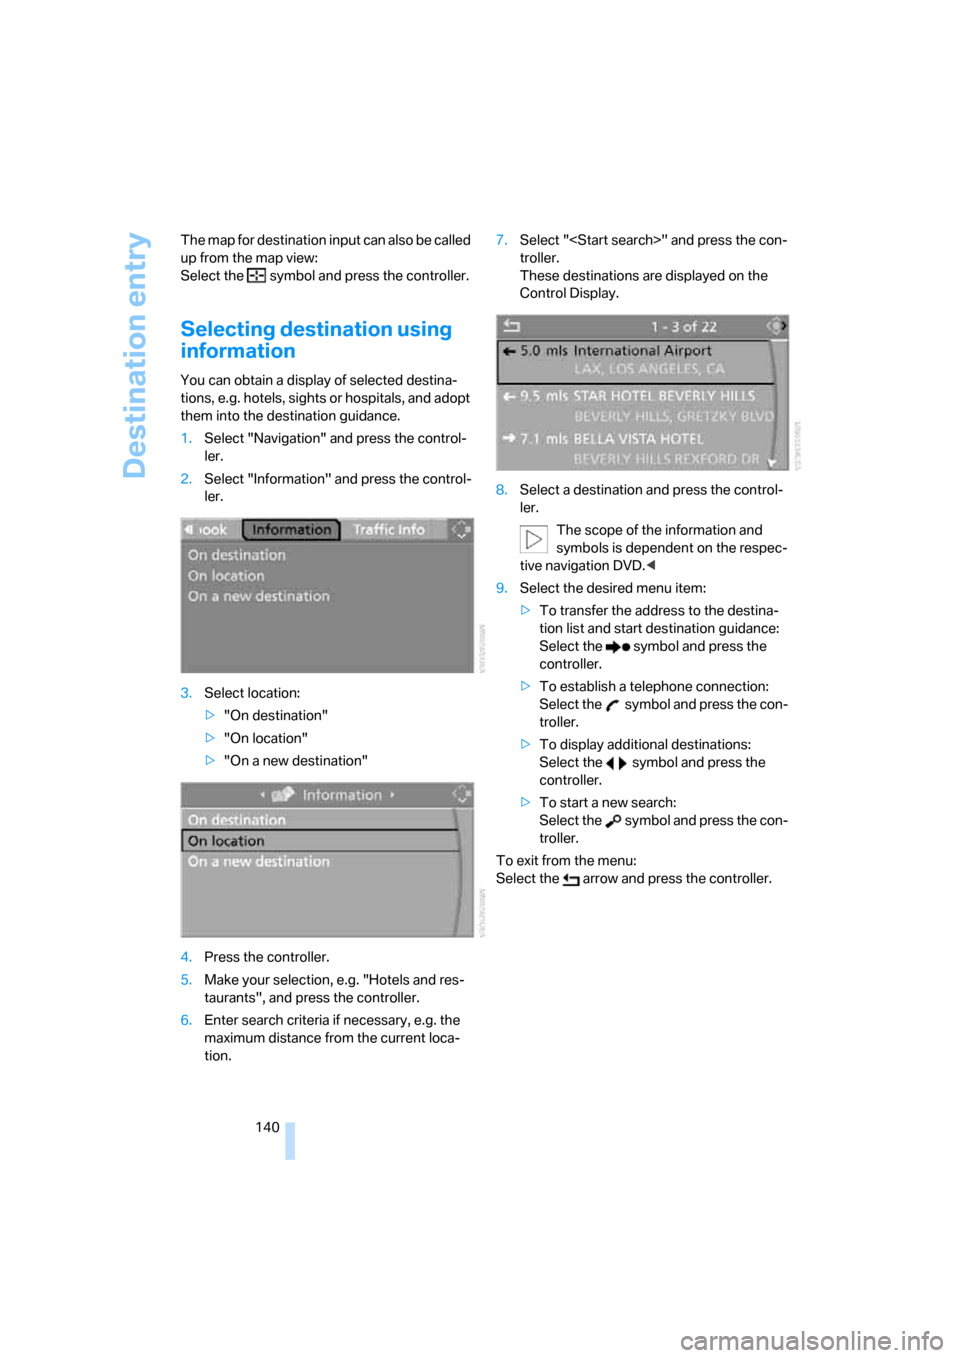
1.Select "Navigation" and press the control-
ler.
2.Select "Information" and press the control-
ler.
3.Select location:
>"On destination"
>"On location"
>"On a new destination"
4.Press the controller.
5.Make your selection, e.g. "Hotels and res-
taurants", and press the controller.
6.Enter search criteria if necessary, e.g. the
maximum distance from the current loca-
tion.7.Select "
troller.
These destinations are displayed on the
Control Display.
8.Select a destination and press the control-
ler.
The scope of the information and
symbols is dependent on the respec-
tive navigation DVD.<
9.Select the desired menu item:
>To transfer the address to the destina-
tion list and start destination guidance:
Select the symbol and press the
controller.
>To establish a telephone connection:
Select the symbol and press the con-
troller.
>To display additional destinations:
Select the symbol and press the
controller.
>To start a new search:
Select the symbol and press the con-
troller.
To exit from the menu:
Select the arrow and press the controller.
Page 143 of 264

Navigation
Driving tips
141Reference
At a glance
Controls
Communications
Entertainment
Mobility
Symbols in map view
If, for example, you have selected the category
Hotels, the hotels are shown on the map as
symbols.
To hide the symbols in the map view:
1.Select the symbol and press the controller.
2.Select "Hide map icons" and press the con-
troller.
The symbols are hidden.
To display the symbols:
Select "Show map icons" and press the con-
troller.
To exit from the menu:
Select the arrow and press the controller.
Destination list
The last 20 destinations entered into the desti-
nation list are displayed. You can select these
destinations and adopt them into the destina-
tion guidance system.
For example, in order to plan a longer route, you
can store all of the destinations you wish to visit
in the destination list ahead of time, refer to
Entering a destination manually on page134.
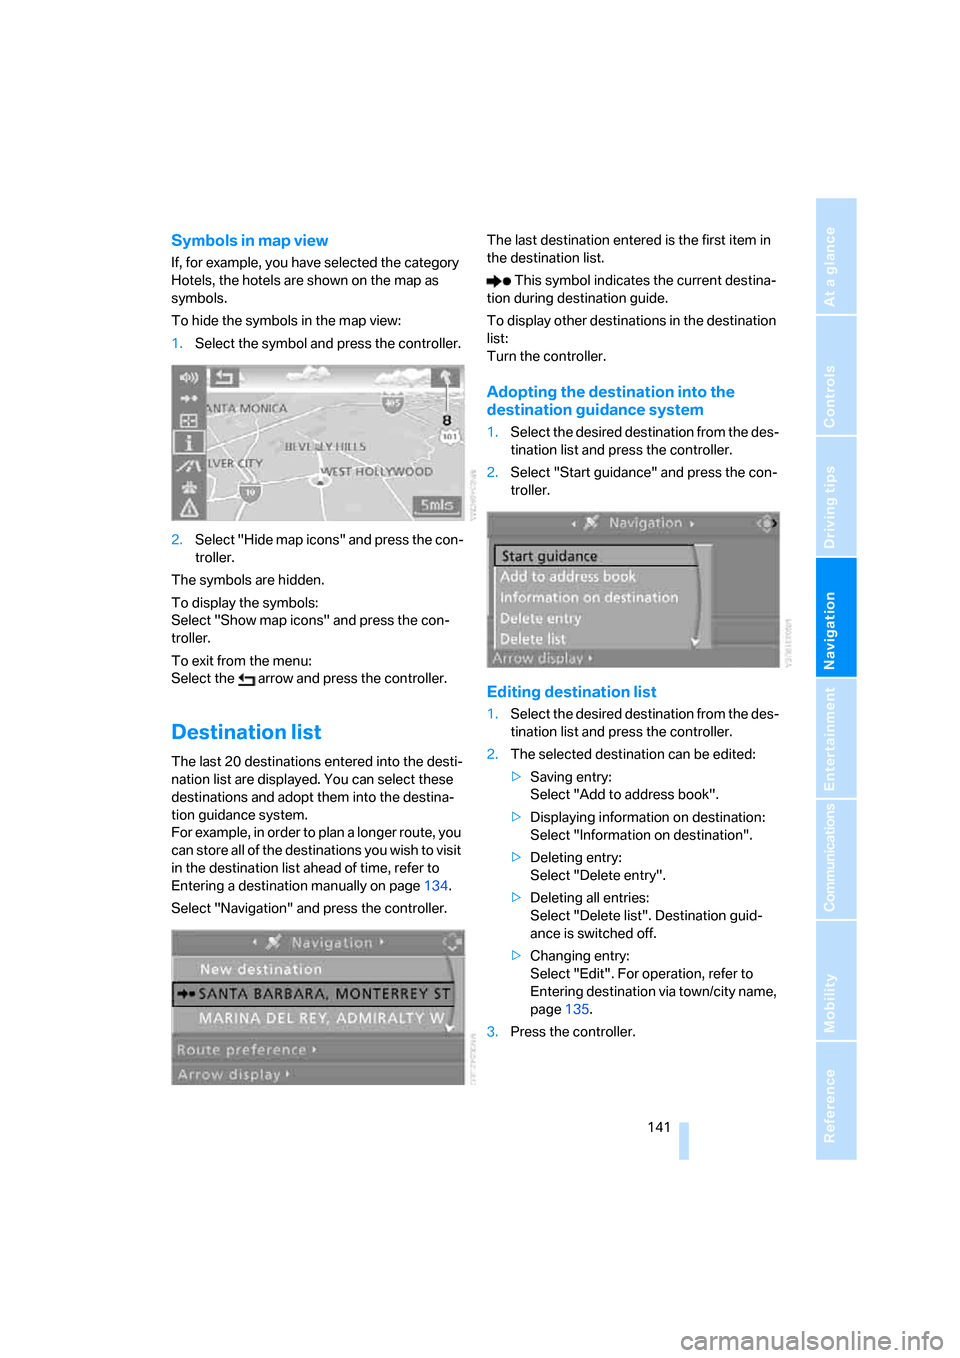
Select "Navigation" and press the controller.The last destination entered is the first item in
the destination list.
This symbol indicates the current destina-
tion during destination guide.
To display other destinations in the destination
list:
Turn the controller.
Adopting the destination into the
destination guidance system
1.Select the desired destination from the des-
tination list and press the controller.
2.Select "Start guidance" and press the con-
troller.
Editing destination list
1.Select the desired destination from the des-
tination list and press the controller.
2.The selected destination can be edited:
>Saving entry:
Select "Add to address book".
>Displaying information on destination:
Select "Information on destination".
>Deleting entry:
Select "Delete entry".
>Deleting all entries:
Select "Delete list". Destination guid-
ance is switched off.
>Changing entry:
Select "Edit". For operation, refer to
Entering destination via town/city name,
page135.
3.Press the controller.
Page 154 of 264

Destination guidance
152
With destination guidance switched off
1.Open the start menu.
2.Move the controller to the right to call up
"Navigation".
3.Select "Traffic Info" and press the control-
ler.
First the traffic information along the planned
route is shown sorted according to the distance
to the current vehicle position.
Depiction of traffic information in map
view
The traffic information symbols are shown in
the map view up to a scale of 100 miles/200 km.
The section of the route affected by a traffic
report as well as the number for the type of inci-
dent are displayed and hidden. This occurs as a
function of the scale selected.
Displaying detailed traffic information
Select a traffic information item from the list and
press the controller.
To exit from the menu:
Select the arrow and press the controller.
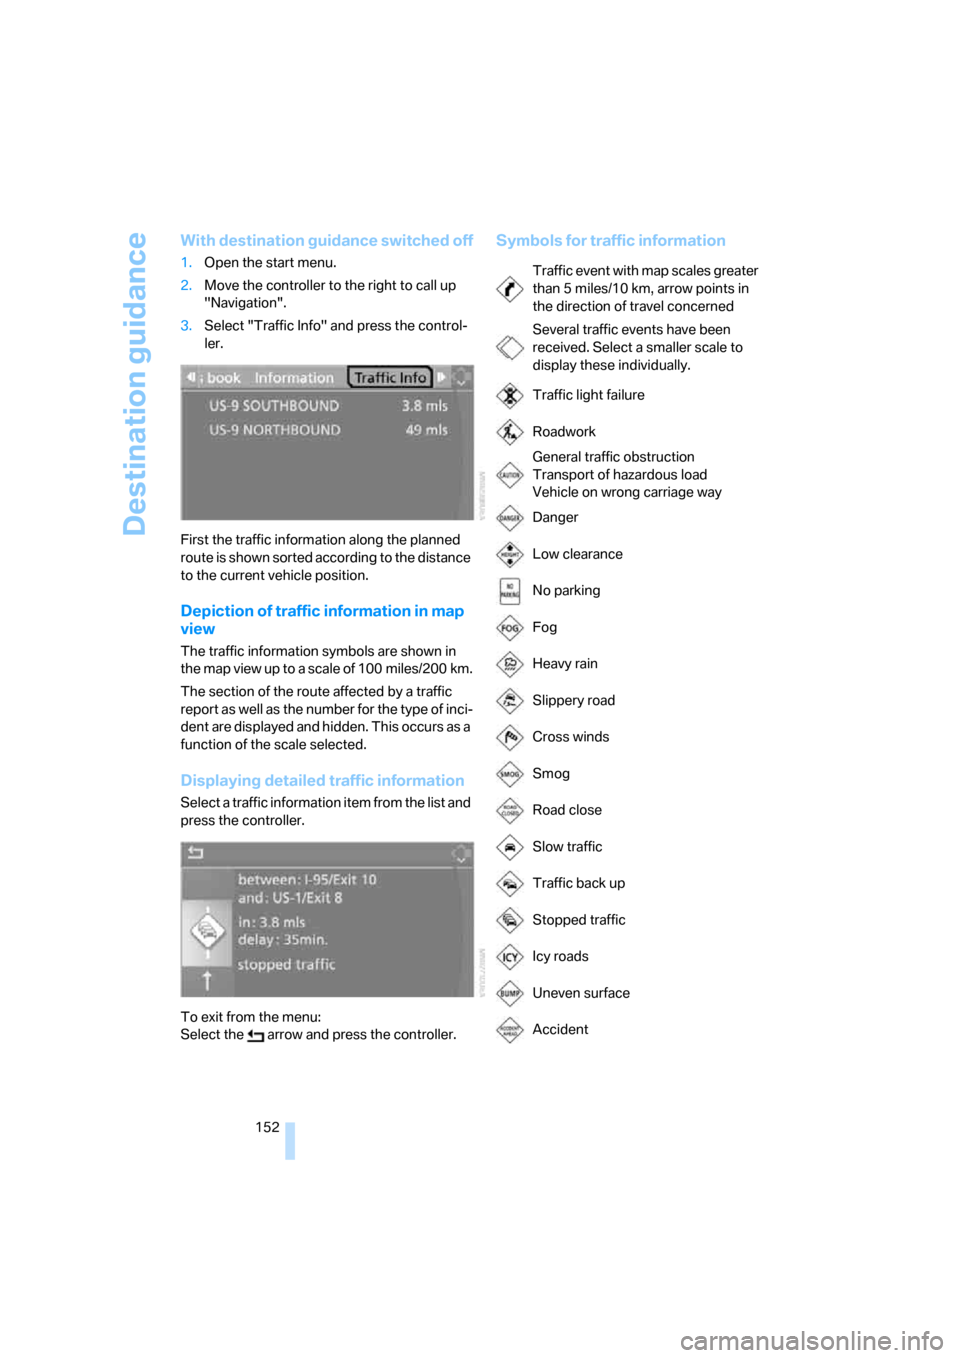
Symbols for traffic information
Traffic event with map scales greater
than 5miles/10km, arrow points in
the direction of travel concerned
Several traffic events have been
received. Select a smaller scale to
display these individually.
Traffic light failure
Roadwork
General traffic obstruction
Transport of hazardous load
Vehicle on wrong carriage way
Danger
Low clearance
No parking
Fog
Heavy rain
Slippery road
Cross winds
Smog
Road close
Slow traffic
Traffic back up
Stopped traffic
Icy roads
Uneven surface
Accident
Page 252 of 264

Everything from A to Z
250
I
IBOC, refer to High Definition
Radio166
Ice, refer to Outside
temperature warning74
ID3-Tag, refer to Information
about track174
Identification mark
– recommended tire
brands215
– run-flat tires214
– tire coding212
iDrive16
– adjusting brightness83
– assistance window20
– changing date and time82
– changing language84
– changing menu page19
– changing settings82
– changing units of measure
and display form84
– controller16
– controls16
– displays, menus17
– operating principle17
– selecting menu item19
– selecting or confirming
entry19
– start menu17
– status information20
– symbols18
Ignition58
– switched off59
– switched on58
Ignition key, refer to Keys/
remote control28
Ignition key position 1, refer to
Radio readiness58
Ignition key position 2, refer to
Ignition on58
Ignition lock58
– starting engine with comfort
access38
i menu17
Imprint2Indicator/warning lamps
– ABS Antilock Brake
System88
– active steering93
– airbags95
– brake system88
– DSC13,87
– DTC13,88
– Flat Tire Monitor90
– fog lamps13,106
– handbrake13,60
– safety belt warning52
– TPM Tire Pressure
Monitor92
Indicator and warning lamps,
overview13
Inflation pressure, refer to Tire
inflation pressure210
Inflation pressure monitoring
– refer to Flat Tire Monitor89
– refer to Tire Pressure
Monitor90
Info menu17
Information
– on another location140
– on current position140
– on town/city of
destination140
"Information" for navigation
system140
Information menu, refer to
imenu17
"Information on
destination"141
"Info sources"77
Initializing
– Flat Tire Monitor89
– radio, refer to Storing
stations164
– refer to Power failure226
– seat, mirror and steering
wheel memory49
– time and date82
"Input map"139
Installation location
– CD changer176
– drive for navigation DVD132Instructions for navigation
system, refer to Voice
instructions149
Instrument cluster12
Instrument illumination, refer
to Instrument lighting106
Instrument lighting106
Instrument panel, refer to
Cockpit10
Instrument panel, refer to
Instrument cluster12
Integrated key28
Integrated universal remote
control115
Interesting destination for
navigation140
"Interim time"82
Interior lamps106
– switching on with remote
control31
Interior motion sensor36
– switching off36
Interior rearview mirror,
automatic dimming
feature54
Intermittent wiper mode64
J
Jacking points225
Joystick, refer to iDrive16
Jump starting228
K
Keyless-Go, refer to Comfort
access36
Keyless opening and closing,
refer to Comfort access36
Key Memory, refer to Personal
Profile29
"Keypad"194
Keys28
– key-related settings, refer to
Personal Profile29
– spare key28
Kick-down, Sport automatic
transmission61