2008 BMW 550I tow
[x] Cancel search: towPage 67 of 288
Controls
65Reference
At a glance
Driving tips
Communications
Navigation
Entertainment
Mobility
When the selector lever is pressed forward or
back, the manual mode is activated and the
Steptronic shifts the gear. The instrument clus-
ter shows M1 through M6.
Upshifts and downshifts are only carried out at a
suitable engine and vehicle speed, e.g. a down-
shift is not carried out at excessively high
engine speeds. The selected gear is briefly dis-
played in the instrument cluster, followed by the
current gear.
To resume automatic mode, press the selector
lever to the right.
Manually unlocking and locking
transmission lock
In case of a power failure, e.g. when the battery
is drained or disconnected, or an electrical fault,
manually release the transmission lock, as oth-
erwise the rear wheels are blocked and the
vehicle cannot be towed.
Only manually release the transmission lock for
towing and firmly apply the handbrake before-
hand so that the vehicle cannot roll. Reengage
the transmission lock after parking the vehicle
at its destination.
Unlocking
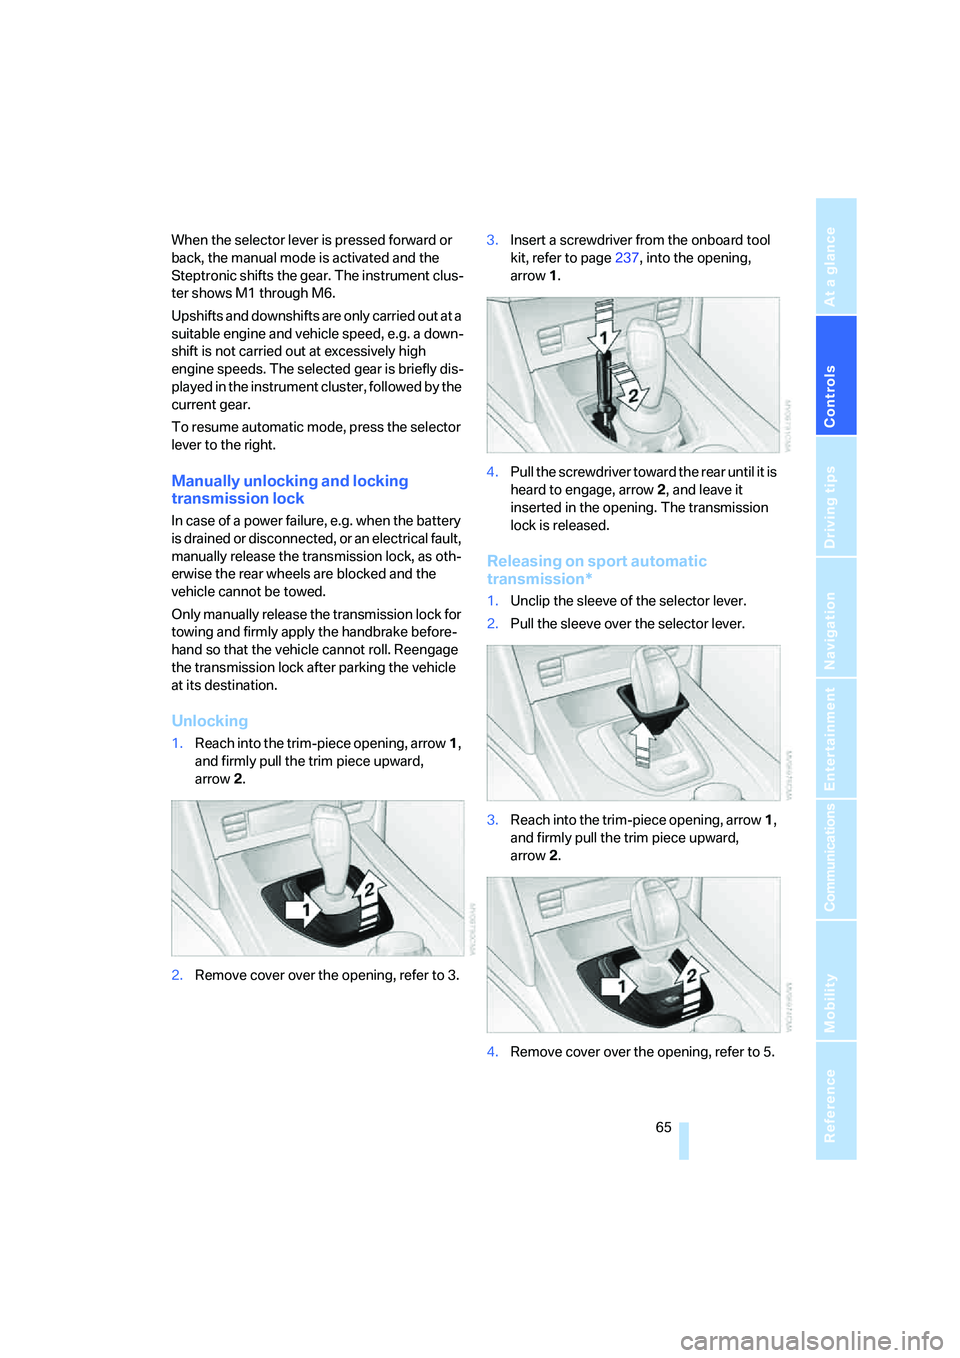
1.Reach into the trim-piece opening, arrow1,
and firmly pull the trim piece upward,
arrow2.
2.Remove cover over the opening, refer to 3.3.Insert a screwdriver from the onboard tool
kit, refer to page237, into the opening,
arrow1.
4.Pull the screwdriver toward the rear until it is
heard to engage, arrow2, and leave it
inserted in the opening. The transmission
lock is released.
Releasing on sport automatic
transmission*
1.Unclip the sleeve of the selector lever.
2.Pull the sleeve over the selector lever.
3.Reach into the trim-piece opening, arrow1,
and firmly pull the trim piece upward,
arrow2.
4.Remove cover over the opening, refer to 5.
Page 68 of 288
Driving
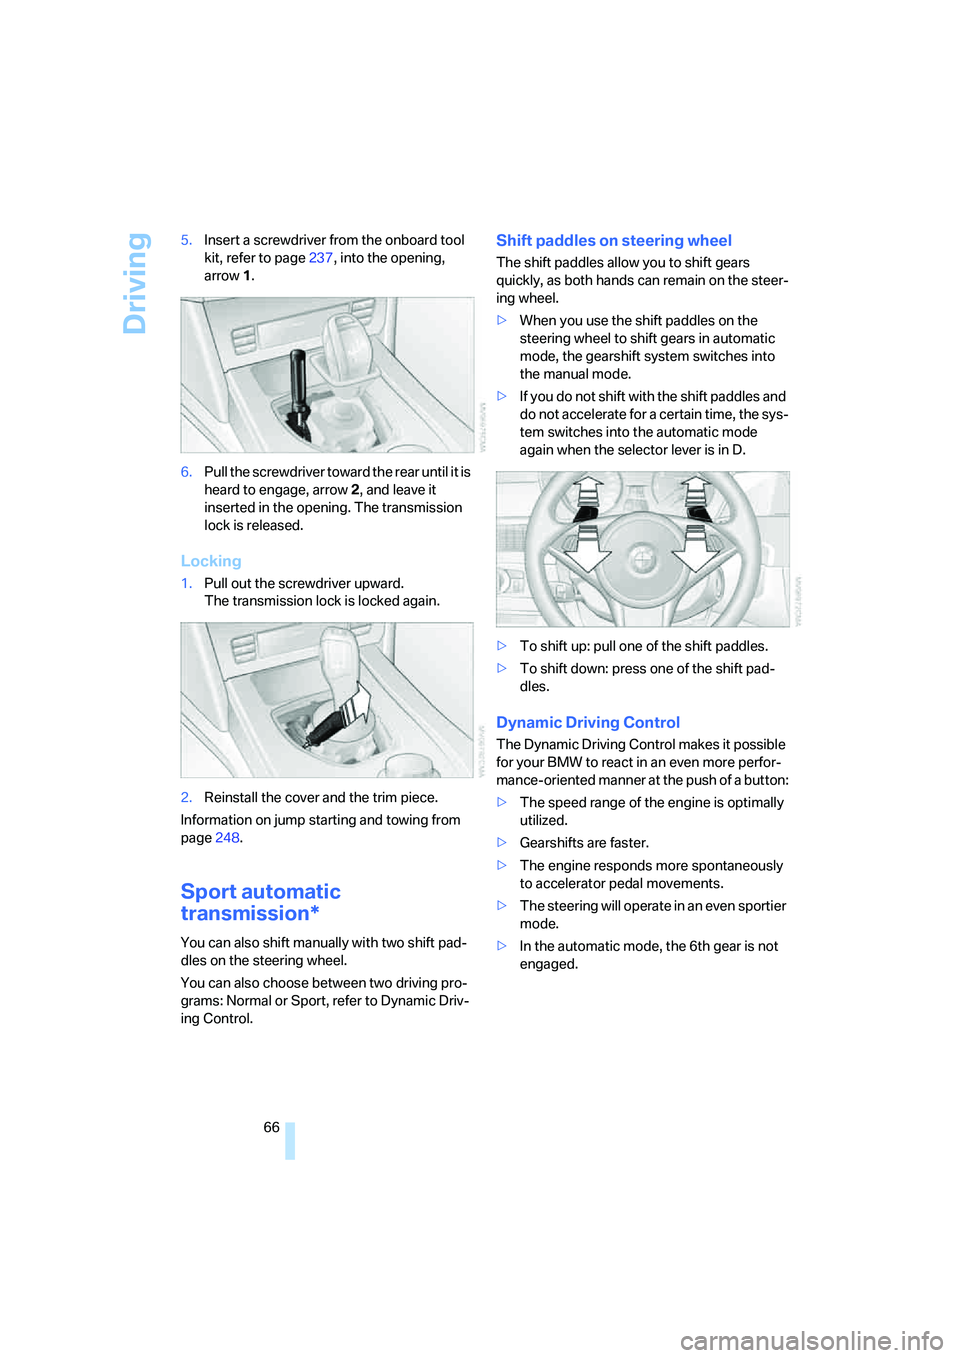
66 5.Insert a screwdriver from the onboard tool
kit, refer to page237, into the opening,
arrow1.
6.Pull the screwdriver toward the rear until it is
heard to engage, arrow2, and leave it
inserted in the opening. The transmission
lock is released.
Locking
1.Pull out the screwdriver upward.
The transmission lock is locked again.
2.Reinstall the cover and the trim piece.
Information on jump starting and towing from
page248.
Sport automatic
transmission*
You can also shift manually with two shift pad-
dles on the steering wheel.
You can also choose between two driving pro-
grams: Normal or Sport, refer to Dynamic Driv-
ing Control.
Shift paddles on steering wheel
The shift paddles allow you to shift gears
quickly, as both hands can remain on the steer-
ing wheel.
>When you use the shift paddles on the
steering wheel to shift gears in automatic
mode, the gearshift system switches into
the manual mode.
>If you do not shift with the shift paddles and
do not accelerate for a certain time, the sys-
tem switches into the automatic mode
again when the selector lever is in D.
>To shift up: pull one of the shift paddles.
>To shift down: press one of the shift pad-
dles.
Dynamic Driving Control
The Dynamic Driving Control makes it possible
for your BMW to react in an even more perfor-
mance-oriented manner at the push of a button:
>The speed range of the engine is optimally
utilized.
>Gearshifts are faster.
>The engine responds more spontaneously
to accelerator pedal movements.
>The steering will operate in an even sportier
mode.
>In the automatic mode, the 6th gear is not
engaged.
Page 93 of 288
Controls
91Reference
At a glance
Driving tips
Communications
Navigation
Entertainment
Mobility
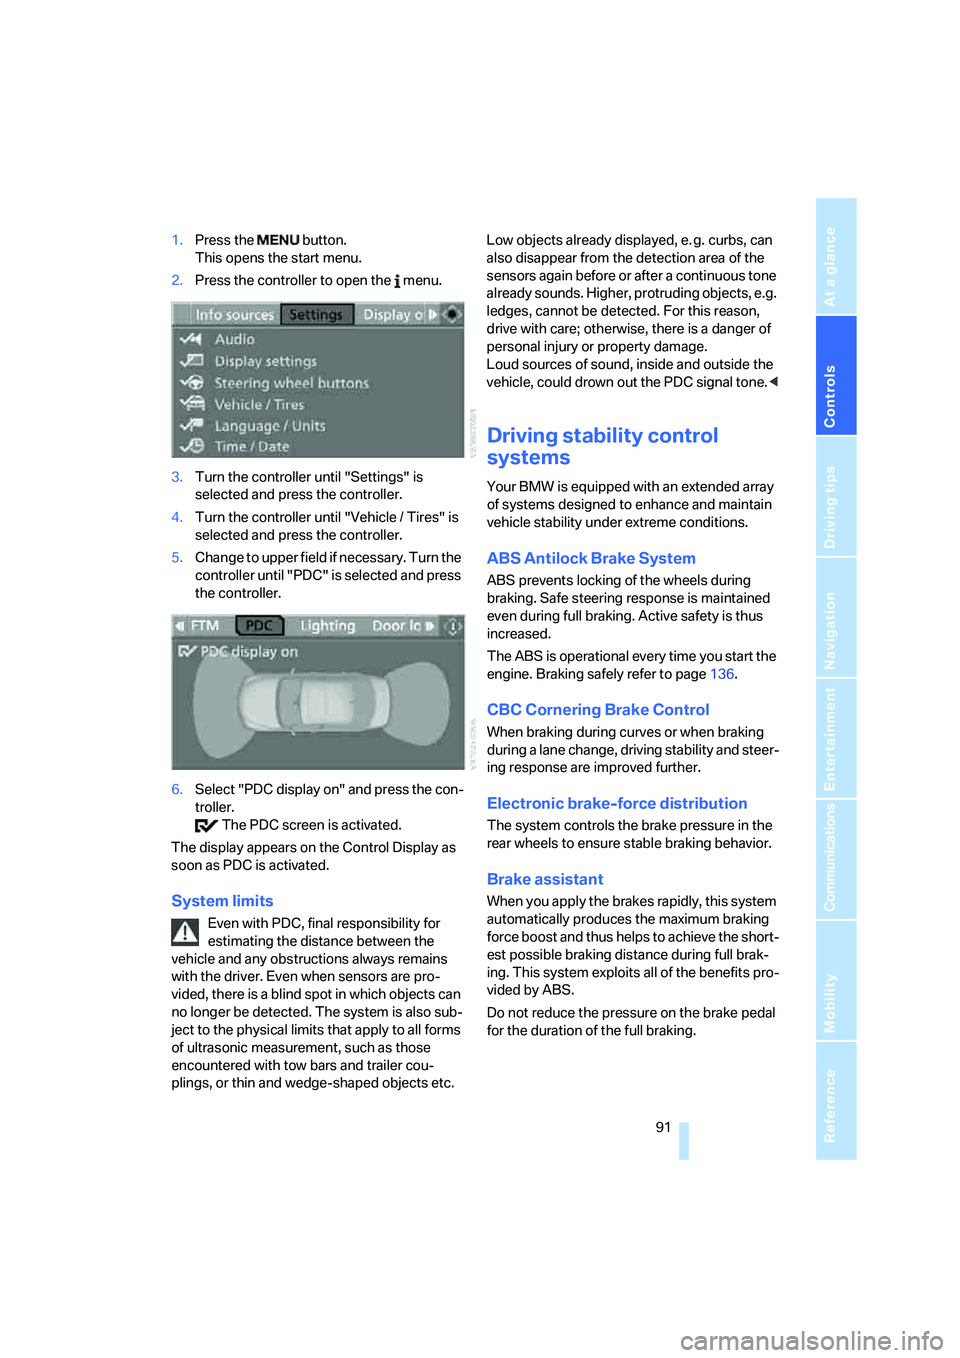
1.Press the button.
This opens the start menu.
2.Press the controller to open the menu.
3.Turn the controller until "Settings" is
selected and press the controller.
4.Turn the controller until "Vehicle / Tires" is
selected and press the controller.
5.Change to upper field if necessary. Turn the
controller until "PDC" is selected and press
the controller.
6.Select "PDC display on" and press the con-
troller.
The PDC screen is activated.
The display appears on the Control Display as
soon as PDC is activated.
System limits
Even with PDC, final responsibility for
estimating the distance between the
vehicle and any obstructions always remains
with the driver. Even when sensors are pro-
vided, there is a blind spot in which objects can
no longer be detected. The system is also sub-
ject to the physical limits that apply to all forms
of ultrasonic measurement, such as those
encountered with tow bars and trailer cou-
plings, or thin and wedge-shaped objects etc. Low objects already displayed, e. g. curbs, can
also disappear from the detection area of the
sensors again before or after a continuous tone
already sounds. Higher, protruding objects, e.g.
ledges, cannot be detected. For this reason,
drive with care; otherwise, there is a danger of
personal injury or property damage.
Loud sources of sound, inside and outside the
vehicle, could drown out the PDC signal tone.<
Driving stability control
systems
Your BMW is equipped with an extended array
of systems designed to enhance and maintain
vehicle stability under extreme conditions.
ABS Antilock Brake System
ABS prevents locking of the wheels during
braking. Safe steering response is maintained
even during full braking. Active safety is thus
increased.
The ABS is operational every time you start the
engine. Braking safely refer to page136.
CBC Cornering Brake Control
When braking during curves or when braking
during a lane change, driving stability and steer-
ing response are improved further.
Electronic brake-force distribution
The system controls the brake pressure in the
rear wheels to ensure stable braking behavior.
Brake assistant
When you apply the brakes rapidly, this system
automatically produces the maximum braking
force boost and thus helps to achieve the short-
est possible braking distance during full brak-
ing. This system exploits all of the benefits pro-
vided by ABS.
Do not reduce the pressure on the brake pedal
for the duration of the full braking.
Page 101 of 288
Controls
99Reference
At a glance
Driving tips
Communications
Navigation
Entertainment
Mobility
Drive reservedly and do not exceed a
speed of 50 mph/80 km/h. In the event of
pressure loss, vehicle handling changes. This
includes reduced tracking stability in braking,
extended braking distance and altered natural
steering characteristics.
If unusual vibrations or loud noises occur while
the vehicle is being driven, this can indicate final
failure of the damaged tire. Reduce speed and
stop at a suitable location as soon as possible,
otherwise pieces of the tire could become
detached and cause an accident. Do not con-
tinue driving, but instead contact your BMW
center.<
Malfunction
The yellow warning lamp flashes and
then lights up continuously. The tires
are shown in gray on the Control Dis-
play and a message is displayed. No flat tire can
be detected.
A message like this is displayed in the following
situations:
>In case of a malfunction;
have the system checked.
>If a wheel is mounted without TPM elec-
tronics
>If TPM is temporarily interfered with by
other systems or devices which use the
same radio frequency.
Declaration according to NHTSA/
FMVSS 138 Tire Pressure Monitoring
Systems
Each tire, including the spare, should be
checked monthly when cold and inflated to the
inflation pressure recommended by the vehicle
manufacturer on the vehicle placard or tire infla-
tion pressure label. If your vehicle has tires of a
different size than the size indicated on the
vehicle placard or tire inflation pressure label,
you should determine the proper tire inflation
pressure for those tires. As an added safety fea-
ture, your vehicle has been equipped with a tire
pressure monitoring system, TPMS, that illumi-
nates a low tire pressure telltale when one or
more of your tires are significantly under-inflated. Accordingly, when the low tire pres-
sure telltale illuminates, you should stop and
check your tires as soon as possible, and inflate
them to the proper pressure. Driving on a signif-
icantly under-inflated tire causes the tire to
overheat and can lead to tire failure. Underinfla-
tion also reduces fuel efficiency and tire tread
life, and may affect the vehicle's handling and
stopping ability. Please note that the TPMS is
not a substitute for proper tire maintenance,
and it is the driver's responsibility to maintain
correct tire pressure, even if underinflation has
not reached the level to trigger illumination of
the TPMS low tire pressure telltale.
The TPMS malfunction indicator is combined
with the low tire pressure telltale. When the sys-
tem detects a malfunction, the telltale will flash
for approximately one minute and then remain
continuously illuminated. This sequence will
continue upon subsequent vehicle startups as
long as the malfunction exists. When the mal-
function indicator lights up, the system may not
be able to detect or signal low tire pressure as
intended. TPMS malfunctions may occur for a
variety of reasons, including the installation of
replacement or alternate tires or wheels on the
vehicle that prevent the TPMS from functioning
properly. Always check the TPMS malfunction
telltale after replacing one or more tires or
wheels on your vehicle to ensure that the
replacement or alternate tires and wheels allow
the TPMS to continue to function properly.
Active steering*
The concept
The active steering is a system that actively var-
ies the steering angle of the front wheels in rela-
tion to the steering wheel movements.
When you are driving in the low road speed
range, e. g. in a town or when parking, the steer-
ing angle increases, i.e. the steering becomes
very direct. In the higher speed range, on the
other hand, the steering angle is reduced more
and more. This improves the handling capability
of your BMW over the entire speed range.
Page 112 of 288
Lamps
110
Adaptive Head Light*
The concept
Adaptive Head Light is a variable headlamp
control system that enables better illumination
of the road surface. Depending on the steering
angle and other parameters, the light from the
headlamp follows the course of the road.
In tight curves at speeds up to approx. 45 mph/
70 km/h, e.g. on mountainous roads or when
negotiating curves, turning lamps are switched
on that light up the inside area of the curve.
Activating Adaptive Head Light
With the ignition switched on, turn the light
switch into position 3, refer to page108.
The turning lamps are automatically switched
on depending on the steering angle or the use
of turn signals.
To avoid blinding oncoming traffic, the Adaptive
Head Light directs light towards the front pas-
senger side when the vehicle is at a standstill.
When driving in reverse, only the turning lamps
are active and illuminate the outer area of
curves.
High beams/
roadside parking lamps
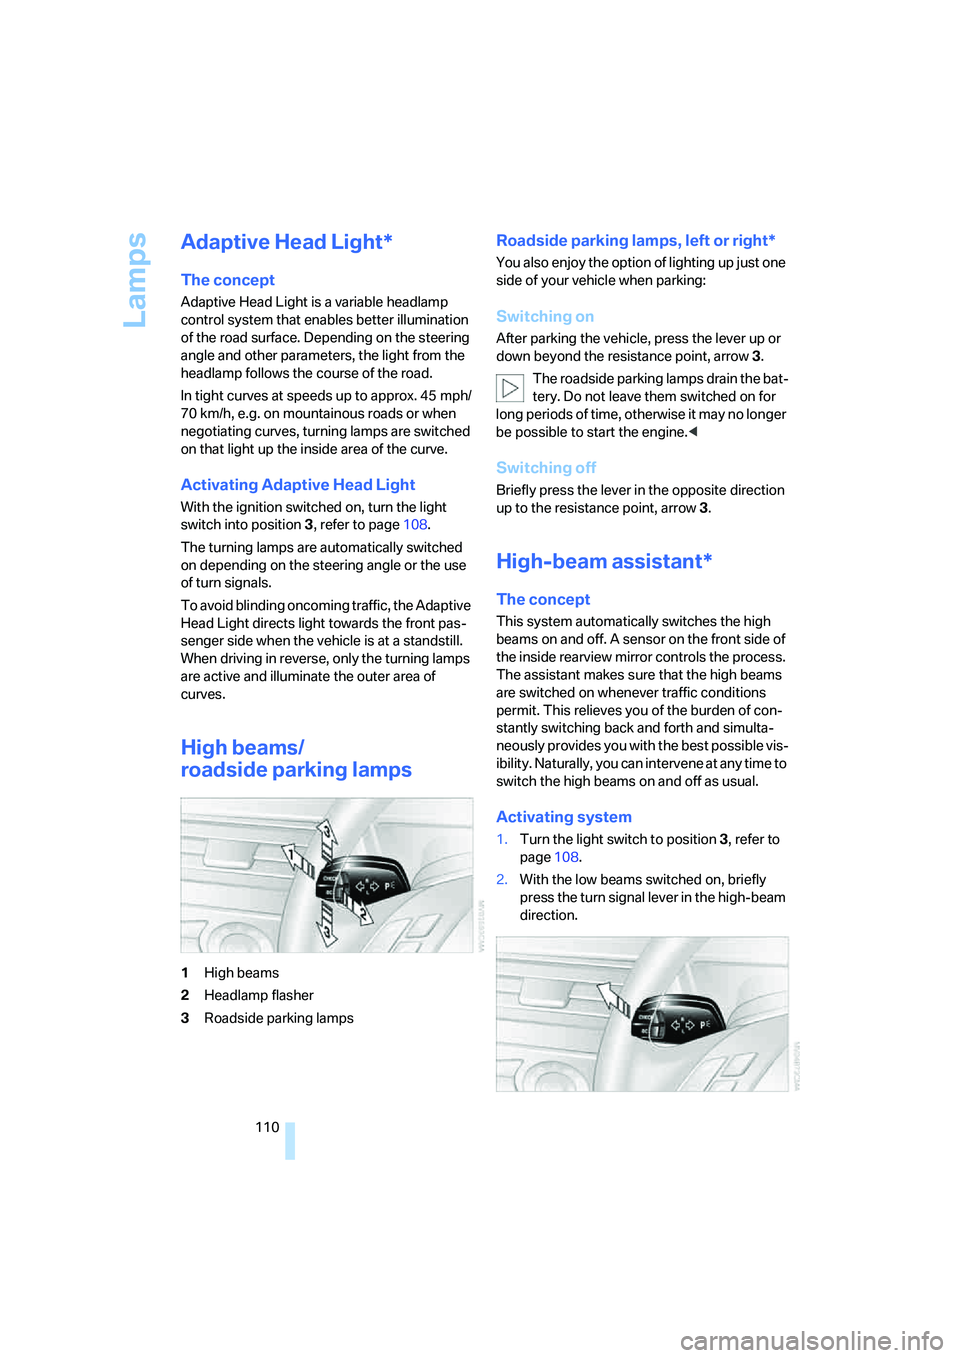
1High beams
2Headlamp flasher
3Roadside parking lamps
Roadside parking lamps, left or right*
You also enjoy the option of lighting up just one
side of your vehicle when parking:
Switching on
After parking the vehicle, press the lever up or
down beyond the resistance point, arrow 3.
The roadside parking lamps drain the bat-
tery. Do not leave them switched on for
long periods of time, otherwise it may no longer
be possible to start the engine.<
Switching off
Briefly press the lever in the opposite direction
up to the resistance point, arrow3.
High-beam assistant*
The concept
This system automatically switches the high
beams on and off. A sensor on the front side of
the inside rearview mirror controls the process.
The assistant makes sure that the high beams
are switched on whenever traffic conditions
permit. This relieves you of the burden of con-
stantly switching back and forth and simulta-
neously provides you with the best possible vis-
ibility. Naturally, you can intervene at any time to
switch the high beams on and off as usual.
Activating system
1.Turn the light switch to position3, refer to
page108.
2.With the low beams switched on, briefly
press the turn signal lever in the high-beam
direction.
Page 116 of 288
Climate
114
Climate
Automatic climate control
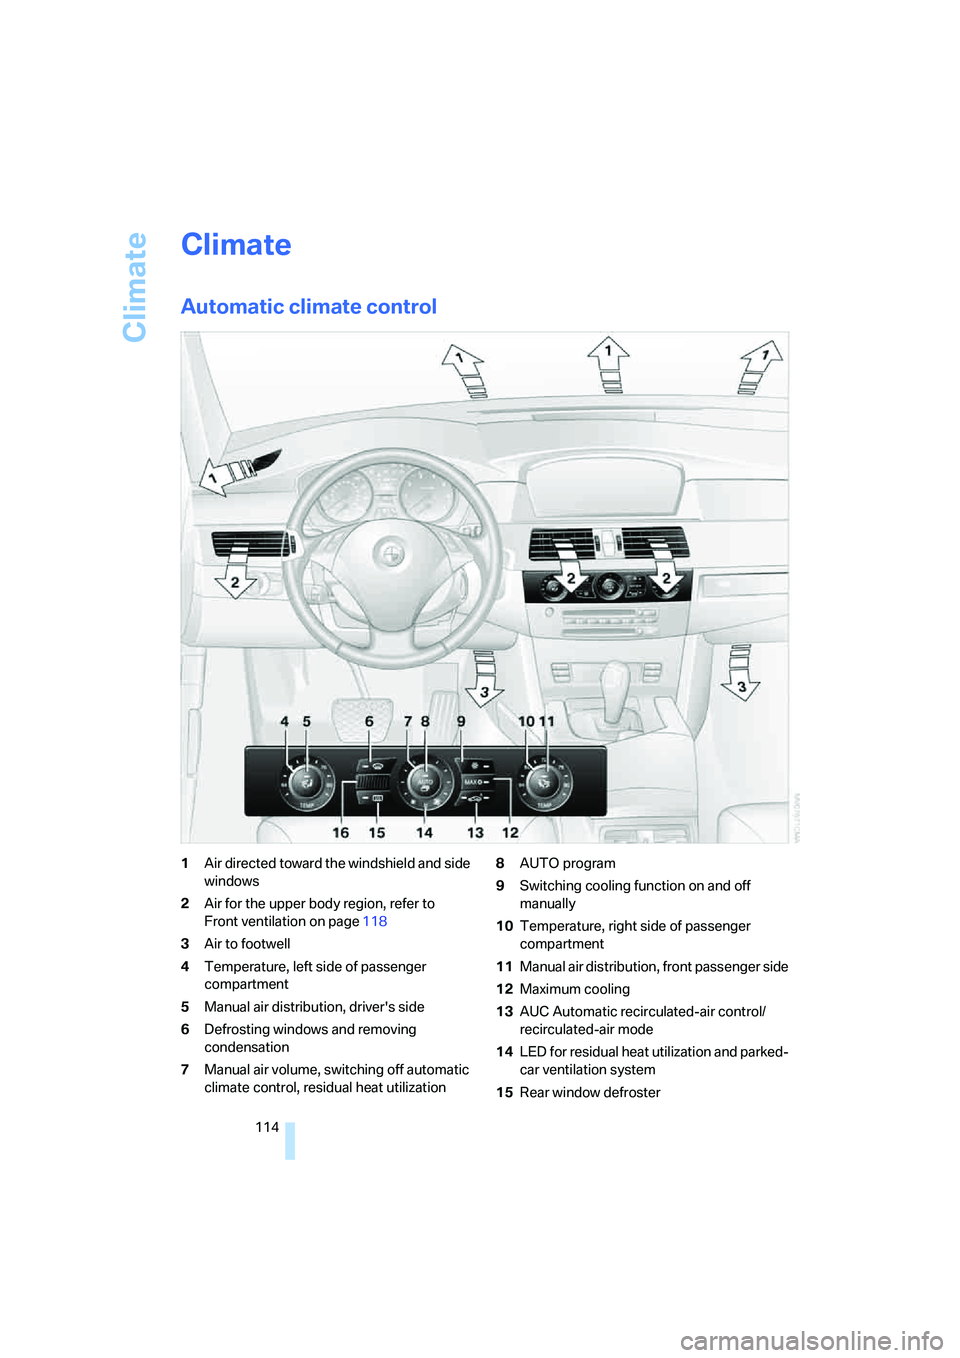
1Air directed toward the windshield and side
windows
2Air for the upper body region, refer to
Front ventilation on page118
3Air to footwell
4Temperature, left side of passenger
compartment
5Manual air distribution, driver's side
6Defrosting windows and removing
condensation
7Manual air volume, switching off automatic
climate control, residual heat utilization8AUTO program
9Switching cooling function on and off
manually
10Temperature, right side of passenger
compartment
11Manual air distribution, front passenger side
12Maximum cooling
13AUC Automatic recirculated-air control/
recirculated-air mode
14LED for residual heat utilization and parked-
car ventilation system
15Rear window defroster
Page 119 of 288
Controls
117Reference
At a glance
Driving tips
Communications
Navigation
Entertainment
Mobility
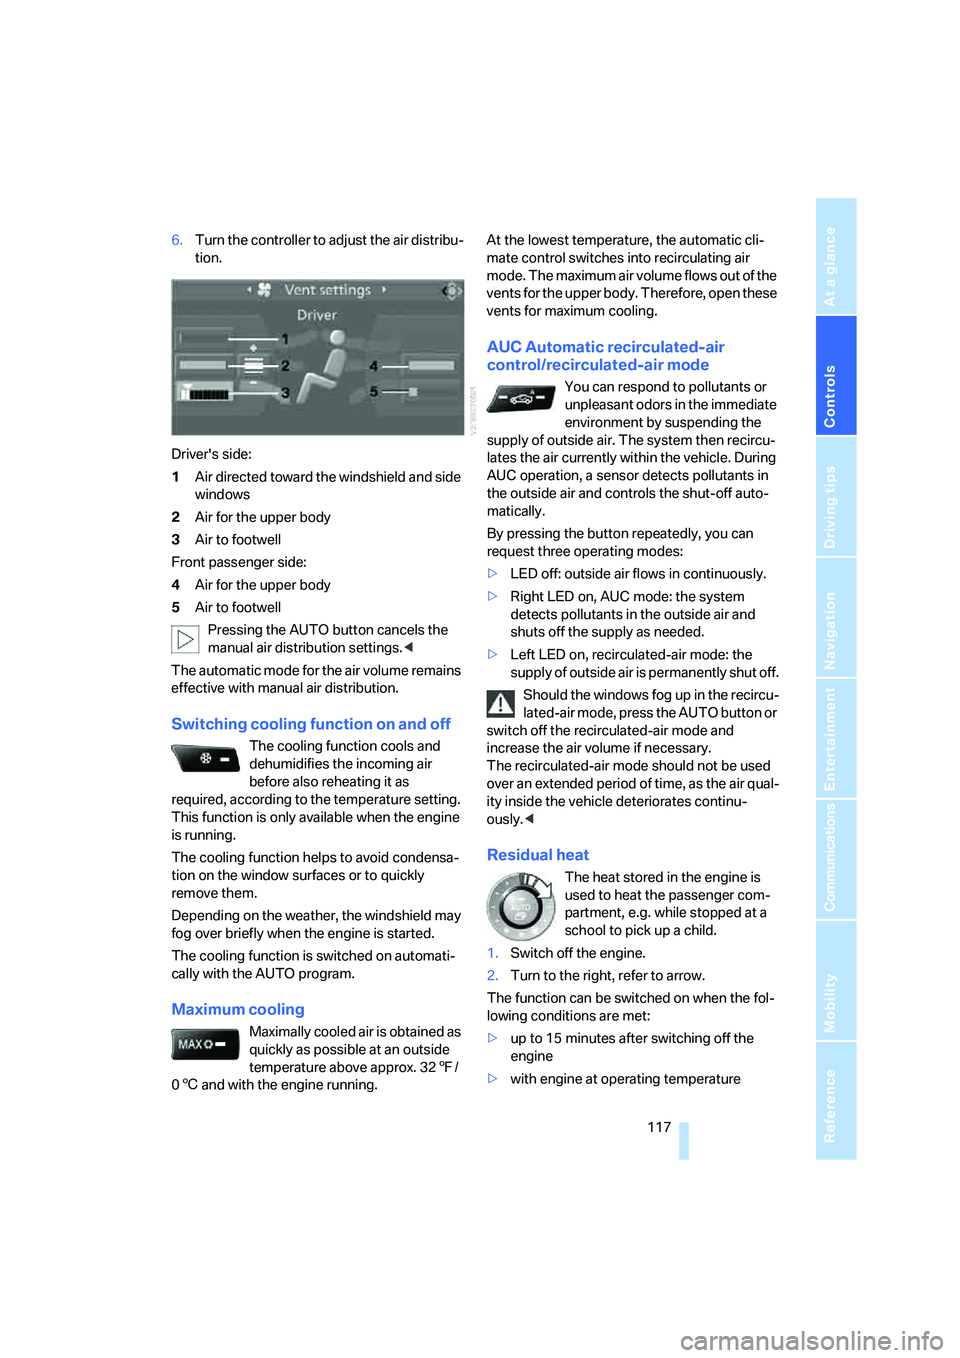
6.Turn the controller to adjust the air distribu-
tion.
Driver's side:
1Air directed toward the windshield and side
windows
2Air for the upper body
3Air to footwell
Front passenger side:
4Air for the upper body
5Air to footwell
Pressing the AUTO button cancels the
manual air distribution settings.<
The automatic mode for the air volume remains
effective with manual air distribution.
Switching cooling function on and off
The cooling function cools and
dehumidifies the incoming air
before also reheating it as
required, according to the temperature setting.
This function is only available when the engine
is running.
The cooling function helps to avoid condensa-
tion on the window surfaces or to quickly
remove them.
Depending on the weather, the windshield may
fog over briefly when the engine is started.
The cooling function is switched on automati-
cally with the AUTO program.
Maximum cooling
Maximally cooled air is obtained as
quickly as possible at an outside
temperature above approx. 327/
06 and with the engine running.At the lowest temperature, the automatic cli-
mate control switches into recirculating air
mode. The maximum air volume flows out of the
vents for the upper body. Therefore, open these
vents for maximum cooling.
AUC Automatic recirculated-air
control/recirculated-air mode
You can respond to pollutants or
unpleasant odors in the immediate
environment by suspending the
supply of outside air. The system then recircu-
lates the air currently within the vehicle. During
AUC operation, a sensor detects pollutants in
the outside air and controls the shut-off auto-
matically.
By pressing the button repeatedly, you can
request three operating modes:
>LED off: outside air flows in continuously.
>Right LED on, AUC mode: the system
detects pollutants in the outside air and
shuts off the supply as needed.
>Left LED on, recirculated-air mode: the
supply of outside air is permanently shut off.
Should the windows fog up in the recircu-
lated-air mode, press the AUTO button or
switch off the recirculated-air mode and
increase the air volume if necessary.
The recirculated-air mode should not be used
over an extended period of time, as the air qual-
ity inside the vehicle deteriorates continu-
ously.<
Residual heat
The heat stored in the engine is
used to heat the passenger com-
partment, e.g. while stopped at a
school to pick up a child.
1.Switch off the engine.
2.Turn to the right, refer to arrow.
The function can be switched on when the fol-
lowing conditions are met:
>up to 15 minutes after switching off the
engine
>with engine at operating temperature
Page 120 of 288
Climate
118 >with sufficient battery voltage
>at an outside temperature below 777/
256
From radio readiness the interior temperature,
the air volume and the air distribution can be
set.
Switching automatic climate control
on and off
1.Turn to the left to minimum air volume.
2.After approx. 1 second, turn to the left
again.
You switch on the system again by pressing any
button of the automatic climate control.
Front ventilation
1Knurled wheels to smoothly open and close
vent outlets
2Levers to change the vent outlet direction
Do not drop any foreign objects into the
vent outlets, otherwise these could be
catapulted outwards and lead to injuries.<
Ventilation for cooling
Adjust the vent outlets to direct the flow of cool
air in your direction, for instance, if the interior
has become too warm, etc.
Draft-free ventilation
Set the vent outlets so that the air flows past
you and is not directed straight at you.
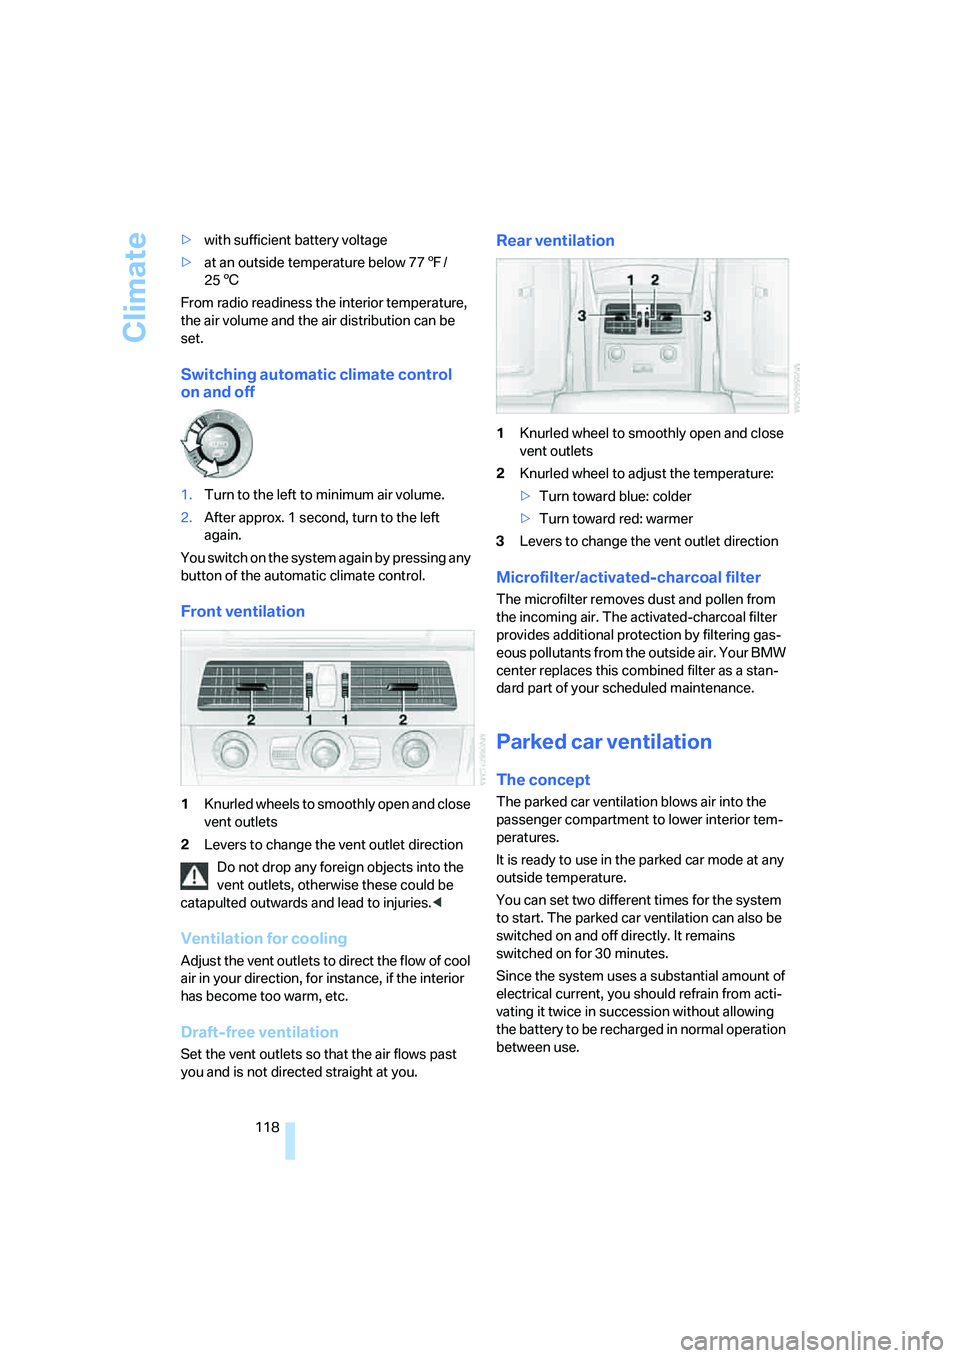
Rear ventilation
1Knurled wheel to smoothly open and close
vent outlets
2Knurled wheel to adjust the temperature:
>Turn toward blue: colder
>Turn toward red: warmer
3Levers to change the vent outlet direction
Microfilter/activated-charcoal filter
The microfilter removes dust and pollen from
the incoming air. The activated-charcoal filter
provides additional protection by filtering gas-
eous pollutants from the outside air. Your BMW
center replaces this combined filter as a stan-
dard part of your scheduled maintenance.
Parked car ventilation
The concept
The parked car ventilation blows air into the
passenger compartment to lower interior tem-
peratures.
It is ready to use in the parked car mode at any
outside temperature.
You can set two different times for the system
to start. The parked car ventilation can also be
switched on and off directly. It remains
switched on for 30 minutes.
Since the system uses a substantial amount of
electrical current, you should refrain from acti-
vating it twice in succession without allowing
the battery to be recharged in normal operation
between use.