2008 BMW 535XI light
[x] Cancel search: lightPage 144 of 288
Starting navigation system
142
Starting navigation system
Your navigation system can use satellites to
ascertain the precise position of your vehicle
and guide you reliably to any destination you
enter.
Navigation DVD
The navigation system requires a special navi-
gation DVD. The latest version is available at
your BMW center.
Inserting navigation DVD
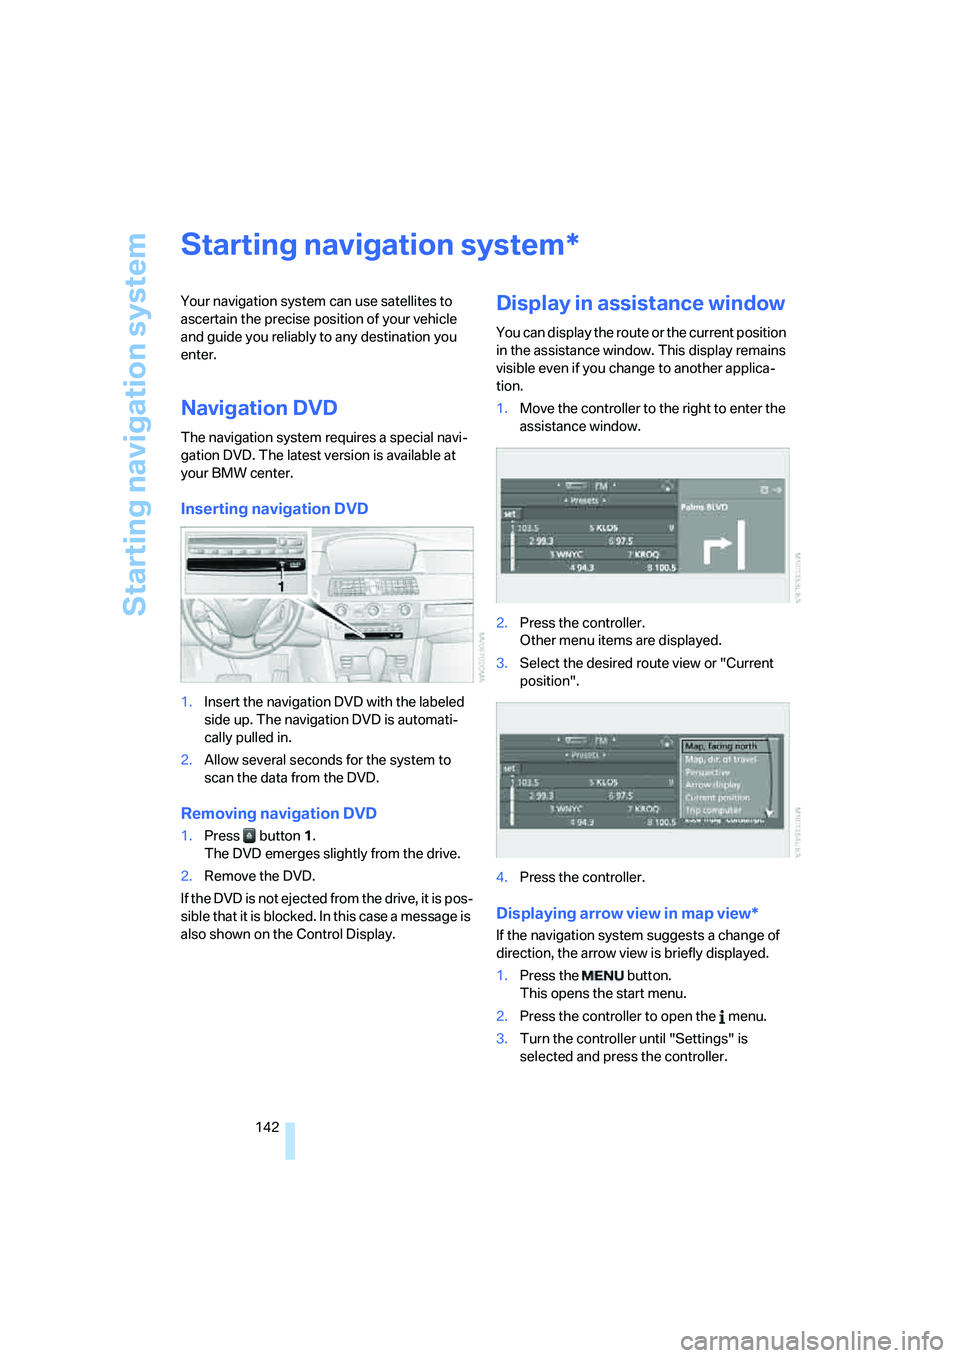
1.Insert the navigation DVD with the labeled
side up. The navigation DVD is automati-
cally pulled in.
2.Allow several seconds for the system to
scan the data from the DVD.
Removing navigation DVD
1.Press button 1.
The DVD emerges slightly from the drive.
2.Remove the DVD.
If the DVD is not ejected from the drive, it is pos-
sible that it is blocked. In this case a message is
also shown on the Control Display.
Display in assistance window
You can display the route or the current position
in the assistance window. This display remains
visible even if you change to another applica-
tion.
1.Move the controller to the right to enter the
assistance window.
2.Press the controller.
Other menu items are displayed.
3.Select the desired route view or "Current
position".
4.Press the controller.
Displaying arrow view in map view*
If the navigation system suggests a change of
direction, the arrow view is briefly displayed.
1.Press the button.
This opens the start menu.
2.Press the controller to open the menu.
3.Turn the controller until "Settings" is
selected and press the controller.
*
Page 149 of 288
Navigation
Driving tips
147Reference
At a glance
Controls
Communications
Entertainment
Mobility
Starting destination guidance with
manual destination entry
>Select "Start guidance" and press the con-
troller.
Destination guidance starts immediately.
>If the destination guidance does not need to
be started immediately:
Select "Add to destination list" and press
the controller.
The destination is stored in the destination
list, refer to page150.
Entering destination via
voice*
You can enter a desired destination via the
voice command system. When entering the
destination, it is possible to change between
voice command and iDrive at any time. Reacti-
vate the voice command function for this pur-
pose if necessary.
With {Options} you can have the possible
commands read aloud.<
1.Press the button on the steering wheel.
Selecting country
1.Wait for the system to ask for the country of
destination.
Say the name of the country of destination in
the language of the voice command system.
Entering destination
The destination can be spelled or entered as an
entire word.
Spelling destination
To enter the destination, spell it using the
orthography of the country of destination.
Pronounce the letters smoothly and at normal
volume, avoiding excessive emphasis and
pauses.
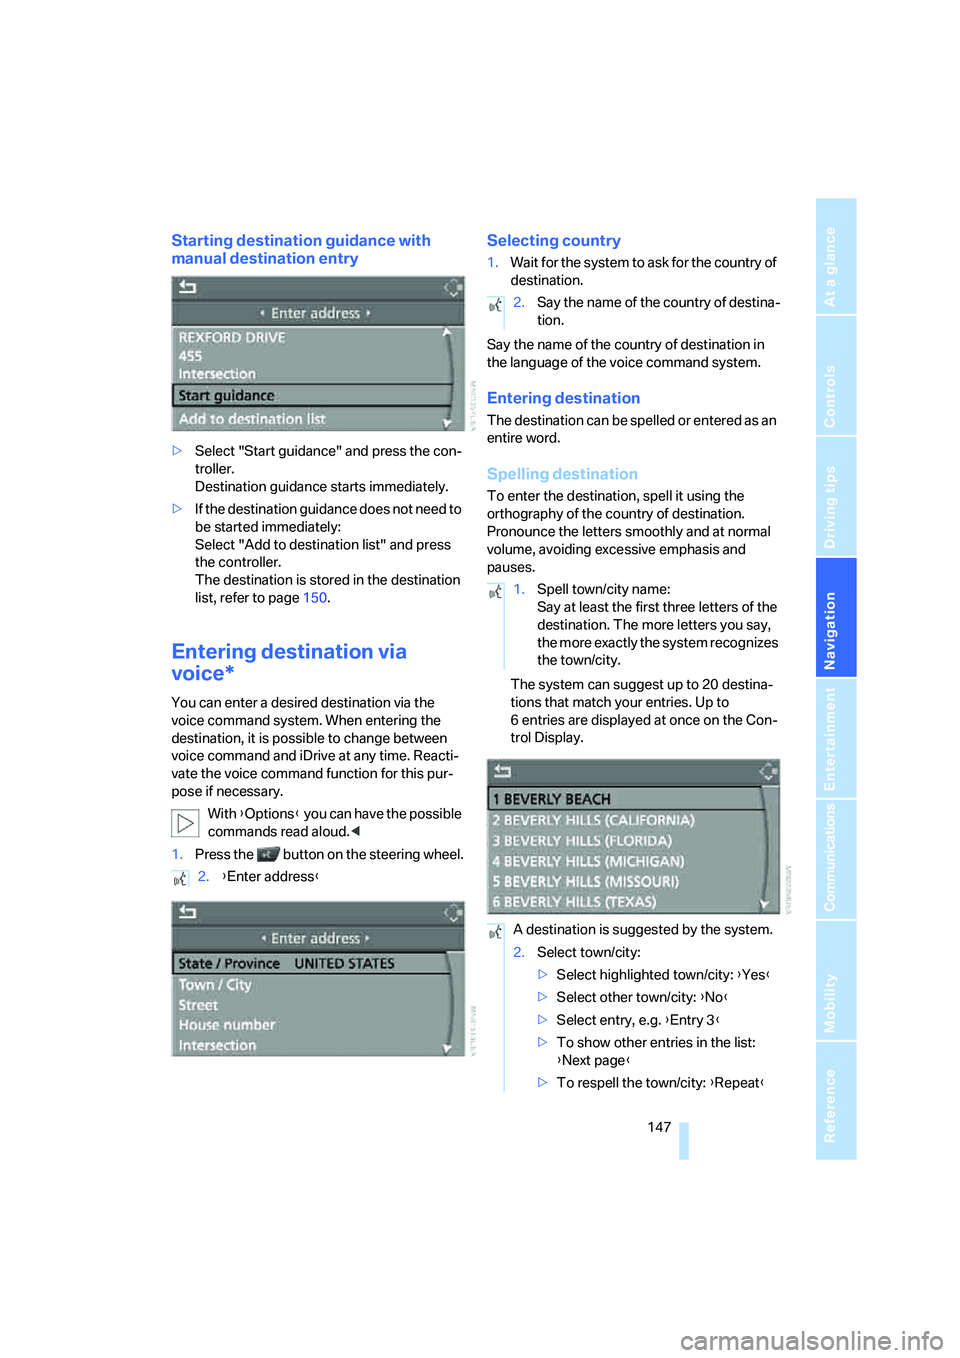
The system can suggest up to 20 destina-
tions that match your entries. Up to
6 entries are displayed at once on the Con-
trol Display.
2.{Enter address}
2.Say the name of the country of destina-
tion.
1.Spell town/city name:
Say at least the first three letters of the
destination. The more letters you say,
the more exactly the system recognizes
the town/city.
A destination is suggested by the system.
2.Select town/city:
>Select highlighted town/city: {Yes}
>Select other town/city: {No}
>Select entry, e.g. {Entry 3}
>To show other entries in the list:
{Next page}
>To respell the town/city: {Repeat}
Page 150 of 288
Destination entry
148 The town/city can also be selected from the list
via iDrive:
Turn the controller until the destination is
selected and press the controller.
Entering the destination as an entire
word*
Towns/cities and streets located in the region
where the language of the voice command sys-
tem is spoken can be entered as an entire word.
Example: to enter a US destination as an entire
word, the system language must be English.
Speak smoothly and at normal volume, avoiding
excessive emphasis and pauses.
1.Wait for the system to request the destina-
tion.
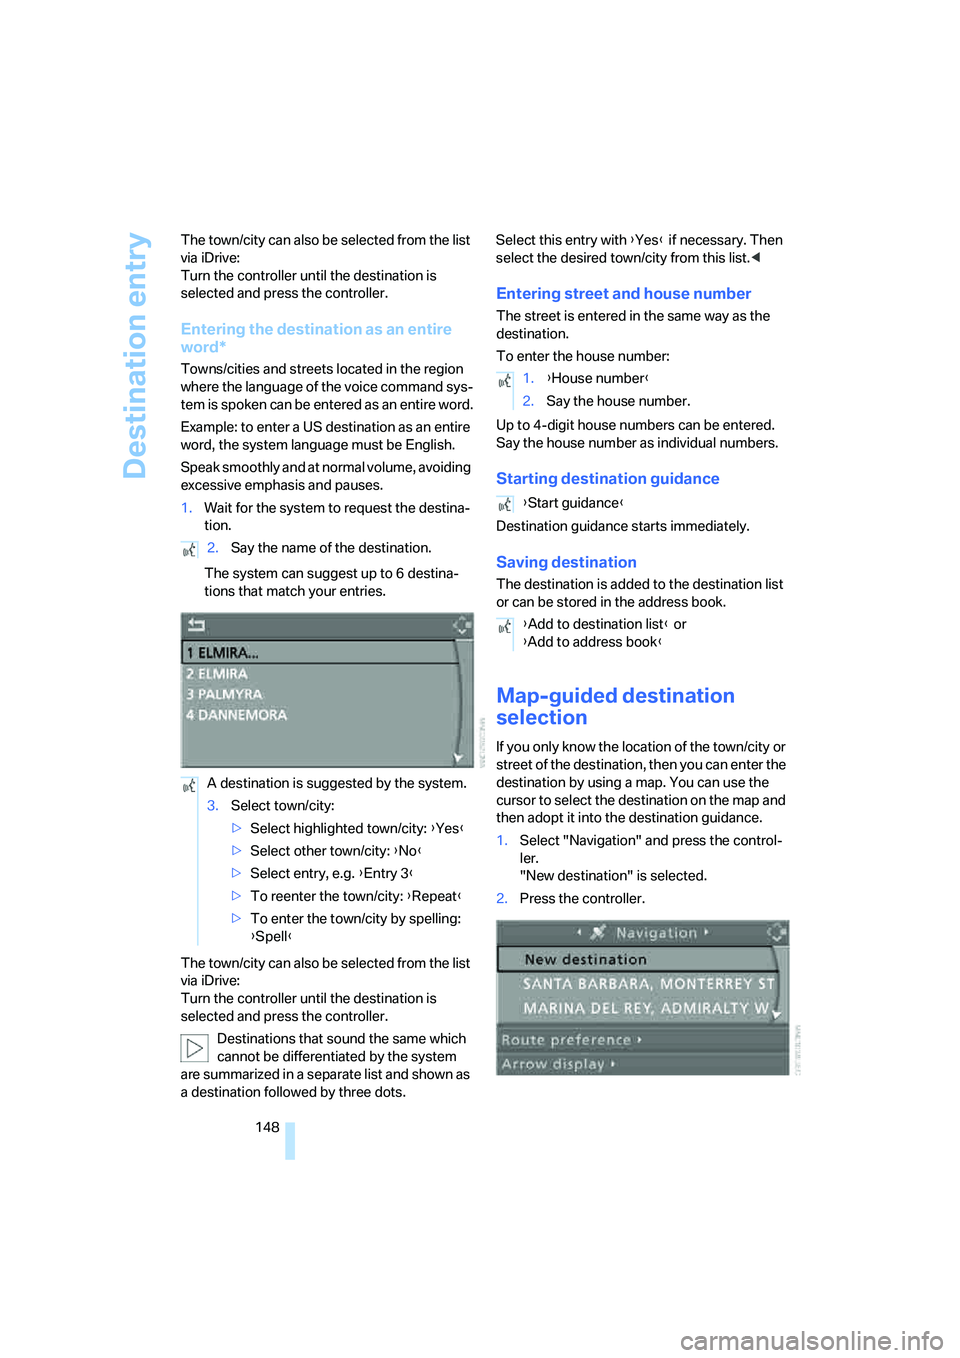
The system can suggest up to 6 destina-
tions that match your entries.
The town/city can also be selected from the list
via iDrive:
Turn the controller until the destination is
selected and press the controller.
Destinations that sound the same which
cannot be differentiated by the system
are summarized in a separate list and shown as
a destination followed by three dots. Select this entry with {Yes} if necessary. Then
select the desired town/city from this list.<
Entering street and house number
The street is entered in the same way as the
destination.
To enter the house number:
Up to 4-digit house numbers can be entered.
Say the house number as individual numbers.
Starting destination guidance
Destination guidance starts immediately.
Saving destination
The destination is added to the destination list
or can be stored in the address book.
Map-guided destination
selection
If you only know the location of the town/city or
street of the destination, then you can enter the
destination by using a map. You can use the
cursor to select the destination on the map and
then adopt it into the destination guidance.
1.Select "Navigation" and press the control-
ler.
"New destination" is selected.
2.Press the controller. 2.Say the name of the destination.
A destination is suggested by the system.
3.Select town/city:
>Select highlighted town/city: {Yes}
>Select other town/city: {No}
>Select entry, e.g. {Entry 3}
>To reenter the town/city: {Repeat}
>To enter the town/city by spelling:
{Spell}
1.{House number}
2.Say the house number.
{Start guidance}
{Add to destination list} or
{Add to address book}
Page 164 of 288
Destination guidance
162
With destination guidance switched off
1.Open the start menu.
2.Move the controller to the right to open
"Navigation".
3.Select "Traffic Info" and press the control-
ler.
First the traffic information along the planned
route is shown sorted according to the distance
to the current vehicle position.
Depiction of traffic information in map
view
The traffic information symbols are shown in
the map view up to a scale of 100 miles/200 km.
The section of the route affected by a traffic
report as well as the number for the type of inci-
dent are displayed and hidden. This occurs as a
function of the scale selected.
Displaying detailed traffic information
Select a traffic information item from the list and
press the controller.
To exit from the menu:
Select the arrow and press the controller.
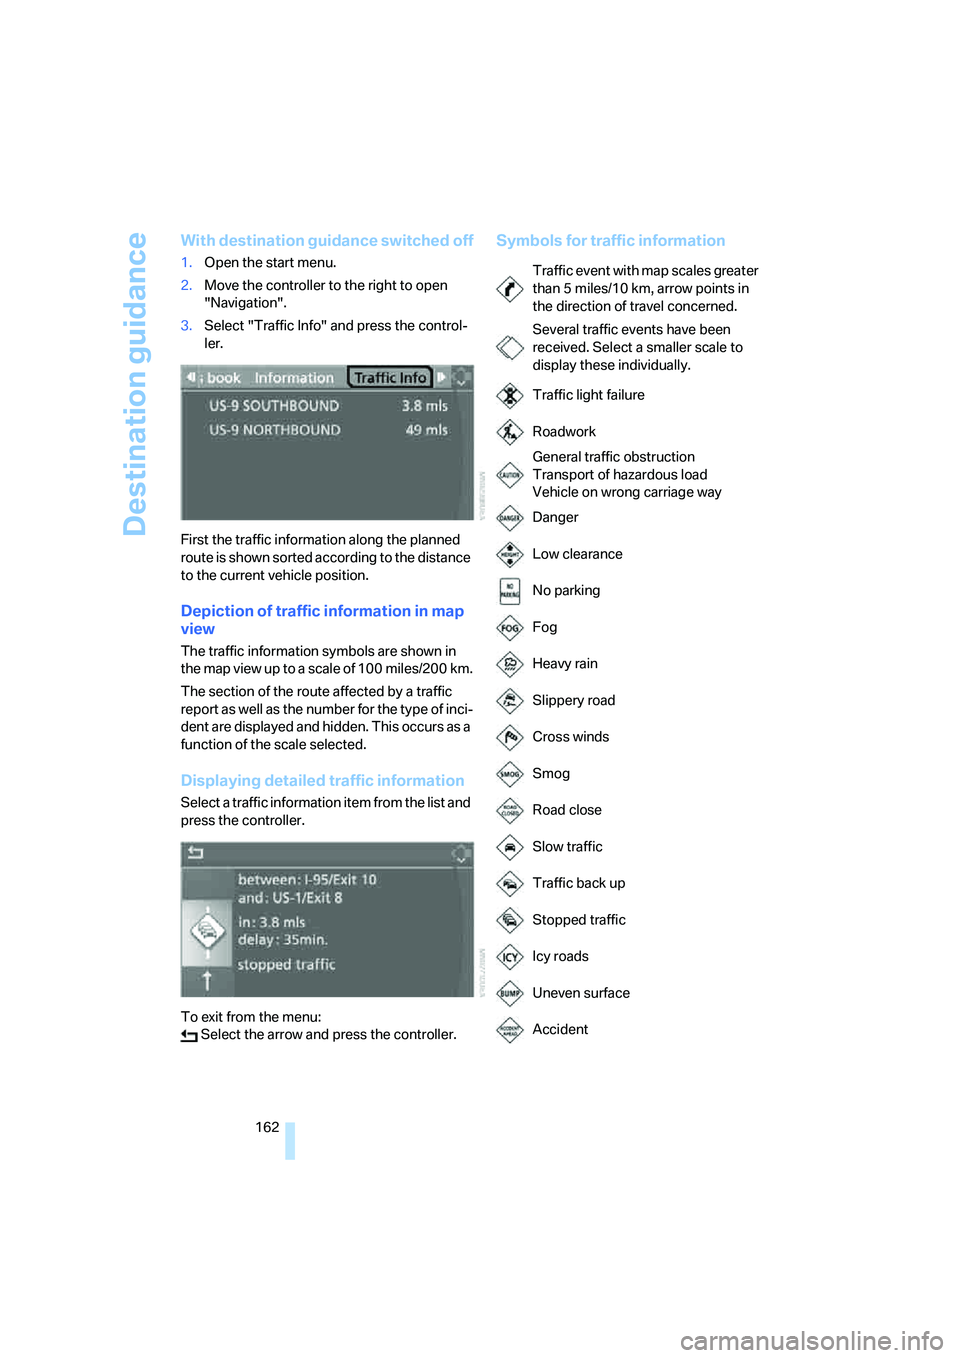
Symbols for traffic information
Traffic event with map scales greater
than 5miles/10km, arrow points in
the direction of travel concerned.
Several traffic events have been
received. Select a smaller scale to
display these individually.
Traffic light failure
Roadwork
General traffic obstruction
Transport of hazardous load
Vehicle on wrong carriage way
Danger
Low clearance
No parking
Fog
Heavy rain
Slippery road
Cross winds
Smog
Road close
Slow traffic
Traffic back up
Stopped traffic
Icy roads
Uneven surface
Accident
Page 184 of 288
CD player and CD changer
182
CD player and CD changer
Listening to CDs
Compressed audio files*
CDs with compressed audio files, i.e. MP3, can
be played by the CD player, but not by the CD
changer.
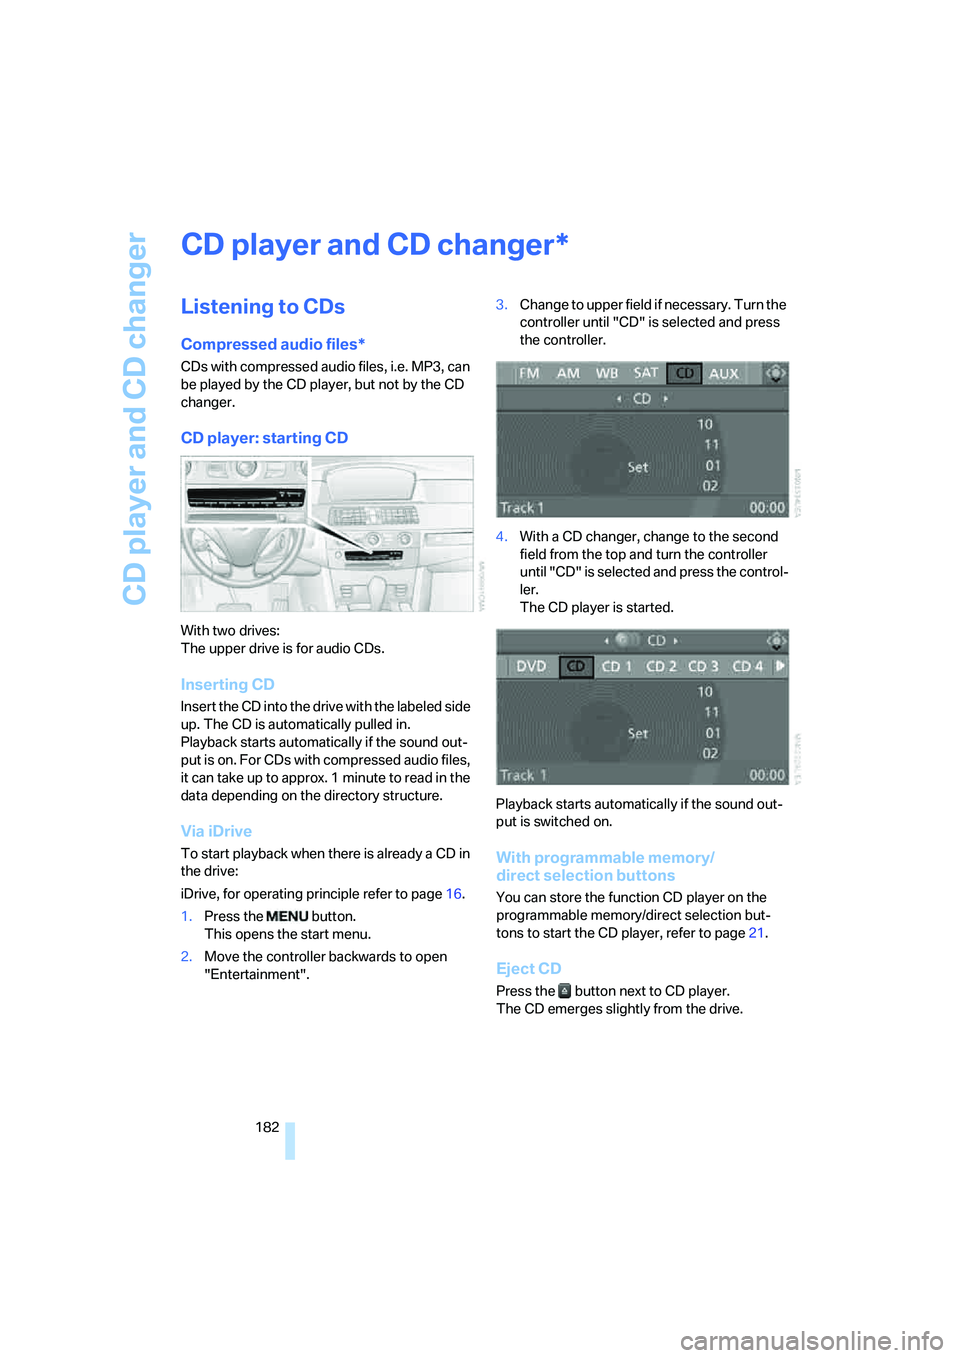
CD player: starting CD
With two drives:
The upper drive is for audio CDs.
Inserting CD
Insert the CD into the drive with the labeled side
up. The CD is automatically pulled in.
Playback starts automatically if the sound out-
put is on. For CDs with compressed audio files,
it can take up to approx. 1 minute to read in the
data depending on the directory structure.
Via iDrive
To start playback when there is already a CD in
the drive:
iDrive, for operating principle refer to page16.
1.Press the button.
This opens the start menu.
2.Move the controller backwards to open
"Entertainment".3.Change to upper field if necessary. Turn the
controller until "CD" is selected and press
the controller.
4.With a CD changer, change to the second
field from the top and turn the controller
until "CD" is selected and press the control-
ler.
The CD player is started.
Playback starts automatically if the sound out-
put is switched on.With programmable memory/
direct selection buttons
You can store the function CD player on the
programmable memory/direct selection but-
tons to start the CD player, refer to page21.
Eject CD
Press the button next to CD player.
The CD emerges slightly from the drive.
*
Page 189 of 288
Navigation
Entertainment
Driving tips
187Reference
At a glance
Controls
Communications
Mobility
Notes
BMW CD/DVD players and changers are
officially designated Class 1 laser prod-
ucts. Do not operate if the cover is damaged,
otherwise severe eye damage can result.
Do not use self-recorded CDs/DVDs with labels
applied as these can become detached during
playback due to heat buildup and can cause
irreparable damage to the device.
Only use round CDs/DVDs with a standard
diameter of 4.7 in/12 cm and do not play CDs/
D V D s w it h a n a d a p t e r , e . g . C D s i n g le s , a s o t h er -
wise the CD/DVD or the adapter can jam and
may no longer eject properly.
Do not use a combined CD/DVD, e. g. DVD
Plus,
otherwise the CD/DVD can jam and will no
longer eject.<
General malfunctions
BMW CD/DVD changers and players have been
optimized for performance in vehicles. In some
instances they may be more sensitive to faulty
CDs/DVDs than stationary devices would be.
If a CD/DVD cannot be played, first check
whether it has been inserted correctly.
Humidity
High levels of humidity can lead to condensa-
tion on the CD/DVD or the laser's scan lens and
temporarily prevent playback.
Malfunctions with individual CDs/DVDs
If malfunctions occur only with particular CDs/
DVDs, this can be due to one of the following
causes.
Self-recorded CDs/DVDs
Possible reasons for malfunctions with self-
recorded CDs/DVDs are, e.g., inconsistent
data-creation or recording processes, or poor
quality or high age of the CD/DVD blank.
Only label CDs/DVDs on the upper side with a
pen intended for this purpose.
Damaged CDs/DVDs
Avoid fingerprints, dust, scratches and mois-
ture.
Store CDs/DVDs in a sleeve.
Do not subject CDs/DVDs to temperatures over
1227/506, high levels of humidity or direct
sunlight.
CDs/DVDs with copy protection
CDs/DVDs are often provided with a copy pro-
tection feature by the manufacturer. This can
m e a n t h a t s o m e C D s / D V D s c a n n o t b e p l a y e d o r
can only be played to a limited extent.
Care
If necessary, clean the reflective scanning side
of the CDs/DVDs with a commercially available
cleaning cloth by wiping in straight lines from
the center outward.
Page 231 of 288
Mobility
229Reference
At a glance
Controls
Driving tips
Communications
Navigation
Entertainment
Storage
Store wheels and tires in a cool, dry place with
as little exposure to light as possible. Always
protect tires against all contact with oil, grease
and fuels. Do not exceed the maximum tire
inflation pressure indicated on the side wall of
the tire.
Rotating wheels between axles
BMW does not recommend moving the front
wheels to the rear or vice versa, as otherwise
the handling characteristics may be impaired.
With tires of different makes and types
* such a
change is not permissible.
Snow chains*
BMW only tests certain fine-link snow chains,
classifies them as road-safe and recommends
them. Consult your BMW center for more infor-
mation.
Use is only permissible in pairs on the rear
wheels.
Observe the manufacturer's instructions when
mounting snow chains. Do not exceed a speed
of 30 mph/50 km/h with the chains mounted.
After mounting snow chains, do not ini-
tialize the Flat Tire Monitor, otherwise
incorrect displays can occur.
When driving with snow chains, it may be prac-
tical to briefly activate DTC, refer to page92.<
Page 238 of 288

Maintenance
236
Socket for OBD Onboard
Diagnostics interface
Components which are decisive for the
exhaust-gas composition can be checked via
the OBD socket with a device.
This socket is located to the left on the driver's
side, on the underside of the instrument panel
under a cover.
Exhaust-gas values
The warning lamp lights up. The
exhaust-gas values worsen. Have the
vehicle checked as soon as possible.
Display of the previously described
malfunction in Canadian models.
The lamp flashes under certain conditions. This
is a sign of excessive misfiring of the engine. In
this case you should reduce speed and drive to
the nearest BMW center as soon as possible.
Heavy engine misfiring causes serious damage
to the emission-relevant components, espe-
cially the catalytic converter, within a short time.
If the fuel filler cap is not properly tight-
ened, the OBD system will assume that
fuel vapor escapes. Then a display lights up. If
the cap is then tightened, the display will go out
within a few days.<
Event Data Recorders
Your vehicle may be equipped with one or sev-
eral measuring and diagnosis modules, or with
a device for recording or transmitting certain
vehicle data or information. If you have also sub-
scribed to BMW Assist, certain vehicle data can
be transmitted or recorded to enable corre-
sponding services.
Care
Important information on the care and mainte-
nance of your BMW is contained in the Caring
for your vehicle brochure.