2008 BMW 528XI SEDAN rear entertainment
[x] Cancel search: rear entertainmentPage 225 of 288

Mobility
223Reference
At a glance
Controls
Driving tips
Communications
Navigation
Entertainment
528xi
Tire sizePressure specifications in psi/kPa
Compact wheel
*:
T 135/80 R 17 102 M61/420
Traveling speeds
up to max. of
100 mph/160 km/hTraveling speeds
including those exceeding
100 mph/160 km/h
All pressure specifications
in the table are indicated in
psi/kilopascal with cold tires.
Cold = ambient temperature
245/45 R 17 95 W
245/45 R 17 99 V M+S XL32/220 35/240 32/220 33/230 35/240 42/290
225/50 R 17 94 V M+S
225/50 R 17 94 W
225/50 R 17 94 H M+S
245/40 R 18 93 W
245/40 R 18 97 V M+S XL32/220 36/250 32/220 36/250 38/260 45/310
Front: 245/40 R 18 93 W
Rear: 275/35R1895W32/220 35/240 32/220 33/230 38/260 42/290
More details on the permissible load and weights can be found on page257.
Page 227 of 288
Mobility
225Reference
At a glance
Controls
Driving tips
Communications
Navigation
Entertainment
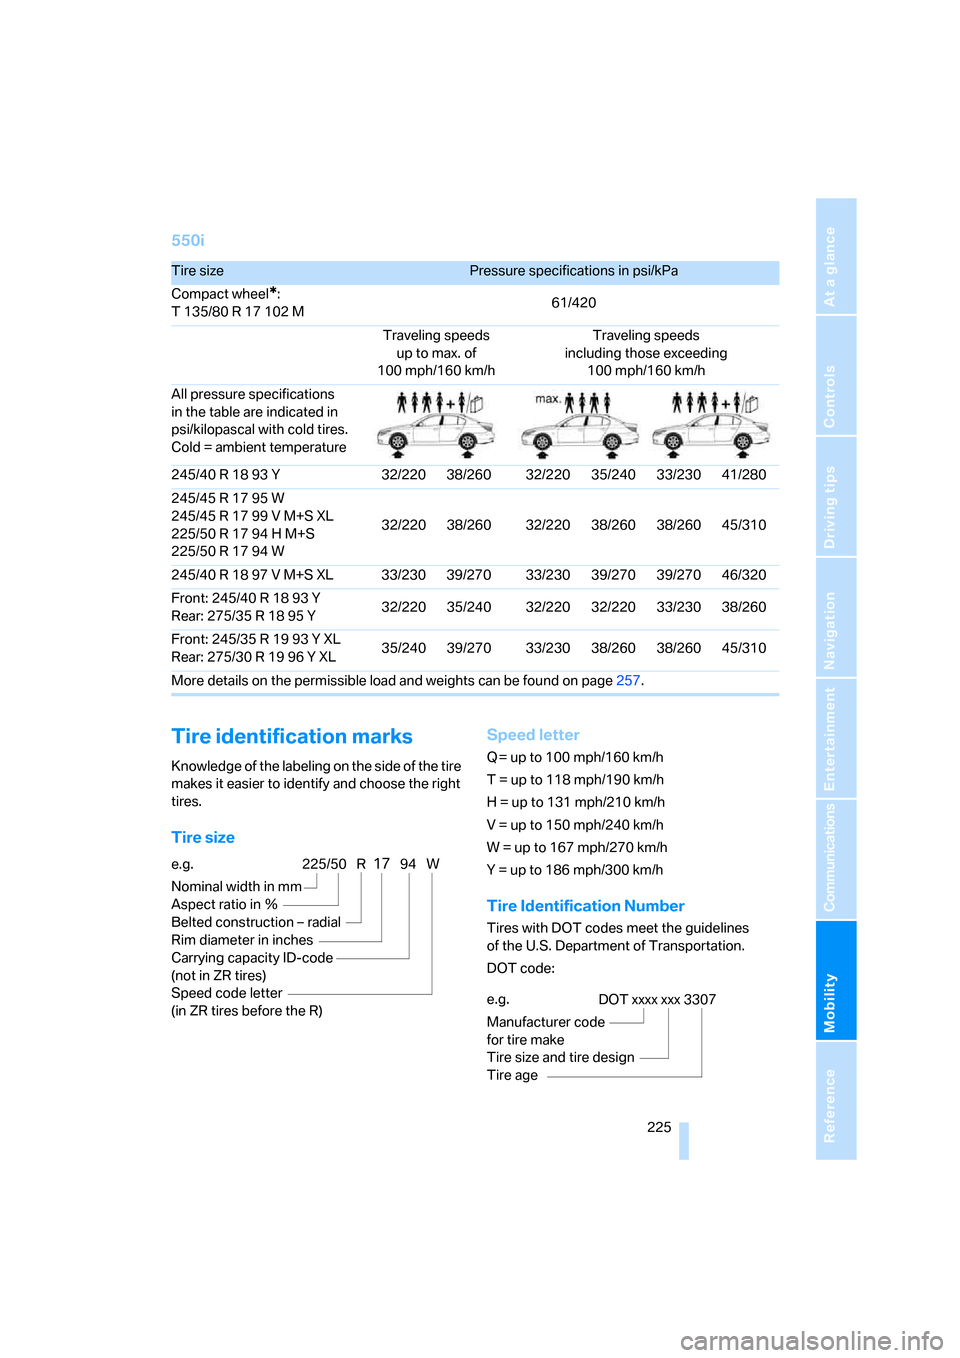
550i
Tire identification marks
Knowledge of the labeling on the side of the tire
makes it easier to identify and choose the right
tires.
Tire sizeSpeed letter
Q= up to 100 mph/160 km/h
T = up to 118 mph/190 km/h
H = up to 131 mph/210 km/h
V = up to 150 mph/240 km/h
W = up to 167 mph/270 km/h
Y = up to 186 mph/300 km/h
Tire Identification Number
Tires with DOT codes meet the guidelines
of the U.S. Department of Transportation.
DOT code:
Tire sizePressure specifications in psi/kPa
Compact wheel
*:
T 135/80 R 17 102 M61/420
Traveling speeds
up to max. of
100 mph/160 km/hTraveling speeds
including those exceeding
100 mph/160 km/h
All pressure specifications
in the table are indicated in
psi/kilopascal with cold tires.
Cold = ambient temperature
245/40 R 18 93 Y 32/220 38/260 32/220 35/240 33/230 41/280
245/45 R 17 95 W
245/45 R 17 99 V M+S XL
225/50 R 17 94 H M+S
225/50 R 17 94 W32/220 38/260 32/220 38/260 38/260 45/310
245/40 R 18 97 V M+S XL 33/230 39/270 33/230 39/270 39/270 46/320
Front: 245/40 R 18 93 Y
Rear: 275/35R1895Y32/220 35/240 32/220 32/220 33/230 38/260
Front: 245/35 R 19 93 Y XL
Rear: 275/30R1996YXL35/240 39/270 33/230 38/260 38/260 45/310
More details on the permissible load and weights can be found on page257.
e.g.
Nominal width in mm
Aspect ratio in Ξ
Belted construction – radial
Rim diameter in inches
Carrying capacity ID-code
(not in ZR tires)
Speed code letter
(in ZR tires before the R)225/50 R1794 W
e.g.
Manufacturer code
for tire make
Tire size and tire design
Tire ageDOT xxxx xxx 3307
Page 231 of 288
Mobility
229Reference
At a glance
Controls
Driving tips
Communications
Navigation
Entertainment
Storage
Store wheels and tires in a cool, dry place with
as little exposure to light as possible. Always
protect tires against all contact with oil, grease
and fuels. Do not exceed the maximum tire
inflation pressure indicated on the side wall of
the tire.
Rotating wheels between axles
BMW does not recommend moving the front
wheels to the rear or vice versa, as otherwise
the handling characteristics may be impaired.
With tires of different makes and types
* such a
change is not permissible.
Snow chains*
BMW only tests certain fine-link snow chains,
classifies them as road-safe and recommends
them. Consult your BMW center for more infor-
mation.
Use is only permissible in pairs on the rear
wheels.
Observe the manufacturer's instructions when
mounting snow chains. Do not exceed a speed
of 30 mph/50 km/h with the chains mounted.
After mounting snow chains, do not ini-
tialize the Flat Tire Monitor, otherwise
incorrect displays can occur.
When driving with snow chains, it may be prac-
tical to briefly activate DTC, refer to page92.<
Page 237 of 288

Mobility
235Reference
At a glance
Controls
Driving tips
Communications
Navigation
Entertainment
Maintenance
BMW maintenance system
The BMW maintenance system supports the
preservation of the traffic and operating safety
of your BMW. The ultimate objective is to
ensure economical maintenance by providing
the ideal service for your vehicle.
Should the day come when you decide to sell
your BMW, a complete dealer service history
will prove to be an asset of inestimable value.
CBS Condition Based Service
Sensors and special algorithms take the differ-
ent driving conditions of your BMW into
account. Condition Based Service uses this to
determine the current and future service
requirements. By letting you define a service
and maintenance regimen that reflects your
own individual requirements, the system builds
the basis for trouble-free driving.
You can set the Control Display to show
remaining distances and times of selected
maintenance intervals and legally mandated
deadlines, refer to page81:
>Engine oil
>Brake pads, front and rear separately
>Brake fluid
>Vehicle check
>Legally mandated inspections depending
on local regulations
Service data in remote control
Your vehicle stores the information required
maintenance continuously in the remote con-
trol during driving. After accessing the data
stored in the remote control, your BMW Service
Advisor can suggest precisely the right array of
service procedures for your own individual vehi-
cle. You should therefore hand over the remote
control you last used to drive to the BMW Ser-
vice Advisor when you take your vehicle in for
service.
Make sure the date is set correctly, refer
to page87, otherwise the effectiveness
of CBS Condition Based Service is not
ensured.<
Service and Warranty Information
Booklet for US models and
Warranty and Service Guide Booklet
for Canadian models
Please consult your Service and Warranty Infor-
mation Booklet for US models and Warranty
and Service Guide Booklet for Canadian models
for additional information on service require-
ments.
BMW recommends that you have service
and repair operations performed at your
BMW center.
Take the time to ensure that these service pro-
cedures are confirmed by entries in your vehi-
cle's Service and Warranty Information Booklet
for US models and Warranty and Service Guide
Booklet for Canadian models. These entries
verify that your vehicle has received the speci-
fied regular maintenance.<
Page 239 of 288

Mobility
237Reference
At a glance
Controls
Driving tips
Communications
Navigation
Entertainment
Replacing components
Onboard toolkit
Sedan
The onboard toolkit is located in the luggage
compartment lid.
Loosen the wing nut to open.
Sports Wagon
The onboard toolkit is located in the left side
panel of the cargo bay.
Wiper blade replacement
Front
1.Fold the wiper arm out and grasp firmly.
2.Press the safety tabs together while sliding
the wiper blade toward the front to disen-
gage it.
3.Mount the new wiper blade and slide in until
it is heard to engage.
Rear*
1.Lift off the wiper arm completely and pull off
the wiper blade, refer to arrow.
2.Mount the new wiper blade and press on
until it is heard to engage.
Page 245 of 288
Mobility
243Reference
At a glance
Controls
Driving tips
Communications
Navigation
Entertainment
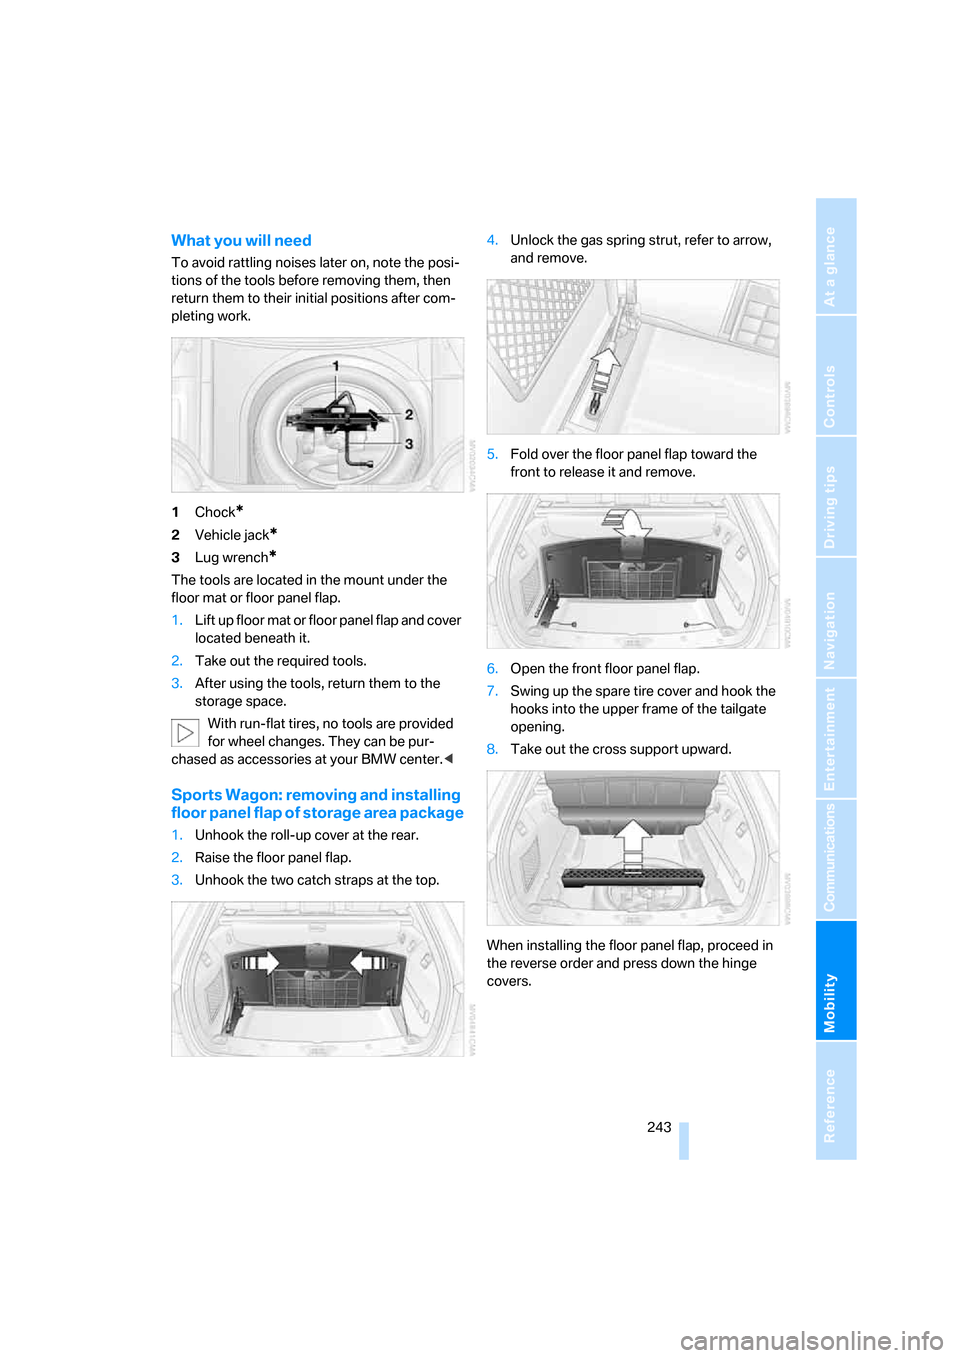
What you will need
To avoid rattling noises later on, note the posi-
tions of the tools before removing them, then
return them to their initial positions after com-
pleting work.
1Chock
*
2Vehicle jack*
3Lug wrench*
The tools are located in the mount under the
floor mat or floor panel flap.
1.Lift up floor mat or floor panel flap and cover
located beneath it.
2.Take out the required tools.
3.After using the tools, return them to the
storage space.
With run-flat tires, no tools are provided
for wheel changes. They can be pur-
chased as accessories at your BMW center.<
Sports Wagon: removing and installing
floor panel flap of storage area package
1.Unhook the roll-up cover at the rear.
2.Raise the floor panel flap.
3.Unhook the two catch straps at the top.4.Unlock the gas spring strut, refer to arrow,
and remove.
5.Fold over the floor panel flap toward the
front to release it and remove.
6.Open the front floor panel flap.
7.Swing up the spare tire cover and hook the
hooks into the upper frame of the tailgate
opening.
8.Take out the cross support upward.
When installing the floor panel flap, proceed in
the reverse order and press down the hinge
covers.
Page 251 of 288
Mobility
249Reference
At a glance
Controls
Driving tips
Communications
Navigation
Entertainment
Preparation
1.Check whether the battery of the other
vehicle has a voltage of 12 Volts and
approximately the same capacitance in Ah.
This information can be found on the bat-
tery.
2.Switch off the engine of the assisting vehi-
cle.
3.Switch off any electrical systems and com-
ponents in both vehicles.
There must not be any contact between
the bodies of the two vehicles, otherwise
there is a danger of shorting.<
Connecting jumper cables
To avoid personal injury from sparks,
follow this sequence when connecting
jumper cables.<
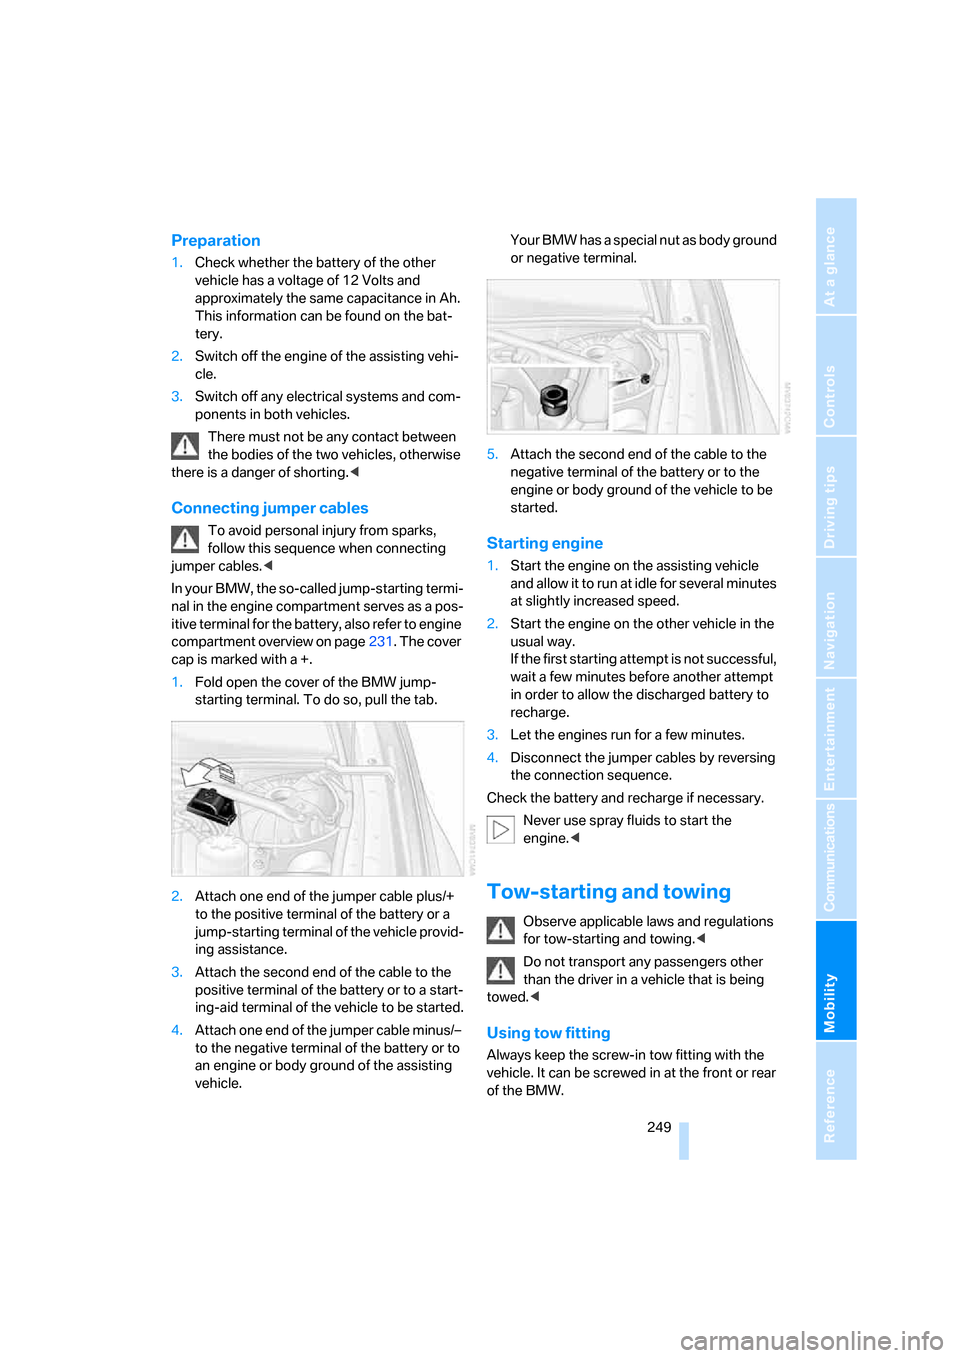
In your BMW, the so-called jump-starting termi-
nal in the engine compartment serves as a pos-
itive terminal for the battery, also refer to engine
compartment overview on page231. The cover
cap is marked with a +.
1.Fold open the cover of the BMW jump-
starting terminal. To do so, pull the tab.
2.Attach one end of the jumper cable plus/+
to the positive terminal of the battery or a
jump-starting terminal of the vehicle provid-
ing assistance.
3.Attach the second end of the cable to the
positive terminal of the battery or to a start-
ing-aid terminal of the vehicle to be started.
4.Attach one end of the jumper cable minus/–
to the negative terminal of the battery or to
an engine or body ground of the assisting
vehicle.Your BMW has a special nut as body ground
or negative terminal.
5.Attach the second end of the cable to the
negative terminal of the battery or to the
engine or body ground of the vehicle to be
started.Starting engine
1.Start the engine on the assisting vehicle
and allow it to run at idle for several minutes
at slightly increased speed.
2.Start the engine on the other vehicle in the
usual way.
If the first starting attempt is not successful,
wait a few minutes before another attempt
in order to allow the discharged battery to
recharge.
3.Let the engines run for a few minutes.
4.Disconnect the jumper cables by reversing
the connection sequence.
Check the battery and recharge if necessary.
Never use spray fluids to start the
engine.<
Tow-starting and towing
Observe applicable laws and regulations
for tow-starting and towing.<
Do not transport any passengers other
than the driver in a vehicle that is being
towed.<
Using tow fitting
Always keep the screw-in tow fitting with the
vehicle. It can be screwed in at the front or rear
of the BMW.
Page 253 of 288
Mobility
251Reference
At a glance
Controls
Driving tips
Communications
Navigation
Entertainment
>When mounted at an angle, the tow bar will
exert lateral forces, tending to push the
vehicle sideways.
Only attach the tow bar to the tow fittings,
as attachment to other vehicle parts can
lead to damage.<
With tow rope
When starting off in the towing vehicle, make
sure that the tow rope is taut.
To avoid jerking and the associated
stresses on vehicle components when
towing, always use nylon ropes or nylon straps.
Only attach tow ropes to the tow fittings, as
attachment to other vehicle parts can lead to
damage.<
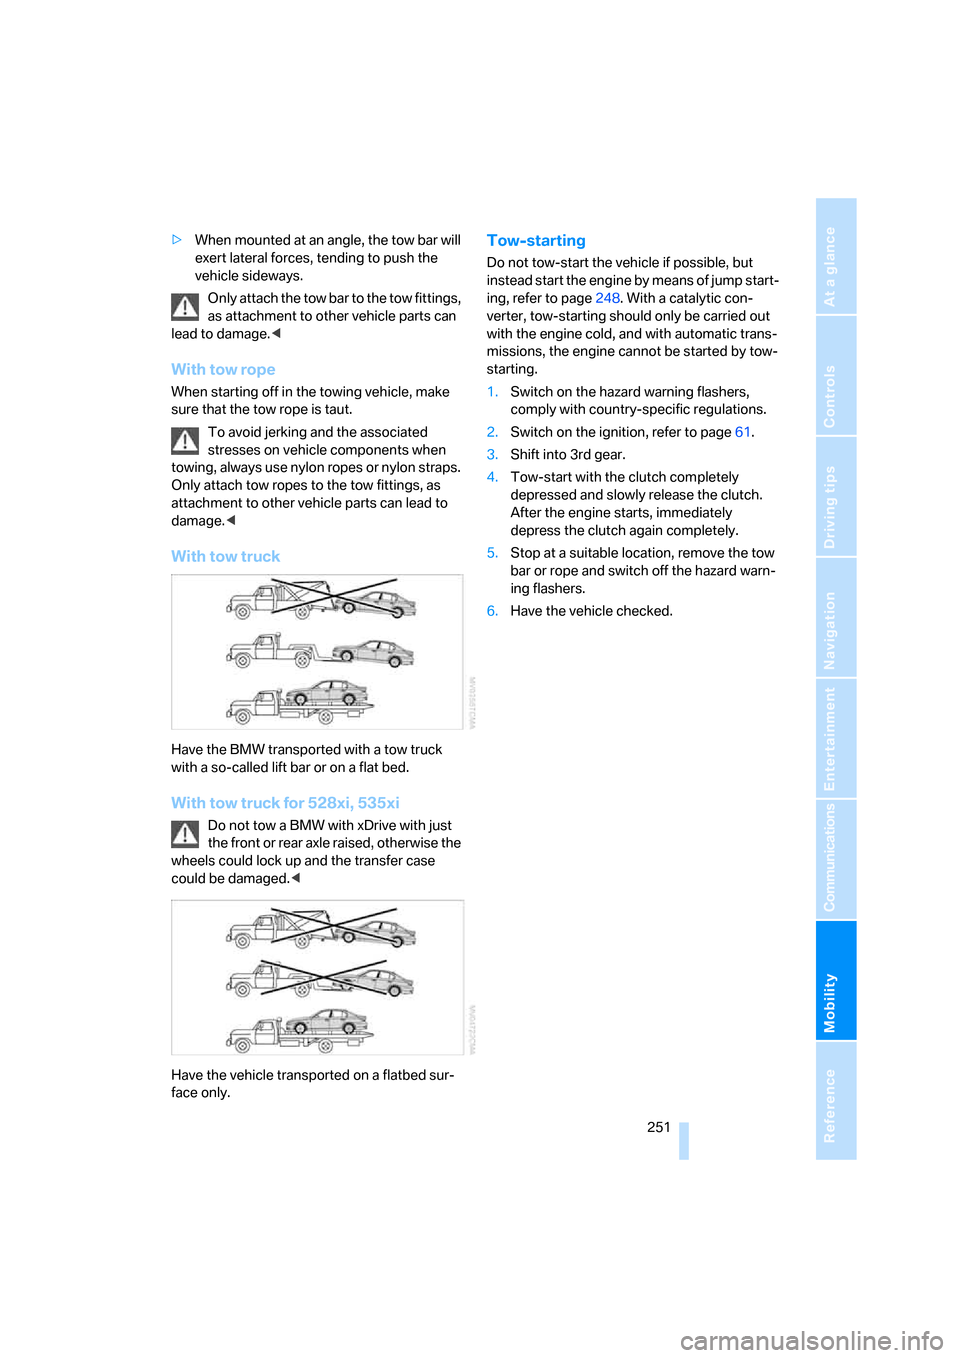
With tow truck
Have the BMW transported with a tow truck
with a so-called lift bar or on a flat bed.
With tow truck for 528xi, 535xi
Do not tow a BMW with xDrive with just
the front or rear axle raised, otherwise the
wheels could lock up and the transfer case
could be damaged.<
Have the vehicle transported on a flatbed sur-
face only.
Tow-starting
Do not tow-start the vehicle if possible, but
instead start the engine by means of jump start-
ing, refer to page248. With a catalytic con-
verter, tow-starting should only be carried out
with the engine cold, and with automatic trans-
missions, the engine cannot be started by tow-
starting.
1.Switch on the hazard warning flashers,
comply with country-specific regulations.
2.Switch on the ignition, refer to page61.
3.Shift into 3rd gear.
4.Tow-start with the clutch completely
depressed and slowly release the clutch.
After the engine starts, immediately
depress the clutch again completely.
5.Stop at a suitable location, remove the tow
bar or rope and switch off the hazard warn-
ing flashers.
6.Have the vehicle checked.