2008 BMW 525XI TOURING change time
[x] Cancel search: change timePage 159 of 292
Navigation
Driving tips
157Reference
At a glance
Controls
Communications
Entertainment
Mobility
2.Select "Stop guidance" and press the con-
troller.
When you park the vehicle before reaching the
entered destination, the following question is
displayed before beginning the next trip:
"Continue guidance to destination?".
The destination guidance starts automatically
after a short time.
To start the destination guidance:
Select "Yes" and press the controller.
Displaying route
You have the option of displaying various views
of the route during destination guidance.
From another menu, you can change
directly to the screen last displayed,
refer to Comfort opening of menu items,
page18.<
Displaying arrow display
1.Select "Navigation" and press the control-
ler.
2.Change into the fourth field from the top.
Turn the controller until "Arrow display" is
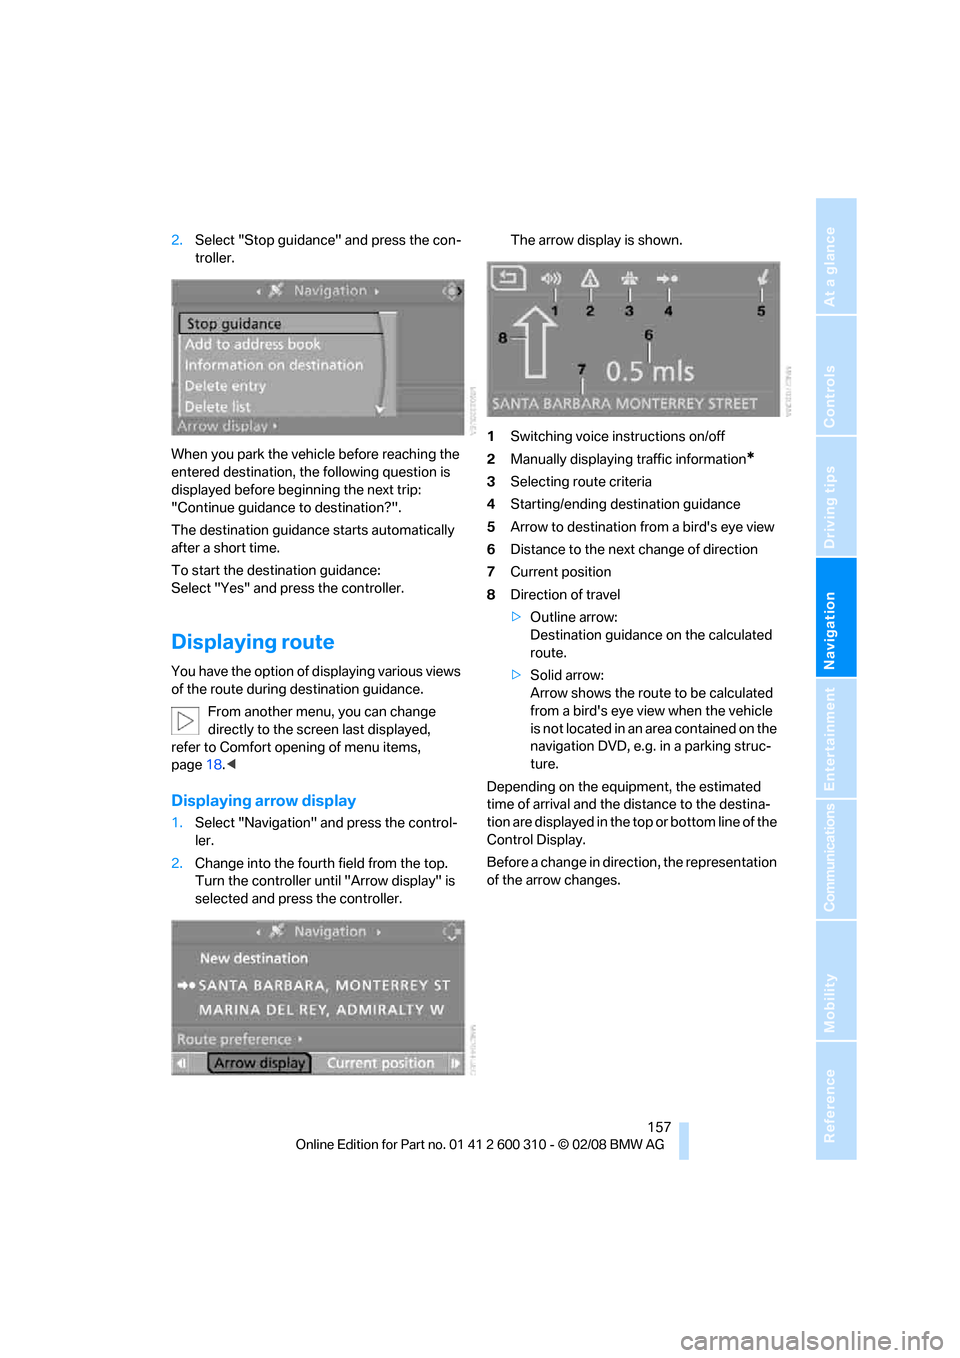
selected and press the controller.The arrow display is shown.
1Switching voice instructions on/off
2Manually displaying traffic information
*
3Selecting route criteria
4Starting/ending destination guidance
5Arrow to destination from a bird's eye view
6Distance to the next change of direction
7Current position
8Direction of travel
>Outline arrow:
Destination guidance on the calculated
route.
>Solid arrow:
Arrow shows the route to be calculated
from a bird's eye view when the vehicle
is not located in an area contained on the
navigation DVD, e.g. in a parking struc-
ture.
Depending on the equipment, the estimated
time of arrival and the distance to the destina-
tion are displayed in the top or bottom line of the
Control Display.
Before a change in direction, the representation
of the arrow changes.
Page 160 of 292
Destination guidance
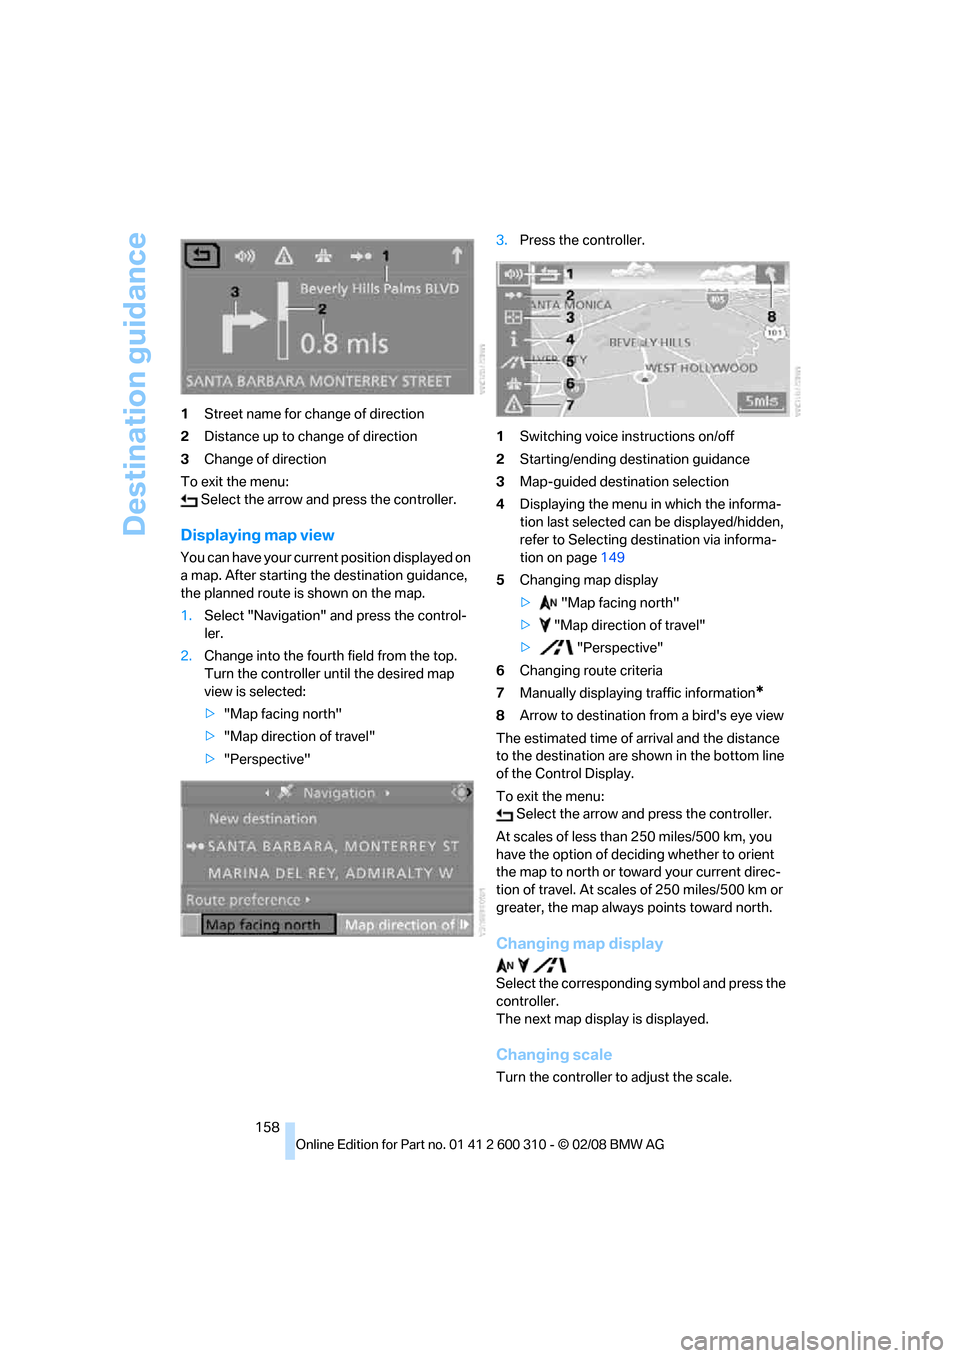
158 1Street name for change of direction
2Distance up to change of direction
3Change of direction
To exit the menu:
Select the arrow and press the controller.
Displaying map view
You can have your current position displayed on
a map. After starting the destination guidance,
the planned route is shown on the map.
1.Select "Navigation" and press the control-
ler.
2.Change into the fourth field from the top.
Turn the controller until the desired map
view is selected:
>"Map facing north"
>"Map direction of travel"
>"Perspective"3.Press the controller.
1Switching voice instructions on/off
2Starting/ending destination guidance
3Map-guided destination selection
4Displaying the menu in which the informa-
tion last selected can be displayed/hidden,
refer to Selecting destination via informa-
tion on page149
5Changing map display
> "Map facing north"
> "Map direction of travel"
> "Perspective"
6Changing route criteria
7Manually displaying traffic information
*
8Arrow to destination from a bird's eye view
The estimated time of arrival and the distance
to the destination are shown in the bottom line
of the Control Display.
To exit the menu:
Select the arrow and press the controller.
At scales of less than 250 miles/500 km, you
have the option of deciding whether to orient
the map to north or toward your current direc-
tion of travel. At scales of 250 miles/500 km or
greater, the map always points toward north.
Changing map display
Select the corresponding symbol and press the
controller.
The next map display is displayed.
Changing scale
Turn the controller to adjust the scale.
Page 161 of 292
Navigation
Driving tips
159Reference
At a glance
Controls
Communications
Entertainment
Mobility
Displaying streets and towns/cities of
route
You can have the roads and towns along the
route displayed during destination guidance.
The distances remaining to be traveled on each
individual road are also displayed.
1.Select "Navigation" and press the control-
ler.
2.Change into the third field from the top.
Turn the controller until "Route list" is
selected and press the controller.
To exit the menu:
Select the arrow and press the controller.
Destination guidance via
voice instructions
Switching voice instructions on/off
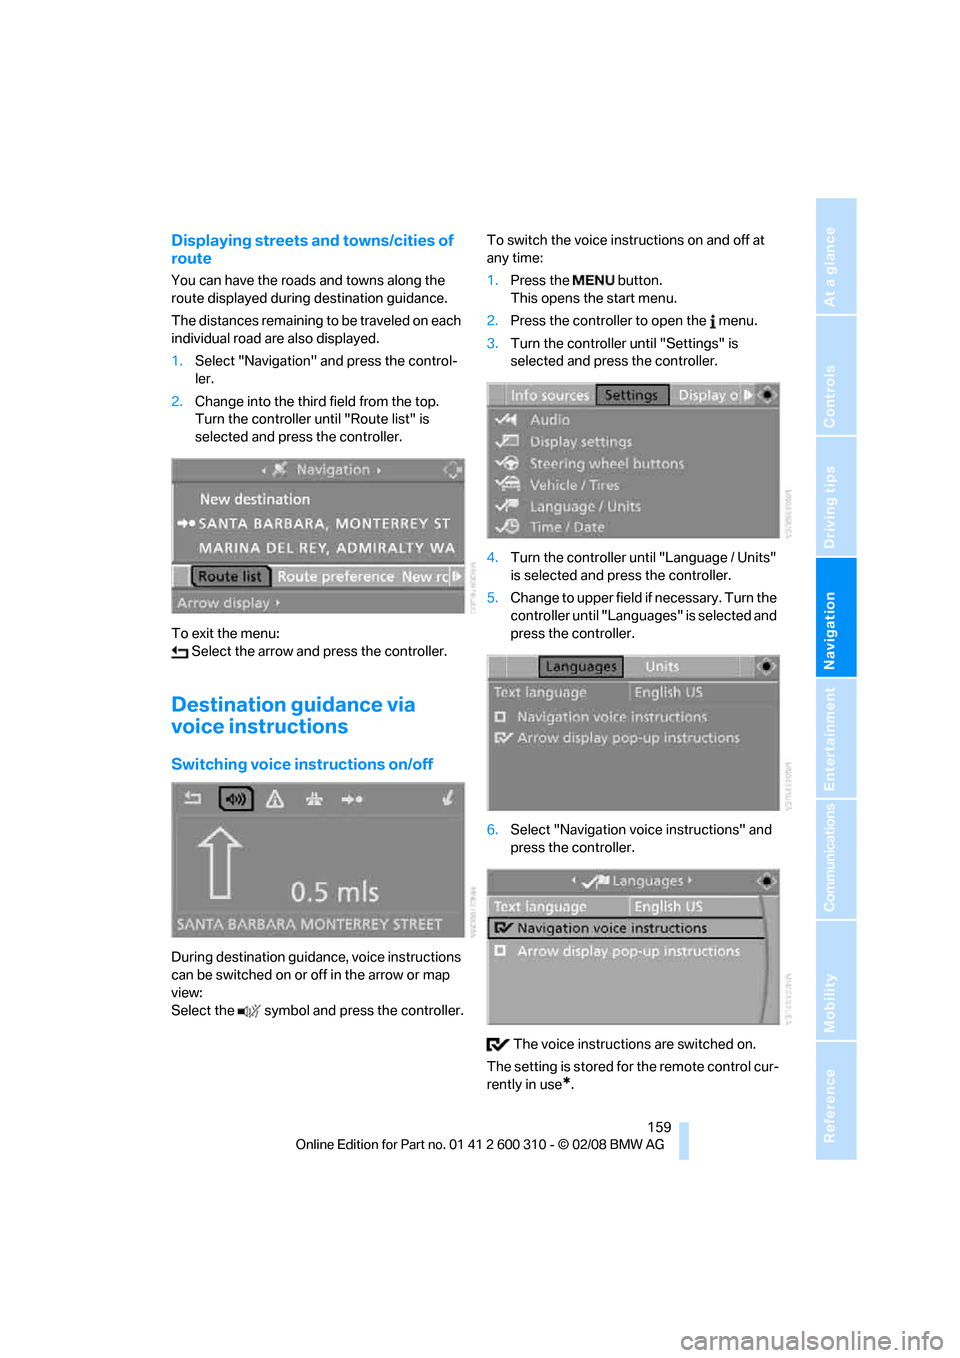
During destination guidance, voice instructions
can be switched on or off in the arrow or map
view:
Select the symbol and press the controller.To switch the voice instructions on and off at
any time:
1.Press the button.
This opens the start menu.
2.Press the controller to open the menu.
3.Turn the controller until "Settings" is
selected and press the controller.
4.Turn the controller until "Language / Units"
is selected and press the controller.
5.Change to upper field if necessary. Turn the
controller until "Languages" is selected and
press the controller.
6.Select "Navigation voice instructions" and
press the controller.
The voice instructions are switched on.
The setting is stored for the remote control cur-
rently in use
*.
Page 182 of 292

Satellite radio
180
Storing channel
1.Select desired channel.
2.Press the controller.
Other menu items are displayed.
3.Select "Store" and press the controller.
"Presets" is displayed.
4.Turn the controller to select a memory loca-
tion and press the controller.
The channel is stored. The channels of the last
selection criterion are displayed once again
after a short time.
Changing channel with buttons next to
CD player
Press the button for the corresponding
direction.
The system changes to the next enabled chan-
nel.
Notes
If no signal can be received for more than 4 sec-
onds, a message is displayed on the Control
Display.
Reception may not be possible for certain
reasons, e.g. environmental influences or
topographical conditions. The satellite radio
has no influence on this.
The signal may not be available in tunnels or
underground garages, next to tall buildings,
near trees, mountains or other sources of radio
interference.
Reception is usually possible again as soon as
the signal is available again.<
Page 190 of 292
USB audio interface
188
USB audio interface
You can connect audio devices to the USB
audio interface, e.g. an iPod or a USB device
(MP3 player, USB memory stick). You can then
operate these via iDrive.
The system can play back common audio files,
e.g. MP3, WMA, WAV (PCM) and ACC, as well
as playback lists in the M3U format.
Due to the large number of audio devices avail-
able on the market, operation via the vehicle
cannot be ensured for every audio device.
Ask your BMW center which audio devices are
suitable.
Connecting
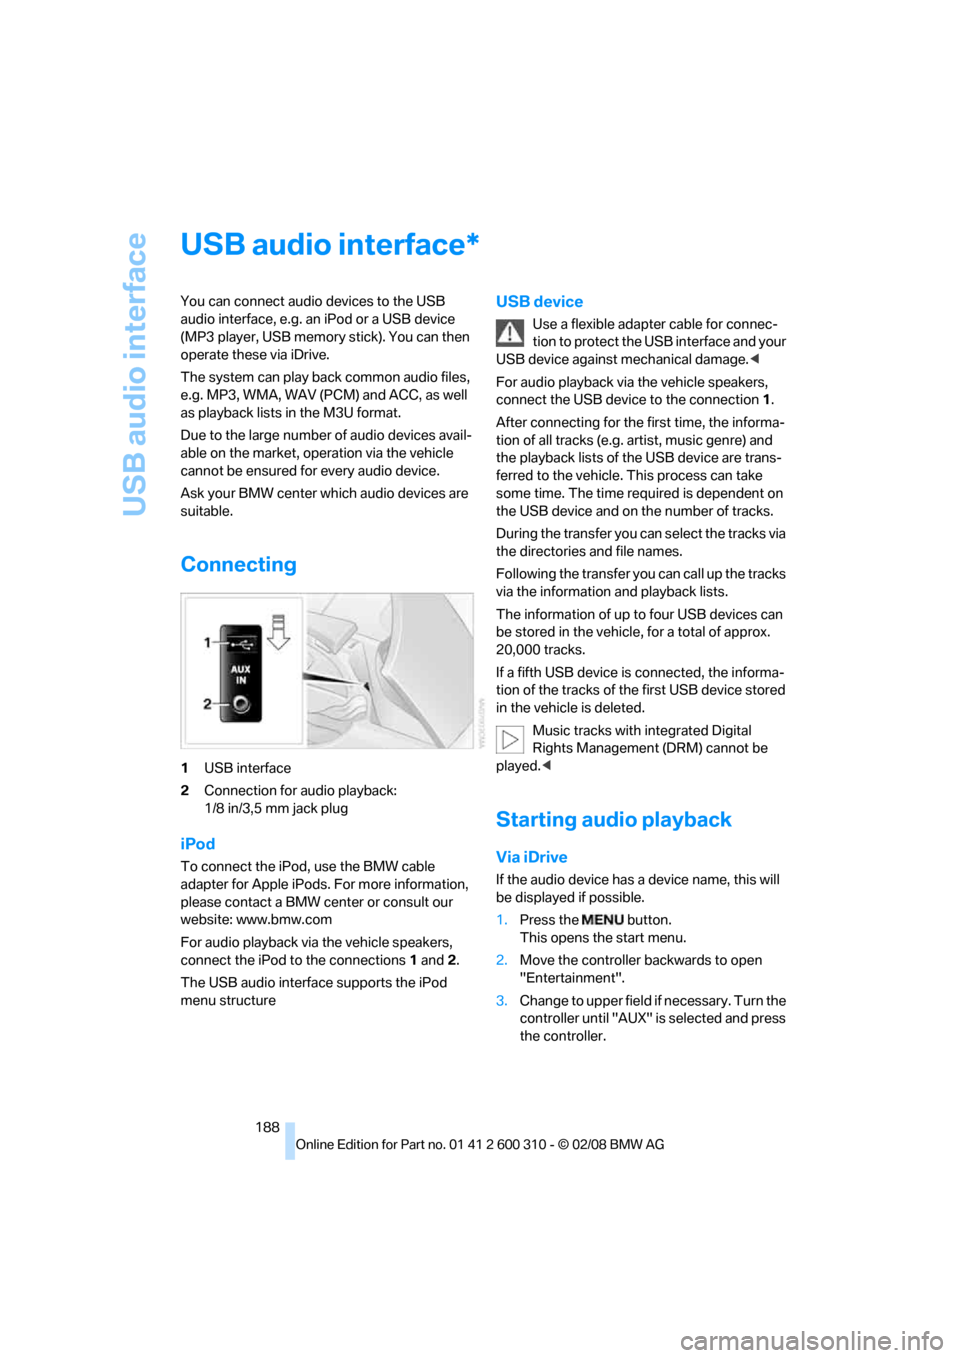
1USB interface
2Connection for audio playback:
1/8 in/3,5 mm jack plug
iPod
To connect the iPod, use the BMW cable
adapter for Apple iPods. For more information,
please contact a BMW center or consult our
website: www.bmw.com
For audio playback via the vehicle speakers,
connect the iPod to the connections1 and2.
The USB audio interface supports the iPod
menu structure
USB device
Use a flexible adapter cable for connec-
tion to protect the USB interface and your
USB device against mechanical damage.<
For audio playback via the vehicle speakers,
connect the USB device to the connection 1.
After connecting for the first time, the informa-
tion of all tracks (e.g. artist, music genre) and
the playback lists of the USB device are trans-
ferred to the vehicle. This process can take
some time. The time required is dependent on
the USB device and on the number of tracks.
During the transfer you can select the tracks via
the directories and file names.
Following the transfer you can call up the tracks
via the information and playback lists.
The information of up to four USB devices can
be stored in the vehicle, for a total of approx.
20,000 tracks.
If a fifth USB device is connected, the informa-
tion of the tracks of the first USB device stored
in the vehicle is deleted.
Music tracks with integrated Digital
Rights Management (DRM) cannot be
played.<
Starting audio playback
Via iDrive
If the audio device has a device name, this will
be displayed if possible.
1.Press the button.
This opens the start menu.
2.Move the controller backwards to open
"Entertainment".
3.Change to upper field if necessary. Turn the
controller until "AUX" is selected and press
the controller.
*
Page 198 of 292
Telephoning
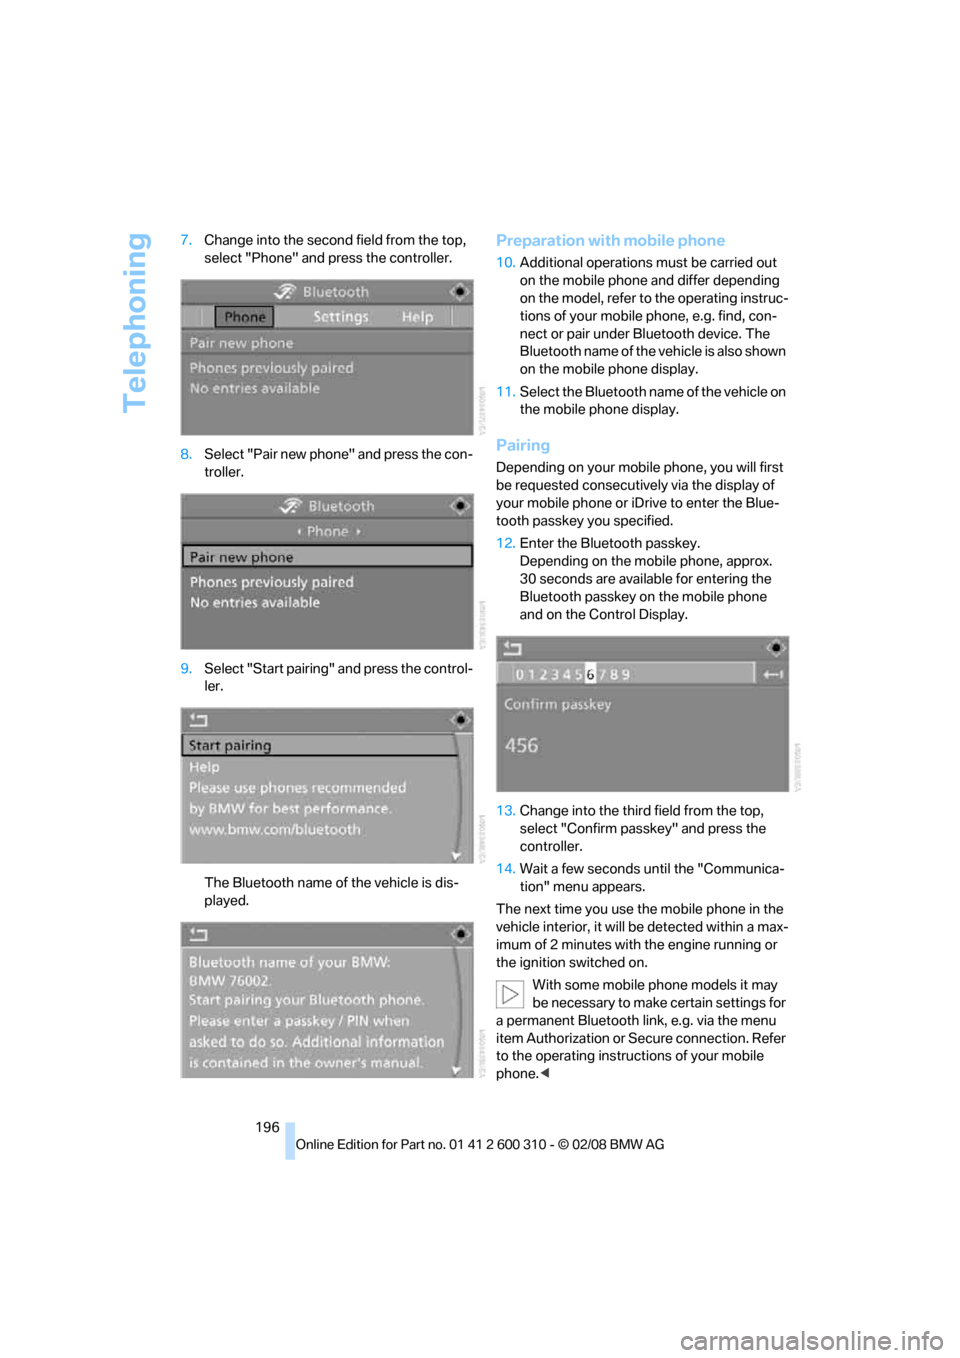
196 7.Change into the second field from the top,
select "Phone" and press the controller.
8.Select "Pair new phone" and press the con-
troller.
9.Select "Start pairing" and press the control-
ler.
The Bluetooth name of the vehicle is dis-
played.
Preparation with mobile phone
10.Additional operations must be carried out
on the mobile phone and differ depending
on the model, refer to the operating instruc-
tions of your mobile phone, e.g. find, con-
nect or pair under Bluetooth device. The
Bluetooth name of the vehicle is also shown
on the mobile phone display.
11.Select the Bluetooth name of the vehicle on
the mobile phone display.
Pairing
Depending on your mobile phone, you will first
be requested consecutively via the display of
your mobile phone or iDrive to enter the Blue-
tooth passkey you specified.
12.Enter the Bluetooth passkey.
Depending on the mobile phone, approx.
30 seconds are available for entering the
Bluetooth passkey on the mobile phone
and on the Control Display.
13.Change into the third field from the top,
select "Confirm passkey" and press the
controller.
14.Wait a few seconds until the "Communica-
tion" menu appears.
The next time you use the mobile phone in the
vehicle interior, it will be detected within a max-
imum of 2 minutes with the engine running or
the ignition switched on.
With some mobile phone models it may
be necessary to make certain settings for
a permanent Bluetooth link, e.g. via the menu
item Authorization or Secure connection. Refer
to the operating instructions of your mobile
phone.<
Page 253 of 292

Mobility
251Reference
At a glance
Controls
Driving tips
Communications
Navigation
Entertainment
3.Check and correct the tire inflation pressure
at the earliest opportunity.
Protect valve stems with valve stem
seal caps against dirt and contamina-
tion. Dirt in valve stems is a frequent source
of gradual air loss.<
4.Initialize the Flat Tire Monitor, refer to
page94, or reset the Tire Pressure Monitor,
refer to page96.
5.Replace the damaged tire as soon as possi-
ble and have the new wheel/tire balanced.
Driving with compact wheel
Drive reservedly and do not exceed a speed of
50 mph/80 km/h.
The driving characteristics change, for example
reduced track stability on braking, extended
braking distance, and altered self-steering
characteristics in the limit range. In conjunction
with winter tires, these characteristics are more
pronounced.
Only one compact wheel may be
mounted. Restore the wheels and tires to
their original size as quickly as possible. Failure
to do so is a safety risk.<
Vehicle battery
Battery care
The battery is 100 % maintenance-free, i.e., the
electrolyte will last for the life of the battery
when the vehicle is operated in a temperate cli-
mate. Your BMW center will be glad to advise in
all matters concerning the battery.
Charging battery
Only charge the battery in the vehicle via the
terminals in the engine compartment with the
engine switched off. Connections, refer to
Jump starting on page254.
Disposal
Have old batteries disposed of by your
BMW center or hand them in to a recy-
cling center. Maintain the battery in an upright
position for transport and storage. Always
restrain the battery to prevent it from tipping
over during transport.<
Power failure
Following a temporary power failure, e.g. due to
a discharged battery, the use of some equip-
ment will be restricted, requiring its reinitializa-
tion. In the same way, individual settings are lost
and must be updated again:
>Seat, mirror and steering wheel memory
The positions must be stored again, refer to
page48.
>Time and date
Must be updated again, refer to page86.
>Radio
Radio stations must be stored again, refer
to page174.
>Navigation system
You must wait until the system becomes
functional again, refer to page142.
>Glass roof, electric
It may only be possible to raise the glass
roof. The system must be initialized, refer to
page42.
>Panorama glass roof
It may only be possible to raise the glass
roof. The system must be reinitialized, refer
to page44.
>Active steering
The system is deactivated and must be
reinitialized, refer to page98. Until then,
larger steering wheel movements are
required.
>Power windows
The pinch prevention system for the power
windows must be reinitialized, refer to
page40.
Talk to your BMW center before placing
the stored vehicle back in service.
Page 275 of 292

Reference 273
At a glance
Controls
Driving tips
Communications
Navigation
Entertainment
Mobility
Cargo bay
– capacity263
– emergency operation, refer
to Opening manually, Sports
Wagon35
– emergency release34
– expanding, Sports
Wagon127
– floor panel flap, refer to
Compartment in floor,
Sports Wagon128
– locking separately34
– opening/closing, refer to
Luggage compartment lid/
tailgate33
– opening from inside33
– opening from inside, Sports
Wagon35
– opening from outside34
– opening from outside,
Sports Wagon35
– opening with remote
control31
Cargo bay cover, refer to Roll-
up cover127
Caring for the vehicle
finish240
Car key, refer to Keys/remote
control28
Car phone194
– installation location, refer to
Center armrest122
– refer to Mobile phone194
– refer to separate operating
instructions
Car radio, refer to Radio172
Car Shampoo241
Car washes62,136,239
– with comfort access39
Catalytic converter, refer to
Hot exhaust system135
"Categories"179
CBC Cornering Brake
Control90
CBS Condition Based
Service237
"CD"168,181CD changer181
– controls168
– fast forward/reverse185
– installation location185
– random sequence184
– repeating a track184
– sampling tracks183
– selecting a CD181
– selecting a track182
– switching on/off168
– tone control169
– volume169
CD player181
– controls168
– fast forward/reverse185
– random sequence184
– repeating a track184
– sampling a track183
– selecting a track182
– switching on/off168
– tone control169
– volume169
Center armrest
– front122
– rear126
Center brake lamp247
Center console14
"Central locking"30
Central locking
– from inside32
– from outside30
Central locking system29
– comfort access38
Changes, technical
– refer to For your own
safety5
– refer to Parts and
accessories6
Changing language on
Control Display88
Changing scale for
navigation158
Changing units of measure on
Control Display88
Changing wheels229,248
CHECK button84
Check Control83
"Check Control
messages"84Check Gas Cap221
Checking the air pressure,
refer to Tire inflation
pressure222
Child restraint fixing system
LATCH57
Child restraints56
Child restraint systems56
Child-safety lock59
Child seats, refer to
Transporting children
safely56
Chime, refer to Check
Control83
Chock249
Chrome-plated parts241
Chrome polish241
Cigarette lighter124
Cigarette lighter socket, refer
to Connecting electrical
devices125
Cleaning your BMW, refer to
Care
239
"Climate"51,114
Clock78
– 12h/24h format87
– hour signal87
– setting time and date86
Closing
– from inside32
– from outside30
Closing fuel filler cap221
Clothes hooks123
Cockpit10
Cold start, refer to Starting
engine62
Comfort access38
– observe in car wash39
– replacing battery, remote
control40
Comfort area, refer to Around
the center console14
Comfort seat46
"Communi-
cation"200,210,211,213
Compact Disc
– refer to CD changer181
– refer to CD player181