2008 BMW 525XI TOURING stop start
[x] Cancel search: stop startPage 118 of 292

Climate
116 6.Turn the controller to adjust the air distribu-
tion.
Driver's side:
1Air directed toward the windshield and side
windows
2Air for the upper body
3Air to footwell
Front passenger side:
4Air for the upper body
5Air to footwell
Pressing the AUTO button cancels the
manual air distribution settings.<
The automatic mode for the air volume remains
effective with manual air distribution.
Switching cooling function on and off
The cooling function cools and
dehumidifies the incoming air
before also reheating it as
required, according to the temperature setting.
This function is only available when the engine
is running.
The cooling function helps to avoid condensa-
tion on the window surfaces or to quickly
remove them.
Depending on the weather, the windshield may
fog over briefly when the engine is started.
The cooling function is also switched on with
the AUTO program.
Maximum cooling
Maximally cooled air is obtained as
quickly as possible at an outside
temperature above approx. 327/
06 and with the engine running.At the lowest temperature, the automatic cli-
mate control switches into recirculating air
mode. The maximum air volume flows out of the
vents for the upper body. Therefore, open these
vents for maximum cooling.
AUC Automatic recirculated-air
control/recirculated-air mode
You can respond to pollutants or
unpleasant odors in the immediate
environment by suspending the
supply of outside air. The system then recircu-
lates the air currently within the vehicle. During
AUC operation, a sensor detects pollutants in
the outside air and controls the shut-off auto-
matically.
By pressing the button repeatedly, you can
request three operating modes:
>LED off: outside air flows in continuously.
>Right LED on, AUC mode: the system
detects pollutants in the outside air and
shuts off the supply as needed.
>Left LED on, recirculated-air mode: the
supply of outside air is permanently shut off.
Should the windows fog up in the recircu-
lated-air mode, press the AUTO button or
switch off the recirculated-air mode and
increase the air volume if necessary.
The recirculated-air mode should not be used
over an extended period of time, as the air qual-
ity inside the vehicle deteriorates continu-
ously.<
Residual heat
The heat stored in the engine is
used to heat the passenger com-
partment, e.g. while stopped at a
school to pick up a child.
1.Switch off the engine.
2.Turn to the right, refer to arrow.
The function can be switched on when the fol-
lowing conditions are met:
>up to 15 minutes after switching off the
engine
>with engine at operating temperature
Page 137 of 292
Driving tips
135Reference
At a glance
Controls
Communications
Navigation
Entertainment
Mobility
Thinking ahead when driving
Avoid unnecessary acceleration and braking.
To do so, maintain the appropriate distance
from the vehicle in front of you. An anticipatory
and smooth driving style reduces fuel con-
sumption.
Avoiding high engine speeds
Use 1st gear only for starting off. Accelerate
rapidly in 2nd gear and above. Avoid high
engine speeds in doing so and shift into the
next gear early.
When you have reached the desired speed,
shift into the highest possible gear and drive
with the lowest possible engine speed while
maintaining a constant a vehicle speed.
In general: driving at a low engine speed
reduces fuel consumption and minimizes wear.
Taking advantage of coasting
When approaching a red light, let off the gas
and allow the vehicle to coast to a stop in the
highest possible gear.
On steep roadways, let off the gas and allow the
vehicle to roll in the appropriate gear.
The flow of fuel is interrupted when coasting.
Switching off the engine during longer
stops
Switch off the engine at longer stops such as
traffic signals, railroad crossings, or in traffic
jams. Even having the engine switched off for
approx. 4 seconds results in fuel savings.
Switching off functions currently not
required
Functions such as air conditioning, seat heat-
ing, or rear window defrosting consume a lot of
energy and require additional fuel. Their influ-
ence is particularly pronounced in city traffic
and stop & go operation. For this reason, it is a
good idea to switch these functions off when
they are not really needed.
Having maintenance carried out
Have the vehicle serviced regularly in order to
achieve the optimum economy and service life
of your vehicle. BMW recommends having the
maintenance performed by a BMW center. Also
please pay attention to the BMW maintenance
system, refer to page237.
General driving notes
Closing luggage compartment lid/
tailgate
Operate the vehicle only when the lug-
gage compartment lid/tailgate is com-
pletely closed. Otherwise, exhaust fumes could
enter the interior of the vehicle.<
If it is absolutely necessary to drive with the lug-
gage compartment lid open:
1.Close all windows and the glass sunroof or
panorama glass sunroof.
2.Increase the air volume of the automatic cli-
mate control to a high level, refer to
page115.
Hot exhaust system
As in all vehicles, extremely high temper-
atures are generated on the exhaust sys-
tem. Do not remove the heat shields installed
adjacent to it, and never apply undercoating to
them. When driving, standing at idle and while
parking take care to avoid possible contact
between the hot exhaust system and any highly
flammable materials such as hay, leaves, grass,
etc. Such contact could lead to a fire, and with it
the risk of serious property damage as well as
personal injury. Do not touch hot exhaust tail
pipes. Otherwise there is a risk of burns.<
Hydroplaning
When driving on wet or slushy roads,
reduce road speed. If you do not, a wedge
of water can form between tires and road sur-
face. This phenomenon is referred to as hydro-
planing, and is characterized by a partial or
complete loss of contact between the tires and
Page 159 of 292
Navigation
Driving tips
157Reference
At a glance
Controls
Communications
Entertainment
Mobility
2.Select "Stop guidance" and press the con-
troller.
When you park the vehicle before reaching the
entered destination, the following question is
displayed before beginning the next trip:
"Continue guidance to destination?".
The destination guidance starts automatically
after a short time.
To start the destination guidance:
Select "Yes" and press the controller.
Displaying route
You have the option of displaying various views
of the route during destination guidance.
From another menu, you can change
directly to the screen last displayed,
refer to Comfort opening of menu items,
page18.<
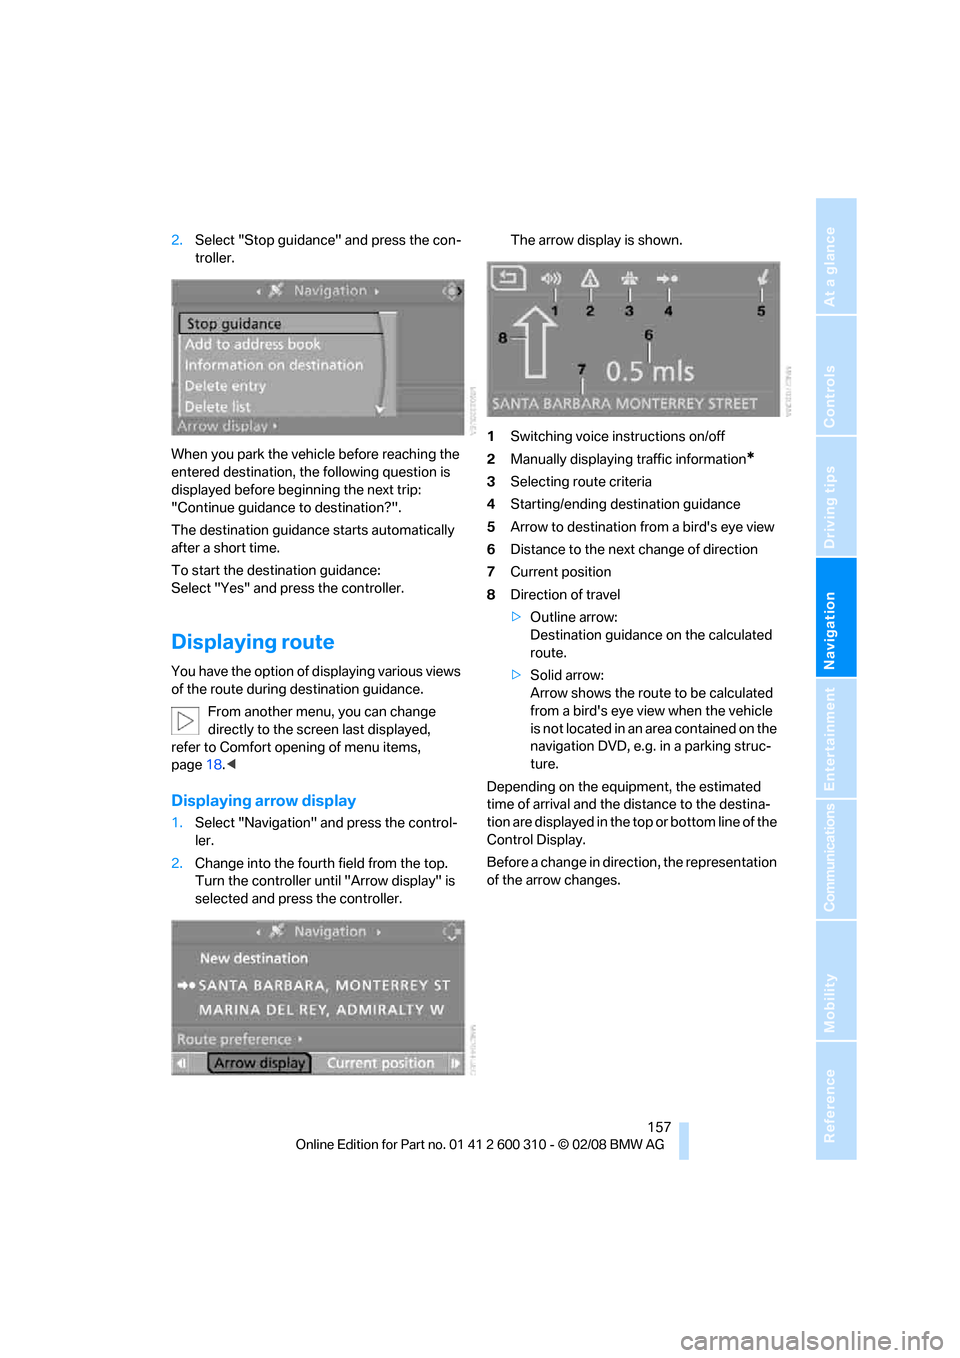
Displaying arrow display
1.Select "Navigation" and press the control-
ler.
2.Change into the fourth field from the top.
Turn the controller until "Arrow display" is
selected and press the controller.The arrow display is shown.
1Switching voice instructions on/off
2Manually displaying traffic information
*
3Selecting route criteria
4Starting/ending destination guidance
5Arrow to destination from a bird's eye view
6Distance to the next change of direction
7Current position
8Direction of travel
>Outline arrow:
Destination guidance on the calculated
route.
>Solid arrow:
Arrow shows the route to be calculated
from a bird's eye view when the vehicle
is not located in an area contained on the
navigation DVD, e.g. in a parking struc-
ture.
Depending on the equipment, the estimated
time of arrival and the distance to the destina-
tion are displayed in the top or bottom line of the
Control Display.
Before a change in direction, the representation
of the arrow changes.
Page 167 of 292
Navigation
Driving tips
165Reference
At a glance
Controls
Communications
Entertainment
Mobility
What to do if …
What to do if …
>a navigation DVD is inserted, but an instruc-
tion to insert the DVD appears on the Con-
trol Display?
The navigation DVD may not be the correct
DVD for the navigation system. This infor-
mation is indicated on the DVD label.
>you request the current position of your
vehicle, but do not receive a precise dis-
play?
The system is unable to receive enough
GPS signals at your current position due to
obstructions, your position is not yet avail-
able on your navigation DVD, or the system
is in the process of calculating your posi-
tion. Reception is best when you have an
unobstructed view to the sky.
>the destination guidance does not accept a
destination?
The data of the destination is not stored on
the navigation DVD that is loaded. Select a
destination that is as close as possible to
the original.
>the destination guidance does not accept
an address without the street name?
On the navigation DVD, no downtown area
can be determined for the city or town
entered. Enter any street, or a destination
such as the railway station in the selected
town, and then start the destination guid-
ance.
>you want to enter a destination for the des-
tination guidance, but it is not possible to
select the letters for your desired entry?
The data of the destination is not stored on
the navigation DVD that is loaded. In this
case, the system will not offer you any let-
ters to choose from. Select a destination
that is as close as possible to the original.>the system stops furnishing directions on
which way to turn as you approach intersec-
tions?
You are driving in an area that has not yet
been completely recorded on the naviga-
tion DVD. Instead of an arrow indicating a
turn, you will see an arrow which indicates
the general direction of your planned route.
Or you have left the recommended route
and the system requires a few seconds to
calculate a new recommended route.
>the navigation system does not react to
entries?
If the battery was disconnected, it takes
about 10 minutes before the system is once
again operational.
Page 191 of 292
Navigation
Entertainment
Driving tips
189Reference
At a glance
Controls
Communications
Mobility
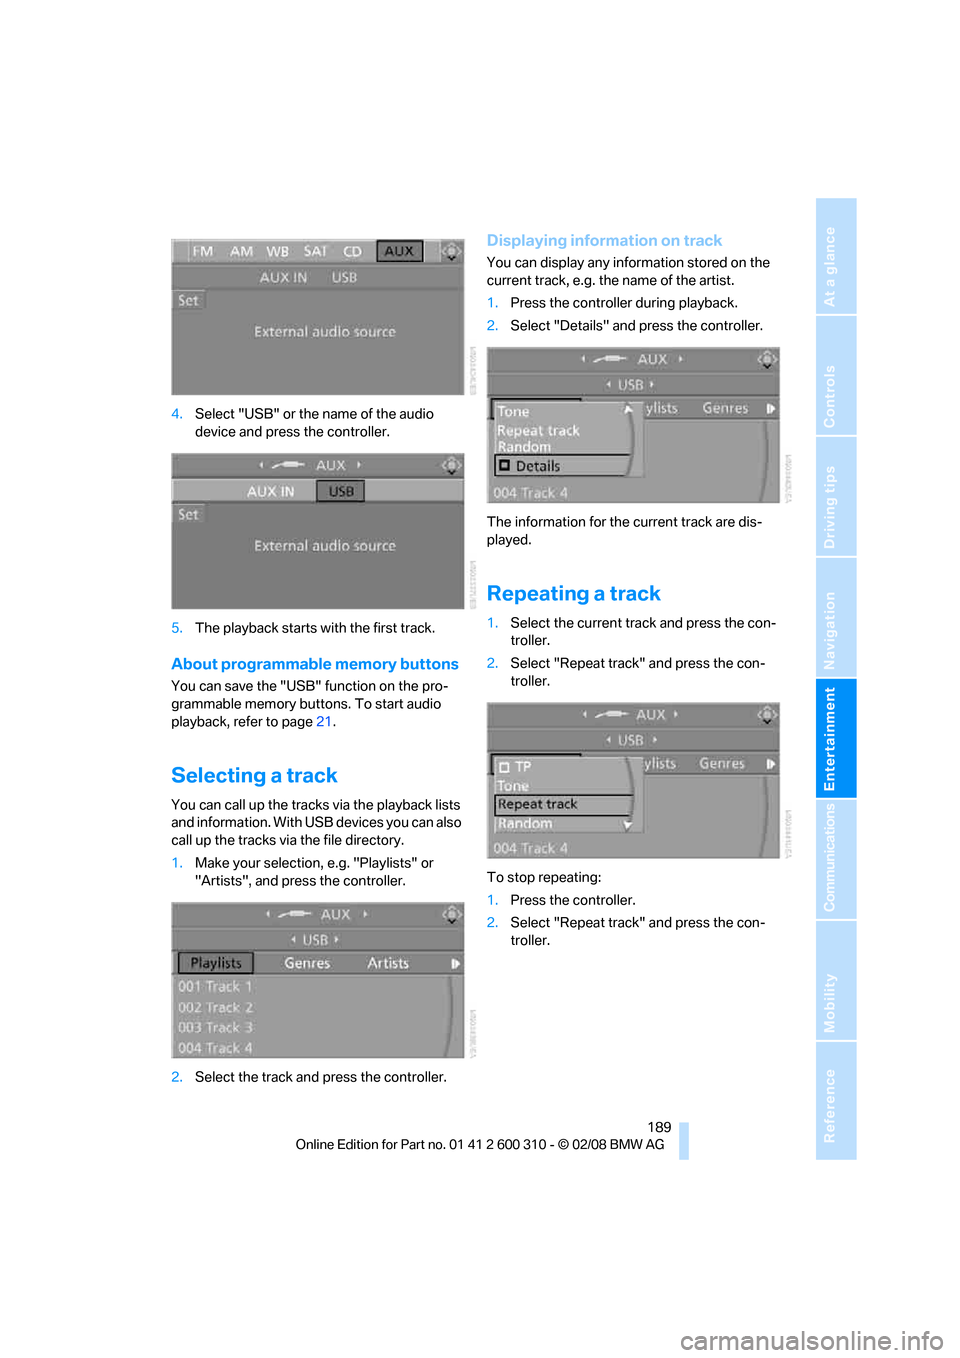
4.Select "USB" or the name of the audio
device and press the controller.
5.The playback starts with the first track.
About programmable memory buttons
You can save the "USB" function on the pro-
grammable memory buttons. To start audio
playback, refer to page21.
Selecting a track
You can call up the tracks via the playback lists
and information. With USB devices you can also
call up the tracks via the file directory.
1.Make your selection, e.g. "Playlists" or
"Artists", and press the controller.
2.Select the track and press the controller.
Displaying information on track
You can display any information stored on the
current track, e.g. the name of the artist.
1.Press the controller during playback.
2.Select "Details" and press the controller.
The information for the current track are dis-
played.
Repeating a track
1.Select the current track and press the con-
troller.
2.Select "Repeat track" and press the con-
troller.
To stop repeating:
1.Press the controller.
2.Select "Repeat track" and press the con-
troller.
Page 197 of 292
195
Entertainment
Reference
At a glance
Controls
Driving tips Communications
Navigation
Mobility
mobile phone from the vehicle if you wish to
place a call with the mobile phone.
Commissioning
Pairing mobile phone in vehicle
The following prerequisites must be met:
>Suitable mobile phone: the mobile phone is
supported by the full mobile phone prepara-
tion package. Information on this subject is
also provided on the Internet at:
www.bmw.com
>The mobile phone is ready to operate.
>The Bluetooth link on the vehicle, refer to
page199, and on the mobile phone is
active.
>Depending on the mobile phone, the mobile
phone may need presetting: e.g. using the
following menu items:
>Bluetooth activated
>Connection not with confirmation
>Reconnect
>Depending on the mobile phone model, the
setting energy saving mode can, for exam-
ple, result in vehicle failing to detect the
paired mobile phone.
>For pairing, specify any desired number as
the Bluetooth passkey, e.g. 1. This Blue-
tooth passkey is no longer required follow-
ing successful pairing.
>The ignition is switched on.
Only pair the mobile phone with the vehi-
cle stopped, otherwise the passengers
and other road users can be endangered due to
a lack of attentiveness on the part of the
driver.<
Switching on ignition
1.Insert the remote control as far as possible
into the ignition lock.
2.Switch on the ignition by pressing the Start/
Stop button without depressing the brake
or clutch pedal.
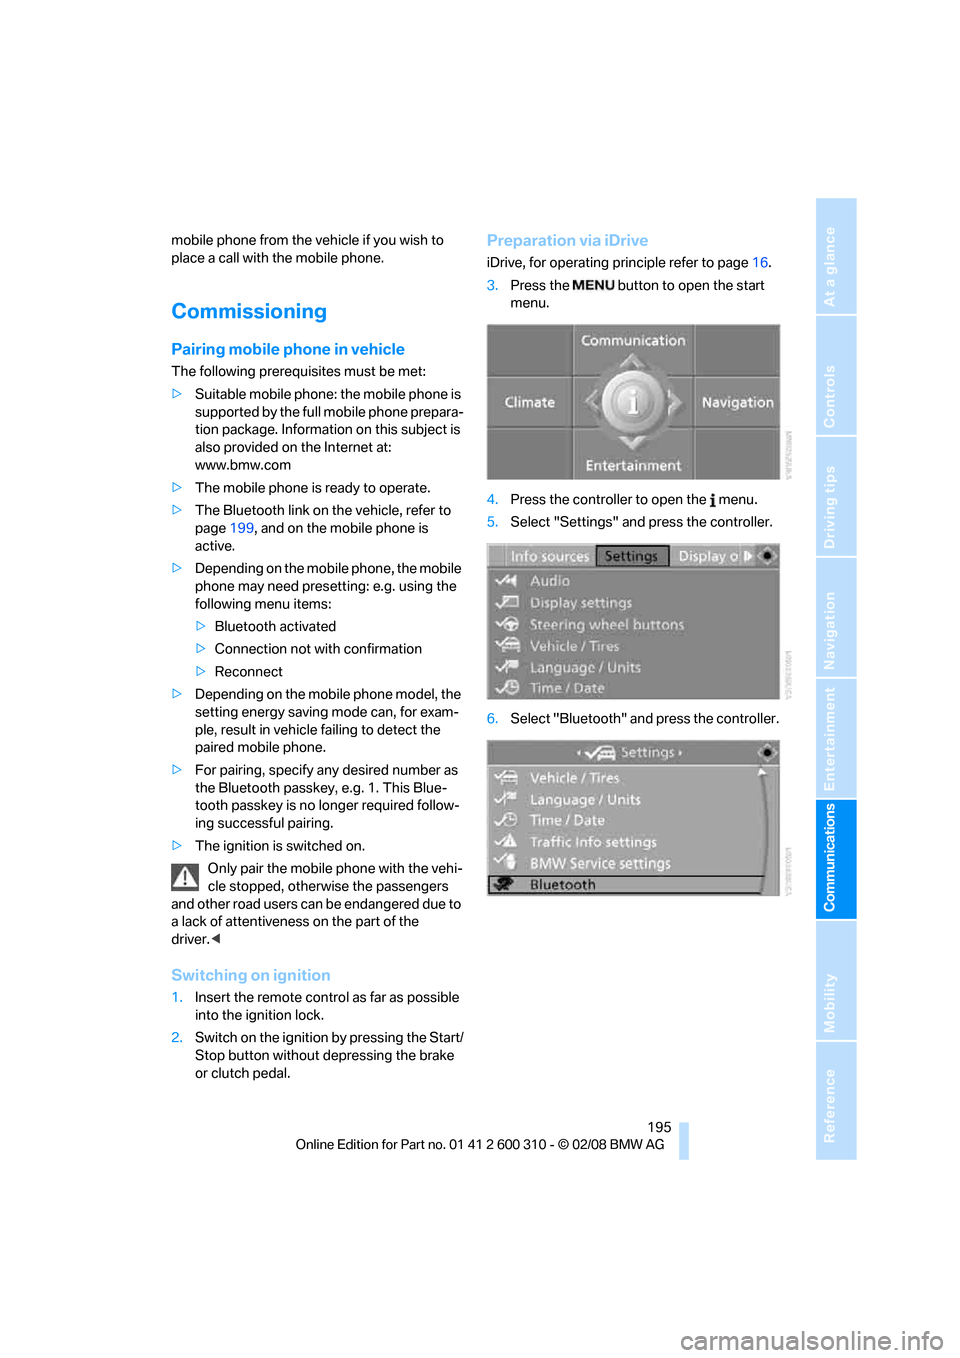
Preparation via iDrive
iDrive, for operating principle refer to page16.
3.Press the button to open the start
menu.
4.Press the controller to open the menu.
5.Select "Settings" and press the controller.
6.Select "Bluetooth" and press the controller.
Page 236 of 292
Under the hood
234
Engine oil
The engine oil consumption is dependent on
driving style and driving conditions.
Checking engine oil level
Your vehicle is equipped with an electronic oil
level check.
The condition for the most accurate indication
of the oil level possible is measurement with the
engine at operating temperature, i.e. following
an uninterrupted drive of at least 6 miles/10 km.
You can display the oil level on the Control Dis-
play while driving or when stopped on a level
surface with the engine running.
iDrive, for operating principle refer to page16.
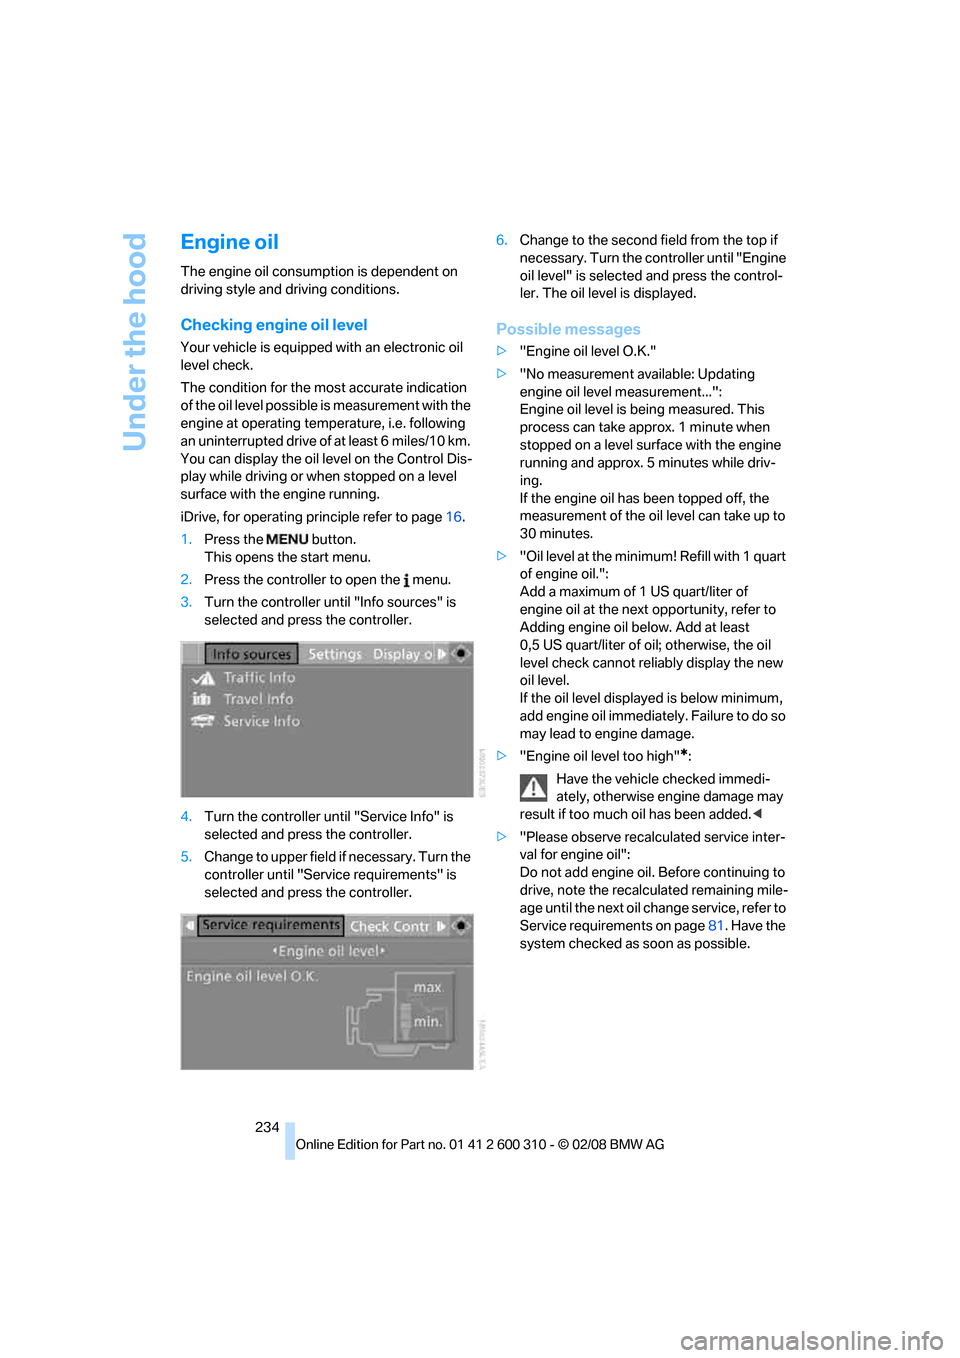
1.Press the button.
This opens the start menu.
2.Press the controller to open the menu.
3.Turn the controller until "Info sources" is
selected and press the controller.
4.Turn the controller until "Service Info" is
selected and press the controller.
5.Change to upper field if necessary. Turn the
controller until "Service requirements" is
selected and press the controller.6.Change to the second field from the top if
necessary. Turn the controller until "Engine
oil level" is selected and press the control-
ler. The oil level is displayed.
Possible messages
>"Engine oil level O.K."
>"No measurement available: Updating
engine oil level measurement...":
Engine oil level is being measured. This
process can take approx. 1 minute when
stopped on a level surface with the engine
running and approx. 5 minutes while driv-
ing.
If the engine oil has been topped off, the
measurement of the oil level can take up to
30 minutes.
>"Oil level at the minimum! Refill with 1 quart
of engine oil.":
Add a maximum of 1 US quart/liter of
engine oil at the next opportunity, refer to
Adding engine oil below. Add at least
0,5 US quart/liter of oil; otherwise, the oil
level check cannot reliably display the new
oil level.
If the oil level displayed is below minimum,
add engine oil immediately. Failure to do so
may lead to engine damage.
>"Engine oil level too high"
*:
Have the vehicle checked immedi-
ately, otherwise engine damage may
result if too much oil has been added.<
>"Please observe recalculated service inter-
val for engine oil":
Do not add engine oil. Before continuing to
drive, note the recalculated remaining mile-
age until the next oil change service, refer to
Service requirements on page81. Have the
system checked as soon as possible.
Page 259 of 292
Mobility
257Reference
At a glance
Controls
Driving tips
Communications
Navigation
Entertainment
>When mounted at an angle, the tow bar will
exert lateral forces, tending to push the
vehicle sideways.
Only attach the tow bar to the tow fittings,
as attachment to other vehicle parts can
lead to damage.<
With tow rope
When starting off in the towing vehicle, make
sure that the tow rope is taut.
To avoid jerking and the associated
stresses on vehicle components when
towing, always use nylon ropes or nylon straps.
Only attach tow ropes to the tow fittings, as
attachment to other vehicle parts can lead to
damage.<
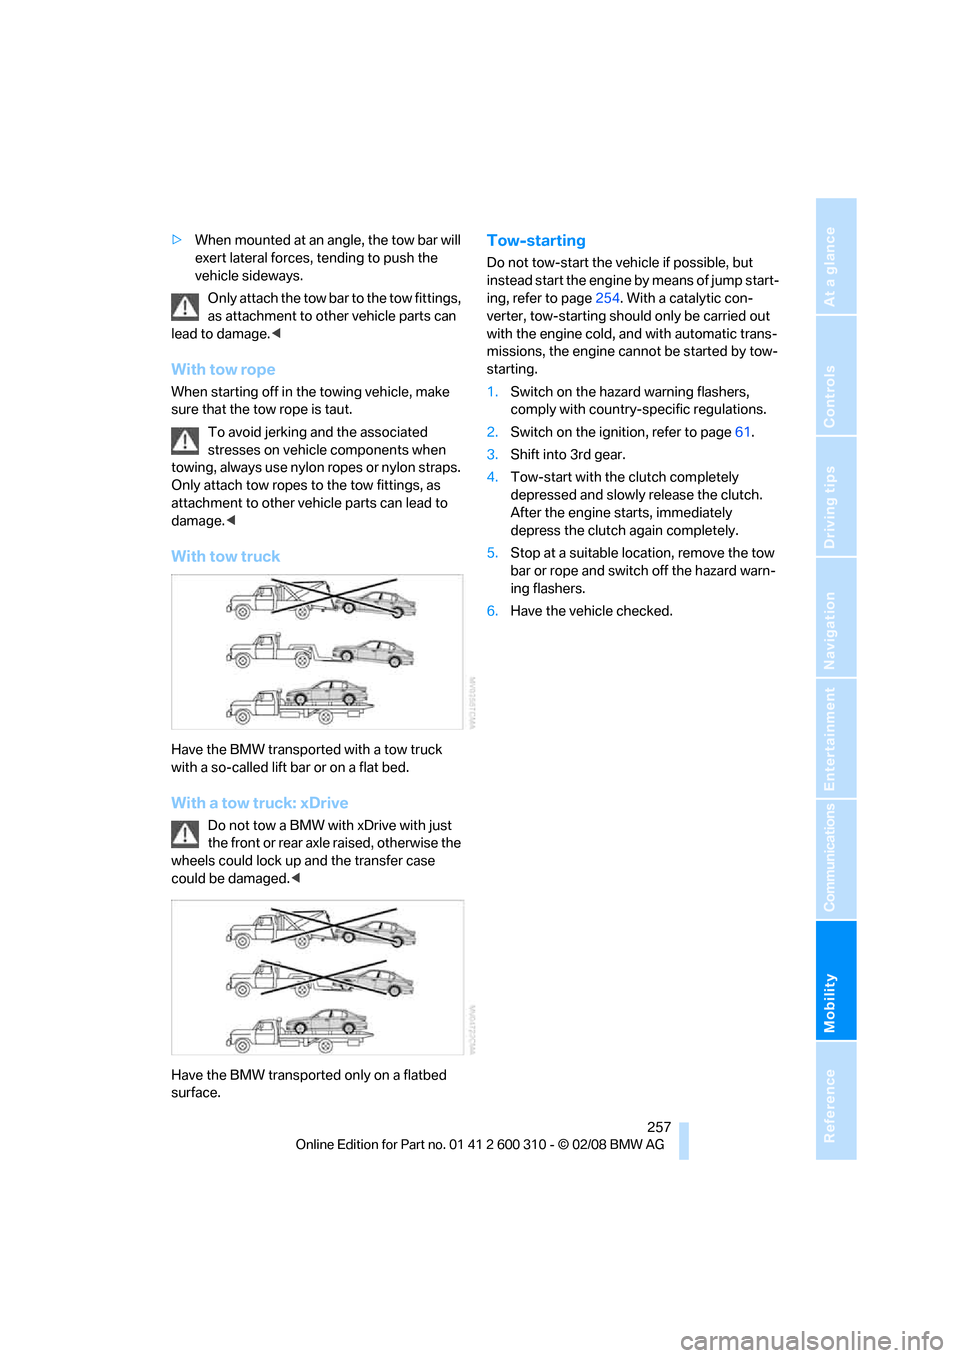
With tow truck
Have the BMW transported with a tow truck
with a so-called lift bar or on a flat bed.
With a tow truck: xDrive
Do not tow a BMW with xDrive with just
the front or rear axle raised, otherwise the
wheels could lock up and the transfer case
could be damaged.<
Have the BMW transported only on a flatbed
surface.
Tow-starting
Do not tow-start the vehicle if possible, but
instead start the engine by means of jump start-
ing, refer to page254. With a catalytic con-
verter, tow-starting should only be carried out
with the engine cold, and with automatic trans-
missions, the engine cannot be started by tow-
starting.
1.Switch on the hazard warning flashers,
comply with country-specific regulations.
2.Switch on the ignition, refer to page61.
3.Shift into 3rd gear.
4.Tow-start with the clutch completely
depressed and slowly release the clutch.
After the engine starts, immediately
depress the clutch again completely.
5.Stop at a suitable location, remove the tow
bar or rope and switch off the hazard warn-
ing flashers.
6.Have the vehicle checked.