2008 BMW 525XI TOURING navigation
[x] Cancel search: navigationPage 33 of 292
Controls
31Reference
At a glance
Driving tips
Communications
Navigation
Entertainment
Mobility
Locking
Press the button.
Do not lock the vehicle from the outside if
persons are inside, as unlocking from the
inside is not possible without special knowl-
edge.<
Switching on interior lamps
With vehicle locked:
Press the button.
You can also use this function to locate your
vehicle in parking garages etc.
Panic mode*
You can trigger the alarm system in case of dan-
ger:
Press the button for at least 3 seconds.
Switching off alarm: press any button.
Sedan: opening luggage
compartment lid
Press the button for approx. 1 second.
The luggage compartment lid opens, regard-
less of whether it was previously locked or
unlocked.
During opening, the luggage compart-
ment lid pivots back and up. Make sure
that adequate clearance is available before
opening.
To prevent accidentally locking yourself out,
never lay the remote control in the cargo bay. A
previously locked luggage compartment lid is
also locked again after closing.<
Sports Wagon: unlocking tailgate
Press the button for approx. 1 second.
The tailgate will open slightly, regardless of
whether it was previously locked or unlocked.
During opening, the tailgate pivots back
and up. Make sure that adequate clear-
ance is available before opening.
To prevent accidentally locking yourself out,
never lay the remote control in the cargo bay. A
previously locked tailgate is also locked again
after closing. When opening the tailgate, the roll-up cover is
raised.<
If pointed or sharp-edged objects could
strike the rear window while driving, be
sure to provide protection around all edges.
Failure to do so could result in damage to the
heating conductors of the rear window.<
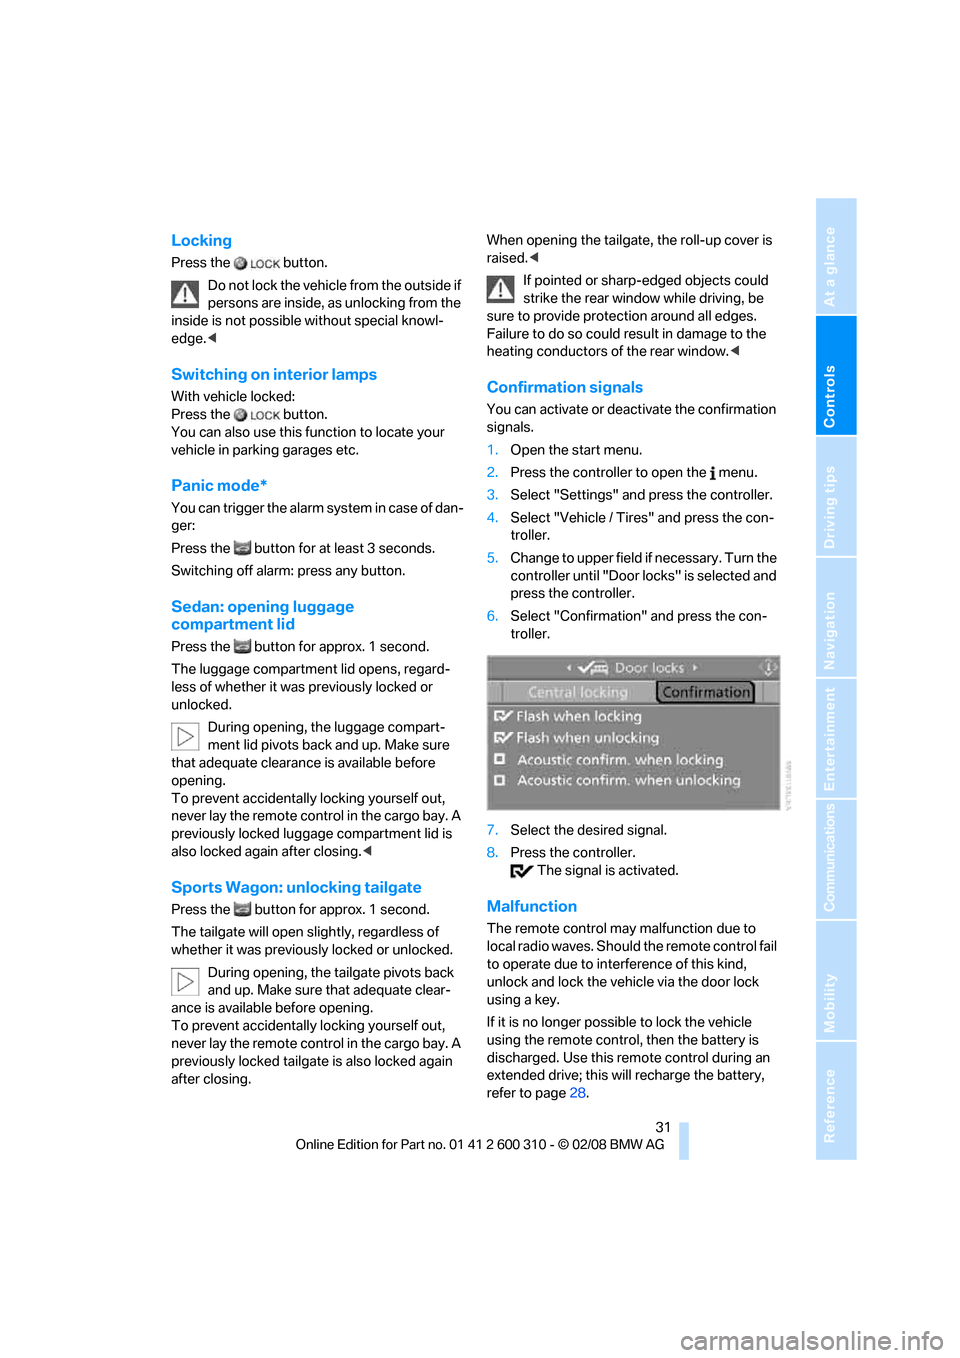
Confirmation signals
You can activate or deactivate the confirmation
signals.
1.Open the start menu.
2.Press the controller to open the menu.
3.Select "Settings" and press the controller.
4.Select "Vehicle / Tires" and press the con-
troller.
5.Change to upper field if necessary. Turn the
controller until "Door locks" is selected and
press the controller.
6.Select "Confirmation" and press the con-
troller.
7.Select the desired signal.
8.Press the controller.
The signal is activated.
Malfunction
The remote control may malfunction due to
local radio waves. Should the remote control fail
to operate due to interference of this kind,
unlock and lock the vehicle via the door lock
using a key.
If it is no longer possible to lock the vehicle
using the remote control, then the battery is
discharged. Use this remote control during an
extended drive; this will recharge the battery,
refer to page28.
Page 35 of 292

Controls
33Reference
At a glance
Driving tips
Communications
Navigation
Entertainment
Mobility
3.Select "Settings" and press the controller.
4.Select "Vehicle / Tires" and press the con-
troller.
5.Change to upper field if necessary. Turn the
controller until "Door locks" is selected and
press the controller.
6.Select "Central locking" and press the con-
troller.
7.Select a menu item:
>"Relock door if not opened"
The central locking system locks again
after a short time if no door has been
opened.
>"Lock after driving"
The central locking system locks the
vehicle as soon as you start to drive.
8.Press the controller.
The setting is selected.
The setting is stored for the remote control cur-
rently in use.
Unlocking and opening
>Either unlock the doors together with the
button for the central locking system and
then pull the door handle above the armrest
or
>pull on the door handle of each door twice:
the first time unlocks the door, the second
time opens it.
Locking
>Use the central locking button to lock all of
the doors simultaneously, or
>press down the lock button of a door.
To prevent you from being locked out, the open driver's door cannot be locked using
the lock button.
Persons or animals left unattended in a
parked vehicle can lock the doors from
the inside. Always take along the remote control
when leaving the vehicle so that the vehicle can
then be opened from the outside.<
Doors
Automatic soft closing*
To close the doors, merely push them gently.
The closing process will then be carried out
automatically.
Make sure that the closing path of the
doors is clear; otherwise injuries may
result.<
Luggage compartment lid/
tailgate
During opening, the luggage compart-
ment lid/tailgate pivots back and up. Make
sure that adequate clearance is available before
opening.<
Sedan
Opening from inside
Press button1 or button2*: the luggage com-
partment lid opens unless it has been locked.
Page 37 of 292
Controls
35Reference
At a glance
Driving tips
Communications
Navigation
Entertainment
Mobility
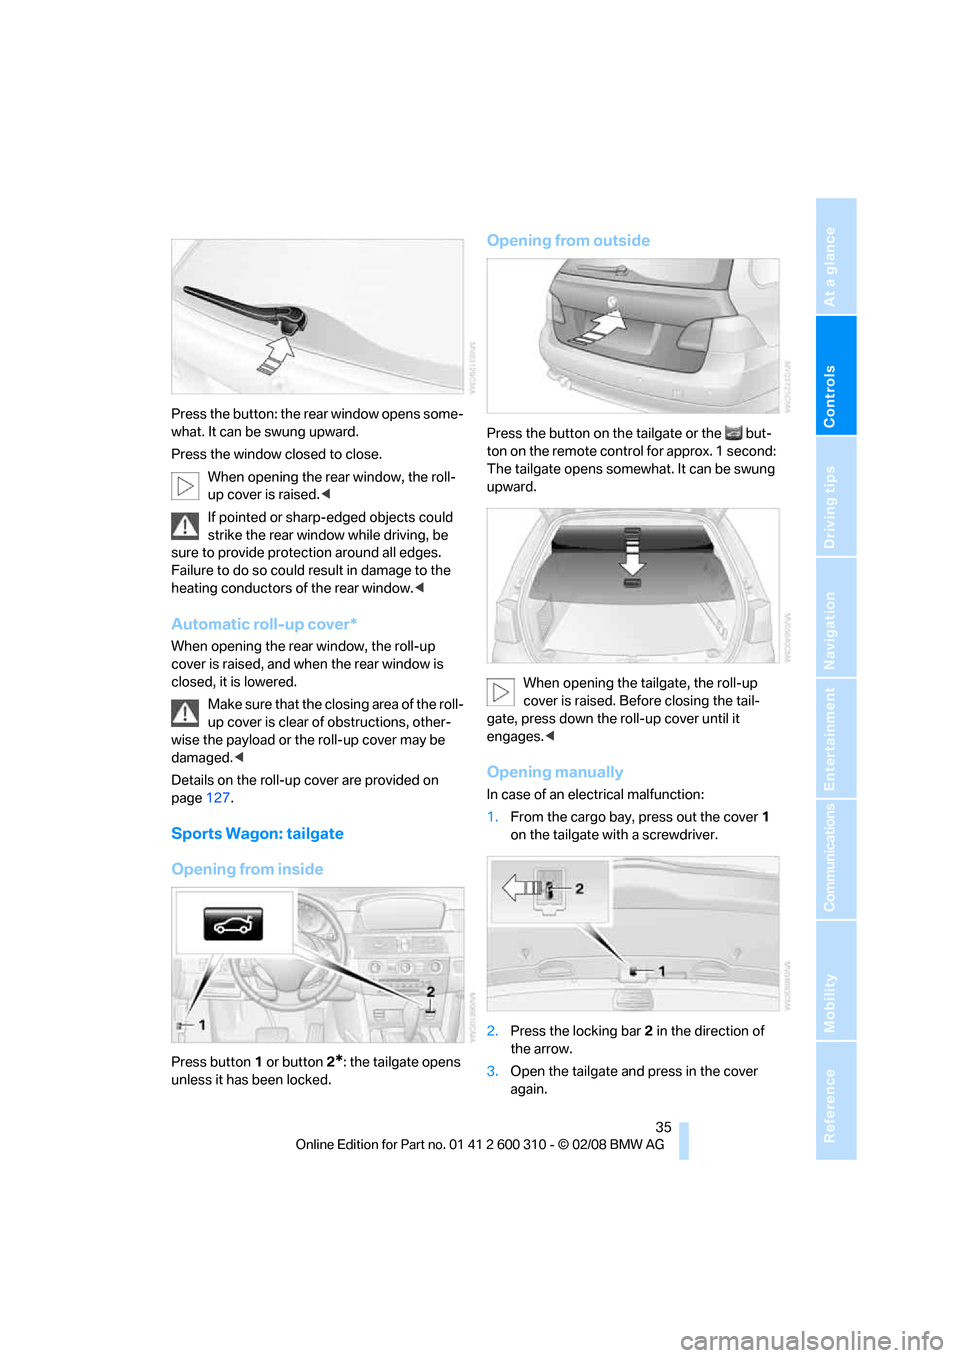
Press the button: the rear window opens some-
what. It can be swung upward.
Press the window closed to close.
When opening the rear window, the roll-
up cover is raised.<
If pointed or sharp-edged objects could
strike the rear window while driving, be
sure to provide protection around all edges.
Failure to do so could result in damage to the
heating conductors of the rear window.<
Automatic roll-up cover*
When opening the rear window, the roll-up
cover is raised, and when the rear window is
closed, it is lowered.
Make sure that the closing area of the roll-
up cover is clear of obstructions, other-
wise the payload or the roll-up cover may be
damaged.<
Details on the roll-up cover are provided on
page127.
Sports Wagon: tailgate
Opening from inside
Press button1 or button2*: the tailgate opens
unless it has been locked.
Opening from outside
Press the button on the tailgate or the but-
ton on the remote control for approx. 1 second:
The tailgate opens somewhat. It can be swung
upward.
When opening the tailgate, the roll-up
cover is raised. Before closing the tail-
gate, press down the roll-up cover until it
engages.<
Opening manually
In case of an electrical malfunction:
1.From the cargo bay, press out the cover1
on the tailgate with a screwdriver.
2.Press the locking bar2 in the direction of
the arrow.
3.Open the tailgate and press in the cover
again.
Page 39 of 292

Controls
37Reference
At a glance
Driving tips
Communications
Navigation
Entertainment
Mobility
Automatic roll-up cover
When the tailgate or rear window are opened,
the roll-up cover is raised, and when the tailgate
and rear window are closed, it is lowered.
Make sure that the closing area of the roll-
up cover is clear of obstructions, other-
wise the payload or the roll-up cover may be
damaged.<
Details on the roll-up cover are provided on
page127.
Closing tailgate
Make sure that the closing path of the tail-
gate is clear, otherwise injuries may
result.<
The tailgate closes automatically when the but-
ton on the inside of the tailgate is pressed.
To interrupt the opening or closing process:
>Press the button on the inside of the tail-
gate.
>Press the button on the outside of the tail-
gate.
Closing is not canceled when you put the
vehicle into motion.<
Alarm system
The concept
The vehicle alarm system responds:
>When a door, the hood or the luggage com-
partment lid/tailgate or rear window are
opened
>To movements in the vehicle: interior
motion sensor, refer to page38>To changes in the vehicle's tilt if someone
attempts to steal the wheels or tow the
vehicle
>To interruptions in battery voltage
Unauthorized operations are briefly signaled by
the alarm system:
>with an acoustic alarm
>by switching on
the hazard warning flashers
>by flashing the high beams
Arming and disarming alarm system
When you lock or unlock the vehicle, either with
the remote control or at the door lock, the alarm
system is armed or disarmed at the same time.
The luggage compartment lid/tailgate can also
be opened with the system armed with the
button on the remote control, refer to page33.
When the luggage compartment lid/tailgate is
closed, it is locked and monitored again.
Switching off alarm
>Unlock the vehicle using the remote control,
refer to page30.
>Insert the remote control all the way into the
ignition lock.
Indicator lamp displays
>The indicator lamp under the interior rear-
view mirror flashes continuously: the sys-
tem is armed.
>The indicator lamp flashes after locking:
doors, hood, luggage compartment lid/tail-
gate or rear window
are not properly closed.
Even if you do not close the alerted area, the
system begins to monitor the remaining
areas, and the indicator lamp flashes con-
Page 41 of 292
Controls
39Reference
At a glance
Driving tips
Communications
Navigation
Entertainment
Mobility
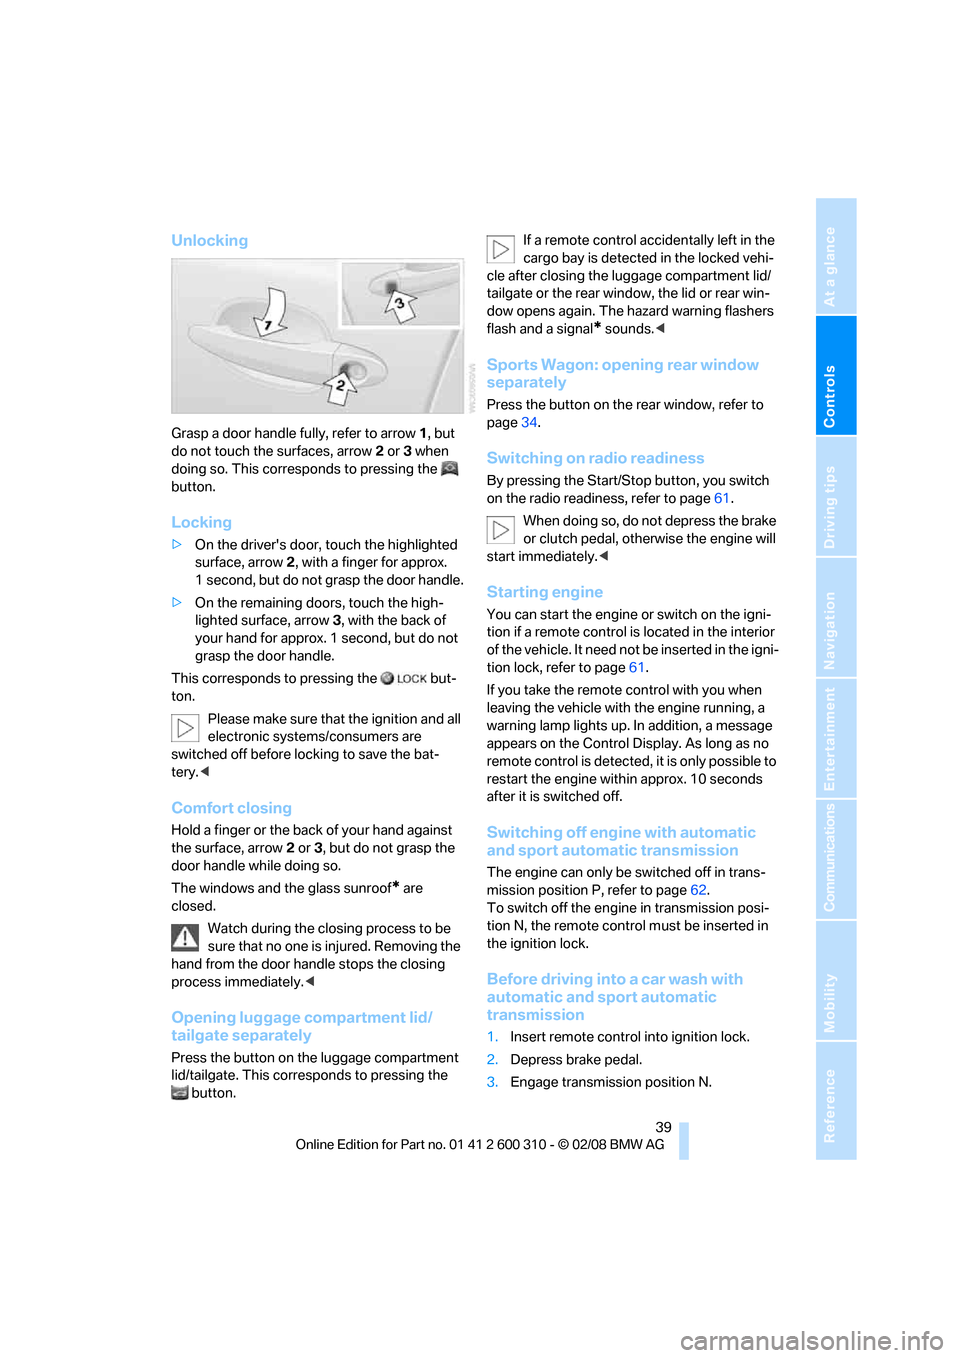
Unlocking
Grasp a door handle fully, refer to arrow1, but
do not touch the surfaces, arrow2 or 3 when
doing so. This corresponds to pressing the
button.
Locking
>On the driver's door, touch the highlighted
surface, arrow2, with a finger for approx.
1 second, but do not grasp the door handle.
>On the remaining doors, touch the high-
lighted surface, arrow3, with the back of
your hand for approx. 1 second, but do not
grasp the door handle.
This corresponds to pressing the but-
ton.
Please make sure that the ignition and all
electronic systems/consumers are
switched off before locking to save the bat-
tery.<
Comfort closing
Hold a finger or the back of your hand against
the surface, arrow2 or 3, but do not grasp the
door handle while doing so.
The windows and the glass sunroof
* are
closed.
Watch during the closing process to be
sure that no one is injured. Removing the
hand from the door handle stops the closing
process immediately.<
Opening luggage compartment lid/
tailgate separately
Press the button on the luggage compartment
lid/tailgate. This corresponds to pressing the
button.If a remote control accidentally left in the
cargo bay is detected in the locked vehi-
cle after closing the luggage compartment lid/
tailgate or the rear window, the lid or rear win-
dow opens again. The hazard warning flashers
flash and a signal
* sounds.<
Sports Wagon: opening rear window
separately
Press the button on the rear window, refer to
page34.
Switching on radio readiness
By pressing the Start/Stop button, you switch
on the radio readiness, refer to page61.
When doing so, do not depress the brake
or clutch pedal, otherwise the engine will
start immediately.<
Starting engine
You can start the engine or switch on the igni-
tion if a remote control is located in the interior
of the vehicle. It need not be inserted in the igni-
tion lock, refer to page61.
If you take the remote control with you when
leaving the vehicle with the engine running, a
warning lamp lights up. In addition, a message
appears on the Control Display. As long as no
remote control is detected, it is only possible to
restart the engine within approx. 10 seconds
after it is switched off.
Switching off engine with automatic
and sport automatic transmission
The engine can only be switched off in trans-
mission position P, refer to page62.
To switch off the engine in transmission posi-
tion N, the remote control must be inserted in
the ignition lock.
Before driving into a car wash with
automatic and sport automatic
transmission
1.Insert remote control into ignition lock.
2.Depress brake pedal.
3.Engage transmission position N.
Page 43 of 292
Controls
41Reference
At a glance
Driving tips
Communications
Navigation
Entertainment
Mobility
Closing without pinch protection
system
In case of danger from outside or if, for example,
ice on the window prevents normal closing, pro-
ceed as follows:
1.Pull the switch beyond the resistance point
and hold. The pinch protection system is
limited and the window opens slightly if the
closing force exceeds a certain value.
2.Pull the switch beyond the resistance point
and hold again within approx. 4 seconds.
The window closes without the pinch pro-
tection system.
Safety switch
With the safety switch, you can prevent the rear
windows from being opened or closed via the
switches in the rear passenger area, by chil-
dren, for example. The LED lights up when this
safety feature is activated.
Always press the safety switch when chil-
dren ride in the rear, otherwise uncon-
trolled closing of the windows could lead to
injuries.<
Glass sunroof*, electric
The glass sunroof is ready for operation with
the ignition switched on, refer to page61.
To prevent injuries, exercise care when
closing the glass sunroof and keep it in
your field of vision until it is closed.
Always take along the remote control when you
leave the vehicle, otherwise children could, for
example, operate the roof and injure them-
selves.<
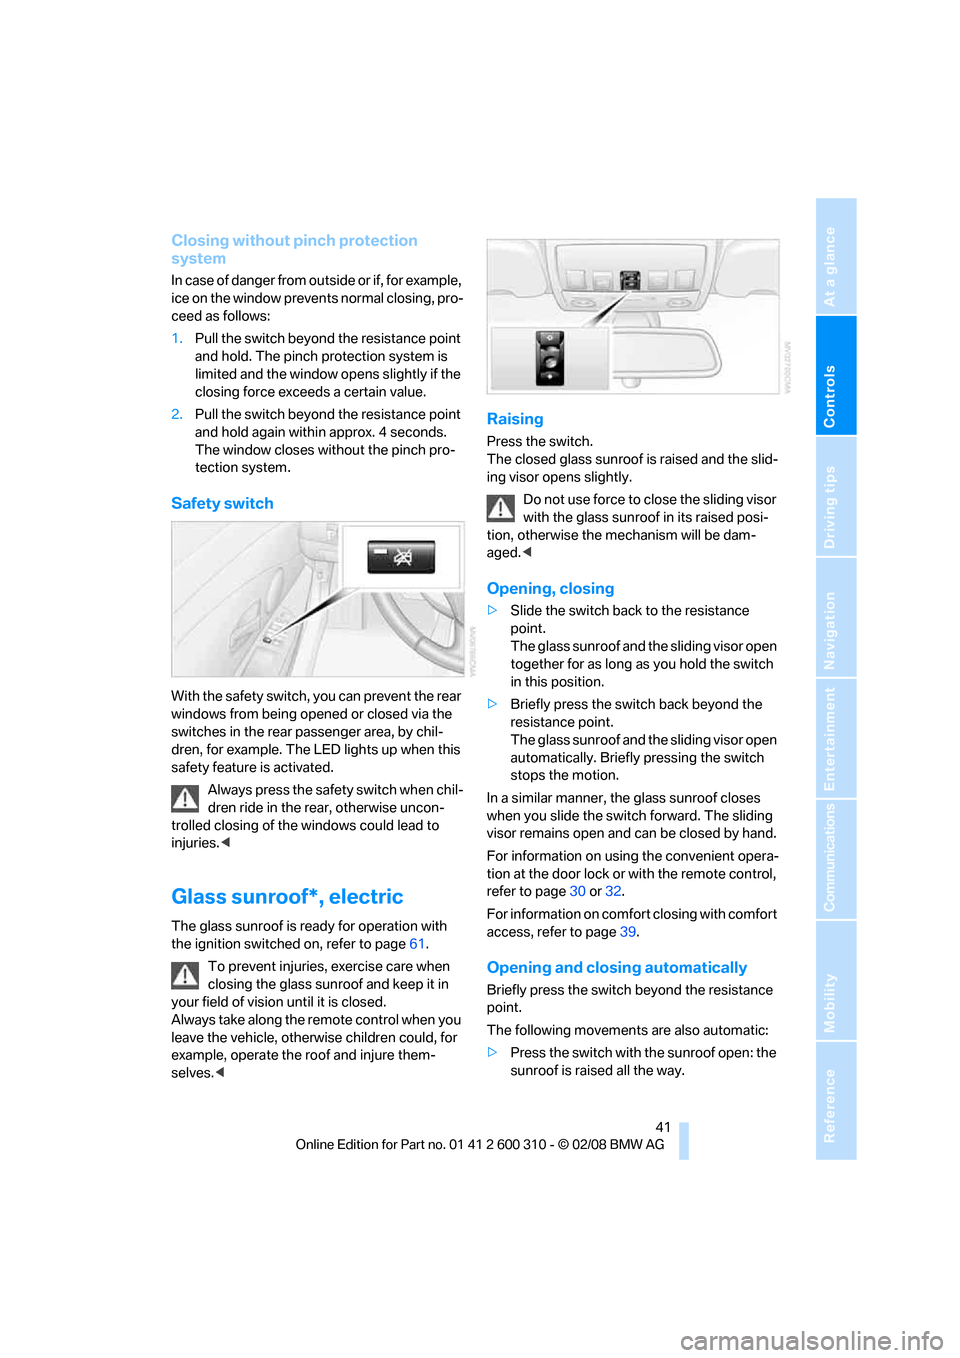
Raising
Press the switch.
The closed glass sunroof is raised and the slid-
ing visor opens slightly.
Do not use force to close the sliding visor
with the glass sunroof in its raised posi-
tion, otherwise the mechanism will be dam-
aged.<
Opening, closing
>Slide the switch back to the resistance
point.
The glass sunroof and the sliding visor open
together for as long as you hold the switch
in this position.
>Briefly press the switch back beyond the
resistance point.
The glass sunroof and the sliding visor open
automatically. Briefly pressing the switch
stops the motion.
In a similar manner, the glass sunroof closes
when you slide the switch forward. The sliding
visor remains open and can be closed by hand.
For information on using the convenient opera-
tion at the door lock or with the remote control,
refer to page30 or32.
For information on comfort closing with comfort
access, refer to page39.
Opening and closing automatically
Briefly press the switch beyond the resistance
point.
The following movements are also automatic:
>Press the switch with the sunroof open: the
sunroof is raised all the way.
Page 45 of 292
Controls
43Reference
At a glance
Driving tips
Communications
Navigation
Entertainment
Mobility
example, operate the roof and injure them-
selves.<
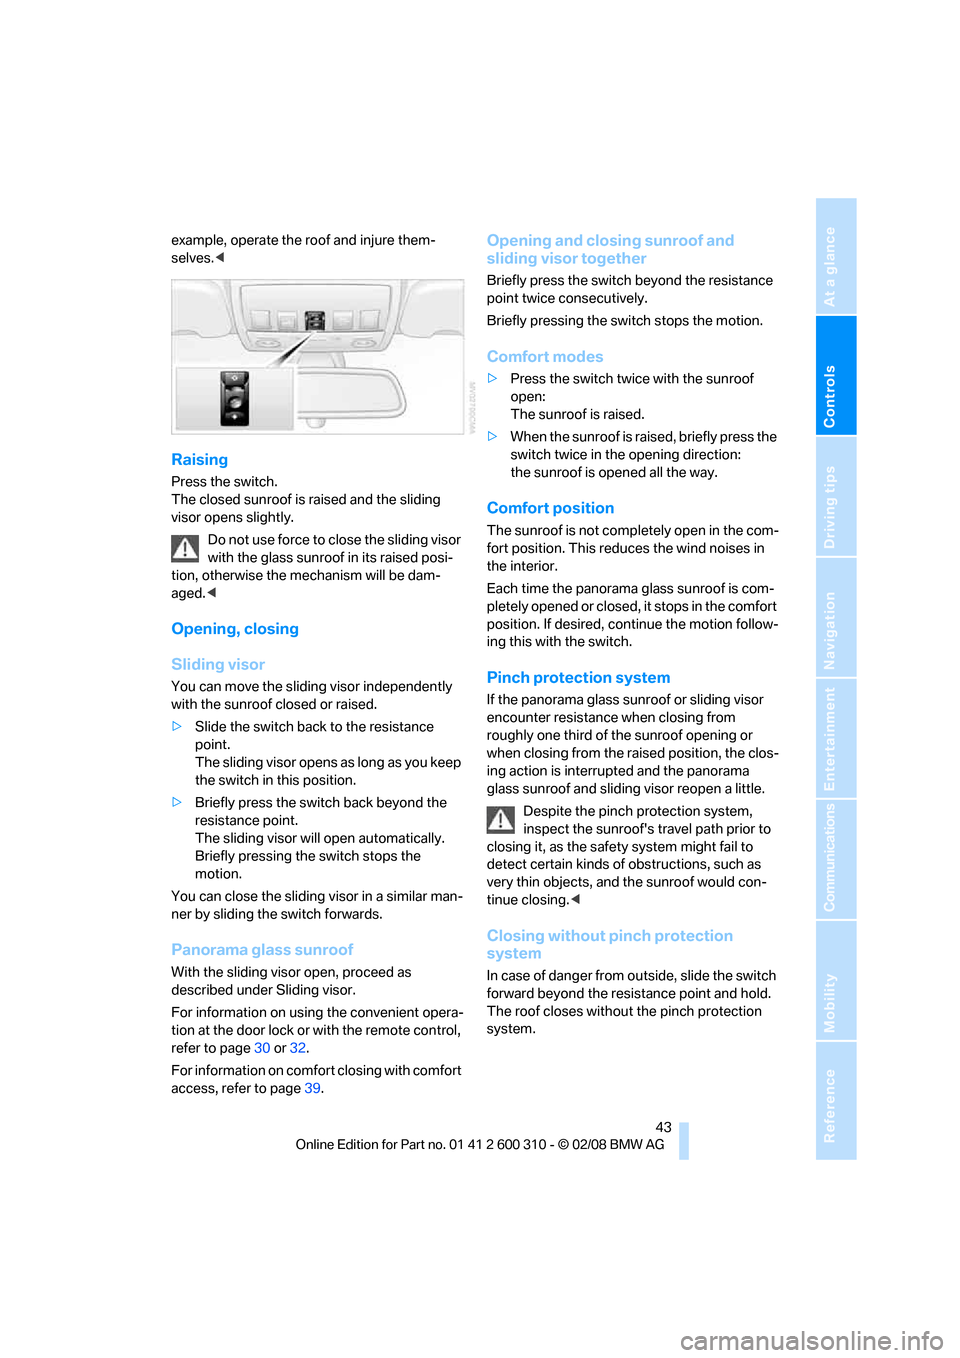
Raising
Press the switch.
The closed sunroof is raised and the sliding
visor opens slightly.
Do not use force to close the sliding visor
with the glass sunroof in its raised posi-
tion, otherwise the mechanism will be dam-
aged.<
Opening, closing
Sliding visor
You can move the sliding visor independently
with the sunroof closed or raised.
>Slide the switch back to the resistance
point.
The sliding visor opens as long as you keep
the switch in this position.
>Briefly press the switch back beyond the
resistance point.
The sliding visor will open automatically.
Briefly pressing the switch stops the
motion.
You can close the sliding visor in a similar man-
ner by sliding the switch forwards.
Panorama glass sunroof
With the sliding visor open, proceed as
described under Sliding visor.
For information on using the convenient opera-
tion at the door lock or with the remote control,
refer to page30 or32.
For information on comfort closing with comfort
access, refer to page39.
Opening and closing sunroof and
sliding visor together
Briefly press the switch beyond the resistance
point twice consecutively.
Briefly pressing the switch stops the motion.
Comfort modes
>Press the switch twice with the sunroof
open:
The sunroof is raised.
>When the sunroof is raised, briefly press the
switch twice in the opening direction:
the sunroof is opened all the way.
Comfort position
The sunroof is not completely open in the com-
fort position. This reduces the wind noises in
the interior.
Each time the panorama glass sunroof is com-
pletely opened or closed, it stops in the comfort
position. If desired, continue the motion follow-
ing this with the switch.
Pinch protection system
If the panorama glass sunroof or sliding visor
encounter resistance when closing from
roughly one third of the sunroof opening or
when closing from the raised position, the clos-
ing action is interrupted and the panorama
glass sunroof and sliding visor reopen a little.
Despite the pinch protection system,
inspect the sunroof's travel path prior to
closing it, as the safety system might fail to
detect certain kinds of obstructions, such as
very thin objects, and the sunroof would con-
tinue closing.<
Closing without pinch protection
system
In case of danger from outside, slide the switch
forward beyond the resistance point and hold.
The roof closes without the pinch protection
system.
Page 47 of 292

Controls
45Reference
At a glance
Driving tips
Communications
Navigation
Entertainment
Mobility
Adjusting
Sitting safely
The ideal sitting position can make a vital con-
tribution to relaxed, fatigue-free driving. In the
interaction with the safety belts, the head
restraints and the airbags, the sitting position
plays an important role in an accident. To
ensure that the safety systems operate with
optimal efficiency, we strongly urge you to
observe the instructions contained in the fol-
lowing section.
For additional information on transporting chil-
dren safely, refer to page56.
Airbags
Always maintain an adequate distance
between yourself and the airbags. Always
hold the steering wheel by its rim with hands at
the 9 o'clock and 3 o'clock positions, to mini-
mize the risk of injuries to your hands and arms
in the event of airbag deployment.
No one and nothing is to come between the air-
bags and the seat occupant.
Do not use the cover of the front airbag on the
front passenger side as a storage area. Make
sure that the front passenger is sitting correctly
and does not rest feet or legs on the instrument
panel, otherwise leg injuries can occur if the
front airbags are triggered.
Make sure that occupants do not rest their head
on the side or head airbags, otherwise injuries
can occur if the airbags are triggered.<
Even if you adhere to all the instructions, inju-
ries resulting from contact with airbags cannot
be fully excluded, depending on the circum-
stances. The ignition and inflation noise may
provoke a mild hearing loss in extremely sensi-
tive individuals. This effect is usually only tem-
porary.
For airbag locations and additional information
on airbags, refer to page99.
Head restraints
A correctly adjusted head restraint reduces the
risk of spinal injury in the event of an accident.
Adjust the head restraint so that its center
is approx. at ear level. Otherwise there is
increased danger of injury in the event of an
accident.<
Head restraints, refer to page49.
Safety belts
Before every drive, make sure that safety belts
are being worn at all of the occupied seats. Air-
bags complement the safety belt as an addi-
tional safety device, but they do not represent a
substitute.
Your vehicle is provided with five seats, which
are all equipped with a safety belt.
Never allow more than one person to
wear a single safety belt. Never allow
infants or small children to ride in a passenger's
lap. Make sure that the belt lies low around the
hips in the lap area and does not press on the
abdomen. The safety belt must not lie across
the neck, rub against sharp edges, be routed
over solid or breakable objects or be pinched.
Wear the safety belt without twisting, snugly
across the lap and shoulders, as close to the
body as possible. Otherwise the belt can slip
over the hips in the lap area in a frontal impact
and injure the abdomen. Avoid wearing clothing
that prevents the belt from fitting properly and
pull the belt in the upper body area periodically
to readjust the tension, in order to avoid a
reduction in the restraint of the safety belt.
Sports Wagon: if the center safety belt in the
rear is used, the larger backrest half must be
locked, refer to page127, otherwise the middle
safety belt has no restraining action.<
Safety belts, refer to page50.