2008 BMW 525XI TOURING start stop button
[x] Cancel search: start stop buttonPage 88 of 292
Everything under control
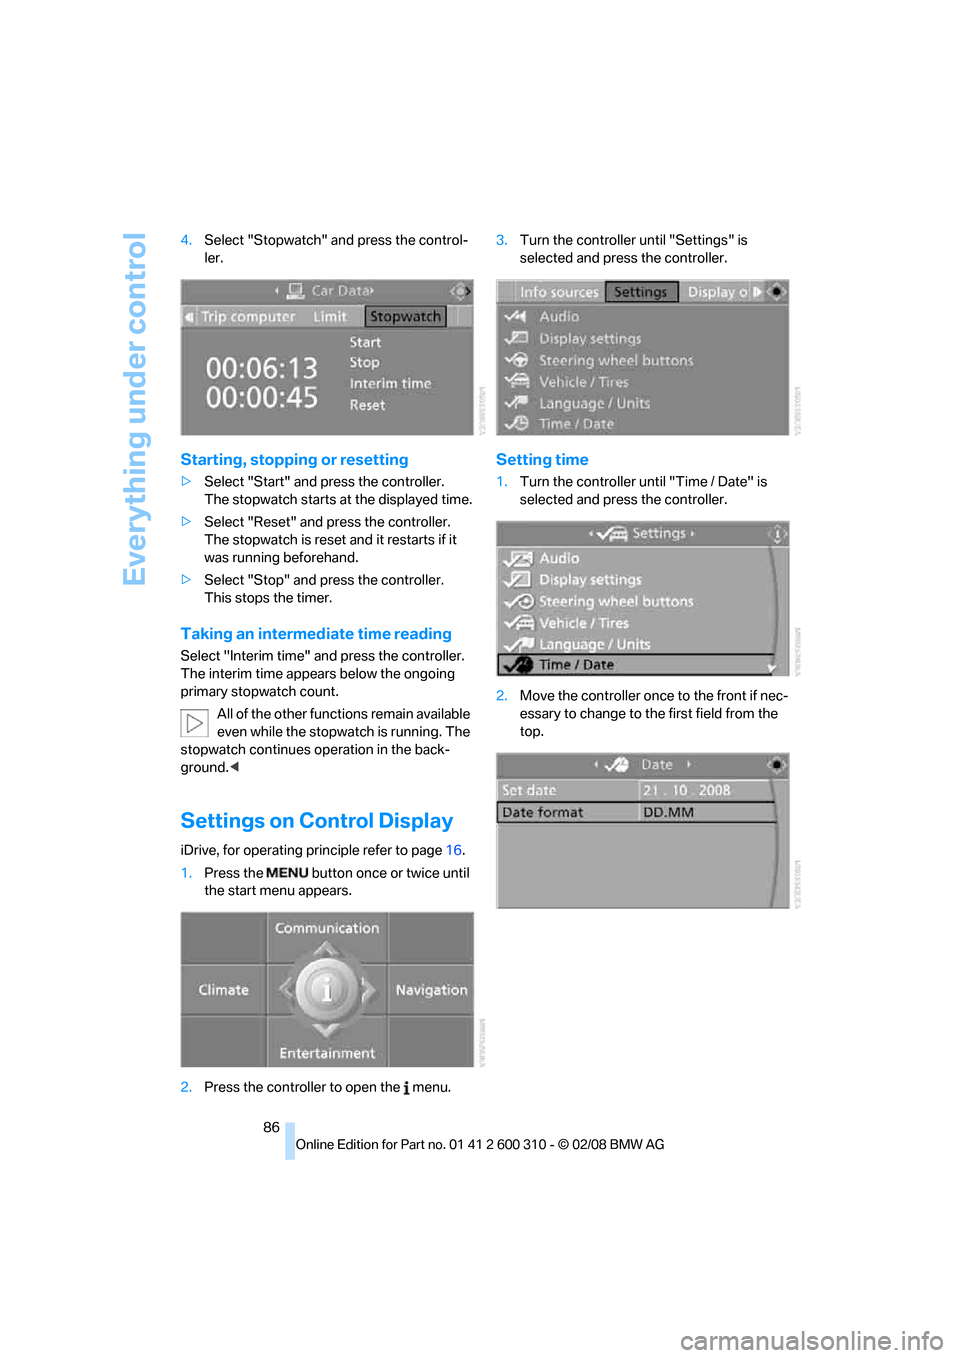
86 4.Select "Stopwatch" and press the control-
ler.
Starting, stopping or resetting
>Select "Start" and press the controller.
The stopwatch starts at the displayed time.
>Select "Reset" and press the controller.
The stopwatch is reset and it restarts if it
was running beforehand.
>Select "Stop" and press the controller.
This stops the timer.
Taking an intermediate time reading
Select "Interim time" and press the controller.
The interim time appears below the ongoing
primary stopwatch count.
All of the other functions remain available
even while the stopwatch is running. The
stopwatch continues operation in the back-
ground.<
Settings on Control Display
iDrive, for operating principle refer to page16.
1.Press the button once or twice until
the start menu appears.
2.Press the controller to open the menu.3.Turn the controller until "Settings" is
selected and press the controller.
Setting time
1.Turn the controller until "Time / Date" is
selected and press the controller.
2.Move the controller once to the front if nec-
essary to change to the first field from the
top.
Page 93 of 292
Controls
91Reference
At a glance
Driving tips
Communications
Navigation
Entertainment
Mobility
Adaptive brake assistant*
In conjunction with the active cruise control
with the stop-and-go function, the adaptive
brake assistant ensures that the brake
responds even more quickly during braking
with the brake assistant.
DSC Dynamic Stability Control
DSC prevents traction loss in the driving wheels
when starting off and accelerating. The system
also identifies unstable driving conditions, such
as a loss of traction at the rear of the vehicle or
sliding of the vehicle in its front wheels. In these
cases, DSC helps the vehicle maintain a safe
course within physical limits by reducing engine
output and through braking actions in the indi-
vidual wheels.
The laws of physics cannot be repealed,
even with DSC. An appropriate driving
style always remains the responsibility of the
driver. Therefore, do not restrict the additional
safety margin with a risky driving style, as other-
wise there is a risk of an accident.<
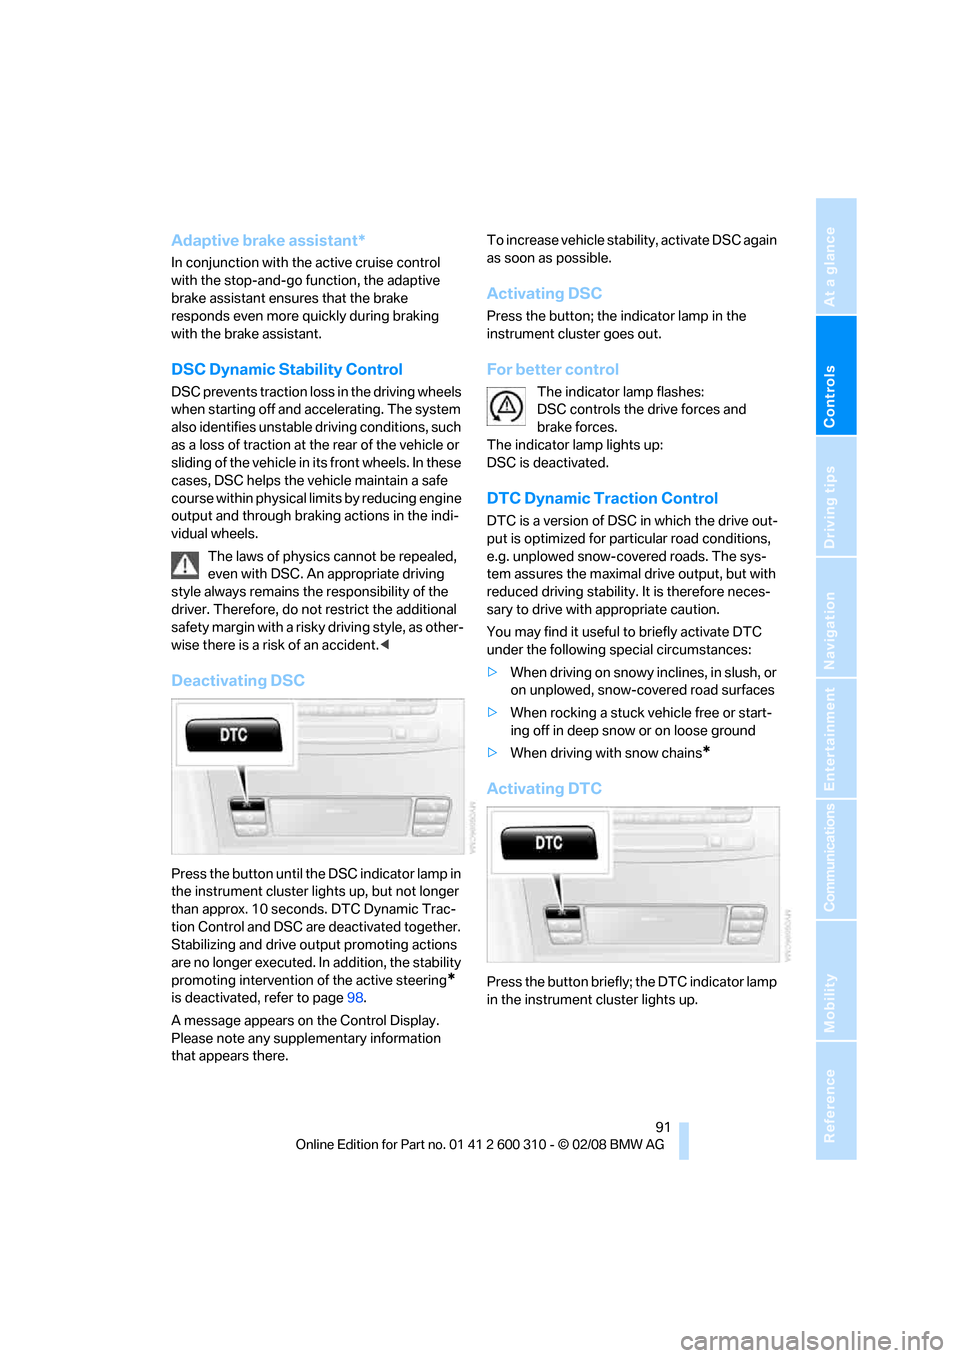
Deactivating DSC
Press the button until the DSC indicator lamp in
the instrument cluster lights up, but not longer
than approx. 10 seconds. DTC Dynamic Trac-
tion Control and DSC are deactivated together.
Stabilizing and drive output promoting actions
are no longer executed. In addition, the stability
promoting intervention of the active steering
*
is deactivated, refer to page98.
A message appears on the Control Display.
Please note any supplementary information
that appears there.To increase vehicle stability, activate DSC again
as soon as possible.
Activating DSC
Press the button; the indicator lamp in the
instrument cluster goes out.
For better control
The indicator lamp flashes:
DSC controls the drive forces and
brake forces.
The indicator lamp lights up:
DSC is deactivated.
DTC Dynamic Traction Control
DTC is a version of DSC in which the drive out-
put is optimized for particular road conditions,
e.g. unplowed snow-covered roads. The sys-
tem assures the maximal drive output, but with
reduced driving stability. It is therefore neces-
sary to drive with appropriate caution.
You may find it useful to briefly activate DTC
under the following special circumstances:
>When driving on snowy inclines, in slush, or
on unplowed, snow-covered road surfaces
>When rocking a stuck vehicle free or start-
ing off in deep snow or on loose ground
>When driving with snow chains
*
Activating DTC
Press the button briefly; the DTC indicator lamp
in the instrument cluster lights up.
Page 96 of 292
Technology for comfort, convenience and safety
94
Sports Wagon: self-leveling
suspension
Malfunction
The warning lamp for self-leveling sus-
pension lights up yellow and a message
is shown on the Control Display. A mal-
function has occurred in the self-leveling sus-
pension. Stop and check the vehicle. If it is con-
siderably lower at the rear than at the front, and
possibly also on one side – rear left compared to
rear right –, go to the nearest BMW center or a
workshop that works according to BMW repair
procedures with correspondingly trained per-
sonnel. Drive with appropriate caution in the
meantime. The vehicle has reduced ground
clearance and driving comfort may be notice-
ably reduced. Even if the position of the vehicle
is normal, go to the nearest BMW center or a
workshop that works according to BMW repair
procedures with correspondingly trained per-
sonnel.
FTM Flat Tire Monitor*
The concept
The Flat Tire Monitor detects a pressure loss in
one tire by comparing the speeds of the individ-
ual wheels during driving.
In the event of a pressure loss, there is a change
in the rolling circumference and therefore the
rotation speed of the corresponding wheel. The
system detects this change and reports it as a
flat tire.
Functional requirement
In order to assure the reliable reporting of a flat
tire, the system must be initialized for the cor-
rect tire inflation pressure.
The initialization must be repeated after
each time the tire inflation pressure is cor-
rected and after every tire or wheel change.<
System limits
The Flat Tire Monitor cannot indicate sudden
severe tire damage caused by outside factors
and does not detect a natural, even pressure
drop in all four tires.
In the following situations, the system could be
delayed or malfunction:
>System has not been initialized
>Driving on snowy or slippery road surface
>Sporty driving style: slip in the drive wheels,
high lateral acceleration
>Driving with snow chains
*
When you are driving with the compact wheel*
the Flat Tire Monitor is unable to function.
Initializing system
The initialization finishes during driving,
which can be interrupted at any time.
When driving resumes, the initialization is con-
tinued automatically. Do not initialize the sys-
tem when driving with snow chains
* or com-
pact wheel
*.<
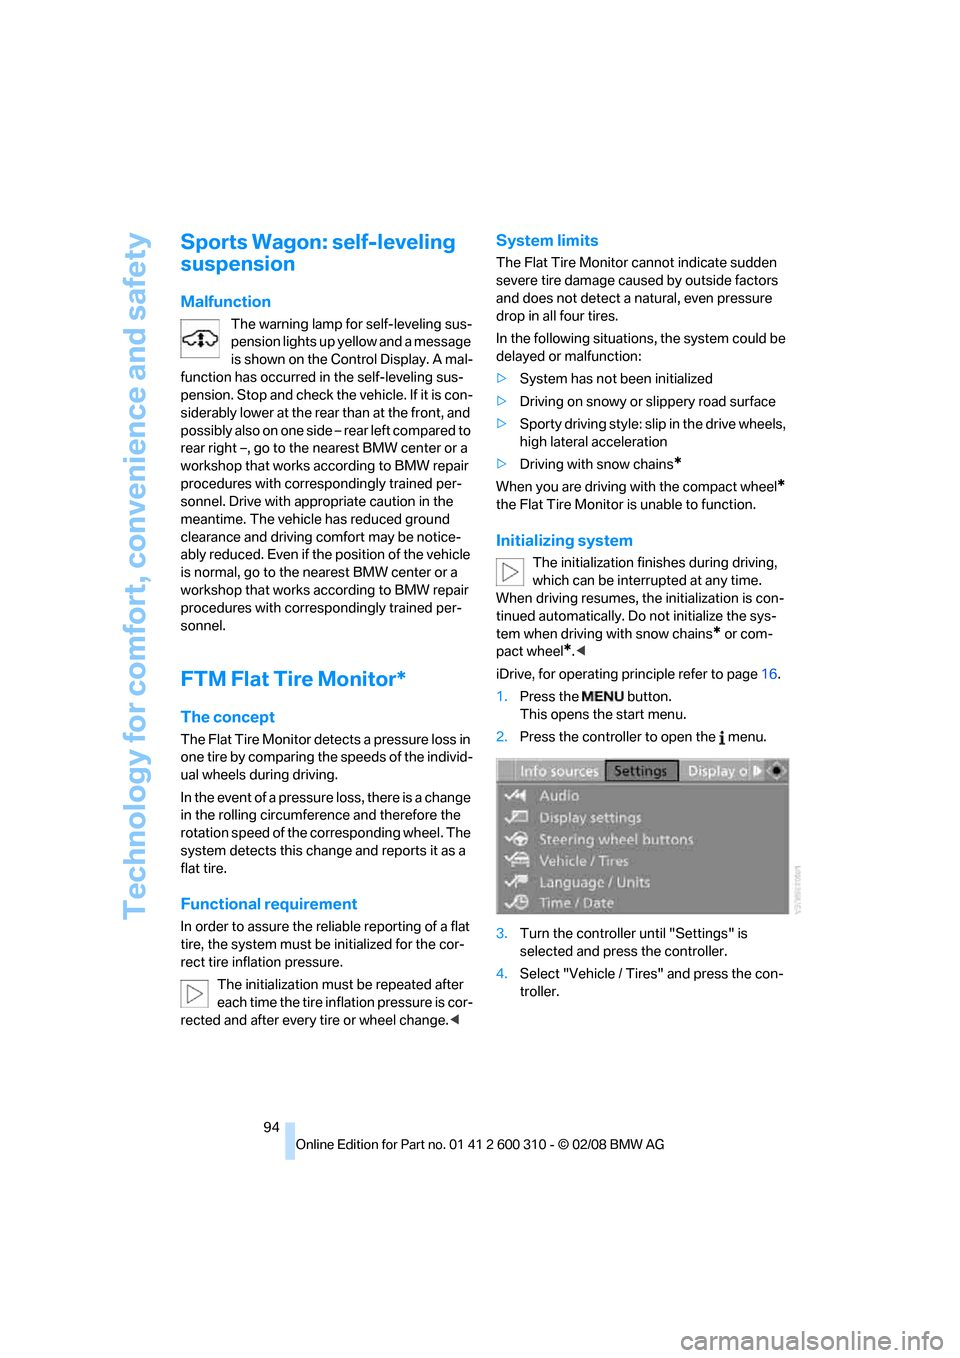
iDrive, for operating principle refer to page16.
1.Press the button.
This opens the start menu.
2.Press the controller to open the menu.
3.Turn the controller until "Settings" is
selected and press the controller.
4.Select "Vehicle / Tires" and press the con-
troller.
Page 113 of 292
Controls
111Reference
At a glance
Driving tips
Communications
Navigation
Entertainment
Mobility
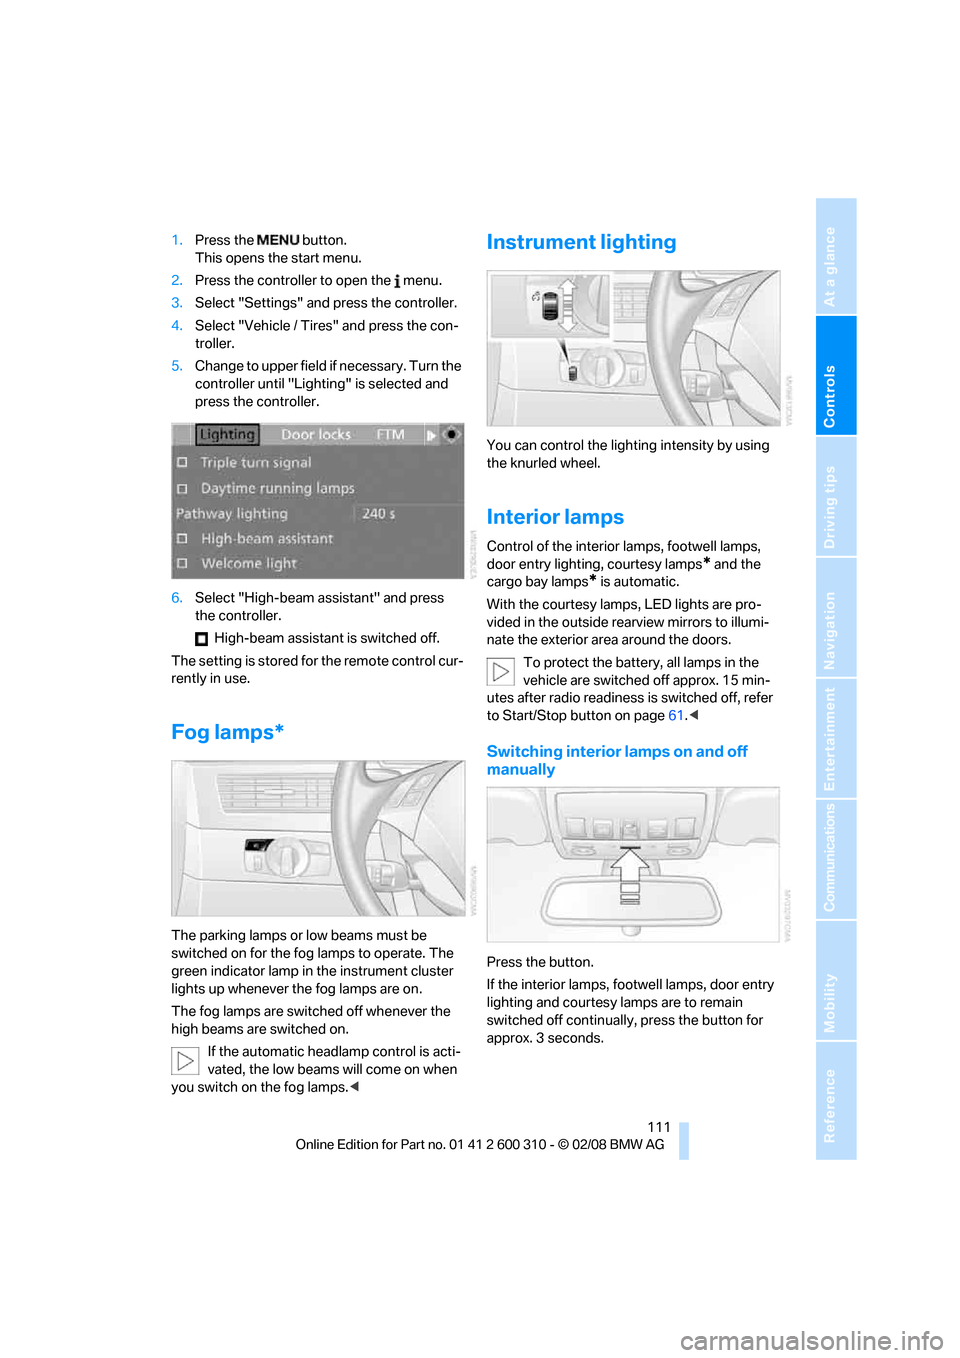
1.Press the button.
This opens the start menu.
2.Press the controller to open the menu.
3.Select "Settings" and press the controller.
4.Select "Vehicle / Tires" and press the con-
troller.
5.Change to upper field if necessary. Turn the
controller until "Lighting" is selected and
press the controller.
6.Select "High-beam assistant" and press
the controller.
High-beam assistant is switched off.
The setting is stored for the remote control cur-
rently in use.
Fog lamps*
The parking lamps or low beams must be
switched on for the fog lamps to operate. The
green indicator lamp in the instrument cluster
lights up whenever the fog lamps are on.
The fog lamps are switched off whenever the
high beams are switched on.
If the automatic headlamp control is acti-
vated, the low beams will come on when
you switch on the fog lamps.<
Instrument lighting
You can control the lighting intensity by using
the knurled wheel.
Interior lamps
Control of the interior lamps, footwell lamps,
door entry lighting, courtesy lamps
* and the
cargo bay lamps
* is automatic.
With the courtesy lamps,
LED lights are pro-
vided in the outside rearview mirrors to illumi-
nate the exterior area around the doors.
To protect the battery, all lamps in the
vehicle are switched off approx. 15 min-
utes after radio readiness is switched off, refer
to Start/Stop button on page61.<
Switching interior lamps on and off
manually
Press the button.
If the interior lamps, footwell lamps, door entry
lighting and courtesy lamps are to remain
switched off continually, press the button for
approx. 3 seconds.
Page 118 of 292

Climate
116 6.Turn the controller to adjust the air distribu-
tion.
Driver's side:
1Air directed toward the windshield and side
windows
2Air for the upper body
3Air to footwell
Front passenger side:
4Air for the upper body
5Air to footwell
Pressing the AUTO button cancels the
manual air distribution settings.<
The automatic mode for the air volume remains
effective with manual air distribution.
Switching cooling function on and off
The cooling function cools and
dehumidifies the incoming air
before also reheating it as
required, according to the temperature setting.
This function is only available when the engine
is running.
The cooling function helps to avoid condensa-
tion on the window surfaces or to quickly
remove them.
Depending on the weather, the windshield may
fog over briefly when the engine is started.
The cooling function is also switched on with
the AUTO program.
Maximum cooling
Maximally cooled air is obtained as
quickly as possible at an outside
temperature above approx. 327/
06 and with the engine running.At the lowest temperature, the automatic cli-
mate control switches into recirculating air
mode. The maximum air volume flows out of the
vents for the upper body. Therefore, open these
vents for maximum cooling.
AUC Automatic recirculated-air
control/recirculated-air mode
You can respond to pollutants or
unpleasant odors in the immediate
environment by suspending the
supply of outside air. The system then recircu-
lates the air currently within the vehicle. During
AUC operation, a sensor detects pollutants in
the outside air and controls the shut-off auto-
matically.
By pressing the button repeatedly, you can
request three operating modes:
>LED off: outside air flows in continuously.
>Right LED on, AUC mode: the system
detects pollutants in the outside air and
shuts off the supply as needed.
>Left LED on, recirculated-air mode: the
supply of outside air is permanently shut off.
Should the windows fog up in the recircu-
lated-air mode, press the AUTO button or
switch off the recirculated-air mode and
increase the air volume if necessary.
The recirculated-air mode should not be used
over an extended period of time, as the air qual-
ity inside the vehicle deteriorates continu-
ously.<
Residual heat
The heat stored in the engine is
used to heat the passenger com-
partment, e.g. while stopped at a
school to pick up a child.
1.Switch off the engine.
2.Turn to the right, refer to arrow.
The function can be switched on when the fol-
lowing conditions are met:
>up to 15 minutes after switching off the
engine
>with engine at operating temperature
Page 191 of 292
Navigation
Entertainment
Driving tips
189Reference
At a glance
Controls
Communications
Mobility
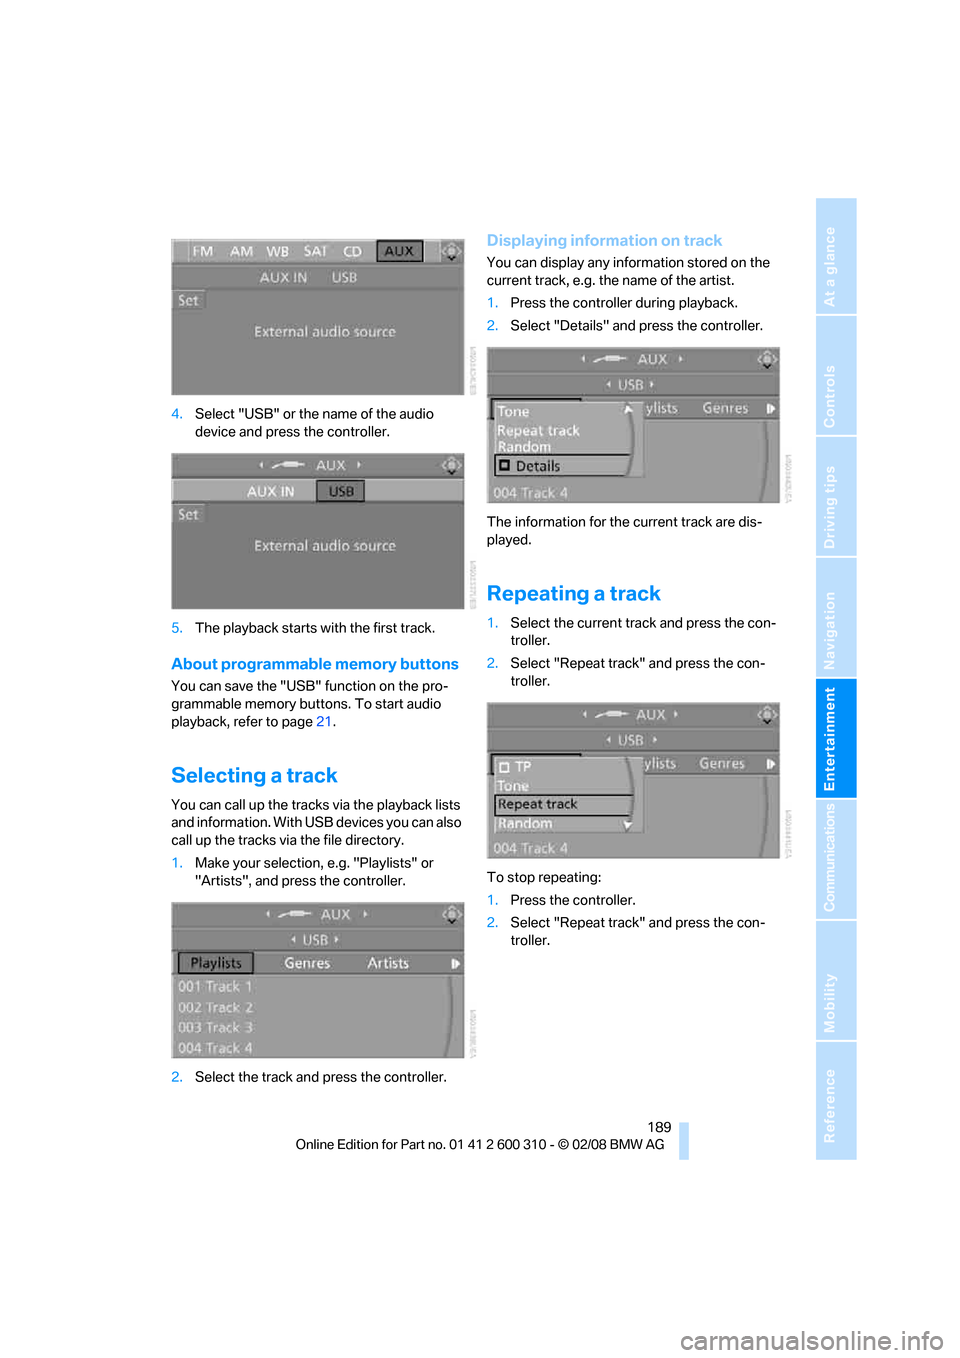
4.Select "USB" or the name of the audio
device and press the controller.
5.The playback starts with the first track.
About programmable memory buttons
You can save the "USB" function on the pro-
grammable memory buttons. To start audio
playback, refer to page21.
Selecting a track
You can call up the tracks via the playback lists
and information. With USB devices you can also
call up the tracks via the file directory.
1.Make your selection, e.g. "Playlists" or
"Artists", and press the controller.
2.Select the track and press the controller.
Displaying information on track
You can display any information stored on the
current track, e.g. the name of the artist.
1.Press the controller during playback.
2.Select "Details" and press the controller.
The information for the current track are dis-
played.
Repeating a track
1.Select the current track and press the con-
troller.
2.Select "Repeat track" and press the con-
troller.
To stop repeating:
1.Press the controller.
2.Select "Repeat track" and press the con-
troller.
Page 197 of 292
195
Entertainment
Reference
At a glance
Controls
Driving tips Communications
Navigation
Mobility
mobile phone from the vehicle if you wish to
place a call with the mobile phone.
Commissioning
Pairing mobile phone in vehicle
The following prerequisites must be met:
>Suitable mobile phone: the mobile phone is
supported by the full mobile phone prepara-
tion package. Information on this subject is
also provided on the Internet at:
www.bmw.com
>The mobile phone is ready to operate.
>The Bluetooth link on the vehicle, refer to
page199, and on the mobile phone is
active.
>Depending on the mobile phone, the mobile
phone may need presetting: e.g. using the
following menu items:
>Bluetooth activated
>Connection not with confirmation
>Reconnect
>Depending on the mobile phone model, the
setting energy saving mode can, for exam-
ple, result in vehicle failing to detect the
paired mobile phone.
>For pairing, specify any desired number as
the Bluetooth passkey, e.g. 1. This Blue-
tooth passkey is no longer required follow-
ing successful pairing.
>The ignition is switched on.
Only pair the mobile phone with the vehi-
cle stopped, otherwise the passengers
and other road users can be endangered due to
a lack of attentiveness on the part of the
driver.<
Switching on ignition
1.Insert the remote control as far as possible
into the ignition lock.
2.Switch on the ignition by pressing the Start/
Stop button without depressing the brake
or clutch pedal.
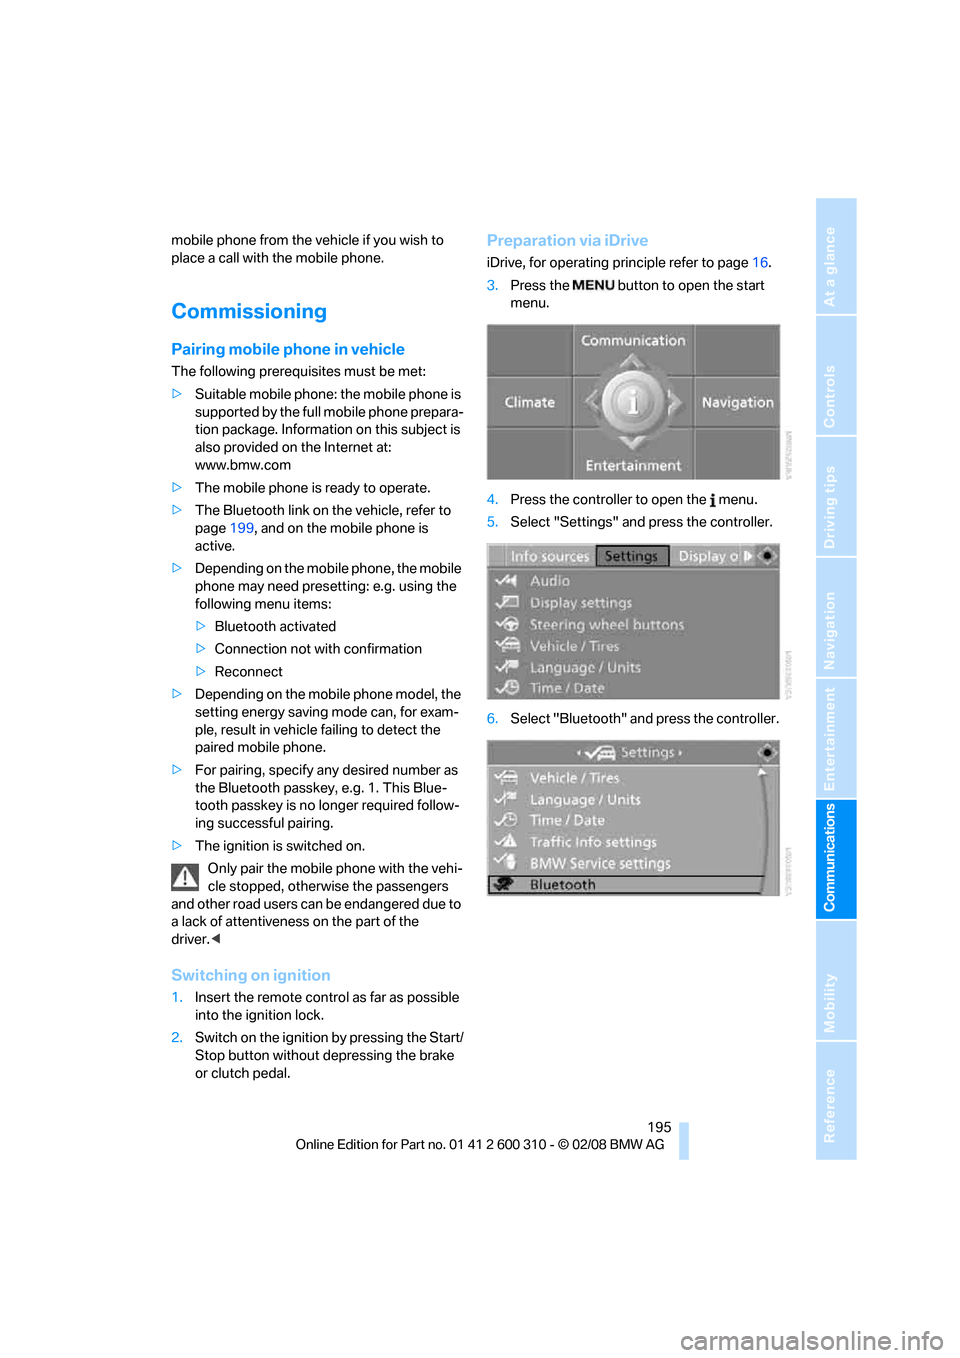
Preparation via iDrive
iDrive, for operating principle refer to page16.
3.Press the button to open the start
menu.
4.Press the controller to open the menu.
5.Select "Settings" and press the controller.
6.Select "Bluetooth" and press the controller.
Page 236 of 292
Under the hood
234
Engine oil
The engine oil consumption is dependent on
driving style and driving conditions.
Checking engine oil level
Your vehicle is equipped with an electronic oil
level check.
The condition for the most accurate indication
of the oil level possible is measurement with the
engine at operating temperature, i.e. following
an uninterrupted drive of at least 6 miles/10 km.
You can display the oil level on the Control Dis-
play while driving or when stopped on a level
surface with the engine running.
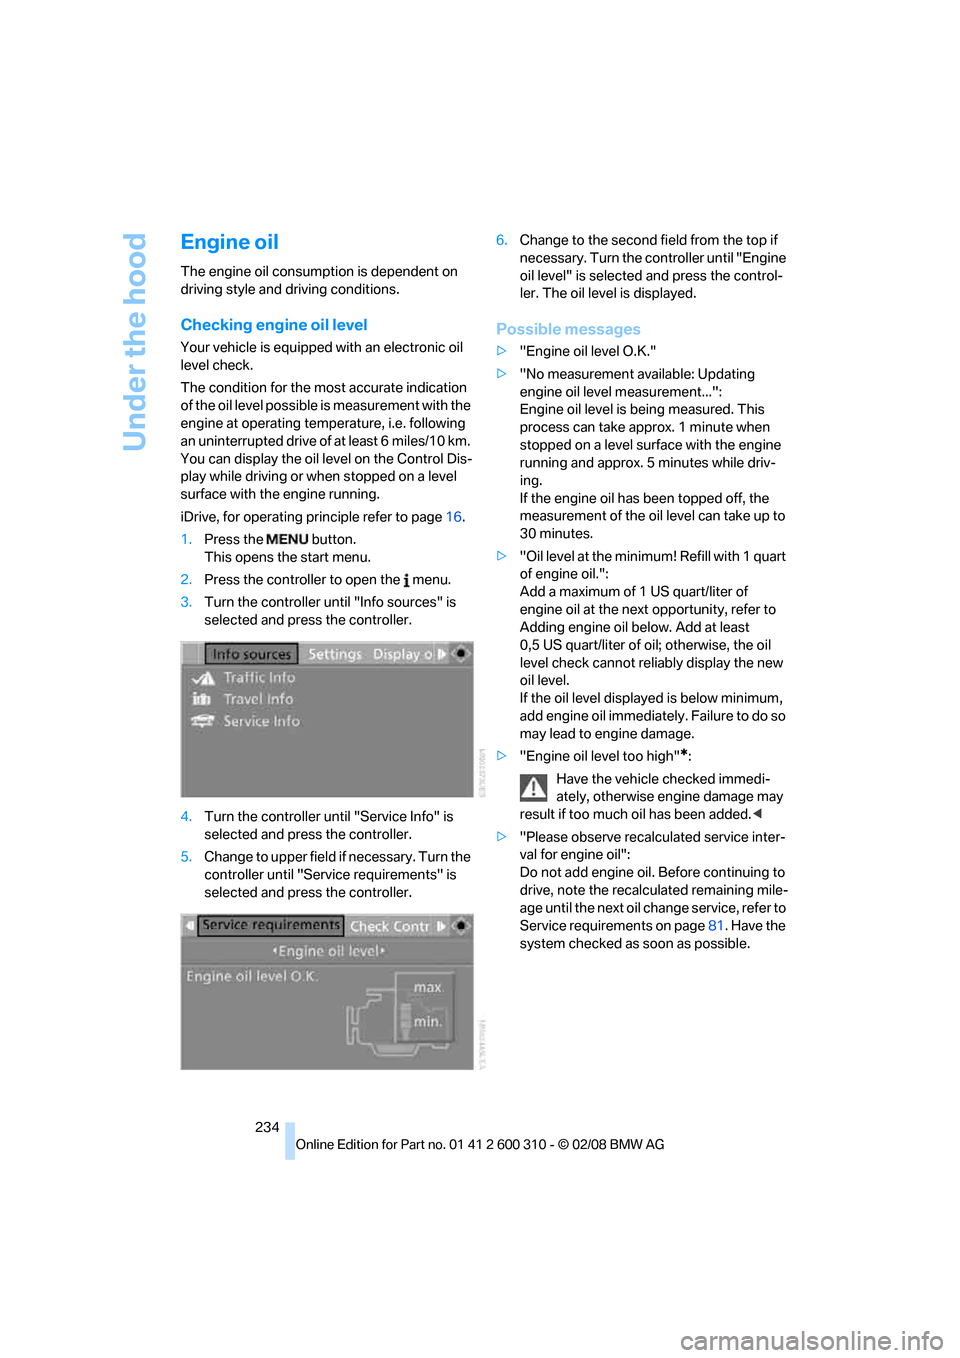
iDrive, for operating principle refer to page16.
1.Press the button.
This opens the start menu.
2.Press the controller to open the menu.
3.Turn the controller until "Info sources" is
selected and press the controller.
4.Turn the controller until "Service Info" is
selected and press the controller.
5.Change to upper field if necessary. Turn the
controller until "Service requirements" is
selected and press the controller.6.Change to the second field from the top if
necessary. Turn the controller until "Engine
oil level" is selected and press the control-
ler. The oil level is displayed.
Possible messages
>"Engine oil level O.K."
>"No measurement available: Updating
engine oil level measurement...":
Engine oil level is being measured. This
process can take approx. 1 minute when
stopped on a level surface with the engine
running and approx. 5 minutes while driv-
ing.
If the engine oil has been topped off, the
measurement of the oil level can take up to
30 minutes.
>"Oil level at the minimum! Refill with 1 quart
of engine oil.":
Add a maximum of 1 US quart/liter of
engine oil at the next opportunity, refer to
Adding engine oil below. Add at least
0,5 US quart/liter of oil; otherwise, the oil
level check cannot reliably display the new
oil level.
If the oil level displayed is below minimum,
add engine oil immediately. Failure to do so
may lead to engine damage.
>"Engine oil level too high"
*:
Have the vehicle checked immedi-
ately, otherwise engine damage may
result if too much oil has been added.<
>"Please observe recalculated service inter-
val for engine oil":
Do not add engine oil. Before continuing to
drive, note the recalculated remaining mile-
age until the next oil change service, refer to
Service requirements on page81. Have the
system checked as soon as possible.