2008 BMW 4.8I instrument panel
[x] Cancel search: instrument panelPage 66 of 292
Driving
64 Indicator lamp on Canadian models.
Any noises which occur are normal. Start-up
may take several seconds.
Automatic transmission with
Steptronic
In addition to fully automatic operation, you can
also manually shift with the Steptronic, refer to
page65.
Transmission positions
P R N D M/S + –
To prevent the vehicle from creeping
after you select a driving position, main-
tain pressure on the brake pedal until you are
ready to start.<
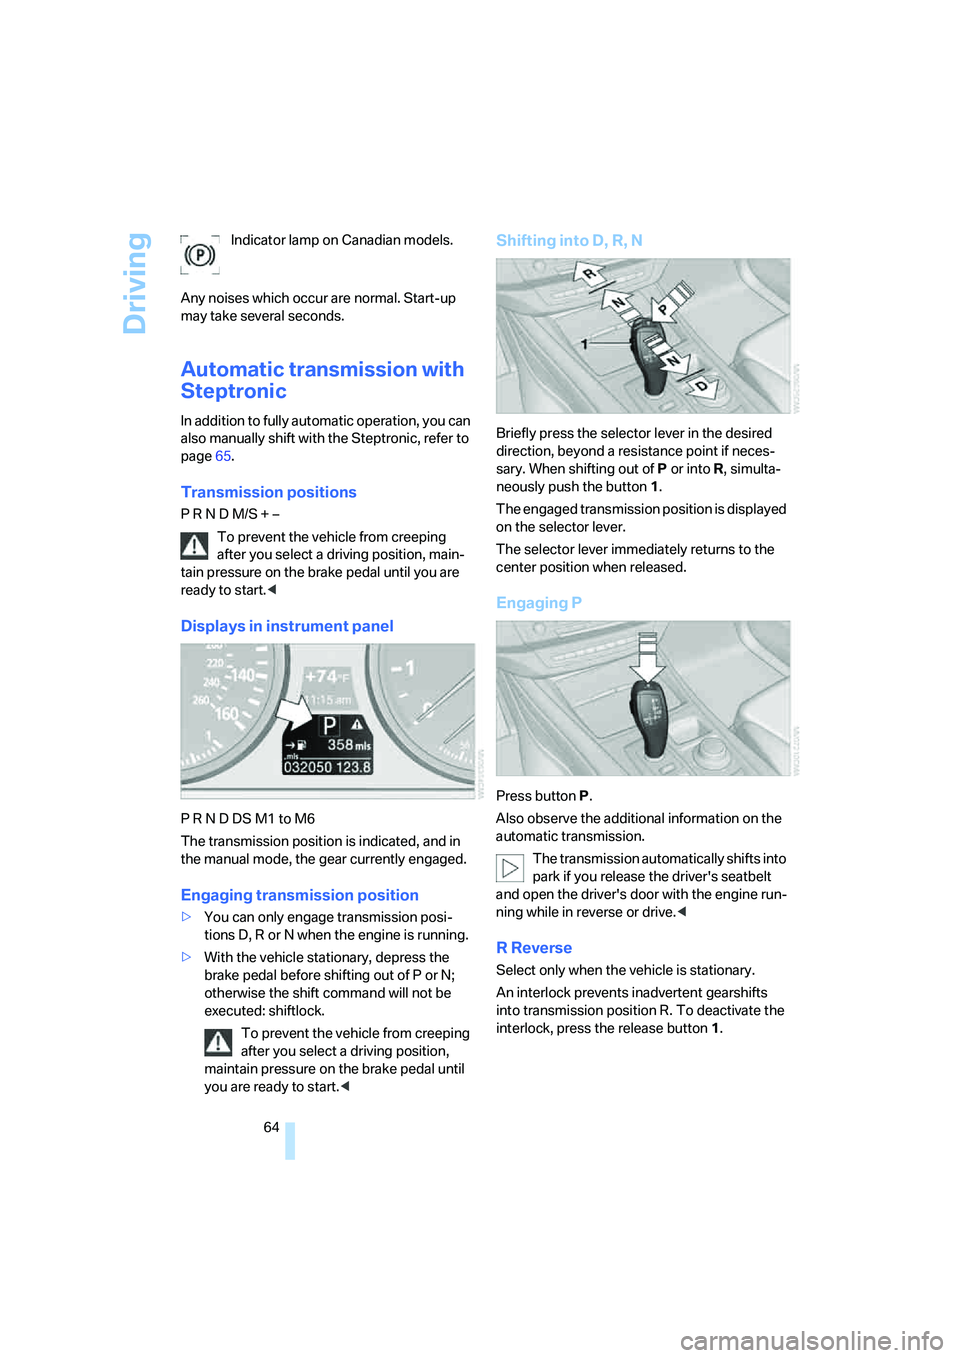
Displays in instrument panel
P R N D DS M1 to M6
The transmission position is indicated, and in
the manual mode, the gear currently engaged.
Engaging transmission position
>You can only engage transmission posi-
tions D, R or N when the engine is running.
>With the vehicle stationary, depress the
brake pedal before shifting out of P or N;
otherwise the shift command will not be
executed: shiftlock.
To prevent the vehicle from creeping
after you select a driving position,
maintain pressure on the brake pedal until
you are ready to start.<
Shifting into D, R, N
Briefly press the selector lever in the desired
direction, beyond a resistance point if neces-
sary. When shifting out of P or into R, simulta-
neously push the button1.
The engaged transmission position is displayed
on the selector lever.
The selector lever immediately returns to the
center position when released.
Engaging P
Press button P.
Also observe the additional information on the
automatic transmission.
The transmission automatically shifts into
park if you release the driver's seatbelt
and open the driver's door with the engine run-
ning while in reverse or drive.<
R Reverse
Select only when the vehicle is stationary.
An interlock prevents inadvertent gearshifts
into transmission position R. To deactivate the
interlock, press the release button1.
Page 67 of 292
Controls
65Reference
At a glance
Driving tips
Communications
Navigation
Entertainment
Mobility
P Park
Select only when the vehicle is stationary.
The rear wheels are locked.
P is engaged automatically as soon as
you switch off the engine unless N is
engaged and on vehicles with comfort access
the remote control is inserted in the ignition
lock, refer to page59.<
N Neutral
Can, for example, be engaged in automatic car
washes. The vehicle can roll.
N remains engaged even after the engine
is switched off whenever you leave the
remote control in the ignition lock. This function
is used, for example, in a car wash, refer to
page60. After approx. 30 minutes P is auto-
matically engaged.<
D Drive, automatic position
Position for normal vehicle operation. All for-
ward gears are available.
Under normal operating conditions, the fuel
consumption is lowest when driving in posi-
tion D.
Kick-down
The kick-down mode provides maximum accel-
eration.
Press the accelerator pedal beyond the
increased resistance at full throttle.
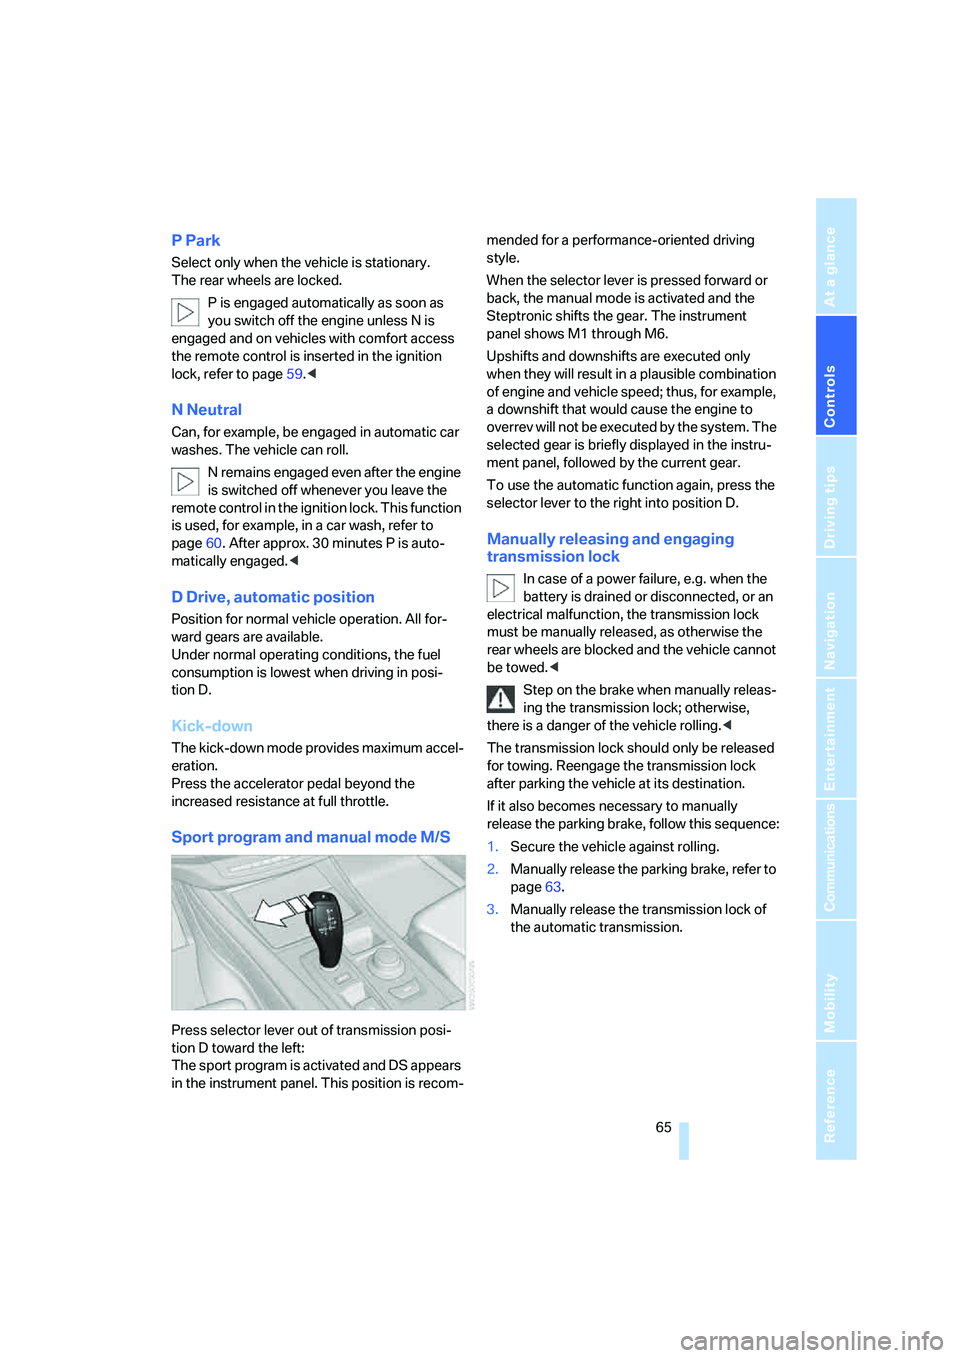
Sport program and manual mode M/S
Press selector lever out of transmission posi-
tion D toward the left:
The sport program is activated and DS appears
in the instrument panel. This position is recom-mended for a performance-oriented driving
style.
When the selector lever is pressed forward or
back, the manual mode is activated and the
Steptronic shifts the gear. The instrument
panel shows M1 through M6.
Upshifts and downshifts are executed only
when they will result in a plausible combination
of engine and vehicle speed; thus, for example,
a downshift that would cause the engine to
overrev will not be executed by the system. The
selected gear is briefly displayed in the instru-
ment panel, followed by the current gear.
To use the automatic function again, press the
selector lever to the right into position D.
Manually releasing and engaging
transmission lock
In case of a power failure, e.g. when the
battery is drained or disconnected, or an
electrical malfunction, the transmission lock
must be manually released, as otherwise the
rear wheels are blocked and the vehicle cannot
be towed.<
Step on the brake when manually releas-
ing the transmission lock; otherwise,
there is a danger of the vehicle rolling.<
The transmission lock should only be released
for towing. Reengage the transmission lock
after parking the vehicle at its destination.
If it also becomes necessary to manually
release the parking brake, follow this sequence:
1.Secure the vehicle against rolling.
2.Manually release the parking brake, refer to
page63.
3.Manually release the transmission lock of
the automatic transmission.
Page 71 of 292
Controls
69Reference
At a glance
Driving tips
Communications
Navigation
Entertainment
Mobility
All washer nozzles are supplied from one reser-
voir.
Fill with water and – if required – with a washer
antifreeze, according to manufacturer's recom-
mendations.
In order to maintain the mixture ratio, mix
the washer fluid before filling.<
Capacity
approx. 6.3USquarts/6liters.
Cruise control*
The concept
The cruise control with a braking function is
available for use at speeds of approx. 20 mph/
30 km/h and higher. The vehicle stores and
maintains the speed that you set using the lever
mounted on the steering column. To keep the
specified speed constant, the system brakes if
the engine braking effect is not sufficient on a
downhill grade.
Do not use the cruise control under driv-
ing conditions that do not permit a con-
stant speed, e.g. when driving on winding
roads, in heavy traffic or in poor road conditions
such as snow, rain, ice, and loose road surface.
Otherwise you could lose control of the vehicle
and cause an accident.<
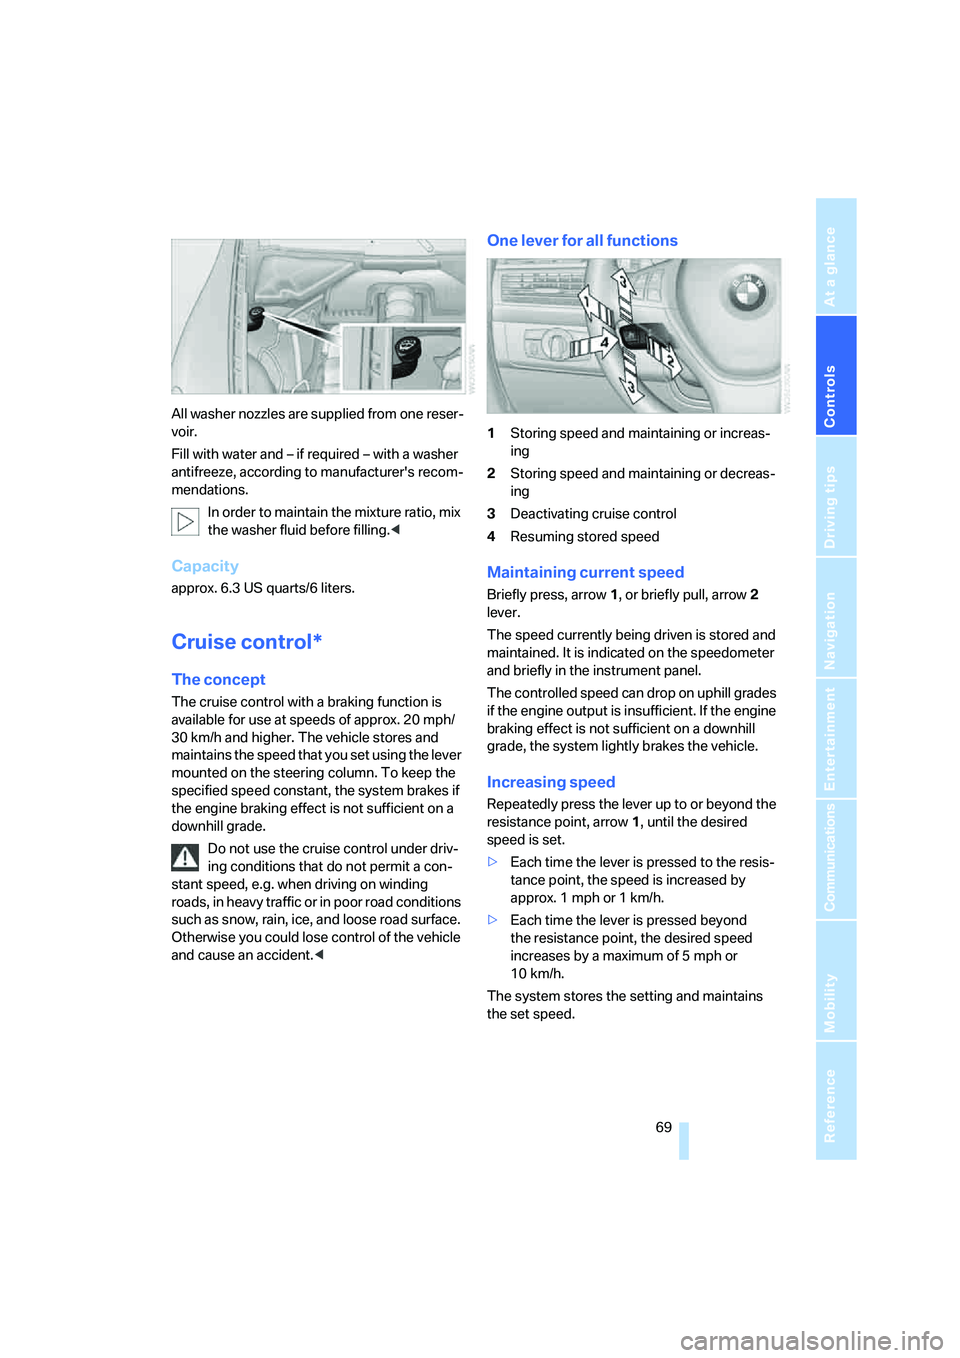
One lever for all functions
1Storing speed and maintaining or increas-
ing
2Storing speed and maintaining or decreas-
ing
3Deactivating cruise control
4Resuming stored speed
Maintaining current speed
Briefly press, arrow1, or briefly pull, arrow2
lever.
The speed currently being driven is stored and
maintained. It is indicated on the speedometer
and briefly in the instrument panel.
The controlled speed can drop on uphill grades
if the engine output is insufficient. If the engine
braking effect is not sufficient on a downhill
grade, the system lightly brakes the vehicle.
Increasing speed
Repeatedly press the lever up to or beyond the
resistance point, arrow1, until the desired
speed is set.
>Each time the lever is pressed to the resis-
tance point, the speed is increased by
approx. 1 mph or 1 km/h.
>Each time the lever is pressed beyond
the resistance point, the desired speed
increases by a maximum of 5 mph or
10 km/h.
The system stores the setting and maintains
the set speed.
Page 72 of 292
Driving
70
Accelerating with lever
Accelerate slightly:
Press the lever up to the resistance point,
arrow1, until the desired speed is reached.
Accelerate more rapidly:
Press the lever beyond the resistance point,
arrow1, until the desired speed is reached.
The vehicle accelerates without pressure on
the accelerator pedal. The system stores the
setting and maintains the set speed.
Reducing speed
Repeatedly pull the lever up to the resistance
point or beyond, arrow2, until the desired
speed is displayed.
>Each time the lever is pulled up to the resis-
tance point, the desired speed decreases
by approx. 1 mph or 1 km/h.
>Each time the lever is pulled beyond the
resistance point, the desired speed is
decreased by a maximum of 5 mph or
10 km/h until the minimum speed of
20 mph or 30 km/h is reached.
The system stores the setting and maintains
the set speed.
Deactivating cruise control
Briefly press the lever up or down, arrow3.
The displays in the speedometer go out.
In addition, the system is automatically deacti-
vated:
>when braking
>when transmission position N is engaged
>when DTC is activated or DSC is deacti-
vated
>when HDC is activated
>when the parking brake is set
>when driving stability control systems inter-
vene
Accelerating does not deactivate the cruise
control. After releasing the accelerator pedal,
the stored speed is reached and maintained
again.
Warning lamp
The warning lamp lights up if the
cruise control has been deactivated
automatically, e.g. by a control inter-
vention of the DSC. A message appears on the
Control Display.
Resuming stored speed
Briefly press the button, arrow4. The stored
speed is resumed and maintained.
With the ignition switched off, the stored speed
value is deleted and cannot be resumed again.
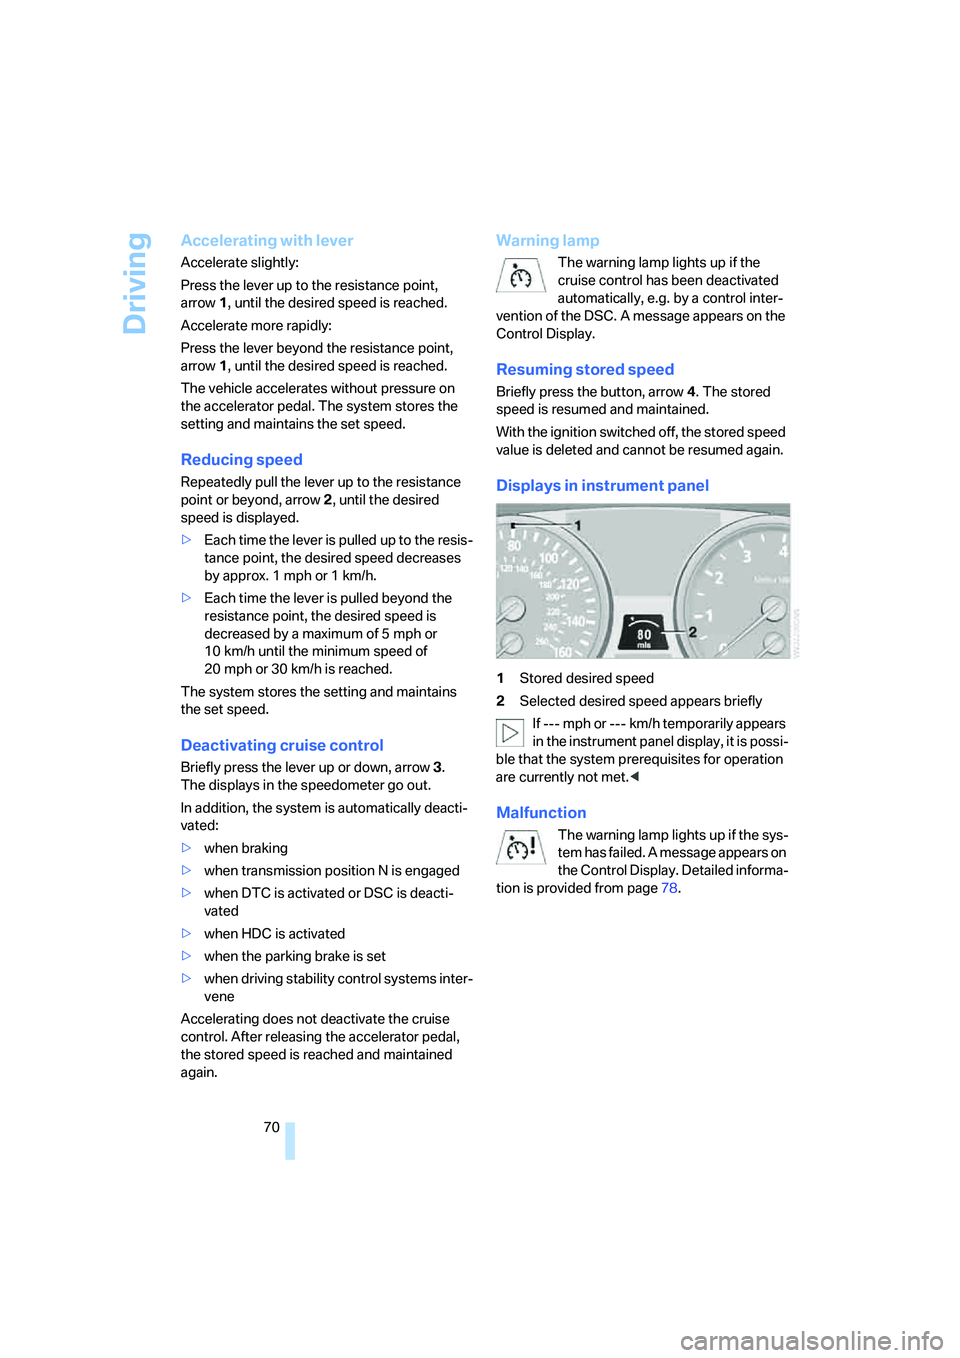
Displays in instrument panel
1Stored desired speed
2Selected desired speed appears briefly
If --- mph or --- km/h temporarily appears
in the instrument panel display, it is possi-
ble that the system prerequisites for operation
are currently not met.<
Malfunction
The warning lamp lights up if the sys-
tem has failed. A message appears on
the Control Display. Detailed informa-
tion is provided from page78.
Page 73 of 292

Controls
71Reference
At a glance
Driving tips
Communications
Navigation
Entertainment
Mobility
Everything under control
Odometer, outside
temperature display, clock
1Knob in the instrument panel
2Time, outside temperature, and date
3Odometer and trip odometer
Knob in the instrument panel
>With ignition switched on
Press button:
Resetting trip odometer
Press the button for approx. 5 seconds:
Displaying service requirements, refer to
page75
>With ignition switched off
Press button:
Briefly displaying time, outside temperature
and odometer
Units of measure
T o s e l e c t t h e r e s p e c t i v e u n i t s o f m e a s u r e , m i l e s
or km for the odometer as well as 7 or6 for
the outside temperature, refer to page82.
The setting is stored for the remote control cur-
rently in use.
Time, date, outside temperature
From radio readiness the outside temperature
and the time are displayed.
Setting the time, refer to page81.
Retrieving date
Press the button on turn signal lever upward;
the date appears.
To set the date, refer to page82.
Pressing the button upward or downward sev-
eral times changes the display between clock,
outside temperature, date, and Check Control
messages, refer to page79.
Outside temperature warning
If the display drops to +377/+36, a signal
sounds and a warning lamp lights up. A mes-
sage appears on the Control Display. There is
an increased danger of ice.
Even at temperatures above +377/
+36 ice can form. Therefore, drive care-
fully, e.g. on bridges and sections of road in the
shade, otherwise there is an increased accident
risk.<
Odometer and trip odometer
Resetting trip odometer:
Press button 1 in the instrument panel with the
ignition switched on.
When vehicle is parked
To briefly display the time, outside temperature
and mileage after the remote control has been
removed from the ignition lock:
Press button1 in the instrument panel.
Page 75 of 292
Controls
73Reference
At a glance
Driving tips
Communications
Navigation
Entertainment
Mobility
Computer
Displays in instrument panel
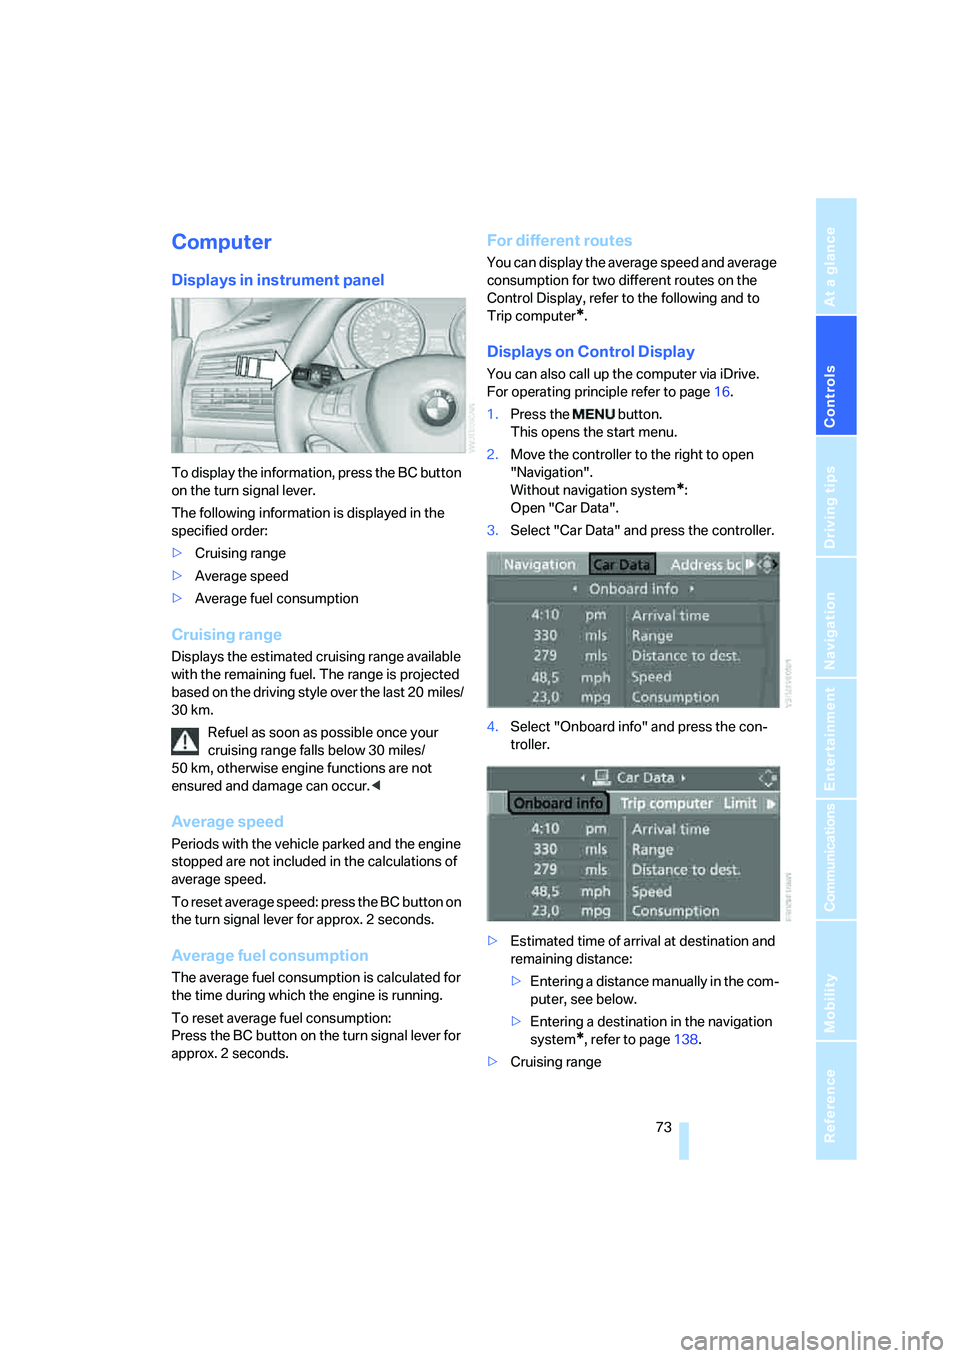
To display the information, press the BC button
on the turn signal lever.
The following information is displayed in the
specified order:
>Cruising range
>Average speed
>Average fuel consumption
Cruising range
Displays the estimated cruising range available
with the remaining fuel. The range is projected
based on the driving style over the last 20 miles/
30 km.
Refuel as soon as possible once your
cruising range falls below 30 miles/
50 km, otherwise engine functions are not
ensured and damage can occur.<
Average speed
Periods with the vehicle parked and the engine
stopped are not included in the calculations of
average speed.
To reset average speed: press the BC button on
the turn signal lever for approx. 2 seconds.
Average fuel consumption
The average fuel consumption is calculated for
the time during which the engine is running.
To reset average fuel consumption:
Press the BC button on the turn signal lever for
approx. 2 seconds.
For different routes
You can display the average speed and average
consumption for two different routes on the
Control Display, refer to the following and to
Trip computer
*.
Displays on Control Display
You can also call up the computer via iDrive.
For operating principle refer to page16.
1.Press the button.
This opens the start menu.
2.Move the controller to the right to open
"Navigation".
Without navigation system
*:
Open "Car Data".
3.Select "Car Data" and press the controller.
4.Select "Onboard info" and press the con-
troller.
>Estimated time of arrival at destination and
remaining distance:
>Entering a distance manually in the com-
puter, see below.
>Entering a destination in the navigation
system
*, refer to page138.
>Cruising range
Page 77 of 292
Controls
75Reference
At a glance
Driving tips
Communications
Navigation
Entertainment
Mobility
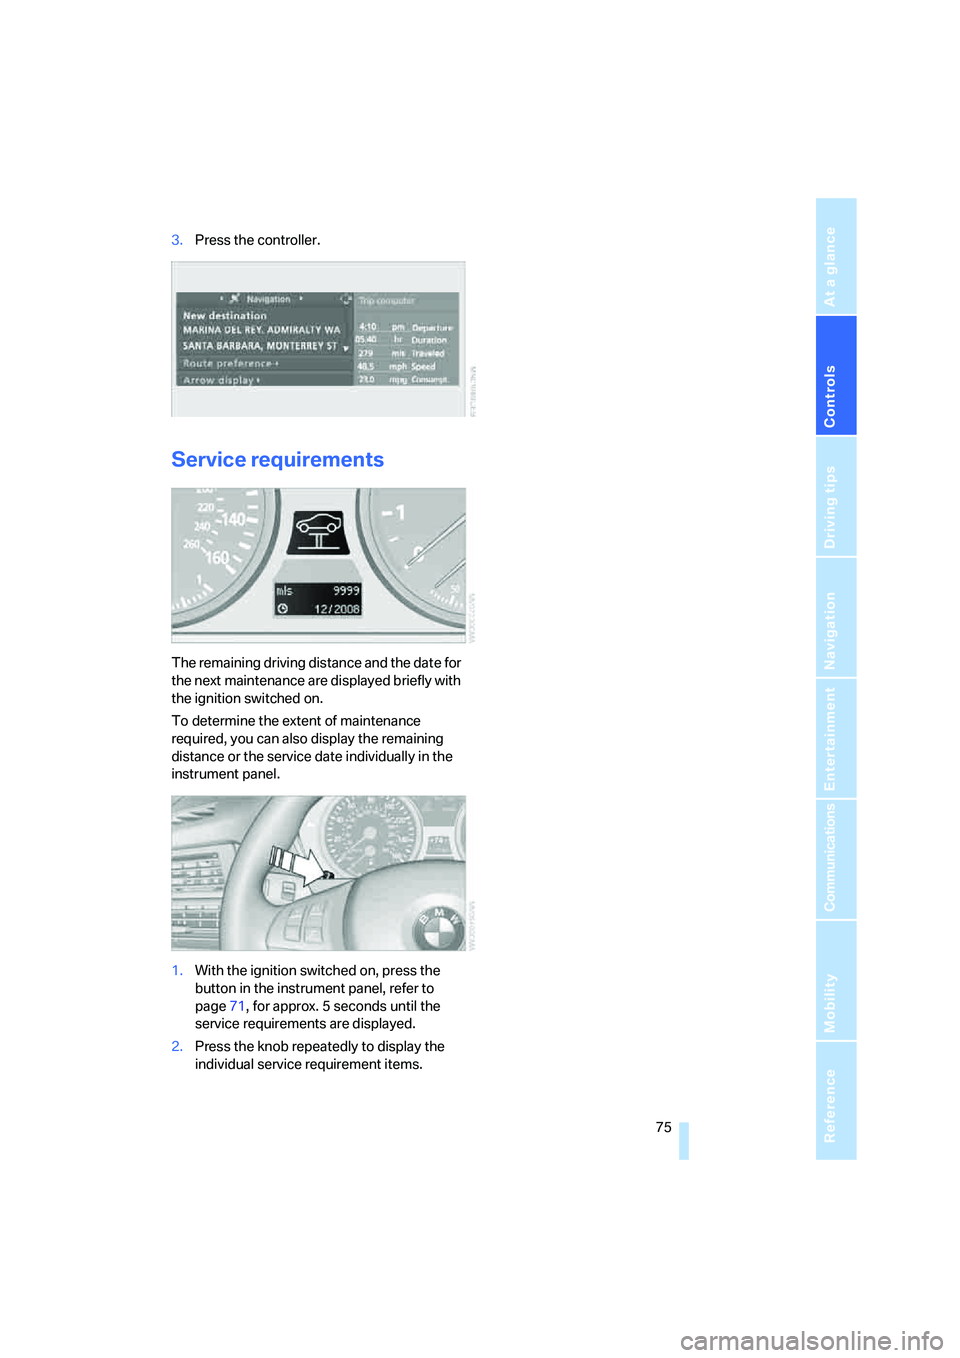
3.Press the controller.
Service requirements
The remaining driving distance and the date for
the next maintenance are displayed briefly with
the ignition switched on.
To determine the extent of maintenance
required, you can also display the remaining
distance or the service date individually in the
instrument panel.
1.With the ignition switched on, press the
button in the instrument panel, refer to
page71, for approx. 5 seconds until the
service requirements are displayed.
2.Press the knob repeatedly to display the
individual service requirement items.
Page 80 of 292
Everything under control
78
Check Control
The concept
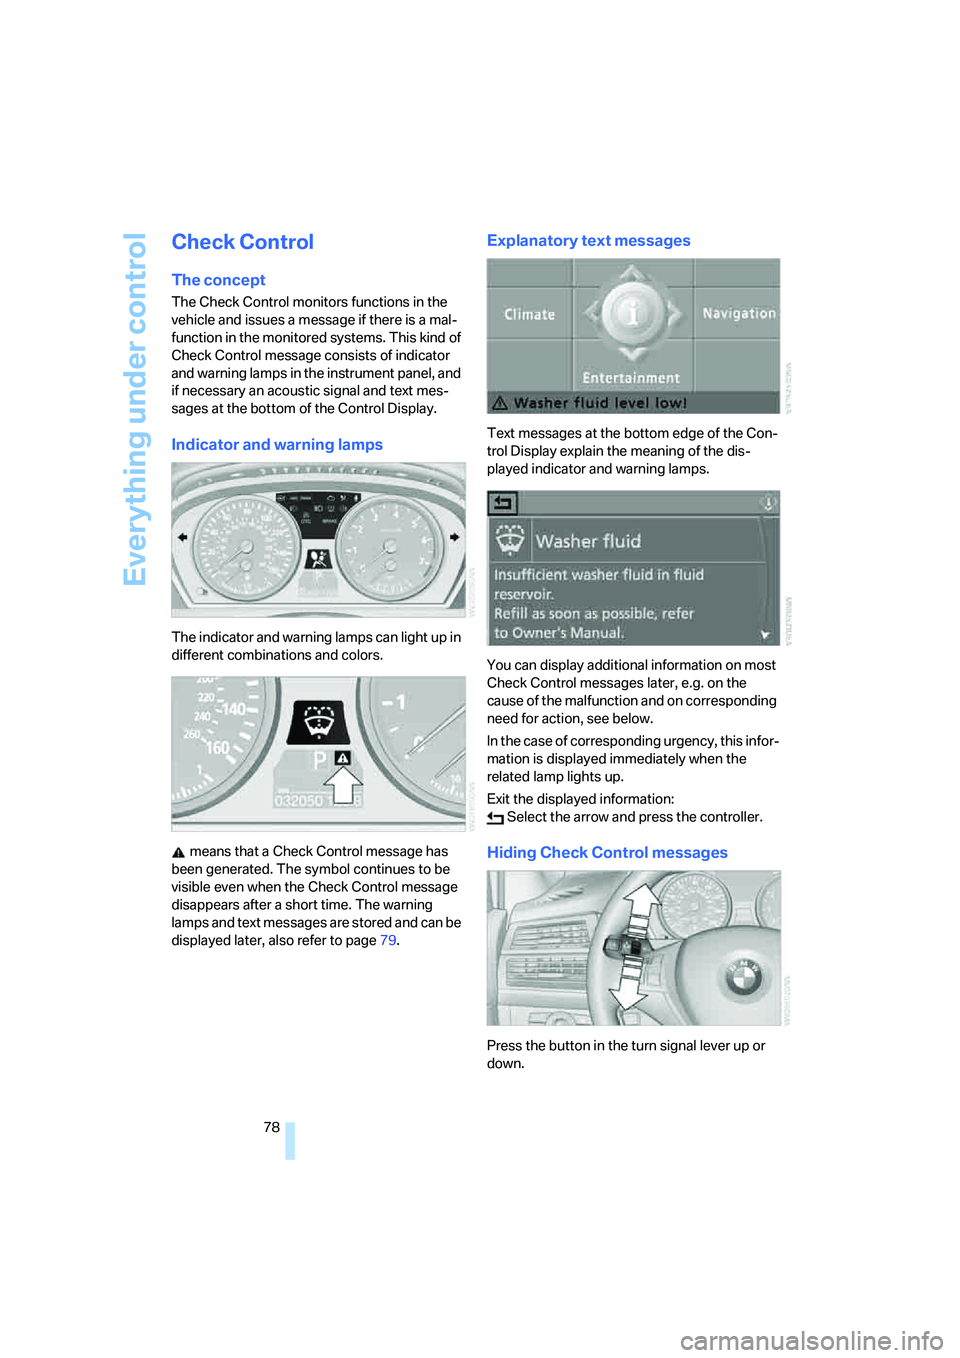
The Check Control monitors functions in the
vehicle and issues a message if there is a mal-
function in the monitored systems. This kind of
Check Control message consists of indicator
and warning lamps in the instrument panel, and
if necessary an acoustic signal and text mes-
sages at the bottom of the Control Display.
Indicator and warning lamps
The indicator and warning lamps can light up in
different combinations and colors.
means that a Check Control message has
been generated. The symbol continues to be
visible even when the Check Control message
disappears after a short time. The warning
lamps and text messages are stored and can be
displayed later, also refer to page79.
Explanatory text messages
Text messages at the bottom edge of the Con-
trol Display explain the meaning of the dis-
played indicator and warning lamps.
You can display additional information on most
Check Control messages later, e.g. on the
cause of the malfunction and on corresponding
need for action, see below.
In the case of corresponding urgency, this infor-
mation is displayed immediately when the
related lamp lights up.
Exit the displayed information:
Select the arrow and press the controller.
Hiding Check Control messages
Press the button in the turn signal lever up or
down.