2008 BMW 4.8I mirror controls
[x] Cancel search: mirror controlsPage 12 of 292
Cockpit
10
Cockpit
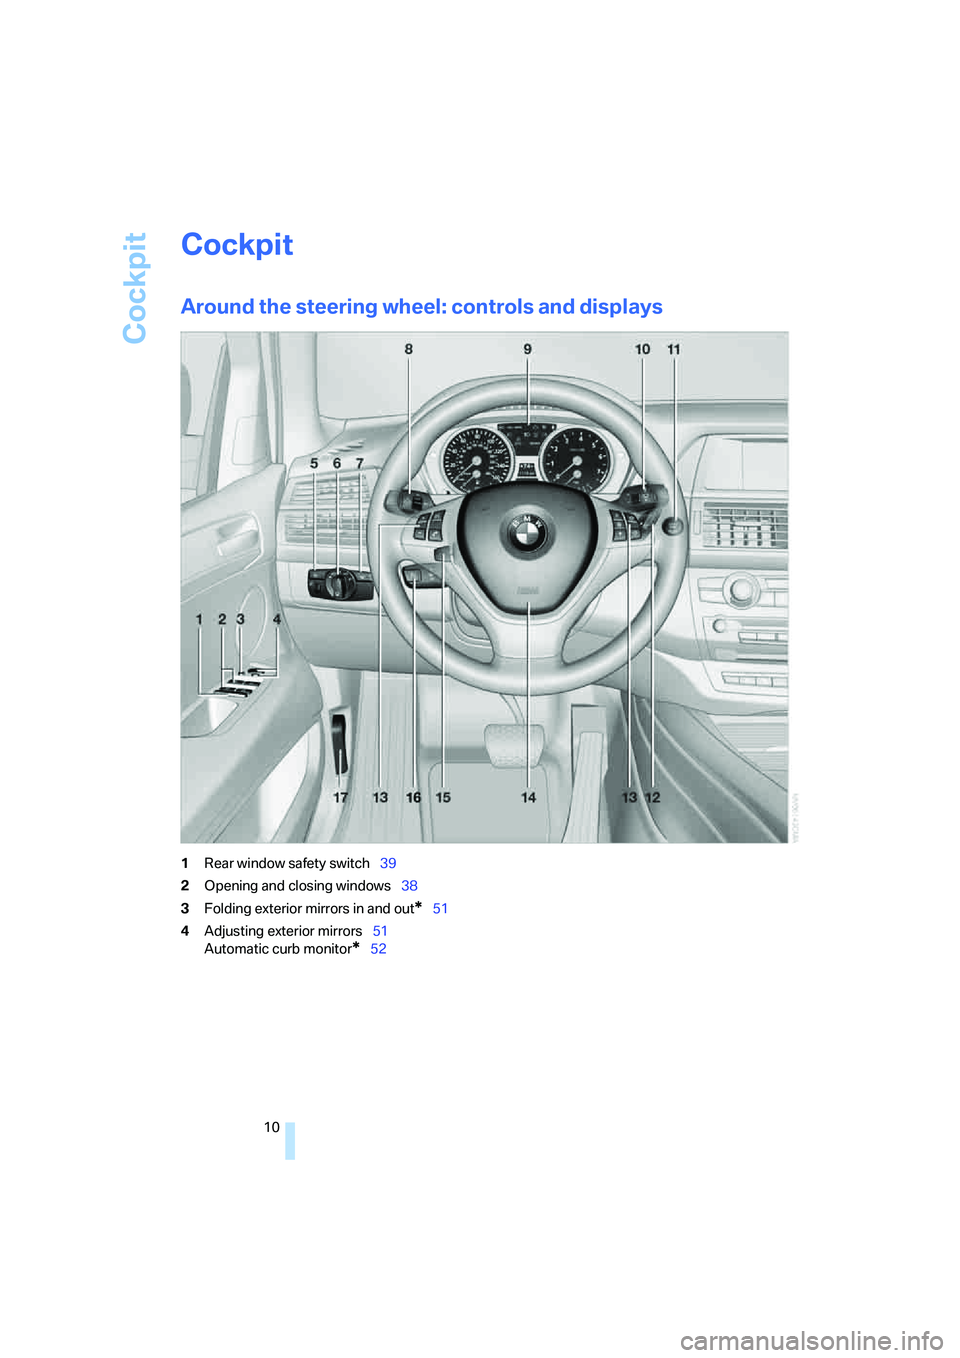
Around the steering wheel: controls and displays
1Rear window safety switch39
2Opening and closing windows38
3Folding exterior mirrors in and out
*51
4Adjusting exterior mirrors51
Automatic curb monitor
*52
Page 25 of 292
At a glance
23Reference
Controls
Driving tips
Communications
Navigation
Entertainment
Mobility
Voice command system
The concept
The voice command system allows you to con-
trol operation of various vehicle systems with-
out ever removing your hands from the steering
wheel.
Individual menu items on the Control Display
can be spoken as commands. This frees you of
having to use the controller.
The voice command system transforms your
oral commands into control signals for the
selected systems and provides support in the
form of instructions or questions.
The voice command system uses a special
microphone located in the area of the interior
rearview mirror, refer to page14.
Precondition
Via iDrive, set the language that applies for the
voice command system in order to enable iden-
tification of the spoken commands. To set the
language of iDrive, refer to page83.
Symbols in Owner's Manual
Voice commands
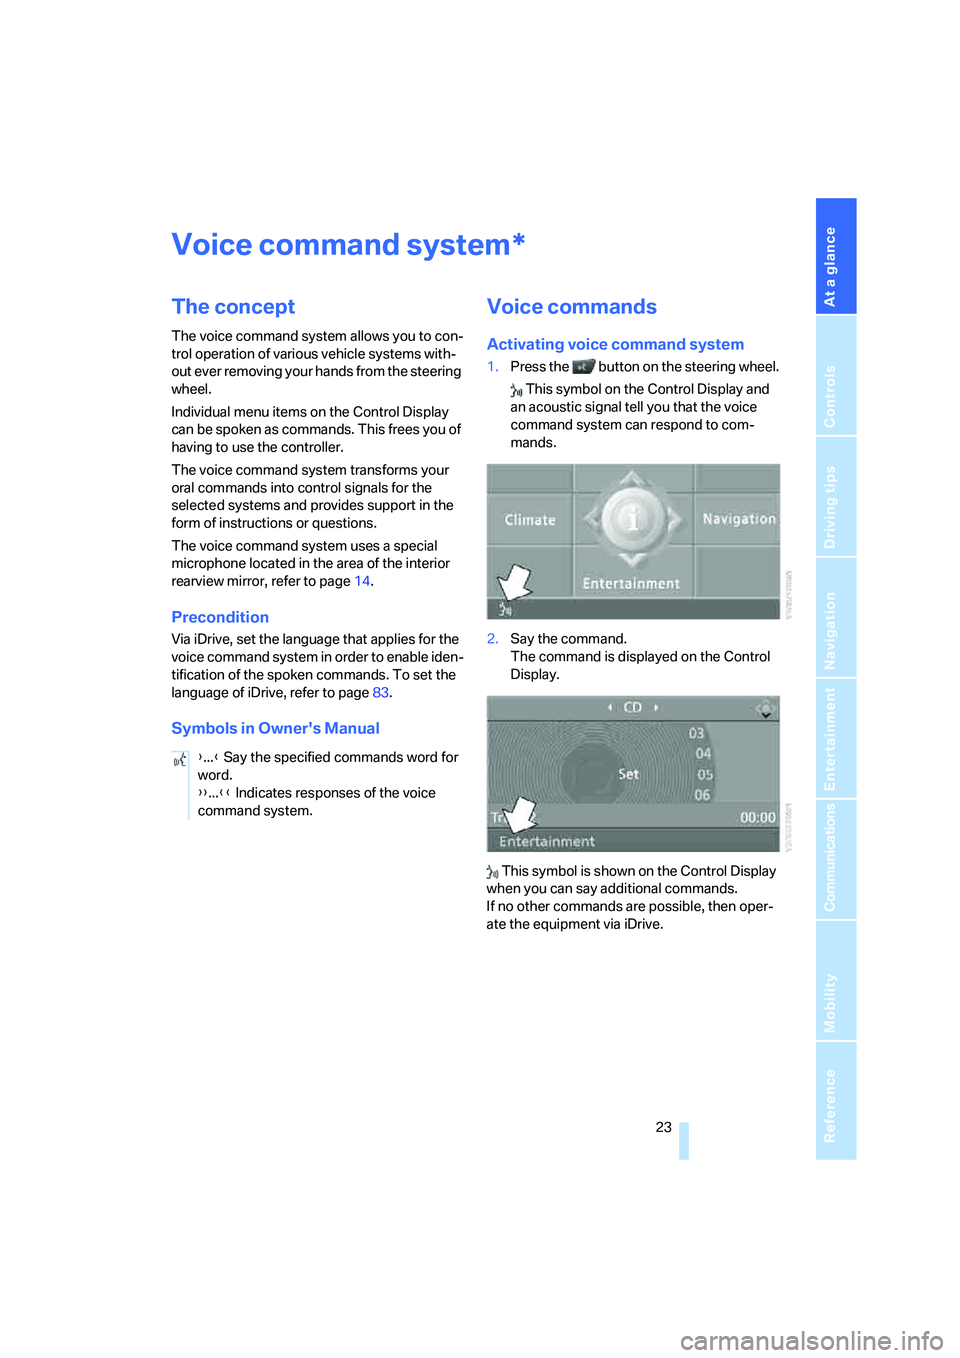
Activating voice command system
1.Press the button on the steering wheel.
This symbol on the Control Display and
an acoustic signal tell you that the voice
command system can respond to com-
mands.
2.Say the command.
The command is displayed on the Control
Display.
This symbol is shown on the Control Display
when you can say additional commands.
If no other commands are possible, then oper-
ate the equipment via iDrive.
*
{...} Say the specified commands word for
word.
{{...}} Indicates responses of the voice
command system.
Page 31 of 292

Controls
29Reference
At a glance
Driving tips
Communications
Navigation
Entertainment
Mobility
>Settings for the display on the Control Dis-
play:
>Brightness of the Control Display, refer
to page82
>Measuring units for consumption, route/
distances, temperature, and pressure,
refer to page82
>Language on Control Display, refer to
page83
>12h/24h mode of the clock, refer to
page82
>Date format, refer to page82
>Showing optical warning for PDC Park Dis-
tance Control
*, refer to page85
>Selection, brightness and position of dis-
play in Head-Up Display
*, refer to page99
>Settings of automatic climate control, refer
to page107
>Positions of driver's seat, exterior mirrors,
and steering wheel
*, refer to page44
>With Adaptive Drive
*, last selected chassis
and suspension tuning setting, refer to
page91
>Audio sources, volume and tone settings,
refer to page163
>Radio, displaying stored stations, refer to
page166
>Telephone, setting volume, refer to
pages214,220
>Pathway lighting, refer to page103, and
daytime running lamps
*, refer to page103
>Triple turn signal activation, refer to
page67
>With rear view camera
*, selection of func-
tions, refer to page86, and type of display,
refer to page88
>With programmable memory/direct selec-
tion buttons, selection of stored functions,
refer to page21
Central locking system
The concept
The central locking system is ready for opera-
tion whenever the driver's door is closed.
The system simultaneously engages and
releases the locks on the following:
>Doors
>Liftgate
>Fuel filler door
Operating from outside
>via the remote control
>via the door lock
>with comfort access
* via the door handles
At the same time, the anti-theft system is also
operated. It prevents the doors from being
unlocked using the lock buttons or door han-
dles. The interior lamps and the courtesy
lamps
* are also switched on and off with the
remote control. The alarm system
is armed/dis-
armed at the same time.
You can find more detailed information on the
alarm system
on page35.
Operating from inside
Via the button for central locking, refer to
page32. The fuel filler door is not locked.
In an accident of sufficient severity, the central
locking system automatically unlocks the vehi-
cle. In addition, the hazard warning flashers and
interior lamps come on.
Opening and closing:
Using remote control
Persons or animals left unattended in a
parked vehicle can lock the doors from
the inside. Always take along the remote control
when leaving the vehicle so that the vehicle can
then be opened from the outside.<
Page 37 of 292
Controls
35Reference
At a glance
Driving tips
Communications
Navigation
Entertainment
Mobility
>Press the button on the outside of the lift-
gate.
Closing is not canceled when you put the
vehicle into motion.<
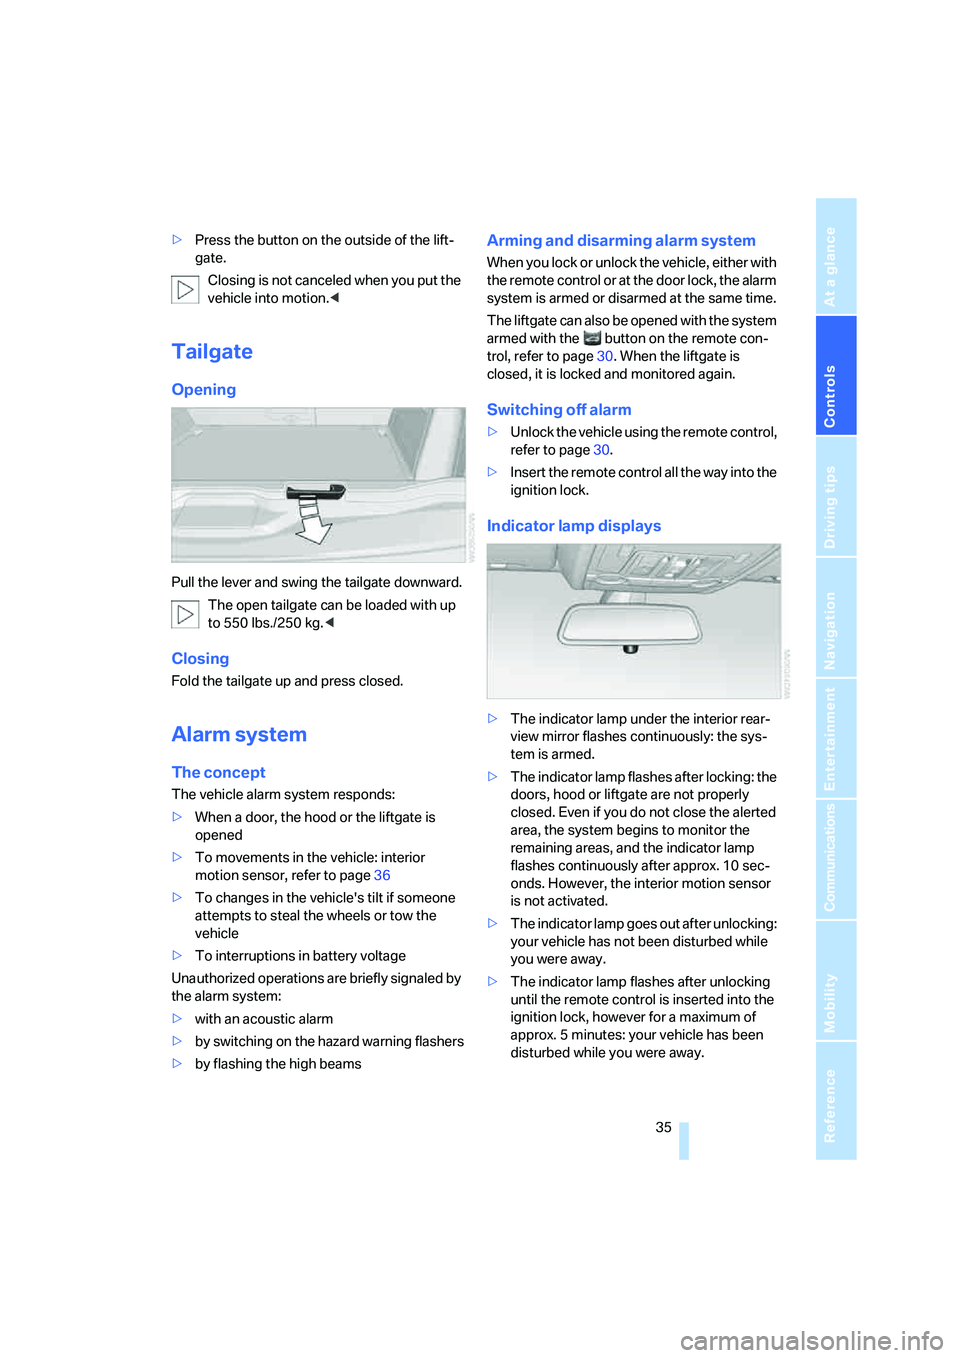
Tailgate
Opening
Pull the lever and swing the tailgate downward.
The open tailgate can be loaded with up
to 550lbs./250kg.<
Closing
Fold the tailgate up and press closed.
Alarm system
The concept
The vehicle alarm system responds:
>When a door, the hood or the liftgate is
opened
>To movements in the vehicle: interior
motion sensor, refer to page36
>To changes in the vehicle's tilt if someone
attempts to steal the wheels or tow the
vehicle
>To interruptions in battery voltage
Unauthorized operations are briefly signaled by
the alarm system:
>with an acoustic alarm
>by switching on
the hazard warning flashers
>by flashing the high beams
Arming and disarming alarm system
When you lock or unlock the vehicle, either with
the remote control or at the door lock, the alarm
system is armed or disarmed at the same time.
The liftgate can also be opened with the system
armed with the button on the remote con-
trol, refer to page30. When the liftgate is
closed, it is locked and monitored again.
Switching off alarm
>Unlock the vehicle using the remote control,
refer to page30.
>Insert the remote control all the way into the
ignition lock.
Indicator lamp displays
>The indicator lamp under the interior rear-
view mirror flashes continuously: the sys-
tem is armed.
>The indicator lamp flashes after locking: the
doors, hood or liftgate are not properly
closed. Even if you do not close the alerted
area, the system begins to monitor the
remaining areas, and the indicator lamp
flashes continuously after approx. 10 sec-
onds. However, the interior motion sensor
is not activated.
>The indicator lamp goes out after unlocking:
your vehicle has not been disturbed while
you were away.
>The indicator lamp flashes after unlocking
until the remote control is inserted into the
ignition lock, however for a maximum of
approx. 5 minutes: your vehicle has been
disturbed while you were away.
Page 47 of 292
Controls
45Reference
At a glance
Driving tips
Communications
Navigation
Entertainment
Mobility
3.Press the button:
The LED in the button lights up.
4.Press the desired memory button1 or2:
The LED goes out.
The positions of the driver's seat, the exte-
rior rearview mirrors, and steering wheel are
stored for the remote control currently in
use.
Calling up automatically
You can choose when the stored positions of
the driver's seat, exterior rearview mirrors, and
steering wheel are activated.
>Calling up when unlocking vehicle
>Calling up when opening driver's door
When using this feature, always make
sure that the footwell behind the driver's
seat is empty and unobstructed. Failure to do
so could cause injury to persons or damage to
objects behind the seat as a result of a rearward
movement of the seat.<
The system cancels the adjustment procedure
when you briefly press one of the seat adjust-
ment switches or one of the memory buttons.
Selecting calling up automatically
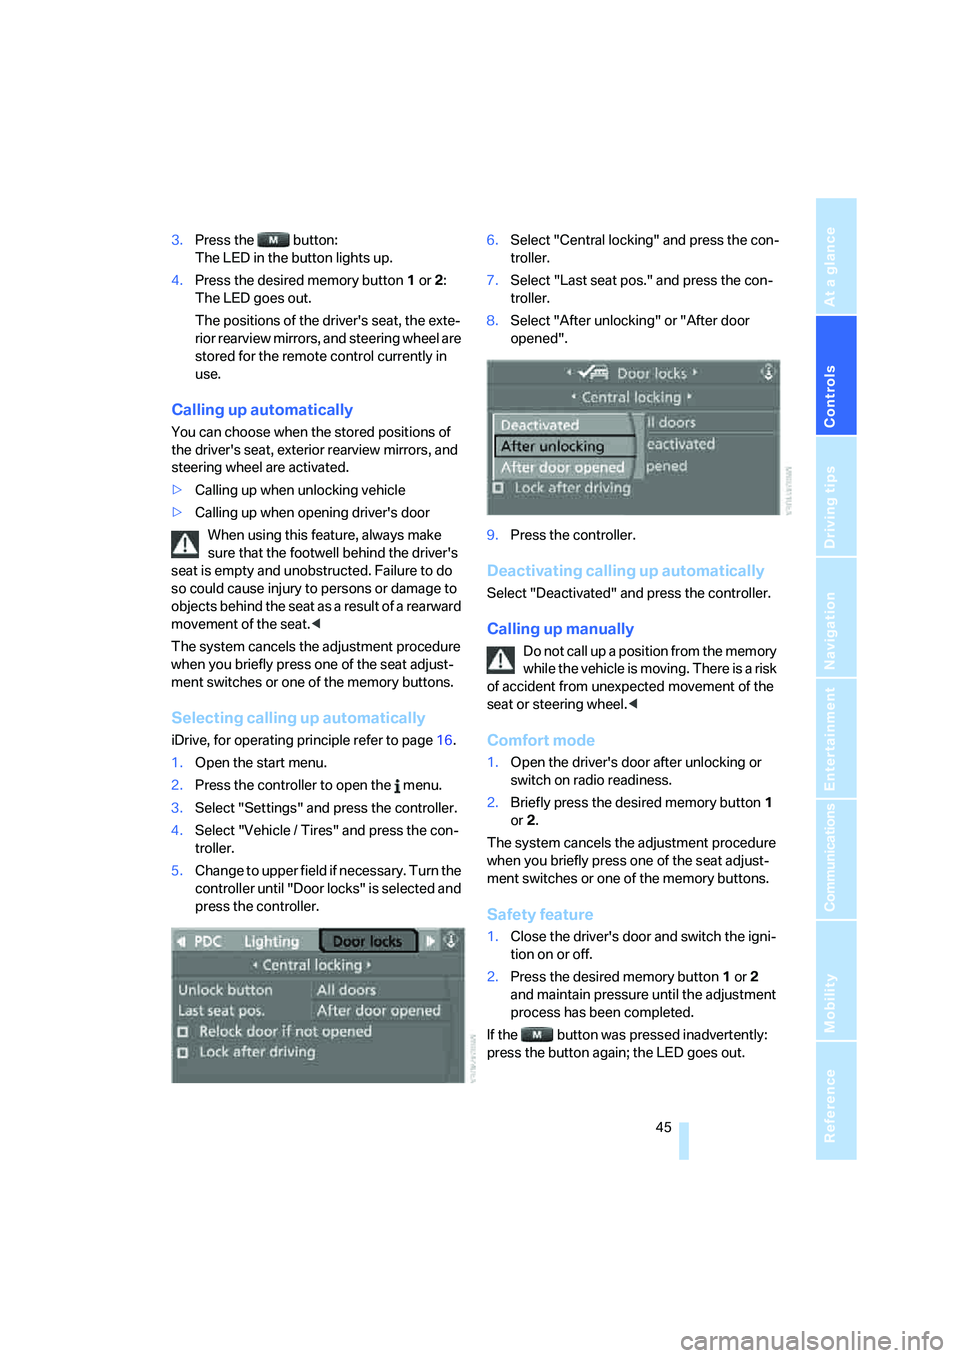
iDrive, for operating principle refer to page16.
1.Open the start menu.
2.Press the controller to open the menu.
3.Select "Settings" and press the controller.
4.Select "Vehicle / Tires" and press the con-
troller.
5.Change to upper field if necessary. Turn the
controller until "Door locks" is selected and
press the controller.6.Select "Central locking" and press the con-
troller.
7.Select "Last seat pos." and press the con-
troller.
8.Select "After unlocking" or "After door
opened".
9.Press the controller.
Deactivating calling up automatically
Select "Deactivated" and press the controller.
Calling up manually
Do not call up a position from the memory
while the vehicle is moving. There is a risk
of accident from unexpected movement of the
seat or steering wheel.<
Comfort mode
1.Open the driver's door after unlocking or
switch on radio readiness.
2.Briefly press the desired memory button1
or2.
The system cancels the adjustment procedure
when you briefly press one of the seat adjust-
ment switches or one of the memory buttons.
Safety feature
1.Close the driver's door and switch the igni-
tion on or off.
2.Press the desired memory button1 or2
and maintain pressure until the adjustment
process has been completed.
If the button was pressed inadvertently:
press the button again; the LED goes out.
Page 53 of 292
Controls
51Reference
At a glance
Driving tips
Communications
Navigation
Entertainment
Mobility
2.Move the controller to the left to open "Cli-
mate".
3.Select "Driver's seat climate" or "Passen-
ger's seat climate" and press the controller.
4.Turn the controller to adjust the distribu-
tion.
The setting is applied.
Heated rear seats
Operation similar to front seat heating; without
temperature distribution, refer to page50.
Active seat*
The seat cushion is actively varied by alter-
nately raising and lowering the right and left half
of the seat cushion. This reduces muscular ten-
sion and fatigue to help prevent lower back
pain.
Press the button to switch on; the LED lights
up.
The action of the system is reduced and if need
be, switched off in order to reduce the load on
the battery. The LED remains lit.
If you switch off the active seat, it can take up
to 1 minute before the two halves of the seat
cushion have returned to their initial position.
Mirrors
Exterior mirrors
The mirror on the passenger's side is
more curved than the driver's mirror.
Objects reflected in the mirror are closer than
they appear. Do not estimate the distance of
following traffic based on what you see in the
mirrors; otherwise, there is an increased risk of
accident.<
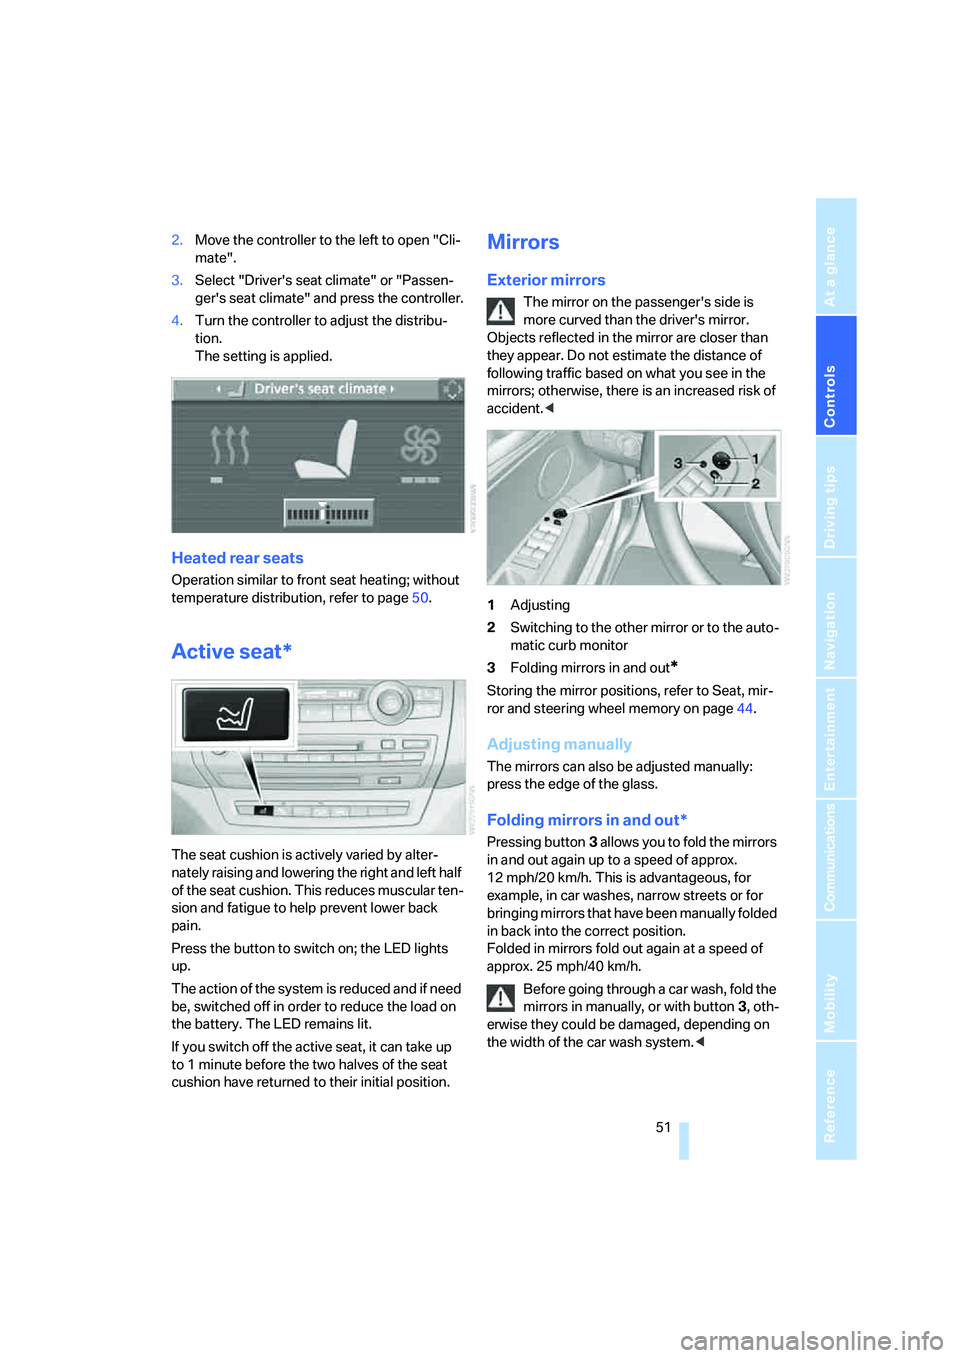
1Adjusting
2Switching to the other mirror or to the auto-
matic curb monitor
3Folding mirrors in and out
*
Storing the mirror positions, refer to Seat, mir-
ror and steering wheel memory on page44.
Adjusting manually
The mirrors can also be adjusted manually:
press the edge of the glass.
Folding mirrors in and out*
Pressing button3 allows you to fold the mirrors
in and out again up to a speed of approx.
12 mph/20 km/h. This is advantageous, for
example, in car washes, narrow streets or for
bringing mirrors that have been manually folded
in back into the correct position.
Folded in mirrors fold out again at a speed of
approx. 25 mph/40 km/h.
Before going through a car wash, fold the
mirrors in manually, or with button 3, oth-
erwise they could be damaged, depending on
the width of the car wash system.<
Page 69 of 292
Controls
67Reference
At a glance
Driving tips
Communications
Navigation
Entertainment
Mobility
Signaling briefly
Press lever to resistance point and hold for as
long as you wish to signal.
Triple turn signal activation
Press the lever up to the resistance point.
The turn signal flashes three times.
You can activate or deactivate this function.
iDrive, for operating principle refer to page16.
1.Press the button.
This opens the start menu.
2.Press the controller to open the menu.
3.Select "Settings" and press the controller.
4.Select "Vehicle / Tires" and press the con-
troller.
5.Change to upper field if necessary. Turn the
controller until "Lighting" is selected and
press the controller.
6.Select "Triple turn signal" and press the
controller.
Triple turn signaling is activated.
The setting is stored for the remote control cur-
rently in use.
Washer/wiper system
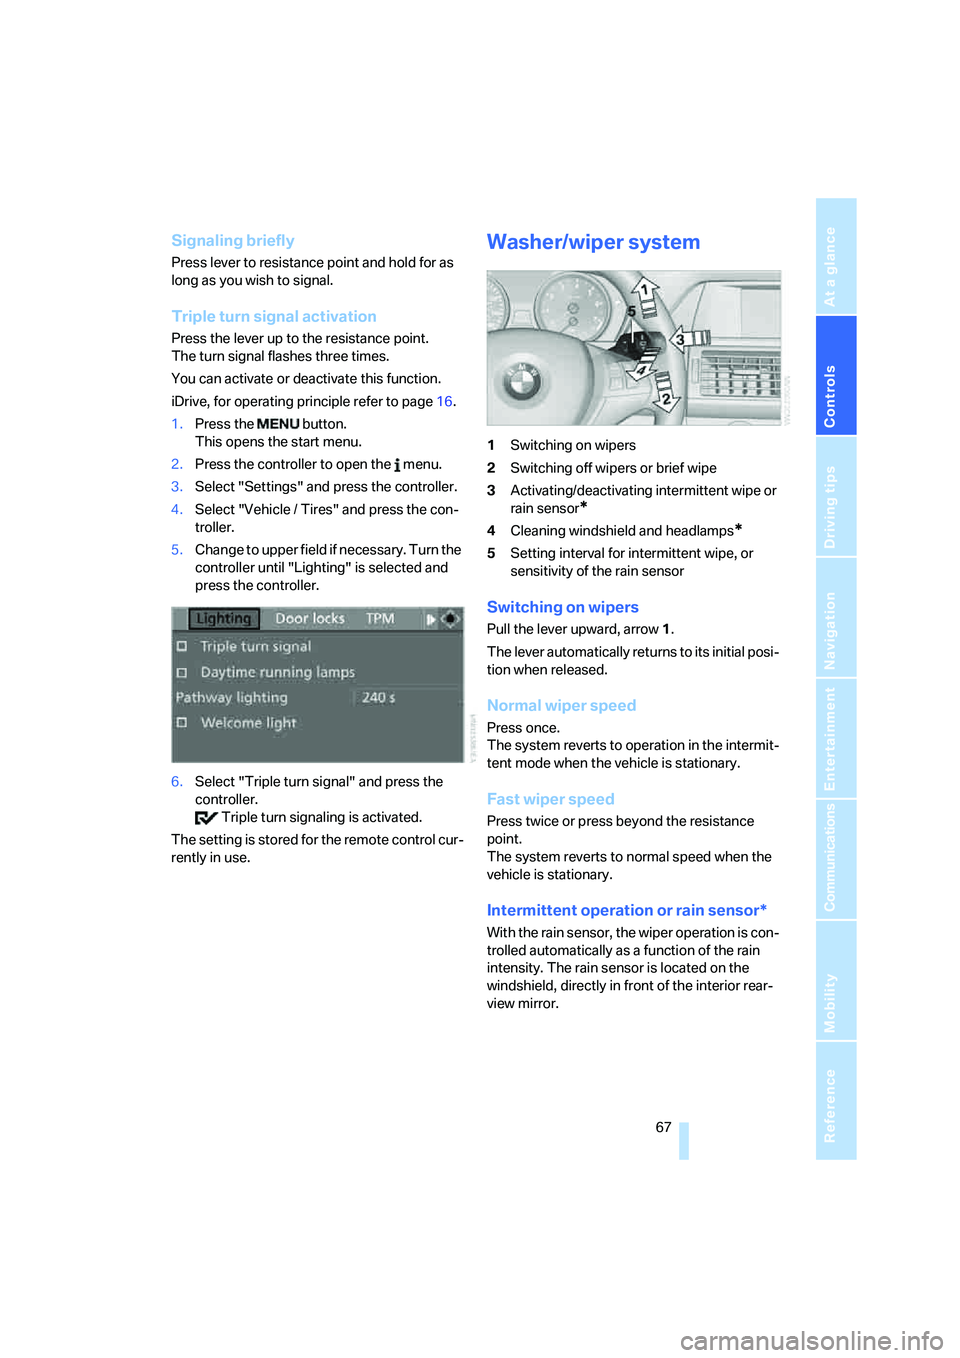
1Switching on wipers
2Switching off wipers or brief wipe
3Activating/deactivating intermittent wipe or
rain sensor
*
4Cleaning windshield and headlamps*
5Setting interval for intermittent wipe, or
sensitivity of the rain sensor
Switching on wipers
Pull the lever upward, arrow1.
The lever automatically returns to its initial posi-
tion when released.
Normal wiper speed
Press once.
The system reverts to operation in the intermit-
tent mode when the vehicle is stationary.
Fast wiper speed
Press twice or press beyond the resistance
point.
The system reverts to normal speed when the
vehicle is stationary.
Intermittent operation or rain sensor*
With the rain sensor, the wiper operation is con-
trolled automatically as a function of the rain
intensity. The rain sensor is located on the
windshield, directly in front of the interior rear-
view mirror.
Page 255 of 292

Mobility
253Reference
At a glance
Controls
Driving tips
Communications
Navigation
Entertainment
3.Check and correct the tire inflation pressure
at the earliest opportunity.
Protect valve stems with valve screw
caps against dirt and contamination.
Dirt in valve stems is a frequent source of
gradual air loss.<
4.Initialize the Flat Tire Monitor, refer to
page92, or reset the Tire Pressure Monitor,
refer to page94.
5.Replace the damaged tire as soon as possi-
ble and have the new wheel/tire balanced.
Driving with compact wheel
Drive reservedly and do not exceed a speed of
50 mph/80 km/h.
The driving characteristics change, for example
reduced track stability on braking, extended
braking distance, and altered self-steering
characteristics in the limit range. In conjunction
with winter tires, these characteristics are more
pronounced.
Only one compact wheel may be
mounted. Restore the wheels and tires to
their original size as quickly as possible. Failure
to do so is a safety risk.<
Vehicle battery
Battery care
The battery is 100 % maintenance-free, i.e., the
electrolyte will last for the life of the battery
when the vehicle is operated in a temperate cli-
mate. Your BMW Sports Activity Vehicle Center
will be glad to advise in all matters concerning
the battery.
Charging battery
Only charge the battery in the vehicle via the
terminals in the engine compartment with the
engine switched off. Connections, refer to
Jump starting on page256.
Disposal
Have old batteries disposed of following
replacement at your BMW Sports Activity
Vehicle Center or bring them to a collection
point. Maintain the battery in an upright position
for transport and storage. Always restrain the
battery to prevent it from tipping over during
transport.<
Power failure
After a temporary power loss, the functioning of
some equipment may be limited and require
reinitialization. Individual settings are also lost
and must be updated:
>Seat, mirror and steering wheel memory
The positions must be stored again, refer to
page44.
>Time and Date
The values must be updated, refer to
pages81, 82.
>Radio
Stations must be stored again if necessary,
refer to page168.
>Navigation system
Wait until the system starts, refer to
page159.
Fuses
Never attempt to repair a blown fuse and
do not replace a defective fuse with a sub-
stitute of another color or amperage rating, as
this could lead to a circuit overload, ultimately
resulting in a fire in the vehicle.<
Spare fuses, a pair of plastic tweezers and infor-
mation on the fuse assignment are located near
the fuses in the cargo bay.