2008 BMW 335XI SEDAN rear entertainment
[x] Cancel search: rear entertainmentPage 125 of 274
Driving tips
123Reference
At a glance
Controls
Communications
Navigation
Entertainment
Mobility
Sports Wagon: rear window wiper
Driving through an automatic car wash can
result in damage to the rear window wiper. If
necessary, ask the operator of the car wash
about protective measures you should take.
With convenient access and automatic
transmission
Insert the remote control into the ignition
switch.
The engine can be switched off when the selec-
tor lever is in position N. Refer also to page37.
Cargo loading
To avoid loading the tires beyond their
approved carrying capacity, never over-
load the vehicle. Overloading can lead to over-
heating and increases the rate at which damage
develops inside the tires. This can ultimately
result in a sudden blow-out.<
Make sure that no liquids are spilled or
leak from their containers in the cargo
bay, as this could result in damage to the vehi-
cle.<
Determining loading limit
1.Locate the following statement on your
vehicle's placard
*:
The combined weight of occupants
and cargo should never exceed
XXX kg or YYY lbs. Otherwise, overloading
can result in damage to the vehicle and
unstable driving conditions.<
2.Determine the combined weight of the
driver and passengers that will be riding in
your vehicle.3.Subtract the combined weight of the driver
and passengers from XXX kilograms or YYY
pounds.
4.The resulting figure equals the available
amount of cargo and luggage load capacity.
For example, if the YYY amount equals
1,400 lbs. and there will be five 150-lb. pas-
sengers in your vehicle, the amount of avail-
able cargo and luggage load capacity is
650 lbs:
1,400 lbs. minus 750 lbs. = 650 lbs.
5.Determine the combined weight of luggage
and cargo being loaded on the vehicle. That
weight may not safely exceed the available
cargo and luggage load capacity calculated
in step 4.
6.If your vehicle will be towing a trailer, part of
the load from your trailer will be transferred
to your vehicle. Consult the manual for
transporting a trailer to determine how this
may reduce the available cargo and luggage
load capacity of your vehicle.
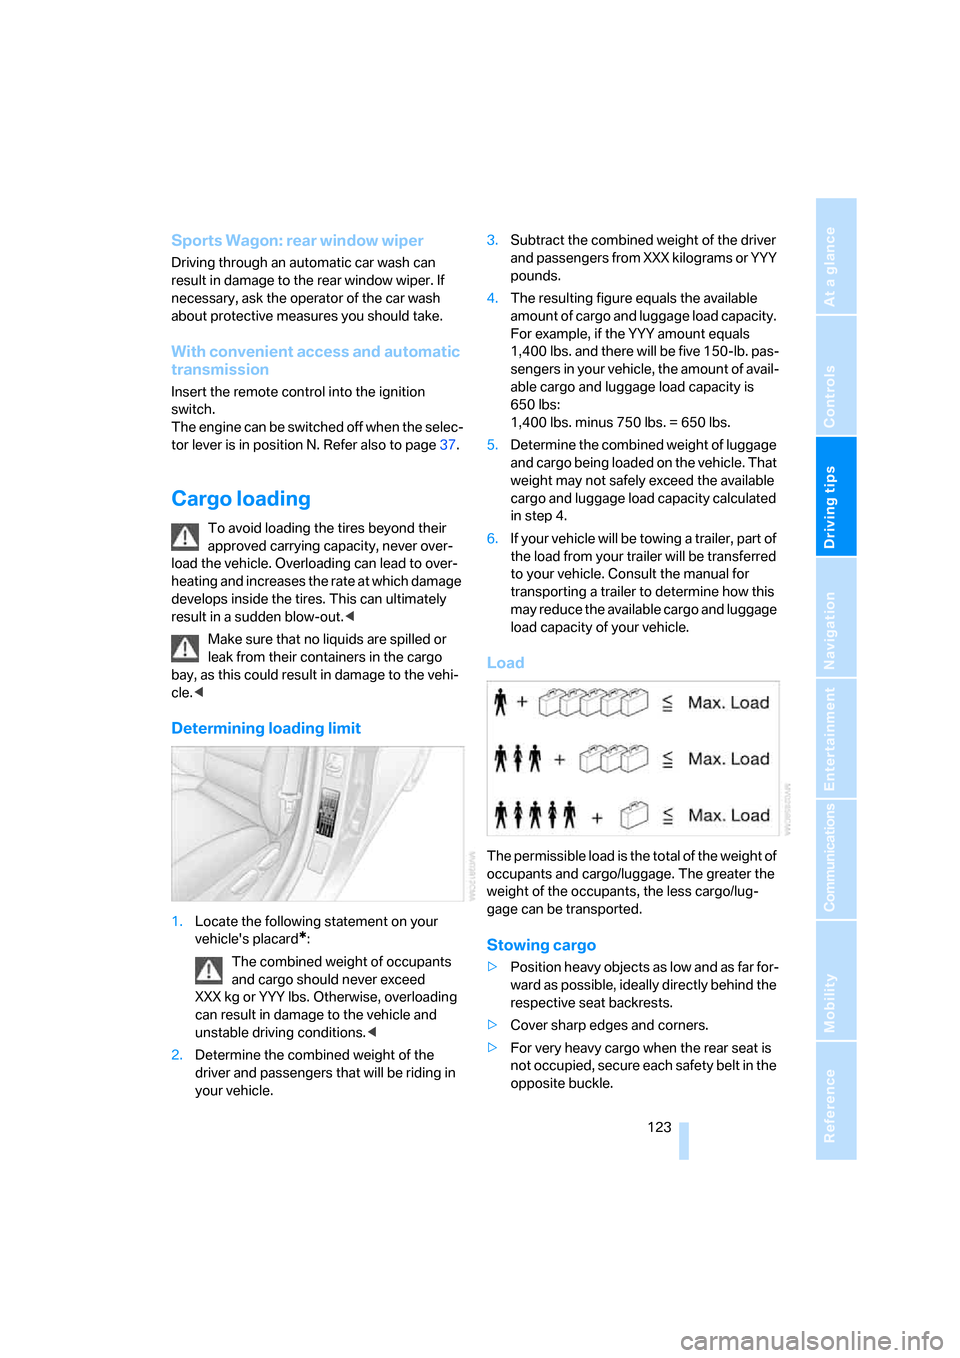
Load
The permissible load is the total of the weight of
occupants and cargo/luggage. The greater the
weight of the occupants, the less cargo/lug-
gage can be transported.
Stowing cargo
>Position heavy objects as low and as far for-
ward as possible, ideally directly behind the
respective seat backrests.
>Cover sharp edges and corners.
>For very heavy cargo when the rear seat is
not occupied, secure each safety belt in the
opposite buckle.
Page 159 of 274
Navigation
Entertainment
Driving tips
157Reference
At a glance
Controls
Communications
Mobility
Adjusting volume
Turn knob1 on the CD player until the desired
volume is obtained.
You can also adjust the volume with buttons on
the steering wheel, refer to page11.
With the ignition at radio readiness or beyond,
the setting is stored for the remote control cur-
rently in use.
Tone control
You can alter various tone settings, e.g. treble
and bass or the speed-dependent volume
increase.
The tone settings are applied to all audio
sources.
With the ignition at radio readiness or beyond,
the settings are stored for the remote control
currently in use.
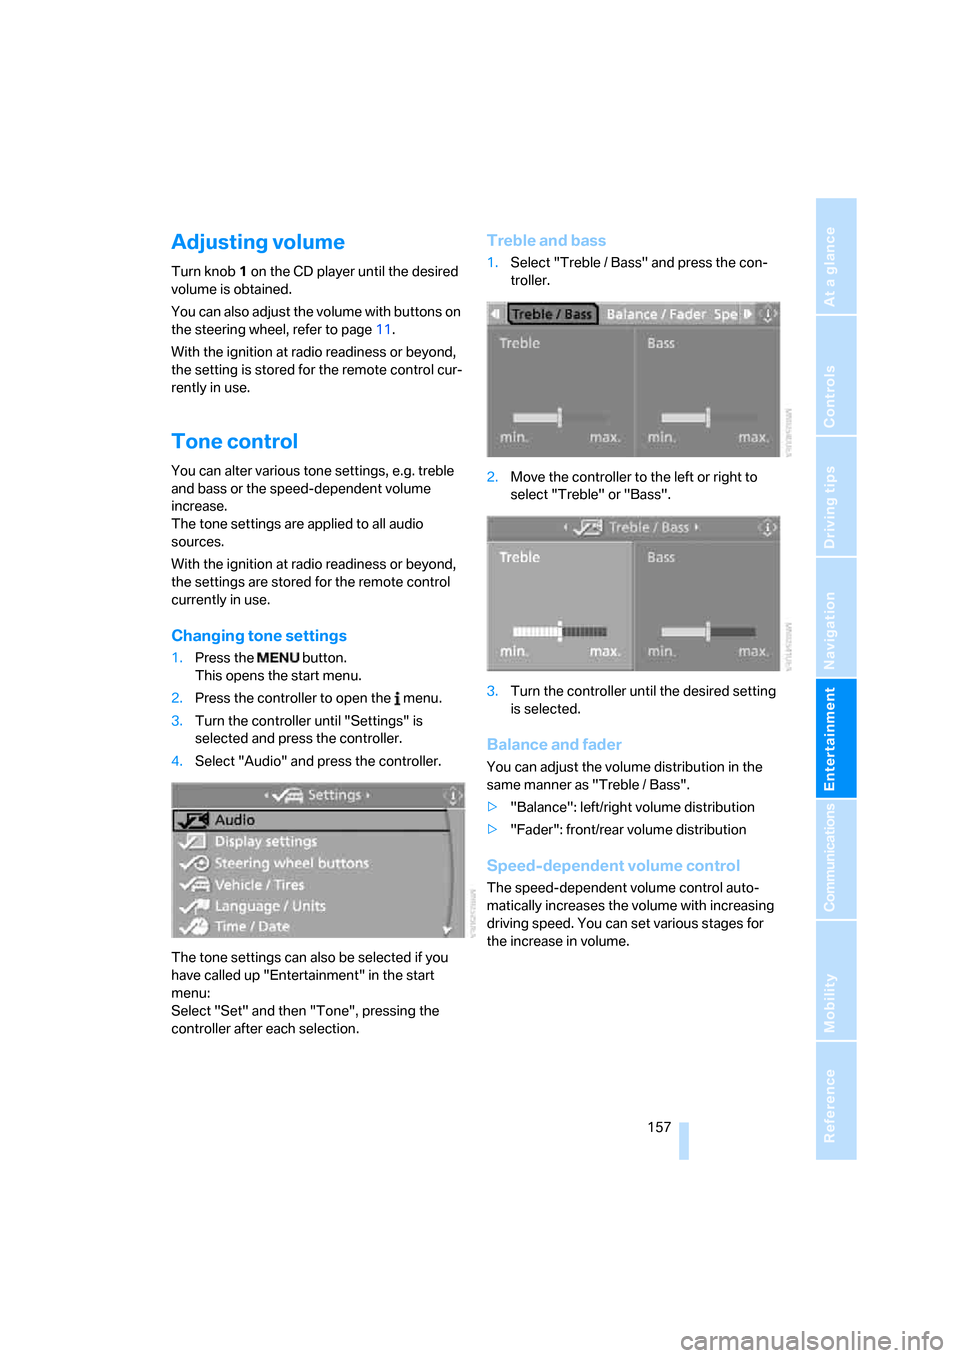
Changing tone settings
1.Press the button.
This opens the start menu.
2.Press the controller to open the menu.
3.Turn the controller until "Settings" is
selected and press the controller.
4.Select "Audio" and press the controller.
The tone settings can also be selected if you
have called up "Entertainment" in the start
menu:
Select "Set" and then "Tone", pressing the
controller after each selection.
Treble and bass
1.Select "Treble / Bass" and press the con-
troller.
2.Move the controller to the left or right to
select "Treble" or "Bass".
3.Turn the controller until the desired setting
is selected.
Balance and fader
You can adjust the volume distribution in the
same manner as "Treble / Bass".
>"Balance": left/right volume distribution
>"Fader": front/rear volume distribution
Speed-dependent volume control
The speed-dependent volume control auto-
matically increases the volume with increasing
driving speed. You can set various stages for
the increase in volume.
Page 211 of 274
Mobility
209Reference
At a glance
Controls
Driving tips
Communications
Navigation
Entertainment
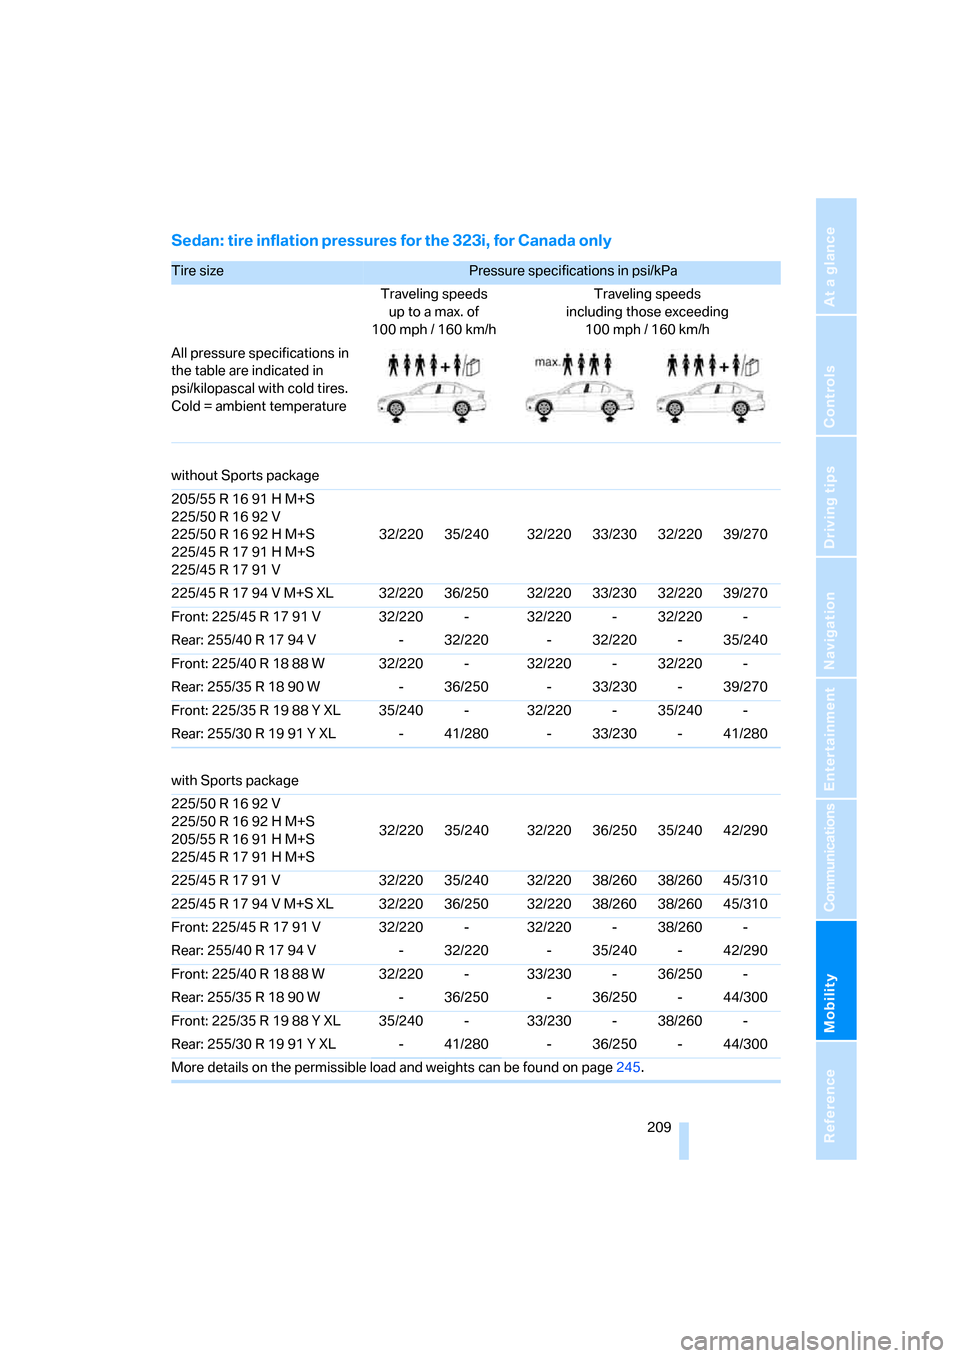
Sedan: tire inflation pressures for the 323i, for Canada only
Tire size Pressure specifications in psi/kPa
Traveling speeds
up to a max. of
100 mph / 160 km/hTraveling speeds
including those exceeding
100mph / 160km/h
All pressure specifications in
the table are indicated in
psi/kilopascal with cold tires.
Cold = ambient temperature
without Sports package
205/55 R 16 91 H M+S
225/50 R 16 92 V
225/50 R 16 92 H M+S
225/45 R 17 91 H M+S
225/45 R 17 91 V32/220 35/240 32/220 33/230 32/220 39/270
225/45 R 17 94 V M+S XL 32/220 36/250 32/220 33/230 32/220 39/270
Front: 225/45 R 17 91 V 32/220 - 32/220 - 32/220 -
Rear: 255/40 R 17 94 V - 32/220 - 32/220 - 35/240
Front: 225/40 R 18 88 W 32/220 - 32/220 - 32/220 -
Rear: 255/35 R 18 90 W - 36/250 - 33/230 - 39/270
Front: 225/35 R 19 88 Y XL 35/240 - 32/220 - 35/240 -
Rear: 255/30 R 19 91 Y XL - 41/280 - 33/230 - 41/280
with Sports package
225/50 R 16 92 V
225/50 R 16 92 H M+S
205/55 R 16 91 H M+S
225/45 R 17 91 H M+S32/220 35/240 32/220 36/250 35/240 42/290
225/45 R 17 91 V 32/220 35/240 32/220 38/260 38/260 45/310
225/45 R 17 94 V M+S XL 32/220 36/250 32/220 38/260 38/260 45/310
Front: 225/45 R 17 91 V 32/220 - 32/220 - 38/260 -
Rear: 255/40 R 17 94 V - 32/220 - 35/240 - 42/290
Front: 225/40 R 18 88 W 32/220 - 33/230 - 36/250 -
Rear: 255/35 R 18 90 W - 36/250 - 36/250 - 44/300
Front: 225/35 R 19 88 Y XL 35/240 - 33/230 - 38/260 -
Rear: 255/30 R 19 91 Y XL - 41/280 - 36/250 - 44/300
More details on the permissible load and weights can be found on page245.
Page 213 of 274
Mobility
211Reference
At a glance
Controls
Driving tips
Communications
Navigation
Entertainment
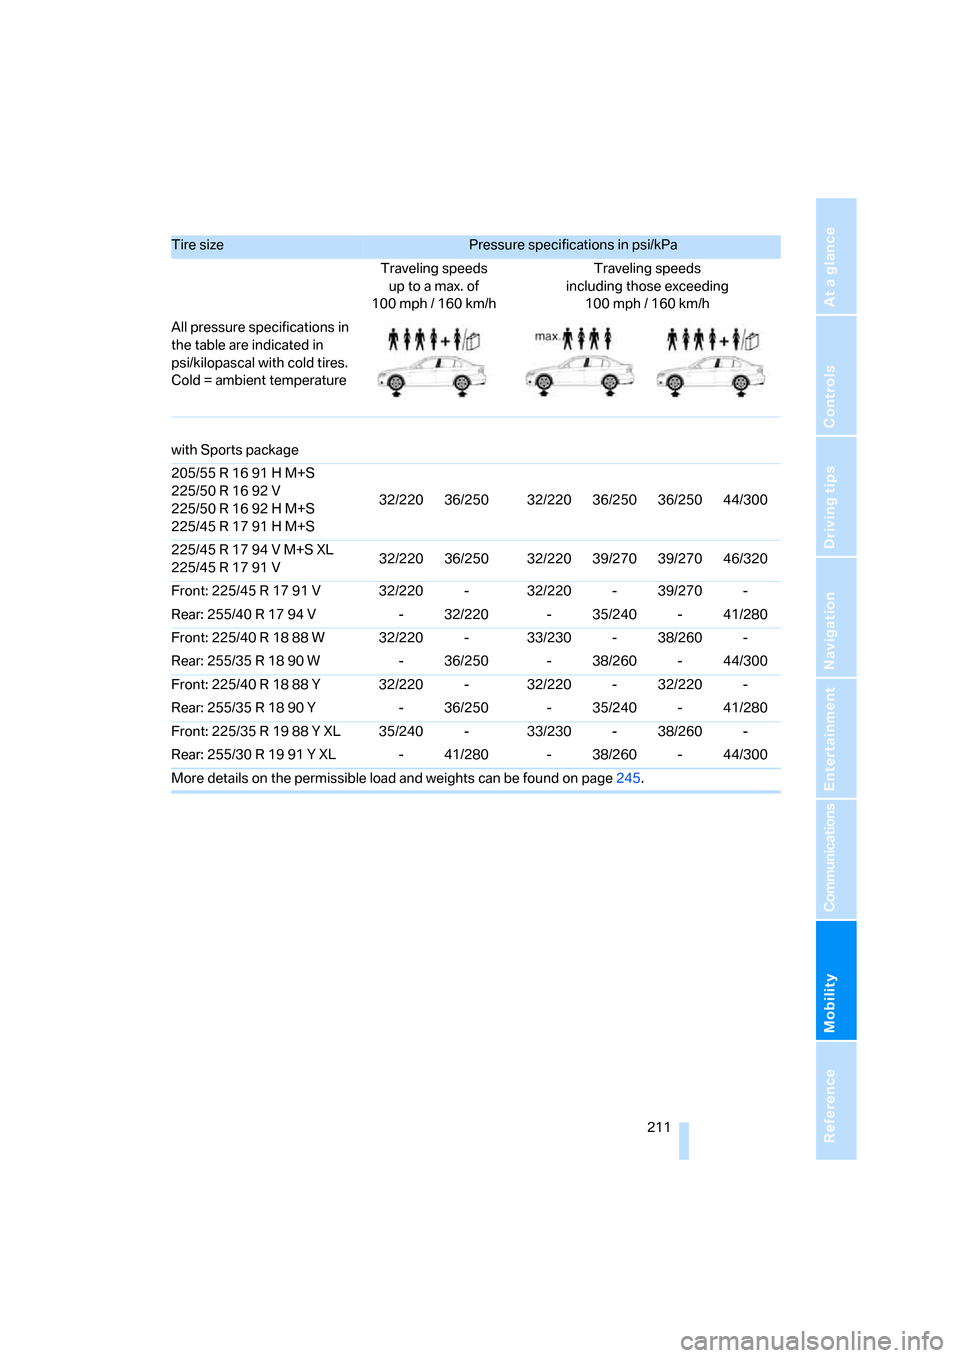
with Sports package
205/55 R 16 91 H M+S
225/50 R 16 92 V
225/50 R 16 92 H M+S
225/45 R 17 91 H M+S32/220 36/250 32/220 36/250 36/250 44/300
225/45 R 17 94 V M+S XL
225/45 R 17 91 V32/220 36/250 32/220 39/270 39/270 46/320
Front: 225/45 R 17 91 V 32/220 - 32/220 - 39/270 -
Rear: 255/40 R 17 94 V - 32/220 - 35/240 - 41/280
Front: 225/40 R 18 88 W 32/220 - 33/230 - 38/260 -
Rear: 255/35 R 18 90 W - 36/250 - 38/260 - 44/300
Front: 225/40 R 18 88 Y 32/220 - 32/220 - 32/220 -
Rear: 255/35 R 18 90 Y - 36/250 - 35/240 - 41/280
Front: 225/35 R 19 88 Y XL 35/240 - 33/230 - 38/260 -
Rear: 255/30 R 19 91 Y XL - 41/280 - 38/260 - 44/300
More details on the permissible load and weights can be found on page245.
Tire size Pressure specifications in psi/kPa
Traveling speeds
up to a max. of
100 mph / 160 km/hTraveling speeds
including those exceeding
100mph / 160km/h
All pressure specifications in
the table are indicated in
psi/kilopascal with cold tires.
Cold = ambient temperature
Page 215 of 274
Mobility
213Reference
At a glance
Controls
Driving tips
Communications
Navigation
Entertainment
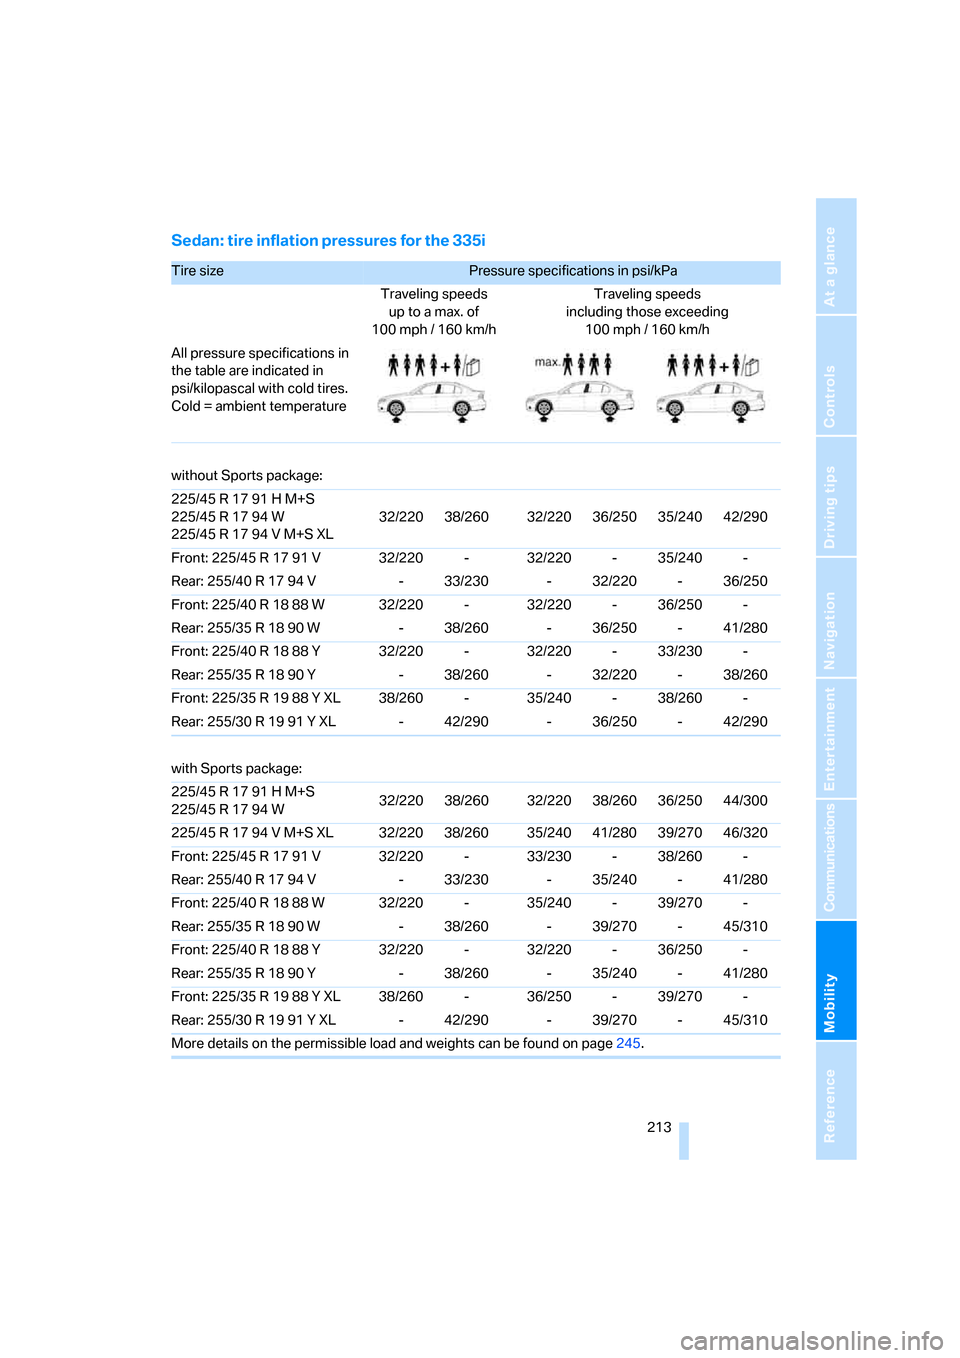
Sedan: tire inflation pressures for the 335i
Tire size Pressure specifications in psi/kPa
Traveling speeds
up to a max. of
100 mph / 160 km/hTraveling speeds
including those exceeding
100mph / 160km/h
All pressure specifications in
the table are indicated in
psi/kilopascal with cold tires.
Cold = ambient temperature
without Sports package:
225/45 R 17 91 H M+S
225/45 R 17 94 W
225/45 R 17 94 V M+S XL32/220 38/260 32/220 36/250 35/240 42/290
Front: 225/45 R 17 91 V 32/220 - 32/220 - 35/240 -
Rear: 255/40 R 17 94 V - 33/230 - 32/220 - 36/250
Front: 225/40 R 18 88 W 32/220 - 32/220 - 36/250 -
Rear: 255/35 R 18 90 W - 38/260 - 36/250 - 41/280
Front: 225/40 R 18 88 Y 32/220 - 32/220 - 33/230 -
Rear: 255/35 R 18 90 Y - 38/260 - 32/220 - 38/260
Front: 225/35 R 19 88 Y XL 38/260 - 35/240 - 38/260 -
Rear: 255/30 R 19 91 Y XL - 42/290 - 36/250 - 42/290
with Sports package:
225/45 R 17 91 H M+S
225/45 R 17 94 W32/220 38/260 32/220 38/260 36/250 44/300
225/45 R 17 94 V M+S XL 32/220 38/260 35/240 41/280 39/270 46/320
Front: 225/45 R 17 91 V 32/220 - 33/230 - 38/260 -
Rear: 255/40 R 17 94 V - 33/230 - 35/240 - 41/280
Front: 225/40 R 18 88 W 32/220 - 35/240 - 39/270 -
Rear: 255/35 R 18 90 W - 38/260 - 39/270 - 45/310
Front: 225/40 R 18 88 Y 32/220 - 32/220 - 36/250 -
Rear: 255/35 R 18 90 Y - 38/260 - 35/240 - 41/280
Front: 225/35 R 19 88 Y XL 38/260 - 36/250 - 39/270 -
Rear: 255/30 R 19 91 Y XL - 42/290 - 39/270 - 45/310
More details on the permissible load and weights can be found on page245.
Page 217 of 274
Mobility
215Reference
At a glance
Controls
Driving tips
Communications
Navigation
Entertainment
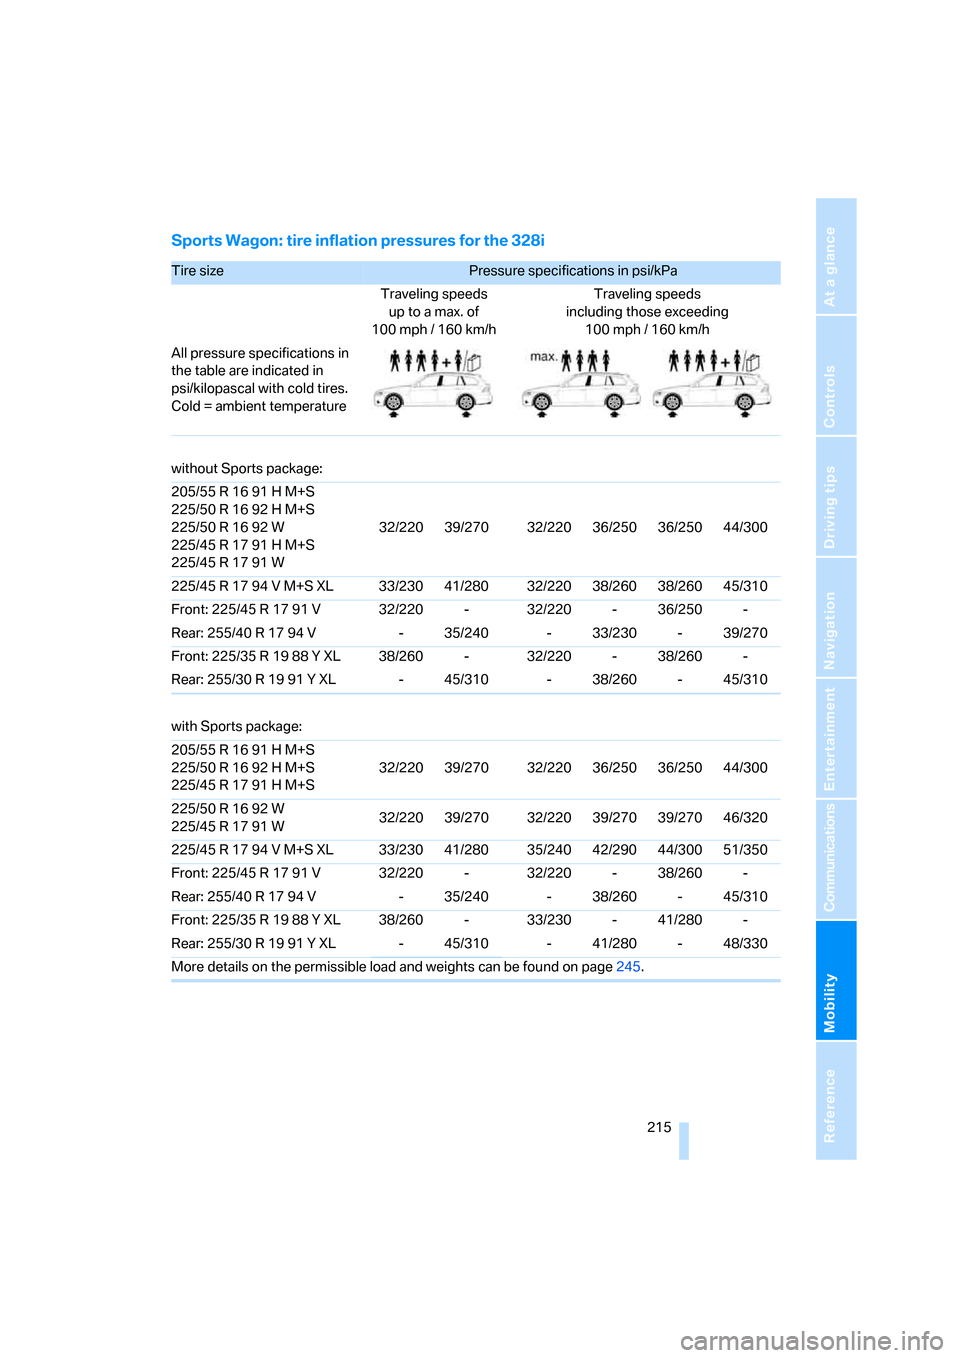
Sports Wagon: tire inflation pressures for the 328i
Tire size Pressure specifications in psi/kPa
Traveling speeds
up to a max. of
100 mph / 160 km/hTraveling speeds
including those exceeding
100mph / 160km/h
All pressure specifications in
the table are indicated in
psi/kilopascal with cold tires.
Cold = ambient temperature
without Sports package:
205/55 R 16 91 H M+S
225/50 R 16 92 H M+S
225/50 R 16 92 W
225/45 R 17 91 H M+S
225/45 R 17 91 W32/220 39/270 32/220 36/250 36/250 44/300
225/45 R 17 94 V M+S XL 33/230 41/280 32/220 38/260 38/260 45/310
Front: 225/45 R 17 91 V 32/220 - 32/220 - 36/250 -
Rear: 255/40 R 17 94 V - 35/240 - 33/230 - 39/270
Front: 225/35 R 19 88 Y XL 38/260 - 32/220 - 38/260 -
Rear: 255/30 R 19 91 Y XL - 45/310 - 38/260 - 45/310
with Sports package:
205/55 R 16 91 H M+S
225/50 R 16 92 H M+S
225/45 R 17 91 H M+S32/220 39/270 32/220 36/250 36/250 44/300
225/50 R 16 92 W
225/45 R 17 91 W32/220 39/270 32/220 39/270 39/270 46/320
225/45 R 17 94 V M+S XL 33/230 41/280 35/240 42/290 44/300 51/350
Front: 225/45 R 17 91 V 32/220 - 32/220 - 38/260 -
Rear: 255/40 R 17 94 V - 35/240 - 38/260 - 45/310
Front: 225/35 R 19 88 Y XL 38/260 - 33/230 - 41/280 -
Rear: 255/30 R 19 91 Y XL - 45/310 - 41/280 - 48/330
More details on the permissible load and weights can be found on page245.
Page 231 of 274
Mobility
229Reference
At a glance
Controls
Driving tips
Communications
Navigation
Entertainment
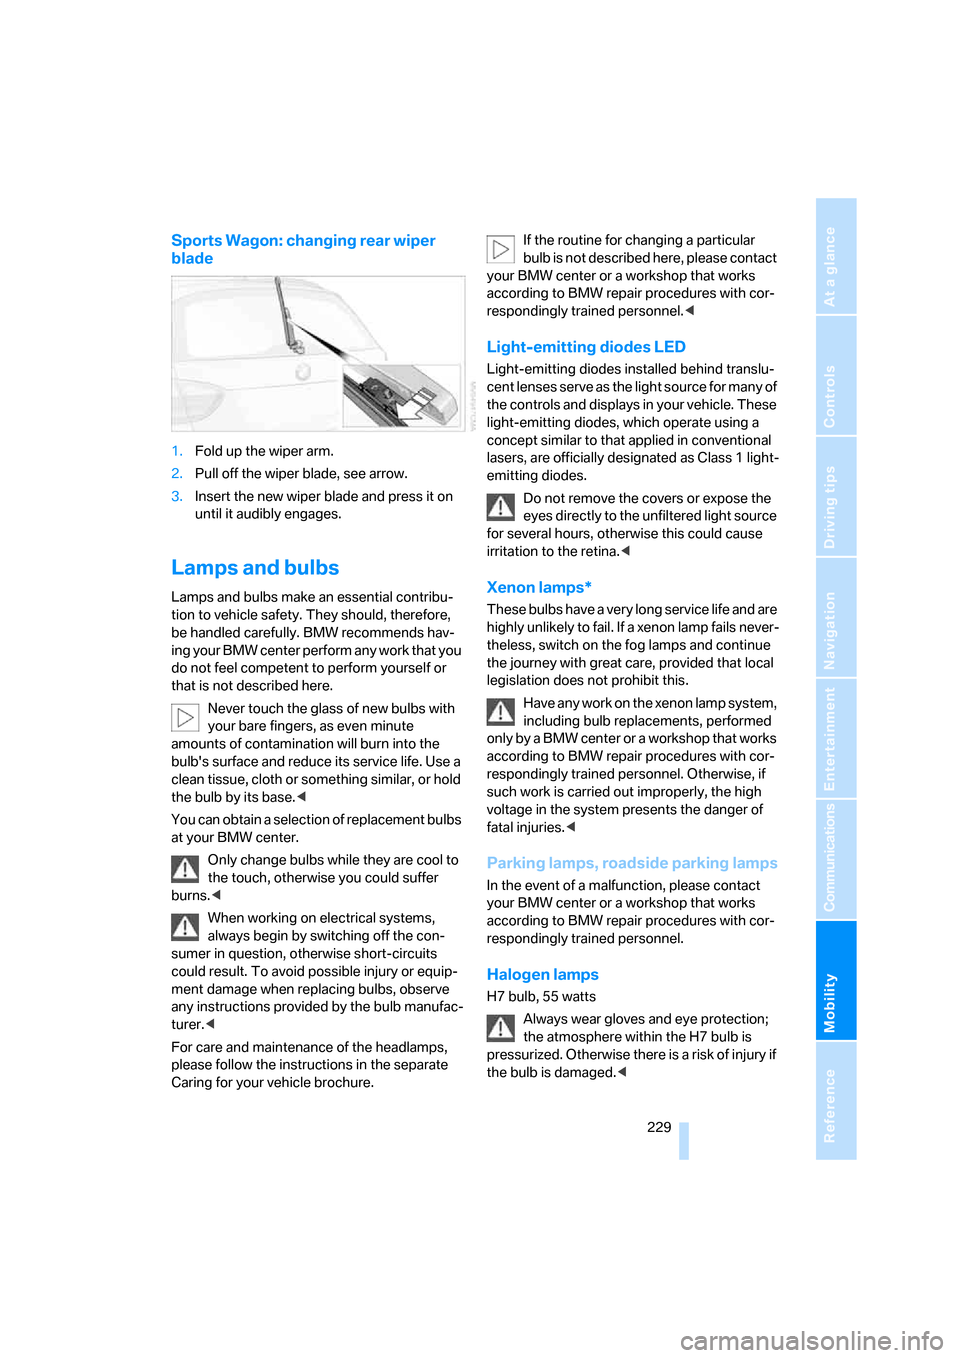
Sports Wagon: changing rear wiper
blade
1.Fold up the wiper arm.
2.Pull off the wiper blade, see arrow.
3.Insert the new wiper blade and press it on
until it audibly engages.
Lamps and bulbs
Lamps and bulbs make an essential contribu-
tion to vehicle safety. They should, therefore,
be handled carefully. BMW recommends hav-
ing your BMW center perform any work that you
do not feel competent to perform yourself or
that is not described here.
Never touch the glass of new bulbs with
your bare fingers, as even minute
amounts of contamination will burn into the
bulb's surface and reduce its service life. Use a
clean tissue, cloth or something similar, or hold
the bulb by its base.<
You can obtain a selection of replacement bulbs
at your BMW center.
Only change bulbs while they are cool to
the touch, otherwise you could suffer
burns.<
When working on electrical systems,
always begin by switching off the con-
sumer in question, otherwise short-circuits
could result. To avoid possible injury or equip-
ment damage when replacing bulbs, observe
any instructions provided by the bulb manufac-
turer.<
For care and maintenance of the headlamps,
please follow the instructions in the separate
Caring for your vehicle brochure.If the routine for changing a particular
bulb is not described here, please contact
your BMW center or a workshop that works
according to BMW repair procedures with cor-
respondingly trained personnel.<
Light-emitting diodes LED
Light-emitting diodes installed behind translu-
cent lenses serve as the light source for many of
the controls and displays in your vehicle. These
light-emitting diodes, which operate using a
concept similar to that applied in conventional
lasers, are officially designated as Class 1 light-
emitting diodes.
Do not remove the covers or expose the
eyes directly to the unfiltered light source
for several hours, otherwise this could cause
irritation to the retina.<
Xenon lamps*
These bulbs have a very long service life and are
highly unlikely to fail. If a xenon lamp fails never-
theless, switch on the fog lamps and continue
the journey with great care, provided that local
legislation does not prohibit this.
Have any work on the xenon lamp system,
including bulb replacements, performed
only by a BMW center or a workshop that works
according to BMW repair procedures with cor-
respondingly trained personnel. Otherwise, if
such work is carried out improperly, the high
voltage in the system presents the danger of
fatal injuries.<
Parking lamps, roadside parking lamps
In the event of a malfunction, please contact
your BMW center or a workshop that works
according to BMW repair procedures with cor-
respondingly trained personnel.
Halogen lamps
H7 bulb, 55 watts
Always wear gloves and eye protection;
the atmosphere within the H7 bulb is
pressurized. Otherwise there is a risk of injury if
the bulb is damaged.<
Page 241 of 274
Mobility
239Reference
At a glance
Controls
Driving tips
Communications
Navigation
Entertainment
With a tow rope
When starting off in the towing vehicle, make
sure that the tow rope is taut.
To avoid jerking and the associated
stresses on vehicle components when
towing, always use nylon ropes or nylon straps.
Attach the tow rope to the tow fittings only, as
attaching it to other parts of the vehicle could
result in damage.<
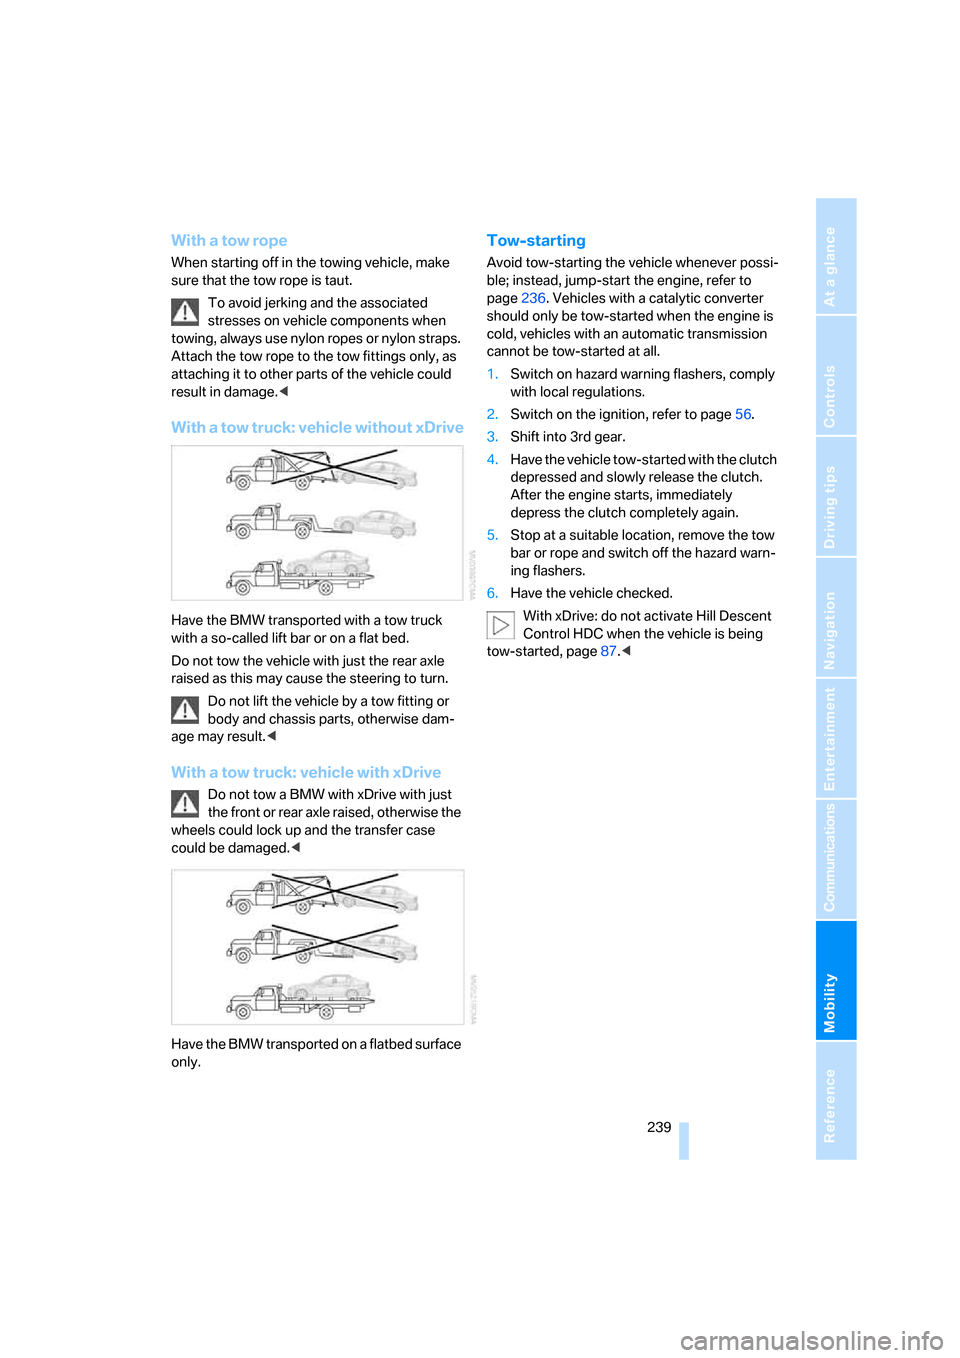
With a tow truck: vehicle without xDrive
Have the BMW transported with a tow truck
with a so-called lift bar or on a flat bed.
Do not tow the vehicle with just the rear axle
raised as this may cause the steering to turn.
Do not lift the vehicle by a tow fitting or
body and chassis parts, otherwise dam-
age may result.<
With a tow truck: vehicle with xDrive
Do not tow a BMW with xDrive with just
the front or rear axle raised, otherwise the
wheels could lock up and the transfer case
could be damaged.<
Have the BMW transported on a flatbed surface
only.
Tow-starting
Avoid tow-starting the vehicle whenever possi-
ble; instead, jump-start the engine, refer to
page236. Vehicles with a catalytic converter
should only be tow-started when the engine is
cold, vehicles with an automatic transmission
cannot be tow-started at all.
1.Switch on hazard warning flashers, comply
with local regulations.
2.Switch on the ignition, refer to page56.
3.Shift into 3rd gear.
4.Have the vehicle tow-started with the clutch
depressed and slowly release the clutch.
After the engine starts, immediately
depress the clutch completely again.
5.Stop at a suitable location, remove the tow
bar or rope and switch off the hazard warn-
ing flashers.
6.Have the vehicle checked.
With xDrive: do not activate Hill Descent
Control HDC when the vehicle is being
tow-started, page87.<