2008 BMW 335XI 2 door
[x] Cancel search: 2 doorPage 57 of 274
Controls
55Reference
At a glance
Driving tips
Communications
Navigation
Entertainment
Mobility
3.Use the hook to clip the retaining strap to
the anchor.
4.Push the head restraint into its lowermost
position.
5.Pull the retaining strap taut.
On journeys
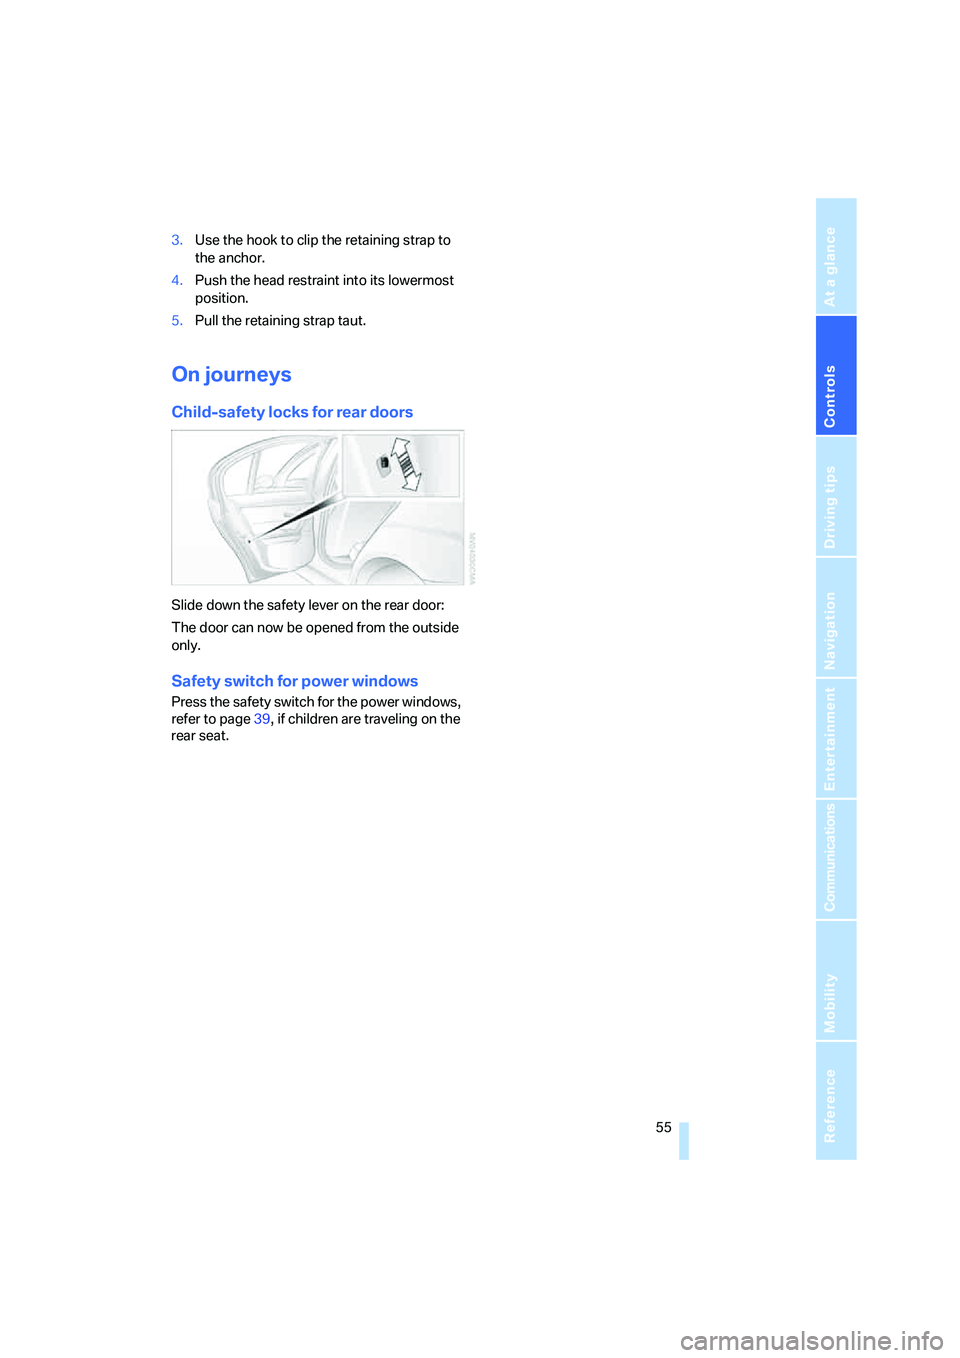
Child-safety locks for rear doors
Slide down the safety lever on the rear door:
The door can now be opened from the outside
only.
Safety switch for power windows
Press the safety switch for the power windows,
refer to page39, if children are traveling on the
rear seat.
Page 58 of 274
Driving
56
Driving
Ignition lock
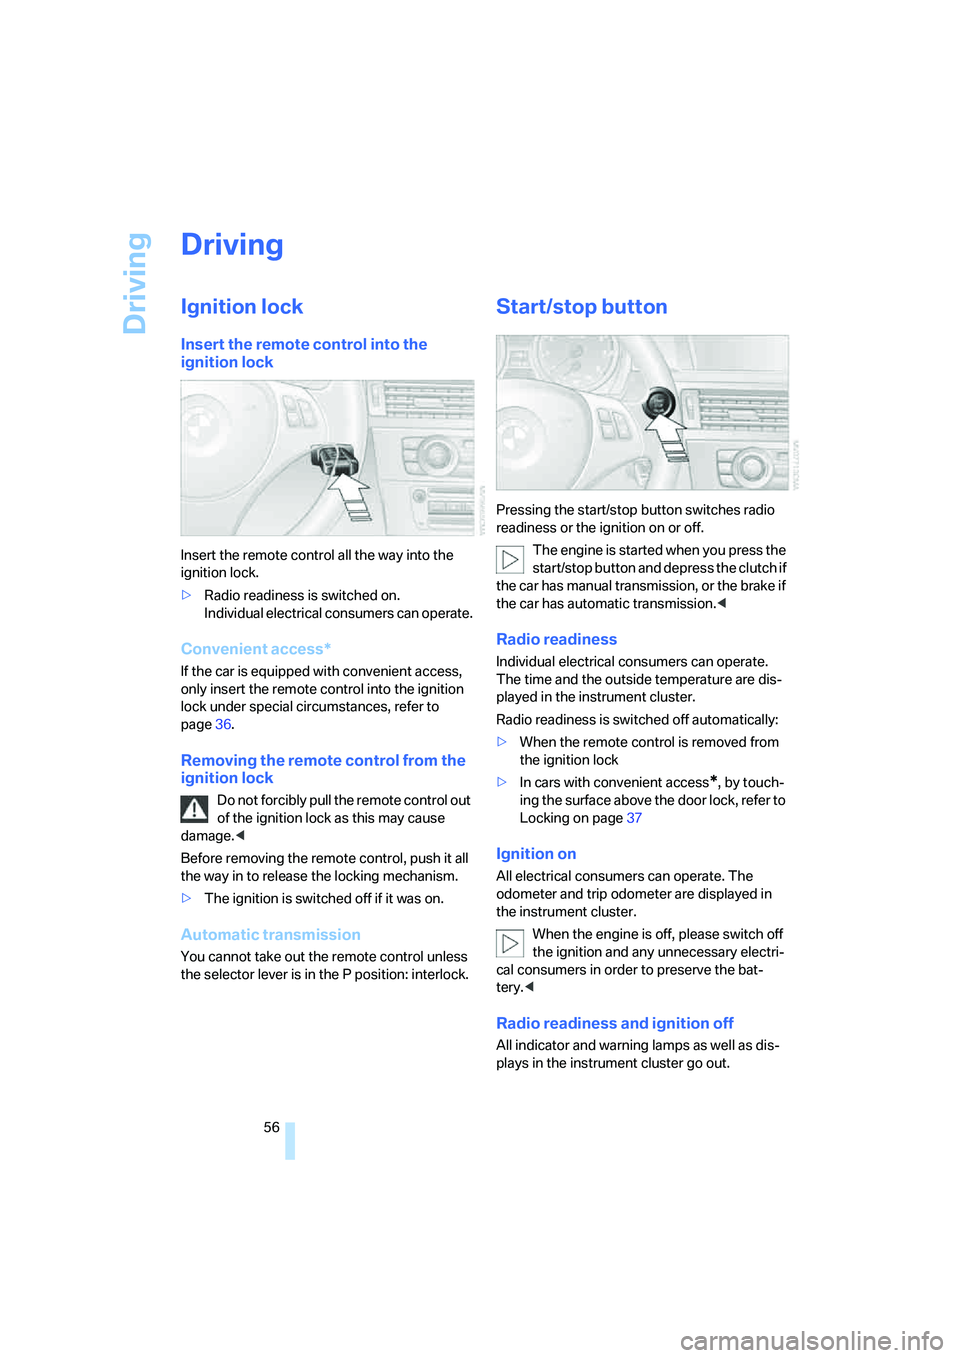
Insert the remote control into the
ignition lock
Insert the remote control all the way into the
ignition lock.
>Radio readiness is switched on.
Individual electrical consumers can operate.
Convenient access*
If the car is equipped with convenient access,
only insert the remote control into the ignition
lock under special circumstances, refer to
page36.
Removing the remote control from the
ignition lock
Do not forcibly pull the remote control out
of the ignition lock as this may cause
damage.<
Before removing the remote control, push it all
the way in to release the locking mechanism.
>The ignition is switched off if it was on.
Automatic transmission
You cannot take out the remote control unless
the selector lever is in the P position: interlock.
Start/stop button
Pressing the start/stop button switches radio
readiness or the ignition on or off.
The engine is started when you press the
start/stop button and depress the clutch if
the car has manual transmission, or the brake if
the car has automatic transmission.<
Radio readiness
Individual electrical consumers can operate.
The time and the outside temperature are dis-
played in the instrument cluster.
Radio readiness is switched off automatically:
>When the remote control is removed from
the ignition lock
>In cars with convenient access
*, by touch-
ing the surface above the door lock, refer to
Locking on page37
Ignition on
All electrical consumers can operate. The
odometer and trip odometer are displayed in
the instrument cluster.
When the engine is off, please switch off
the ignition and any unnecessary electri-
cal consumers in order to preserve the bat-
tery.<
Radio readiness and ignition off
All indicator and warning lamps as well as dis-
plays in the instrument cluster go out.
Page 98 of 274
Lamps
96
Lamps
Parking lamps/low beams
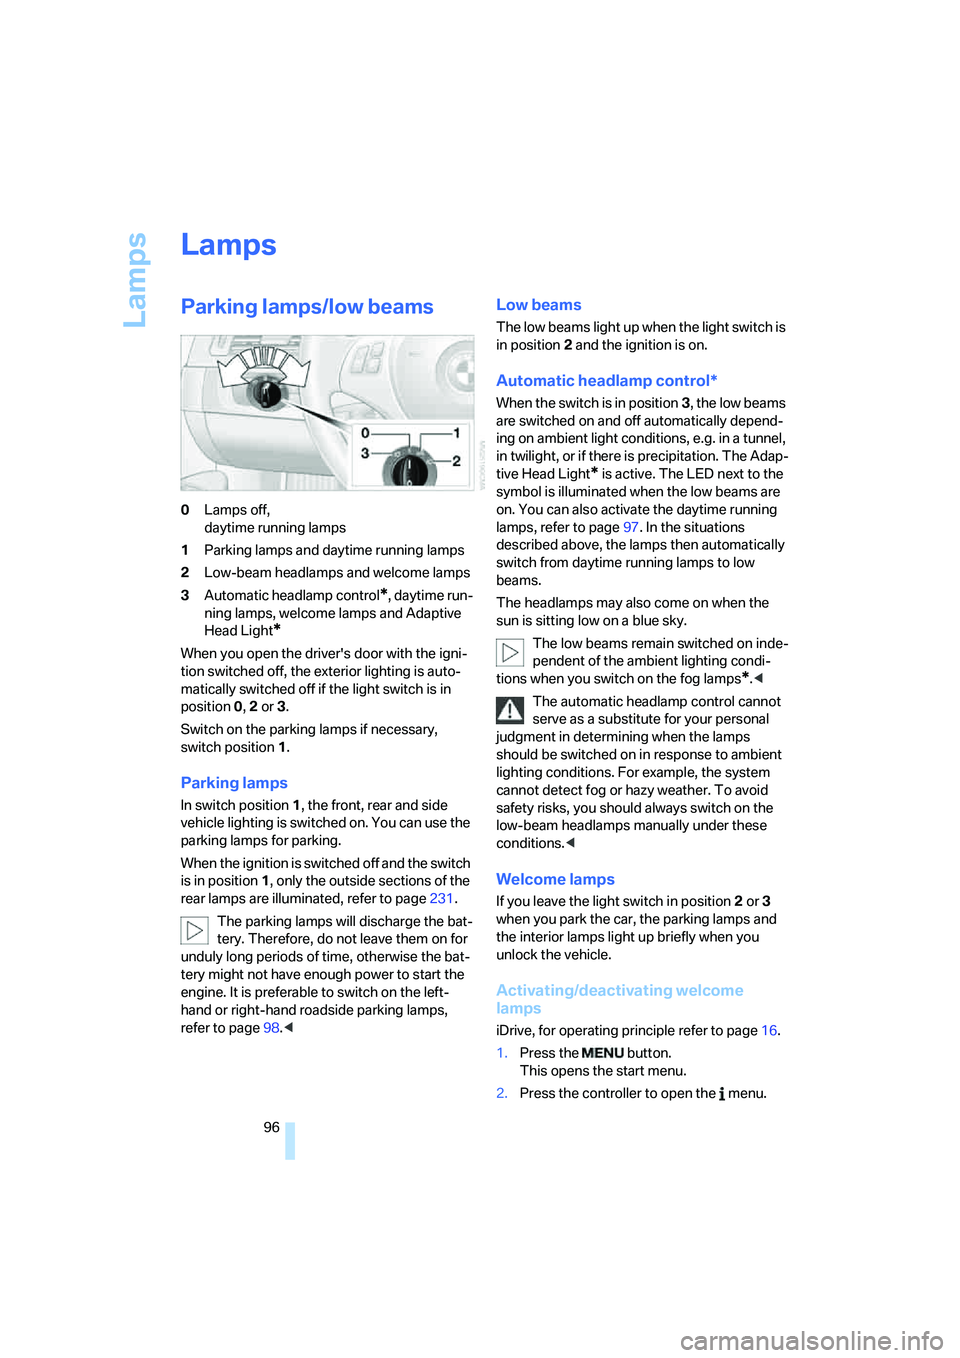
0Lamps off,
daytime running lamps
1Parking lamps and daytime running lamps
2Low-beam headlamps and welcome lamps
3Automatic headlamp control
*, daytime run-
ning lamps, welcome lamps and Adaptive
Head Light
*
When you open the driver's door with the igni-
tion switched off, the exterior lighting is auto-
matically switched off if the light switch is in
position 0, 2 or 3.
Switch on the parking lamps if necessary,
switch position 1.
Parking lamps
In switch position1, the front, rear and side
vehicle lighting is switched on. You can use the
parking lamps for parking.
When the ignition is switched off and the switch
is in position 1, only the outside sections of the
rear lamps are illuminated, refer to page231.
The parking lamps will discharge the bat-
tery. Therefore, do not leave them on for
unduly long periods of time, otherwise the bat-
tery might not have enough power to start the
engine. It is preferable to switch on the left-
hand or right-hand roadside parking lamps,
refer to page98.<
Low beams
The low beams light up when the light switch is
in position 2 and the ignition is on.
Automatic headlamp control*
When the switch is in position3, the low beams
are switched on and off automatically depend-
ing on ambient light conditions, e.g. in a tunnel,
in twilight, or if there is precipitation. The Adap-
tive Head Light
* is active. The LED next to the
symbol is illuminated when the low beams are
on. You can also activate the daytime running
lamps, refer to page97. In the situations
described above, the lamps then automatically
switch from daytime running lamps to low
beams.
The headlamps may also come on when the
sun is sitting low on a blue sky.
The low beams remain switched on inde-
pendent of the ambient lighting condi-
tions when you switch on the fog lamps
*.<
The automatic headlamp control cannot
serve as a substitute for your personal
judgment in determining when the lamps
should be switched on in response to ambient
lighting conditions. For example, the system
cannot detect fog or hazy weather. To avoid
safety risks, you should always switch on the
low-beam headlamps manually under these
conditions.<
Welcome lamps
If you leave the light switch in position 2 or 3
when you park the car, the parking lamps and
the interior lamps light up briefly when you
unlock the vehicle.
Activating/deactivating welcome
lamps
iDrive, for operating principle refer to page16.
1.Press the button.
This opens the start menu.
2.Press the controller to open the menu.
Page 101 of 274
Controls
99Reference
At a glance
Driving tips
Communications
Navigation
Entertainment
Mobility
Instrument lighting
You can adjust the brightness of the instrument
lighting only when the parking lamps or the low
beams are switched on.
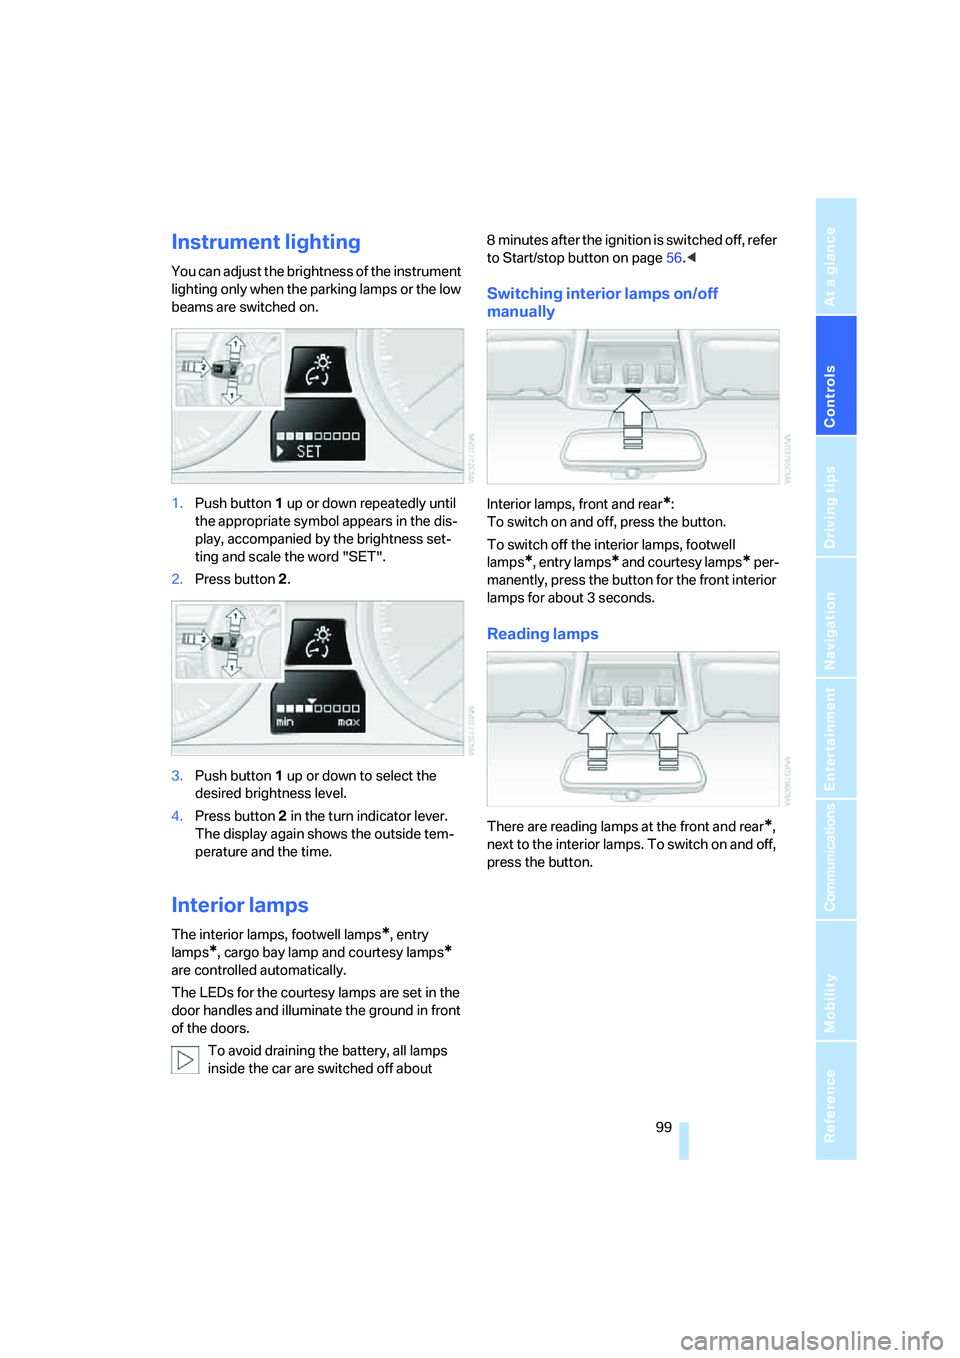
1.Push button 1 up or down repeatedly until
the appropriate symbol appears in the dis-
play, accompanied by the brightness set-
ting and scale the word "SET".
2.Press button 2.
3.Push button 1 up or down to select the
desired brightness level.
4.Press button 2 in the turn indicator lever.
The display again shows the outside tem-
perature and the time.
Interior lamps
The interior lamps, footwell lamps*, entry
lamps
*, cargo bay lamp and courtesy lamps*
are controlled automatically.
The LEDs for the courtesy lamps
are set in the
door handles and illuminate the ground in front
of the doors.
To avoid draining the battery, all lamps
inside the car are switched off about 8 minutes after the ignition is switched off, refer
to Start/stop button on page56.<
Switching interior lamps on/off
manually
Interior lamps, front and rear*:
To switch on and off, press the button.
To switch off the interior lamps, footwell
lamps
*, entry lamps* and courtesy lamps* per-
manently, press the button for the front interior
lamps for about 3 seconds.
Reading lamps
There are reading lamps at the front and rear*,
next to the interior lamps. To switch on and off,
press the button.
Page 108 of 274
Practical interior accessories
106
Practical interior accessories
Integrated universal remote
control*
The concept
The integrated universal remote control can
replace as many as three hand-held transmit-
ters for various remote-controlled devices,
such as garage doors and gates or lighting sys-
tems. The integrated universal remote control
registers and stores signals from the original
hand-held transmitters.
The signal of an original hand-held transmitter
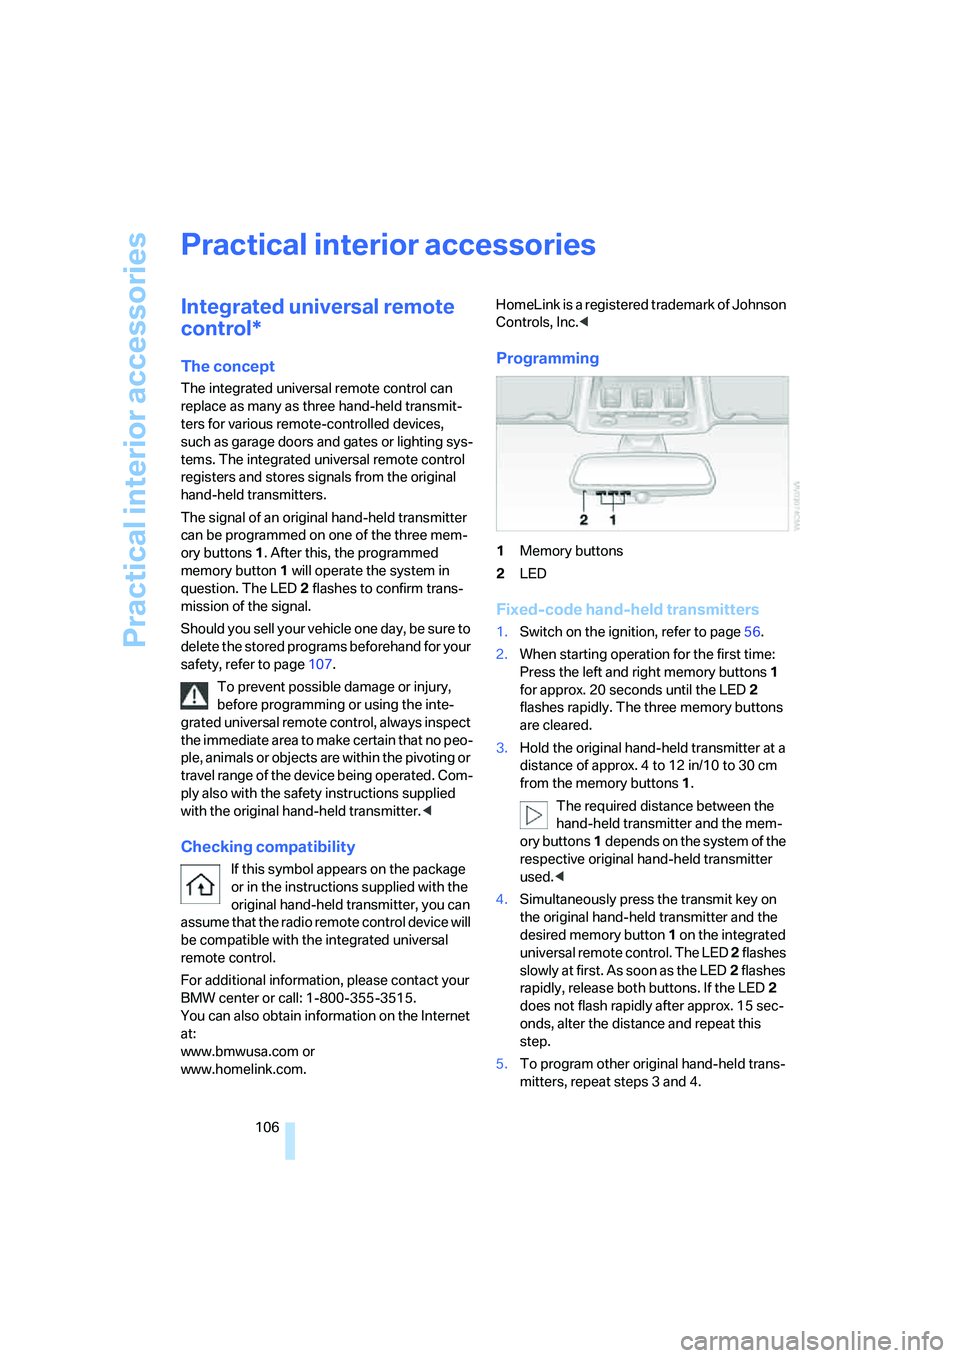
can be programmed on one of the three mem-
ory buttons1. After this, the programmed
memory button1 will operate the system in
question. The LED2 flashes to confirm trans-
mission of the signal.
Should you sell your vehicle one day, be sure to
delete the stored programs beforehand for your
safety, refer to page107.
To prevent possible damage or injury,
before programming or using the inte-
grated universal remote control, always inspect
the immediate area to make certain that no peo-
ple, animals or objects are within the pivoting or
travel range of the device being operated. Com-
ply also with the safety instructions supplied
with the original hand-held transmitter.<
Checking compatibility
If this symbol appears on the package
or in the instructions supplied with the
original hand-held transmitter, you can
assume that the radio remote control device will
be compatible with the integrated universal
remote control.
For additional information, please contact your
BMW center or call: 1-800-355-3515.
You can also obtain information on the Internet
at:
www.bmwusa.com or
www.homelink.com. HomeLink is a registered trademark of Johnson
Controls, Inc.<
Programming
1Memory buttons
2LED
Fixed-code hand-held transmitters
1.Switch on the ignition, refer to page56.
2.When starting operation for the first time:
Press the left and right memory buttons1
for approx. 20 seconds until the LED2
flashes rapidly. The three memory buttons
are cleared.
3.Hold the original hand-held transmitter at a
distance of approx. 4 to 12 in/10 to 30 cm
from the memory buttons1.
The required distance between the
hand-held transmitter and the mem-
ory buttons1 depends on the system of the
respective original hand-held transmitter
used.<
4.Simultaneously press the transmit key on
the original hand-held transmitter and the
desired memory button 1 on the integrated
universal remote control. The LED 2 flashes
slowly at first. As soon as the LED2 flashes
rapidly, release both buttons. If the LED2
does not flash rapidly after approx. 15 sec-
onds, alter the distance and repeat this
step.
5.To program other original hand-held trans-
mitters, repeat steps 3 and 4.
Page 112 of 274
Practical interior accessories
110
Locking
To lock the glove compartment, use the inte-
grated key of the remote control, refer to
page28.
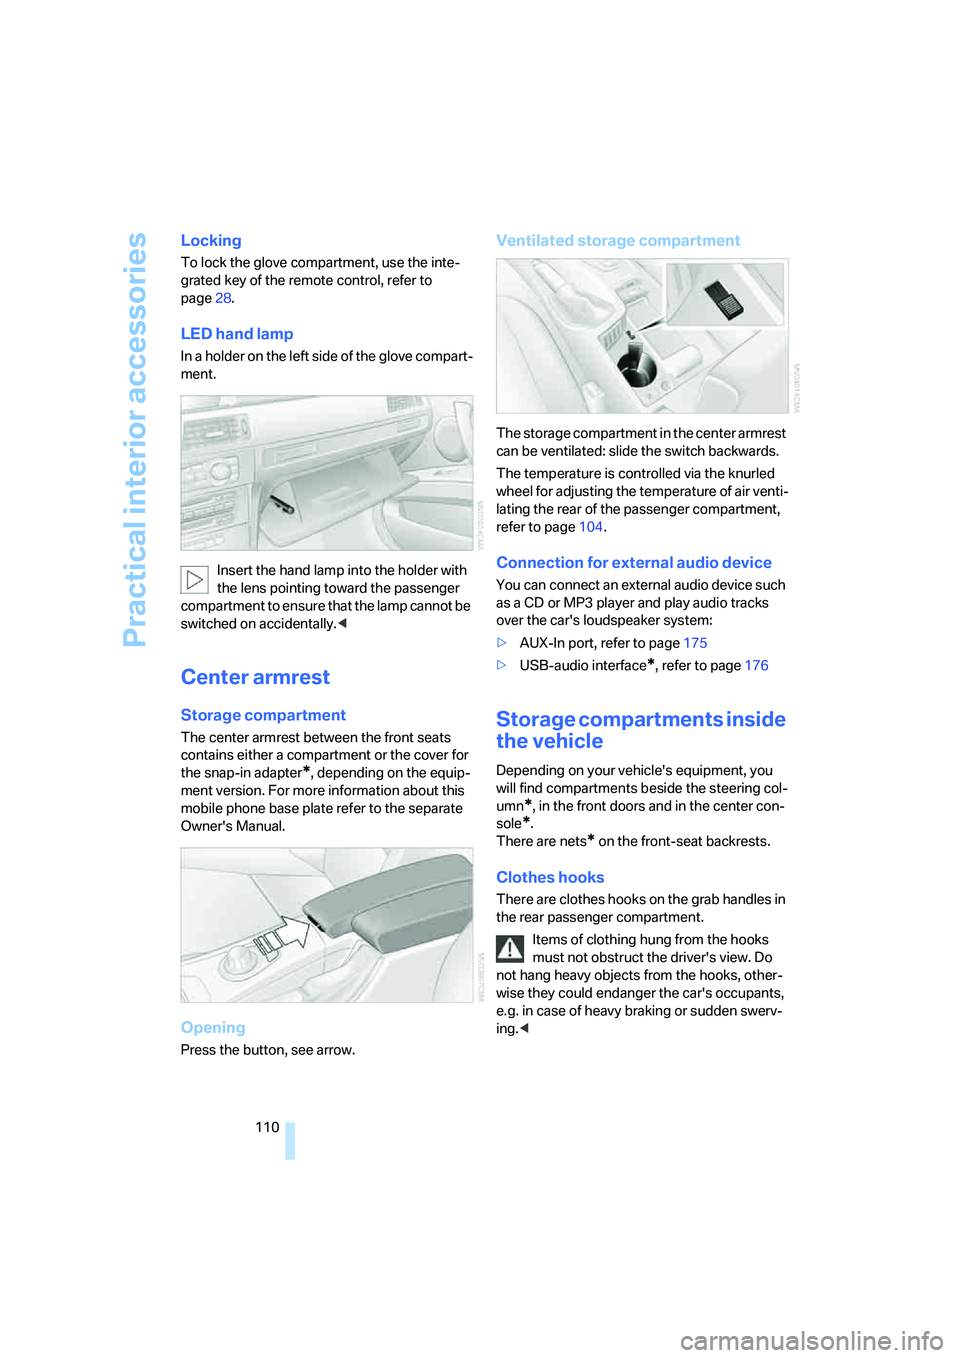
LED hand lamp
In a holder on the left side of the glove compart-
ment.
Insert the hand lamp into the holder with
the lens pointing toward the passenger
compartment to ensure that the lamp cannot be
switched on accidentally.<
Center armrest
Storage compartment
The center armrest between the front seats
contains either a compartment or the cover for
the snap-in adapter
*, depending on the equip-
ment version. For more information about this
mobile phone base plate refer to the separate
Owner's Manual.
Opening
Press the button, see arrow.
Ventilated storage compartment
The storage compartment in the center armrest
can be ventilated: slide the switch backwards.
The temperature is controlled via the knurled
wheel for adjusting the temperature of air venti-
lating the rear of the passenger compartment,
refer to page104.
Connection for external audio device
You can connect an external audio device such
as a CD or MP3 player and play audio tracks
over the car's loudspeaker system:
>AUX-In port, refer to page175
>USB-audio interface
*, refer to page176
Storage compartments inside
the vehicle
Depending on your vehicle's equipment, you
will find compartments beside the steering col-
umn
*, in the front doors and in the center con-
sole
*.
There are nets
* on the front-seat backrests.
Clothes hooks
There are clothes hooks on the grab handles in
the rear passenger compartment.
Items of clothing hung from the hooks
must not obstruct the driver's view. Do
not hang heavy objects from the hooks, other-
wise they could endanger the car's occupants,
e.g. in case of heavy braking or sudden swerv-
ing.<
Page 197 of 274
195
Entertainment
Reference
At a glance
Controls
Driving tips Communications
Navigation
Mobility
Notes
Important for voice commands
For voice commands, bear in mind the follow-
ing:
>Pronounce the commands smoothly and at
normal volume, avoiding excessive empha-
ses and pauses.
>Keep the doors, windows and glass roof
closed to prevent interference from outside
noise.
>Avoid ambient noise in the vehicle while
speaking.
Inserting/removing snap-in
adapter
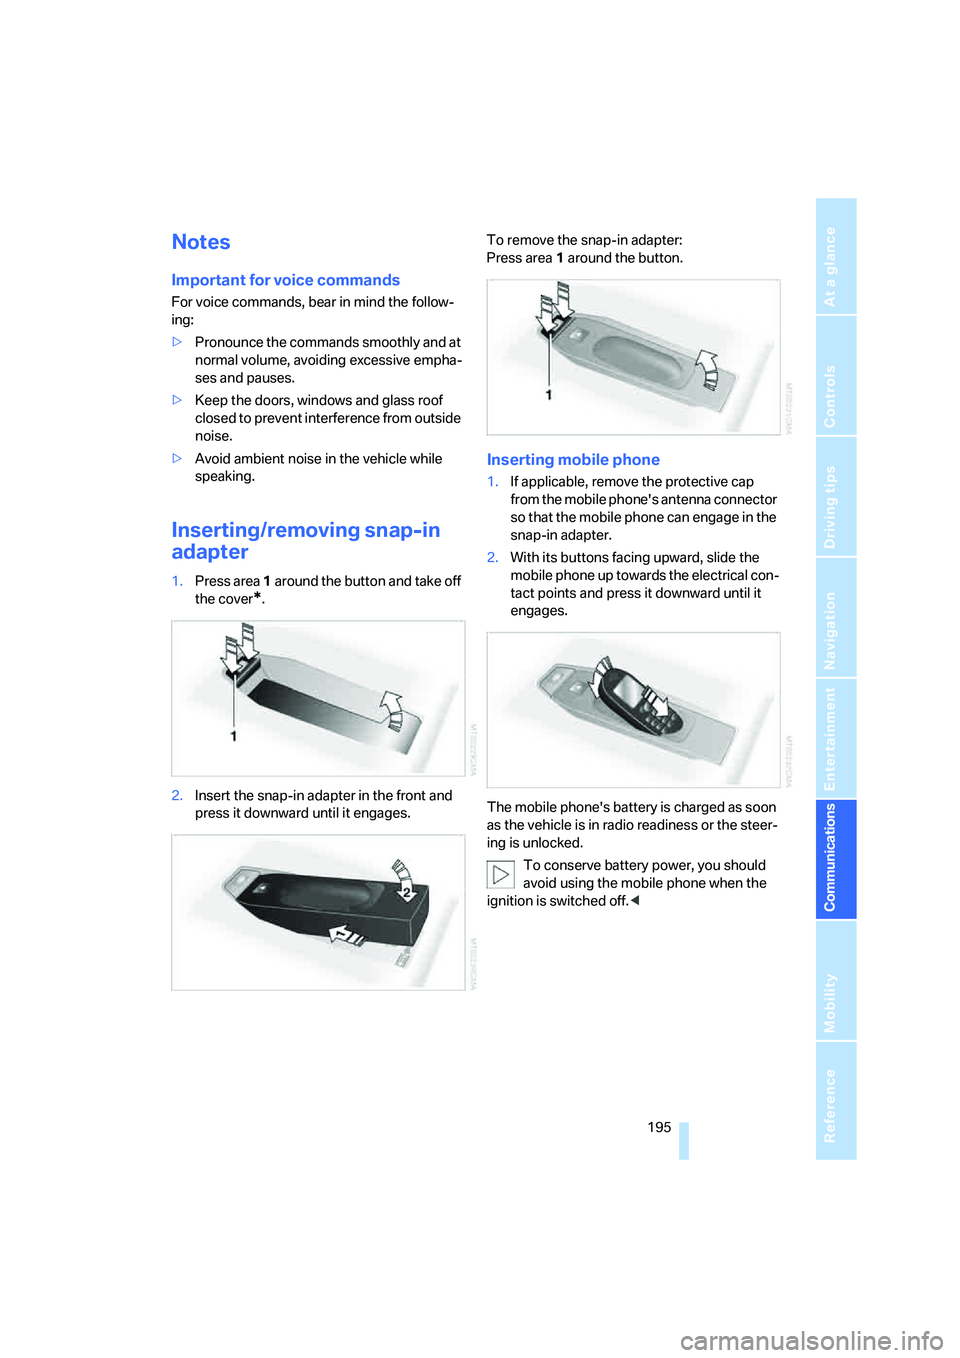
1.Press area 1 around the button and take off
the cover
*.
2.Insert the snap-in adapter in the front and
press it downward until it engages.To remove the snap-in adapter:
Press area 1 around the button.
Inserting mobile phone
1.If applicable, remove the protective cap
from the mobile phone's antenna connector
so that the mobile phone can engage in the
snap-in adapter.
2.With its buttons facing upward, slide the
mobile phone up towards the electrical con-
tact points and press it downward until it
engages.
The mobile phone's battery is charged as soon
as the vehicle is in radio readiness or the steer-
ing is unlocked.
To conserve battery power, you should
avoid using the mobile phone when the
ignition is switched off.<
Page 199 of 274
197
Entertainment
Reference
At a glance
Controls
Driving tips Communications
Navigation
Mobility
BMW Assist
BMW Assist provides you with various services.
For example, the position data of your vehicle
can be transmitted to the BMW Assist
Response Center if an Emergency Request
*
has been sent.
Many BMW Assist services depend on the indi-
vidually agreed contract.
After your contract has expired, the
BMW Assist system will be deactivated by the
BMW Assist Response Center without you hav-
ing to visit a BMW center. After the BMW Assist
system has been deactivated, no BMW Assist
service will be available. The BMW Assist sys-
tem can be reactivated by a BMW center after a
new contract has been signed.
Requirements
You can use BMW Assist when the following
requirements are met:
>The installed BMW Assist system is logged
on to a mobile phone network. This network
must be capable of transmitting the ser-
vices.
>To transmit position data, the vehicle must
be able to determine the current position.
>To activate and update BMW Assist, a GPS
signal must be available.
>You have subscribed to BMW Assist with
your BMW center or with the BMW Assist
Response Center. Enabling must have
been completed.
>BMW Assist is activated, refer to page202.
Offered services
The following services are available via
BMW Assist:
>Emergency Request, refer to page235:
When you press the SOS button, a connec-
tion is established to the BMW Assist
Response Center. The BMW Assist Response Center contacts you and takes
further steps to help you.
>Automatic Collision Notification:
Under certain conditions, a connection is
established to the BMW Assist Response
Center after a serious accident. If possible,
the BMW Assist Response Center contacts
you and takes further steps to help you.
>Enhanced Roadside Assistance:
You can call BMW Roadside Assistance
*
should you require help in the event of a
breakdown. If possible, the vehicle data and
position data are transmitted during this
call.
>Customer Relations:
For all information related to your vehicle
you can be connected with BMW Customer
Relations.
>TeleService:
Data on your vehicle's service status or
required inspections are transmitted to your
BMW center either automatically before a
service due date or when you request a
BMW service appointment.
>Remote Door Unlock:
Contact the BMW Assist Response Center
if your remote control or key is not available
and you would like to have the vehicle
unlocked.
>Stolen Vehicle Recovery:
After you report your vehicle stolen with the
police, call the BMW Assist Response Cen-
ter to determine its position.
In addition, optional services can be provided to
you, such as the Concierge service or informa-
tion on directions, traffic or the weather. You
can use Critical Calling to activate a limited
number of calls via the BMW Assist Response
Center, e.g. when you do not have your mobile
phone with you.
Press the SOS button in order to contact the
BMW Assist Response Center, see below.
*