2008 BMW 335XI reset
[x] Cancel search: resetPage 92 of 274
Technology for driving comfort and safety
90
Indication of a flat tire
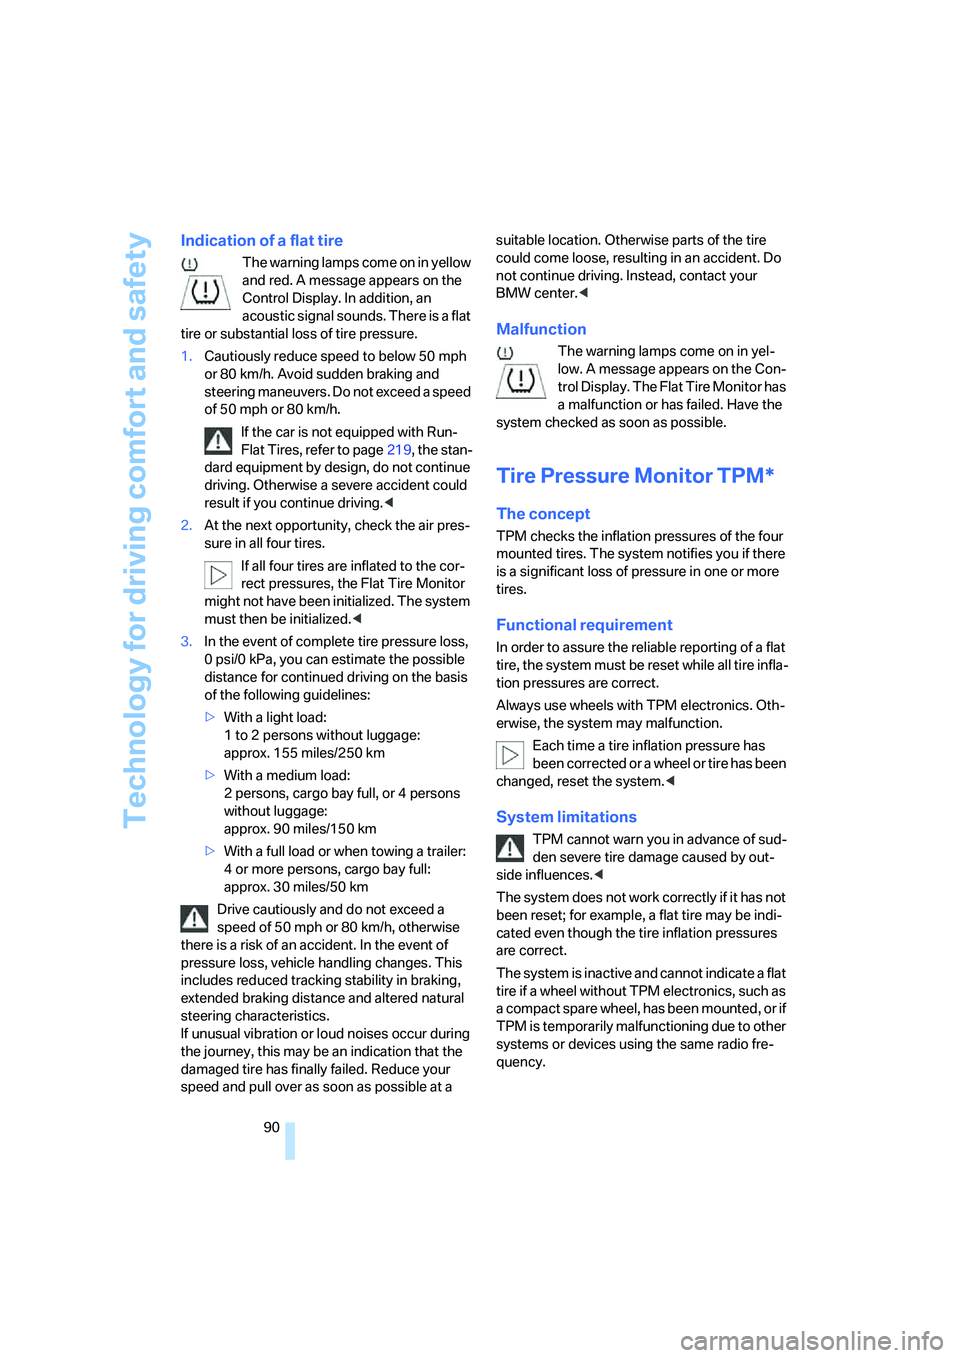
The warning lamps come on in yellow
and red. A message appears on the
Control Display. In addition, an
acoustic signal sounds. There is a flat
tire or substantial loss of tire pressure.
1.Cautiously reduce speed to below 50 mph
or 80 km/h. Avoid sudden braking and
steering maneuvers. Do not exceed a speed
of 50 mph or 80 km/h.
If the car is not equipped with Run-
Flat Tires, refer to page219, the stan-
dard equipment by design, do not continue
driving. Otherwise a severe accident could
result if you continue driving.<
2.At the next opportunity, check the air pres-
sure in all four tires.
If all four tires are inflated to the cor-
rect pressures, the Flat Tire Monitor
might not have been initialized. The system
must then be initialized.<
3.In the event of complete tire pressure loss,
0 psi/0 kPa, you can estimate the possible
distance for continued driving on the basis
of the following guidelines:
>With a light load:
1 to 2 persons without luggage:
approx. 155 miles/250 km
>With a medium load:
2 persons, cargo bay full, or 4 persons
without luggage:
approx. 90 miles/150 km
>With a full load or when towing a trailer:
4 or more persons, cargo bay full:
approx. 30 miles/50 km
Drive cautiously and do not exceed a
speed of 50 mph or 80 km/h, otherwise
there is a risk of an accident. In the event of
pressure loss, vehicle handling changes. This
includes reduced tracking stability in braking,
extended braking distance and altered natural
steering characteristics.
If unusual vibration or loud noises occur during
the journey, this may be an indication that the
damaged tire has finally failed. Reduce your
speed and pull over as soon as possible at a suitable location. Otherwise parts of the tire
could come loose, resulting in an accident. Do
not continue driving. Instead, contact your
BMW center.<
Malfunction
The warning lamps come on in yel-
low. A message appears on the Con-
trol Display. The Flat Tire Monitor has
a malfunction or has failed. Have the
system checked as soon as possible.
Tire Pressure Monitor TPM*
The concept
TPM checks the inflation pressures of the four
mounted tires. The system notifies you if there
is a significant loss of pressure in one or more
tires.
Functional requirement
In order to assure the reliable reporting of a flat
tire, the system must be reset while all tire infla-
tion pressures are correct.
Always use wheels with TPM electronics. Oth-
erwise, the system may malfunction.
Each time a tire inflation pressure has
been corrected or a wheel or tire has been
changed, reset the system.<
System limitations
TPM cannot warn you in advance of sud-
den severe tire damage caused by out-
side influences.<
The system does not work correctly if it has not
been reset; for example, a flat tire may be indi-
cated even though the tire inflation pressures
are correct.
The system is inactive and cannot indicate a flat
tire if a wheel without TPM electronics, such as
a compact spare wheel, has been mounted, or if
TPM is temporarily malfunctioning due to other
systems or devices using the same radio fre-
quency.
Page 93 of 274
Controls
91Reference
At a glance
Driving tips
Communications
Navigation
Entertainment
Mobility
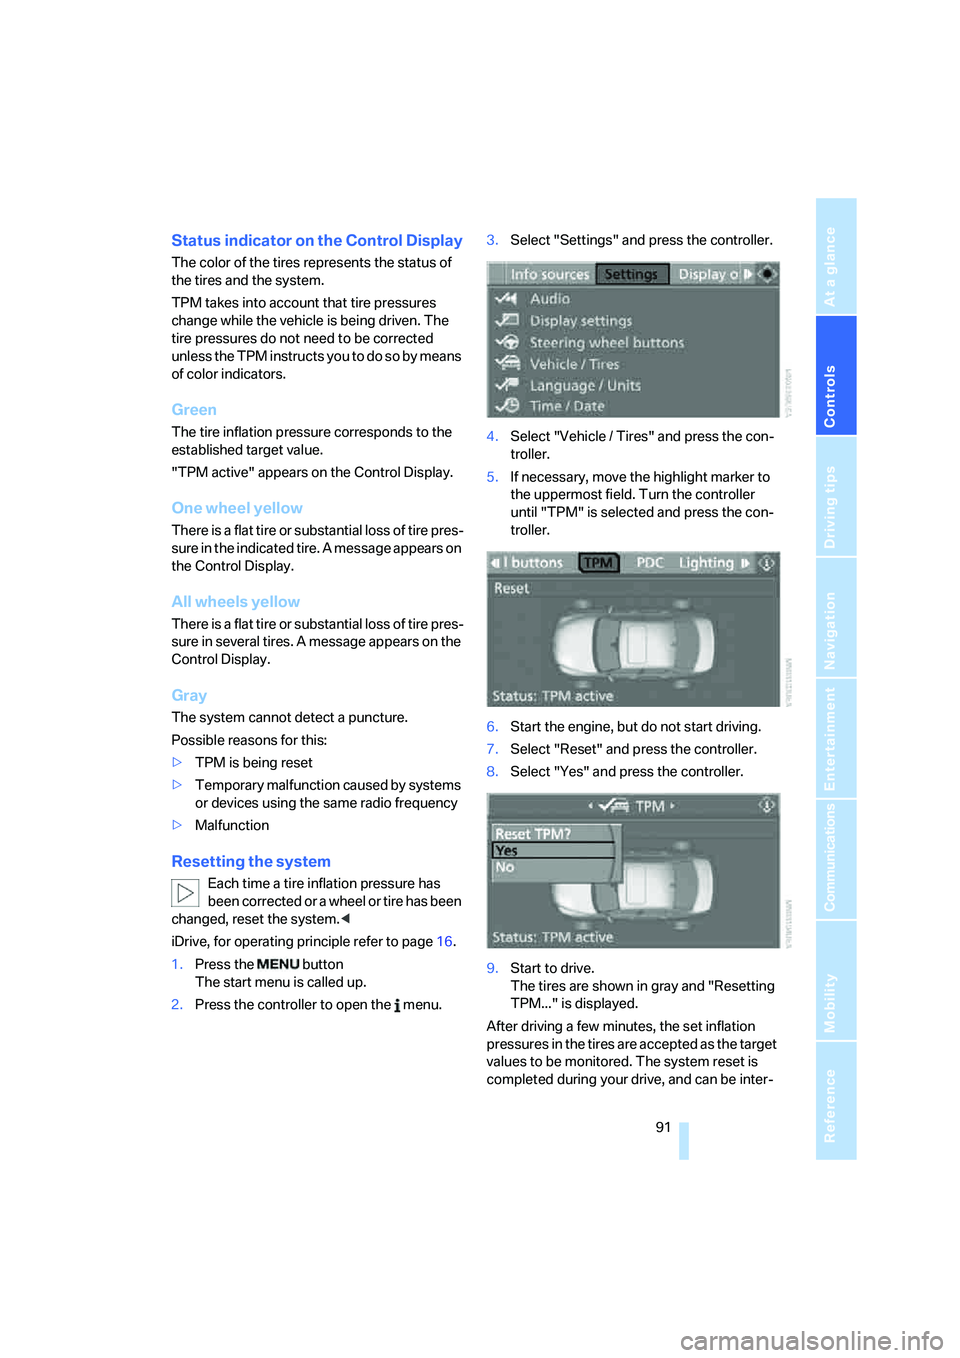
Status indicator on the Control Display
The color of the tires represents the status of
the tires and the system.
TPM takes into account that tire pressures
change while the vehicle is being driven. The
tire pressures do not need to be corrected
unless the TPM instructs you to do so by means
of color indicators.
Green
The tire inflation pressure corresponds to the
established target value.
"TPM active" appears on the Control Display.
One wheel yellow
There is a flat tire or substantial loss of tire pres-
sure in the indicated tire. A message appears on
the Control Display.
All wheels yellow
There is a flat tire or substantial loss of tire pres-
sure in several tires. A message appears on the
Control Display.
Gray
The system cannot detect a puncture.
Possible reasons for this:
>TPM is being reset
>Temporary malfunction caused by systems
or devices using the same radio frequency
>Malfunction
Resetting the system
Each time a tire inflation pressure has
been corrected or a wheel or tire has been
changed, reset the system.<
iDrive, for operating principle refer to page16.
1.Press the button
The start menu is called up.
2.Press the controller to open the menu.3.Select "Settings" and press the controller.
4.Select "Vehicle / Tires" and press the con-
troller.
5.If necessary, move the highlight marker to
the uppermost field. Turn the controller
until "TPM" is selected and press the con-
troller.
6.Start the engine, but do not start driving.
7.Select "Reset" and press the controller.
8.Select "Yes" and press the controller.
9.Start to drive.
The tires are shown in gray and "Resetting
TPM..." is displayed.
After driving a few minutes, the set inflation
pressures in the tires are accepted as the target
values to be monitored. The system reset is
completed during your drive, and can be inter-
will be adapted
will be adapted
Page 94 of 274
Technology for driving comfort and safety
92 rupted at any time. When driving resumes, the
reset is continued automatically. On the Control
Display, the tires are shown in green and "Sta-
tus: TPM active" is displayed again.
If a flat tire is detected while the system is
resetting and determining the inflation
pressures, all tires on the Control Display are
displayed in yellow. The message "Tire low!" is
shown.<
Message for low tire inflation pressure
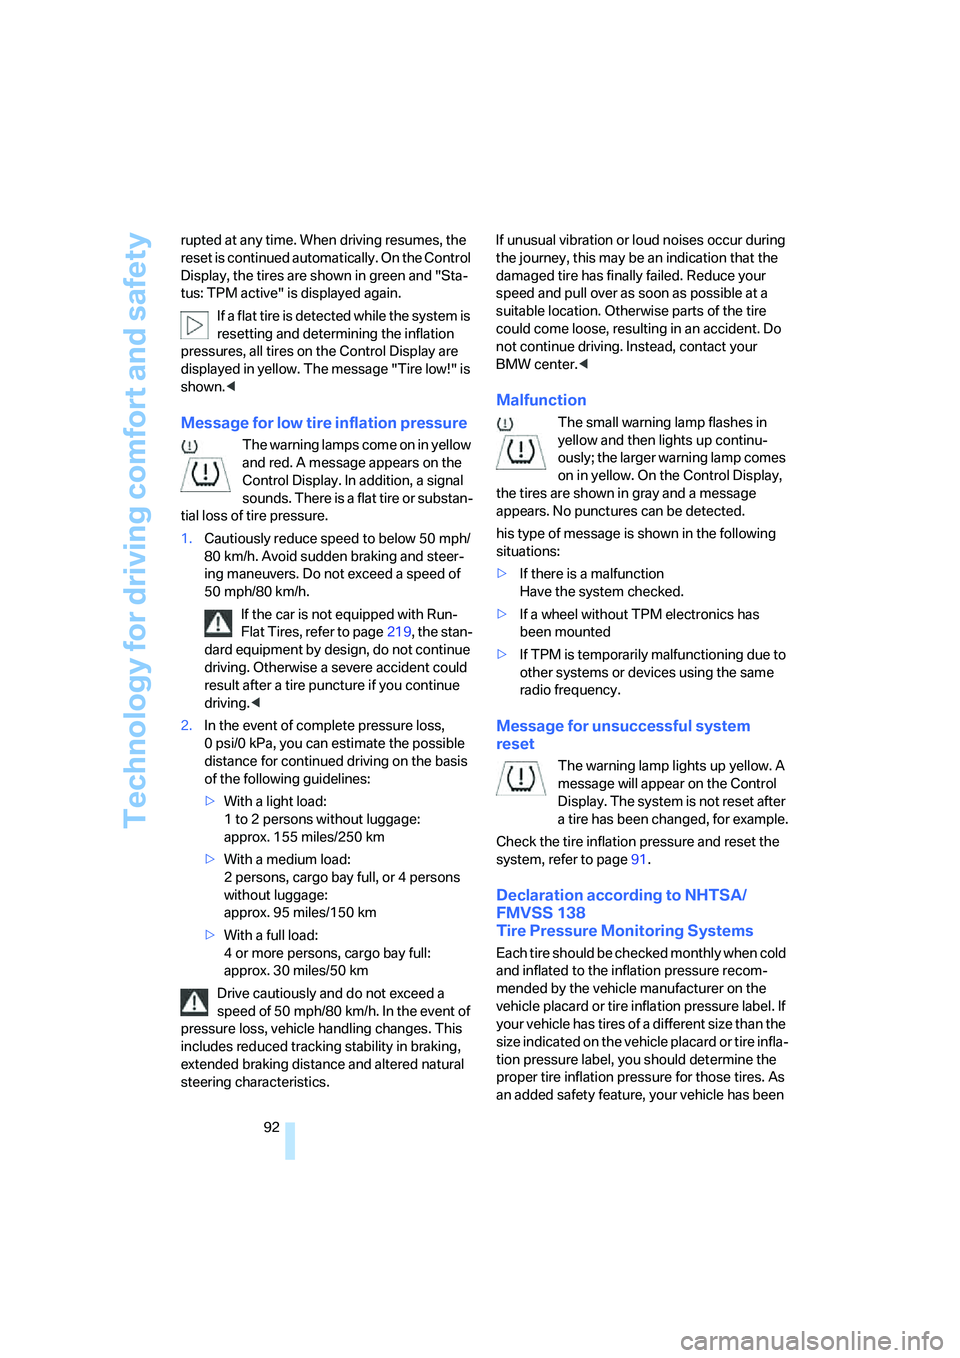
The warning lamps come on in yellow
and red. A message appears on the
Control Display. In addition, a signal
sounds. There is a flat tire or substan-
tial loss of tire pressure.
1.Cautiously reduce speed to below 50 mph/
80 km/h. Avoid sudden braking and steer-
ing maneuvers. Do not exceed a speed of
50 mph/80 km/h.
If the car is not equipped with Run-
Flat Tires, refer to page219, the stan-
dard equipment by design, do not continue
driving. Otherwise a severe accident could
result after a tire puncture if you continue
driving.<
2.In the event of complete pressure loss,
0 psi/0 kPa, you can estimate the possible
distance for continued driving on the basis
of the following guidelines:
>With a light load:
1 to 2 persons without luggage:
approx. 155 miles/250 km
>With a medium load:
2 persons, cargo bay full, or 4 persons
without luggage:
approx. 95 miles/150 km
>With a full load:
4 or more persons, cargo bay full:
approx. 30 miles/50 km
Drive cautiously and do not exceed a
speed of 50 mph/80 km/h. In the event of
pressure loss, vehicle handling changes. This
includes reduced tracking stability in braking,
extended braking distance and altered natural
steering characteristics.If unusual vibration or loud noises occur during
the journey, this may be an indication that the
damaged tire has finally failed. Reduce your
speed and pull over as soon as possible at a
suitable location. Otherwise parts of the tire
could come loose, resulting in an accident. Do
not continue driving. Instead, contact your
BMW center.<
Malfunction
The small warning lamp flashes in
yellow and then lights up continu-
ously; the larger warning lamp comes
on in yellow. On the Control Display,
the tires are shown in gray and a message
appears. No punctures can be detected.
his type of message is shown in the following
situations:
>If there is a malfunction
Have the system checked.
>If a wheel without TPM electronics has
been mounted
>If TPM is temporarily malfunctioning due to
other systems or devices using the same
radio frequency.
Message for unsuccessful system
reset
The warning lamp lights up yellow. A
message will appear on the Control
Display. The system is not reset after
a tire has been changed, for example.
Check the tire inflation pressure and reset the
system, refer to page91.
Declaration according to NHTSA/
FMVSS 138
Tire Pressure Monitoring Systems
Each tire should be checked monthly when cold
and inflated to the inflation pressure recom-
mended by the vehicle manufacturer on the
vehicle placard or tire inflation pressure label. If
your vehicle has tires of a different size than the
size indicated on the vehicle placard or tire infla-
tion pressure label, you should determine the
proper tire inflation pressure for those tires. As
an added safety feature, your vehicle has been
Page 161 of 274
Navigation
Entertainment
Driving tips
159Reference
At a glance
Controls
Communications
Mobility
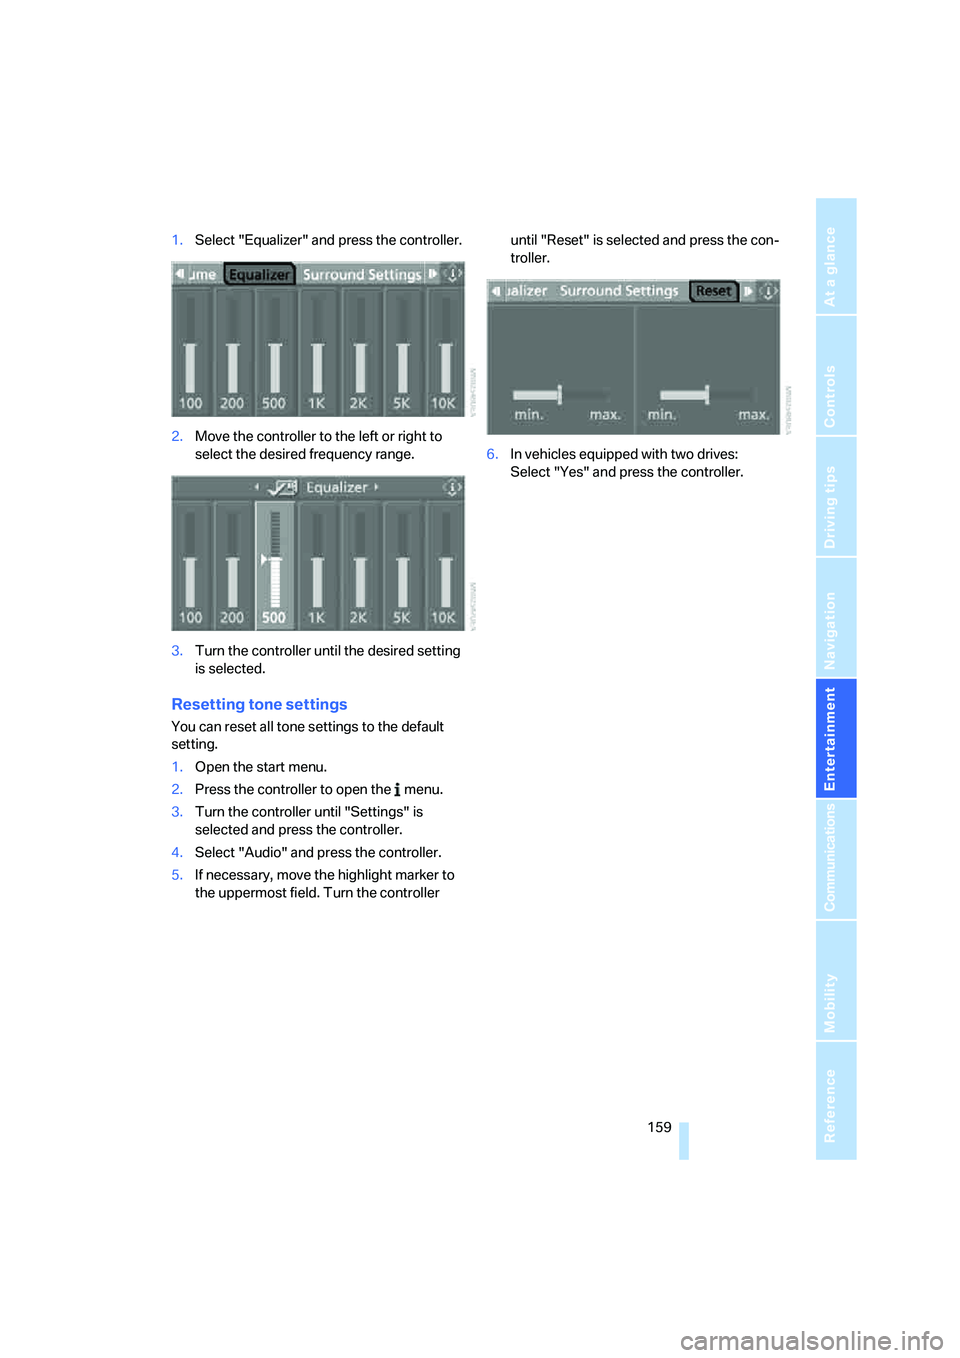
1.Select "Equalizer" and press the controller.
2.Move the controller to the left or right to
select the desired frequency range.
3.Turn the controller until the desired setting
is selected.
Resetting tone settings
You can reset all tone settings to the default
setting.
1.Open the start menu.
2.Press the controller to open the menu.
3.Turn the controller until "Settings" is
selected and press the controller.
4.Select "Audio" and press the controller.
5.If necessary, move the highlight marker to
the uppermost field. Turn the controller until "Reset" is selected and press the con-
troller.
6.In vehicles equipped with two drives:
Select "Yes" and press the controller.
Page 162 of 274
Radio
160
Radio
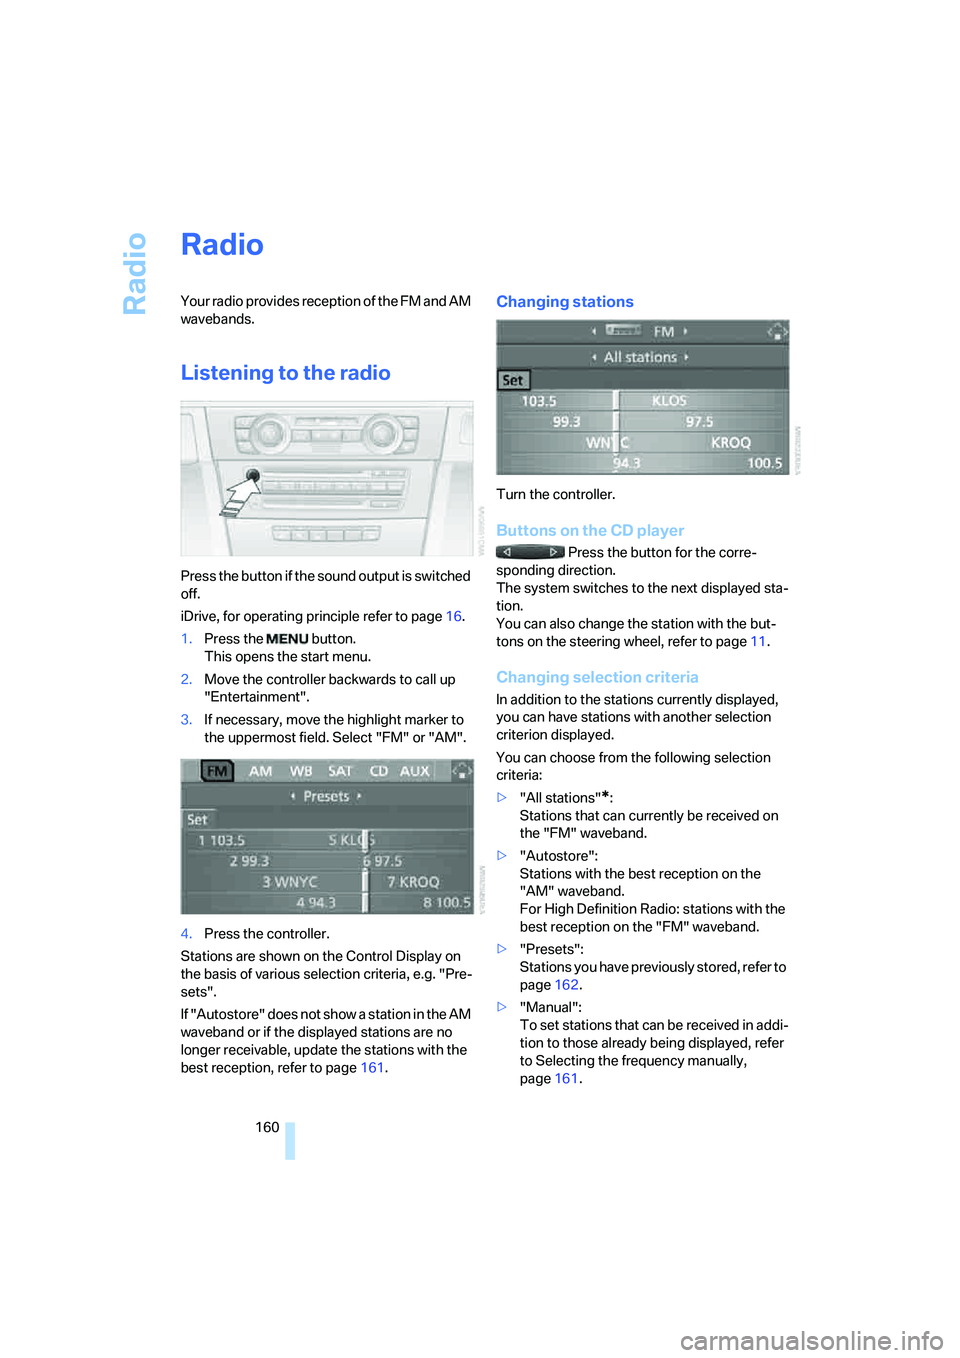
Your radio provides reception of the FM and AM
wavebands.
Listening to the radio
Press the button if the sound output is switched
off.
iDrive, for operating principle refer to page16.
1.Press the button.
This opens the start menu.
2.Move the controller backwards to call up
"Entertainment".
3.If necessary, move the highlight marker to
the uppermost field. Select "FM" or "AM".
4.Press the controller.
Stations are shown on the Control Display on
the basis of various selection criteria, e.g. "Pre-
sets".
If "Autostore" does not show a station in the AM
waveband or if the displayed stations are no
longer receivable, update the stations with the
best reception, refer to page161.
Changing stations
Turn the controller.
Buttons on the CD player
Press the button for the corre-
sponding direction.
The system switches to the next displayed sta-
tion.
You can also change the station with the but-
tons on the steering wheel, refer to page11.
Changing selection criteria
In addition to the stations currently displayed,
you can have stations with another selection
criterion displayed.
You can choose from the following selection
criteria:
>"All stations"
*:
Stations that can currently be received on
the "FM" waveband.
>"Autostore":
Stations with the best reception on the
"AM" waveband.
For High Definition Radio: stations with the
best reception on the "FM" waveband.
>"Presets":
Stations you have previously stored, refer to
page162.
>"Manual":
To set stations that can be received in addi-
tion to those already being displayed, refer
to Selecting the frequency manually,
page161.
Page 164 of 274
Radio
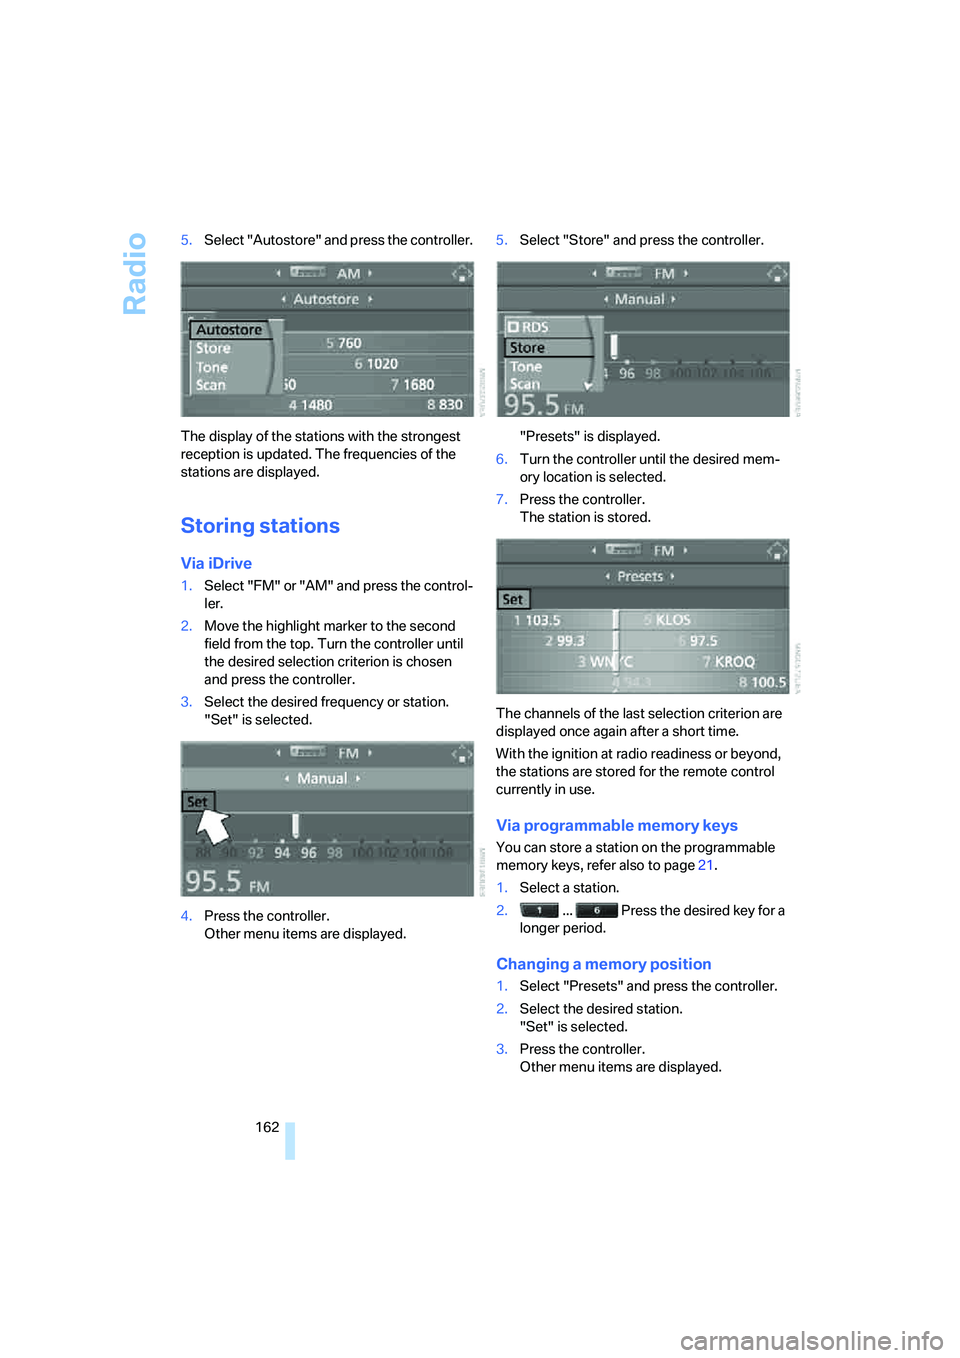
162 5.Select "Autostore" and press the controller.
The display of the stations with the strongest
reception is updated. The frequencies of the
stations are displayed.
Storing stations
Via iDrive
1.Select "FM" or "AM" and press the control-
ler.
2.Move the highlight marker to the second
field from the top. Turn the controller until
the desired selection criterion is chosen
and press the controller.
3.Select the desired frequency or station.
"Set" is selected.
4.Press the controller.
Other menu items are displayed.5.Select "Store" and press the controller.
"Presets" is displayed.
6.Turn the controller until the desired mem-
ory location is selected.
7.Press the controller.
The station is stored.
The channels of the last selection criterion are
displayed once again after a short time.
With the ignition at radio readiness or beyond,
the stations are stored for the remote control
currently in use.
Via programmable memory keys
You can store a station on the programmable
memory keys, refer also to page21.
1.Select a station.
2. ... Press the desired key for a
longer period.
Changing a memory position
1.Select "Presets" and press the controller.
2.Select the desired station.
"Set" is selected.
3.Press the controller.
Other menu items are displayed.
Page 169 of 274
Navigation
Entertainment
Driving tips
167Reference
At a glance
Controls
Communications
Mobility
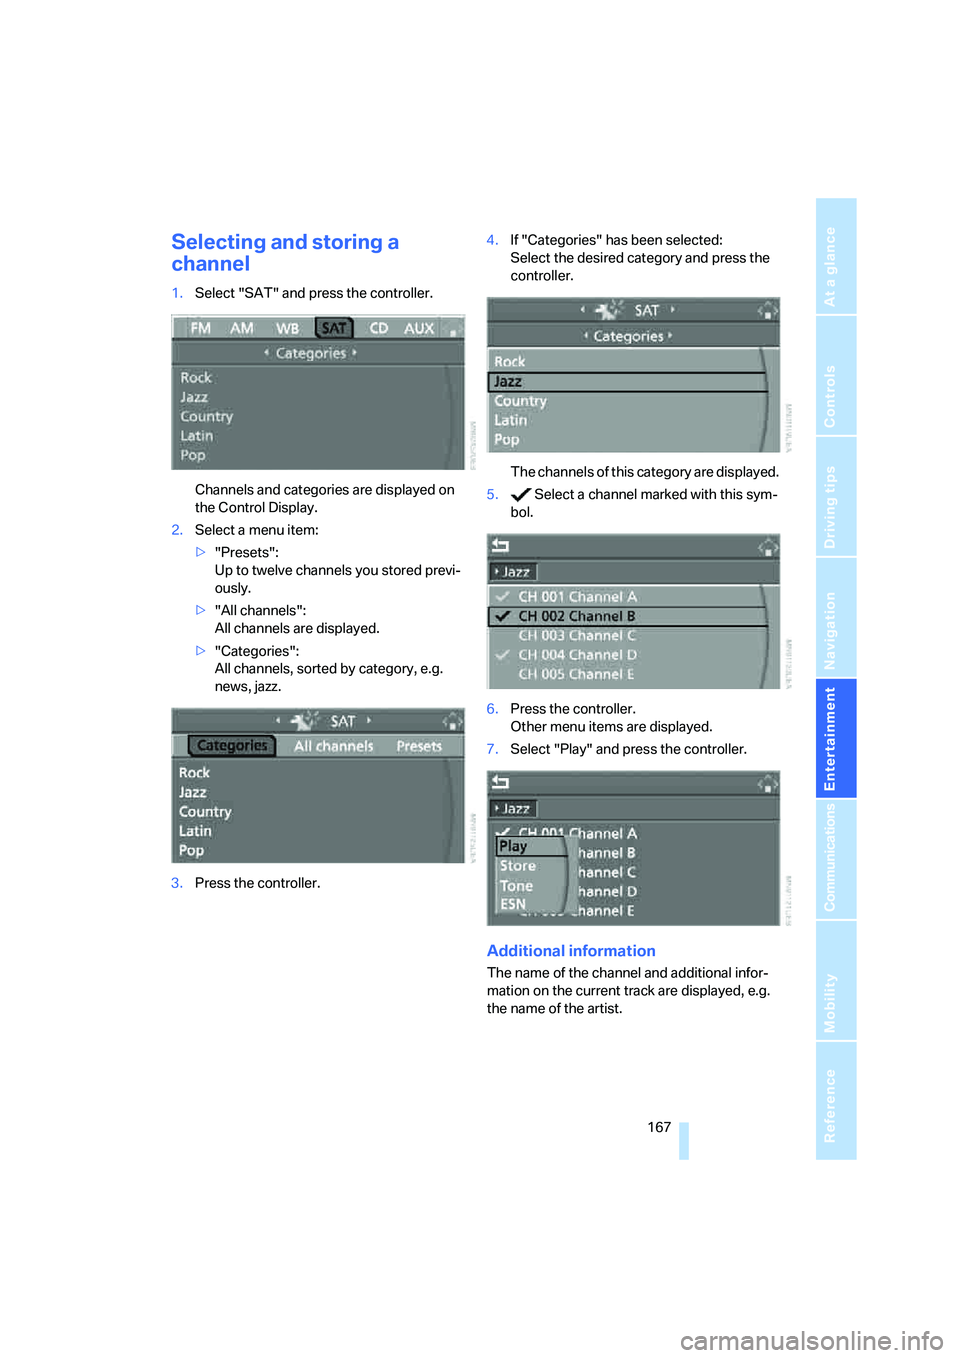
Selecting and storing a
channel
1.Select "SAT" and press the controller.
Channels and categories are displayed on
the Control Display.
2.Select a menu item:
>"Presets":
Up to twelve channels you stored previ-
ously.
>"All channels":
All channels are displayed.
>"Categories":
All channels, sorted by category, e.g.
news, jazz.
3.Press the controller.4.If "Categories" has been selected:
Select the desired category and press the
controller.
The channels of this category are displayed.
5. Select a channel marked with this sym-
bol.
6.Press the controller.
Other menu items are displayed.
7.Select "Play" and press the controller.
Additional information
The name of the channel and additional infor-
mation on the current track are displayed, e.g.
the name of the artist.
Page 170 of 274
Satellite radio
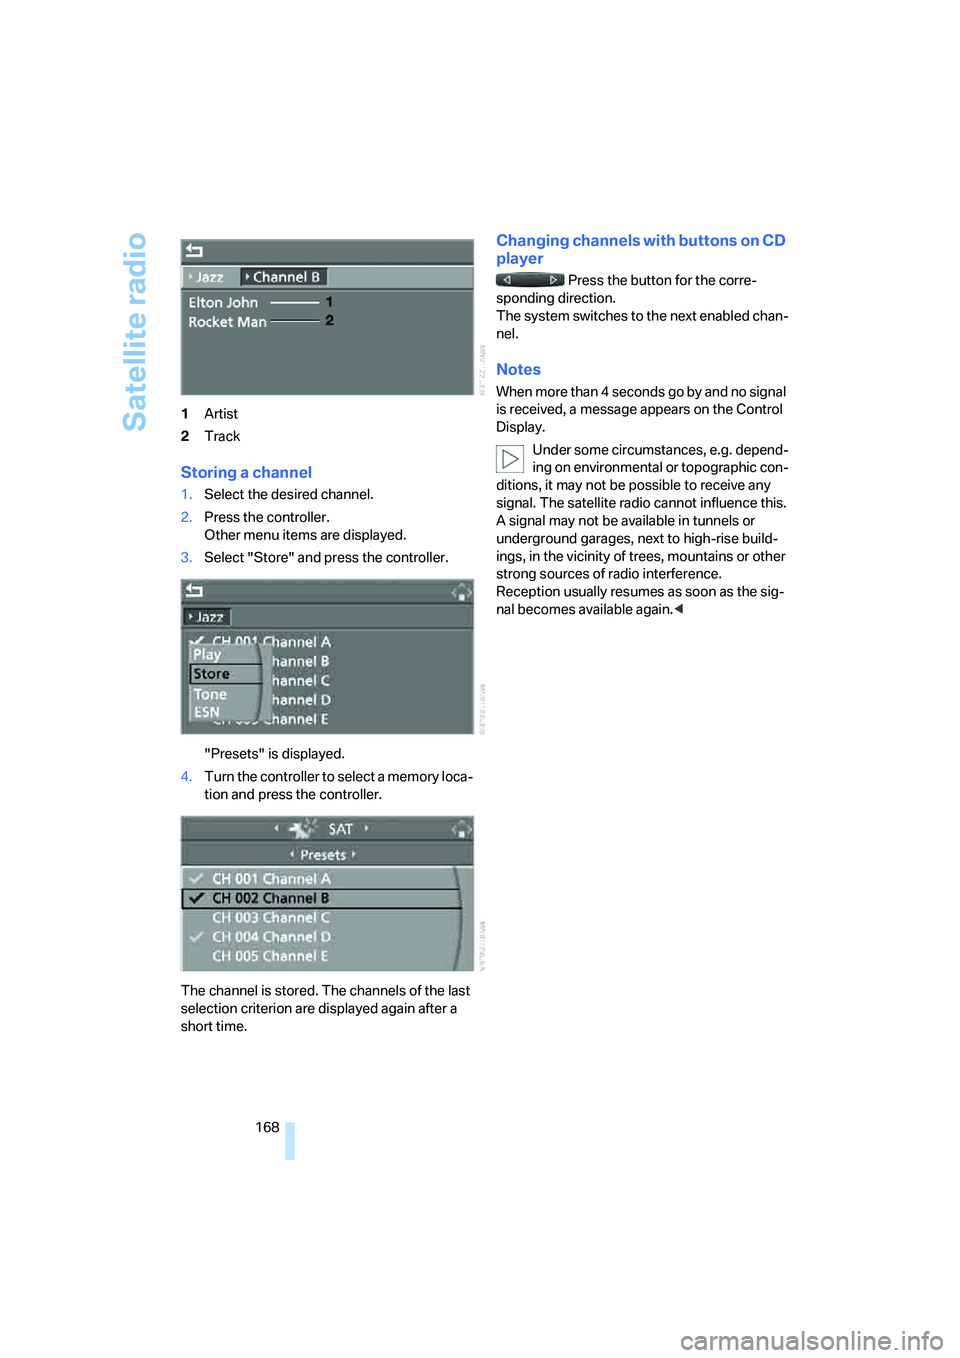
168 1Artist
2Track
Storing a channel
1.Select the desired channel.
2.Press the controller.
Other menu items are displayed.
3.Select "Store" and press the controller.
"Presets" is displayed.
4.Turn the controller to select a memory loca-
tion and press the controller.
The channel is stored. The channels of the last
selection criterion are displayed again after a
short time.
Changing channels with buttons on CD
player
Press the button for the corre-
sponding direction.
The system switches to the next enabled chan-
nel.
Notes
W hen mo re than 4 seconds go by and no s igna l
is received, a message appears on the Control
Display.
Under some circumstances, e.g. depend-
ing on environmental or topographic con-
ditions, it may not be possible to receive any
signal. The satellite radio cannot influence this.
A signal may not be available in tunnels or
underground garages, next to high-rise build-
ings, in the vicinity of trees, mountains or other
strong sources of radio interference.
Reception usually resumes as soon as the sig-
nal becomes available again.<