2008 BMW 335XI navigation
[x] Cancel search: navigationPage 237 of 274
Mobility
235Reference
At a glance
Controls
Driving tips
Communications
Navigation
Entertainment
Giving and receiving assistance
Emergency Request*
Conditions for an Emergency Request:
>Equipment version with full preparation
package mobile phone. This equipment
makes it possible to send an Emergency
Request even if no mobile phone is paired
with the vehicle.
>BMW Assist is activated. Activating
BMW Assist, refer to page202.
>Radio readiness is on.
>The BMW Assist system is logged on to a
mobile phone network.
>The Emergency Request system is opera-
ble.
Once your service contract for BMW Assist
expires, the BMW Assist system can be deacti-
vated by a BMW center without you having to
visit a workshop. Once the BMW Assist system
has been deactivated, Emergency Requests
are not possible. The BMW Assist system can
be reactivated by a BMW center after a new
contract has been signed.
Sending an Emergency Request
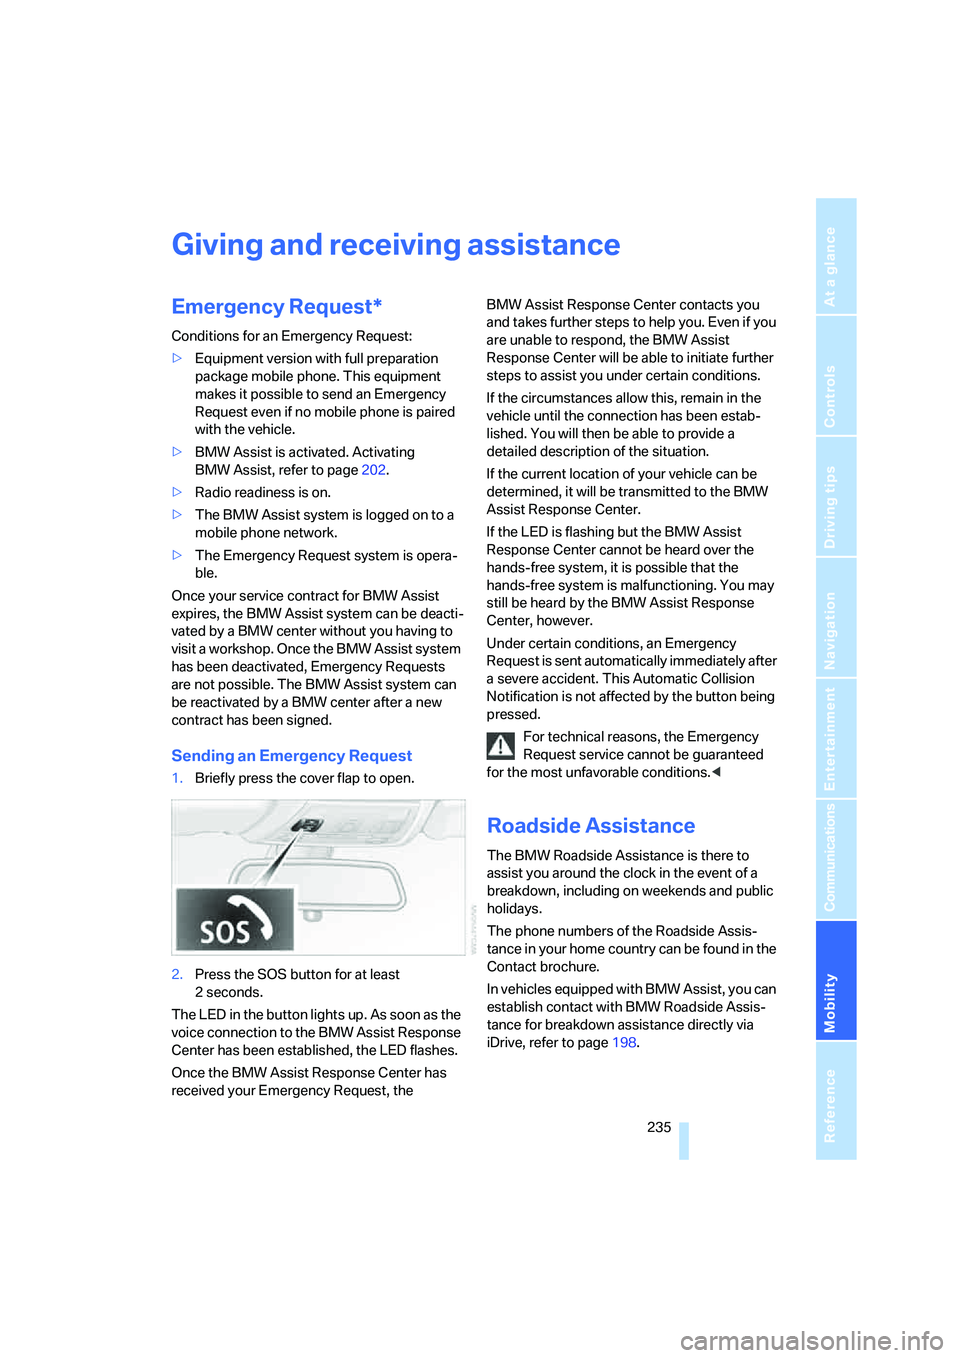
1.Briefly press the cover flap to open.
2.Press the SOS button for at least
2seconds.
The LED in the button lights up. As soon as the
voice connection to the BMW Assist Response
Center has been established, the LED flashes.
Once the BMW Assist Response Center has
received your Emergency Request, the BMW Assist Response Center contacts you
and takes further steps to help you. Even if you
are unable to respond, the BMW Assist
Response Center will be able to initiate further
steps to assist you under certain conditions.
If the circumstances allow this, remain in the
vehicle until the connection has been estab-
lished. You will then be able to provide a
detailed description of the situation.
If the current location of your vehicle can be
determined, it will be transmitted to the BMW
Assist Response Center.
If the LED is flashing but the BMW Assist
Response Center cannot be heard over the
hands-free system, it is possible that the
hands-free system is malfunctioning. You may
still be heard by the BMW Assist Response
Center, however.
Under certain conditions, an Emergency
Request is sent automatically immediately after
a severe accident. This Automatic Collision
Notification is not affected by the button being
pressed.
For technical reasons, the Emergency
Request service cannot be guaranteed
for the most unfavorable conditions.<
Roadside Assistance
The BMW Roadside Assistance is there to
assist you around the clock in the event of a
breakdown, including on weekends and public
holidays.
The phone numbers of the Roadside Assis-
tance in your home country can be found in the
Contact brochure.
In vehicles equipped with BMW Assist, you can
establish contact with BMW Roadside Assis-
tance for breakdown assistance directly via
iDrive, refer to page198.
Page 239 of 274
Mobility
237Reference
At a glance
Controls
Driving tips
Communications
Navigation
Entertainment
Preparation
1.Check whether the battery of the other
vehicle has a voltage of 12 volts and
approximately the same capacitance in Ah.
This information can be found on the bat-
tery.
2.Switch off the engine of the assisting vehi-
cle.
3.Switch off any consumers in both vehicles.
There must not be any contact between
the bodies of the two vehicles, otherwise
there is a danger of shorting.<
Connecting jumper cables
Connect the jumper cables in the correct
order, so that no sparks which could
cause injury occur.<
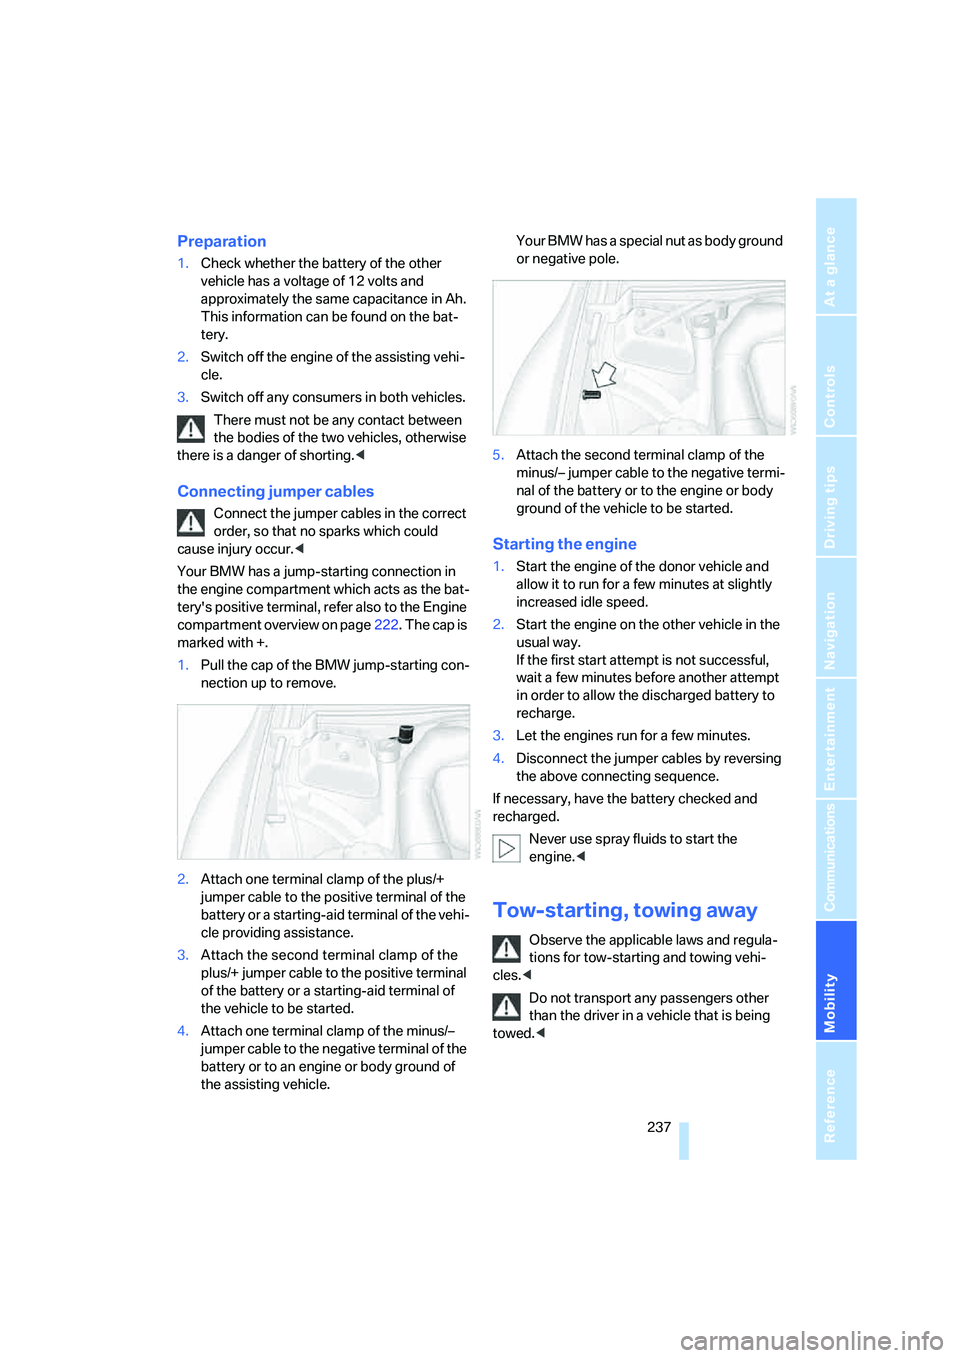
Your BMW has a jump-starting connection in
the engine compartment which acts as the bat-
tery's positive terminal, refer also to the Engine
compartment overview on page222. The cap is
marked with +.
1.Pull the cap of the BMW jump-starting con-
nection up to remove.
2.Attach one terminal clamp of the plus/+
jumper cable to the positive terminal of the
battery or a starting-aid terminal of the vehi-
cle providing assistance.
3.Attach the second terminal clamp of the
plus/+ jumper cable to the positive terminal
of the battery or a starting-aid terminal of
the vehicle to be started.
4.Attach one terminal clamp of the minus/–
jumper cable to the negative terminal of the
battery or to an engine or body ground of
the assisting vehicle. Your BMW has a special nut as body ground
or negative pole.
5.Attach the second terminal clamp of the
minus/– jumper cable to the negative termi-
nal of the battery or to the engine or body
ground of the vehicle to be started.
Starting the engine
1.Start the engine of the donor vehicle and
allow it to run for a few minutes at slightly
increased idle speed.
2.Start the engine on the other vehicle in the
usual way.
If the first start attempt is not successful,
wait a few minutes before another attempt
in order to allow the discharged battery to
recharge.
3.Let the engines run for a few minutes.
4.Disconnect the jumper cables by reversing
the above connecting sequence.
If necessary, have the battery checked and
recharged.
Never use spray fluids to start the
engine.<
Tow-starting, towing away
Observe the applicable laws and regula-
tions for tow-starting and towing vehi-
cles.<
Do not transport any passengers other
than the driver in a vehicle that is being
towed.<
Page 241 of 274
Mobility
239Reference
At a glance
Controls
Driving tips
Communications
Navigation
Entertainment
With a tow rope
When starting off in the towing vehicle, make
sure that the tow rope is taut.
To avoid jerking and the associated
stresses on vehicle components when
towing, always use nylon ropes or nylon straps.
Attach the tow rope to the tow fittings only, as
attaching it to other parts of the vehicle could
result in damage.<
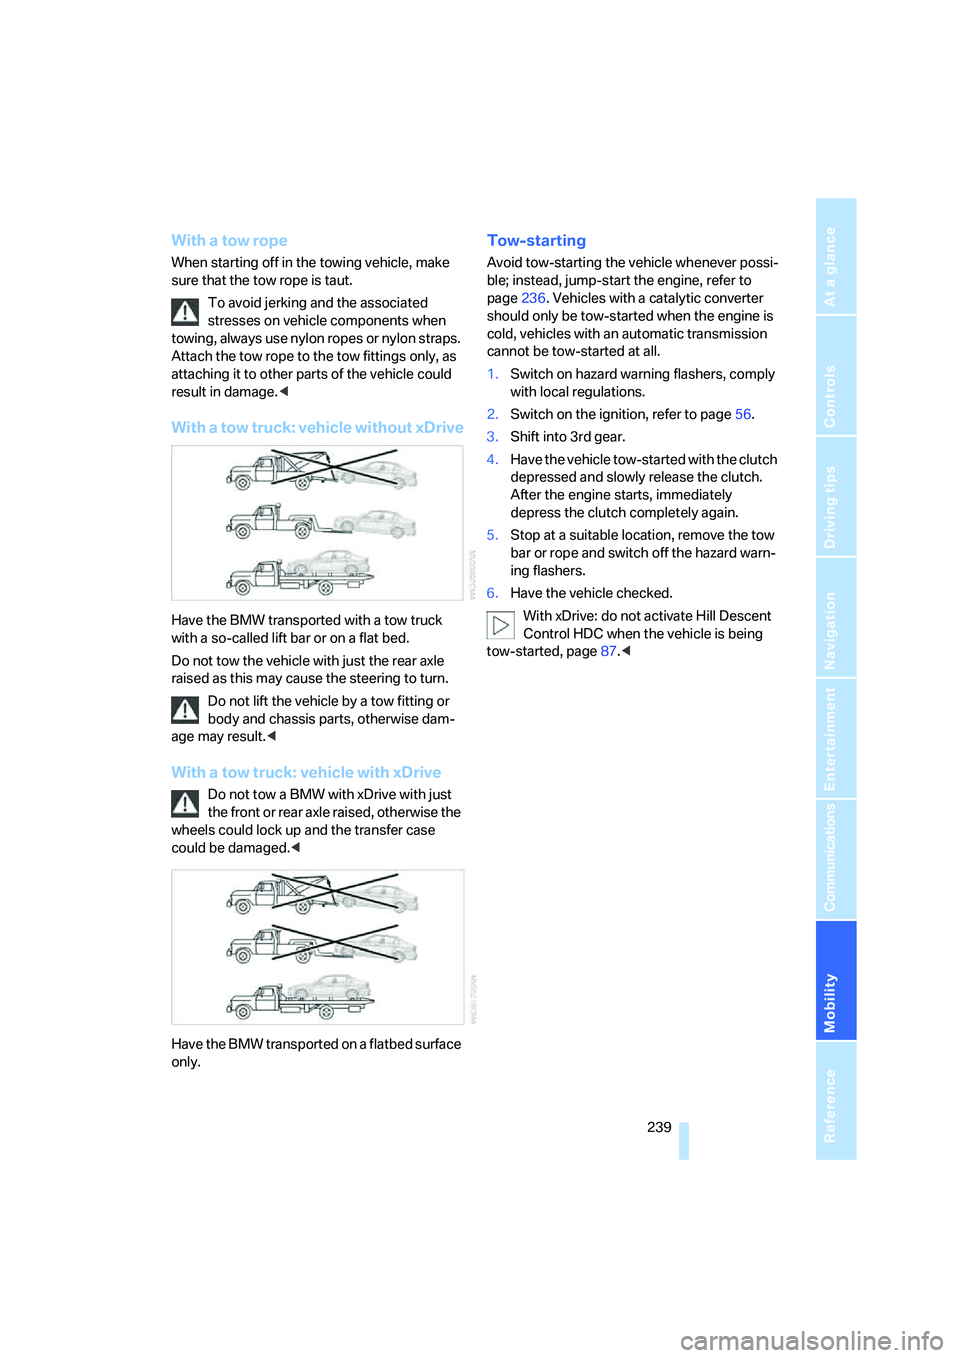
With a tow truck: vehicle without xDrive
Have the BMW transported with a tow truck
with a so-called lift bar or on a flat bed.
Do not tow the vehicle with just the rear axle
raised as this may cause the steering to turn.
Do not lift the vehicle by a tow fitting or
body and chassis parts, otherwise dam-
age may result.<
With a tow truck: vehicle with xDrive
Do not tow a BMW with xDrive with just
the front or rear axle raised, otherwise the
wheels could lock up and the transfer case
could be damaged.<
Have the BMW transported on a flatbed surface
only.
Tow-starting
Avoid tow-starting the vehicle whenever possi-
ble; instead, jump-start the engine, refer to
page236. Vehicles with a catalytic converter
should only be tow-started when the engine is
cold, vehicles with an automatic transmission
cannot be tow-started at all.
1.Switch on hazard warning flashers, comply
with local regulations.
2.Switch on the ignition, refer to page56.
3.Shift into 3rd gear.
4.Have the vehicle tow-started with the clutch
depressed and slowly release the clutch.
After the engine starts, immediately
depress the clutch completely again.
5.Stop at a suitable location, remove the tow
bar or rope and switch off the hazard warn-
ing flashers.
6.Have the vehicle checked.
With xDrive: do not activate Hill Descent
Control HDC when the vehicle is being
tow-started, page87.<
Page 245 of 274
Reference 243
At a glance
Controls
Driving tips
Communications
Navigation
Entertainment
Mobility
Dimensions
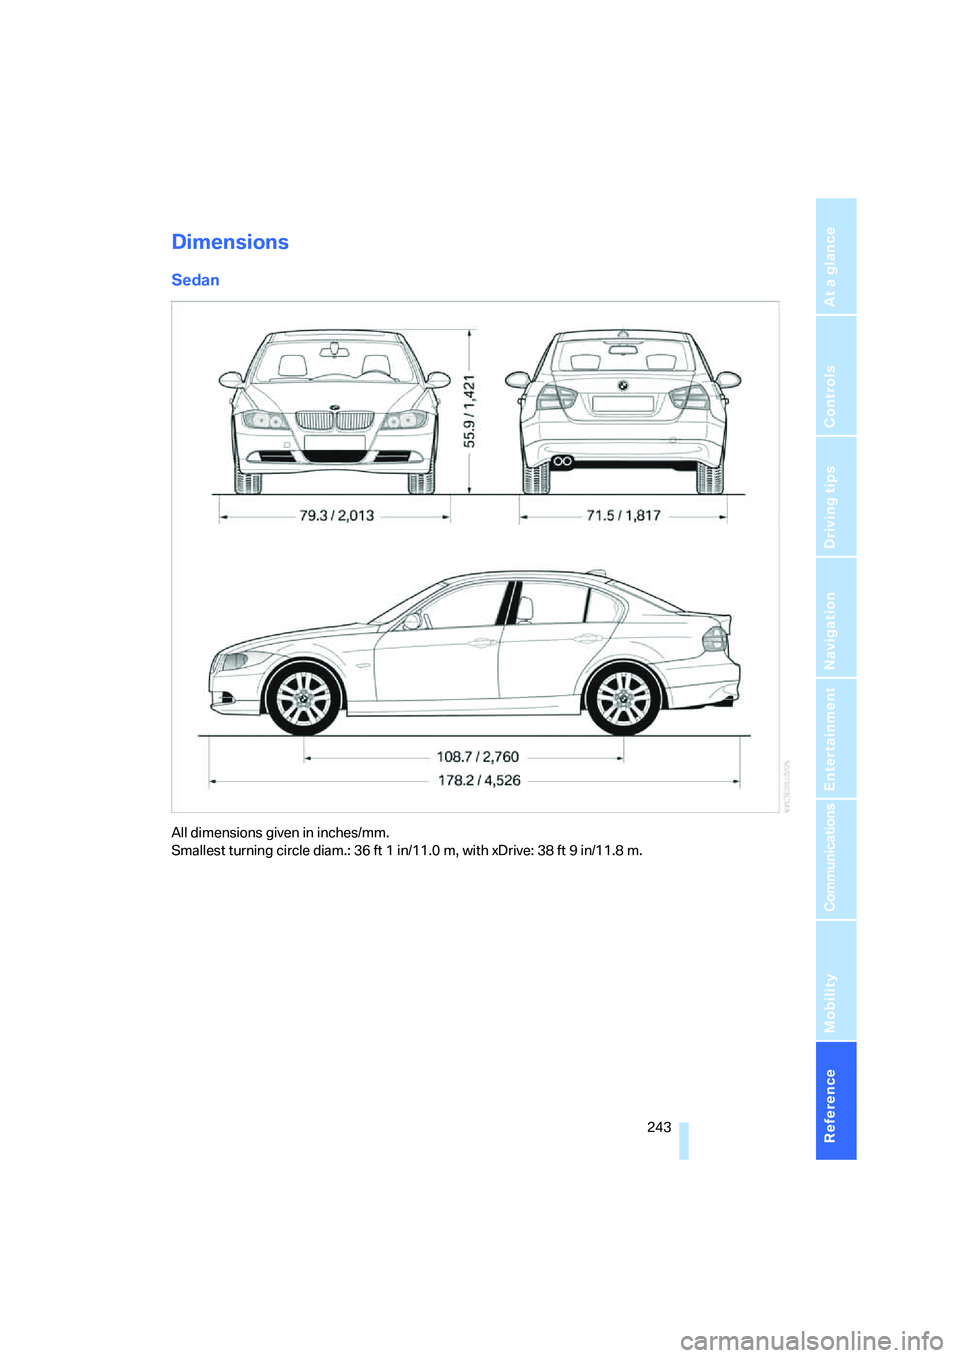
Sedan
All dimensions given in inches/mm.
Smallest turning circle diam.: 36 ft 1 in/11.0 m, with xDrive: 38 ft 9 in/11.8 m.
Page 247 of 274
Reference 245
At a glance
Controls
Driving tips
Communications
Navigation
Entertainment
Mobility
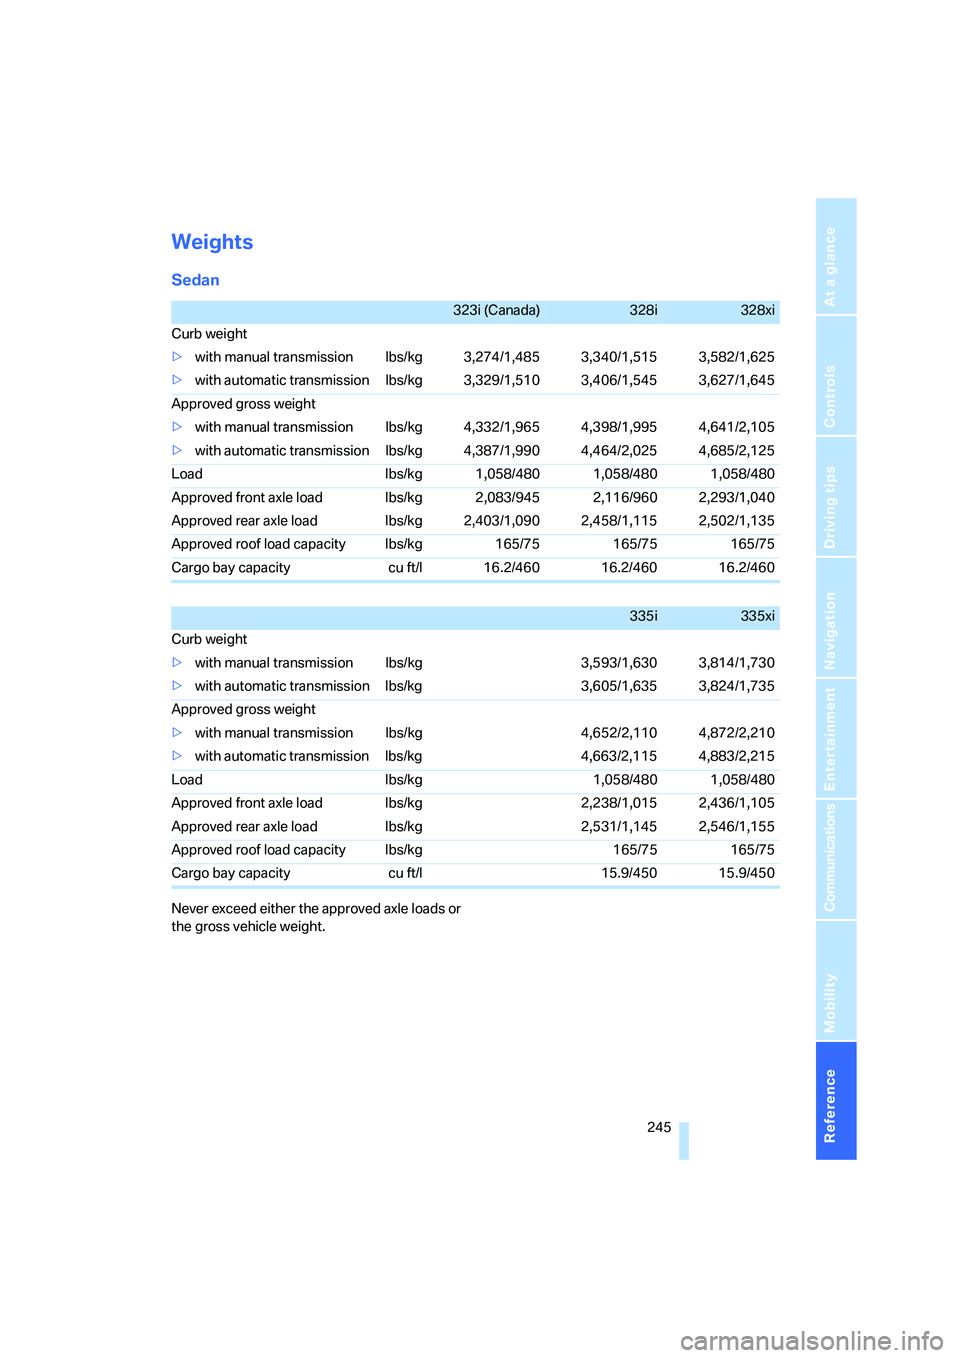
Weights
Sedan
Never exceed either the approved axle loads or
the gross vehicle weight.
323i (Canada)328i328xi
Curb weight
>with manual transmission lbs/kg 3,274/1,485 3,340/1,515 3,582/1,625
>with automatic transmission lbs/kg 3,329/1,510 3,406/1,545 3,627/1,645
Approved gross weight
>with manual transmission lbs/kg 4,332/1,965 4,398/1,995 4,641/2,105
>with automatic transmission lbs/kg 4,387/1,990 4,464/2,025 4,685/2,125
Load lbs/kg 1,058/480 1,058/480 1,058/480
Approved front axle load lbs/kg 2,083/945 2,116/960 2,293/1,040
Approved rear axle load lbs/kg 2,403/1,090 2,458/1,115 2,502/1,135
Approved roof load capacity lbs/kg 165/75 165/75 165/75
Cargo bay capacity cu ft/l 16.2/460 16.2/460 16.2/460
335i335xi
Curb weight
>with manual transmission lbs/kg 3,593/1,630 3,814/1,730
>with automatic transmission lbs/kg 3,605/1,635 3,824/1,735
Approved gross weight
>with manual transmission lbs/kg 4,652/2,110 4,872/2,210
>with automatic transmission lbs/kg 4,663/2,115 4,883/2,215
Load lbs/kg 1,058/480 1,058/480
Approved front axle load lbs/kg 2,238/1,015 2,436/1,105
Approved rear axle load lbs/kg 2,531/1,145 2,546/1,155
Approved roof load capacity lbs/kg 165/75 165/75
Cargo bay capacity cu ft/l 15.9/450 15.9/450
Page 249 of 274
Reference 247
At a glance
Controls
Driving tips
Communications
Navigation
Entertainment
Mobility
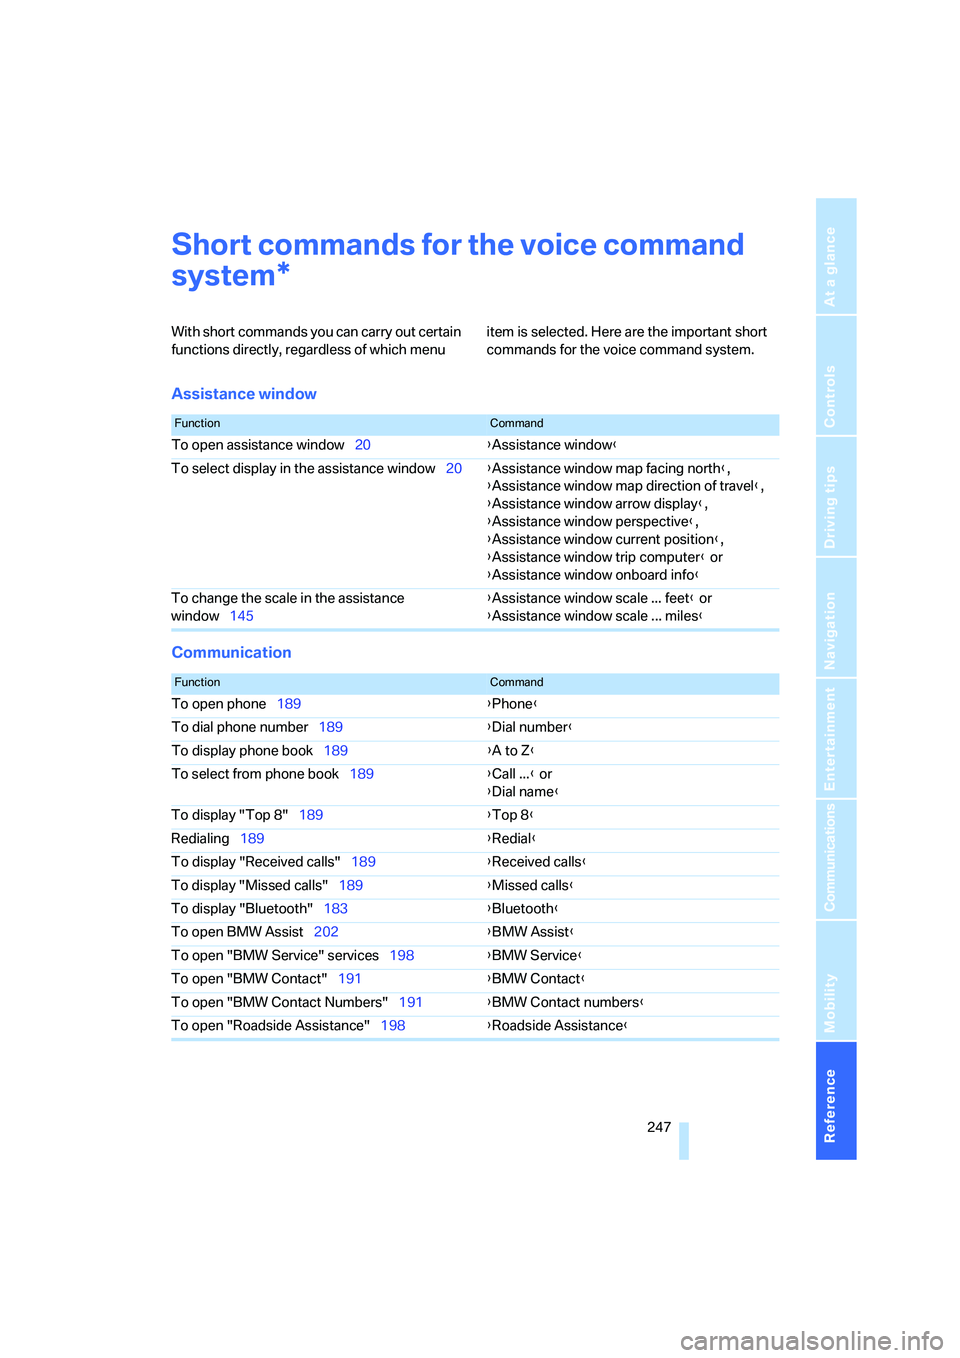
Short commands for the voice command
system
With short commands you can carry out certain
functions directly, regardless of which menu item is selected. Here are the important short
commands for the voice command system.
Assistance window
Communication
*
FunctionCommand
To open assistance window20{Assistance window}
To select display in the assistance window20{Assistance window map facing north},
{Assistance window map direction of travel},
{Assistance window arrow display},
{Assistance window perspective},
{Assistance window current position},
{Assistance window trip computer} or
{Assistance window onboard info}
To change the scale in the assistance
window145{Assistance window scale ... feet} or
{Assistance window scale ... miles}
FunctionCommand
To open phone189{Phone}
To dial phone number189{Dial number}
To display phone book189{A to Z}
To select from phone book189{Call ...} or
{Dial name}
To display "Top 8"189{Top 8}
Redialing189{Redial}
To display "Received calls"189{Received calls}
To display "Missed calls"189{Missed calls}
To display "Bluetooth"183{Bluetooth}
To open BMW Assist202{BMW Assist}
To open "BMW Service" services198{BMW Service}
To open "BMW Contact"191{BMW Contact}
To open "BMW Contact Numbers"191{BMW Contact numbers}
To open "Roadside Assistance"198{Roadside Assistance}
Page 250 of 274
Short commands for the voice command system
248
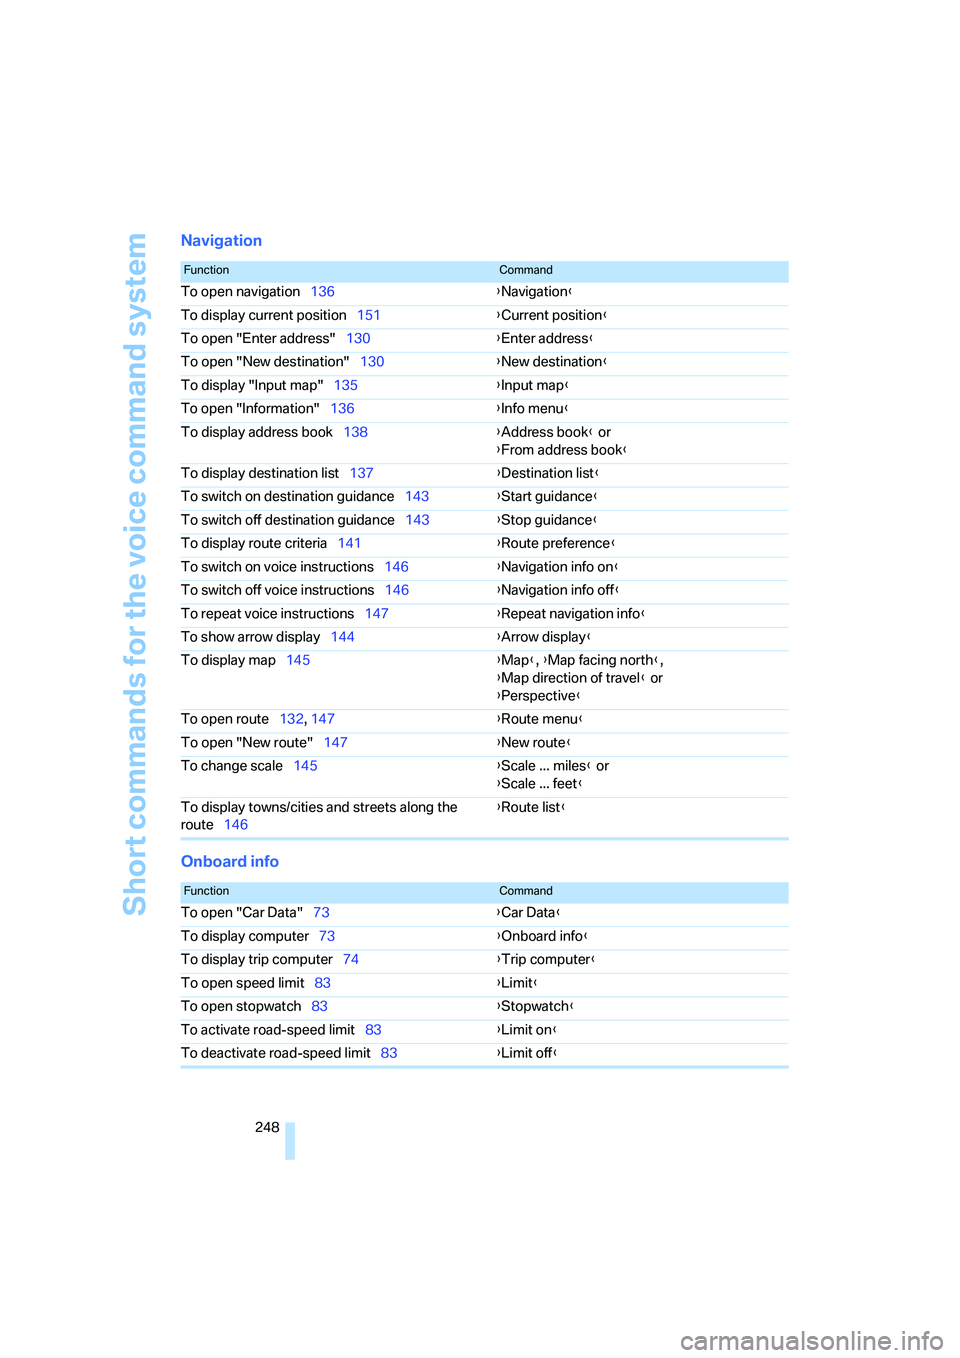
Navigation
Onboard info
FunctionCommand
To open navigation136{Navigation}
To display current position151{Current position}
To open "Enter address"130{Enter address}
To open "New destination"130{New destination}
To display "Input map"135{Input map}
To open "Information"136{Info menu}
To display address book138{Address book} or
{From address book}
To display destination list137{Destination list}
To switch on destination guidance143{Start guidance}
To switch off destination guidance143{Stop guidance}
To display route criteria141{Route preference}
To switch on voice instructions146{Navigation info on}
To switch off voice instructions146{Navigation info off}
To repeat voice instructions147{Repeat navigation info}
To show arrow display144{Arrow display}
To display map145{Map}, {Map facing north},
{Map direction of travel} or
{Perspective}
To open route132, 147
{Route menu}
To open "New route"147{New route}
To change scale145{Scale ... miles} or
{Scale ... feet}
To display towns/cities and streets along the
route146{Route list}
FunctionCommand
To open "Car Data"73{Car Data}
To display computer73{Onboard info}
To display trip computer74{Trip computer}
To open speed limit83{Limit}
To open stopwatch83{Stopwatch}
To activate road-speed limit83{Limit on}
To deactivate road-speed limit83{Limit off}
Page 251 of 274
Reference 249
At a glance
Controls
Driving tips
Communications
Navigation
Entertainment
Mobility
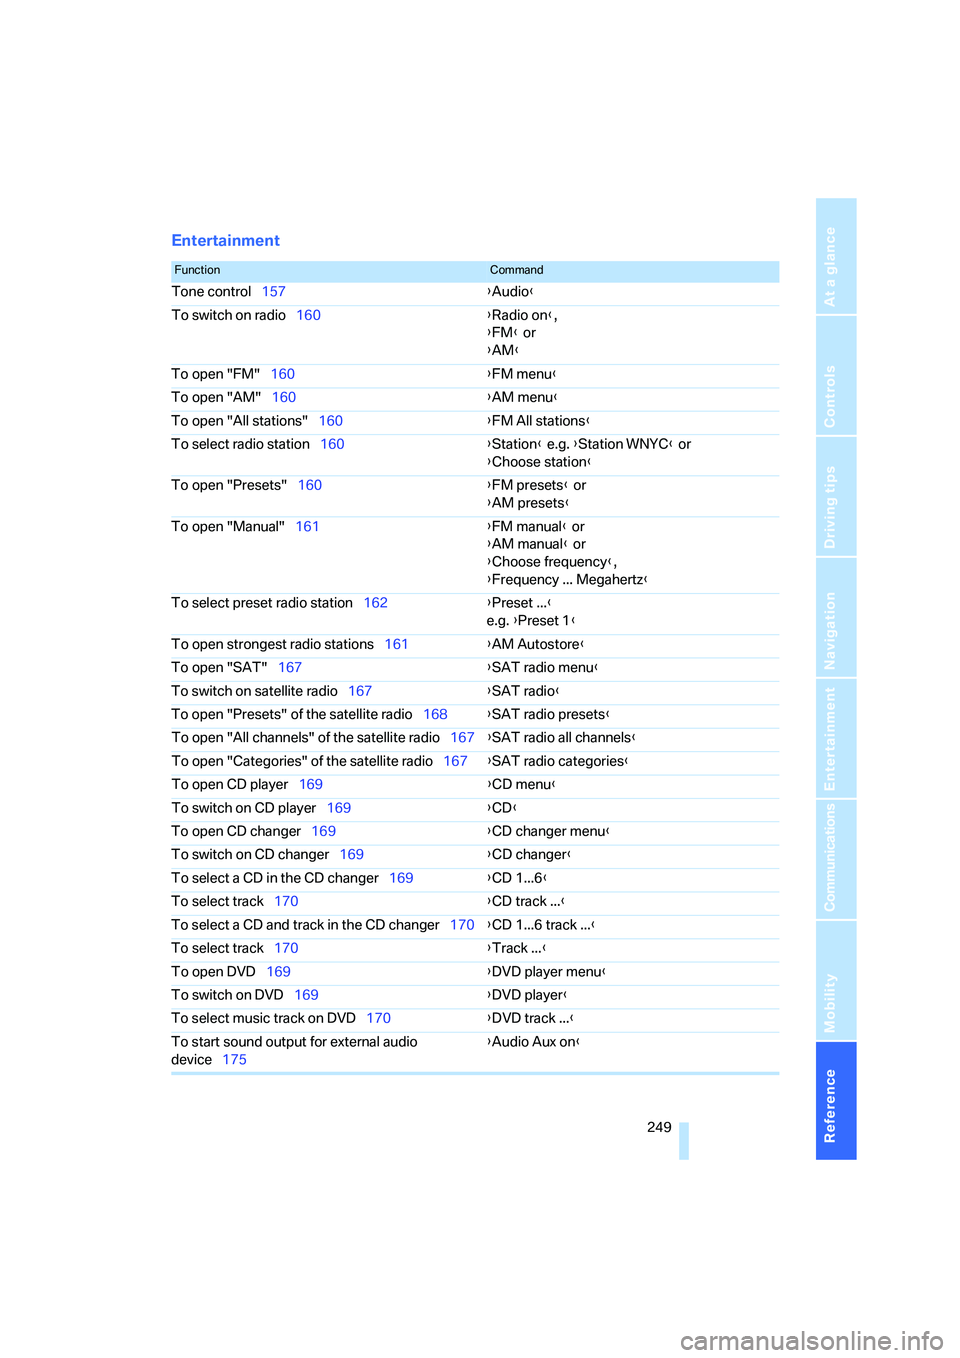
Entertainment
FunctionCommand
Tone control157{Audio}
To switch on radio160{Radio on},
{FM} or
{AM}
To open "FM"160{FM menu}
To open "AM"160{AM menu}
To open "All stations"160{FM All stations}
To select radio station160{Station} e.g. {Station WNYC} or
{Choose station}
To open "Presets"160{FM presets} or
{AM presets}
To open "Manual"161{FM manual} or
{AM manual} or
{Choose frequency},
{Frequency ... Megahertz}
To select preset radio station162{Preset ...}
e.g. {Preset 1}
To open strongest radio stations161{AM Autostore}
To open "SAT"167{SAT radio menu}
To switch on satellite radio167{SAT radio}
To open "Presets" of the satellite radio168{SAT radio presets}
To open "All channels" of the satellite radio167{SAT radio all channels}
To open "Categories" of the satellite radio167{SAT radio categories}
To open CD player169{CD menu}
To switch on CD player169{CD}
To open CD changer169{CD changer menu}
To switch on CD changer169{CD changer}
To select a CD in the CD changer169{CD 1...6}
To select track170{CD track ...}
To select a CD and track in the CD changer170{CD 1...6 track ...}
To select track170{Track ...}
To open DVD169{DVD player menu}
To switch on DVD169{DVD player}
To select music track on DVD170{DVD track ...}
To start sound output for external audio
device175{Audio Aux on}