2008 BMW 335I CONVERTIBLE navigation system
[x] Cancel search: navigation systemPage 111 of 272

Controls
109Reference
At a glance
Driving tips
Communications
Navigation
Entertainment
Mobility
4.Select "Activation time" and press the con-
troller.
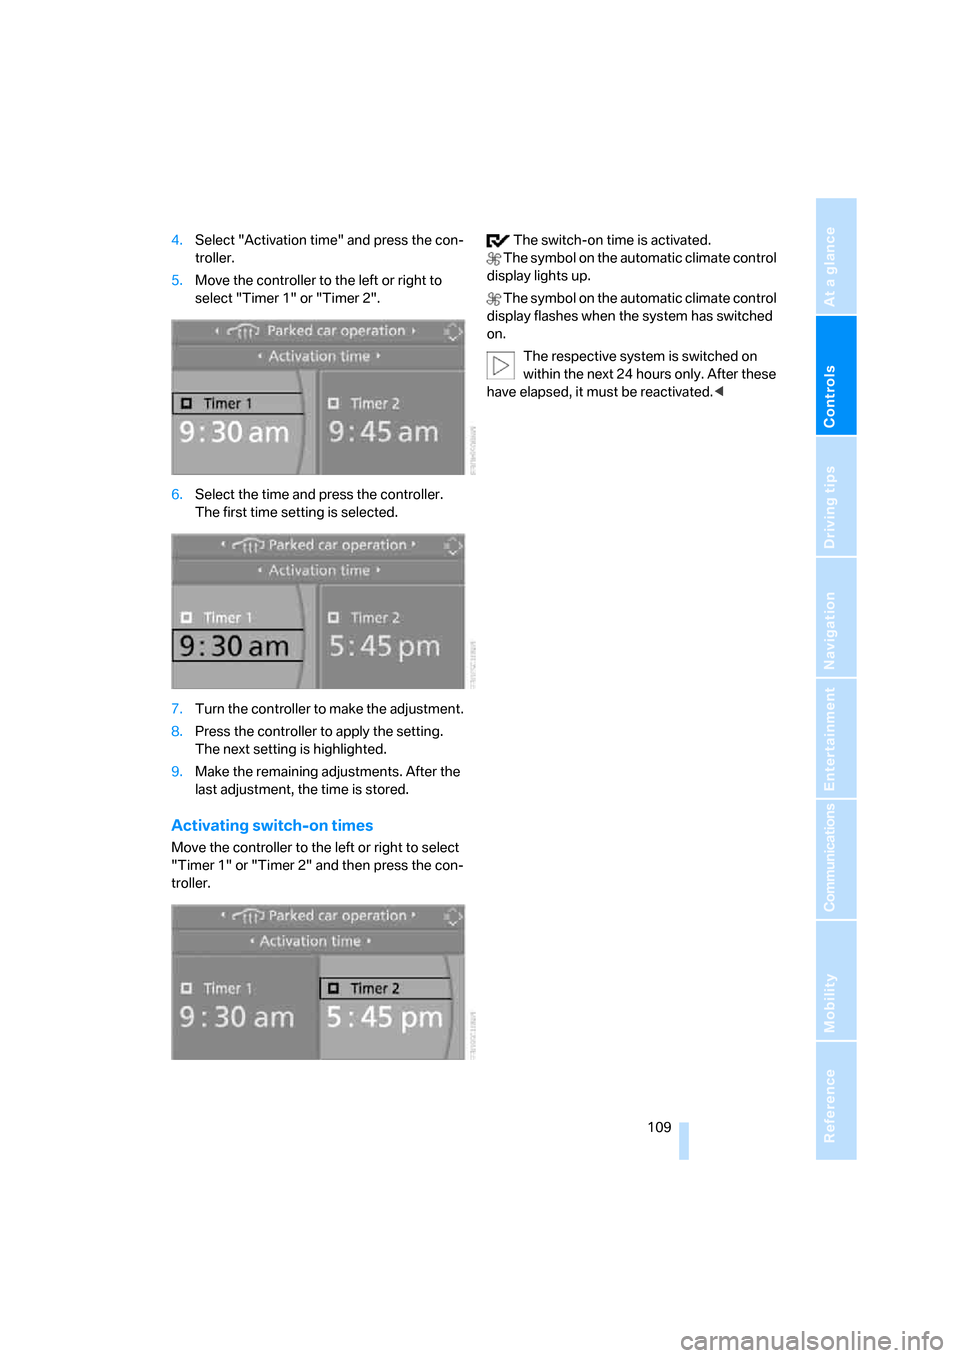
5.Move the controller to the left or right to
select "Timer 1" or "Timer 2".
6.Select the time and press the controller.
The first time setting is selected.
7.Turn the controller to make the adjustment.
8.Press the controller to apply the setting.
The next setting is highlighted.
9.Make the remaining adjustments. After the
last adjustment, the time is stored.
Activating switch-on times
Move the controller to the left or right to select
"Timer 1" or "Timer 2" and then press the con-
troller. The switch-on time is activated.
The symbol on the automatic climate control
display lights up.
The symbol on the automatic climate control
display flashes when the system has switched
on.
The respective system is switched on
within the next 24 hours only. After these
have elapsed, it must be reactivated.<
Page 113 of 272

Controls
111Reference
At a glance
Driving tips
Communications
Navigation
Entertainment
Mobility
The corresponding memory button 1 is now
programmed with the signal of the original
hand-held transmitter.
You can operate the device while the ignition is
switched off.
If the device fails to function even after
repeated programming, check whether
the original hand-held transmitter uses an alter-
nating-code system. To do so, either read the
instructions for the original hand-held transmit-
ter or hold down the programmed memory
button1 of the integrated universal remote
control. If the LED2 on the integrated universal
remote control flashes rapidly and then remains
lit for about two seconds, the original hand-held
transmitter uses an alternating-code system. If
it uses an alternating-code system, program
the memory buttons1 as described under
Alternating-code hand-held transmitters.<
Alternating-code hand-held
transmitters
To program the integrated universal remote
control, consult the operating instructions for
the device to be set. You will find information
there on the possibilities for synchronization.
When programming hand-held transmitters
that employ an alternating code, please observe
the following supplementary instructions:
P r o g ra m m in g w i ll b e ea s i er w it h t h e a i d o f
a second person.<
1.Park your vehicle within the range of the
remote-controlled device.
2.Program the integrated universal remote
control as described above in the section
Fixed-code hand-held transmitters.
3.Locate the button on the receiver of the
device to be set, e.g. on the drive unit.
4.Press the button on the receiver of the
device to be set. After step 4, you have
approx. 30 seconds for step 5.
5.Press the programmed memory button1 of
the integrated universal remote control
three times.The corresponding memory button 1 is now
programmed with the signal of the original
hand-held transmitter.
If you have any questions, please contact
your BMW center.<
Deleting all stored programs
Press the left and right memory buttons1 for
approx. 20 seconds until the LED2 flashes rap-
idly: all stored programs are deleted.
Reassigning individual programs
1.Hold the original hand-held transmitter at a
distance of approx. 4 to 12 in/10 to 30 cm
from the memory buttons1.
The required distance between the
hand-held transmitter and the mem-
ory buttons1 depends on the system of the
respective original hand-held transmitter
used.<
2.Press the desired memory button1 of the
integrated universal remote control.
3.If the LED2 flashes slowly after approx.
20 seconds, press the transmit key of the
original hand-held transmitter. Release
both buttons as soon as the LED2 flashes
rapidly. If the LED2 does not flash rapidly
after approx. 15 seconds, alter the distance
and repeat this step.
Page 119 of 272

Controls
117Reference
At a glance
Driving tips
Communications
Navigation
Entertainment
Mobility
Coupe: socket in the cargo bay*
Open the cap.
Coupe:
Through-loading system*
Opening
1.To release the rear seat backrest, pull the
corresponding lever in the cargo bay.
2.The unlocked rear seat backrest moves for-
ward slightly. Fold the backrest forward by
the head restraint.
Closing
Return the rear seat backrest to its upright posi-
tion and engage it.When returning the backrest into its seat-
ing position, make sure that the seat's
locking mechanism engages properly. Other-
wise, cargo could be thrown around in the event
of sharp braking or swerving and endanger the
occupants.<
The lashing eyes in the cargo bay provide you
with a way to attach cargo bay nets
* or draw
straps for securing suitcases and luggage, refer
to page128.
Convertible:
Cargo loading
Enlarging the cargo bay
When the hardtop is closed you can enlarge the
cargo bay:
To do so, push the cargo bay partition upward.
Before opening the hardtop, push the cargo bay
partition down until it engages on both sides.
Before moving the hardtop, ensure that
there are no objects on or next to the
cargo bay partition, otherwise parts of the hard-
top may be damaged. Do not exceed the maxi-
mum loading height; refer to the sticker in the
cargo bay showing a line indicating the maxi-
mum height. Do not use force to push down the
cargo bay partition.<
The retractable hardtop can only be
opened if the cargo bay partition is in its
lowermost position and engaged on both
sides.<
Page 127 of 272

Driving tips
125Reference
At a glance
Controls
Communications
Navigation
Entertainment
Mobility
Drive defensively
Avoid unnecessary acceleration and braking
maneuvers. To do so, keep an adequate dis-
tance to the forward vehicle. A defensive and
smooth driving style keeps fuel consumption
down.
Avoid high engine speeds
Only use first gear when setting off. In second
and higher gears, accelerate without hesitation
or pauses. When accelerating, shift up before
reaching high engine speeds.
When you reach the desired speed, shift into
the highest applicable gear and drive with the
engine speed as low as possible and at a con-
stant speed.
As a rule: driving at low engine speeds lowers
fuel consumption and reduces wear.
Coasting
When approaching a red light, take your foot off
the accelerator and coast to a stop in the high-
est applicable gear.
O n a d o w n h il l s lo p e , t a k e y o u r f o o t o f f t h e a c c el -
erator and coast in a suitable gear.
The fuel supply is interrupted when coasting.
Switch off the engine during lengthy
stops
Switch off the engine when stopping for lengthy
periods, e.g. at traffic lights, railroad crossings
or in traffic congestions. You achieve fuel sav-
ings even if standing time is as short as approx.
4 seconds.
Switch off functions you do not need at
the moment
Functions such as the air conditioner and the
seat or rear window heating draw large amounts
of power and consume additional fuel. Espe-
cially in city traffic and in stop and go driving
they have a considerable impact. Therefore,
switch these functions off when they are not
really needed.
Have the vehicle serviced
Have the vehicle serviced regularly to achieve
good economy and a long vehicle life. BMW
recommends having the vehicle serviced at a
BMW center. Also note the BMW service sys-
tem, refer to page229.
General driving notes
Close the luggage compartment lid
Operate the vehicle only when the lug-
gage compartment lid is closed. Other-
wise, exhaust fumes could enter the interior of
the vehicle.<
If the vehicle must be driven with the luggage
compartment lid open:
1.Close all windows and the glass roof.
2.Greatly increase the air volume of the auto-
matic climate control system, refer to
page106.
Hot exhaust system
In all vehicles, extremely high tempera-
tures are generated in the exhaust sys-
tem. Do not remove the heat shields installed
adjacent to various sections of the exhaust sys-
tem, and never apply undercoating to them.
When driving, standing at idle and while park-
ing, take care to avoid possible contact
between the hot exhaust system and any highly
flammable materials such as hay, leaves, grass,
etc. Such contact could lead to a fire, with the
risk of serious personal injuries and property
damage. Do not touch hot exhaust tail pipes.
Otherwise there is a risk of burns.<
Hydroplaning
When driving on wet or slushy roads,
reduce road speed. If you do not, a wedge
of water can form between tires and road sur-
face. This situation, known as hydroplaning,
means that the tire can completely lose contact
with the road surface, so that neither the car can
be steered nor the brake be properly applied.<
Page 131 of 272

Driving tips
129Reference
At a glance
Controls
Communications
Navigation
Entertainment
Mobility
safety hazard, and may also place you in viola-
tion of traffic safety laws.
Heavy or hard objects should not be carried
loose inside the car, since they could be thrown
around, for example as a result of heavy braking,
sudden swerves, etc., and endanger the occu-
pants.<
Coupe: roof-mounted
luggage rack*
A special rack system is available as an option
for your BMW. Comply with the directions given
in the installation instructions.
Mounting points
The mounting points are located in the roof.
Loading roof-mounted luggage rack
Because roof racks raise the vehicle's center of
gravity when loaded, they have a major effect on
vehicle handling and steering response.
You should therefore always remember not to
exceed the approved roof load capacity, the
approved gross vehicle weight or the axle loads
when loading the rack.
You can find the applicable data under Weights
on page247.
The roof load must be distributed uniformly and
should not be too large in area. Heavy items
should always be placed at the bottom. Be sure
that adequate clearance is maintained for rais-
ing the glass roof, and that objects do not
project into the opening path of the luggage
compartment lid.Fasten roof-mounted cargo correctly and
securely to prevent it from shifting or falling off
during the trip.
Drive smoothly. Avoid sudden acceleration and
braking maneuvers. Take corners gently.
Page 133 of 272

Navigation
This chapter describes how you can
enter destinations and specify your route
so that your navigation system guides you
reliably to your destination.
Navigation
Page 134 of 272

Starting the navigation system
132
Starting the navigation system
Your navigation system can use satellites to
ascertain the precise position of your vehicle
and guide you reliably to any destination you
enter.
Navigation DVD
The navigation system requires a special navi-
gation DVD. You can obtain the latest version at
your BMW center.
Inserting navigation DVD
Use the lower drive for navigation DVDs.
1.Insert the navigation DVD with the labeled
side up.
The navigation DVD is pulled in automati-
cally.
2.Wait for several seconds to allow the con-
tents of the DVD to be read in.
Removing navigation DVD
1. Press button 1.
The DVD emerges slightly from the drive.
2.Remove the DVD.
If the DVD is not ejected, the drive may be
blocked. In this case, a message will appear on
the Control Display.
Display in the assistance
window
You can display the route or the current position
in the assistance window. This display remains
visible even if you change to another applica-
tion.
1.Move the controller to the right to enter the
assistance window.
2.Press the controller.
Other menu items are displayed.
3.Select the desired route view or "Current
position".
4.Press the controller.
Displaying arrow display in map view*
When the navigation system suggests a change
in direction, the arrow display appears briefly.
1.Press the button.
This opens the start menu.
2.Press the controller to open the menu.
3.Turn the controller until "Settings" is
selected and press the controller.
*
Page 136 of 272

Destination entry
134
Destination entry
In entering your destination you can select from
the following options:
>Entering a destination manually, see below
>Entering a destination by voice com-
mands*, refer to page138
>Selecting destination using information,
refer to page140
>Selecting destination from a list, refer to
Destination list, page141
>Selecting destination from address book,
refer to page142
>Selecting home address, refer to page144
After selecting your destination you can pro-
ceed to start the destination guidance, refer to
page147.
You can also store a navigation destination on
the programmable memory keys, refer to
page21.
Enter data only when the vehicle is sta-
tionary, and always give priority to the
applicable traffic regulations in the event of any
contradiction between traffic and road condi-
tions and the instructions issued by the naviga-
tion system. Otherwise, vehicle occupants and
other road users may be endangered.<
Opening navigation
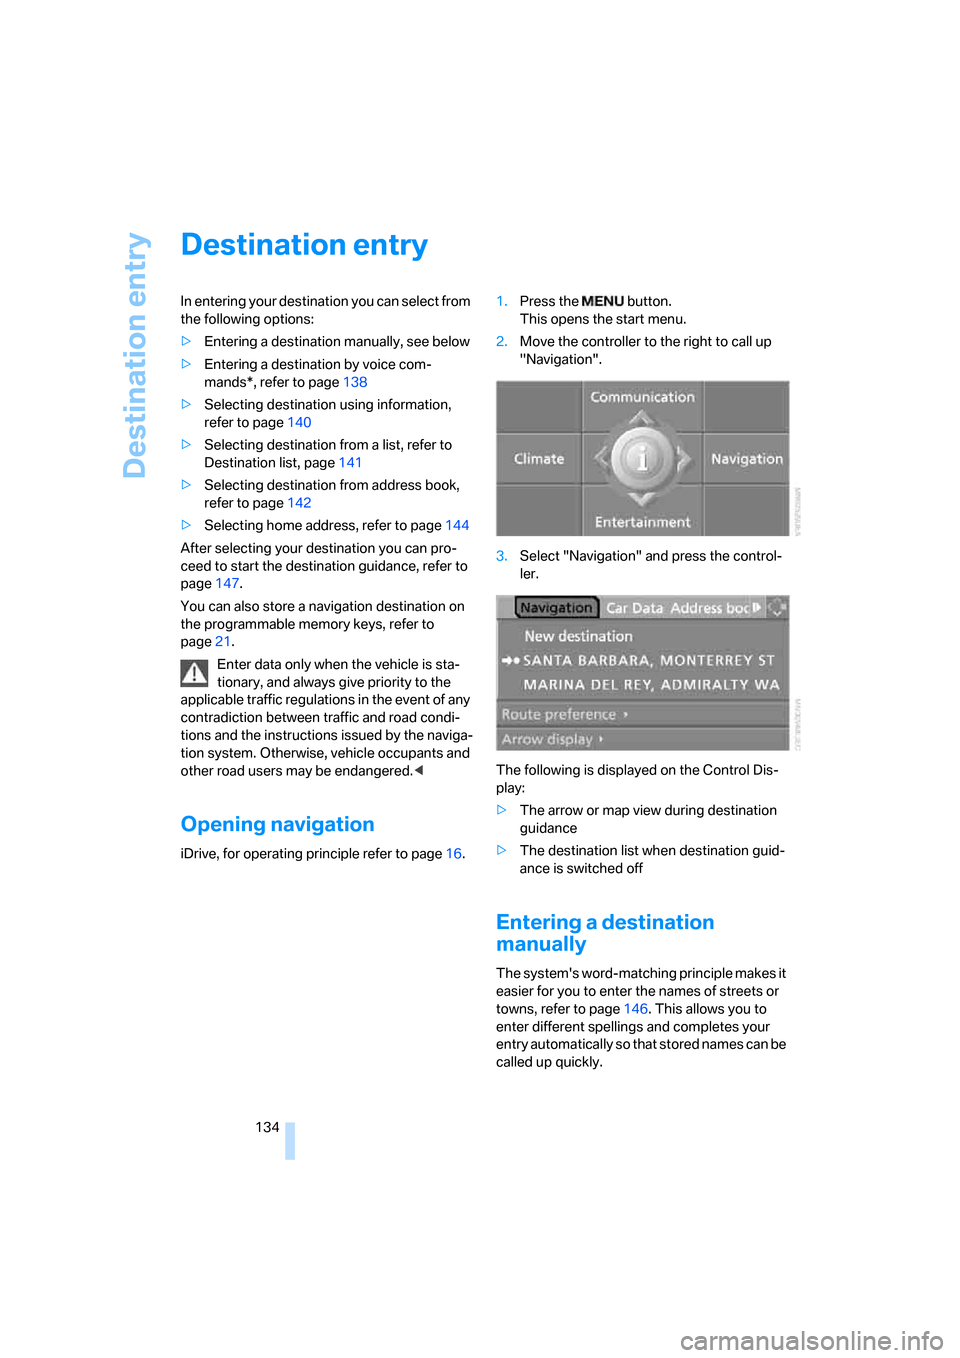
iDrive, for operating principle refer to page16.1.Press the button.
This opens the start menu.
2.Move the controller to the right to call up
"Navigation".
3.Select "Navigation" and press the control-
ler.
The following is displayed on the Control Dis-
play:
>The arrow or map view during destination
guidance
>The destination list when destination guid-
ance is switched off
Entering a destination
manually
The system's word-matching principle makes it
easier for you to enter the names of streets or
towns, refer to page146. This allows you to
enter different spellings and completes your
entry automatically so that stored names can be
called up quickly.