2008 BMW 328XI SEDAN towing
[x] Cancel search: towingPage 37 of 274

Controls
35Reference
At a glance
Driving tips
Communications
Navigation
Entertainment
Mobility
Make sure that the closing path of the
luggage compartment lid/tailgate is clear,
otherwise injuries may result.<
Sedan
Sports Wagon
Sports Wagon: opening and closing the
rear window
Small items can be loaded and unloaded
quickly when the rear window is opened sepa-
rately.
The roll-up cover is raised when the rear
window is opened. Before closing the rear
window, press the roll-up cover downward until
it engages.<
Press the button: the rear window opens
slightly. It can now be swung upwards.Press the window shut to close it.
Make sure that the corners of any pointed
or sharp-edged cargo are padded if they
could bump against the rear window while the
vehicle is in motion, otherwise the heating ele-
ments of the rear window could be damaged.<
Alarm system*
The concept
The vehicle alarm system responds:
>When a door, the hood or the luggage com-
partment lid/tailgate is opened
>To movements inside the vehicle: Interior
motion sensor, refer to page36
>When the car's inclination changes, for
instance if an attempt is made to jack it up
and steal the wheels or to raise it prior to
towing away
>When there is an interruption in the power
supply from the battery
The alarm system signals unauthorized entry
attempts for a short time by means of:
>An acoustic alarm
>Switching on the hazard warning flashers
>Flashing the high beams
Arming and disarming
When you lock or unlock the vehicle, either with
the remote control or at the door lock, the alarm
system is armed or disarmed at the same time.
You can open the luggage compartment lid/tail-
gate even when the alarm system is armed, by
pressing the button on the remote control,
refer to page30. The lid is locked and moni-
tored again as soon as you close it.
Panic mode*
You can trigger the alarm system if you find
yourself in a dangerous situation:
Press the button for at least three seconds.
To switch off the alarm: press any button.
Page 92 of 274
Technology for driving comfort and safety
90
Indication of a flat tire
The warning lamps come on in yellow
and red. A message appears on the
Control Display. In addition, an
acoustic signal sounds. There is a flat
tire or substantial loss of tire pressure.
1.Cautiously reduce speed to below 50 mph
or 80 km/h. Avoid sudden braking and
steering maneuvers. Do not exceed a speed
of 50 mph or 80 km/h.
If the car is not equipped with Run-
Flat Tires, refer to page219, the stan-
dard equipment by design, do not continue
driving. Otherwise a severe accident could
result if you continue driving.<
2.At the next opportunity, check the air pres-
sure in all four tires.
If all four tires are inflated to the cor-
rect pressures, the Flat Tire Monitor
might not have been initialized. The system
must then be initialized.<
3.In the event of complete tire pressure loss,
0 psi/0 kPa, you can estimate the possible
distance for continued driving on the basis
of the following guidelines:
>With a light load:
1 to 2 persons without luggage:
approx. 155 miles/250 km
>With a medium load:
2 persons, cargo bay full, or 4 persons
without luggage:
approx. 90 miles/150 km
>With a full load or when towing a trailer:
4 or more persons, cargo bay full:
approx. 30 miles/50 km
Drive cautiously and do not exceed a
speed of 50 mph or 80 km/h, otherwise
there is a risk of an accident. In the event of
pressure loss, vehicle handling changes. This
includes reduced tracking stability in braking,
extended braking distance and altered natural
steering characteristics.
If unusual vibration or loud noises occur during
the journey, this may be an indication that the
damaged tire has finally failed. Reduce your
speed and pull over as soon as possible at a suitable location. Otherwise parts of the tire
could come loose, resulting in an accident. Do
not continue driving. Instead, contact your
BMW center.<
Malfunction
The warning lamps come on in yel-
low. A message appears on the Con-
trol Display. The Flat Tire Monitor has
a malfunction or has failed. Have the
system checked as soon as possible.
Tire Pressure Monitor TPM*
The concept
TPM checks the inflation pressures of the four
mounted tires. The system notifies you if there
is a significant loss of pressure in one or more
tires.
Functional requirement
In order to assure the reliable reporting of a flat
tire, the system must be reset while all tire infla-
tion pressures are correct.
Always use wheels with TPM electronics. Oth-
erwise, the system may malfunction.
Each time a tire inflation pressure has
been corrected or a wheel or tire has been
changed, reset the system.<
System limitations
TPM cannot warn you in advance of sud-
den severe tire damage caused by out-
side influences.<
The system does not work correctly if it has not
been reset; for example, a flat tire may be indi-
cated even though the tire inflation pressures
are correct.
The system is inactive and cannot indicate a flat
tire if a wheel without TPM electronics, such as
a compact spare wheel, has been mounted, or if
TPM is temporarily malfunctioning due to other
systems or devices using the same radio fre-
quency.
Page 125 of 274
Driving tips
123Reference
At a glance
Controls
Communications
Navigation
Entertainment
Mobility
Sports Wagon: rear window wiper
Driving through an automatic car wash can
result in damage to the rear window wiper. If
necessary, ask the operator of the car wash
about protective measures you should take.
With convenient access and automatic
transmission
Insert the remote control into the ignition
switch.
The engine can be switched off when the selec-
tor lever is in position N. Refer also to page37.
Cargo loading
To avoid loading the tires beyond their
approved carrying capacity, never over-
load the vehicle. Overloading can lead to over-
heating and increases the rate at which damage
develops inside the tires. This can ultimately
result in a sudden blow-out.<
Make sure that no liquids are spilled or
leak from their containers in the cargo
bay, as this could result in damage to the vehi-
cle.<
Determining loading limit
1.Locate the following statement on your
vehicle's placard
*:
The combined weight of occupants
and cargo should never exceed
XXX kg or YYY lbs. Otherwise, overloading
can result in damage to the vehicle and
unstable driving conditions.<
2.Determine the combined weight of the
driver and passengers that will be riding in
your vehicle.3.Subtract the combined weight of the driver
and passengers from XXX kilograms or YYY
pounds.
4.The resulting figure equals the available
amount of cargo and luggage load capacity.
For example, if the YYY amount equals
1,400 lbs. and there will be five 150-lb. pas-
sengers in your vehicle, the amount of avail-
able cargo and luggage load capacity is
650 lbs:
1,400 lbs. minus 750 lbs. = 650 lbs.
5.Determine the combined weight of luggage
and cargo being loaded on the vehicle. That
weight may not safely exceed the available
cargo and luggage load capacity calculated
in step 4.
6.If your vehicle will be towing a trailer, part of
the load from your trailer will be transferred
to your vehicle. Consult the manual for
transporting a trailer to determine how this
may reduce the available cargo and luggage
load capacity of your vehicle.
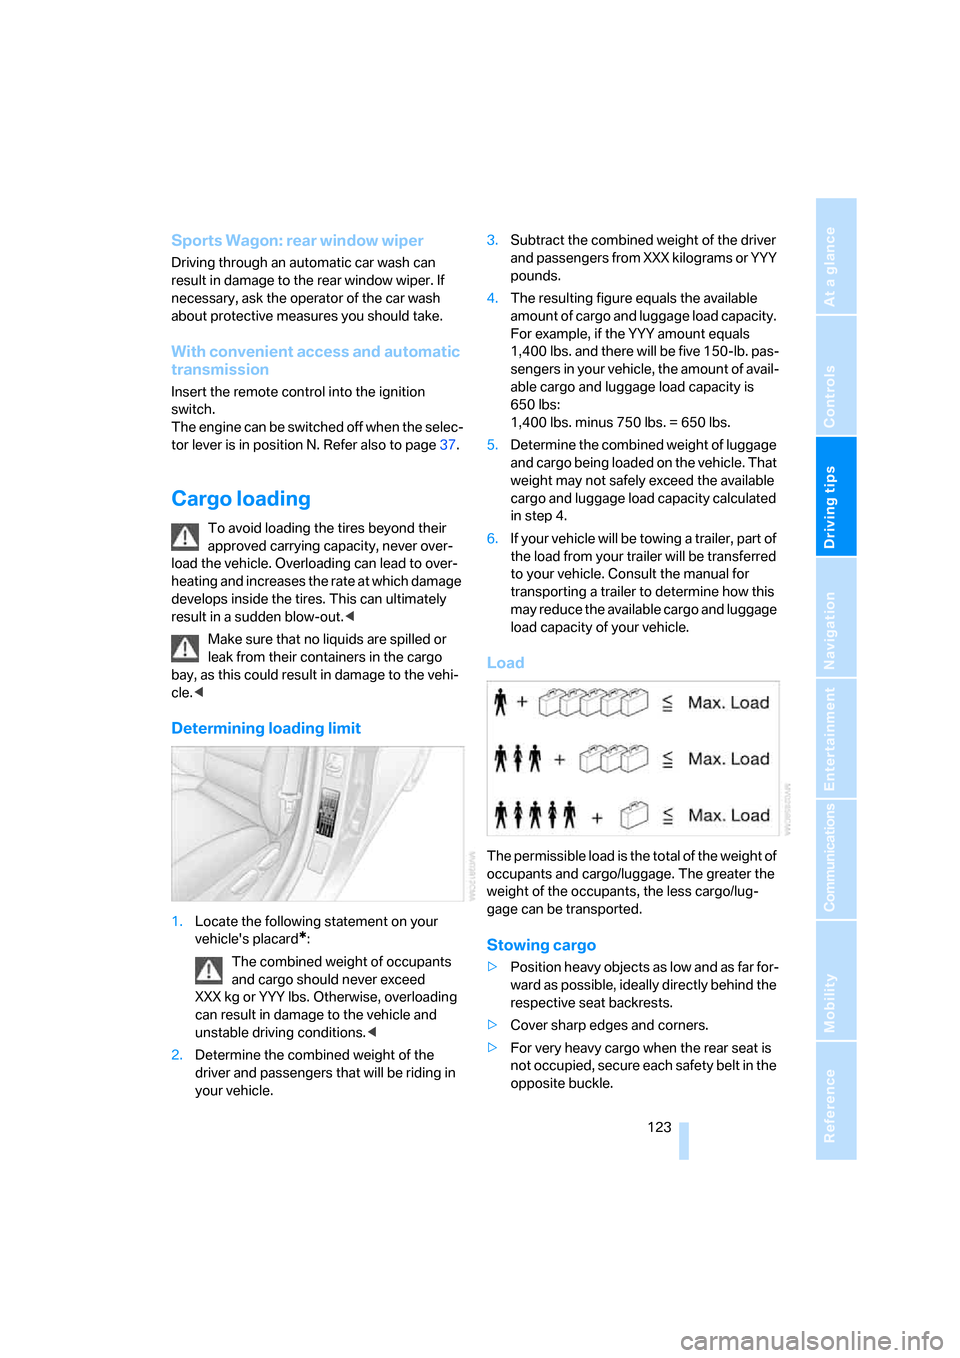
Load
The permissible load is the total of the weight of
occupants and cargo/luggage. The greater the
weight of the occupants, the less cargo/lug-
gage can be transported.
Stowing cargo
>Position heavy objects as low and as far for-
ward as possible, ideally directly behind the
respective seat backrests.
>Cover sharp edges and corners.
>For very heavy cargo when the rear seat is
not occupied, secure each safety belt in the
opposite buckle.
Page 239 of 274

Mobility
237Reference
At a glance
Controls
Driving tips
Communications
Navigation
Entertainment
Preparation
1.Check whether the battery of the other
vehicle has a voltage of 12 volts and
approximately the same capacitance in Ah.
This information can be found on the bat-
tery.
2.Switch off the engine of the assisting vehi-
cle.
3.Switch off any consumers in both vehicles.
There must not be any contact between
the bodies of the two vehicles, otherwise
there is a danger of shorting.<
Connecting jumper cables
Connect the jumper cables in the correct
order, so that no sparks which could
cause injury occur.<
Your BMW has a jump-starting connection in
the engine compartment which acts as the bat-
tery's positive terminal, refer also to the Engine
compartment overview on page222. The cap is
marked with +.
1.Pull the cap of the BMW jump-starting con-
nection up to remove.
2.Attach one terminal clamp of the plus/+
jumper cable to the positive terminal of the
battery or a starting-aid terminal of the vehi-
cle providing assistance.
3.Attach the second terminal clamp of the
plus/+ jumper cable to the positive terminal
of the battery or a starting-aid terminal of
the vehicle to be started.
4.Attach one terminal clamp of the minus/–
jumper cable to the negative terminal of the
battery or to an engine or body ground of
the assisting vehicle. Your BMW has a special nut as body ground
or negative pole.
5.Attach the second terminal clamp of the
minus/– jumper cable to the negative termi-
nal of the battery or to the engine or body
ground of the vehicle to be started.
Starting the engine
1.Start the engine of the donor vehicle and
allow it to run for a few minutes at slightly
increased idle speed.
2.Start the engine on the other vehicle in the
usual way.
If the first start attempt is not successful,
wait a few minutes before another attempt
in order to allow the discharged battery to
recharge.
3.Let the engines run for a few minutes.
4.Disconnect the jumper cables by reversing
the above connecting sequence.
If necessary, have the battery checked and
recharged.
Never use spray fluids to start the
engine.<
Tow-starting, towing away
Observe the applicable laws and regula-
tions for tow-starting and towing vehi-
cles.<
Do not transport any passengers other
than the driver in a vehicle that is being
towed.<
Page 240 of 274
Giving and receiving assistance
238
Using a tow fitting
The screw-in tow fitting must always be carried
in the car. It can be screwed in at the front or
rear of the BMW.
Sedan: it is stored in the onboard tool kit under-
neath the cover on the right-hand side of the
cargo bay, refer to page228.
Sports Wagon: it is stored in the onboard tool kit
underneath the cover on the left-hand side of
the cargo bay, refer to page228.
Use only the tow fitting provided with the
vehicle and screw it all the way in. Use the
tow fitting for towing on paved roads only. Avoid
lateral loading of the tow fitting, e.g. do not lift
the vehicle by the tow fitting. Otherwise the tow
fitting and the vehicle could be damaged.<
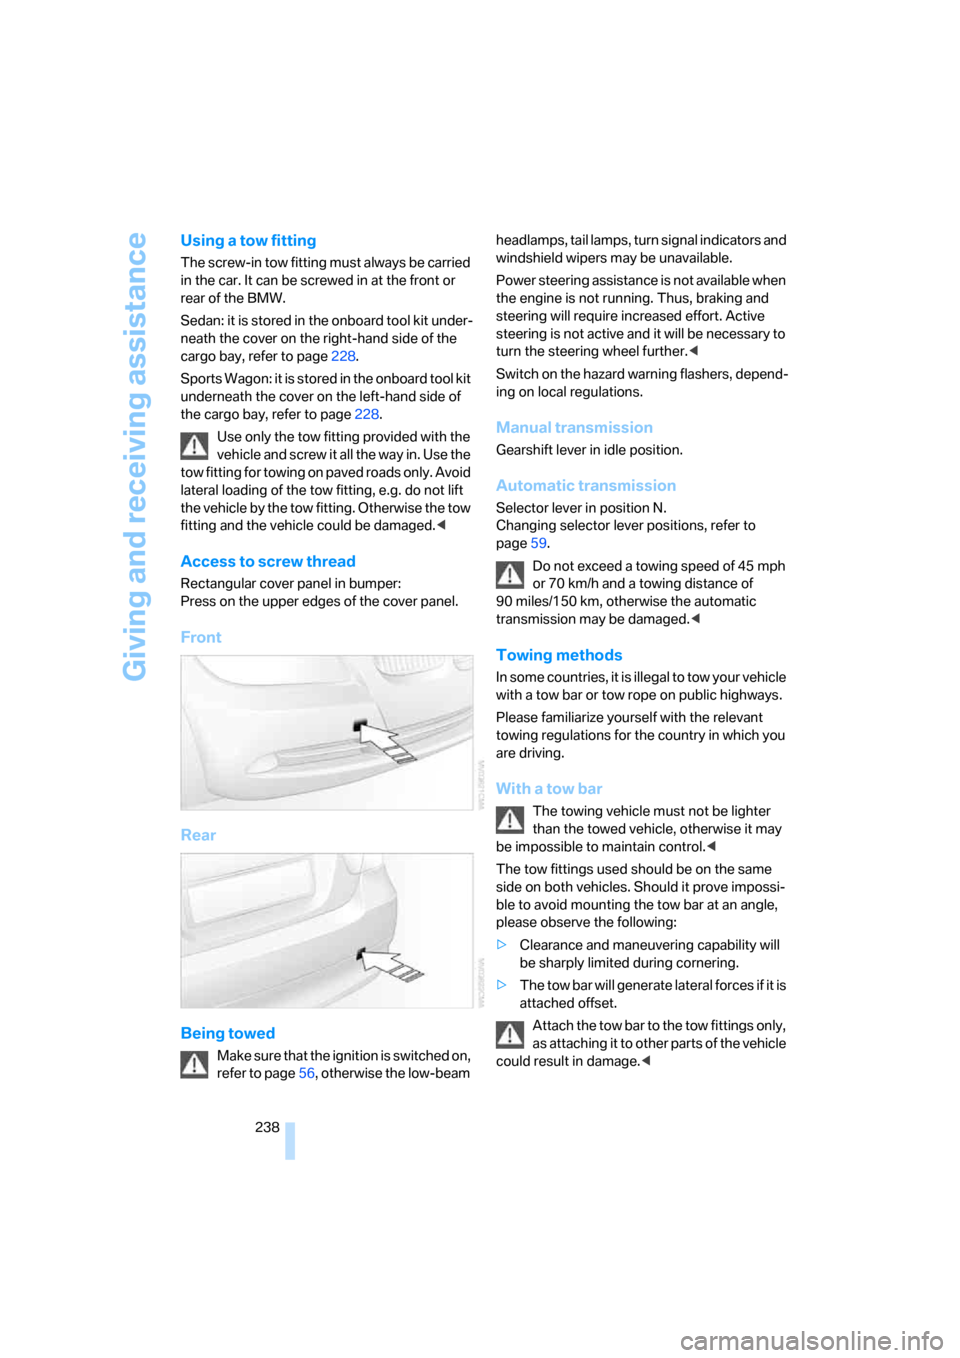
Access to screw thread
Rectangular cover panel in bumper:
Press on the upper edges of the cover panel.
Front
Rear
Being towed
Make sure that the ignition is switched on,
refer to page56, otherwise the low-beam headlamps, tail lamps, turn signal indicators and
windshield wipers may be unavailable.
Power steering assistance is not available when
the engine is not running. Thus, braking and
steering will require increased effort. Active
steering is not active and it will be necessary to
turn the steering wheel further.<
Switch on the hazard warning flashers, depend-
ing on local regulations.
Manual transmission
Gearshift lever in idle position.
Automatic transmission
Selector lever in position N.
Changing selector lever positions, refer to
page59.
Do not exceed a towing speed of 45 mph
or 70 km/h and a towing distance of
90 miles/150 km, otherwise the automatic
transmission may be damaged.<
Towing methods
In some countries, it is illegal to tow your vehicle
with a tow bar or tow rope on public highways.
Please familiarize yourself with the relevant
towing regulations for the country in which you
are driving.
With a tow bar
The towing vehicle must not be lighter
than the towed vehicle, otherwise it may
be impossible to maintain control.<
The tow fittings used should be on the same
side on both vehicles. Should it prove impossi-
ble to avoid mounting the tow bar at an angle,
please observe the following:
>Clearance and maneuvering capability will
be sharply limited during cornering.
>The tow bar will generate lateral forces if it is
attached offset.
Attach the tow bar to the tow fittings only,
as attaching it to other parts of the vehicle
could result in damage.<
Page 241 of 274
Mobility
239Reference
At a glance
Controls
Driving tips
Communications
Navigation
Entertainment
With a tow rope
When starting off in the towing vehicle, make
sure that the tow rope is taut.
To avoid jerking and the associated
stresses on vehicle components when
towing, always use nylon ropes or nylon straps.
Attach the tow rope to the tow fittings only, as
attaching it to other parts of the vehicle could
result in damage.<
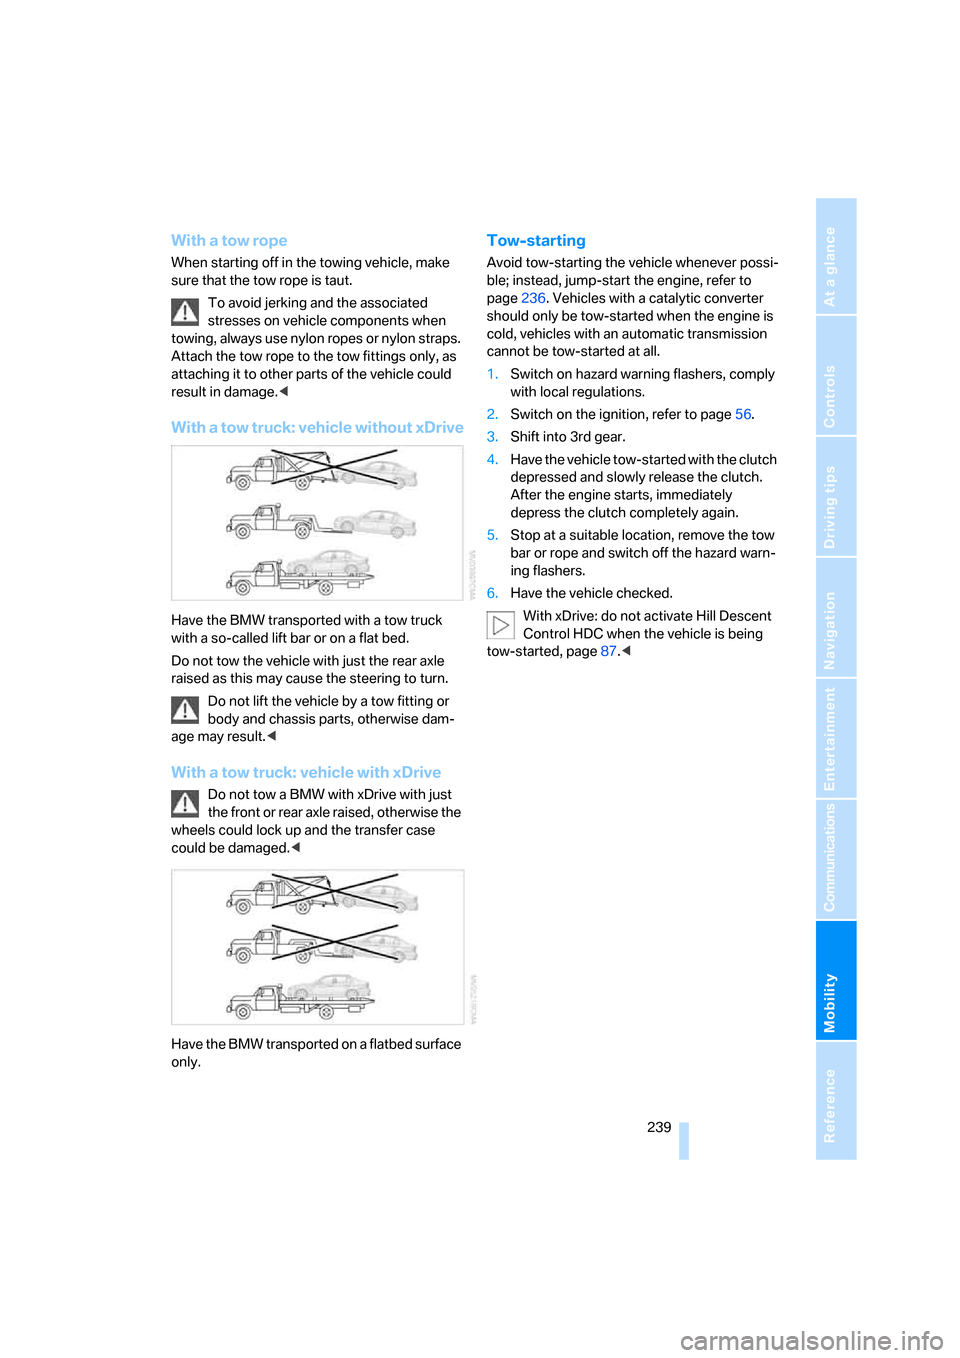
With a tow truck: vehicle without xDrive
Have the BMW transported with a tow truck
with a so-called lift bar or on a flat bed.
Do not tow the vehicle with just the rear axle
raised as this may cause the steering to turn.
Do not lift the vehicle by a tow fitting or
body and chassis parts, otherwise dam-
age may result.<
With a tow truck: vehicle with xDrive
Do not tow a BMW with xDrive with just
the front or rear axle raised, otherwise the
wheels could lock up and the transfer case
could be damaged.<
Have the BMW transported on a flatbed surface
only.
Tow-starting
Avoid tow-starting the vehicle whenever possi-
ble; instead, jump-start the engine, refer to
page236. Vehicles with a catalytic converter
should only be tow-started when the engine is
cold, vehicles with an automatic transmission
cannot be tow-started at all.
1.Switch on hazard warning flashers, comply
with local regulations.
2.Switch on the ignition, refer to page56.
3.Shift into 3rd gear.
4.Have the vehicle tow-started with the clutch
depressed and slowly release the clutch.
After the engine starts, immediately
depress the clutch completely again.
5.Stop at a suitable location, remove the tow
bar or rope and switch off the hazard warn-
ing flashers.
6.Have the vehicle checked.
With xDrive: do not activate Hill Descent
Control HDC when the vehicle is being
tow-started, page87.<
Page 255 of 274
Reference 253
At a glance
Controls
Driving tips
Communications
Navigation
Entertainment
Mobility
Automatic
– air distribution102
– air flow rate102
– cruise control63,64
– headlamp control96
– service notification199
– storing of stations161
Automatic climate control100
– automatic air
distribution102
– settings via iDrive101
Automatic curb monitor49
"Automatic programs" with
automatic climate
control102
Automatic recirculated-air
control AUC102
Automatic station search161
Automatic transmission with
Steptronic58
– interlock58,59
– overriding selector lever
lock60
– shiftlock, refer to Changing
selector lever position59
– sport program59
– towing237
– tow-starting237
"Automatic ventilation"104
AUTO program for automatic
climate control102
"Auto Request"199
"Autostore"
– on the radio162
"AUX"156,175,177
– AUX-In port175
– USB-audio interface176
AUX-IN
– port110
AUX-In port175
Average fuel consumption73
– setting the units76
Average speed73
"Avoid ferries" in
navigation141
"Avoid highways" in
navigation141
Avoid highways in
navigation141Avoiding unintentional
alarms36
"Avoid tollroads" in
navigation141
Axle loads, refer to
Weights245
"A - Z"189
,190
B
Backrest contour, refer to
Lumbar support45
Backrests, refer to Seat
adjustment44
Backrest width adjustment45
Back seats
– refer to Rear seats46
Backup lamps
– replacing bulb232
Backup lamps, refer to Tail
lamps231
Balance, tone control157
Band-aids, refer to First-aid
pouch236
Bar, refer to Towing
methods238
Base plate for telephone or
mobile phone
– refer to Snap-in adapter in
the center armrest storage
compartment110
Bass, tone control157
Bass sounds, refer to Treble
and bass157
Battery233
– charging233
– disposal38,234
– jump starting236
– remote control28
– temporary power failure234
Battery renewal
– remote control38
– remote control for vehicle38
Being towed238
Belts, refer to Safety belts48
Belt tensioner, refer to Safety
belts48
Beverage holders, refer to
Cup holders111Blower, refer to Air flow
rate102
Bluetooth, refer to separate
Owner's Manual
"BMW Assist"198,199,200
BMW Assist
– activating202
– Concierge service200
– contacting BMW Customer
Relations200
– Roadside Assistance198
– services offered197
– TeleService199
"BMW Contact"192
"BMW Contact
Numbers"192
BMW Homepage4
BMW Maintenance
System226
"BMW Service settings"203
BMW webpage4
Bottle holders, refer to Cup
holders111
Brake assist, refer to Dynamic
Brake Control DBC86
Brake fluid, refer to Service
requirements76
Brake Force Display93
Brake lamps
– replacing bulb232
– two-stage93
Brake pads120
– breaking in120
Brake rotors122
– brakes120
– breaking in120
Brakes
– ABS86
– BMW Maintenance
System226
– breaking in120
– parking brake57
– service requirements76
Brakes, refer to Braking
safely122
Page 256 of 274

Everything from A - Z
254 Brake system120
– BMW Maintenance
System226
– breaking in120
– disc brakes122
Breakdown services, refer to
Roadside Assistance235
Breaking in the clutch120
Breaking in the differential,
refer to Engine and
differential120
Break-in period120
Brightness of the Control
Display84
"Brightness" on the Control
Display84
Bulb changing, refer to Lamps
and bulbs229
Button for starting the engine,
refer to Start/stop button56
Buttons on the steering
wheel11
C
California Proposition 65
warning6
"Call"190,201
Call
– accepting188
– displaying accepted190
– ending189
– missed190
– starting189
Calling
– from phone book189
– from Top 8 list190
– redialing190
Can holders, refer to Cup
holders111
Capacities246
Capacity of the cargo bay245
Car battery, refer to Vehicle
battery233
Car care, refer to Caring for
your vehicle brochure
Car-care products, refer to
Caring for your vehicle
brochure"Car Data"73
Care, refer to Caring for your
vehicle brochure
Cargo, securing124
Cargo bay114
– capacity245
– convenient access37
– folding up the floor
panel116
– lamp, refer to Interior
lamps99
– opening from inside33
– opening from outside33
– partition net114
– roll-up cover114
Cargo bay lid, refer to
Luggage compartment lid/
tailgate33
Cargo bay net, refer to
Partition net114
Cargo loading
– securing cargo124
– stowing cargo123
– vehicle123
Caring for artificial leather,
refer to Caring for your
vehicle brochure
Caring for leather, refer to
Caring for your vehicle
brochure
Caring for plastic, refer to
Caring for your vehicle
brochure
Caring for the carpet, refer to
Caring for your vehicle
brochure
Caring for the vehicle finish,
refer to Caring for your
vehicle brochure
Car jack
– jacking points233
Car key, refer to Integrated
key/remote control28
Car phone182
– installation location, refer to
Center armrest110
– refer to Mobile phone182
– refer to separate Owner's
ManualCar radio, refer to Radio160
Car wash122
– also refer to Caring for your
vehicle brochure
– with convenient access37
Catalytic converter, refer to
Hot exhaust system121
"Categories" for satellite
radio167
CBS Condition Based
Service226
"CD"156,169
CD changer169
– compressed audio files169
– controls156
– fast forward/reverse173
– installation location173
– playing a track171
– random order172
– repeating a track172
– selecting a CD169
– selecting a track170
– switching on/off156
– tone control157
– volume157
CD player169
– compressed audio files169
– controls156
– fast forward/reverse173
– playing a track171
– random order172
– repeating a track172
– selecting a track170
– switching on/off156
– tone control157
– volume157
Center armrest110
Center brake lamp
– replacing bulb233
Center console, refer to
Around the center
console14
"Central locking"30
Central locking
– from inside32
– from outside29
Central locking system29
– convenient access36
– hotel function34