2008 BMW 328XI SEDAN fold seats
[x] Cancel search: fold seatsPage 48 of 274

Adjustments
46
Front seats
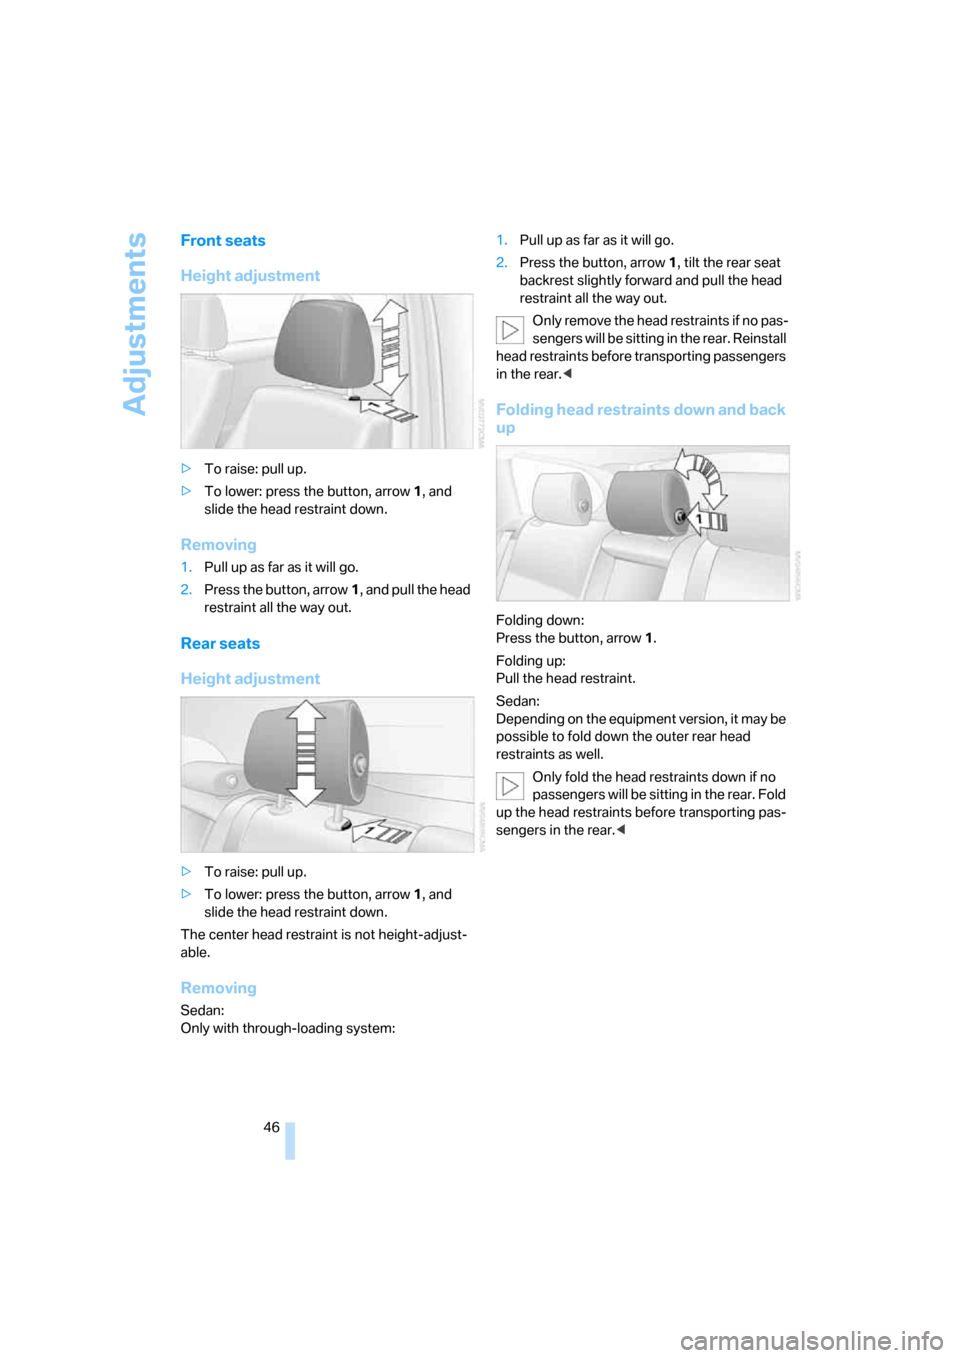
Height adjustment
>To raise: pull up.
>To lower: press the button, arrow1, and
slide the head restraint down.
Removing
1.Pull up as far as it will go.
2.Press the button, arrow1, and pull the head
restraint all the way out.
Rear seats
Height adjustment
>To raise: pull up.
>To lower: press the button, arrow1, and
slide the head restraint down.
The center head restraint is not height-adjust-
able.
Removing
Sedan:
Only with through-loading system:1.Pull up as far as it will go.
2.Press the button, arrow 1, tilt the rear seat
backrest slightly forward and pull the head
restraint all the way out.
O nly remove the head restraints if no pas-
sengers will be sitting in the rear. Reinstall
head restraints before transporting passengers
in the rear.<
Folding head restraints down and back
up
Folding down:
Press the button, arrow1.
Folding up:
Pull the head restraint.
Sedan:
Depending on the equipment version, it may be
possible to fold down the outer rear head
restraints as well.
Only fold the head restraints down if no
passengers will be sitting in the rear. Fold
up the head restraints before transporting pas-
sengers in the rear.<
Page 117 of 274

Controls
115Reference
At a glance
Driving tips
Communications
Navigation
Entertainment
Mobility
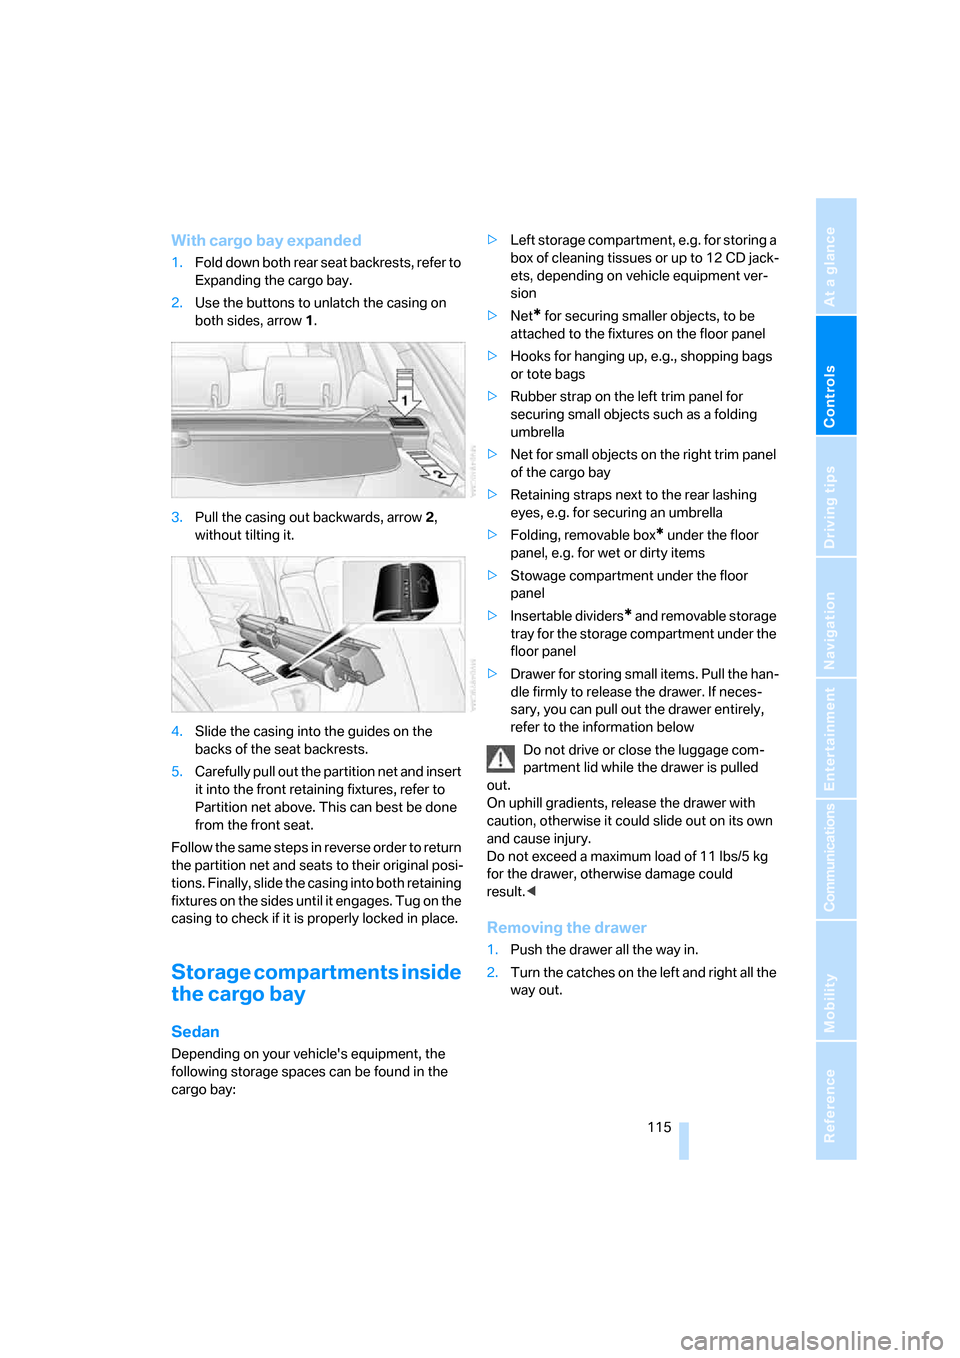
With cargo bay expanded
1.Fold down both rear seat backrests, refer to
Expanding the cargo bay.
2.Use the buttons to unlatch the casing on
both sides, arrow 1.
3.Pull the casing out backwards, arrow 2,
without tilting it.
4.Slide the casing into the guides on the
backs of the seat backrests.
5.Carefully pull out the partition net and insert
it into the front retaining fixtures, refer to
Partition net above. This can best be done
from the front seat.
Follow the same steps in reverse order to return
the partition net and seats to their original posi-
tions. Finally, slide the casing into both retaining
fixtures on the sides until it engages. Tug on the
casing to check if it is properly locked in place.
Storage compartments inside
the cargo bay
Sedan
Depending on your vehicle's equipment, the
following storage spaces can be found in the
cargo bay:>Left storage compartment, e.g. for storing a
box of cleaning tissues or up to 12 CD jack-
ets, depending on vehicle equipment ver-
sion
>Net
* for securing smaller objects, to be
attached to the fixtures on the floor panel
>Hooks for hanging up, e.g., shopping bags
or tote bags
>Rubber strap on the left trim panel for
securing small objects such as a folding
umbrella
>Net for small objects on the right trim panel
of the cargo bay
>Retaining straps next to the rear lashing
eyes, e.g. for securing an umbrella
>Folding, removable box
* under the floor
panel, e.g. for wet or dirty items
>Stowage compartment under the floor
panel
>Insertable dividers
* and removable storage
tray for the storage compartment under the
floor panel
>Drawer for storing small items. Pull the han-
dle firmly to release the drawer. If neces-
sary, you can pull out the drawer entirely,
refer to the information below
Do not drive or close the luggage com-
partment lid while the drawer is pulled
out.
On uphill gradients, release the drawer with
caution, otherwise it could slide out on its own
and cause injury.
Do not exceed a maximum load of 11 lbs/5 kg
for the drawer, otherwise damage could
result.<
Removing the drawer
1.Push the drawer all the way in.
2.Turn the catches on the left and right all the
way out.
Page 119 of 274

Controls
117Reference
At a glance
Driving tips
Communications
Navigation
Entertainment
Mobility
Lashing eyes
You will find lashing eyelets in the cargo bay for
securing luggage items with nets or tensioning
straps, refer to page124.
Ski bag*
The ski bag is designed for safe, clean transport
of up to 4 pairs of standard skis or up to
2snowboards.
With the ski bag you can stow skis with a length
of up to 6ft 10in/2.10m. When skis of 6ft 10in/
2.10 m length are loaded, the overall capacity of
the ski bag is reduced due to its tapered design.
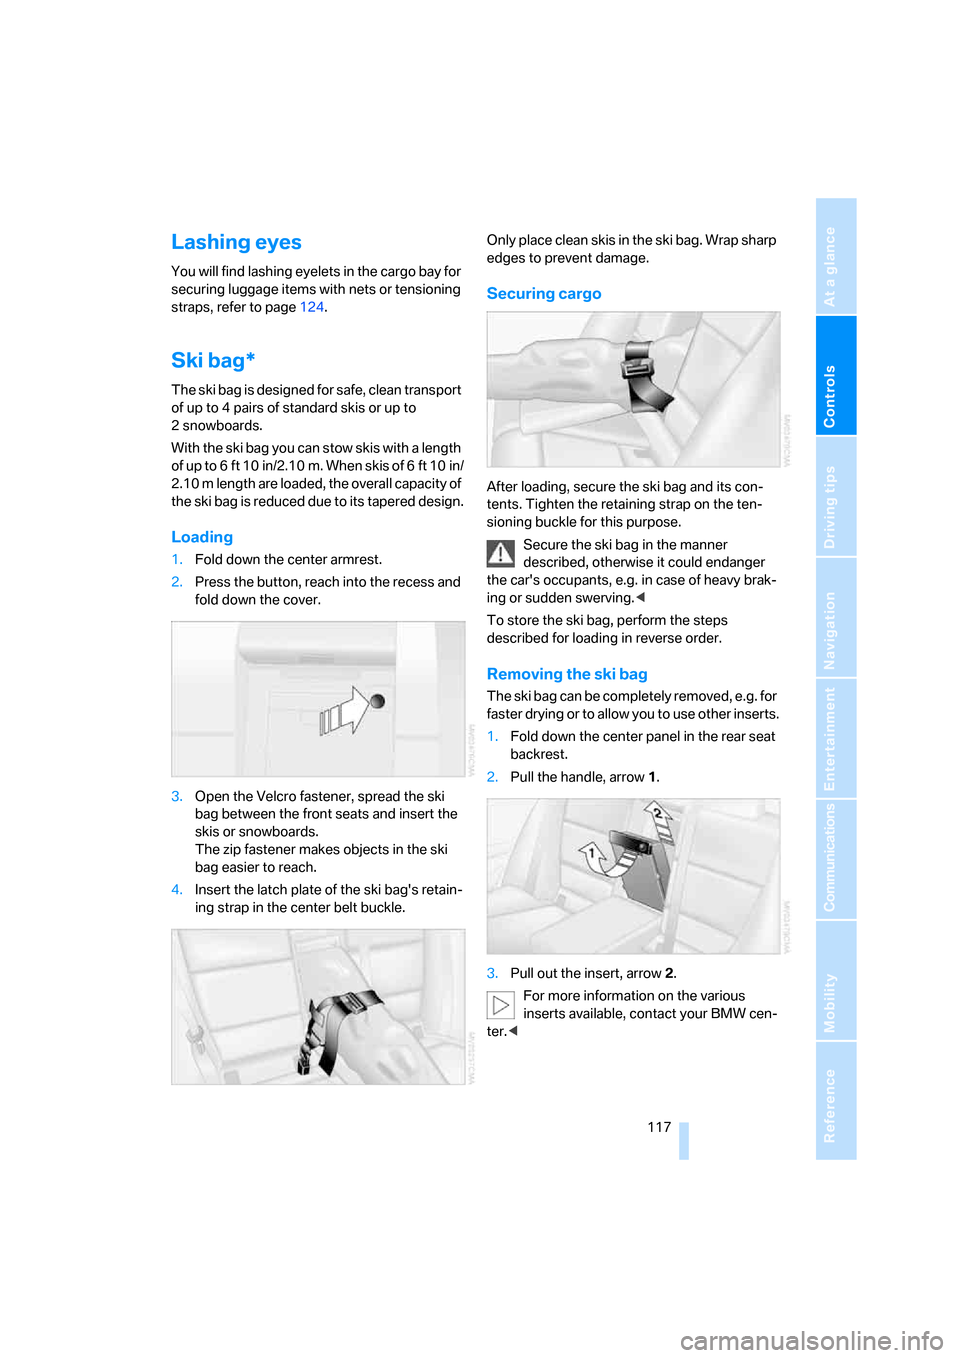
Loading
1.Fold down the center armrest.
2.Press the button, reach into the recess and
fold down the cover.
3.Open the Velcro fastener, spread the ski
bag between the front seats and insert the
skis or snowboards.
The zip fastener makes objects in the ski
bag easier to reach.
4.Insert the latch plate of the ski bag's retain-
ing strap in the center belt buckle.Only place clean skis in the ski bag. Wrap sharp
edges to prevent damage.
Securing cargo
After loading, secure the ski bag and its con-
tents. Tighten the retaining strap on the ten-
sioning buckle for this purpose.
Secure the ski bag in the manner
described, otherwise it could endanger
the car's occupants, e.g. in case of heavy brak-
ing or sudden swerving.<
To store the ski bag, perform the steps
described for loading in reverse order.
Removing the ski bag
The ski bag can be completely removed, e.g. for
faster drying or to allow you to use other inserts.
1.Fold down the center panel in the rear seat
backrest.
2.Pull the handle, arrow1.
3.Pull out the insert, arrow 2.
For more information on the various
inserts available, contact your BMW cen-
ter.<
Page 265 of 274

Reference 263
At a glance
Controls
Driving tips
Communications
Navigation
Entertainment
Mobility
Passenger-side mirror tilt
function49
"Pathway lighting"97
Pathway lighting97
"PDC"85
PDC Park Distance Control85
Personal Profile28
"Perspective"145
Phone book187
Phone numbers
– deleting from phone
book191
– dialing189
– most recent numbers190
– selecting in phone book190
– Top 8190
Pinch protection system
– glass roof, electric40
– panorama glass roof41
– windows39
Placing a call, refer to
telephone owner's manual
"Play" for satellite radio167
Pollen
– refer to Microfilter/activated-
charcoal filter for automatic
climate control104
Position
– displaying151
– saving, refer to Storing
current position139
Power failure234
Power windows38
– safety switch39
Power windows, refer to
Windows38
"Presets", displaying with the
radio160
"Presets" for satellite
radio167
Pressure, tires208
Pressure monitoring, tires89
– Flat Tire Monitor89
Pressure monitoring of tires,
refer to Tire Pressure
Monitor TPM90
"Profile"203
Programmable buttons on the
steering wheel11Programmable memory
keys21
Protection function, refer to
Pinch protection system
– glass roof, electric40
– panorama glass roof41
– windows39
Providing medical assistance,
refer to First add pouch236
Puncture
– Flat Tire Monitor89
R
Radio
– autostore161
– controls156
– High Definition Radio163
– listening to stations160
– regional programs163
– sampling stations161
– satellite radio166
– selecting a
waveband156,160
– selecting the frequency
manually161
– station search161
– stations with best
reception161
– storing stations162
– switching on/off156
– tone control157
– volume157
Radio position, refer to Radio
readiness56
Radio readiness56
– switched off56
– switched on56
Radio-remote key, refer to
Remote control with
integrated key28
Rain sensor61
"Random", refer to Random
play172
"Random all" for audio
mode173
"Random directory" for audio
mode173
Random play172"RDS" Radio Data
System163
Reading lamps99
Rear lamps, refer to Tail
lamps231
– replacing bulb232
Rear seat backrest,
folding114
Rear seats
– adjusting head restraints46
– folding114
– folding down
backrests113,114
– folding head restraint down
and up46
Rear turn signals
– replacing bulb232
Rear ventilation104
Rearview mirror, refer to
Mirrors49
Rear window
– cleaning62
– opening35
Rear window blind, refer to
Roller sun blinds109
Rear window defroster103
Rear window safety switch39
Rear window wiper62
– changing rear wiper
blade229
"Received calls"190
Receiving level of mobile
phone, refer to Status
information20
Recirculated-air mode102
Recirculation of air, refer to
Recirculated-air mode102
Reclining seat, refer to
Backrest44
Recording times, refer to
Stopwatch83
"Redial" for mobile phone190
Refueling206
Releasing
– hood221
Remaining distance, refer to
Cruising range73