2008 BMW 328XI CONVERTIBLE bst
[x] Cancel search: bstPage 41 of 272

Controls
39Reference
At a glance
Driving tips
Communications
Navigation
Entertainment
Mobility
Convertible: jointly
>Press the switch to the resistance point:
All windows open as long as you press the
switch.
>Press the switch beyond the resistance
point:
All windows open automatically. Press the
switch again to stop the opening move-
ment.
>Pull the switch:
All windows close as long as you pull the
switch.
After switching off the ignition
When the remote control is removed or the igni-
tion is switched off, you can still operate the
windows for approx. 1 minute as long as no
door is opened.
For information on convenient operation via the
remote control or the door lock, refer to page29
or32. For information on closing with conve-
nient access, refer to Locking on page30.
Pinch protection system
If the closing force exceeds a specific value as a
window closes, the closing action is interrupted
and the window reopens slightly.
Despite the pinch protection system
check and clear the window's travel path
prior to closing it, otherwise the safety system
might fail to detect certain kinds of obstruc-
tions, such as thin objects, and the window
would continue closing.
Do not install any accessories that might inter-
fere with window movement. Otherwise the
pinch protection system could be impaired.
Convertible: the rear windows are not equipped with pinch protection. Therefore, watch them
closely when closing to avoid personal injury.<
Closing without pinch protection
If there is an external danger, or if ice on the win-
dows, etc., prevents you from closing the win-
dows normally, proceed as follows:
1.Pull the switch past the resistance point and
hold it there. Pinch protection is limited and
the window reopens slightly if the closing
force exceeds a certain value.
2.Pull the switch again past the resistance
point within approx. 4 seconds and hold it
there. The window closes without pinch
protection.
Coupe: glass roof*, electric
To prevent injuries, watch the glass roof
while closing it.
Take the remote control with you when you
leave the car, otherwise children could operate
the roof and possibly injure themselves.<
Raising
Press the switch.
>The closed glass roof is raised and the slid-
ing visor opens slightly.
>The open glass roof automatically travels
into the raised position. The sliding visor
remains completely open.
Opening, closing
>Press the switch backwards to the resis-
tance point.
The glass roof and the sliding visor open
Page 42 of 272

Opening and closing
40 together as long as you hold the switch in
this position.
>Press the switch backwards past the resis-
tance point.
The glass roof and the sliding visor open
automatically. Briefly press the switch again
to stop the opening movement.
You can close the glass roof in a similar manner
by pressing the switch forwards. The sliding
visor remains open and can be closed by hand.
For information on convenient operation via the
remote control or door lock, refer to page29
or32.
After switching off the ignition
When the remote control is removed or the igni-
tion is switched off, you can still operate the roof
for approx. 1 minute as long as no door has
been opened.
Pinch protection system
If the glass roof encounters an obstruction dur-
ing closing from approximately the middle of
the opening in the roof, or during closing from
the raised position, the closing movement is
interrupted and the glass roof is opened again
slightly.
Despite the pinch protection system
check and clear the roof's travel path prior
to closing it, otherwise the safety system might
fail to detect certain kinds of obstructions, such
as very thin objects, and the roof would con-
tinue closing.<
Closing without pinch protection
If there is an external danger, press the switch
forward past the resistance point. The roof
closes without pinch protection.
Following interruptions in electrical
power supply
After a power failure, there is a possibility that
the glass roof can only be raised. The system
must be initialized. BMW recommends having
this work done by your BMW center.
Closing manually*
In the event of an electrical malfunction, you can
move the glass roof manually:
1.Unclip the front of the cover of the interior
lamps using the screwdriver from the
onboard tool kit, refer to page231.
2.Insert the screwdriver into the openings on
each side to press the clips.
3.Remove the control unit.
4.Unplug the motor. Considerably less effort
will be required for manual operation.
5.Insert the Allen wrench
* supplied with the
onboard tool kit, refer to page231, into the
Page 47 of 272

Controls
45Reference
At a glance
Driving tips
Communications
Navigation
Entertainment
Mobility
Adjustments
Sitting safely
The ideal sitting position can make a vital con-
tribution to relaxed, fatigue-free driving. In con-
junction with the safety belts, the head
restraints and the airbags, the seated position
has a major influence on your safety in the event
of an accident. To ensure that the safety sys-
tems operate with optimal efficiency, we
strongly urge you to observe the instructions
contained in the following section.
For additional information on transporting chil-
dren safely, refer to page56.
Airbags
Always maintain an adequate distance
between yourself and the airbags. Always
grip the steering wheel on the rim, with your
hands in the 3 o'clock and 9 o'clock positions,
to minimize the risk of injury to the hands or
arms in the event of the airbag being triggered
off.
No one and nothing is to come between the air-
bags and the seat occupant.
Do not use the cover of the front airbag on the
front passenger side as a storage area. Make
sure that the front passenger is sitting correctly,
e.g. not resting feet or legs on the dashboard,
otherwise leg injuries can occur if the front air-
bag is triggered.
Make sure that passengers do not lean their
heads against the side or head airbags, other-
wise serious injuries could result if the airbags
suddenly deployed.<
Even if you follow all the instructions, injuries
resulting from contact with airbags cannot be
fully excluded, depending on the circum-
stances. The ignition and inflation noise may
provoke a mild hearing loss in extremely sensi-
tive individuals. This effect is usually only tem-
porary.
For airbag locations and additional information
on airbags, refer to page97.
Head restraint
A correctly adjusted head restraint reduces the
risk of neck injury in the event of an accident.
Adjust the head restraint in such a way
that its center is at approx. ear level. Oth-
erwise, there is an increased risk of injury in the
event of an accident.<
Head restraints, refer to page47.
Safety belt
Before every drive, make sure that all occupants
wear their safety belts. Airbags complement the
safety belt as an additional safety device, but
they do not represent a substitute.
Your vehicle has four seats, each of which is
equipped with a safety belt.
Never allow more than one person to
wear a single safety belt. Never allow
infants or small children to ride in a passenger's
lap. Make sure that the belt in the lap area sits
low across the hips and does not press against
the abdomen.
The safety belt must not rest against the throat,
run across sharp edges, pass over hard or frag-
ile objects or be pinched. Fasten the safety belt
so that it sits as snugly as possible against the
lap and shoulder without being twisted. Other-
wise the belt could slide over your hips and
injure your abdomen in the event of a frontal
collision.
Avoid wearing bulky clothing and regularly pull
the belt in the upper-body area taut, otherwise
its restraining effect could be impaired.<
Safety belts, refer to page51.
Seats
Note before adjusting
Never attempt to adjust your seat while
the vehicle is moving. The seat could
respond with unexpected movement, and the
ensuing loss of vehicle control could lead to an
Page 52 of 272
Adjustments
50 To switch off:
Press button longer.
If you continue driving within approx. the next
15 minutes, the seat heating is automatically
activated at the previously set temperature.
The temperature is lowered or the heating is
switched off entirely to save on battery power.
The LEDs stay lit.
Seat and mirror memory*
You can store and call up two different combi-
nations of driver's-seat and exterior-mirror
positions.
Settings for the backrest width and lumbar sup-
port are not stored in memory.
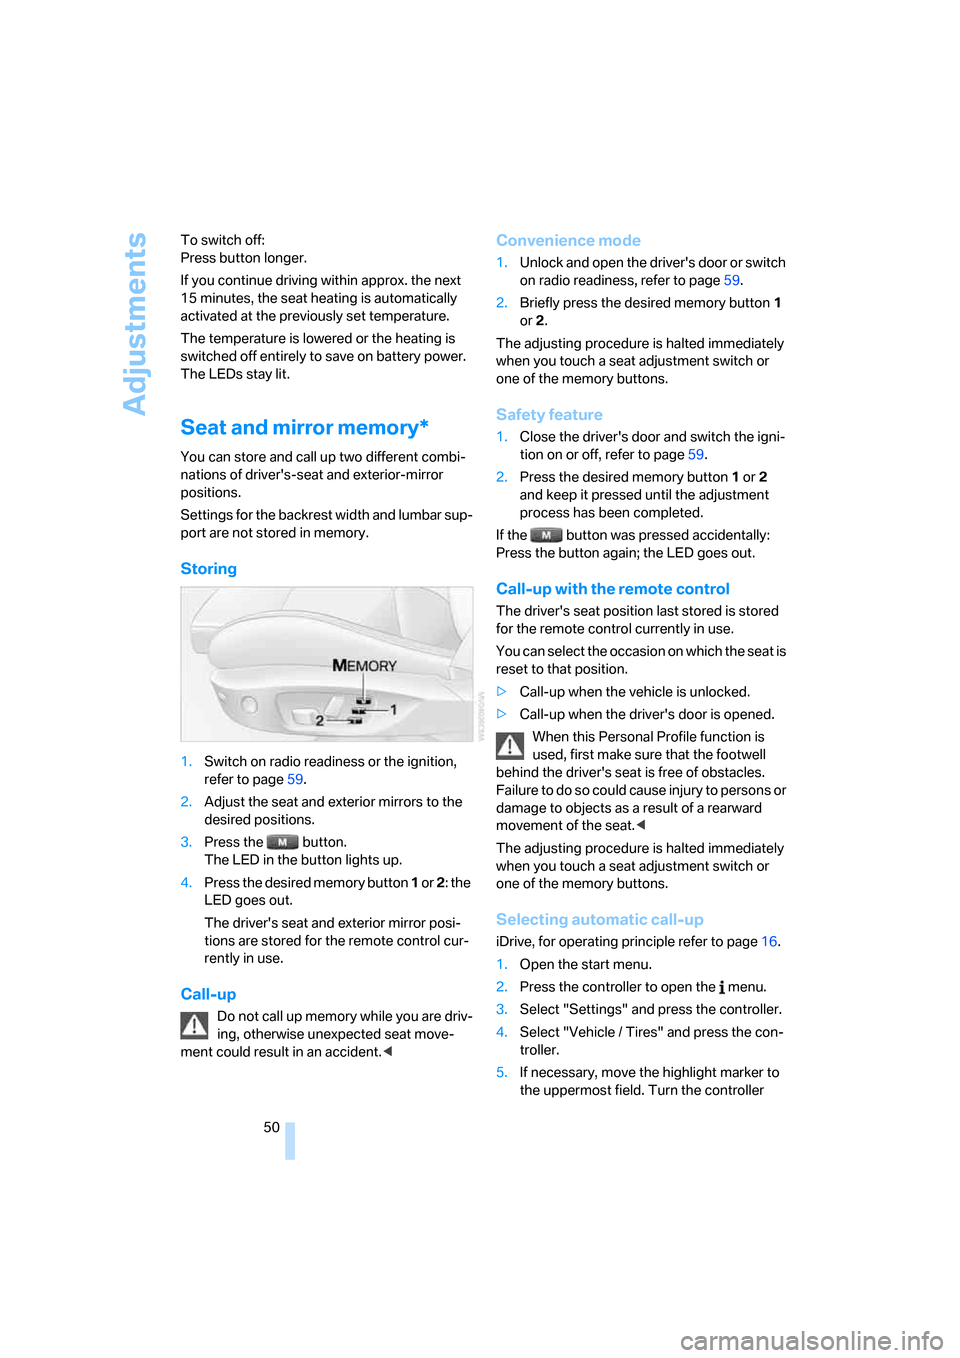
Storing
1.Switch on radio readiness or the ignition,
refer to page59.
2.Adjust the seat and exterior mirrors to the
desired positions.
3.Press the button.
The LED in the button lights up.
4.Press the desired memory button 1 or 2: the
LED goes out.
The driver's seat and exterior mirror posi-
tions are stored for the remote control cur-
rently in use.
Call-up
Do not call up memory while you are driv-
ing, otherwise unexpected seat move-
ment could result in an accident.<
Convenience mode
1.Unlock and open the driver's door or switch
on radio readiness, refer to page59.
2.Briefly press the desired memory button1
or 2.
The adjusting procedure is halted immediately
when you touch a seat adjustment switch or
one of the memory buttons.
Safety feature
1.Close the driver's door and switch the igni-
tion on or off, refer to page59.
2.Press the desired memory button1 or2
and keep it pressed until the adjustment
process has been completed.
If the button was pressed accidentally:
Press the button again; the LED goes out.
Call-up with the remote control
The driver's seat position last stored is stored
for the remote control currently in use.
You can select the occasion on which the seat is
reset to that position.
>Call-up when the vehicle is unlocked.
>Call-up when the driver's door is opened.
When this Personal Profile function is
used, first make sure that the footwell
behind the driver's seat is free of obstacles.
Failure to do so could cause injury to persons or
damage to objects as a result of a rearward
movement of the seat.<
The adjusting procedure is halted immediately
when you touch a seat adjustment switch or
one of the memory buttons.
Selecting automatic call-up
iDrive, for operating principle refer to page16.
1.Open the start menu.
2.Press the controller to open the menu.
3.Select "Settings" and press the controller.
4.Select "Vehicle / Tires" and press the con-
troller.
5.If necessary, move the highlight marker to
the uppermost field. Turn the controller
Page 53 of 272

Controls
51Reference
At a glance
Driving tips
Communications
Navigation
Entertainment
Mobility
until "Door locks" is selected and press the
controller.
6.Select "Central locking" and press the con-
troller.
7.Select "Last seat pos." and press the con-
troller.
8.Select "After unlocking" or "After door
opened".
9.Press the controller.
Switching off automatic call-up
Select "Deactivated" and press the controller.
Safety belts
Observe the adjustment instructions on
page45 to ensure the best possible per-
sonal protection.<
Before every drive, make sure that all occupants
wear their safety belts. Airbags complement the
safety belt as an additional safety device, but
they do not represent a substitute.
Closing
Make sure you hear the latch plate engage in
the belt buckle.
The upper belt anchor is suitable for adults of
any stature as long as the seat is adjusted prop-
erly, refer to page45.
Opening
1.Grasp the belt firmly.
2.Press the red button in the buckle.
3.Guide the belt into its reel.
'Fasten safety belts' reminder for front
seats
The indicator lamp comes on and an
acoustic signal sounds. In addition, a
message appears on the Control Dis-
play. Check whether the safety belt
has been fastened correctly.
The 'Fasten safety belts' reminder is issued as
long as the driver's safety belt has not been fas-
tened. The 'Fasten safety belts' reminder is also
activated at road speeds above approx. 5 mph
or 8 km/h if the front passenger's safety belt is
not fastened, if objects are placed on the front
passenger seat, or if driver or front passenger
unfasten their safety belts.
Damage to safety belts
If the safety belts are damaged or
stressed in an accident: have the belt sys-
tem, including any belt tensioners or child-
restraint systems, replaced and the belt
anchors checked. Have this work done only by
your BMW center or at a workshop that works
according to BMW repair procedures with cor-
Page 70 of 272

Driving
68 the distance to be maintained from the vehicle
in front in four stages. For safety reasons, the
distance is speed-dependent. Based on your
selected distance setting, the system automat-
ically decreases the throttle setting and lightly
applies the brakes if necessary. The vehicle
brake lamps will automatically illuminate to sig-
nal a following driver to take action. In addition,
it may be necessary for the vehicle or the driver
to downshift, depending on the kind of trans-
mission your vehicle is equipped with, to main-
tain the distance setting selected. If the vehicle
ahead speeds up or when the lane ahead
becomes clear, your vehicle will accelerate to
the speed you have selected by increasing the
throttle setting and shifting gears automatically
or by the driver as needed. Your selected speed
will be held when driving downhill, too.
Since this active cruise control system is a new
technology and operates differently from con-
ventional cruise control systems which you may
be accustomed to, you are strongly urged to
read all of the pages relating to this system
before use. Pay special attention to the System
limitations section beginning on page71.
Braking sensation
>If you step on the brake pedal while the sys-
tem is braking, pedal sensation will be
slightly different from the usual.
>Possible noises during automatic braking
are normal.
Manual transmission
You can shift gears while cruise control is acti-
vated. An indicator lamp notifies you that you
should shift gears when you drive for an
extended period at very high or very low engine
speeds, or the system is deactivated.
Range of applications
The minimum desired speed is 20 mph or
30 km/h, the maximum desired speed is
110mph or 180km/h.
As with conventional cruise control sys-
tems, active cruise control in no way
diminishes or substitutes for the driver’s own personal responsibility, alertness and aware-
ness in adjusting speed, braking or otherwise
controlling the vehicle. The driver should
decide when to use the system on the basis of
road, traffic, visibility, and weather conditions.
Active cruise control is intended for use on
highway-type roadways where traffic is moving
relatively smoothly. Do not use this system in
city driving; heavy traffic such as during rush
hour; on curvy, winding roads, slippery roads or
roads with sharp curves such as highway off-
ramps; during inclement weather such as snow,
strong rain or fog; or when entering inter-
changes, service/parking areas or toll booths.
It is also important to regulate your vehicle's
speed and distance setting within applicable
legal limits. Always be ready to take action or
apply the brakes if necessary, especially when
the system is actively following a vehicle in front
of you. Otherwise driving situations could result
that pose the risk of accidents.<
One lever for all functions
1Store and increase desired speed
2Store and decrease desired speed
3Deactivate system, refer to page70
4Resume stored desired speed and dis-
tance, refer to page70
5Select distance to vehicle driving ahead,
refer to page69
Storing current speed
Briefly press the lever, arrow 1, or briefly pull it,
arrow 2, at a driving speed of more than approx.
20 mph or 30 km/h.
Page 74 of 272

Driving
72 Active cruise control is not and must not
be used as a collision avoidance/warning
system.<
If while your vehicle is actively following a vehi-
cle in front of you and the vehicle ahead speeds
up or the lane ahead becomes clear, then your
vehicle will accelerate to the speed you have
selected. Be aware that changing to a clear,
unobstructed lane will also result in your vehicle
accelerating.
Be certain to deactivate the system when
you pull into an exit lane for a highway off-
ramp.<
Also, vehicles traveling in a staggered manner
on a highway may cause a delay in the system's
reaction to a vehicle in front of you or may cause
the system to react to a vehicle actually in the
lane next to you. Always be ready to take action
or apply the brakes if necessary.
While active cruise control is capable of
braking your vehicle automatically when
you approach a slower vehicle ahead, it is
important to be aware that the ability of the sys-
tem to apply the brakes is also limited, e.g.
when you reduce your desired speed sharply.
The system cannot stop your vehicle. It uses
only a portion of braking system capacity and
does not utilize the full capacity of the vehicle
braking system. Therefore, the system cannot
decrease your speed for large differences in
speed between your vehicle and the vehicle
ahead. Examples: when you approach a vehicle
traveling at a much lower speed than your own
speed such as approaching a toll booth or when
a much slower vehicle cuts in front of you at
close range.<
Active cruise control can only decelerate the
vehicle to approx. 20 mph or 30 km/h.
Swerving vehicles
When a vehicle moves from an adjacent lane
into your lane, active cruise control will not rec-
ognize this vehicle until it is fully in your lane
ahead of your vehicle.
When a vehicle ahead suddenly swerves
into your lane, the system may not be able
to maintain the selected distance automatically.
This also applies to great differences in speed
between you and vehicles ahead, e.g. when
quickly approaching a truck. There is a risk of
collision. Once the system has established that
a vehicle is indeed in front of you, it will indicate
that you must brake and/or maneuver the vehi-
cle yourself. Take action yourself, otherwise
there is a risk of an accident.<
Behavior in curves
Because of the limited range of the system, it is
possible that in curves or on the peaks and val-
leys of hilly roads, a vehicle ahead may be rec-
ognized late, or not at all. Therefore, it is up to
the driver to select a speed that is prudent in
view of the curves and terrain of the roadway.
Page 91 of 272

Controls
89Reference
At a glance
Driving tips
Communications
Navigation
Entertainment
Mobility
until "PDC" is selected and press the con-
troller.
6.Select "PDC display on" and press the con-
troller.
The PDC screen is activated.
The display is shown on the Control Display as
soon as PDC is activated.
System limitations
Even with PDC, final responsibility for
estimating the distance between the
vehicle and any obstructions always remains
with the driver. Even when sensors are pro-
vided, there is a blind spot in which objects can
no longer be detected. The system is also sub-
ject to the physical limits that apply to all forms
of ultrasonic measurement, such as those
encountered with trailer towbars and hitches,
thin or wedge-shaped objects, etc. Low objects
that have already been displayed, e. g. curbs,
can disappear again from the detection area of
the sensors before or after a continuous tone
sounds. Higher, protruding objects, e.g. ledges,
cannot be detected. Therefore, always drive
cautiously, otherwise there is a risk of personal
injury or property damage.
Loud sound sources outside or inside the car
can drown out the PDC signal.<
Driving stability control
systems
Your BMW has a number of systems that help
to maintain the vehicle's stability even in
adverse driving conditions.
ABS Antilock Brake System
ABS prevents locking of the wheels during
braking. Safe steering response is maintained
even during full braking. Active safety is thus
increased.
The ABS is operational every time you start the
engine. Braking safely, refer to page126.
Electronic brake-force distribution
The system controls the brake pressure in the
rear wheels to ensure stable braking behavior.
DBC Dynamic Brake Control
When you apply the brakes rapidly, this system
automatically produces the maximum braking
force boost and thus helps to achieve the short-
est possible braking distance during full brak-
ing. This system exploits all of the benefits pro-
vided by ABS.
Do not reduce the pressure on the brake for the
duration of the full braking application.
DSC Dynamic Stability Control
DSC prevents the driving wheels from losing
traction when you pull away from rest or accel-
erate. The system also recognizes unstable
driving conditions, for example if the rear of the
car is about to swerve or if momentum is acting
at an angle past the front wheels. In these
cases, DSC helps the vehicle maintain a safe
course within physical limits by reducing engine
output and through braking actions at the indi-
vidual wheels.
The laws of physics cannot be repealed,
even with DSC. An appropriate driving
style always remains the responsibility of the
driver. Therefore, do not reduce the additional
safety margin again by taking risks, as this could
result in an accident.<