2008 BMW 328I windshield
[x] Cancel search: windshieldPage 13 of 272

At a glance
11Reference
Controls
Driving tips
Communications
Navigation
Entertainment
Mobility
9Instrument cluster12
12Ignition lock59
13Buttons
* on the steering wheel14Horn: the entire surface
15Adjusting the steering wheel53
17Releasing the hood224
18Opening the luggage compartment lid
*
8
Turn signals63
High beams, headlamp
flasher102
Roadside parking lamps
*102
Computer75
Settings and information about the
vehicle78
Instrument lighting103
10
Windshield wipers64
Rain sensor
*64
11Switching the ignition on/off and
starting/stopping the engine59
Telephone
*:
>Press: accepting and ending a
call, starting dialing
* selected
phone numbers. Redialing if
no phone number is selected
>Press longer: redialing
Volume
Changing radio station
Selecting music track
Scrolling through phone book and
lists with stored phone numbers
Individually programmable54
Individually programmable54
16
Cruise control*66
Active cruise control
*67
Page 17 of 272
At a glance
15Reference
Controls
Driving tips
Communications
Navigation
Entertainment
Mobility
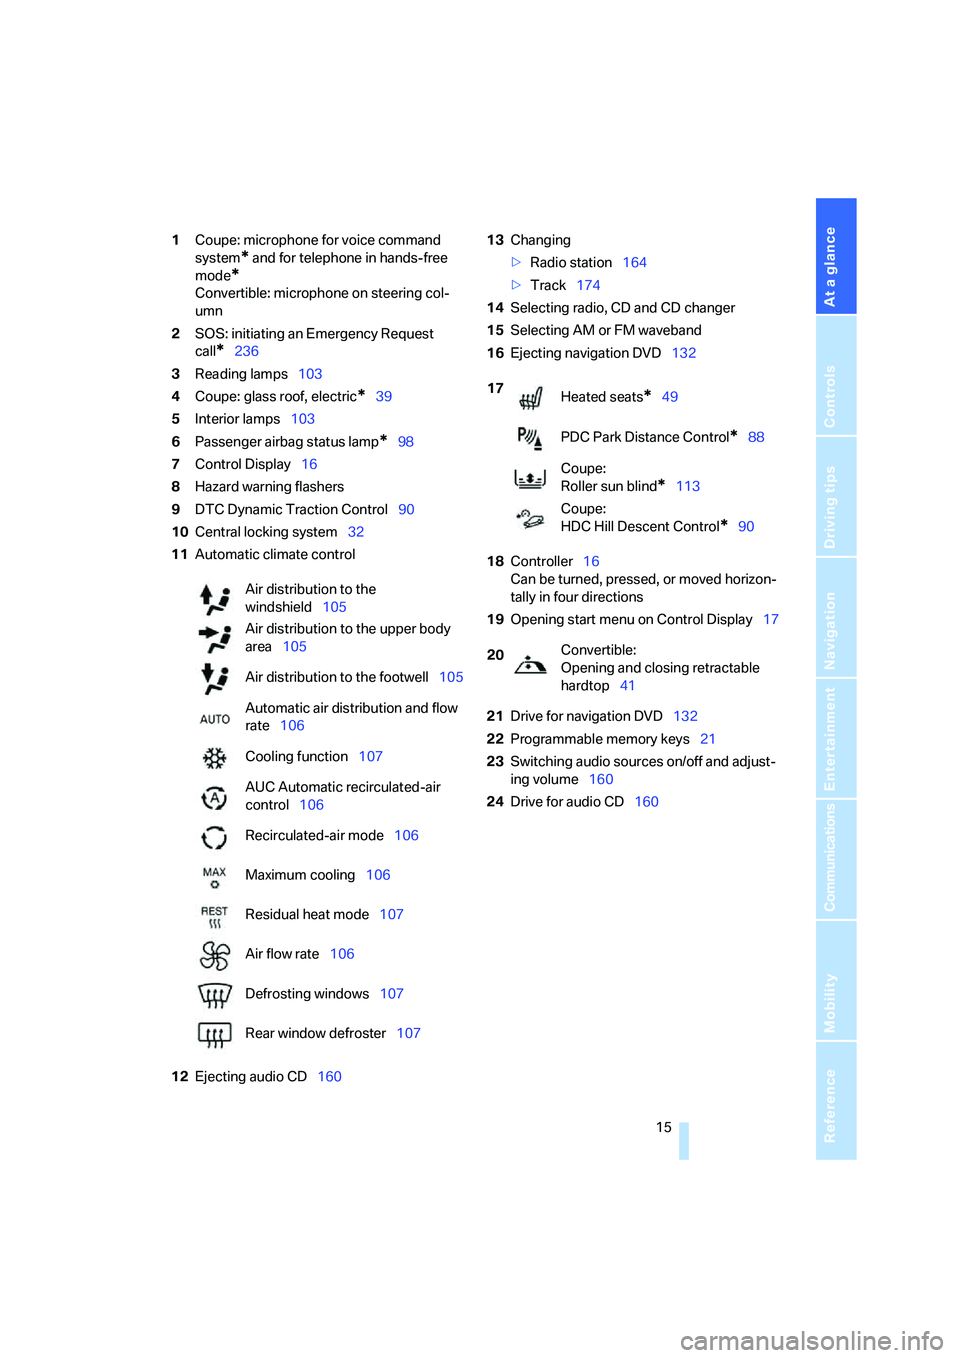
1Coupe: microphone for voice command
system
* and for telephone in hands-free
mode
*
Convertible: microphone on steering col-
umn
2SOS: initiating an Emergency Request
call
*236
3Reading lamps103
4Coupe: glass roof, electric
*39
5Interior lamps103
6Passenger airbag status lamp
*98
7Control Display16
8Hazard warning flashers
9DTC Dynamic Traction Control90
10Central locking system32
11Automatic climate control
12Ejecting audio CD16013Changing
>Radio station164
>Track174
14Selecting radio, CD and CD changer
15Selecting AM or FM waveband
16Ejecting navigation DVD132
18Controller16
Can be turned, pressed, or moved horizon-
tally in four directions
19Opening start menu on Control Display17
21Drive for navigation DVD132
22Programmable memory keys21
23Switching audio sources on/off and adjust-
ing volume160
24Drive for audio CD160 Air distribution to the
windshield105
Air distribution to the upper body
area105
Air distribution to the footwell105
Automatic air distribution and flow
rate106
Cooling function107
AUC Automatic recirculated-air
control106
Recirculated-air mode106
Maximum cooling106
Residual heat mode107
Air flow rate106
Defrosting windows107
Rear window defroster107
17
Heated seats*49
PDC Park Distance Control
*88
Coupe:
Roller sun blind
*113
Coupe:
HDC Hill Descent Control
*90
20Convertible:
Opening and closing retractable
hardtop41
Page 44 of 272
Opening and closing
42
Opening and closing
When the vehicle is stationary and at radio
readiness or beyond, refer to page59:
If possible, conserve the battery by only
operating the retractable hardtop when
the engine is running.
Before closing the retractable hardtop, remove
all foreign objects from the windshield frame as
these could prevent the hardtop from closing
properly.<
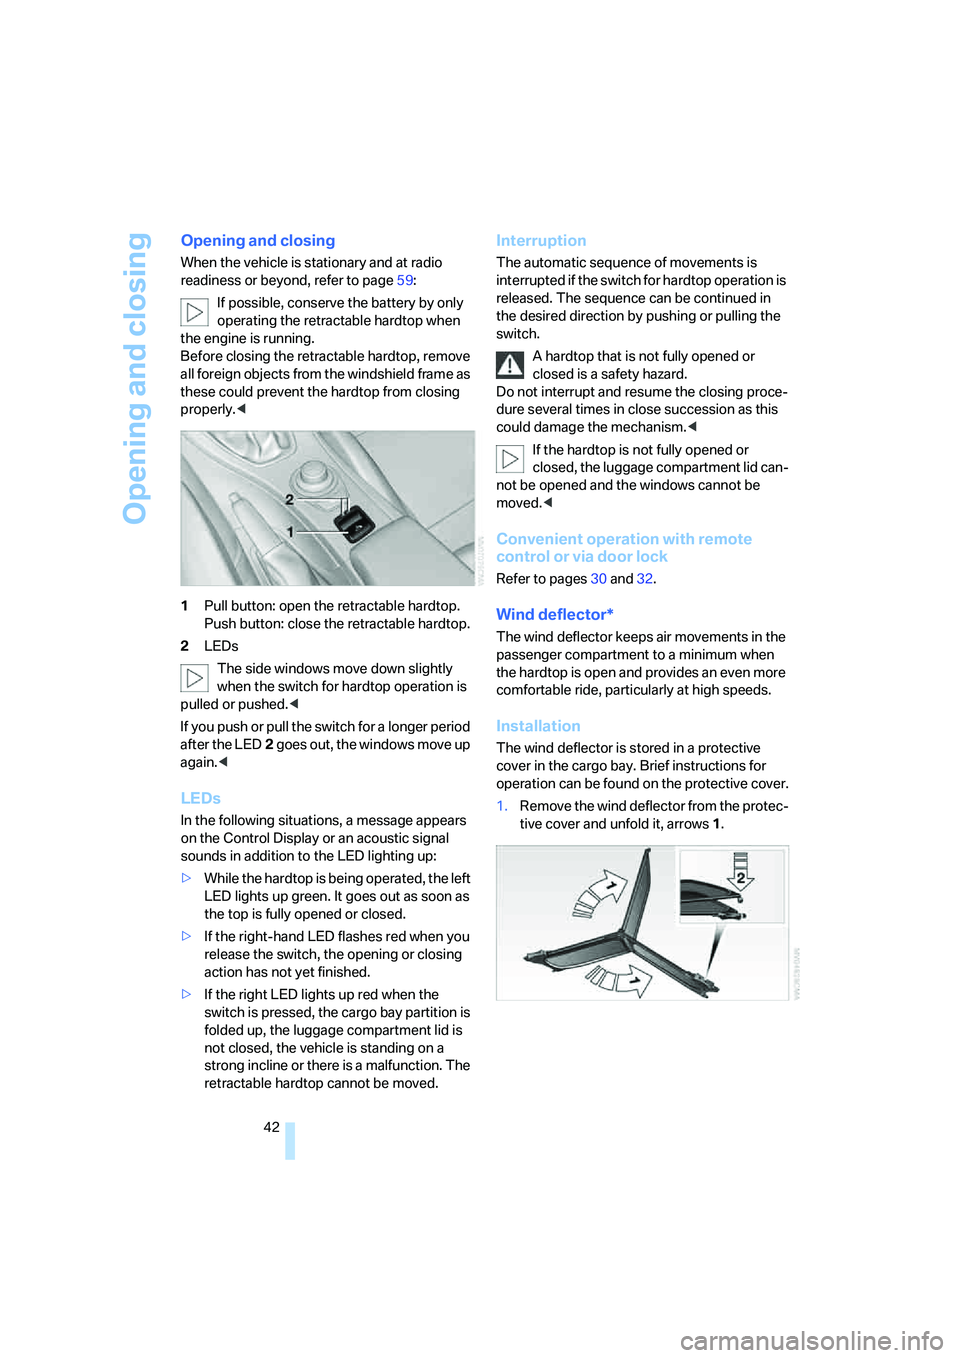
1Pull button: open the retractable hardtop.
Push button: close the retractable hardtop.
2LEDs
The side windows move down slightly
when the switch for hardtop operation is
pulled or pushed.<
If you push or pull the switch for a longer period
after the LED2 goes out, the windows move up
again.<
LEDs
In the following situations, a message appears
on the Control Display or an acoustic signal
sounds in addition to the LED lighting up:
>While the hardtop is being operated, the left
LED lights up green. It goes out as soon as
the top is fully opened or closed.
>If the right-hand LED flashes red when you
release the switch, the opening or closing
action has not yet finished.
>If the right LED lights up red when the
switch is pressed, the cargo bay partition is
folded up, the luggage compartment lid is
not closed, the vehicle is standing on a
strong incline or there is a malfunction. The
retractable hardtop cannot be moved.
Interruption
The automatic sequence of movements is
interrupted if the switch for hardtop operation is
released. The sequence can be continued in
the desired direction by pushing or pulling the
switch.
A hardtop that is not fully opened or
closed is a safety hazard.
Do not interrupt and resume the closing proce-
dure several times in close succession as this
could damage the mechanism.<
If the hardtop is not fully opened or
closed, the luggage compartment lid can-
not be opened and the windows cannot be
moved.<
Convenient operation with remote
control or via door lock
Refer to pages30 and32.
Wind deflector*
The wind deflector keeps air movements in the
passenger compartment to a minimum when
the hardtop is open and provides an even more
comfortable ride, particularly at high speeds.
Installation
The wind deflector is stored in a protective
cover in the cargo bay. Brief instructions for
operation can be found on the protective cover.
1.Remove the wind deflector from the protec-
tive cover and unfold it, arrows 1.
Page 55 of 272
Controls
53Reference
At a glance
Driving tips
Communications
Navigation
Entertainment
Mobility
folded out automatically at a speed of approx.
25 mph/40 km/h.
Before entering an automatic car wash,
fold in the exterior mirrors by hand or with
button3, to prevent them from being damaged
due to the width of the vehicle.<
Automatic heating
Both exterior mirrors are heated automatically
while the engine is running or the ignition is
switched on.
Passenger-side mirror tilt function –
automatic curb monitor*
Activating
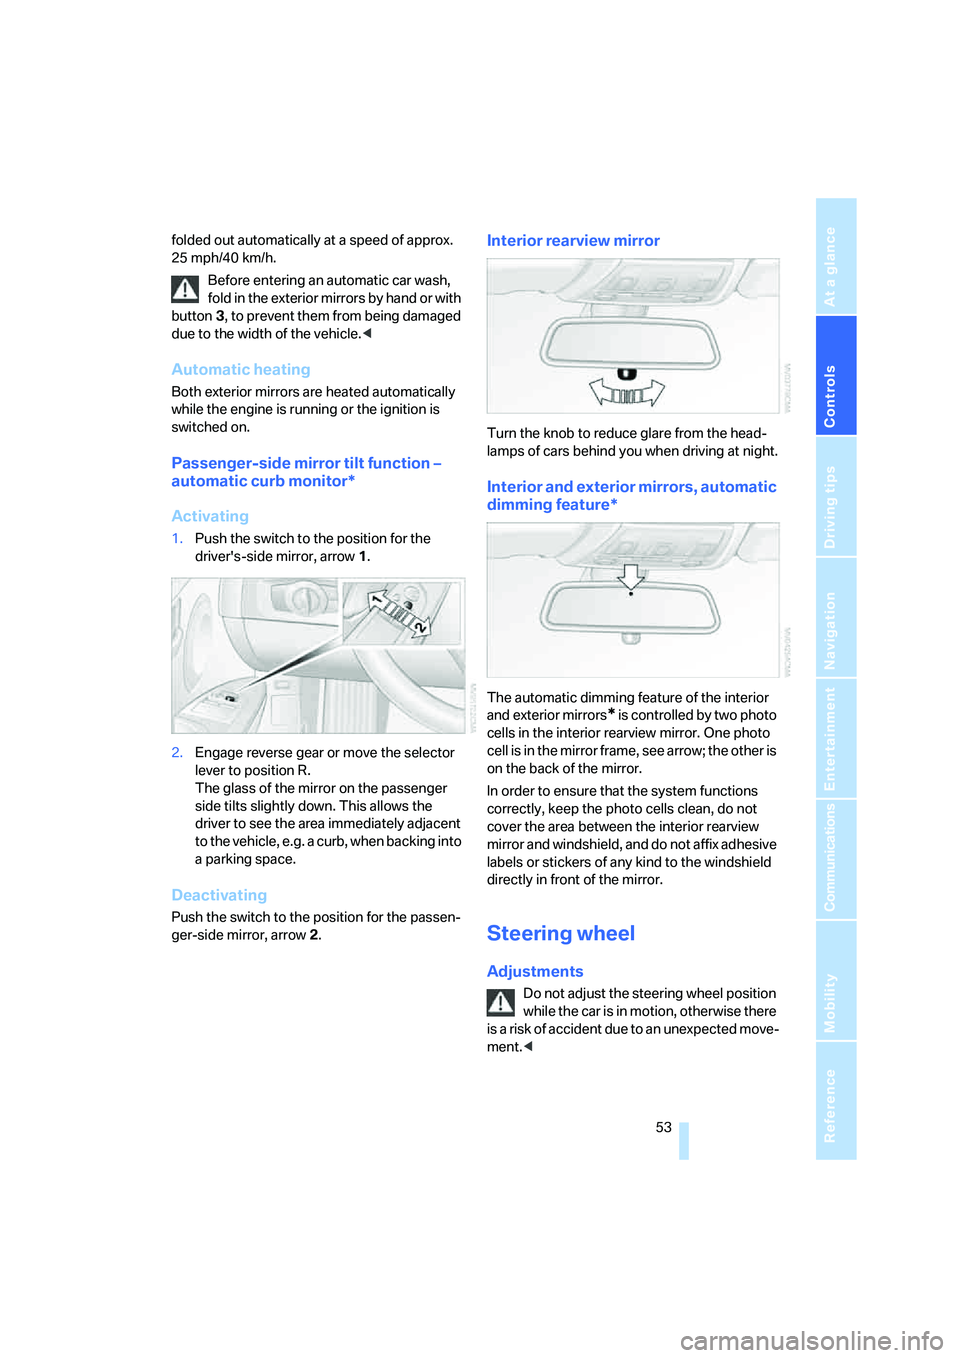
1.Push the switch to the position for the
driver's-side mirror, arrow 1.
2.Engage reverse gear or move the selector
lever to position R.
The glass of the mirror on the passenger
side tilts slightly down. This allows the
driver to see the area immediately adjacent
to the vehicle, e.g. a curb, when backing into
a parking space.
Deactivating
Push the switch to the position for the passen-
ger-side mirror, arrow 2.
Interior rearview mirror
Turn the knob to reduce glare from the head-
lamps of cars behind you when driving at night.
Interior and exterior mirrors, automatic
dimming feature*
The automatic dimming feature of the interior
and exterior mirrors
* is controlled by two photo
cells in the interior rearview mirror. One photo
cell is in the mirror frame, see arrow; the other is
on the back of the mirror.
In order to ensure that the system functions
correctly, keep the photo cells clean, do not
cover the area between the interior rearview
mirror and windshield, and do not affix adhesive
labels or stickers of any kind to the windshield
directly in front of the mirror.
Steering wheel
Adjustments
Do not adjust the steering wheel position
while the car is in motion, otherwise there
i s a ri s k o f a c c id e n t du e t o a n un e x p e ct e d m o v e -
ment.<
Page 66 of 272
Driving
64 Unusually rapid flashing of the indicator
lamp indicates that a turn signal indicator
has failed.<
Indicating a turn briefly
Press the lever as far as the resistance point for
as long as you wish to indicate a turn.
Triple turn signal activation
Press the lever as far as the resistance point.
The turn signals flash three times.
You can activate or deactivate this function.
iDrive, for operating principle refer to page16.
1.Open the start menu.
2.Press the controller to open the menu.
3.Select "Settings" and press the controller.
4.Select "Vehicle / Tires" and press the con-
troller.
5.If necessary, move the highlight marker to
the uppermost field. Turn the controller
until "Lighting" is selected and press the
controller.
6.Select "Triple turn signal" and press the
controller.
Triple turn signaling is activated.
The setting is stored for the remote control cur-
rently in use.
Wiper system
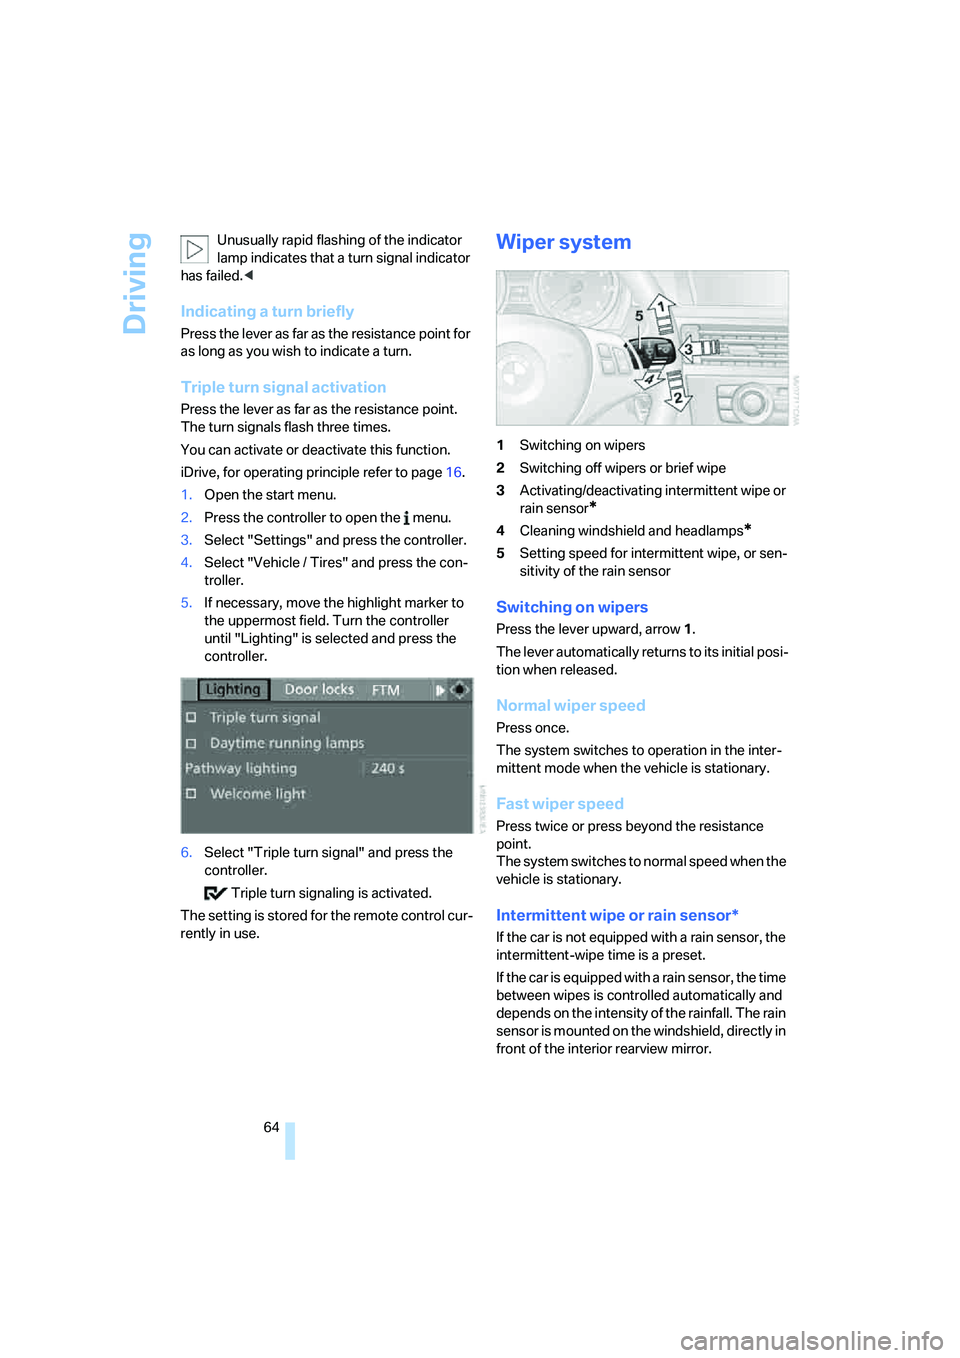
1Switching on wipers
2Switching off wipers or brief wipe
3Activating/deactivating intermittent wipe or
rain sensor
*
4Cleaning windshield and headlamps*
5Setting speed for intermittent wipe, or sen-
sitivity of the rain sensor
Switching on wipers
Press the lever upward, arrow 1.
The lever automatically returns to its initial posi-
tion when released.
Normal wiper speed
Press once.
The system switches to operation in the inter-
mittent mode when the vehicle is stationary.
Fast wiper speed
Press twice or press beyond the resistance
point.
The system switches to normal speed when the
vehicle is stationary.
Intermittent wipe or rain sensor*
If the car is not equipped with a rain sensor, the
intermittent-wipe time is a preset.
If the car is equipped with a rain sensor, the time
between wipes is controlled automatically and
depends on the intensity of the rainfall. The rain
sensor is mounted on the windshield, directly in
front of the interior rearview mirror.
Page 67 of 272

Controls
65Reference
At a glance
Driving tips
Communications
Navigation
Entertainment
Mobility
Activating intermittent wipe or rain
sensor
Press the button, arrow3. The LED in the but-
ton lights up.
Setting speed for intermittent wipe or
sensitivity of the rain sensor
Turn knurled wheel5 up or down.
Deactivating intermittent wipe or rain
sensor
Press the button again, arrow3.
The LED goes out.
Deactivate the rain sensor before enter-
ing an automatic car wash. Failure to do
so could result in damage caused by undesired
wiper activation.<
Cleaning windshield and headlamps*
Pull the lever, arrow 4.
Washer fluid is sprayed onto the windshield and
the wipers are operated for a short time.
When the vehicle lighting system is switched
on, the headlamps are cleaned at regular and
appropriate intervals.
Do not use the washers if there is any
danger that the fluid will freeze on the
windshield. If you do, your vision could be
obscured. Antifreeze should therefore be
added to the fluid, refer to Washer fluid.
Do not use the washers when the washer fluid
reservoir is empty, otherwise you will damage
the washer pump.<
Windshield washer nozzles
The windshield washer nozzles are heated
automatically while the engine is running or the
ignition is switched on.
Washer fluid
Washer fluid antifreeze is flammable.
Therefore, keep it away from ignition
sources and only store it in the closed original
container that is kept out of reach of children,
otherwise there is a risk of personal injury.
Comply with the instructions on the con-
tainer.<
Washer fluid filler neck
Only refill washer fluid when the engine is
cool to avoid contact with hot engine
parts. Otherwise, fluid spills constitute a fire
hazard and a risk to personal safety.<
All washer nozzles are supplied with washer
fluid by the same reservoir.
Fill with water and, if required, with a washer
antifreeze, according to manufacturer's recom-
mendations.
Mix the water and antifreeze before filling
the washer fluid reservoir to make sure
the correct concentration is maintained.<
Capacity
Approx. 6.3 US quarts/6 liters.
Page 101 of 272
Controls
99Reference
At a glance
Driving tips
Communications
Navigation
Entertainment
Mobility
The protection bars behind the rear head
restraints deploy within fractions of a second.
As a supplementary system to the reinforced
windshield frame, the rollover protection sys-
tem ensures that the necessary headroom is
maintained for all vehicle occupants.
Always keep the area of movement of the
rollover protection system clear.
In minor accidents, you are protected by the
fastened safety belt and, depending on acci-
dent severity, by the safety belt tensioner and
multi-phase airbag retention system.<
Resetting
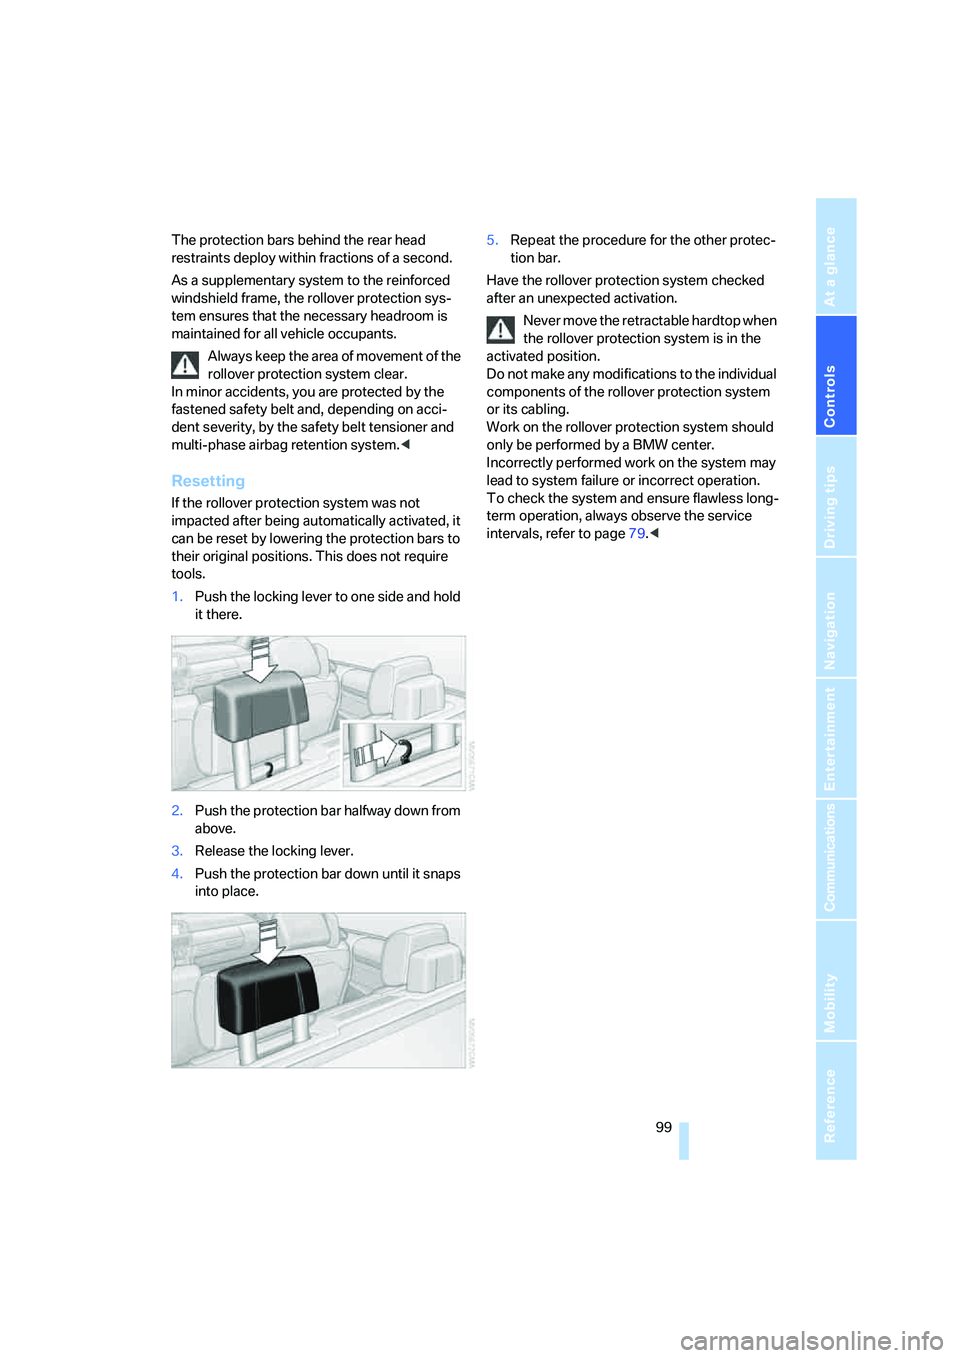
If the rollover protection system was not
impacted after being automatically activated, it
can be reset by lowering the protection bars to
their original positions. This does not require
tools.
1.Push the locking lever to one side and hold
it there.
2.Push the protection bar halfway down from
above.
3.Release the locking lever.
4.Push the protection bar down until it snaps
into place.5.Repeat the procedure for the other protec-
tion bar.
Have the rollover protection system checked
after an unexpected activation.
Never move the retractable hardtop when
the rollover protection system is in the
activated position.
Do not make any modifications to the individual
components of the rollover protection system
or its cabling.
Work on the rollover protection system should
only be performed by a BMW center.
Incorrectly performed work on the system may
lead to system failure or incorrect operation.
To check the system and ensure flawless long-
term operation, always observe the service
intervals, refer to page79.<
Page 106 of 272
Climate
104
Climate
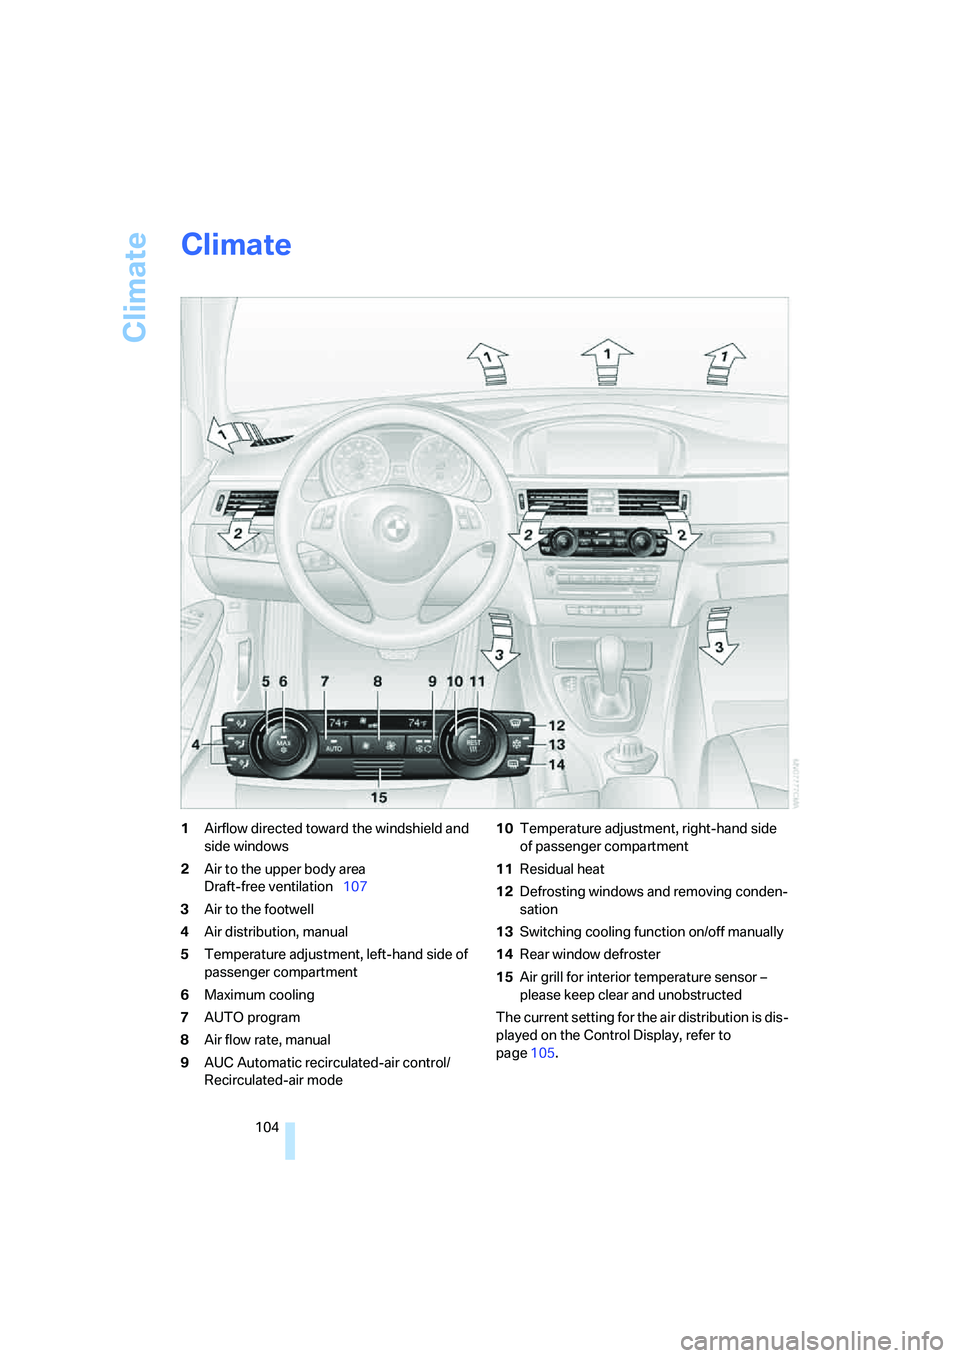
1Airflow directed toward the windshield and
side windows
2Air to the upper body area
Draft-free ventilation107
3Air to the footwell
4Air distribution, manual
5Temperature adjustment, left-hand side of
passenger compartment
6Maximum cooling
7AUTO program
8Air flow rate, manual
9AUC Automatic recirculated-air control/
Recirculated-air mode10Temperature adjustment, right-hand side
of passenger compartment
11Residual heat
12Defrosting windows and removing conden-
sation
13Switching cooling function on/off manually
14Rear window defroster
15Air grill for interior temperature sensor –
please keep clear and unobstructed
The current setting for the air distribution is dis-
played on the Control Display, refer to
page105.