2008 BMW 135I COUPE daytime
[x] Cancel search: daytimePage 31 of 260

Controls
29Reference
At a glance
Driving tips
Communications
Navigation
Entertainment
Mobility
>Settings for the display on the Control Dis-
play and in the instrument cluster:
>12h/24h format of the clock, refer to
page75
>Date format, refer to page76
>Brightness of Control Display, refer to
page79
>Language of Control Display, refer to
page79
>Units of measure for fuel consumption,
distance covered/remaining distances,
and temperature, refer to page70
>Show visual warning for Park Distance Con-
trol PDC, refer to page80
>Light settings:
>Welcome lamps, refer to page91
>Pathway lighting, refer to page92
>Daytime running lamps, refer to page92
>Automatic climate control: AUTO program,
cooling function and automatic recircu-
lated-air control activation/deactivation,
temperature, air flow rate and distribution,
refer to page97
>Entertainment:
>Audio volume, refer to page151
>Tone control, refer to page151
>Speed-dependent volume control, refer
to page151
Central locking system
The concept
The central locking system is ready for opera-
tion whenever the driver's door is closed.
The system simultaneously engages and
releases the locks on the following:
>Doors
>Luggage compartment lid
>Fuel filler door
Operating from outside
>Via the remote control>Via the door lock
>In cars with convenient access
*, via the
handles on the driver's and front passen-
ger's doors
The anti-theft system is also operated at the
same time. It prevents the doors from being
unlocked using the lock buttons or door han-
dles. In addition, if the remote control is used,
the welcome lamps
*, interior lamps and the
door's courtesy lamps
* are switched on or off.
The alarm system
* is also armed or disarmed.
For further details on the alarm system
*, refer
to page34.
Operating from inside
By means of the button for central locking, refer
to page32.
In the event of a sufficiently severe accident, the
central locking system unlocks automatically. In
addition, the hazard warning flashers and inte-
rior lamps come on.
Opening and closing:
Using the remote control
Persons or animals in a parked vehicle
could lock the doors from the inside. You
should therefore take the remote control with
you when you leave the vehicle so that the latter
can be opened from outside.<
Unlocking
Press the button.
The interior lamps, the courtesy lamps
* and the
welcome lamps come on.
You can set how the vehicle is to be unlocked.
The setting is stored for the remote control cur-
rently in use.
iDrive, for operating principle refer to page16.
1.Press the button.
This opens the start menu.
2.Press the controller to open the menu.
3.Select "Settings" and press the controller.
4.Select "Vehicle / Tires" and press the con-
troller.
Page 93 of 260

Controls
91Reference
At a glance
Driving tips
Communications
Navigation
Entertainment
Mobility
Lamps
Parking lamps/low beams
0Lamps off,
daytime running lamps
1Parking lamps and daytime running lamps
2Low beams,
welcome lamps
*
3Automatic headlamp control*, daytime run-
ning lamps
*, welcome lamps*, Adaptive
Head Light
*
When you open the driver's door with the igni-
tion switched off, the exterior lighting is auto-
matically switched off if the light switch is in
position 0, 2 or 3.
Switch on the parking lamps if necessary,
switch position 1.
Parking lamps
In switch position1, the front, rear and side
vehicle lighting is switched on. You can use the
parking lamps for parking.
The parking lamps will discharge the bat-
tery. Therefore, do not leave them on for
unduly long periods of time, otherwise the bat-
tery might not have enough power to start the
engine. It is preferable to switch on the left-
hand or right-hand roadside parking lamps,
refer to page93.<
Low-beam headlamps
The low beams light up when the light switch is
in position 2 and the ignition is on.
Automatic headlamp control*
When the switch is in position3, the low beams
are switched on and off automatically depend-
ing on ambient light conditions, e.g. in a tunnel,
in twilight, or if there is precipitation. The Adap-
tive Head Light
* is active. The LED next to the
symbol is illuminated when the low beams are
on. You can also activate the daytime running
lamps, refer to page92. In the situations
described above, the lamps then automatically
switch from daytime running lamps to low
beams.
The headlamps may also come on when the
sun is sitting low on a blue sky.
The low beams remain switched on inde-
pendent of the ambient lighting condi-
tions when you switch on the fog lamps
*.<
The automatic headlamp control cannot
serve as a substitute for your personal
judgment in determining when the lamps
should be switched on in response to ambient
lighting conditions. For example, the system
cannot detect fog or hazy weather. To avoid
safety risks, you should always switch on the
low-beam headlamps manually under these
conditions.<
Welcome lamps
If you leave the light switch in position 2 or 3
when you park the car, the parking lamps and
the interior lamps light up briefly when you
unlock the vehicle.
Activating/deactivating welcome
lamps
iDrive, for operating principle refer to page16.
1.Press the button.
This opens the start menu.
2.Press the controller to open the menu.
3.Select "Settings" and press the controller.
4.Select "Vehicle / Tires" and press the con-
troller.
Page 94 of 260
Lamps
92 5.If necessary, move the highlight marker to
the uppermost field. Turn the controller
until "Lighting" is selected and press the
controller.
6.Select "Welcome light" and press the con-
troller.
The welcome lamps are switched on.
The setting is stored for the remote control cur-
rently in use.
Pathway lighting
If you activate the headlamp flasher after park-
ing the car, with the lamps switched off, the low
beams come on and remain on for a certain
time.
You can adjust the operating period or deacti-
vate the function.
iDrive, for operating principle refer to page16.
1.Press the button.
This opens the start menu.
2.Press the controller to open the menu.
3.Select "Settings" and press the controller.
4.Select "Vehicle / Tires" and press the con-
troller.
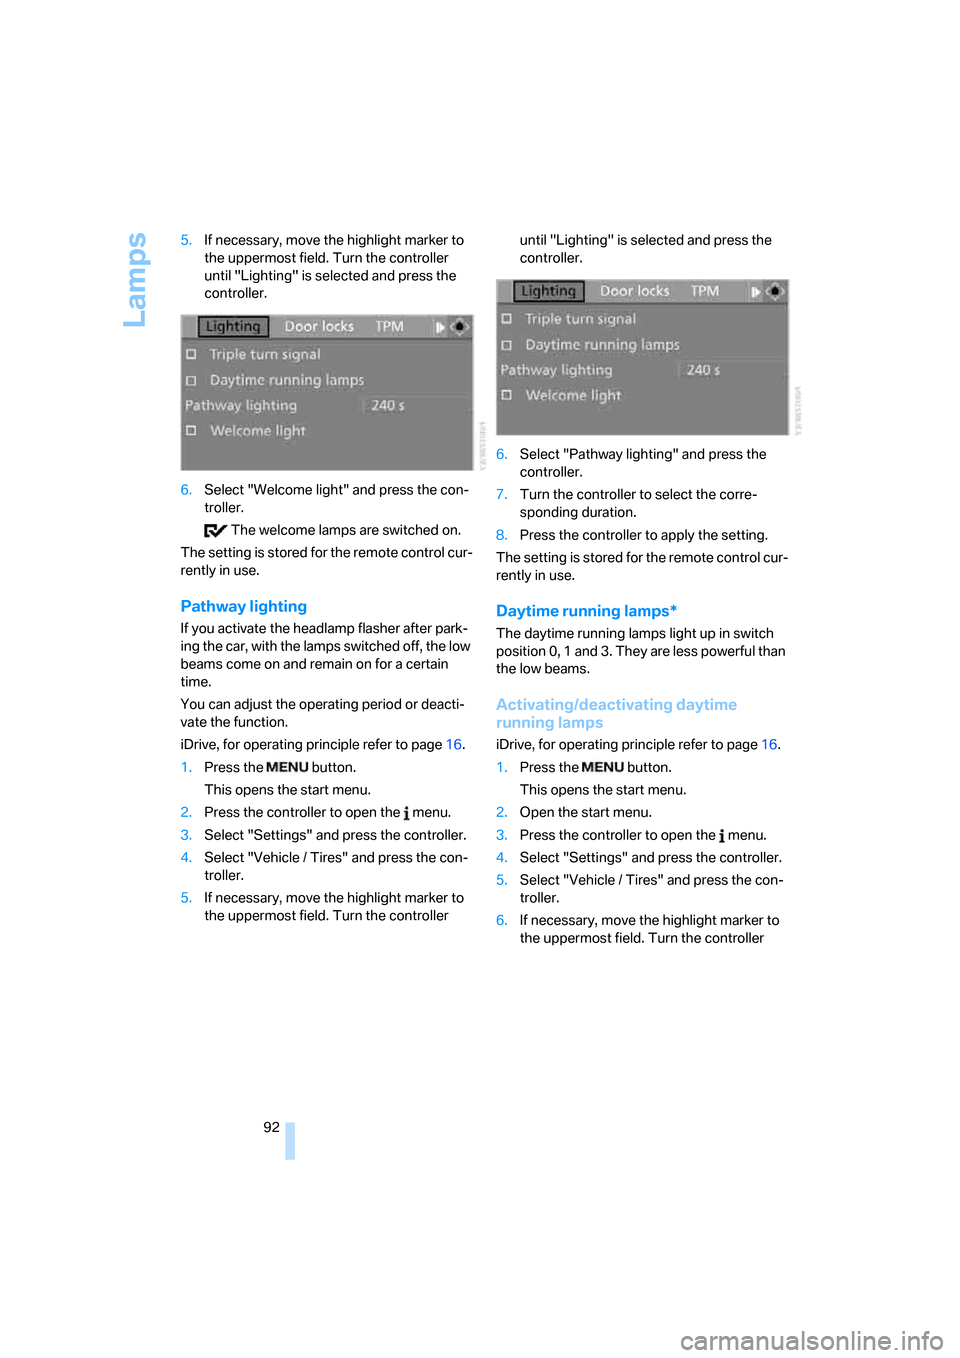
5.If necessary, move the highlight marker to
the uppermost field. Turn the controller until "Lighting" is selected and press the
controller.
6.Select "Pathway lighting" and press the
controller.
7.Turn the controller to select the corre-
sponding duration.
8.Press the controller to apply the setting.
The setting is stored for the remote control cur-
rently in use.
Daytime running lamps*
The daytime running lamps light up in switch
position 0, 1 and 3. They are less powerful than
the low beams.
Activating/deactivating daytime
running lamps
iDrive, for operating principle refer to page16.
1.Press the button.
This opens the start menu.
2.Open the start menu.
3.Press the controller to open the menu.
4.Select "Settings" and press the controller.
5.Select "Vehicle / Tires" and press the con-
troller.
6.If necessary, move the highlight marker to
the uppermost field. Turn the controller
Page 95 of 260
Controls
93Reference
At a glance
Driving tips
Communications
Navigation
Entertainment
Mobility
until "Lighting" is selected and press the
controller.
7.Select "Daytime running lamps" and press
the controller.
The daytime running lamps are
switched on.
The setting is stored for the remote control cur-
rently in use.
Adaptive Head Light*
The concept
Adaptive Head Light is a variable headlamp
control system that enables better illumination
of the road surface. Depending on the steering
angle and other parameters, the light from the
headlamp follows the course of the road.
In tight curves at speeds up to 40 mph/70 km/h,
e.g. on mountainous roads or when turning, an
additional, corner-illuminating lamp is switched
on that lights up the inside area of the curve.
Activating Adaptive Head Light
With the ignition switched on, turn the light
switch to position 3, refer to page91.
The corner-illuminating lamp is switched on
automatically, depending on the steering wheel
angle or turn signal indicator.
To avoid blinding oncoming traffic, the Adaptive
Head Light directs light towards the front pas-
senger side when the vehicle is at a standstill.
When you are reversing, only the corner-illumi-
nating lamps are active and switched on on
both sides.
Malfunction
The LED next to the symbol for automatic head-
lamp control flashes. Adaptive Head Light is
malfunctioning or has failed. Have the system
checked as soon as possible.
High beams/roadside parking
lamps
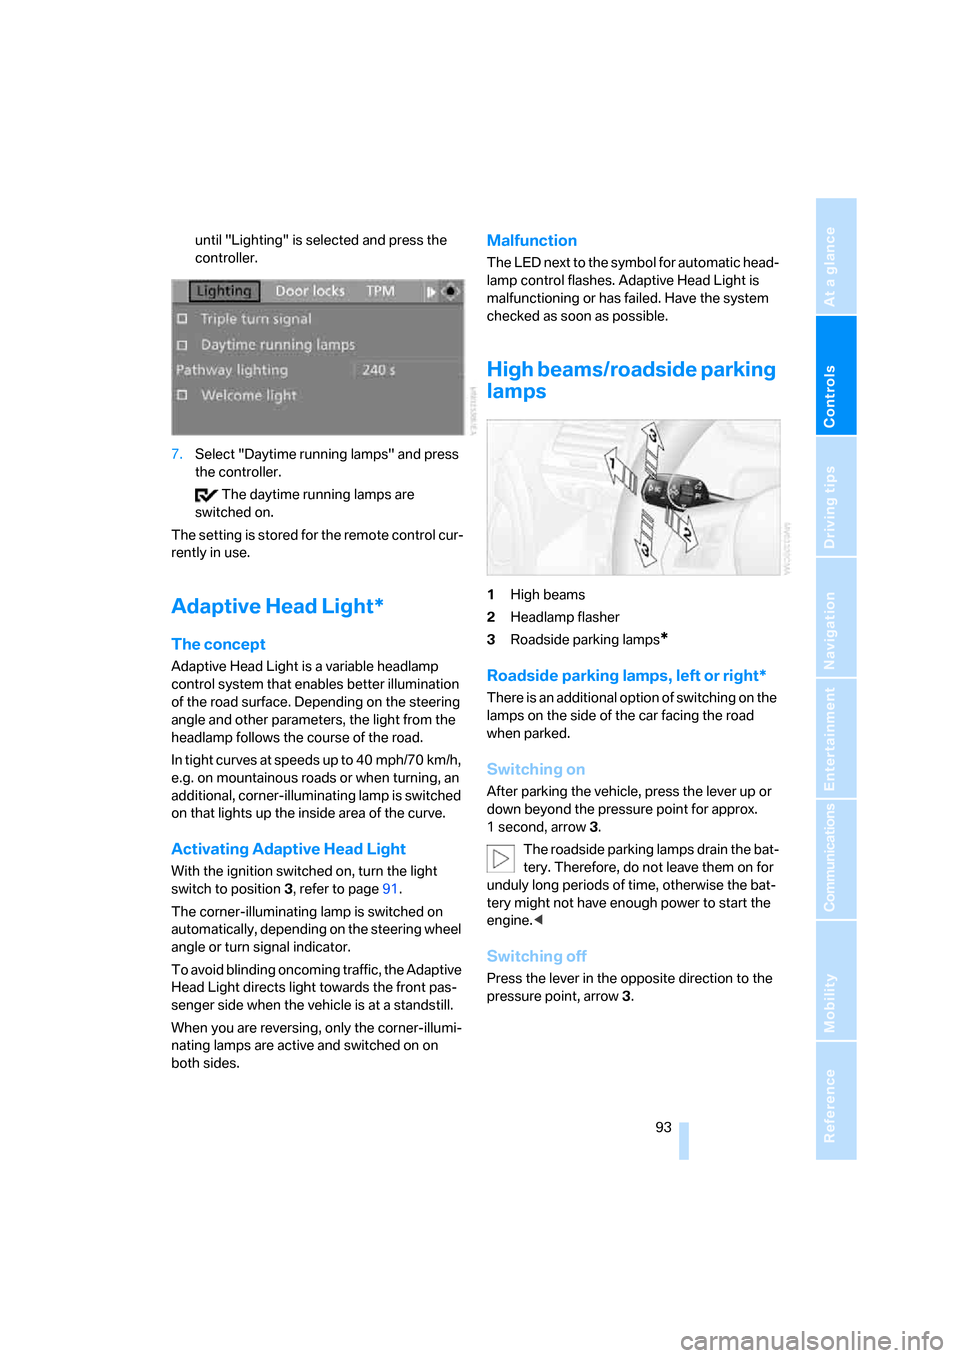
1High beams
2Headlamp flasher
3Roadside parking lamps
*
Roadside parking lamps, left or right*
There is an additional option of switching on the
lamps on the side of the car facing the road
when parked.
Switching on
After parking the vehicle, press the lever up or
down beyond the pressure point for approx.
1 second, arrow 3.
The roadside parking lamps drain the bat-
tery. Therefore, do not leave them on for
unduly long periods of time, otherwise the bat-
tery might not have enough power to start the
engine.<
Switching off
Press the lever in the opposite direction to the
pressure point, arrow 3.
Page 219 of 260
Mobility
217Reference
At a glance
Controls
Driving tips
Communications
Navigation
Entertainment
Removing the headlamp cover
1.Pull the wire brackets over the notches, see
arrow, and fold to the side.
2.Fold away the headlamp cover.
Be careful when attaching the headlamp
cover and ensure that both wire brackets
are securely in place, otherwise leaks could
occur and cause damage to the headlamp sys-
tem.<
Attach the headlamp cover in reverse order.
Halogen headlamps
Halogen low beams and high beams
H7 bulb, 55 watts
Always wear gloves and eye protection;
the atmosphere within the H7 bulb is
pressurized. Otherwise there is a risk of injury if
the bulb is damaged.<
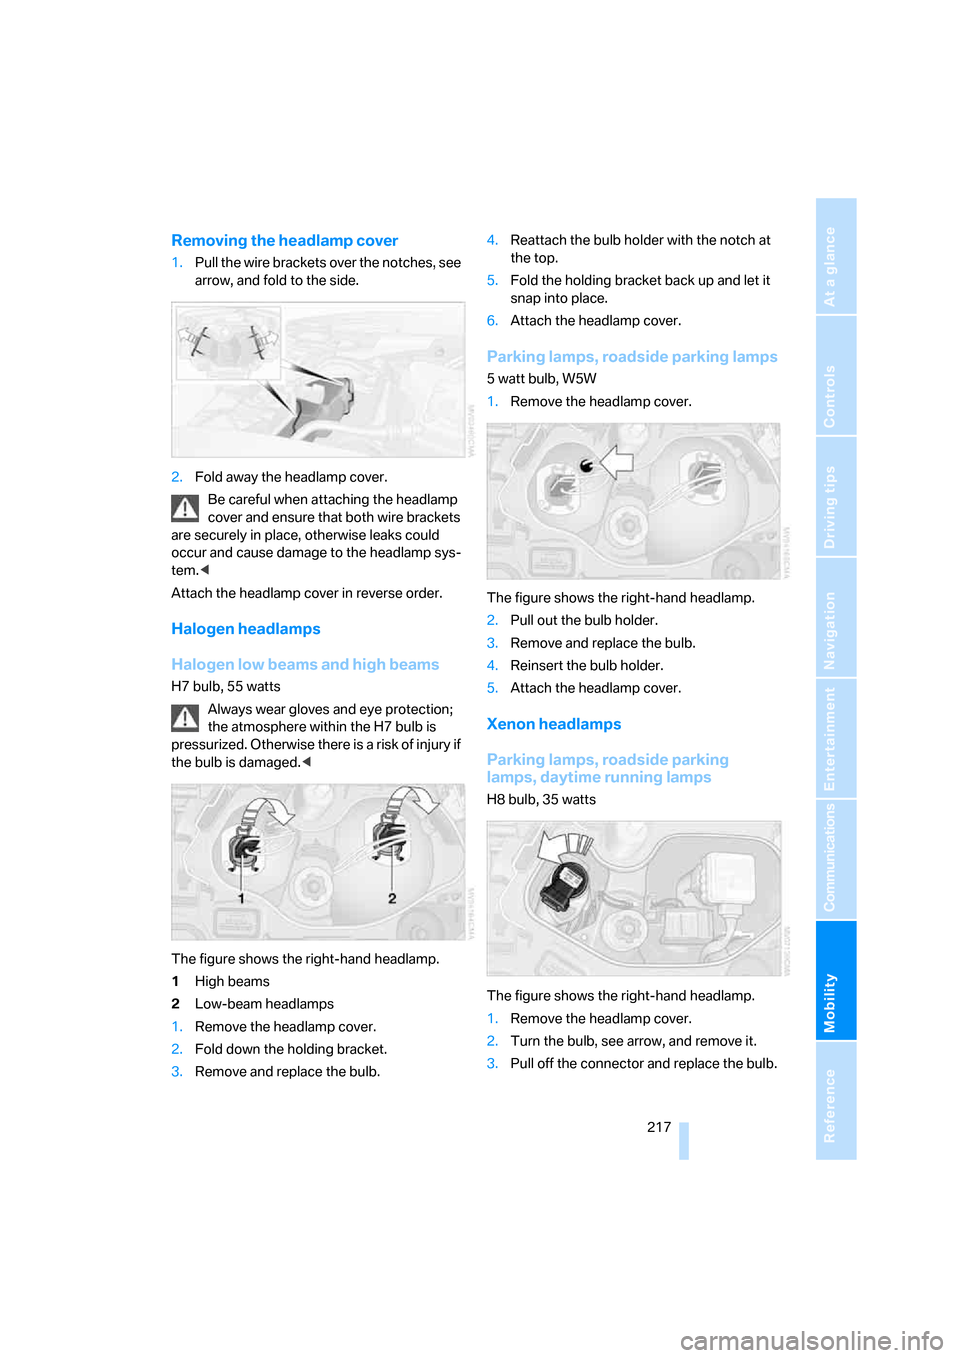
The figure shows the right-hand headlamp.
1High beams
2Low-beam headlamps
1.Remove the headlamp cover.
2.Fold down the holding bracket.
3.Remove and replace the bulb.4.Reattach the bulb holder with the notch at
the top.
5.Fold the holding bracket back up and let it
snap into place.
6.Attach the headlamp cover.
Parking lamps, roadside parking lamps
5 watt bulb, W5W
1.Remove the headlamp cover.
The figure shows the right-hand headlamp.
2.Pull out the bulb holder.
3.Remove and replace the bulb.
4.Reinsert the bulb holder.
5.Attach the headlamp cover.
Xenon headlamps
Parking lamps, roadside parking
lamps, daytime running lamps
H8 bulb, 35 watts
The figure shows the right-hand headlamp.
1.Remove the headlamp cover.
2.Turn the bulb, see arrow, and remove it.
3.Pull off the connector and replace the bulb.
Page 245 of 260

Reference 243
At a glance
Controls
Driving tips
Communications
Navigation
Entertainment
Mobility
Compact disc, refer to
– CD changer163
– CD player163
Compartment for remote
control, refer to Ignition
lock58
Compass104
Computer67
– displays on Control
Display68
– hour signal75
Computer, refer to iDrive16
"Concert hall" for Tone
control152
"Concierge"194
Concierge service194
Condensation, refer to When
the vehicle is parked116
Condition Based Service
CBS214
Configuring settings, refer to
Personal Profile28
Confirmation signals for
locking/unlocking the
vehicle31
Connecting vacuum cleaner,
refer to Connecting
electrical appliances107
Consumption, refer to
Average fuel
consumption68
"Continue guidance to
destination?"137
Control Center, refer to
iDrive16
Control Display16
Controller, refer to iDrive16
Controls and displays10
Convenient access36
– replacing the battery37
Convenient operation
– windows30
– windows with convenient
access36
– with convenient access36
Convenient starting, refer to
Starting the engine59Convertible
– rollover protection
system89
– top40
– wind deflector44
Convertible top
– convenient opening30
Coolant213
– checking level213
– filling213
Coolant temperature67
Cooling, maximum97
Cooling fluid, refer to
Coolant213
Copyright2
Corner-illuminating lamps93
Corner-illuminating lamps,
refer to Adaptive Head
Light93
Cornering lamps, refer to
Adaptive Head Light93
Courtesy lamps94
Cross-hairs in navigation128
Cruise control64
Cruising range68
Cup holders106
Curb weight, refer to
Weights233
Current fuel consumption68
"Current position"144
Current position
– displaying144
– entering132
– storing132
"Customer
Relations"186,194
D
Dashboard, refer to
Cockpit10
Dashboard lighting, refer to
Instrument lighting94
Data
– dimensions231
– sizes231Data, technical230
– capacities234
– engine230
– weights233
"Date"75,76
Date
– setting75
– setting format76
"Date format"76
"Daytime running lamps"93
Daytime running lamps,
switch positions92
DBC Dynamic Brake
Control81
"Deactivated"51
Deactivating front passenger
airbags88
Deadlocking, refer to
Locking30
Decommissioning the vehicle,
refer to Caring for your
vehicle brochure
Defect
– door lock32
– fuel filler door200
– glass roof40
– luggage compartment lid33
Defogging windows99
Defrosting the windows99
Defrosting windshield, refer to
Defrosting windows99
Defrost position, refer to
Defrosting windows99
"Delete address book" in
navigation133
"Delete all numbers" on the
mobile phone185
"Delete data" in
navigation133
"Delete" for mobile
phone185
Destination address
– deleting133
– entering123,127