2008 BMW 135I COUPE headlamp
[x] Cancel search: headlampPage 95 of 260

Controls
93Reference
At a glance
Driving tips
Communications
Navigation
Entertainment
Mobility
until "Lighting" is selected and press the
controller.
7.Select "Daytime running lamps" and press
the controller.
The daytime running lamps are
switched on.
The setting is stored for the remote control cur-
rently in use.
Adaptive Head Light*
The concept
Adaptive Head Light is a variable headlamp
control system that enables better illumination
of the road surface. Depending on the steering
angle and other parameters, the light from the
headlamp follows the course of the road.
In tight curves at speeds up to 40 mph/70 km/h,
e.g. on mountainous roads or when turning, an
additional, corner-illuminating lamp is switched
on that lights up the inside area of the curve.
Activating Adaptive Head Light
With the ignition switched on, turn the light
switch to position 3, refer to page91.
The corner-illuminating lamp is switched on
automatically, depending on the steering wheel
angle or turn signal indicator.
To avoid blinding oncoming traffic, the Adaptive
Head Light directs light towards the front pas-
senger side when the vehicle is at a standstill.
When you are reversing, only the corner-illumi-
nating lamps are active and switched on on
both sides.
Malfunction
The LED next to the symbol for automatic head-
lamp control flashes. Adaptive Head Light is
malfunctioning or has failed. Have the system
checked as soon as possible.
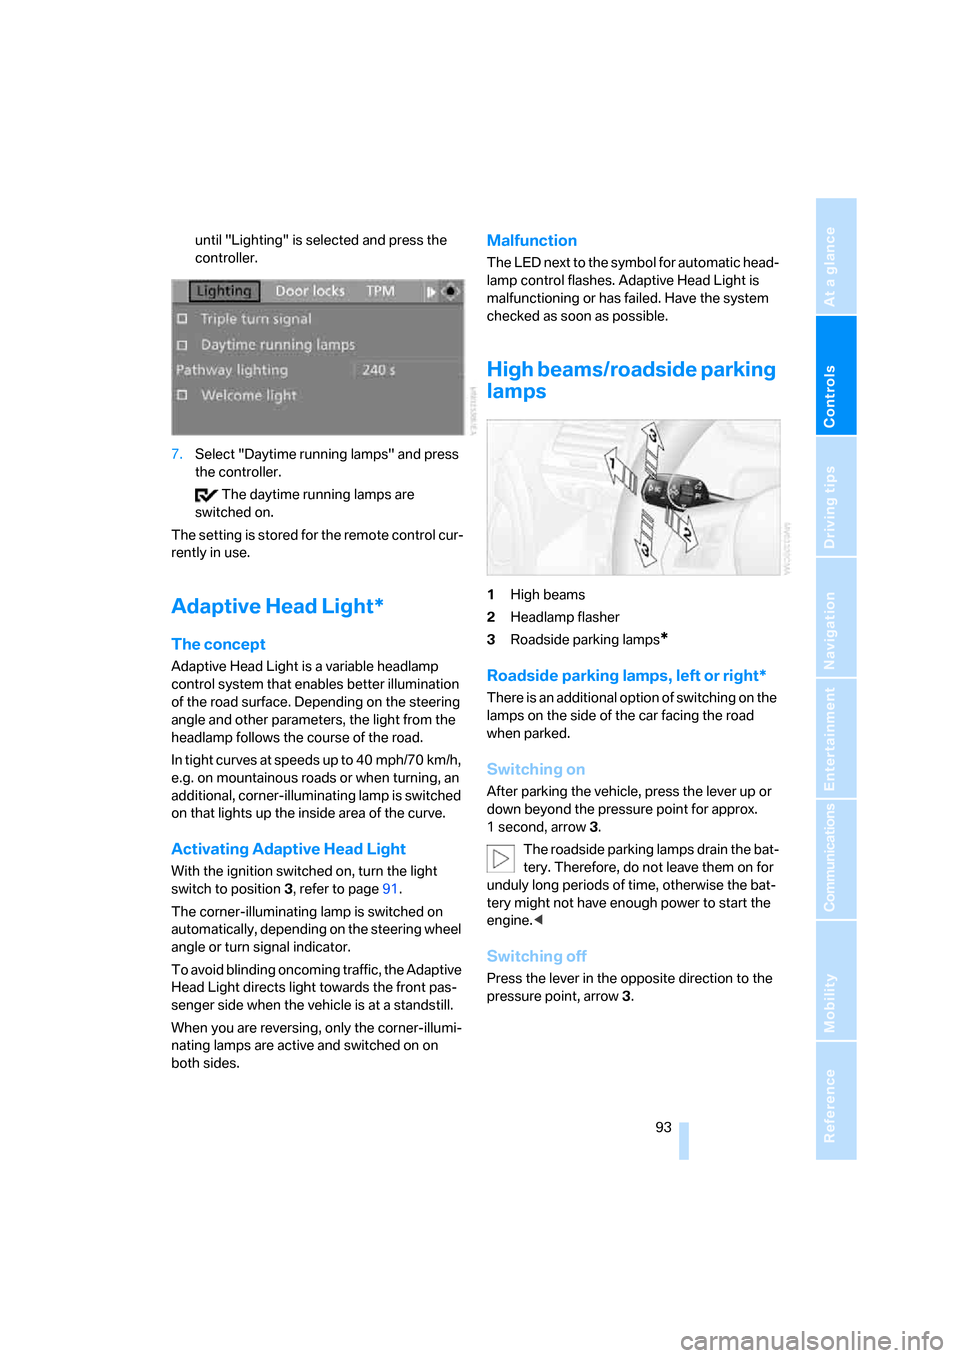
High beams/roadside parking
lamps
1High beams
2Headlamp flasher
3Roadside parking lamps
*
Roadside parking lamps, left or right*
There is an additional option of switching on the
lamps on the side of the car facing the road
when parked.
Switching on
After parking the vehicle, press the lever up or
down beyond the pressure point for approx.
1 second, arrow 3.
The roadside parking lamps drain the bat-
tery. Therefore, do not leave them on for
unduly long periods of time, otherwise the bat-
tery might not have enough power to start the
engine.<
Switching off
Press the lever in the opposite direction to the
pressure point, arrow 3.
Page 96 of 260

Lamps
94
Fog lamps*
To switch on/off, press the button.
The parking lamps or low beams must
be switched on for the fog lamps to
operate. The green indicator lamp in
the instrument cluster lights up whenever the
fog lamps are on.
The fog lamps are switched off while you acti-
vate the headlamp flasher or switch on the high
beams.
If the automatic headlamp control is acti-
vated, the low beams will come on auto-
matically when you switch on the fog lamps.<
Instrument lighting
You can adjust the brightness of the instrument
lighting only when the parking lamps or the low
beams are switched on.
1.Push button 1 up or down repeatedly until
the appropriate symbol appears in the dis-
play, accompanied by the brightness set-
ting and scale the word "SET".
2.Press button 2.3.Push button 1 up or down to select the
desired brightness level.
4.Press button 2.
The display again shows the outside tem-
perature and the time.
Interior lamps
The interior lamps, footwell lamps*, entry
lamps
*, cargo bay lamp and courtesy lamps*
are controlled automatically.
The LEDs for the courtesy lamps
are set in the
door handles and illuminate the ground in front
of the doors.
To avoid draining the battery, all lamps
inside the car are switched off about
8 minutes after the ignition is switched off, refer
to Start/stop button on page58.<
Switching interior lamps on/off
manually
Interior lamps, front and rear*:
To switch on and off, press the button.
To switch off the interior lamps, footwell
lamps
*, entry lamps* and courtesy lamps* per-
manently, press the button for the front interior
lamps for about 3 seconds.
Page 212 of 260

Under the hood
210
Important parts of the engine compartment
1Expansion tank for coolant, refer to
page213
2Washer fluid filler neck for headlamp clean-
ing system and window washer system,
refer to page643Jump-starting connection, refer to
page223
4Fluid filler neck for engine oil, refer to Add-
ing engine oil, page212
Engine oil
The engine oil consumption is dependent on
driving style and driving conditions.
Checking oil level
Your car is equipped with an electronic oil-level
monitor.
For a precise measurement and display of the
oil level, it is necessary that the engine be at
operating temperature, i.e. after uninterrupted
driving for at least approx. 6.5 miles/10 km. You
can have the oil level displayed while you are
driving, or while the vehicle is at a standstill on a
level surface and the engine is running.
Display in the instrument cluster
1.Push button 1 in the turn indicator lever up
or down repeatedly until the appropriate
symbol is shown in the display, accompa-
nied by the word "OIL".
2.Press button 2 in the turn indicator lever.
The oil level is checked and the reading dis-
played.
Page 218 of 260

Replacing components
216
Replacing components
Onboard tool kit
The onboard tool kit is stored beneath the floor
panel in the cargo bay.
Wiper blades
1.Fold out the wiper arm and hold it.
2.Press together the locking spring, arrow1,
and fold out the wiper blade, arrow2.
3.Take the wiper blade out of the catch mech-
anism, pulling the blade toward the front.
To avoid damage, make sure that the
wiper arms are against the windshield
before you open the engine compartment.<
Lamps and bulbs
Lamps and bulbs make an essential contribu-
tion to vehicle safety. They should, therefore,
be handled carefully. BMW recommends hav-
ing your BMW center perform any work that you
do not feel competent to perform yourself or
that is not described here.
Never touch the glass of new bulbs with
your bare fingers, as even minute
amounts of contamination will burn into the
bulb's surface and reduce its service life. Use a
clean tissue, cloth or something similar, or hold
the bulb by its base.<
You can obtain a selection of replacement bulbs
at your BMW center.When working on electrical systems,
always begin by switching off the con-
sumer in question, otherwise short-circuits
could result. To avoid possible injury or equip-
ment damage when replacing bulbs, observe
any instructions provided by the bulb manufac-
turer.<
For care and maintenance of the headlamps,
please follow the instructions in the separate
Caring for your vehicle brochure.
If the routine for changing a particular
bulb is not described here, please contact
your BMW center or a workshop that works
according to BMW repair procedures with cor-
respondingly trained personnel.<
Light-emitting diodes LED
Light-emitting diodes installed behind translu-
cent lenses serve as the light source for many of
the controls and displays in your vehicle. These
light-emitting diodes, which operate using a
concept similar to that applied in conventional
lasers, are officially designated as Class 1 light-
emitting diodes.
Do not remove the covers or expose the
eyes directly to the unfiltered light source
for several hours, otherwise this could cause
irritation to the retina.<
Xenon lamps*
These bulbs have a very long service life and are
highly unlikely to fail. If a xenon lamp fails never-
theless, switch on the fog lamps and continue
the journey with great care, provided that local
legislation does not prohibit this.
Have any work on the xenon lamp system,
including bulb replacements, performed
o nl y b y a BM W c e n t er o r a w o r k s h o p t h a t w o rk s
according to BMW repair procedures with cor-
respondingly trained personnel. Otherwise, if
such work is carried out improperly, the high
voltage in the system presents the danger of
fatal injuries.<
Page 219 of 260

Mobility
217Reference
At a glance
Controls
Driving tips
Communications
Navigation
Entertainment
Removing the headlamp cover
1.Pull the wire brackets over the notches, see
arrow, and fold to the side.
2.Fold away the headlamp cover.
Be careful when attaching the headlamp
cover and ensure that both wire brackets
are securely in place, otherwise leaks could
occur and cause damage to the headlamp sys-
tem.<
Attach the headlamp cover in reverse order.
Halogen headlamps
Halogen low beams and high beams
H7 bulb, 55 watts
Always wear gloves and eye protection;
the atmosphere within the H7 bulb is
pressurized. Otherwise there is a risk of injury if
the bulb is damaged.<
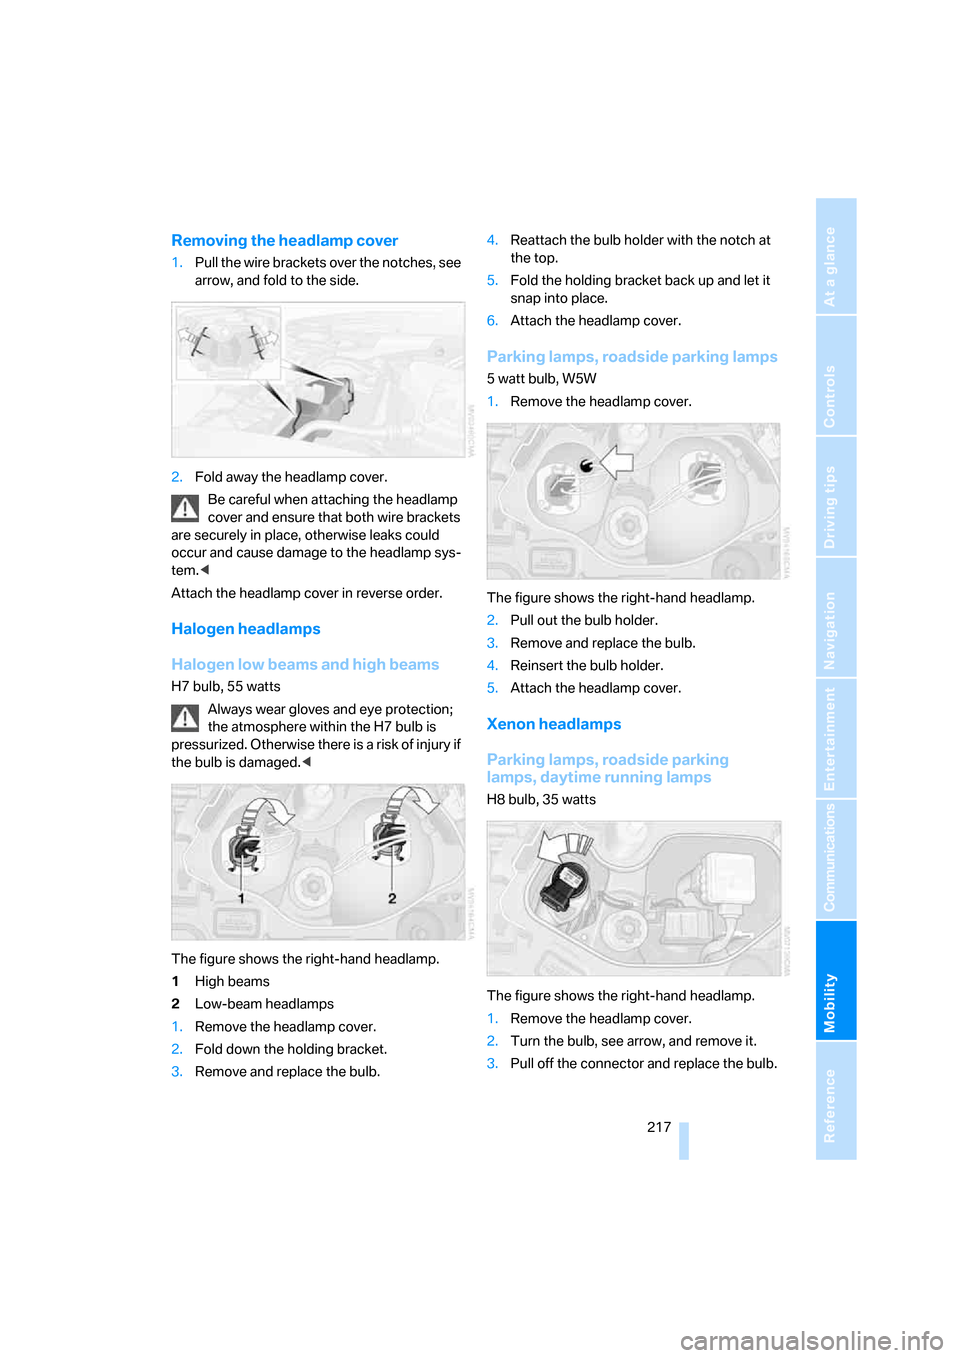
The figure shows the right-hand headlamp.
1High beams
2Low-beam headlamps
1.Remove the headlamp cover.
2.Fold down the holding bracket.
3.Remove and replace the bulb.4.Reattach the bulb holder with the notch at
the top.
5.Fold the holding bracket back up and let it
snap into place.
6.Attach the headlamp cover.
Parking lamps, roadside parking lamps
5 watt bulb, W5W
1.Remove the headlamp cover.
The figure shows the right-hand headlamp.
2.Pull out the bulb holder.
3.Remove and replace the bulb.
4.Reinsert the bulb holder.
5.Attach the headlamp cover.
Xenon headlamps
Parking lamps, roadside parking
lamps, daytime running lamps
H8 bulb, 35 watts
The figure shows the right-hand headlamp.
1.Remove the headlamp cover.
2.Turn the bulb, see arrow, and remove it.
3.Pull off the connector and replace the bulb.
Page 220 of 260

Replacing components
218 4.Attach the connector, insert the bulb and
turn it all the way in the opposite direction.
5.Attach the headlamp cover.
Corner-illuminating lamps
H3 bulb, 55 watts
The figure shows the right-hand headlamp.
1.Remove the top headlamp cover, using the
screwdriver to push the detents to one side.
2.Turn the bulb holder, see arrow, and
remove it.
3.Slide the bulb out of the holder and pull off
the connector.
4.Replace the bulb and attach the connector.
5.Insert the bulb holder and turn it all the way
in the opposite direction.
6.Attach the headlamp cover.
Turn signals, front
21 watt bulb, PY21W Silver Vision
The turn signal bulb can be changed via a cover
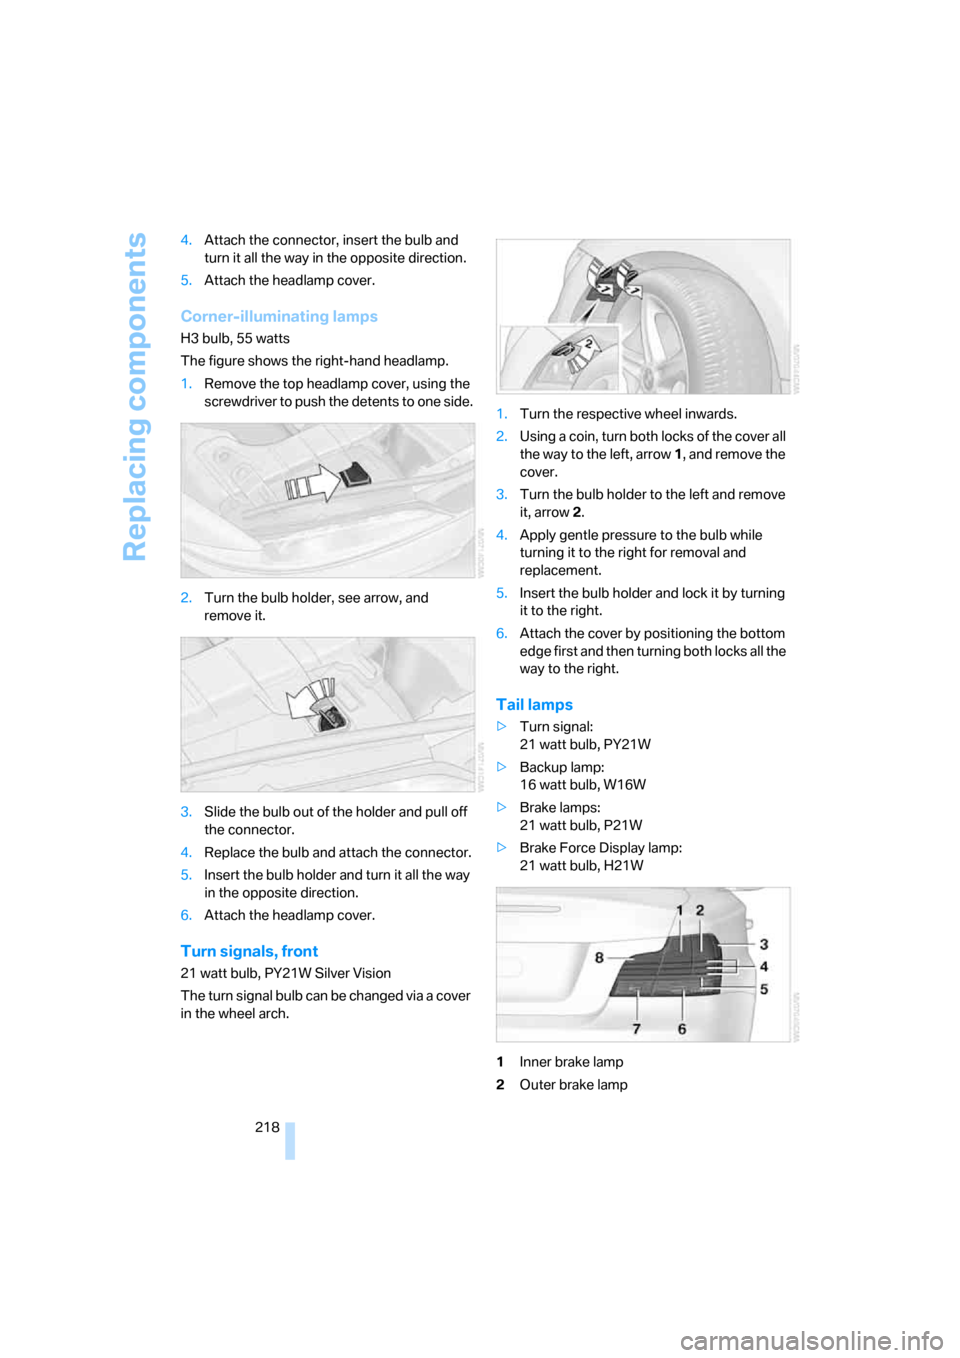
in the wheel arch.1.Turn the respective wheel inwards.
2.Using a coin, turn both locks of the cover all
the way to the left, arrow 1, and remove the
cover.
3.Turn the bulb holder to the left and remove
it, arrow2.
4.Apply gentle pressure to the bulb while
turning it to the right for removal and
replacement.
5.Insert the bulb holder and lock it by turning
it to the right.
6.Attach the cover by positioning the bottom
edge first and then turning both locks all the
way to the right.
Tail lamps
>Turn signal:
21 watt bulb, PY21W
>Backup lamp:
16 watt bulb, W16W
>Brake lamps:
21 watt bulb, P21W
>Brake Force Display lamp:
21 watt bulb, H21W
1Inner brake lamp
2Outer brake lamp
Page 226 of 260

Giving and receiving assistance
224 4.Attach one terminal clamp of the minus/–
jumper cable to the negative terminal of the
battery or to an engine or body ground of
the assisting vehicle.
Your BMW has a special nut as body ground or
negative pole.
5.Attach the second terminal clamp of the
minus/– jumper cable to the negative termi-
nal of the battery or to the engine or body
ground of the vehicle to be started.
Starting the engine
1.Start the engine of the donor vehicle and
allow it to run for a few minutes at slightly
increased idle speed.
2.Start the engine on the other vehicle in the
usual way.
If the first start attempt is not successful,
wait a few minutes before another attempt
in order to allow the discharged battery to
recharge.
3.Let the engines run for a few minutes.
4.Disconnect the jumper cables by reversing
the above connecting sequence.
If necessary, have the battery checked and
recharged.
Never use spray fluids to start the
engine.<
Tow-starting, towing away
Observe the applicable laws and regula-
tions for tow-starting and towing vehi-
cles.
towed.<
Using a tow fitting
The screw-in tow fitting must always be carried
in the car. It can be screwed in at the front or
rear of the BMW.
It is stored with the onboard tool kit underneath
the floor mat in the cargo bay, refer to page216.
Use only the tow fitting provided with the
vehicle and screw it all the way in. Use the
tow fitting for towing on paved roads only. Avoid
lateral loading of the tow fitting, e.g. do not lift
the vehicle by the tow fitting. Otherwise the tow
fitting and the vehicle could be damaged.<
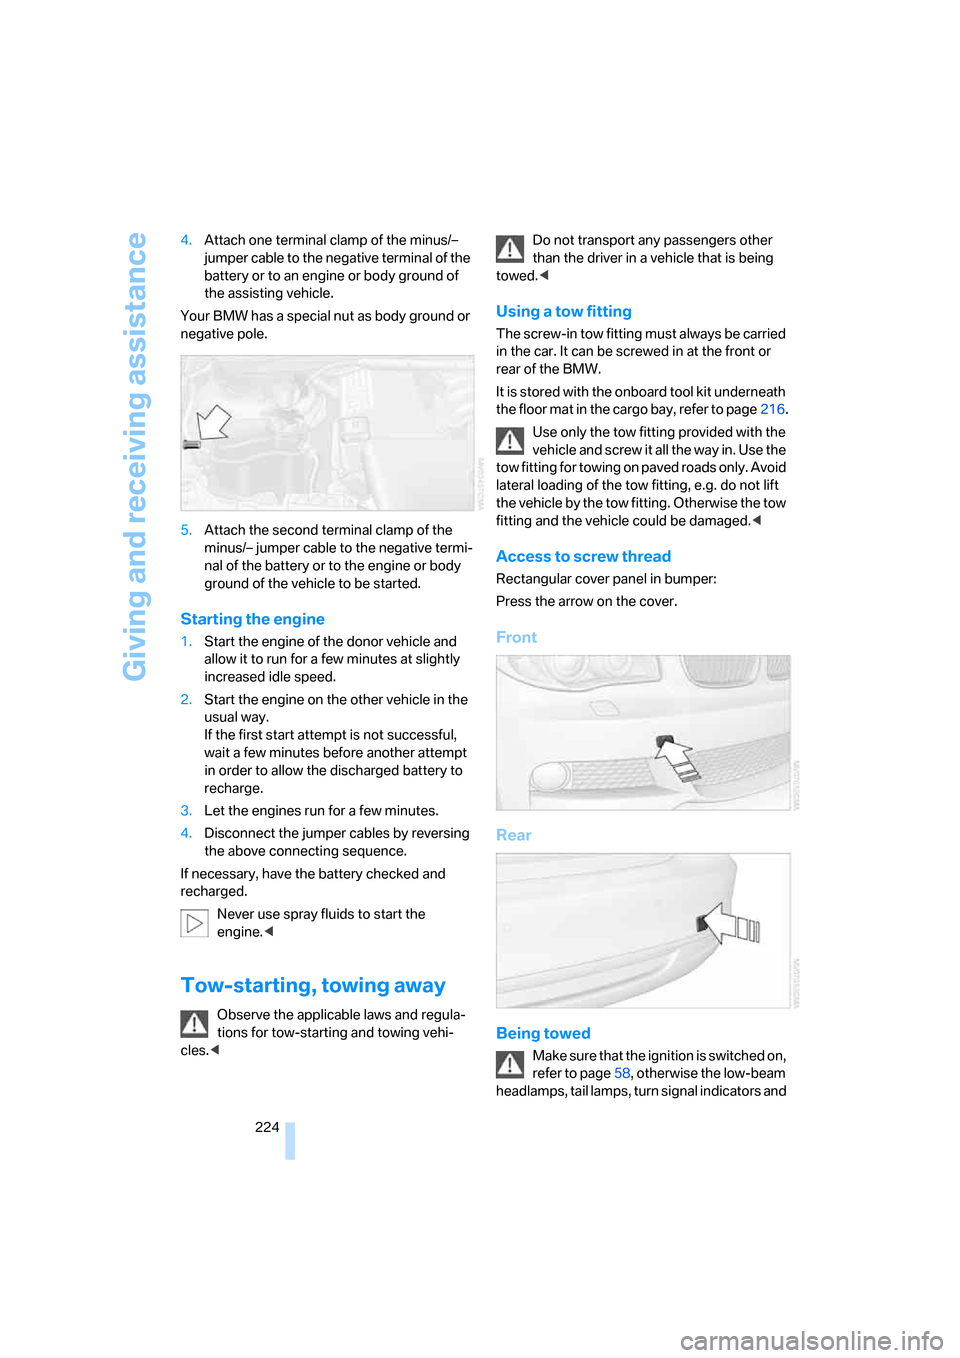
Access to screw thread
Rectangular cover panel in bumper:
Press the arrow on the cover.
Front
Rear
Being towed
Make sure that the ignition is switched on,
refer to page58, otherwise the low-beam
headlamps, tail lamps, turn signal indicators and
Page 236 of 260

Technical data
234
Capacities
Notes
Fuel tank US gal/liters approx. 14.0/53 Fuel grade: page201
including reserve of US gal/liters approx. 2.1/8.0
Window washer system For more details: page64
including headlamp washers US qt/liters approx. 6.3/6.0