2008 BMW 135I COUPE fuel
[x] Cancel search: fuelPage 63 of 260

Controls
61Reference
At a glance
Driving tips
Communications
Navigation
Entertainment
Mobility
Changing selector lever positions
>With the ignition switched on or the engine
running, the selector lever can be moved
out of position P: interlock.
>Before moving the lever away from P or N
with the vehicle stationary, first depress the
brake; otherwise the selector lever will
refuse to move: shiftlock.
To prevent the vehicle from creeping
after you select a driving position,
depress the brake until you are ready to
start.<
A lock prevents you from inadvertently engag-
ing selector lever positions R and P. To cancel
the lock, press the button on the front of the
selector lever, see arrow.
P Park
Select this only when the vehicle is stationary.
The drive wheels are locked.
R Reverse
Select this only when the vehicle is stationary.
N Neutral, idle
You can select this in a car wash, for example.
The vehicle can roll.
D Drive, automatic position
Position for normal vehicle operation. All for-
ward gears are selected automatically.
Under normal operating conditions, fuel con-
sumption is lowest when you are driving in posi-
tion D.
Kick-down
Kick-down enables you to achieve maximum
performance.
Press the accelerator pedal beyond the full-
throttle resistance point.
Sport program and manual operation
M/S
Move selector lever from position D toward the
left into the M/S shifting slot:
The sport program is activated and DS is dis-
played on the instrument cluster. This position
is recommended for a performance-oriented
driving style.
To use the automatic mode again, move the
selector lever to the right into position D.
Shifting gears via the selector lever
When you press the selector lever forwards or
backwards, the manual mode is activated and
Steptronic changes gear. M1 through M6 are
displayed on the instrument cluster.
Upshifts and downshifts are executed only
when they will result in a plausible combination
of engine and vehicle speed; thus, for example,
a downshift that would cause the engine to
overrev will not be executed by the system. The
gear selected is briefly displayed in the instru-
ment cluster, followed by the gear actually in
use.
Shifting gears via shift paddles* on the
steering wheel
The shift paddles allow you to shift gears
quickly since both hands can remain on the
steering wheel.
Page 68 of 260

Everything under control
66
Everything under control
Odometer, outside
temperature display, clock
1Knob in the instrument cluster
2Outside temperature and clock
3Odometer and trip odometer
Knob in the instrument cluster
>To reset the trip odometer while the ignition
is switched on
>To display the time, outside temperature
and odometer briefly while the ignition is
switched off
Units of measure
To select the respective units of measure, miles
or km for the odometer as well as 7 or 6 for
the outside temperature, refer to Units of mea-
sure on page70.
The setting is stored for the remote control cur-
rently in use.
Time, outside temperature display
Setting the time, refer to page74.
Outside temperature warning
When the displayed temperature sinks to
approx. +37 7/+36, a signal sounds and a
warning lamp lights up. There is an increased
risk of black ice.
Black ice can also form at temperatures
above +37 7/+36. You should there-
fore drive carefully on bridges and shaded roads, for example, otherwise there is an
increased risk of an accident.<
Odometer and trip odometer
Resetting trip odometer:
With the ignition switched on, press button1 in
the instrument cluster.
When the vehicle is parked
If you still want to view the time, outside tem-
perature and odometer reading briefly after the
remote control has been taken out of the igni-
tion lock:
Press button 1 in the instrument cluster.
Tachometer
Never force the engine speed up into the red
warning field, see arrow. In this range, the fuel
supply is interrupted to protect the engine.
Page 69 of 260

Controls
67Reference
At a glance
Driving tips
Communications
Navigation
Entertainment
Mobility
Coolant temperature
A warning lamp comes on if the coolant, and
therefore the engine, becomes too hot. In addi-
tion, a message appears on the Control Display.
Check coolant level, refer to page213.
Engine oil temperature*
When the engine is at normal operating temper-
ature, the engine oil temperature is between
approx. 2107/1006 and approx. 3007/
1506.
If the engine oil temperature is too high, a mes-
sage appears on the Control Display.
Fuel gauge
Fuel tank capacity: approx. 14 US gallons/
53 liters.
You can find information on refueling on
page200.
If the tilt of the vehicle varies for a longer period,
when you are driving in mountainous areas, for
example, the indicator may fluctuate slightly.
Fuel display 135i: in speedometer.
Reserve
Once the fuel level has fallen to the reserve
zone, a message briefly appears on the Control
Display and the cruising range for the remaining
amount of fuel is displayed on the computer.
Under a cruising range of approx. 30 miles/
50 km, the message remains in the Control Dis-
play.
Refuel as soon as possible once your
cruising range falls below 30 miles/
50 km, otherwise engine functions are not
ensured and damage can occur.<
Computer
Displays in the instrument cluster
Calling up information
Press the button in the turn indicator lever.
The following items of information are dis-
played in the order listed:
>Cruising range
>Average speed
>Average fuel consumption
>Current fuel consumption
>No information
Page 70 of 260

Everything under control
68 To set the corresponding units of measure,
refer to Adjusting the units of measure on
page70.
Cruising range
Displays the estimated cruising range available
with the remaining fuel. The range is calculated
on the basis of the way the car has been driven
over the last 18 miles/30 km and the amount of
fuel currently in the tank.
It is important that you refuel as soon as
possible once your cruising range falls
below 30 miles/50 km, otherwise engine func-
tions are not ensured and damage can occur.<
Average speed
Periods with the vehicle parked and the engine
switched off are not included in the calculations
of average speed.
With the trip computer, refer to page69, you
can have the average speed for another trip dis-
played.
To reset average speed: press the button in the
turn indicator lever for approx. 2 seconds.
Average fuel consumption
The average fuel consumption is calculated for
the time during which the engine is running.
With the trip computer, refer to page69, you
can have the average consumption for another
trip displayed.
To reset average fuel consumption: press the
button in the turn indicator lever for approx.
2seconds.
Current fuel consumption
Displays the current fuel consumption. This
allows you to see whether your current driving
style is conducive to fuel economy with mini-
mum exhaust emissions.
Displays on the Control Display
You can also call up the computer via iDrive; for
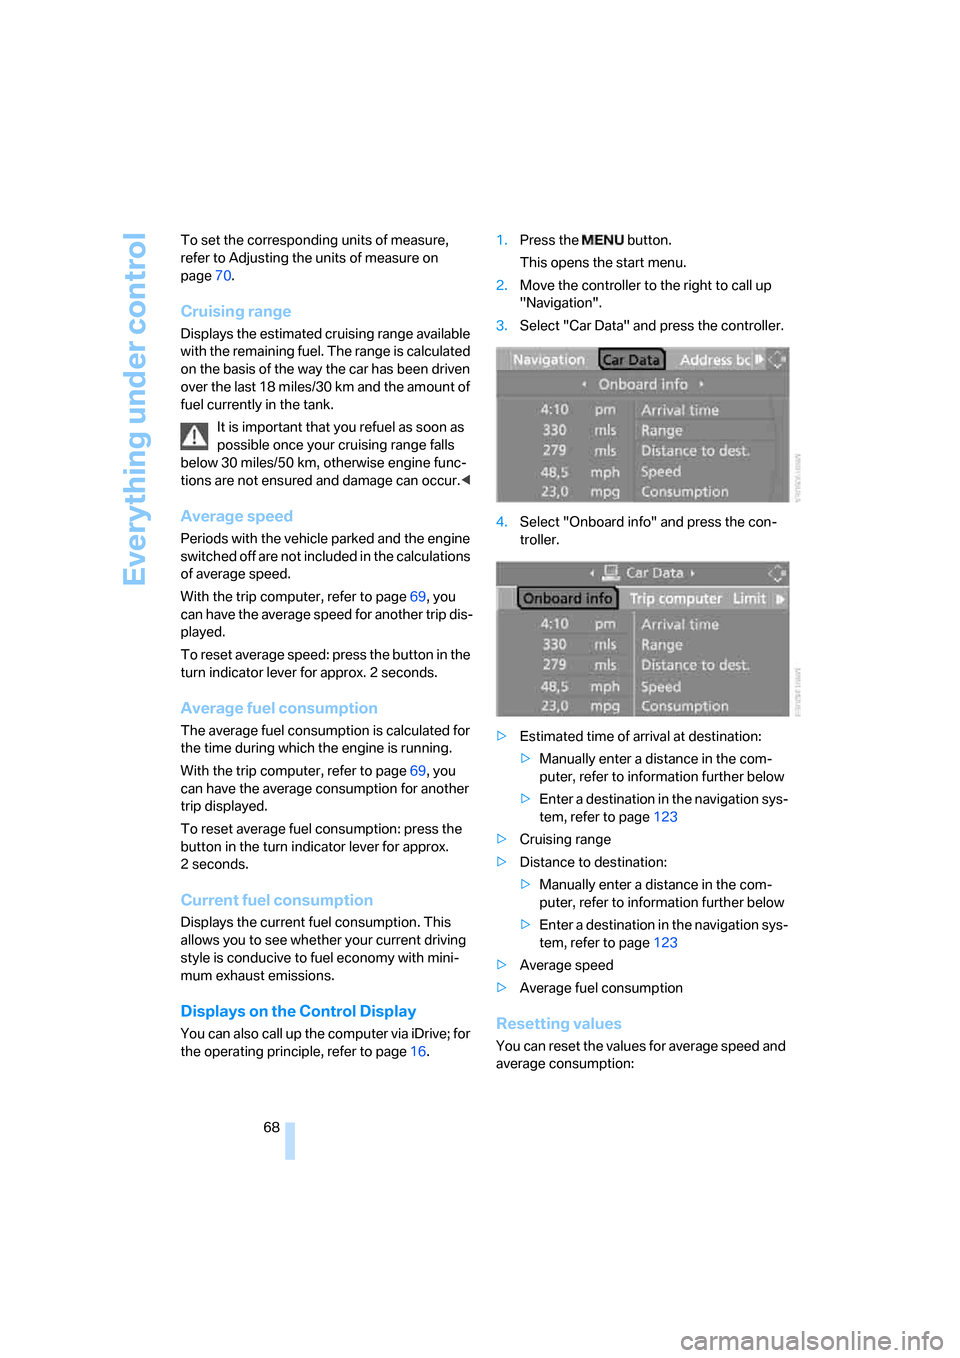
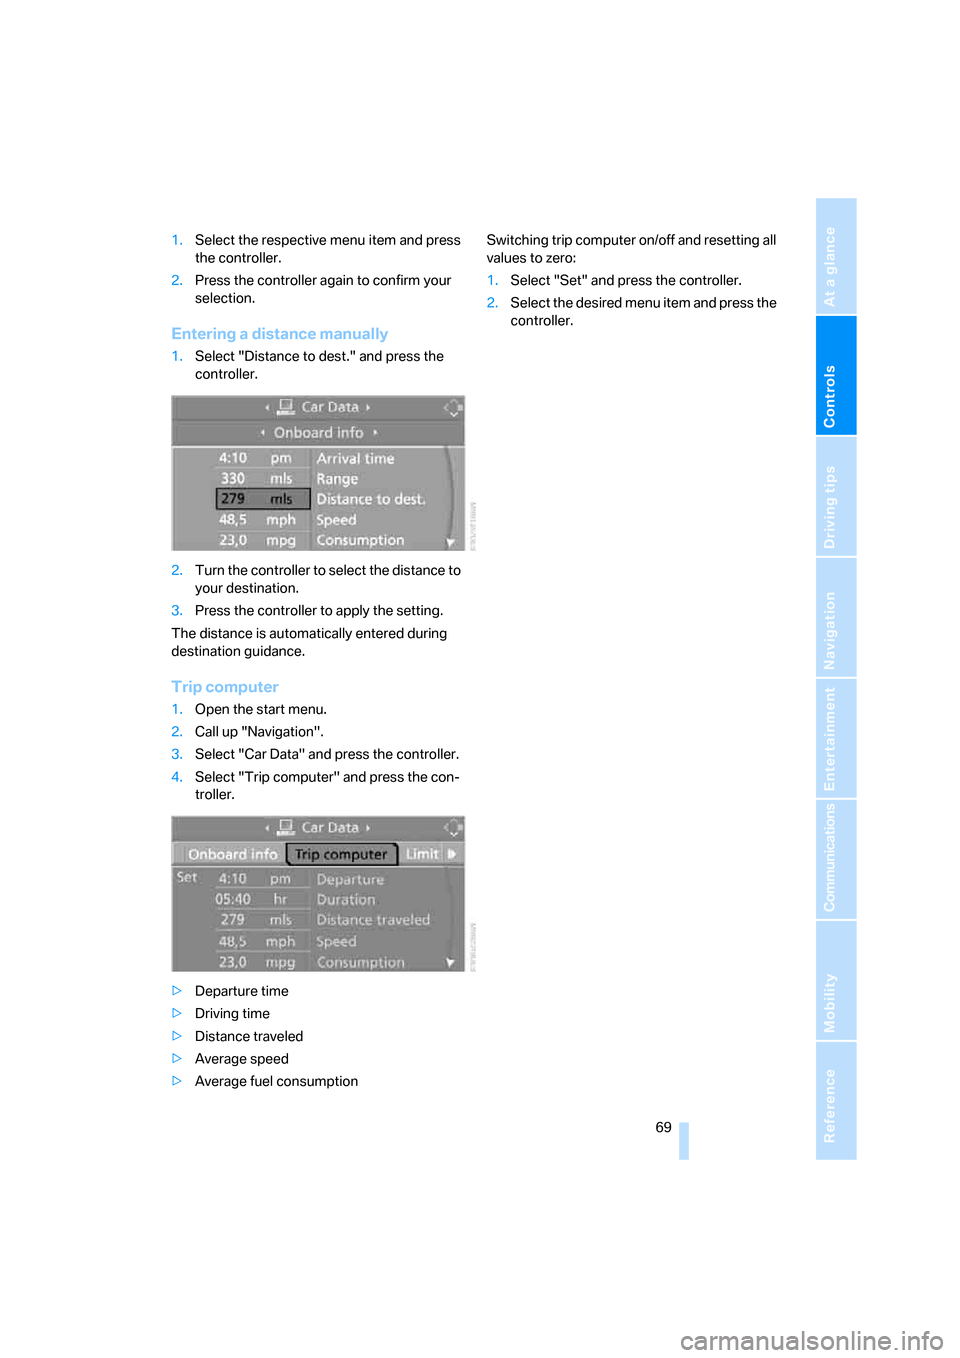
the operating principle, refer to page16.1.Press the button.
This opens the start menu.
2.Move the controller to the right to call up
"Navigation".
3.Select "Car Data" and press the controller.
4.Select "Onboard info" and press the con-
troller.
>Estimated time of arrival at destination:
>Manually enter a distance in the com-
puter, refer to information further below
>Enter a destination in the navigation sys-
tem, refer to page123
>Cruising range
>Distance to destination:
>Manually enter a distance in the com-
puter, refer to information further below
>Enter a destination in the navigation sys-
tem, refer to page123
>Average speed
>Average fuel consumptionResetting values
You can reset the values for average speed and
average consumption:
Page 71 of 260

Controls
69Reference
At a glance
Driving tips
Communications
Navigation
Entertainment
Mobility
1.Select the respective menu item and press
the controller.
2.Press the controller again to confirm your
selection.
Entering a distance manually
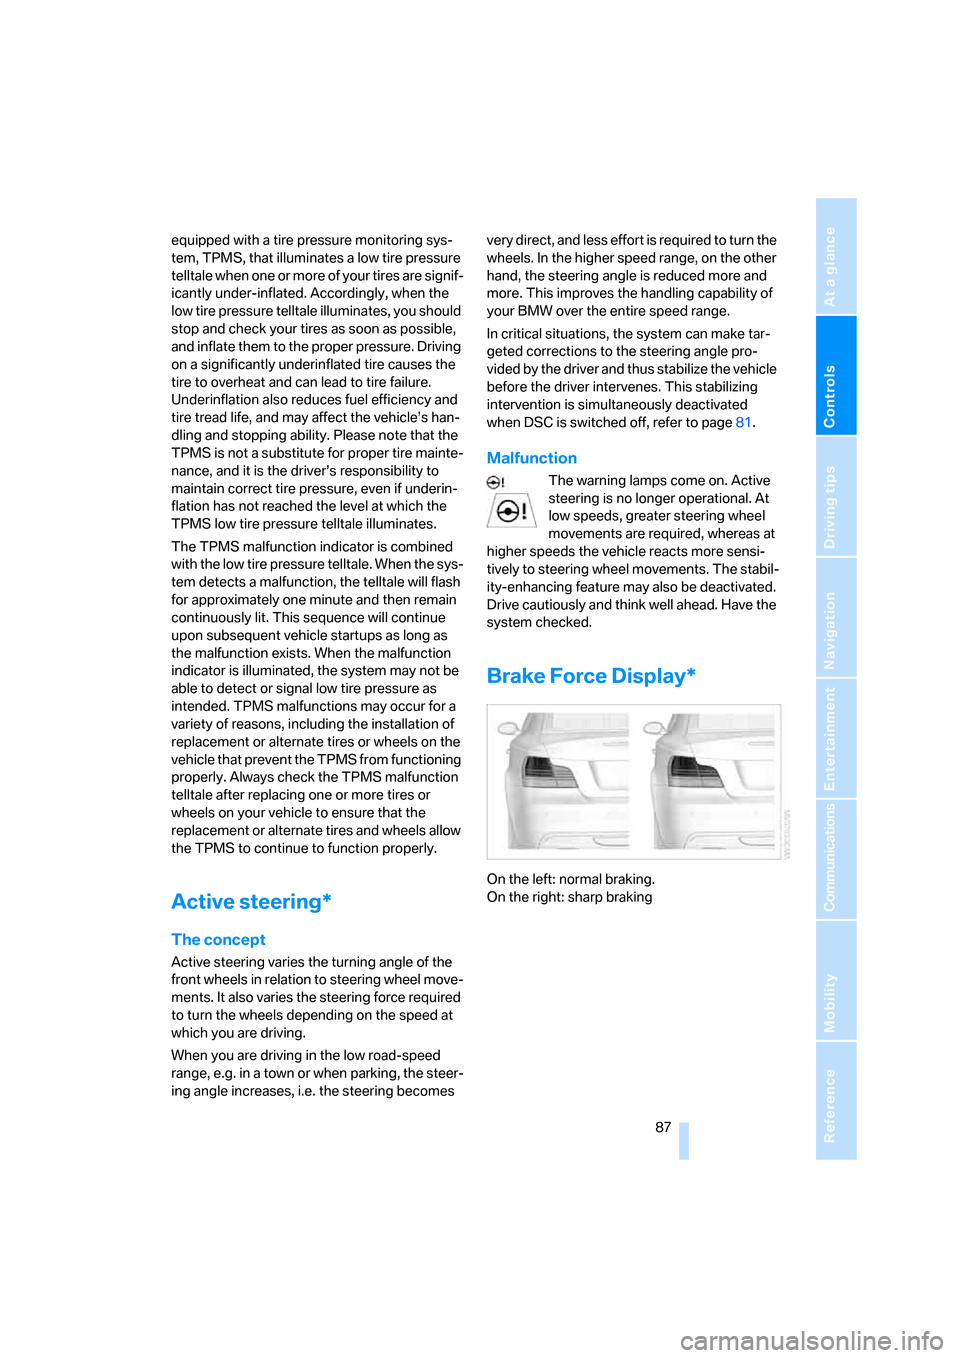
1.Select "Distance to dest." and press the
controller.
2.Turn the controller to select the distance to
your destination.
3.Press the controller to apply the setting.
The distance is automatically entered during
destination guidance.
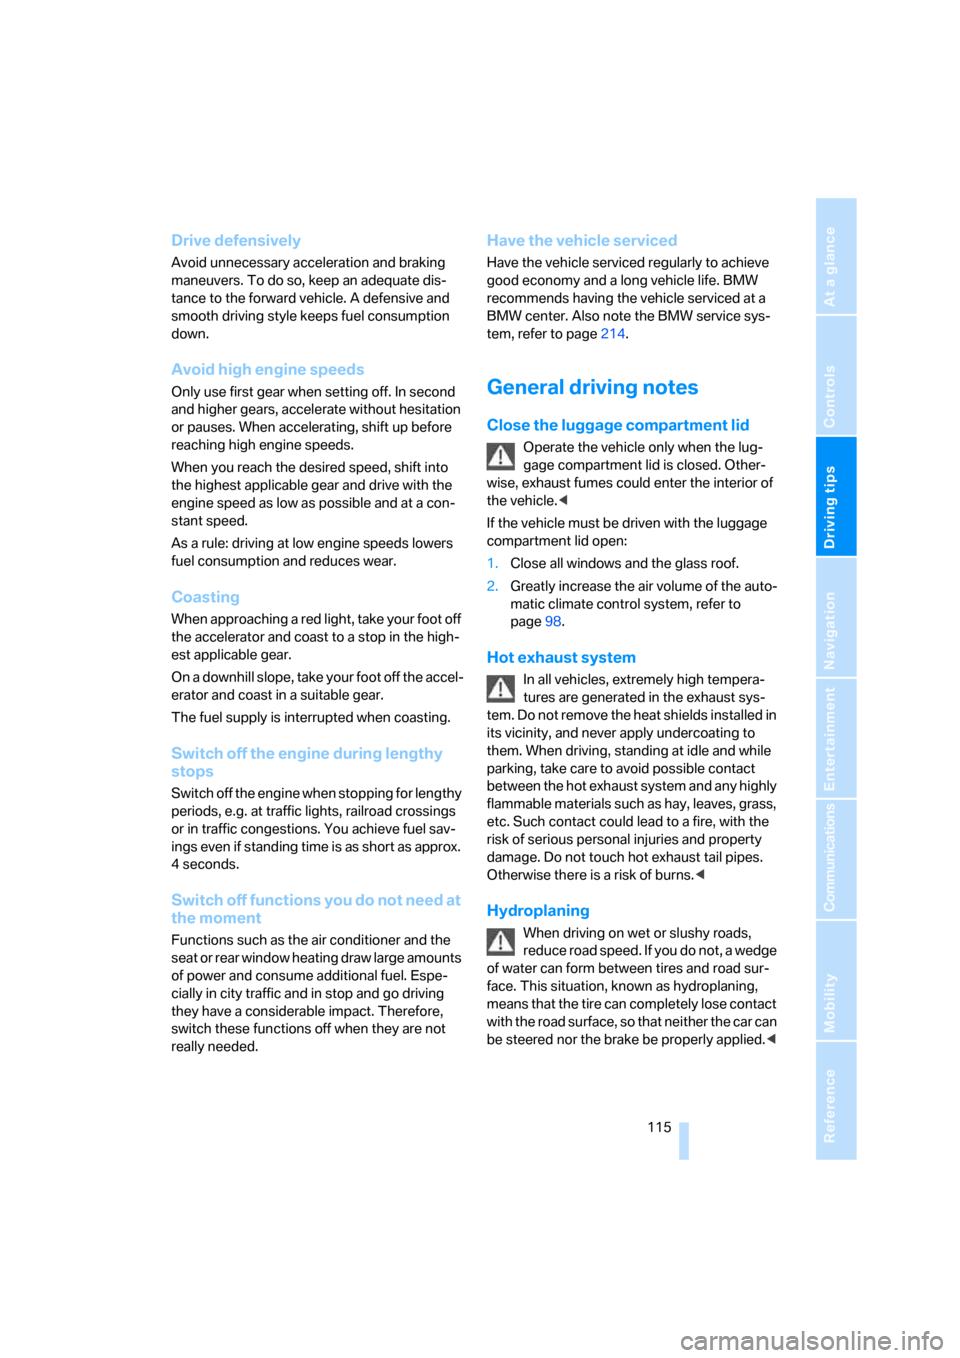
Trip computer
1.Open the start menu.
2.Call up "Navigation".
3.Select "Car Data" and press the controller.
4.Select "Trip computer" and press the con-
troller.
>Departure time
>Driving time
>Distance traveled
>Average speed
>Average fuel consumptionSwitching trip computer on/off and resetting all
values to zero:
1.Select "Set" and press the controller.
2.Select the desired menu item and press the
controller.
Page 89 of 260

Controls
87Reference
At a glance
Driving tips
Communications
Navigation
Entertainment
Mobility
equipped with a tire pressure monitoring sys-
tem, TPMS, that illuminates a low tire pressure
telltale when one or more of your tires are signif-
icantly under-inflated. Accordingly, when the
low tire pressure telltale illuminates, you should
stop and check your tires as soon as possible,
and inflate them to the proper pressure. Driving
on a significantly underinflated tire causes the
tire to overheat and can lead to tire failure.
Underinflation also reduces fuel efficiency and
tire tread life, and may affect the vehicle’s han-
dling and stopping ability. Please note that the
TPMS is not a substitute for proper tire mainte-
nance, and it is the driver’s responsibility to
maintain correct tire pressure, even if underin-
flation has not reached the level at which the
TPMS low tire pressure telltale illuminates.
The TPMS malfunction indicator is combined
with the low tire pressure telltale. When the sys-
tem detects a malfunction, the telltale will flash
for approximately one minute and then remain
continuously lit. This sequence will continue
upon subsequent vehicle startups as long as
the malfunction exists. When the malfunction
indicator is illuminated, the system may not be
able to detect or signal low tire pressure as
intended. TPMS malfunctions may occur for a
variety of reasons, including the installation of
replacement or alternate tires or wheels on the
vehicle that prevent the TPMS from functioning
properly. Always check the TPMS malfunction
telltale after replacing one or more tires or
wheels on your vehicle to ensure that the
replacement or alternate tires and wheels allow
the TPMS to continue to function properly.
Active steering*
The concept
Active steering varies the turning angle of the
front wheels in relation to steering wheel move-
ments. It also varies the steering force required
to turn the wheels depending on the speed at
which you are driving.
When you are driving in the low road-speed
range, e.g. in a town or when parking, the steer-
ing angle increases, i.e. the steering becomes very direct, and less effort is required to turn the
wheels. In the higher speed range, on the other
hand, the steering angle is reduced more and
more. This improves the handling capability of
your BMW over the entire speed range.
In critical situations, the system can make tar-
geted corrections to the steering angle pro-
vided by the driver and thus stabilize the vehicle
before the driver intervenes. This stabilizing
intervention is simultaneously deactivated
when DSC is switched off, refer to page81.
Malfunction
The warning lamps come on. Active
steering is no longer operational. At
low speeds, greater steering wheel
movements are required, whereas at
higher speeds the vehicle reacts more sensi-
tively to steering wheel movements. The stabil-
ity-enhancing feature may also be deactivated.
Drive cautiously and think well ahead. Have the
system checked.
Brake Force Display*
On the left: normal braking.
On the right: sharp braking
Page 116 of 260

Things to remember when driving
114
Things to remember when driving
Break-in period
Moving parts need breaking-in time to adjust to
each other. Please follow the instructions below
in order to achieve the optimal service life and
economy of operation for your vehicle.
Engine and differential
Always obey all official speed limits.
Up to 1,200 miles/2,000 km
Drive at varying engine and road speeds, but do
not exceed an engine speed of 4500 rpm or a
road speed of 100 mph/160 km/h.
Avoid full-throttle operation and use of the
transmission's kick-down mode.
After driving 1,200 miles/2,000 km
Engine and vehicle speeds can be gradually
increased.
Tires
Due to technical factors associated with their
manufacture, tires do not achieve their full trac-
tion potential until after an initial break-in
period. Therefore, drive cautiously during the
first 200 miles/300 km.
Brake system
Brakes require an initial break-in period of
approx. 300 miles/500 km to achieve optimized
contact and wear patterns between brake pads
and rotors. Drive cautiously during this break-in
period.
Clutch
The function of the clutch reaches its optimal
level only after a distance driven of approx.
300 miles/500 km. During this break-in period,
engage the clutch gently.
Following part replacement
The same break-in procedures should be
observed if any of the components mentioned
above have to be renewed in the course of the
vehicle's operating life.
Saving fuel
The fuel consumption of your vehicle depends
on several factors. You can lower fuel consump-
tion and the environmental impact by taking
certain measures, adjusting your driving style
and having the vehicle serviced regularly.
Remove any unneeded cargo
Additional weight increases fuel consumption.
Remove any mounted parts after you
have finished using them
Remove unneeded additional mirrors, the roof
rack and the rear luggage rack after use.
Mounted parts affect the vehicle's aerodynam-
ics and increase fuel consumption.
Close the windows and glass roof
An open glass roof or window causes higher air
resistance and thus increases fuel consump-
tion.
Check tire inflation pressure regularly
Check the tire inflation pressure at least twice a
month and before embarking on a long journey,
and correct it if necessary.
Low tire inflation pressure causes higher rolling
resistance and thus increases fuel consumption
and tire wear.
Set off immediately
Do not let the engine warm up while the car is
still standing, but set off immediately at moder-
ate engine speed. This is the fastest way for the
cold engine to reach its operating temperature.
Page 117 of 260

Driving tips
115Reference
At a glance
Controls
Communications
Navigation
Entertainment
Mobility
Drive defensively
Avoid unnecessary acceleration and braking
maneuvers. To do so, keep an adequate dis-
tance to the forward vehicle. A defensive and
smooth driving style keeps fuel consumption
down.
Avoid high engine speeds
Only use first gear when setting off. In second
and higher gears, accelerate without hesitation
or pauses. When accelerating, shift up before
reaching high engine speeds.
When you reach the desired speed, shift into
the highest applicable gear and drive with the
engine speed as low as possible and at a con-
stant speed.
As a rule: driving at low engine speeds lowers
fuel consumption and reduces wear.
Coasting
When approaching a red light, take your foot off
the accelerator and coast to a stop in the high-
est applicable gear.
O n a d o w n h il l s lo p e , t a k e y o u r f o o t o f f t h e a c c el -
erator and coast in a suitable gear.
The fuel supply is interrupted when coasting.
Switch off the engine during lengthy
stops
Switch off the engine when stopping for lengthy
periods, e.g. at traffic lights, railroad crossings
or in traffic congestions. You achieve fuel sav-
ings even if standing time is as short as approx.
4 seconds.
Switch off functions you do not need at
the moment
Functions such as the air conditioner and the
seat or rear window heating draw large amounts
of power and consume additional fuel. Espe-
cially in city traffic and in stop and go driving
they have a considerable impact. Therefore,
switch these functions off when they are not
really needed.
Have the vehicle serviced
Have the vehicle serviced regularly to achieve
good economy and a long vehicle life. BMW
recommends having the vehicle serviced at a
BMW center. Also note the BMW service sys-
tem, refer to page214.
General driving notes
Close the luggage compartment lid
Operate the vehicle only when the lug-
gage compartment lid is closed. Other-
wise, exhaust fumes could enter the interior of
the vehicle.<
If the vehicle must be driven with the luggage
compartment lid open:
1.Close all windows and the glass roof.
2.Greatly increase the air volume of the auto-
matic climate control system, refer to
page98.
Hot exhaust system
In all vehicles, extremely high tempera-
tures are generated in the exhaust sys-
tem. Do not remove the heat shields installed in
its vicinity, and never apply undercoating to
them. When driving, standing at idle and while
parking, take care to avoid possible contact
between the hot exhaust system and any highly
flammable materials such as hay, leaves, grass,
etc. Such contact could lead to a fire, with the
risk of serious personal injuries and property
damage. Do not touch hot exhaust tail pipes.
Otherwise there is a risk of burns.<
Hydroplaning
When driving on wet or slushy roads,
reduce road speed. If you do not, a wedge
of water can form between tires and road sur-
face. This situation, known as hydroplaning,
means that the tire can completely lose contact
with the road surface, so that neither the car can
be steered nor the brake be properly applied.<