2008 BMW 135I COUPE change time
[x] Cancel search: change timePage 101 of 260

Controls
99Reference
At a glance
Driving tips
Communications
Navigation
Entertainment
Mobility
shut off. The system then recirculates the
air currently within the vehicle.
If condensation starts to form on the
inside window surfaces during operation
in the recirculated-air mode, you should switch
it off while also increasing the air flow rate as
required.
The recirculated-air mode should not be used
over an extended period of time, otherwise the
air quality inside the car will deteriorate contin-
uously.<
Via the button* on the steering wheel
You can use an individually programmable but-
ton on the steering wheel, refer to page53, to
select between the different modes.
Residual heat
The heat stored in the engine is
used to heat the passenger com-
partment, e.g. while stopped at a
school to pick up a child.
The function can be switched on when the fol-
lowing conditions are met:
>Up to 15 minutes after the engine has been
switched off
>While the engine is at operating tempera-
ture
>As long as battery voltage is sufficient
>At an outside temperature below 777/
256
The LED is lit when the function is on.
As of radio readiness, you can set the interior
temperature, air flow rate and air distribution.
Defrosting windows and removing
condensation
Quickly removes ice and conden-
sation from the windshield and
front side windows.
Switch on the cooling function as well.
Switching cooling function on/off
The cooling function cools and
dehumidifies the incoming air
before reheating it as required,
according to the temperature setting. This
function is only available while the engine is
running.
The cooling function helps prevent condensa-
tion on the windows or removes it quickly.
Depending on the weather, the windshield may
fog over briefly when the engine is started.
The cooling function is automatically switched
on along with the AUTO program.
Rear window defroster
The defroster is switched off auto-
matically after a certain time.
Depending on your vehicle's
equipment, the upper wires serve
as an antenna and are not part of the rear win-
dow defroster.
Ventilation
1Use the knurled wheels to smoothly open
and close the air vents
2Use the lever to change the direction of the
airflow
Ventilation for cooling
Adjust the vent outlets to direct the flow of cool
air in your direction, for instance if it has become
too hot in the car.
Draft-free ventilation
Set the vent outlets so that the air flows past
you and not straight at you.
Page 138 of 260

Destination guidance
136
Destination guidance
Starting destination
guidance
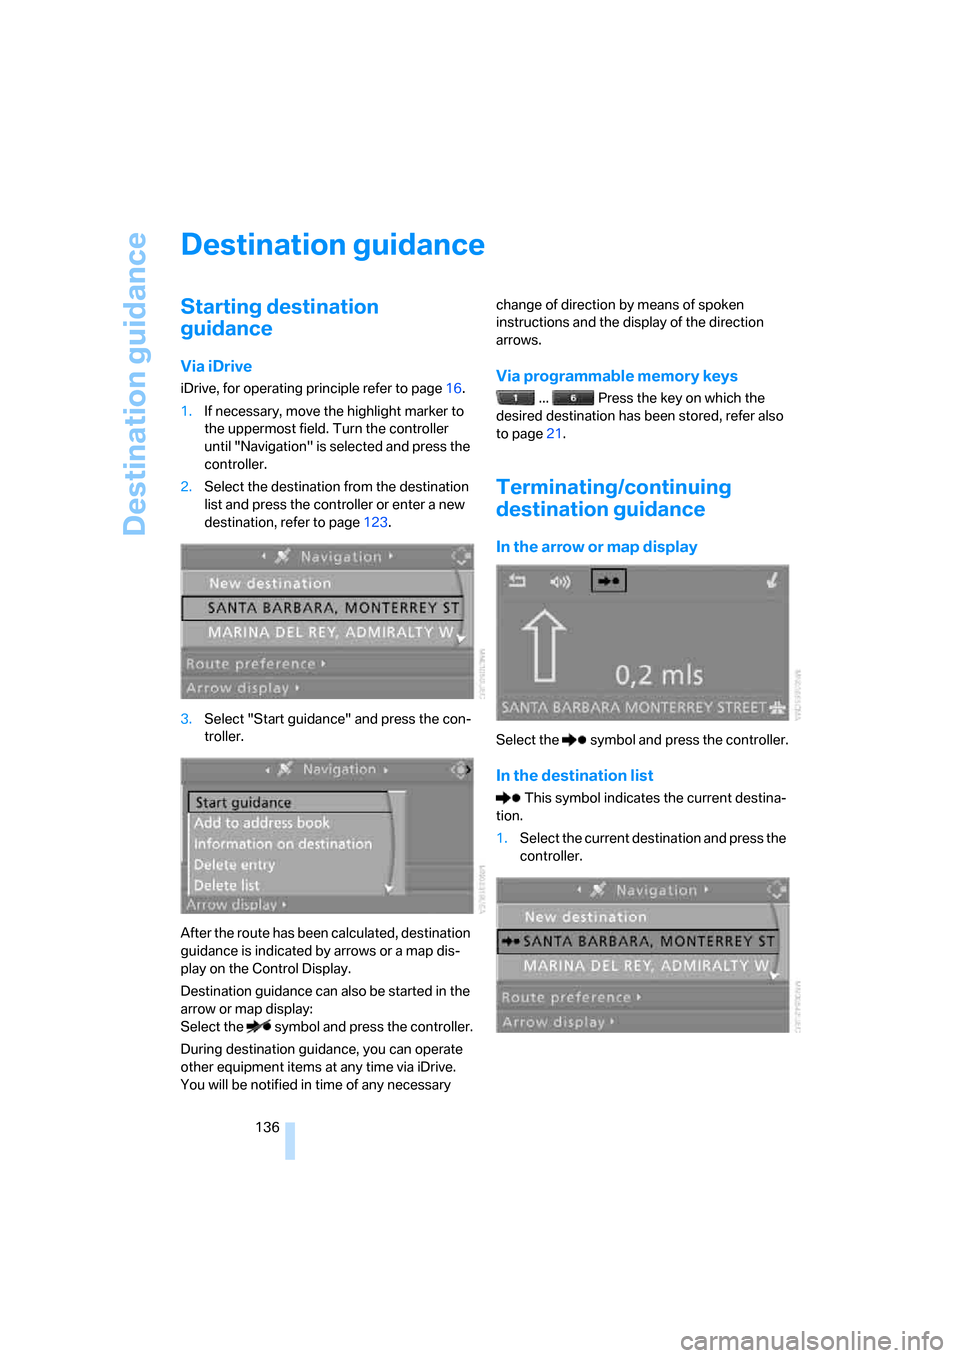
Via iDrive
iDrive, for operating principle refer to page16.
1.If necessary, move the highlight marker to
the uppermost field. Turn the controller
until "Navigation" is selected and press the
controller.
2.Select the destination from the destination
list and press the controller or enter a new
destination, refer to page123.
3.Select "Start guidance" and press the con-
troller.
After the route has been calculated, destination
guidance is indicated by arrows or a map dis-
play on the Control Display.
Destination guidance can also be started in the
arrow or map display:
Select the symbol and press the controller.
During destination guidance, you can operate
other equipment items at any time via iDrive.
You will be notified in time of any necessary change of direction by means of spoken
instructions and the display of the direction
arrows.Via programmable memory keys
... Press the key on which the
desired destination has been stored, refer also
to page21.
Terminating/continuing
destination guidance
In the arrow or map display
Select the symbol and press the controller.
In the destination list
This symbol indicates the current destina-
tion.
1.Select the current destination and press the
controller.
Page 139 of 260

Navigation
Driving tips
137Reference
At a glance
Controls
Communications
Entertainment
Mobility
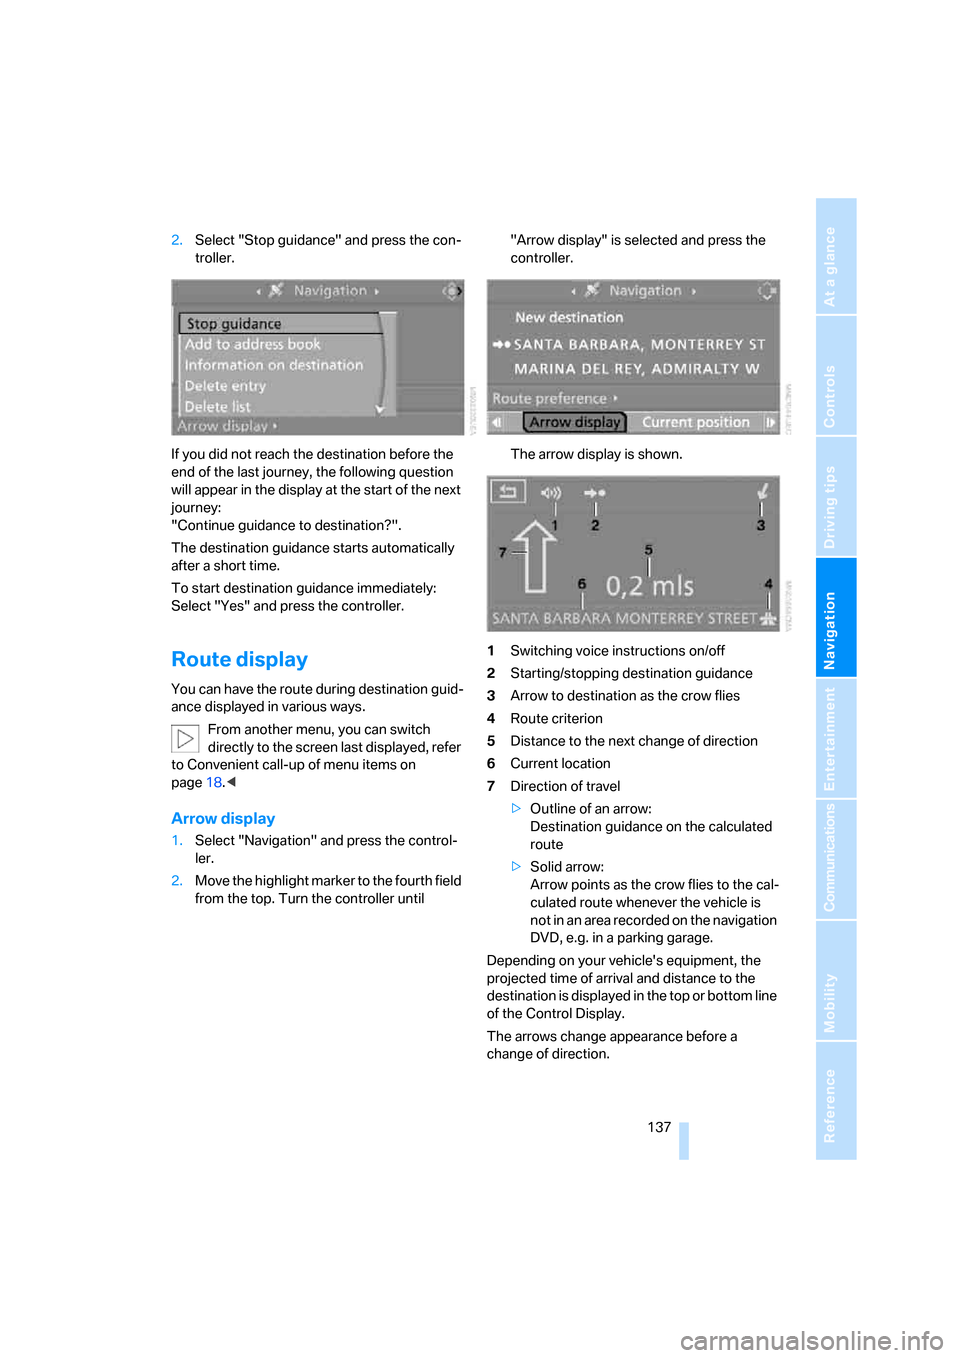
2.Select "Stop guidance" and press the con-
troller.
If you did not reach the destination before the
end of the last journey, the following question
will appear in the display at the start of the next
journey:
"Continue guidance to destination?".
The destination guidance starts automatically
after a short time.
To start destination guidance immediately:
Select "Yes" and press the controller.
Route display
You can have the route during destination guid-
ance displayed in various ways.
From another menu, you can switch
directly to the screen last displayed, refer
to Convenient call-up of menu items on
page18.<
Arrow display
1.Select "Navigation" and press the control-
ler.
2.Move the highlight marker to the fourth field
from the top. Turn the controller until "Arrow display" is selected and press the
controller.
The arrow display is shown.
1Switching voice instructions on/off
2Starting/stopping destination guidance
3Arrow to destination as the crow flies
4Route criterion
5Distance to the next change of direction
6Current location
7Direction of travel
>Outline of an arrow:
Destination guidance on the calculated
route
>Solid arrow:
Arrow points as the crow flies to the cal-
culated route whenever the vehicle is
not in an area recorded on the navigation
DVD, e.g. in a parking garage.
Depending on your vehicle's equipment, the
projected time of arrival and distance to the
destination is displayed in the top or bottom line
of the Control Display.
The arrows change appearance before a
change of direction.
Page 140 of 260

Destination guidance
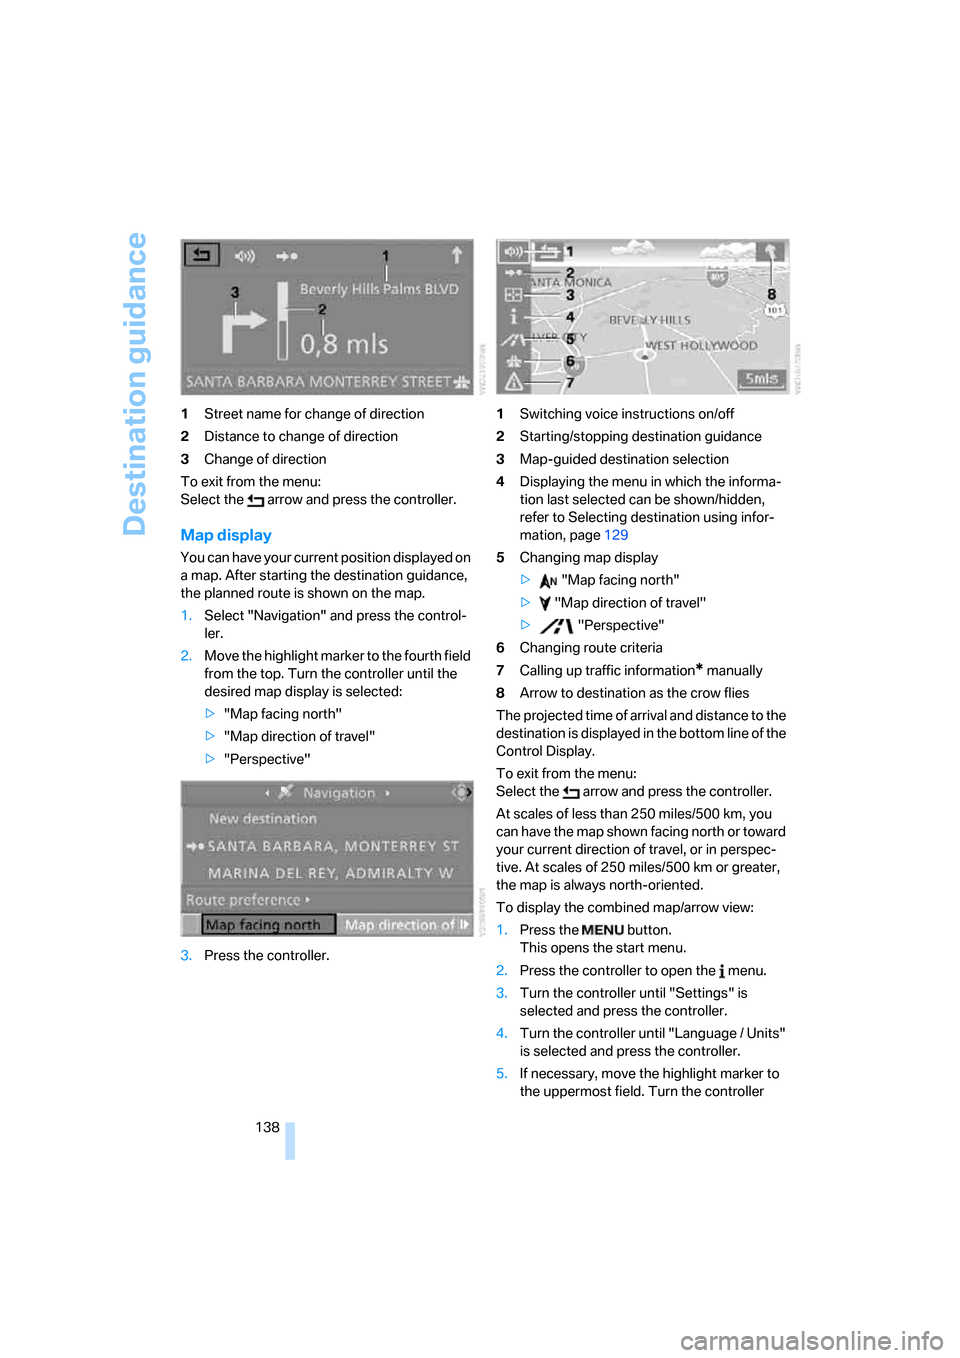
138 1Street name for change of direction
2Distance to change of direction
3Change of direction
To exit from the menu:
Select the arrow and press the controller.
Map display
You can have your current position displayed on
a map. After starting the destination guidance,
the planned route is shown on the map.
1.Select "Navigation" and press the control-
ler.
2.Move the highlight marker to the fourth field
from the top. Turn the controller until the
desired map display is selected:
>"Map facing north"
>"Map direction of travel"
>"Perspective"
3.Press the controller.1Switching voice instructions on/off
2Starting/stopping destination guidance
3Map-guided destination selection
4Displaying the menu in which the informa-
tion last selected can be shown/hidden,
refer to Selecting destination using infor-
mation, page129
5Changing map display
> "Map facing north"
> "Map direction of travel"
> "Perspective"
6Changing route criteria
7Calling up traffic information
* manually
8Arrow to destination as the crow flies
The projected time of arrival and distance to the
destination is displayed in the bottom line of the
Control Display.
To exit from the menu:
Select the arrow and press the controller.
At scales of less than 250 miles/500 km, you
can have the map shown facing north or toward
your current direction of travel, or in perspec-
tive. At scales of 250 miles/500 km or greater,
the map is always north-oriented.
To display the combined map/arrow view:
1.Press the button.
This opens the start menu.
2.Press the controller to open the menu.
3.Turn the controller until "Settings" is
selected and press the controller.
4.Turn the controller until "Language / Units"
is selected and press the controller.
5.If necessary, move the highlight marker to
the uppermost field. Turn the controller
Page 157 of 260

Navigation
Entertainment
Driving tips
155Reference
At a glance
Controls
Communications
Mobility
To change the selection criterion:
1.Move the highlight marker to the second
field from the top.
2.Choose a selection criterion and press the
controller.
Sampling stations, Scan
The stations on the current waveband are auto-
matically sampled in succession.
1.Select "FM" or "AM" and press the control-
ler.
"Set" is selected.
2.Press the controller.
Other menu items are displayed.
3.Select "Scan" and press the controller.
The stations are sampled.
Stop sampling:
1.Press the controller.
2.Select "Scan" and press the controller.
Station sampling is interrupted and the
selected station stays on.
Buttons on the CD player
To sample stations, press the but-
ton for the corresponding direction for an
extended time.To stop scanning, press the button again.
Selecting the frequency manually
With "Manual" you can select stations that can
be received in addition to those displayed.
1.Select "FM" or "AM" and press the control-
ler.
2.Move the highlight marker to the second
field from the top.
3.Select "Manual" and press the controller.
4.Turn the controller to set a certain fre-
quency.
Updating stations with best reception
If on a longer journey you move out of the
reception range of the stations originally
received, you can update the list of stations
received with the strongest signals in the AM
waveband.
1.Select "AM" and press the controller.
2.Move the highlight marker to the second
field from the top.
3.Select "Autostore" and press the controller.
"Set" is selected.
4.Press the controller.
Other menu items are displayed.
Page 182 of 260

Telephoning
180 time, the mobile phone at the top of the list can
be operated via the vehicle.
You can change the order of the mobile phones
on the list. As long as a mobile phone from this
list is selected, you cannot operate the mobile
phones via the vehicle.
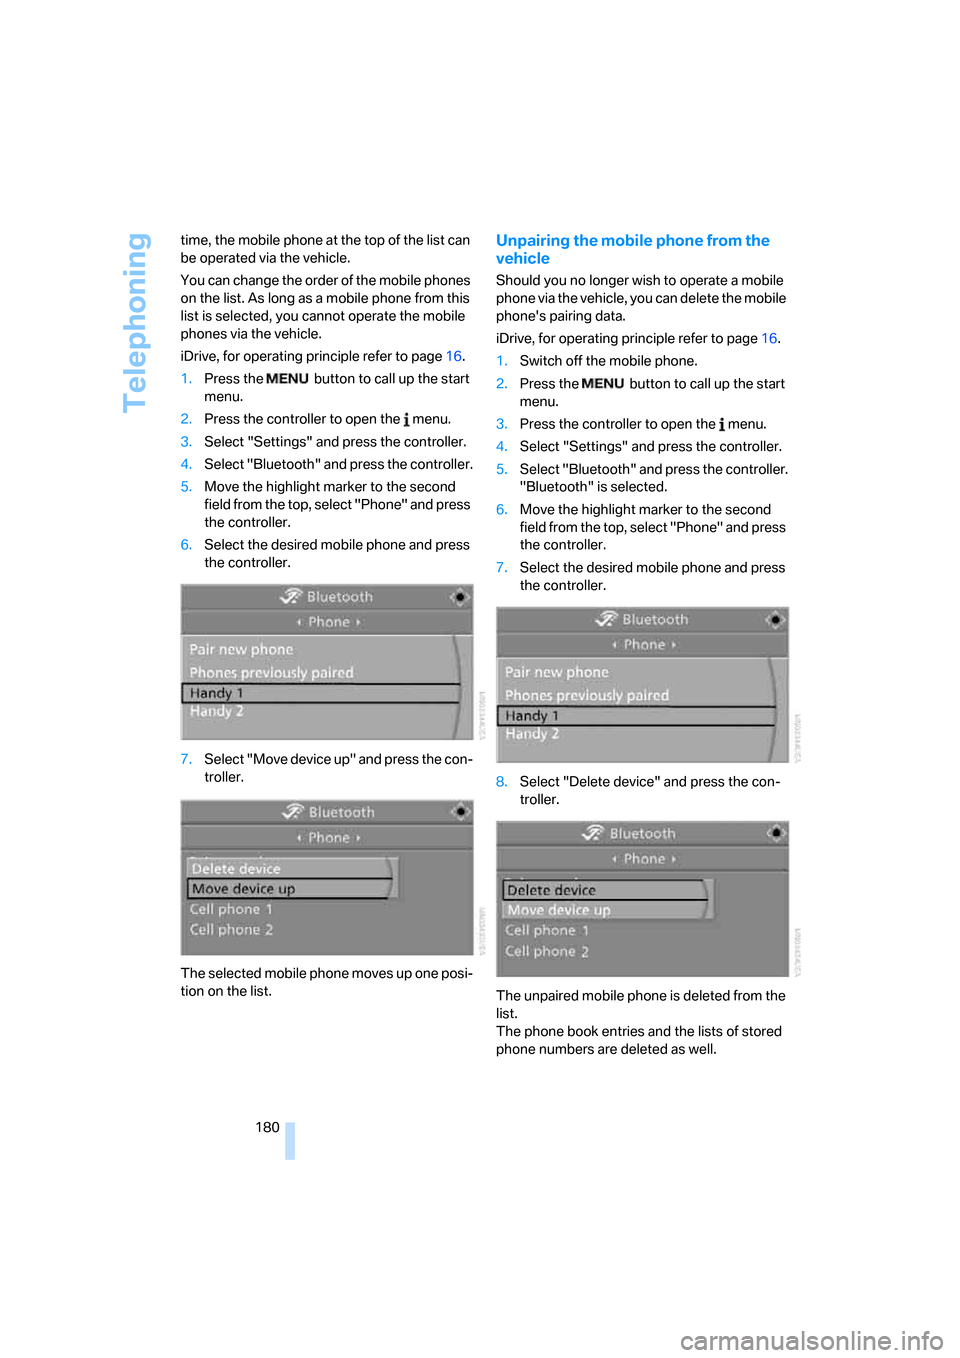
iDrive, for operating principle refer to page16.
1.Press the button to call up the start
menu.
2.Press the controller to open the menu.
3.Select "Settings" and press the controller.
4.Select "Bluetooth" and press the controller.
5.Move the highlight marker to the second
field from the top, select "Phone" and press
the controller.
6.Select the desired mobile phone and press
the controller.
7.Select "Move device up" and press the con-
troller.
The selected mobile phone moves up one posi-
tion on the list.
Unpairing the mobile phone from the
vehicle
Should you no longer wish to operate a mobile
phone via the vehicle, you can delete the mobile
phone's pairing data.
iDrive, for operating principle refer to page16.
1.Switch off the mobile phone.
2.Press the button to call up the start
menu.
3.Press the controller to open the menu.
4.Select "Settings" and press the controller.
5.Select "Bluetooth" and press the controller.
"Bluetooth" is selected.
6.Move the highlight marker to the second
field from the top, select "Phone" and press
the controller.
7.Select the desired mobile phone and press
the controller.
8.Select "Delete device" and press the con-
troller.
The unpaired mobile phone is deleted from the
list.
The phone book entries and the lists of stored
phone numbers are deleted as well.
Page 244 of 260

Everything from A - Z
242 Car-care products, refer to
Caring for your vehicle
brochure
"Car Data"68
Care, refer to Caring for your
vehicle brochure
Cargo, securing118
Cargo bay
– capacity233
– convenient access37
– enlarging, refer to Through-
loading system108
– lamp, refer to Interior
lamps94
– lid, refer to Luggage
compartment lid33
– opening from outside33
Cargo bay lid, refer to
Luggage compartment
lid33
Cargo bay net, refer to
Securing cargo118
Cargo loading
– securing cargo118
– stowing cargo117
– vehicle117
Caring for artificial leather,
refer to Caring for your
vehicle brochure
Caring for leather, refer to
Caring for your vehicle
brochure
Caring for plastic, refer to
Caring for your vehicle
brochure
Caring for the carpet, refer to
Caring for your vehicle
brochure
Caring for the vehicle finish,
refer to Caring for your
vehicle brochure
Car jack
– jacking points220
Car key, refer to Integrated
key/remote control28Car phone176
– installation location, refer to
Center armrest106
– refer to Mobile phone176
– refer to separate Owner's
Manual
Car radio, refer to Radio154
Car wash116
– also refer to Caring for your
vehicle brochure
Catalytic converter, refer to
Hot exhaust system115
"Categories" for satellite
radio161
"CD"150,163
CD changer163
– compressed audio files163
– controls150
– fast forward/reverse167
– installation location167
– playing a track165
– random order166
– repeating a track166
– selecting a CD163
– selecting a track164
– switching on/off150
– tone control151
– volume151
CD player163
– compressed audio files163
– controls150
– fast forward/reverse167
– playing a track165
– random order166
– repeating a track166
– selecting a track164
– switching on/off150
– tone control151
– volume151
Center armrest106
Center brake lamp, replacing
bulb219
Center console, refer to
Around the center
console14
Central key, refer to Integrated
key/remote control28
"Central locking"30,50Central locking
– from inside32
– from outside29
Central locking system29
– convenient access36
Changes, technical, refer to
For your own safety5
Changing the language on the
Control Display79
Changing the measurement
units on the Control
Display70,78
Changing wheels219
Chassis number, refer to
Engine compartment210
Check Control76
"Check Control
messages"77
Checking oil level210
Child-restraint fixing system
LATCH56
Child-restraint systems55
Child seats55
Chrome parts, care, refer to
Caring for your vehicle
brochure
Cigarette lighter107
Cleaning, refer to Caring for
your vehicle brochure
Cleaning headlamps64
– washer fluid64
"Climate"97
Clock66
– 12h/24h format75
– setting time74
Closing
– from inside32
– from outside29
Clothes hooks106
Cold start, refer to Starting the
engine59
Combination instrument, refer
to Instrument cluster12
Comfort access, refer to
Convenient access36
Comfort area, refer to Around
the center console14
"Communication"182,192,1
93,194
Page 245 of 260

Reference 243
At a glance
Controls
Driving tips
Communications
Navigation
Entertainment
Mobility
Compact disc, refer to
– CD changer163
– CD player163
Compartment for remote
control, refer to Ignition
lock58
Compass104
Computer67
– displays on Control
Display68
– hour signal75
Computer, refer to iDrive16
"Concert hall" for Tone
control152
"Concierge"194
Concierge service194
Condensation, refer to When
the vehicle is parked116
Condition Based Service
CBS214
Configuring settings, refer to
Personal Profile28
Confirmation signals for
locking/unlocking the
vehicle31
Connecting vacuum cleaner,
refer to Connecting
electrical appliances107
Consumption, refer to
Average fuel
consumption68
"Continue guidance to
destination?"137
Control Center, refer to
iDrive16
Control Display16
Controller, refer to iDrive16
Controls and displays10
Convenient access36
– replacing the battery37
Convenient operation
– windows30
– windows with convenient
access36
– with convenient access36
Convenient starting, refer to
Starting the engine59Convertible
– rollover protection
system89
– top40
– wind deflector44
Convertible top
– convenient opening30
Coolant213
– checking level213
– filling213
Coolant temperature67
Cooling, maximum97
Cooling fluid, refer to
Coolant213
Copyright2
Corner-illuminating lamps93
Corner-illuminating lamps,
refer to Adaptive Head
Light93
Cornering lamps, refer to
Adaptive Head Light93
Courtesy lamps94
Cross-hairs in navigation128
Cruise control64
Cruising range68
Cup holders106
Curb weight, refer to
Weights233
Current fuel consumption68
"Current position"144
Current position
– displaying144
– entering132
– storing132
"Customer
Relations"186,194
D
Dashboard, refer to
Cockpit10
Dashboard lighting, refer to
Instrument lighting94
Data
– dimensions231
– sizes231Data, technical230
– capacities234
– engine230
– weights233
"Date"75,76
Date
– setting75
– setting format76
"Date format"76
"Daytime running lamps"93
Daytime running lamps,
switch positions92
DBC Dynamic Brake
Control81
"Deactivated"51
Deactivating front passenger
airbags88
Deadlocking, refer to
Locking30
Decommissioning the vehicle,
refer to Caring for your
vehicle brochure
Defect
– door lock32
– fuel filler door200
– glass roof40
– luggage compartment lid33
Defogging windows99
Defrosting the windows99
Defrosting windshield, refer to
Defrosting windows99
Defrost position, refer to
Defrosting windows99
"Delete address book" in
navigation133
"Delete all numbers" on the
mobile phone185
"Delete data" in
navigation133
"Delete" for mobile
phone185
Destination address
– deleting133
– entering123,127