2008 BMW 135I COUPE Cargo bay
[x] Cancel search: Cargo bayPage 110 of 260
Practical interior accessories
108
Coupe: through-loading
system
Opening
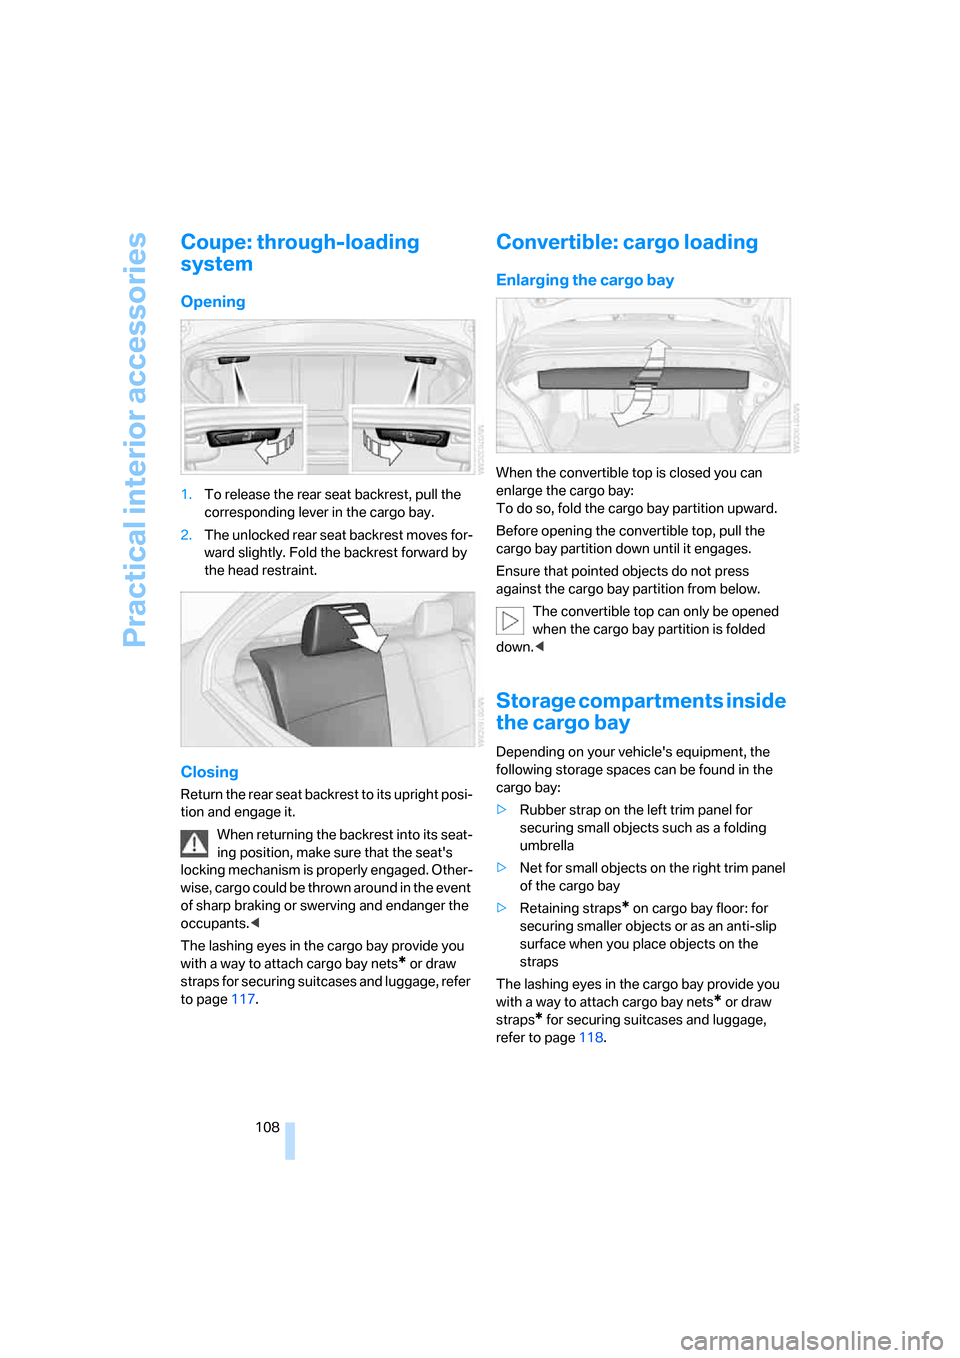
1.To release the rear seat backrest, pull the
corresponding lever in the cargo bay.
2.The unlocked rear seat backrest moves for-
ward slightly. Fold the backrest forward by
the head restraint.
Closing
Return the rear seat backrest to its upright posi-
tion and engage it.
When returning the backrest into its seat-
ing position, make sure that the seat's
locking mechanism is properly engaged. Other-
wise, cargo could be thrown around in the event
of sharp braking or swerving and endanger the
occupants.<
The lashing eyes in the cargo bay provide you
with a way to attach cargo bay nets
* or draw
straps for securing suitcases and luggage, refer
to page117.
Convertible: cargo loading
Enlarging the cargo bay
When the convertible top is closed you can
enlarge the cargo bay:
To do so, fold the cargo bay partition upward.
Before opening the convertible top, pull the
cargo bay partition down until it engages.
Ensure that pointed objects do not press
against the cargo bay partition from below.
The convertible top can only be opened
when the cargo bay partition is folded
down.<
Storage compartments inside
the cargo bay
Depending on your vehicle's equipment, the
following storage spaces can be found in the
cargo bay:
>Rubber strap on the left trim panel for
securing small objects such as a folding
umbrella
>Net for small objects on the right trim panel
of the cargo bay
>Retaining straps
* on cargo bay floor: for
securing smaller objects or as an anti-slip
surface when you place objects on the
straps
The lashing eyes in the cargo bay provide you
with a way to attach cargo bay nets
* or draw
straps
* for securing suitcases and luggage,
refer to page118.
Page 112 of 260
Practical interior accessories
110
Convertible: through-loading
opening with integrated
transport bag*
The transport bag is designed for safe, clean
transport of up to 4 pairs of standard skis or up
to 2 snowboards.
With the transport bag you can stow skis up to a
length of 6 ft 7 in/2.0 m. When skis of 6 ft 7 in/
2.0 m length are loaded, the overall capacity of
the ski bag is reduced due to its tapered design.
When using the transport bag, it is not
permissible to transport passengers in
the rear seats.<
Loading
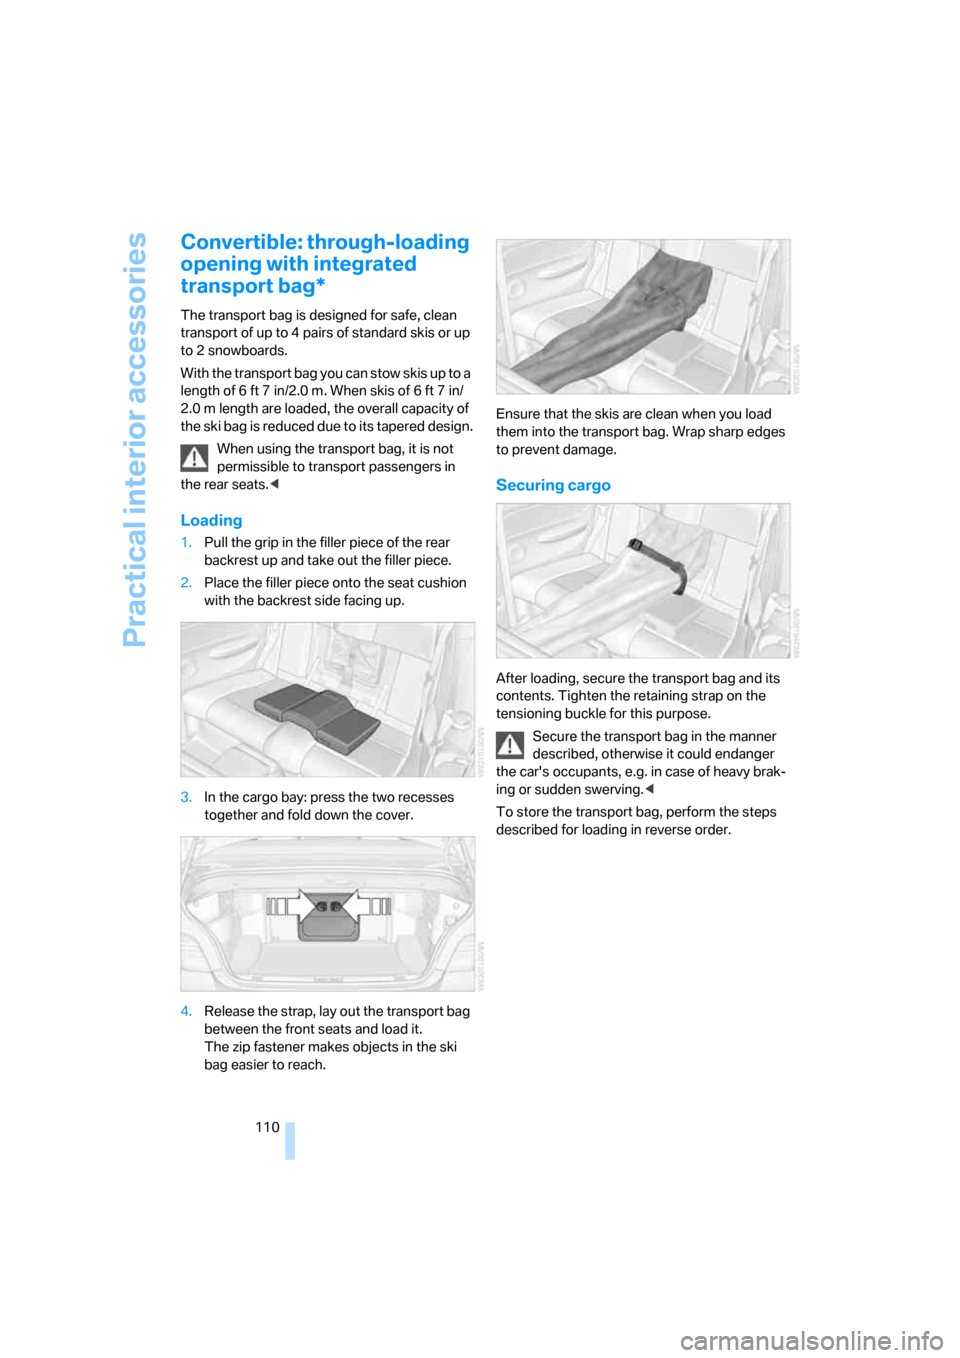
1.Pull the grip in the filler piece of the rear
backrest up and take out the filler piece.
2.Place the filler piece onto the seat cushion
with the backrest side facing up.
3.In the cargo bay: press the two recesses
together and fold down the cover.
4.Release the strap, lay out the transport bag
between the front seats and load it.
The zip fastener makes objects in the ski
bag easier to reach.Ensure that the skis are clean when you load
them into the transport bag. Wrap sharp edges
to prevent damage.
Securing cargo
After loading, secure the transport bag and its
contents. Tighten the retaining strap on the
tensioning buckle for this purpose.
Secure the transport bag in the manner
described, otherwise it could endanger
the car's occupants, e.g. in case of heavy brak-
ing or sudden swerving.<
To store the transport bag, perform the steps
described for loading in reverse order.
Page 119 of 260
Driving tips
117Reference
At a glance
Controls
Communications
Navigation
Entertainment
Mobility
With convenient access and automatic
transmission
Insert the remote control into the ignition
switch.
The engine can be switched off when the selec-
tor lever is in position N. Refer also to page37.
Cargo loading
To avoid loading the tires beyond their
approved carrying capacity, never over-
load the vehicle. Overloading can lead to over-
heating and increases the rate at which damage
develops inside the tires. This can ultimately
result in a sudden blow-out.<
Make sure that no liquids are spilled or
leak from their containers in the cargo
bay, as this could result in damage to the vehi-
cle.<
Determining loading limit
1.Locate the following statement on your
vehicle's placard
*:
The combined weight of occupants
and cargo should never exceed
XXX kg or YYY lbs. Otherwise, overloading
can result in damage to the vehicle and
unstable driving conditions.<
2.Determine the combined weight of the
driver and passengers that will be riding in
your vehicle.
3.Subtract the combined weight of the driver
and passengers from XXX kilograms or YYY
pounds.
4.The resulting figure equals the available
amount of cargo and luggage load capacity. For example, if the YYY amount equals
1,400 lbs. and there will be five 150-lb. pas-
sengers in your vehicle, the amount of avail-
able cargo and luggage load capacity is
650 lbs:
1,400 lbs. minus 750 lbs. = 650 lbs.
5.Determine the combined weight of luggage
and cargo being loaded on the vehicle. That
weight may not safely exceed the available
cargo and luggage load capacity calculated
in step 4.
6.If your vehicle will be towing a trailer, part of
the load from your trailer will be transferred
to your vehicle. Consult the manual for
transporting a trailer to determine how this
may reduce the available cargo and luggage
load capacity of your vehicle.
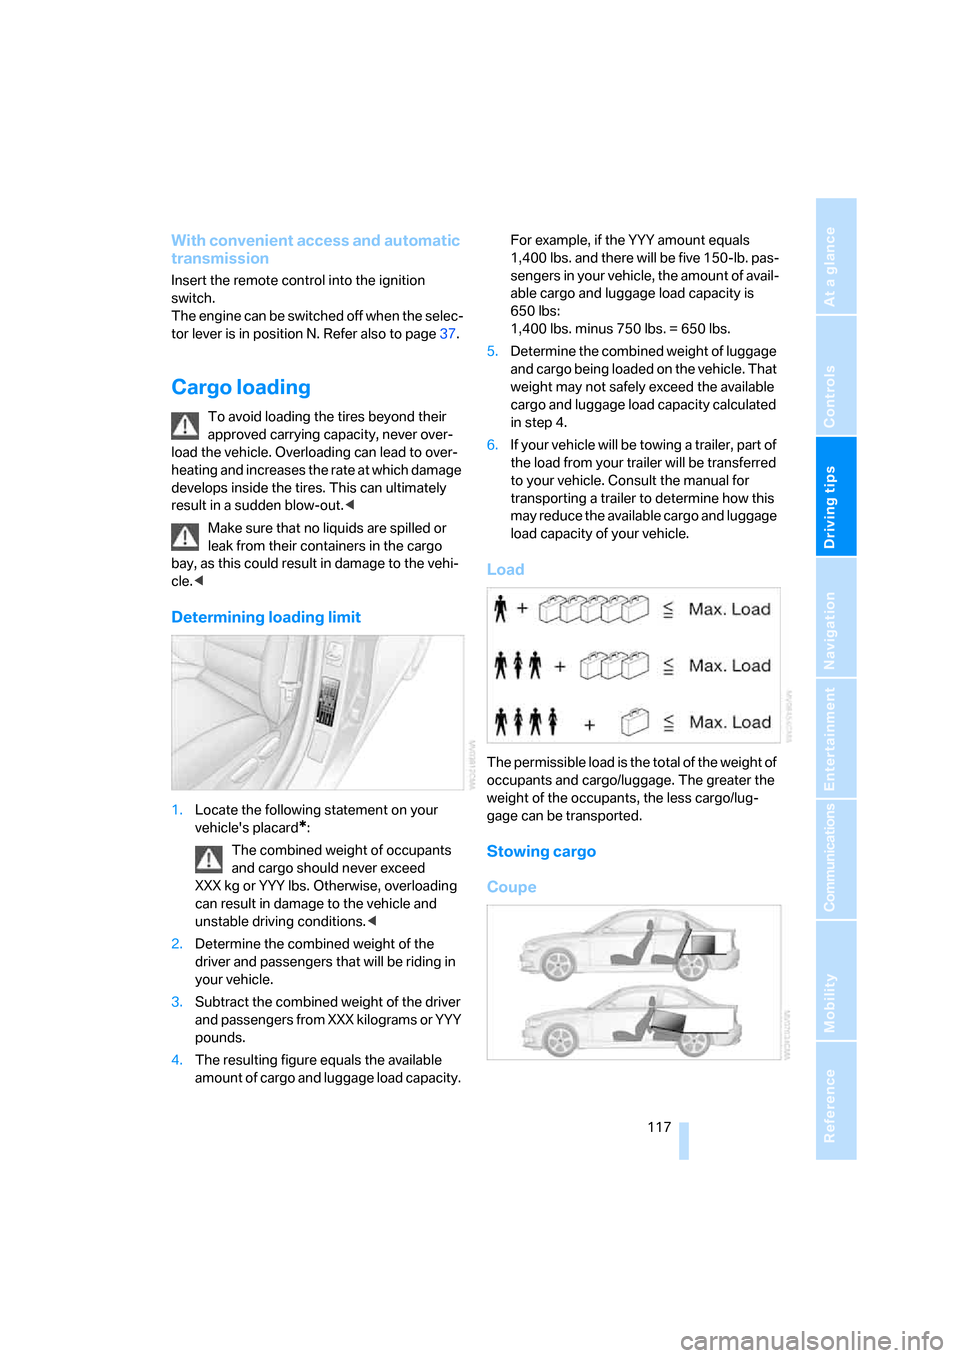
Load
The permissible load is the total of the weight of
occupants and cargo/luggage. The greater the
weight of the occupants, the less cargo/lug-
gage can be transported.
Stowing cargo
Coupe
Page 120 of 260
Things to remember when driving
118
Convertible
>Position heavy objects as low and as far for-
ward as possible, ideally directly behind the
respective seat backrests.
>Cover sharp edges and corners.
>For very heavy cargo when the rear seat is
not occupied, secure each safety belt in the
opposite buckle.
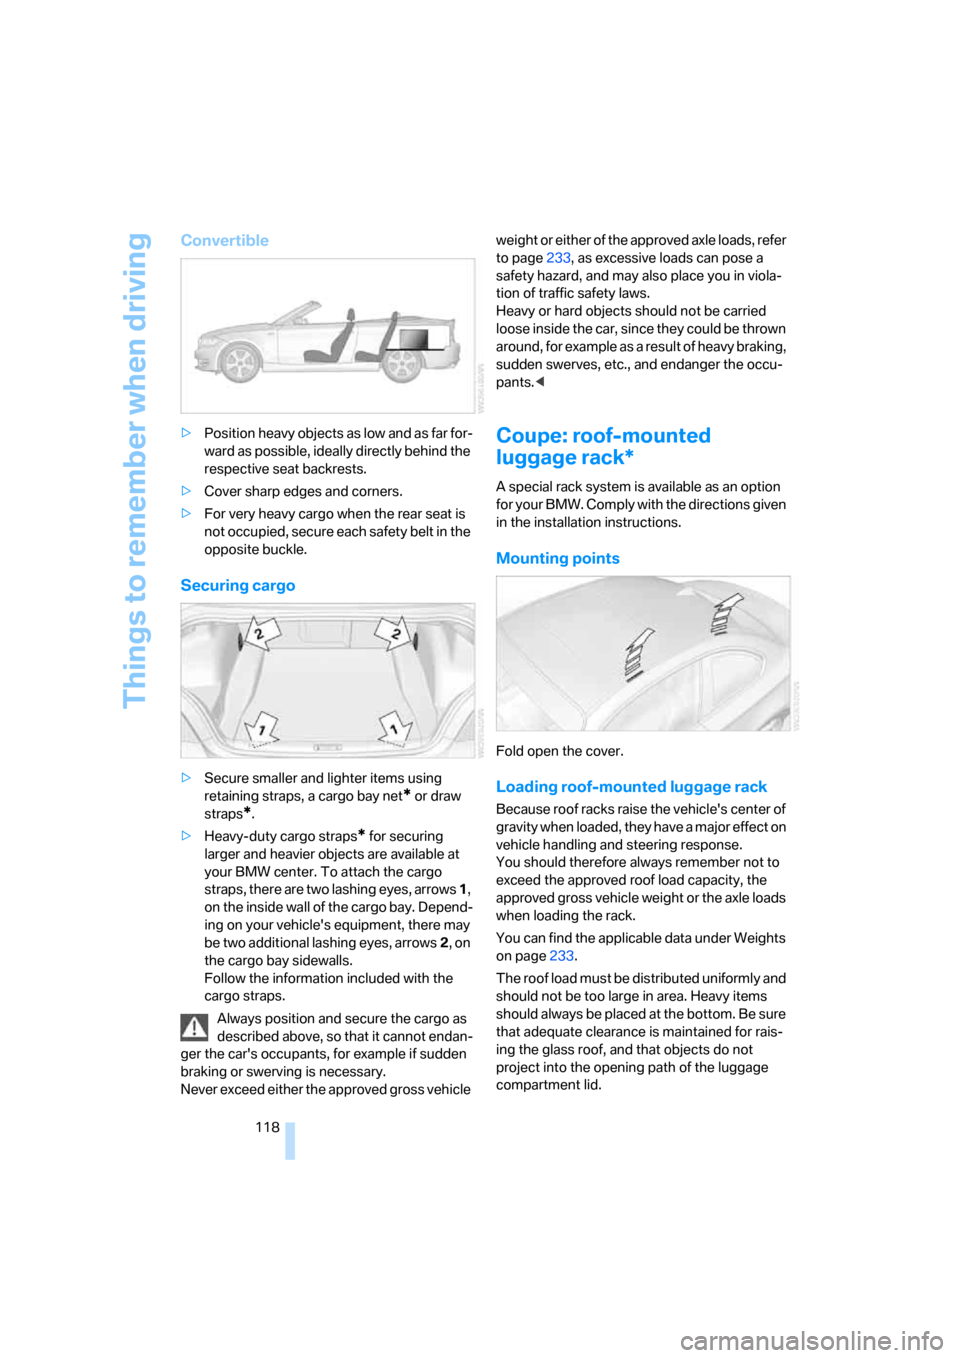
Securing cargo
>Secure smaller and lighter items using
retaining straps, a cargo bay net
* or draw
straps
*.
>Heavy-duty cargo straps
* for securing
larger and heavier objects are available at
your BMW center. To attach the cargo
straps, there are two lashing eyes, arrows 1,
on the inside wall of the cargo bay. Depend-
ing on your vehicle's equipment, there may
be two additional lashing eyes, arrows2, on
the cargo bay sidewalls.
Follow the information included with the
cargo straps.
Always position and secure the cargo as
described above, so that it cannot endan-
ger the car's occupants, for example if sudden
braking or swerving is necessary.
Never exceed either the approved gross vehicle weight or either of the approved axle loads, refer
to page233, as excessive loads can pose a
safety hazard, and may also place you in viola-
tion of traffic safety laws.
Heavy or hard objects should not be carried
loose inside the car, since they could be thrown
around, for example as a result of heavy braking,
sudden swerves, etc., and endanger the occu-
pants.<
Coupe: roof-mounted
luggage rack*
A special rack system is available as an option
f o r y o u r B M W . C o m p l y w i t h t h e d i r e c t i o n s g i v e n
in the installation instructions.
Mounting points
Fold open the cover.
Loading roof-mounted luggage rack
Because roof racks raise the vehicle's center of
gravity when loaded, they have a major effect on
vehicle handling and steering response.
You should therefore always remember not to
exceed the approved roof load capacity, the
approved gross vehicle weight or the axle loads
when loading the rack.
You can find the applicable data under Weights
on page233.
The roof load must be distributed uniformly and
should not be too large in area. Heavy items
should always be placed at the bottom. Be sure
that adequate clearance is maintained for rais-
ing the glass roof, and that objects do not
project into the opening path of the luggage
compartment lid.
Page 169 of 260
Navigation
Entertainment
Driving tips
167Reference
At a glance
Controls
Communications
Mobility
Compressed audio files*
1.Select the current track and press the con-
troller.
2.Select the desired menu item:
>To play all the tracks in the current direc-
tory in random order, select "Random
directory" and press the controller.
>To play all the tracks on the CD in ran-
dom order, select "Random all" and
press the controller.
Stop random function:
1.Press the controller.
2.Select "Random directory" or "Random all"
and press the controller.
Fast forward/reverse
Buttons on the CD player:
Press and hold the button for the
corresponding direction.
The tracks can be heard, but reproduction is
distorted.
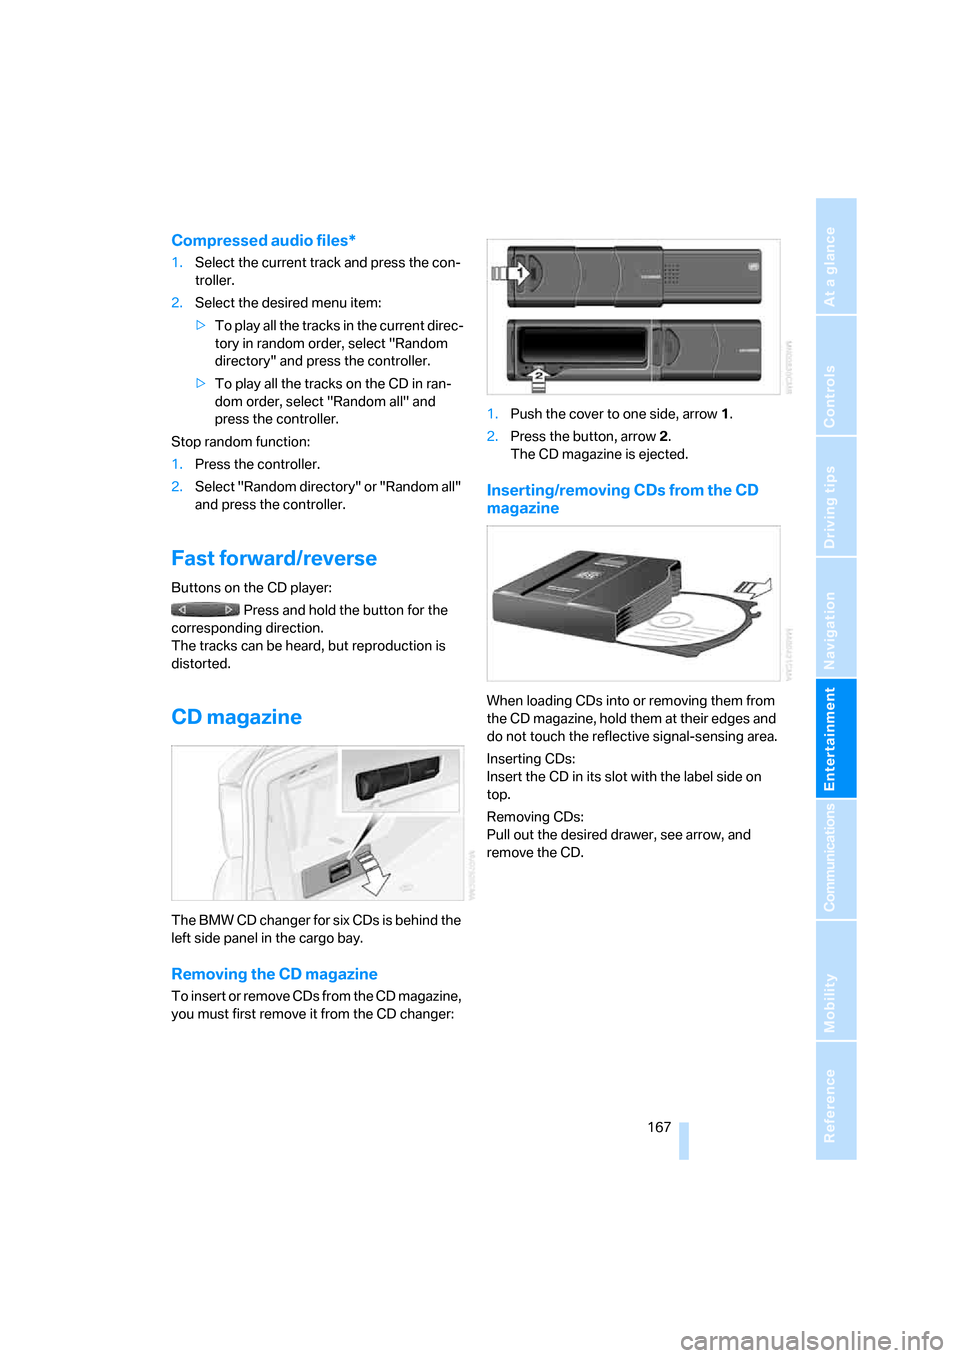
CD magazine
The BMW CD changer for six CDs is behind the
left side panel in the cargo bay.
Removing the CD magazine
T o i n s e r t o r r e m o v e C D s f r o m t h e C D m a g a z i n e ,
you must first remove it from the CD changer:1.Push the cover to one side, arrow 1.
2.Press the button, arrow 2.
The CD magazine is ejected.
Inserting/removing CDs from the CD
magazine
When loading CDs into or removing them from
the CD magazine, hold them at their edges and
do not touch the reflective signal-sensing area.
Inserting CDs:
Insert the CD in its slot with the label side on
top.
Removing CDs:
Pull out the desired drawer, see arrow, and
remove the CD.
Page 202 of 260

Refueling
200
Refueling
Always switch off the engine before refu-
eling, otherwise, fuel cannot be added to
the tank and a message will be displayed.<
Take all precautionary measures and
observe all applicable regulations when
handling fuel. Do not carry any spare fuel con-
tainers in your vehicle. They can develop a leak
and cause an explosion or cause a fire in the
event of an accident.<
Fuel filler door
Opening
1.Open fuel filler door. To do so, lightly press
the rear edge.
2.Turn the gas cap counterclockwise.
3.Place the gas cap in the bracket attached to
the fuel filler door.
Closing
Fit the cap and turn it clockwise until you clearly
hear a click.
Do not pinch the band attached to the
cap, otherwise the cap cannot be closed
properly and fuel vapors can escape. A mes-
sage will be displayed if the gas cap is loose or
missing.<
Manually releasing the fuel filler door
In the event of a malfunction, you can release
the fuel filler door manually:1.Remove the cover from the right-hand side-
wall of the cargo bay.
2.Pull the button with the fuel pump symbol
down.
The fuel filler door is released.
Observe the following when refueling
When handling fuels, follow the safety
instructions provided at filling stations,
otherwise there is a risk of personal injury or
property damage.<
When refueling, insert the filler nozzle com-
pletely into the filler pipe. Avoid lifting the filler
nozzle while filling the tank, as that would lead
to
>premature pump shutoff
>reduced efficiency of the fuel-vapor recov-
ery system
The fuel tank is full when the filler nozzle clicks
off the first time.
Fuel tank capacity
Approx. 14 US gallons/53 liters, including the
reserve capacity of 2.1 US gallons/8 liters.
Refuel as soon as possible once your
cruising range falls below 30 miles/
50 km, otherwise engine functions are not
ensured and damage can occur.<
Fuel specifications
Do not fill the tank with leaded fuel, as this
would cause permanent damage to the
Page 218 of 260

Replacing components
216
Replacing components
Onboard tool kit
The onboard tool kit is stored beneath the floor
panel in the cargo bay.
Wiper blades
1.Fold out the wiper arm and hold it.
2.Press together the locking spring, arrow1,
and fold out the wiper blade, arrow2.
3.Take the wiper blade out of the catch mech-
anism, pulling the blade toward the front.
To avoid damage, make sure that the
wiper arms are against the windshield
before you open the engine compartment.<
Lamps and bulbs
Lamps and bulbs make an essential contribu-
tion to vehicle safety. They should, therefore,
be handled carefully. BMW recommends hav-
ing your BMW center perform any work that you
do not feel competent to perform yourself or
that is not described here.
Never touch the glass of new bulbs with
your bare fingers, as even minute
amounts of contamination will burn into the
bulb's surface and reduce its service life. Use a
clean tissue, cloth or something similar, or hold
the bulb by its base.<
You can obtain a selection of replacement bulbs
at your BMW center.When working on electrical systems,
always begin by switching off the con-
sumer in question, otherwise short-circuits
could result. To avoid possible injury or equip-
ment damage when replacing bulbs, observe
any instructions provided by the bulb manufac-
turer.<
For care and maintenance of the headlamps,
please follow the instructions in the separate
Caring for your vehicle brochure.
If the routine for changing a particular
bulb is not described here, please contact
your BMW center or a workshop that works
according to BMW repair procedures with cor-
respondingly trained personnel.<
Light-emitting diodes LED
Light-emitting diodes installed behind translu-
cent lenses serve as the light source for many of
the controls and displays in your vehicle. These
light-emitting diodes, which operate using a
concept similar to that applied in conventional
lasers, are officially designated as Class 1 light-
emitting diodes.
Do not remove the covers or expose the
eyes directly to the unfiltered light source
for several hours, otherwise this could cause
irritation to the retina.<
Xenon lamps*
These bulbs have a very long service life and are
highly unlikely to fail. If a xenon lamp fails never-
theless, switch on the fog lamps and continue
the journey with great care, provided that local
legislation does not prohibit this.
Have any work on the xenon lamp system,
including bulb replacements, performed
o nl y b y a BM W c e n t er o r a w o r k s h o p t h a t w o rk s
according to BMW repair procedures with cor-
respondingly trained personnel. Otherwise, if
such work is carried out improperly, the high
voltage in the system presents the danger of
fatal injuries.<
Page 221 of 260

Mobility
219Reference
At a glance
Controls
Driving tips
Communications
Navigation
Entertainment
3Lateral reflector
4Roadside parking lamp and tail lamp LED
5Reflector
6Turn signal
7Backup lamp
8Brake Force Display lamp
Replacing tail lamps
Outer brake lamp
The outer brake lamp can be accessed through
a single socket.
The figure shows the right side of the vehicle.
1.Remove the cover from the panel of the
cargo bay.
2.Turn the bulb holder to the left, see arrow,
and remove it.
3.Apply gentle pressure to the bulb while
turning it to the left for removal and replace-
ment.
4.Attach the bulb holder and turn it all the way
in the opposite direction.
5.Reattach the cover.
Inner brake lamp, turn signal, backup
lamp and Brake Force Display lamp
The bulbs are integrated in a single bulb holder.
1.Remove the cover from the panel of the
cargo bay.
2.Detach the bulb holder by pressing
together the clips, see arrow, and remove it.
3.Brake lamps and turn signal: apply gentle
pressure to the bulb while turning it to the
left for removal and replacement.
4.Backup lamp: pull the bulb out of the socket
and replace it.
5.Attach the bulb holder and let it snap into
place.
6.Reattach the cover.
The roadside parking lamp/tail lamp uses
LED design. After replacing the bulb,
ensure that the bulb holder is properly seated,
otherwise the roadside parking lamp/tail lamp
may not work.<
License plate lamps and center brake
lamp
These lamps use LED technology for operation.
In the event of a malfunction, please contact
your BMW center or a workshop that works
according to BMW repair procedures with cor-
respondingly trained personnel.
Changing wheels
Your BMW is equipped with Run-Flat Tires as
standard. This removes the need to change a
wheel immediately in the event of a puncture.