2008 BMW 128I COUPE steering
[x] Cancel search: steeringPage 120 of 260
Things to remember when driving
118
Convertible
>Position heavy objects as low and as far for-
ward as possible, ideally directly behind the
respective seat backrests.
>Cover sharp edges and corners.
>For very heavy cargo when the rear seat is
not occupied, secure each safety belt in the
opposite buckle.
Securing cargo
>Secure smaller and lighter items using
retaining straps, a cargo bay net
* or draw
straps
*.
>Heavy-duty cargo straps
* for securing
larger and heavier objects are available at
your BMW center. To attach the cargo
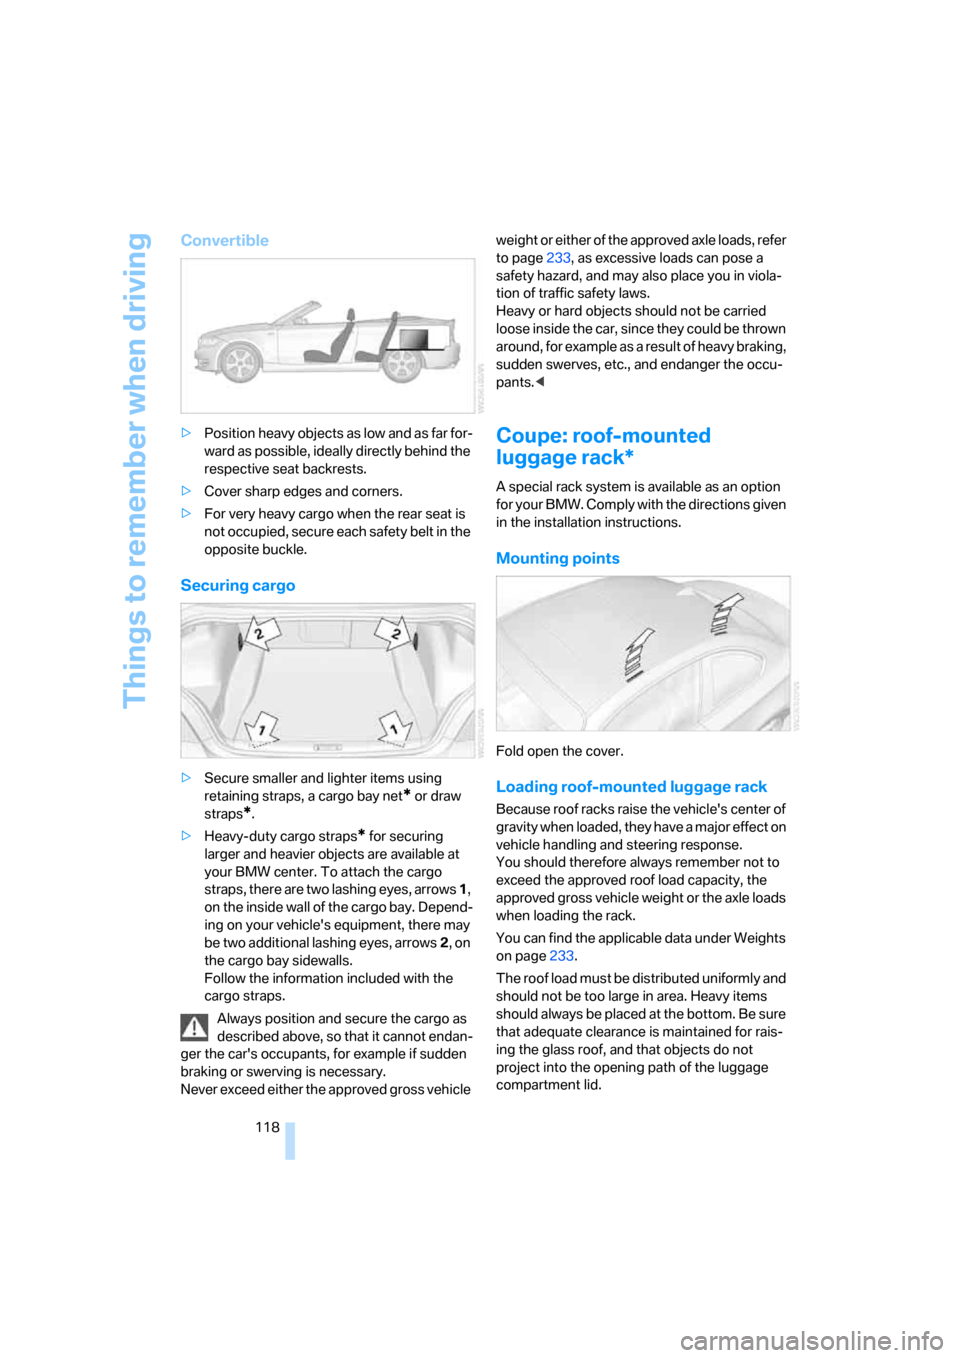
straps, there are two lashing eyes, arrows 1,
on the inside wall of the cargo bay. Depend-
ing on your vehicle's equipment, there may
be two additional lashing eyes, arrows2, on
the cargo bay sidewalls.
Follow the information included with the
cargo straps.
Always position and secure the cargo as
described above, so that it cannot endan-
ger the car's occupants, for example if sudden
braking or swerving is necessary.
Never exceed either the approved gross vehicle weight or either of the approved axle loads, refer
to page233, as excessive loads can pose a
safety hazard, and may also place you in viola-
tion of traffic safety laws.
Heavy or hard objects should not be carried
loose inside the car, since they could be thrown
around, for example as a result of heavy braking,
sudden swerves, etc., and endanger the occu-
pants.<
Coupe: roof-mounted
luggage rack*
A special rack system is available as an option
f o r y o u r B M W . C o m p l y w i t h t h e d i r e c t i o n s g i v e n
in the installation instructions.
Mounting points
Fold open the cover.
Loading roof-mounted luggage rack
Because roof racks raise the vehicle's center of
gravity when loaded, they have a major effect on
vehicle handling and steering response.
You should therefore always remember not to
exceed the approved roof load capacity, the
approved gross vehicle weight or the axle loads
when loading the rack.
You can find the applicable data under Weights
on page233.
The roof load must be distributed uniformly and
should not be too large in area. Heavy items
should always be placed at the bottom. Be sure
that adequate clearance is maintained for rais-
ing the glass roof, and that objects do not
project into the opening path of the luggage
compartment lid.
Page 129 of 260
Navigation
Driving tips
127Reference
At a glance
Controls
Communications
Entertainment
Mobility
the controller.
The destination is stored in the destination
list, refer to page130.
Entering a destination by
voice commands*
You can enter a desired destination via the
voice command system. During the destination
input, you can switch between voice entry and
entry via iDrive at any time. To do so, reactivate
the voice command system if necessary.
You can have the possible commands
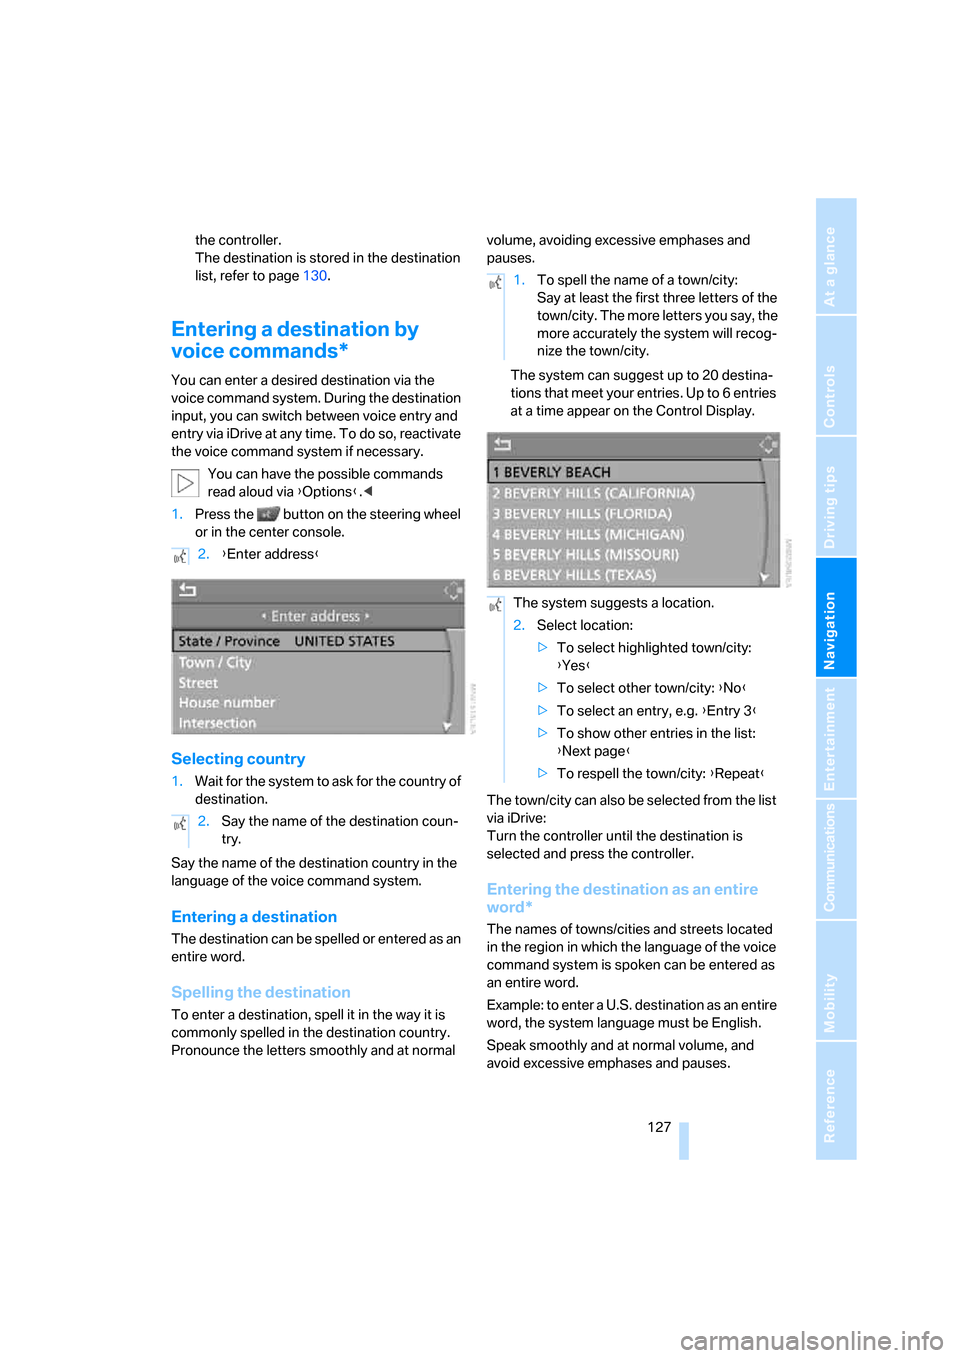
read aloud via {Options}.<
1.Press the button on the steering wheel
or in the center console.
Selecting country
1.Wait for the system to ask for the country of
destination.
Say the name of the destination country in the
language of the voice command system.
Entering a destination
The destination can be spelled or entered as an
entire word.
Spelling the destination
To enter a destination, spell it in the way it is
commonly spelled in the destination country.
Pronounce the letters smoothly and at normal volume, avoiding excessive emphases and
pauses.
The system can suggest up to 20 destina-
tions that meet your entries. Up to 6 entries
at a time appear on the Control Display.
The town/city can also be selected from the list
via iDrive:
Turn the controller until the destination is
selected and press the controller.
Entering the destination as an entire
word*
The names of towns/cities and streets located
in the region in which the language of the voice
command system is spoken can be entered as
an entire word.
Example: to enter a U.S. destination as an entire
word, the system language must be English.
Speak smoothly and at normal volume, and
avoid excessive emphases and pauses. 2.{Enter address}
2.Say the name of the destination coun-
try.
1.To spell the name of a town/city:
Say at least the first three letters of the
town/city. The more letters you say, the
more accurately the system will recog-
nize the town/city.
The system suggests a location.
2.Select location:
>To select highlighted town/city:
{Yes}
>To select other town/city: {No}
>To select an entry, e.g. {Entry 3}
>To show other entries in the list:
{Next page}
>To respell the town/city: {Repeat}
Page 142 of 260
Destination guidance
140
Destination guidance
through voice instructions
Switching voice instructions on/off
Voice instructions can be switched on or off
during the destination guidance in the arrow or
map display:
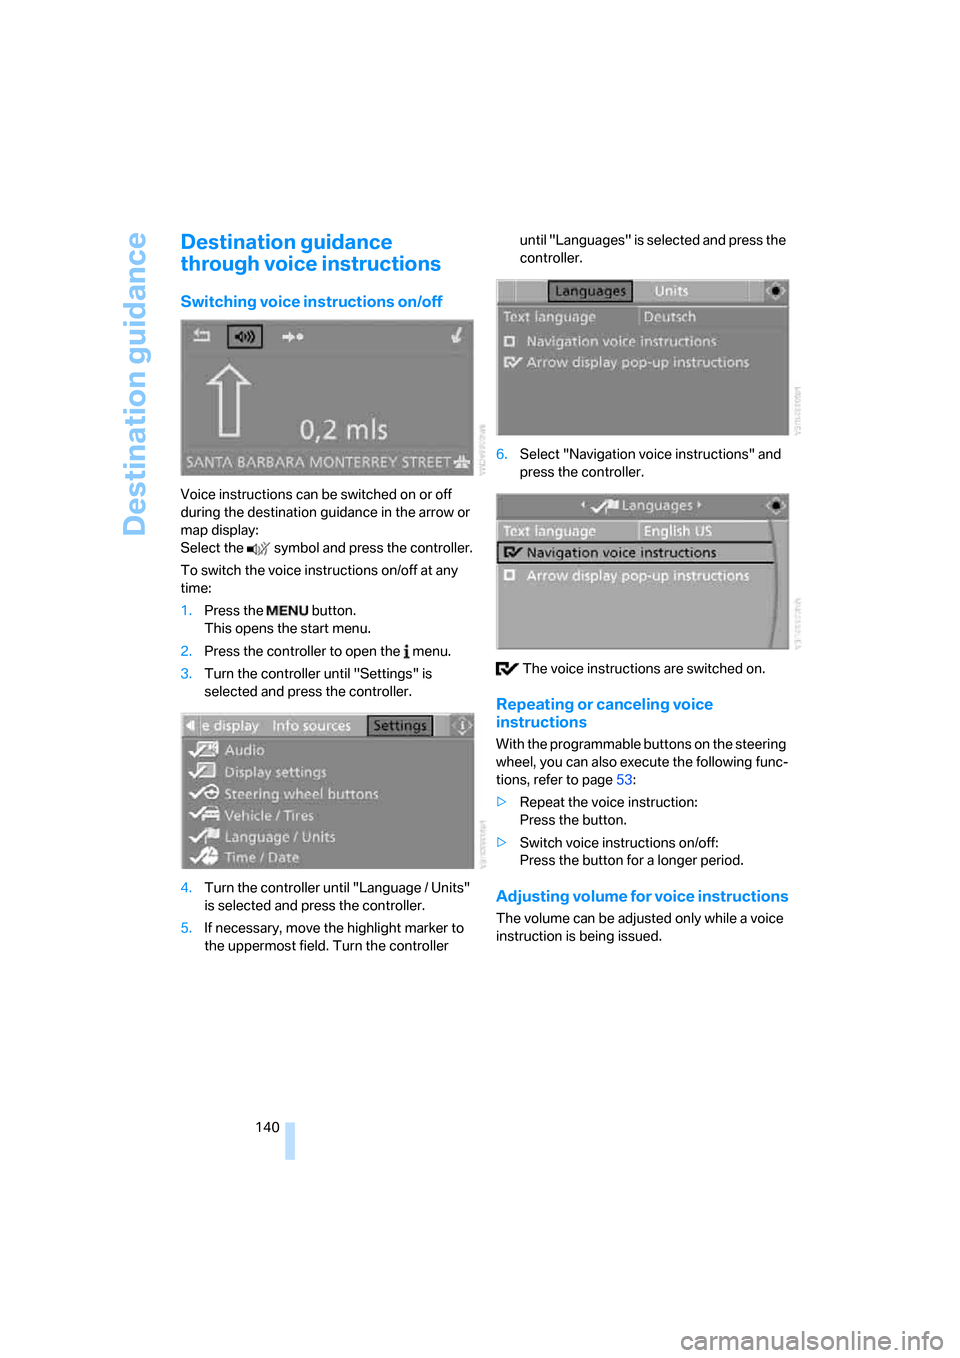
Select the symbol and press the controller.
To switch the voice instructions on/off at any
time:
1.Press the button.
This opens the start menu.
2.Press the controller to open the menu.
3.Turn the controller until "Settings" is
selected and press the controller.
4.Turn the controller until "Language / Units"
is selected and press the controller.
5.If necessary, move the highlight marker to
the uppermost field. Turn the controller until "Languages" is selected and press the
controller.
6.Select "Navigation voice instructions" and
press the controller.
The voice instructions are switched on.
Repeating or canceling voice
instructions
With the programmable buttons on the steering
wheel, you can also execute the following func-
tions, refer to page53:
>Repeat the voice instruction:
Press the button.
>Switch voice instructions on/off:
Press the button for a longer period.
Adjusting volume for voice instructions
The volume can be adjusted only while a voice
instruction is being issued.
Page 152 of 260

On/off and settings
150
On/off and settings
The following audio sources have shared con-
trols and setting options:
>Radio
>CD player
>CD changer
*
Controls
The audio sources can be operated using:
>Buttons near the CD player
>iDrive
>Buttons
on the steering wheel, refer to
page11
>Programmable memory keys, refer to
page21
Buttons on the CD player
1Sound output for entertainment on/off, vol-
ume
>Press: switch on/off.
When you switch on the unit, the last set
radio station or track is played.
>Turn: adjust volume.
2Drive for audio CDs
3 Eject CD.
4 Station scan/track search
>Change radio station.
>Select track for CD player and CD
changer.
5Drive for navigation DVD
Operation via iDrive
iDrive, for operating principle refer to page16.
1.Press the button.
This opens the start menu.
2.Move the controller backwards to call up
"Entertainment".
You have the following choices:
>"FM" and "AM": radio reception
>"SAT": satellite radio
*
>"CD": CD player or changer*
>"AUX": AUX-In port, USB-audio interface*
>"Set": depending on the audio source,
other adjustments can be made, e.g. with
the radio: update station with strongest
reception, store station, tone control, sam-
ple stations.
From another menu, you can switch
directly to the screen last displayed, refer
to Convenient call-up of menu items on
page18.<
With the ignition at radio readiness or beyond,
the selected audio source is stored for the
remote control currently in use.
Switching on/off
To switch the entertainment audio output on or
off:
Press button1 on the CD player.
This symbol on the Control Display indi-
cates that sound output is switched off.
Page 153 of 260
Navigation
Entertainment
Driving tips
151Reference
At a glance
Controls
Communications
Mobility
Adjusting volume
Turn knob1 on the CD player until the desired
volume is obtained.
You can also adjust the volume with buttons on
the steering wheel, refer to page11.
With the ignition at radio readiness or beyond,
the setting is stored for the remote control cur-
rently in use.
Tone control
You can alter various tone settings, e.g. treble
and bass or the speed-dependent volume
increase.
The tone settings are applied to all audio
sources.
With the ignition at radio readiness or beyond,
the settings are stored for the remote control
currently in use.
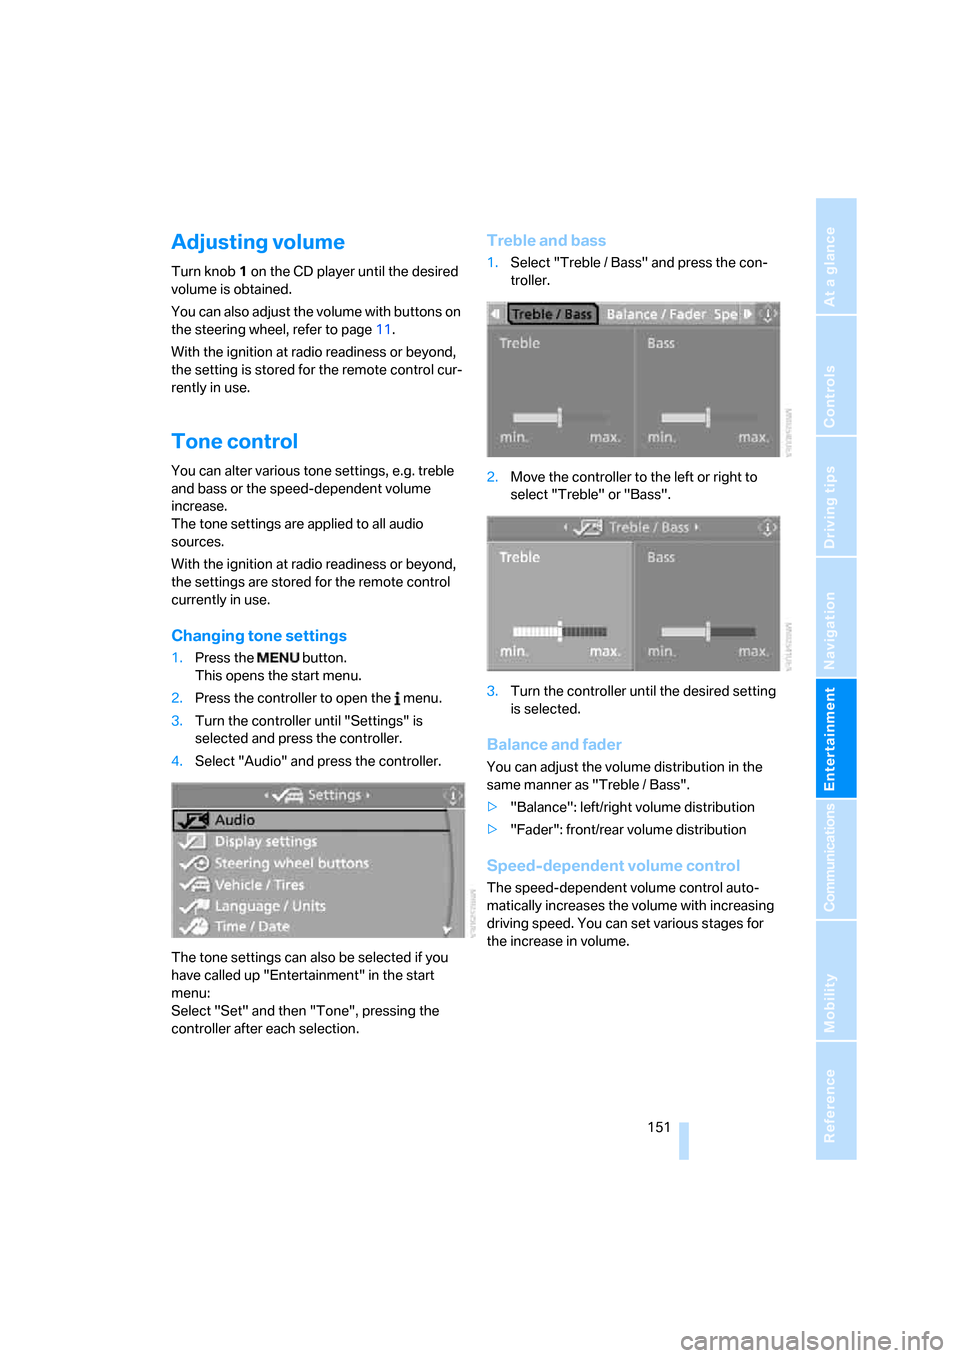
Changing tone settings
1.Press the button.
This opens the start menu.
2.Press the controller to open the menu.
3.Turn the controller until "Settings" is
selected and press the controller.
4.Select "Audio" and press the controller.
The tone settings can also be selected if you
have called up "Entertainment" in the start
menu:
Select "Set" and then "Tone", pressing the
controller after each selection.
Treble and bass
1.Select "Treble / Bass" and press the con-
troller.
2.Move the controller to the left or right to
select "Treble" or "Bass".
3.Turn the controller until the desired setting
is selected.
Balance and fader
You can adjust the volume distribution in the
same manner as "Treble / Bass".
>"Balance": left/right volume distribution
>"Fader": front/rear volume distribution
Speed-dependent volume control
The speed-dependent volume control auto-
matically increases the volume with increasing
driving speed. You can set various stages for
the increase in volume.
Page 156 of 260

Radio
154
Radio
Your radio provides reception of the FM and AM
wavebands.
Listening to the radio
Press the button if the sound output is switched
off.
iDrive, for operating principle refer to page16.
1.Press the button.
This opens the start menu.
2.Move the controller backwards to call up
"Entertainment".
3.If necessary, move the highlight marker to
the uppermost field. Select "FM" or "AM".
4.Press the controller.
Stations are shown on the Control Display on
the basis of various selection criteria, e.g. "Pre-
sets".
If "Autostore" does not show a station in the AM
waveband or if the displayed stations are no
longer receivable, update the stations with the
best reception, refer to page155.
Changing stations
Turn the controller.
Buttons on the CD player
Press the button for the corre-
sponding direction.
The system switches to the next displayed sta-
tion.
You can also change the station with the but-
tons on the steering wheel, refer to page11.
Changing selection criteria
In addition to the stations currently displayed,
you can have stations with another selection
criterion displayed.
You can choose from the following selection
criteria:
>"All stations"
*:
Stations that can currently be received on
the "FM" waveband.
>"Autostore":
Stations with the best reception on the
"AM" waveband. For High Definition Radio:
Stations with the best reception on the
"FM" or "AM" waveband.
>"Presets":
Stations you have previously stored, refer to
page156.
>"Manual":
To set stations that can be received in addi-
tion to those already being displayed, refer
to Selecting the frequency manually,
page155.
Page 160 of 260
Radio
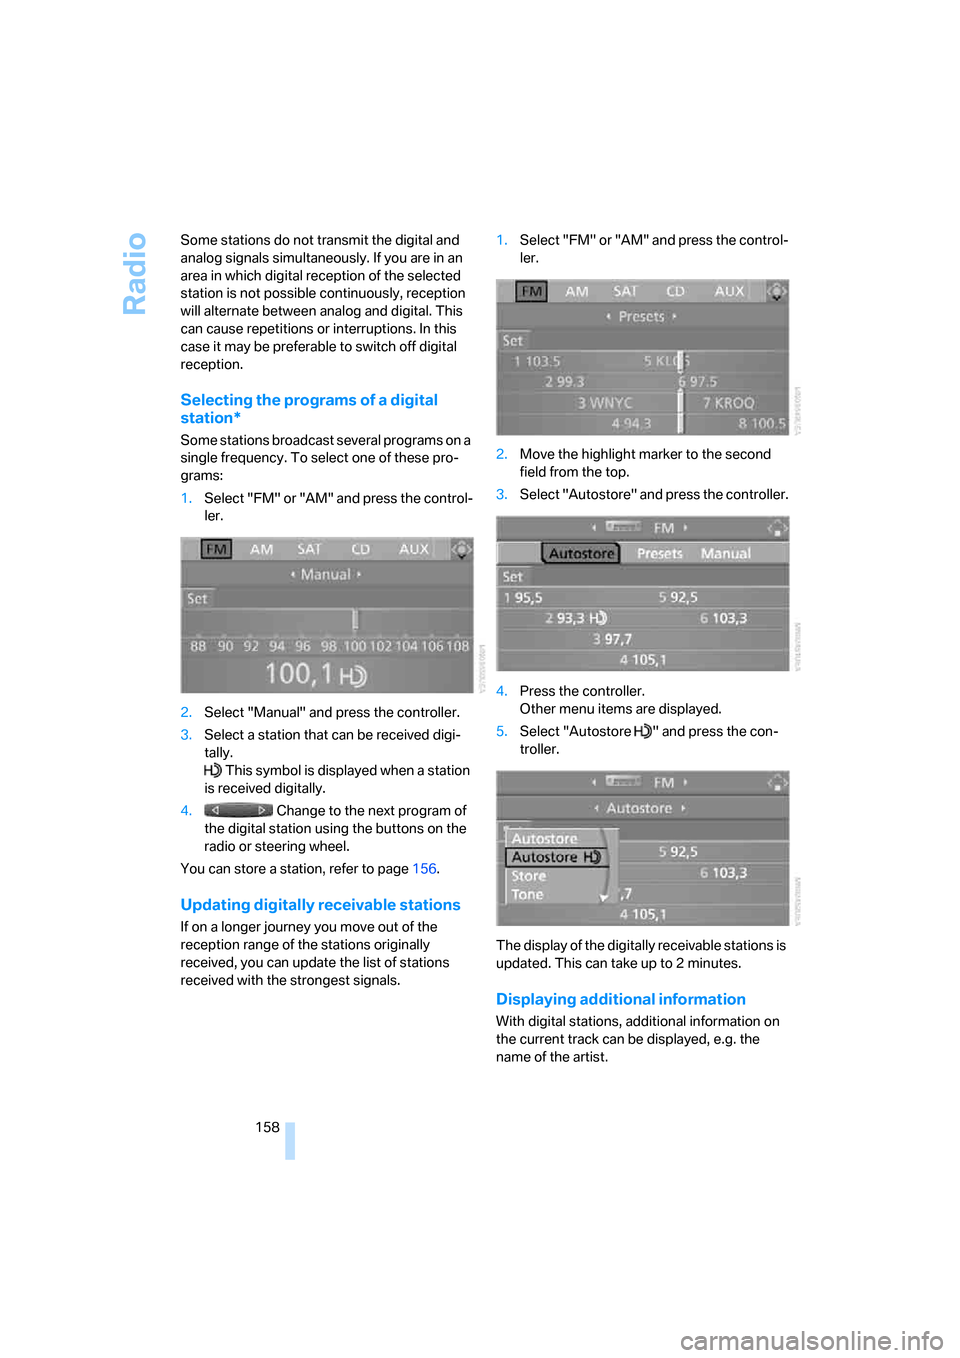
158 Some stations do not transmit the digital and
analog signals simultaneously. If you are in an
area in which digital reception of the selected
station is not possible continuously, reception
will alternate between analog and digital. This
can cause repetitions or interruptions. In this
case it may be preferable to switch off digital
reception.
Selecting the programs of a digital
station*
Some stations broadcast several programs on a
single frequency. To select one of these pro-
grams:
1.Select "FM" or "AM" and press the control-
ler.
2.Select "Manual" and press the controller.
3.Select a station that can be received digi-
tally.
This symbol is displayed when a station
is received digitally.
4. Change to the next program of
the digital station using the buttons on the
radio or steering wheel.
You can store a station, refer to page156.
Updating digitally receivable stations
If on a longer journey you move out of the
reception range of the stations originally
received, you can update the list of stations
received with the strongest signals.1.Select "FM" or "AM" and press the control-
ler.
2.Move the highlight marker to the second
field from the top.
3.Select "Autostore" and press the controller.
4.Press the controller.
Other menu items are displayed.
5.Select "Autostore " and press the con-
troller.
The display of the digitally receivable stations is
updated. This can take up to 2 minutes.
Displaying additional information
With digital stations, additional information on
the current track can be displayed, e.g. the
name of the artist.
Page 166 of 260
CD player and CD changer
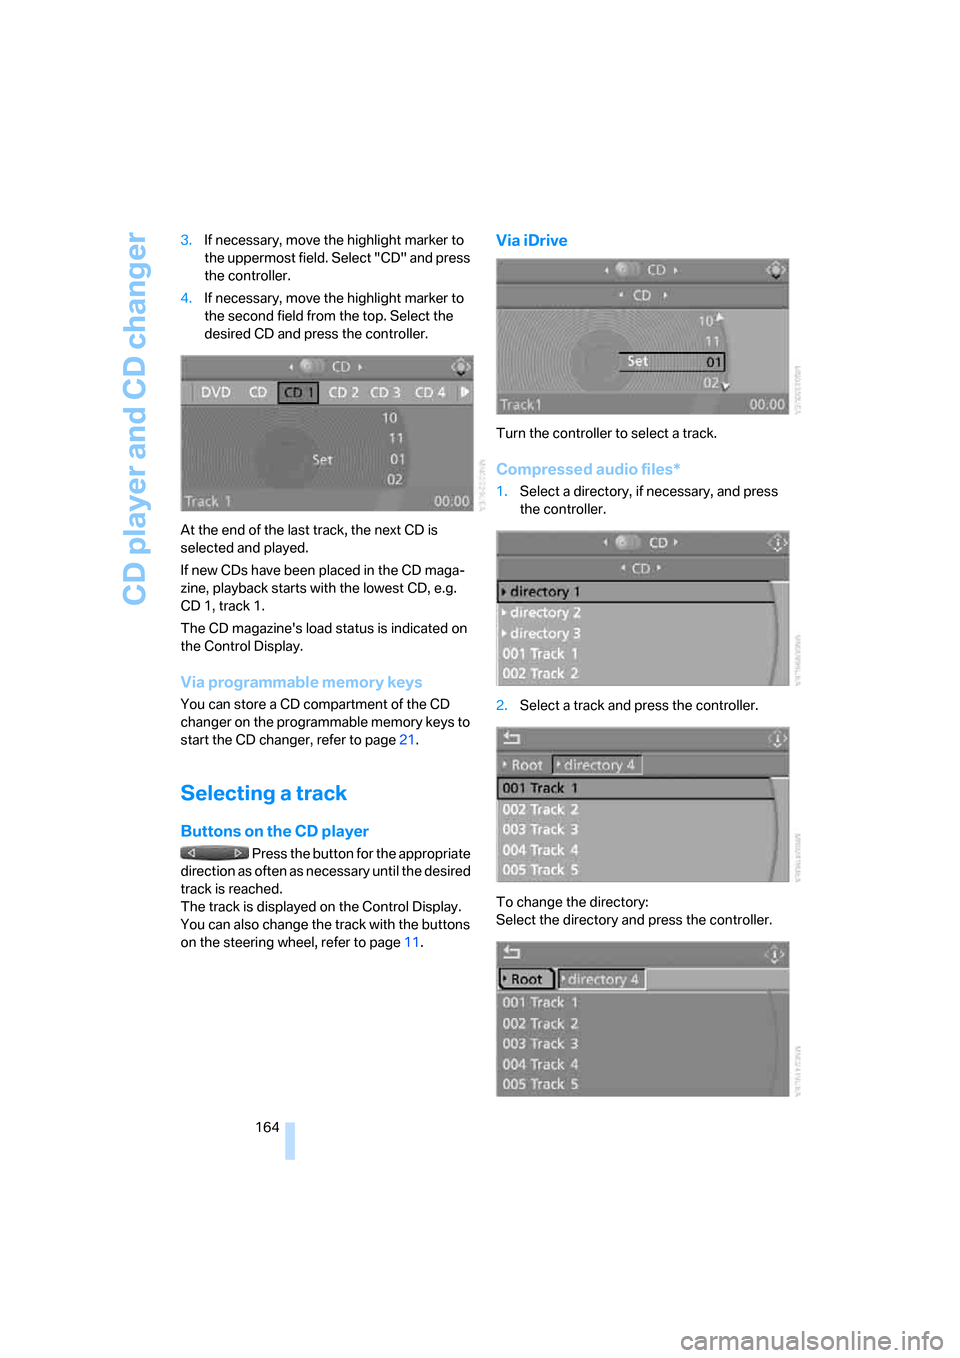
164 3.If necessary, move the highlight marker to
the uppermost field. Select "CD" and press
the controller.
4.If necessary, move the highlight marker to
the second field from the top. Select the
desired CD and press the controller.
At the end of the last track, the next CD is
selected and played.
If new CDs have been placed in the CD maga-
zine, playback starts with the lowest CD, e.g.
CD 1, track 1.
The CD magazine's load status is indicated on
the Control Display.
Via programmable memory keys
You can store a CD compartment of the CD
changer on the programmable memory keys to
start the CD changer, refer to page21.
Selecting a track
Buttons on the CD player
Press the button for the appropriate
direction as often as necessary until the desired
track is reached.
The track is displayed on the Control Display.
You can also change the track with the buttons
on the steering wheel, refer to page11.
Via iDrive
Turn the controller to select a track.
Compressed audio files*
1.Select a directory, if necessary, and press
the controller.
2.Select a track and press the controller.
To change the directory:
Select the directory and press the controller.