2008 AUDI TT ROADSTER refuelling
[x] Cancel search: refuellingPage 27 of 316

If, however, the Malfunction Indicator Lamp (MIU comes on,
always drive to your nearest authorized Audi dealer or qualified
workshop and have the vehicle checked.
For more information =>
page 216, "Refuelling".•
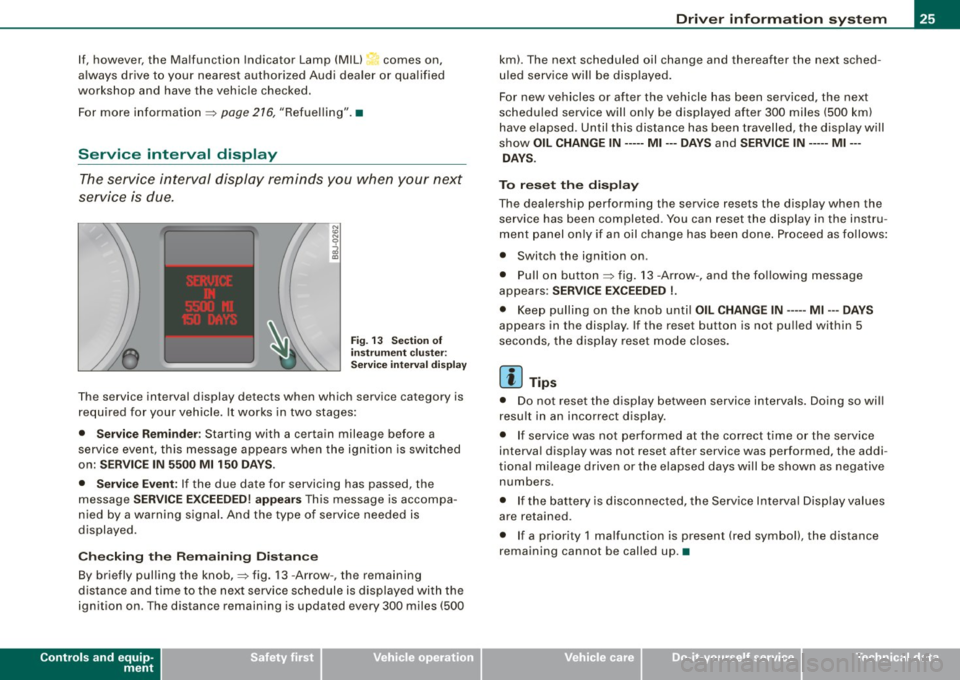
Service interval display
The service interval display reminds you when your next
service is due.
Fig. 13 Section of
instrument cluster:
Service interval display
The service interval display detects when which service category is
required for your vehicle. It works in two stages:
• Service Reminder : Starting with a certain mileage before a
service event, this message appears when the ignition is switched
on:
SERVICE IN 5500 Ml 150 DAYS.
• Service Event:
If the due date for servicing has passed, the
message
SERVICE EXCEEDED! appears This message is accompa
nied by a warning signal. And the type of service needed is
displayed.
Checking the Remaining Distance
By briefly pulling the knob,=> fig. 13 -Arrow -, the remaining
distance and time to the next service schedule is displayed with the
ignition on . The distance remaining is updated every 300 miles (500
Controls and equip
ment
Driver information system
km). The next scheduled oil change and thereafter the next sched
uled service will be displayed.
For new vehicles or after the vehicle has been serviced, the next
scheduled service will only be displayed after 300 miles (500 km)
have elapsed. Until this distance has been travelled, the display will
show
OIL CHANGE IN----- Ml ---DAYS and SERVICE IN----- Ml --
DAYS.
To reset the display
The dealership performing the service resets the display when the service has been completed . You can reset the display in the instru
ment panel only if an oil change has been done. Proceed as follows:
• Switch the ignition on .
• Pull on button=> fig.
13 -Arrow-, and the following message
appears:
SERVICE EXCEEDED !.
• Keep pulling on the knob until OIL CHANGE IN ---- -Ml ---DAYS
appears in the display. If the reset button is not pulled within 5
seconds, the display reset mode closes.
[ i] Tips
• Do not reset the display between service intervals. Doing so will
result in an incorrect display.
• If service was not performed at the correct time or the service
interval display was not reset after service was performed, the addi
tional mileage driven or the elapsed days will be shown as negative
numbers.
• If the battery is disconnected, the Service Interval Display values
are retained.
• If a priority 1 malfunction is present (red symbol), the distance
remaining cannot be called up. •
I • •
Page 28 of 316

Driver inf ormation sy ste m
On-Board Diagnostic system (08D)
Malfunction Indicator Lamp (MIL )
The Malfunction Indicator Lamp (MIU in the instrument cluster
=:> page 16, fig. 6 is part of the On -Board Diagnos tic (OBD II) system.
The warning/indicator ligh t ill uminates when the ignition is
switched on and goes out after the engine starts and the idle has
stabilized . This indicates that the MIL is working properly .
If th e light d oes not go out after the engine is started, or illuminates
while you are driving, a ma lfunction may exist in the engine system.
If the light starts flashing, the catalytic converter cou ld be damaged .
Continue driving
w ith redu ced pow er (avoiding sustained high
speeds and/or rapid acce lerations) and have the condition
corrected. Contact your authorized Audi dealer.
If the light illuminates, the e lectronic speed limiter may also be
malfunctioning. For more information=:>
page 26, "E lectronic speed
limiter".
An imprope rly clo sed fuel filler c ap m ay als o c au se th e MIL light t o
illumi nate =:. page 216. •
On-Board Diagnostics
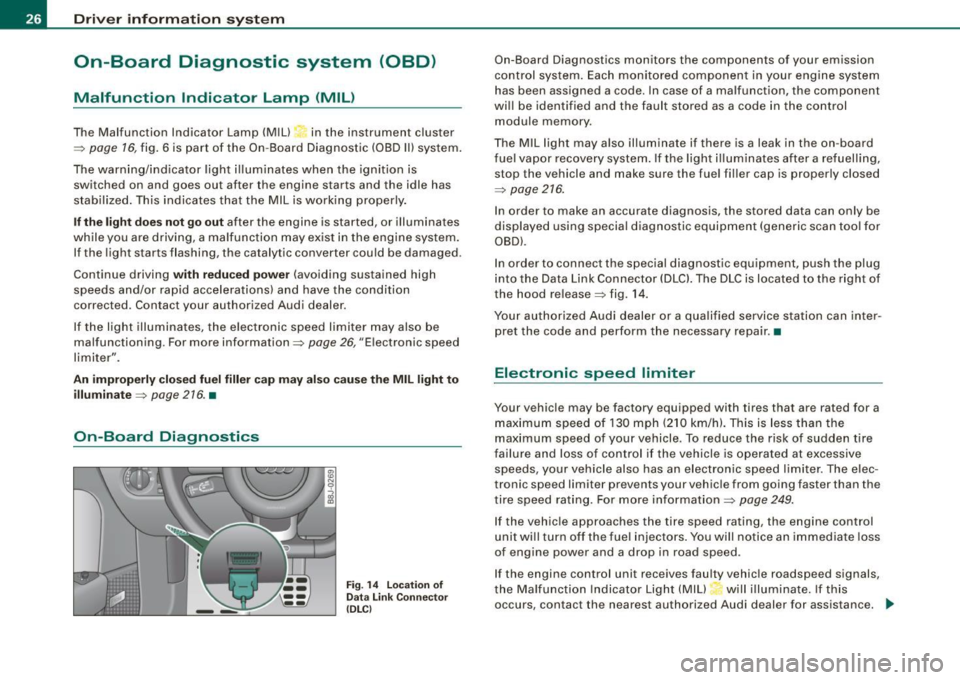
F ig . 14 L ocation of
Data Link Co nnector
( DL Cl
On -Board Diagnostics monitors the components of your emission
control system. Each monitored component in your engine system
has been assigned a code. In case of a malfunction, the component
will be identified and the fault stored as a code in the control
module memory .
The MIL light may also illuminate if there is a leak in the on -board
f ue l vapor recovery system. If the light i lluminates after a refuelling,
stop the vehicle and make sure the fuel filler cap is properly closed
=:>
page 216.
In order to make an accurate diagnosis, the stored data can only be
displayed using special diagnostic equipment (generic scan too l for
OBD).
In order to connect the special diagnostic equipment, push the plug
into the Data Link Connector (DLCl. The DLC is located to the right of
the hood release =:> fig . 14.
Your authorized Audi dealer or a qualified service station can inter
pret the code and perform the necessary repair. •
Electronic speed limiter
Your vehicle may be factory equipped with tires that are rated for a
maximum speed of 130 mph (210 km/h). This is less than the
maximum speed of your vehicle. To reduce the risk of sudden tire
failure and loss of control if the vehicle is operated at excessive
speeds, your vehicle also has an electronic speed limiter . The elec
tronic speed limiter prevents your vehic le from going faster than the
tire speed rating. For more in formation=:>
page 249.
If the vehicle approaches the tire speed rating, the engine control
unit will turn off the fue l injectors. You will notice an immediate loss
of engine power and a drop in road speed .
If the engine control unit receives faulty vehicle roadspeed signals,
the Ma lfunction Indicator Light (MIU will illuminate. If this
occurs, contact the nearest authorized Audi dealer for assistance.
~
Page 218 of 316

Fuel supply and filling your fuel tank
The label on the inside of the fuel filler flap tells you the correct fuel
for your vehicle. For more information about fuel specifications, see
~ page 214.
Your vehicle fuel tank has an on -board refuelling vapor recovery
system. This feature helps to prevent fuel vapors from escaping
from the tank and polluting the environment while you refuel your
vehicle. In order to fill the tank properly while protecting the envi
ronmen t, please follow this refueling procedure carefully.
& WARNING
Under normal operating conditions, never carry additional fuel
containers in your car. Gas canisters and other containers used to
transport fuel can be dangerous. Such containers, full or empty,
may leak and could cause a fire in a collision. If you must transport
fuel to use for your lawn mower, snow blower, etc ., be very careful
and always observe local and state laws regarding the use, trans
portation and storage of such fuel containers . Make certain the
container meets industry standards (ANSI/ASTM F852 -861.
0 Note
Never drive your vehicle until the fuel tank is completely dry. The
irregular supply of fuel can cause misfiring . Gasoline could enter
into the exhaust system and damage the catalytic converter. •
Refuelling
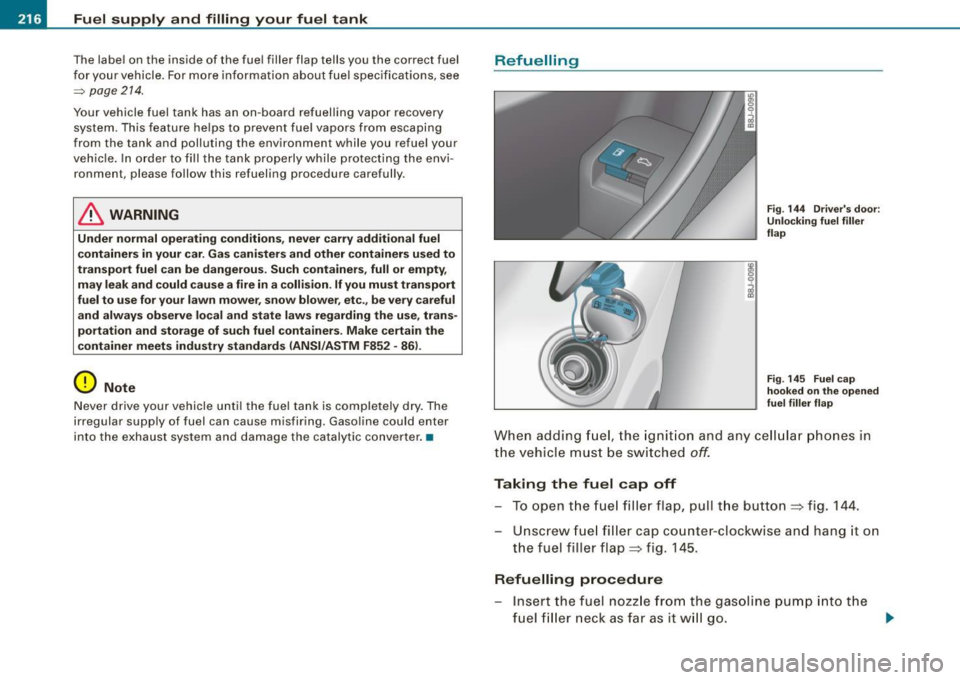
Fig. 144 Driver's door:
Unlocking fuel filler
flap
Fig . 145 Fuel cap
hooked on the opened
fuel filler flap
When adding fuel, the ignition and any cellular phones in
the vehicle must be switched
off.
Taking the fuel cap off
To open the fuel filler flap, pull the button ~ fig. 144.
Unscrew fuel filler cap counter-clockwise and hang it on
the fuel filler flap~ fig. 145 .
Refuelling procedure
Insert the fuel nozzle from the gasoline pump into the
fuel filler neck as far as
it will go. .,_
Page 219 of 316

_____________________________________ F_ u_ e_l _s _u-= pc...:... p_ly =--- a_ n_ d_ f_ i_ ll _in -=: gc.. y -=--- o-u_ r_ fu_ e_l _t _a _n_ k __ fflllll
•
- Select a medium refuelling rate so that the nozzle
switches off automatically when the tank is full.
Putting the fuel cap back on
- After filling your tank, twist the fuel filler cap clockwise
until you hear a definite click.
- Close the fuel filler flap.
To avoid fuel spilling or evaporating from the fuel tank always close
fuel filler cap properly and completely. An improperly closed fuel
filler cap may also cause a message in the driver information system =>
page 24 or cause the MIL lamp=> page 26 to come on.
& WARNING
Improper refueling or handling of fuel can cause fire, explosion
and severe burns .
• Fuel is highly flammable and can cause severe burns and other
injuries.
• Failure to shut the engine off while refueling and/or to insert
the pump nozzle fully into the fuel filler neck could cause fuel to
spray out of filler neck or to overflow. Fuel spray and overflowing
fuel can cause a fire.
• Never use a cellular telephone while refueling . The electromag
netic radiation can cause sparks that can ignite fuel vapors and
cause a fire .
• Never get back into your vehicle while refueling. If in excep
tional circumstances you must get back in your vehicle while refu
eling, make certain that you close the door and touch metal to
discharge static electricity before touching the filler nozzle again.
Static electricity can cause sparks that can ignite fuel vapors
released during refueling.
• Never smoke or have an open flame anywhere in or near your
vehicle when refueling or filling a portable fuel container.
& WARNING (continued)
• For your safety, we strongly recommend that you do not travel
with a portable fuel container in your vehicle. The container, full or empty may leak and could cause a fire, especially in a crash .
• If, under exceptional circumstances, you must transport a
portable fuel container, please observe the following: -Never fill a portable fuel container while it is anywhere in or
on the vehicle (for example, in the luggage compartment, or on
the trunk). Static electricity can build up while filling and can ignite fuel vapors causing a fire.
- Always place a portable fuel container on the ground before
filling.
- Always keep the filler nozzle completely inside the portable
container before and during filling.
- If filling a portable container made of metal, the filler nozzle
must always be in contact with the container. This will help
prevent static electricity from discharging and cause a fire.
- Never spill fuel inside the vehicle or luggage compartment.
Fuel vapors are highly flammable.
- Always observe local and state/provincial laws regarding the
use, storage and transportation of fuel containers
- Make certain the fuel container meets industry standards
(ANSI / ASTM F852-86l.
(D Note
If any fuel has spilled onto the car, it should be removed immedi
ately to prevent damage to the paint.
<£> For the sake of the environment
As soon as the correctly operated nozzle switches off automatically
for the first time, the tank is full. Do not try to add more fuel because
fuel may spill out. In addition, the expansion space in the fuel tank ..,_
Vehicle care
I t •
Page 306 of 316

__ _!:_A~l'.!:p~ h~ a~ b~e~ t~ic ~a..'.... l ~in~d~e ~x~ --------------------------------------------
Proper disposal of drained brake fluid ...
230
Proper disposal of drained engine
coolant . ............ .... ...... . 228
Proper disposa l of drained engine oil
225,226
Recycling used engine oil ..... .... 225
Un leaded fuel .... ............... 214
What should I do with an old battery?
231
EPC
See Electronic power control . . . . . . . . 17
ESP
See Electronic Stability Program .... 184
Event Da ta Recorder (EDR) . . . . . . . . . . . 184
Expansion tank 228
F
Fan 100
Radiator . . . . . . . . . . . . . . . . . . . . . . . . 229
Flat tire Changing ....................... 267
Floor mats . . . . . . . . . . . . . . . . . . . . . . . . . 134
Fog lights, front ..................... 73
Folding master key with remote contro l . 47
Fo lding top .. ..... .. .... .... ........ 60
Automatic folding top . . . . . . . . . . . . . 62
Care and cleaning ...... ........ .. 203
Emergency operation . . . . . . . . . . . . . . 64
General . .... ... .. .... .... ...... .. 60
manual folding top ........... ..... 61
Warning/indictor lights .. ........ .. 18
Wind deflector . . . . . . . . . . . . . . . . . . . . 64 Foot pedals
. . . . . . . . . . . . . . . . . . . . . . . . 134
For the sake of the env ironment
Gasoline fumes and the environment 2 16
Letting your engine warm up . ..... 107
Reducing engine noise by early
upshifting .................. .... 12
Refueling ... .. .... .... .... ...... 216
Saving fuel by early upshifting ...... 12
Front airbags Description ..... ..... ...... ...... 150
How they work . . . . . . . . . . . . . . . . . . . 155
Front seats . . . . . . . . . . . . . . . . . . . . . . . . . . 87
Adjusting ......... .... .... ...... 131
Adjusting the manual seats .. .... ... 89
Child restraints in the front seat .... 147
Fronta l col lisions and the laws of physics ...
138
Fuel Additives .. ....... .... .......... 214
Blended gasoline ................. 214
Consumption .. ............. ...... 39
Fi ller neck . .... ........ ... ....... 215
Fuel gauge . . . . . . . . . . . . . . . . . . . . . . . 14
Gasoline ........... ... .... .... .. 214
Gasoline additives .... .... ... .. ... 215
Octane rating ... .. .... .... .... ... 214
Recommendation . . . . . . . . . . . . . . . . 214
Refuelling ..... ........ .... ... ... 216
Reserve .. .... ....... ...... .... ... 14
Tank capacity . .... ... .... ..... ... 291
Unlocking the fuel filler flap by hand 218
Fuel fi ller cap ......... .... .... ... .... 24
Fuel supply too low ........ ....... ... 35 Fuse
arrangement .... ... .. .. . .... .. . 274
G
Garage door opener ... .......... .... 121
Gas discharge lamps ...... ... .... ... 277
Gauges Engine coolant temperature ........ 13
Fuel gauge .... .... ....... .... .... 14
Tachometer ........... ...... .... . 12
Gearshift lever
6 -speed manual transmission ... ... 113
Generator Warning/indicator lights ............ 19
G lossary of tire and loading terminology ...
239
G love compartment ...... .... .... .... 96
Gross Vehicle Weight Rating (GVWR) ... 289
H
Head restraints ........ ... ........ .. 132
Adjusting .. ........... .... .... .. 132
Headlight Defective . . . . . . . . . . . . . . . . . . . . . . . . . 36
Headlight range control
defective .......... .... ....... .... 35
Headlights .... ....... .... ... .... .... 69
adaptive light ...... ........ .... ... 72
Front fog lights ... .... .... .... .... 73
Switching off ... .... ...... .... .... 69
Switching on ...... .... ....... .... 69
Washer system . . . . . . . . . . . . . . . . . . . 79
Page 309 of 316

______________________________________________ A_ l_,_ p _h_ a_ b_e _t_ic _ a _ l _in _ d_e _ x __ lll
Pass-through .. ..... .... ... .... .... .. 93 Proper safety belt position . ... .. ...... 142 Remote control ....... ... .. .. ... .. ... 48
Pedals ...... .... ... ........ .... .... 134 Proper seating position Resetting remote control ...... ... .. 52
Physical principles of a frontal collision 138
Polishing ...... .... .... ....... .... . 204
Pollen filter ......................... 99
Pollutant filter .. .... .... .... .... ... .. 99
Power locking switch ........... .... .. 53
Power locking system ... .... .... .... .. 50
Convenience close/open feature .... . 58
Locking and unlocking the vehicle from
inside .. .. .. .... .... ... .... .... . 53
Opening and closing the windows ... 58
Rear lid/trunk lid ..... .... .... .... . 55
Remote control ...... .... .... ... .. 48
Unlocking and locking vehicle . .... .. 51
Power seats
Adjusting the seatback ....... .... .. 91
Adjustment .. .... .... .... ...... ... 89
Power steering
See Electro -mechanical power assist 21,
190
Power top
Care and cleaning . ....... .... .... 203
Convenience close/open feature ... .. 63
Convenience opening/closing ... .... 63
Power window switches ...... ...... ... 57
Reactivating the system .... .... .... 59
Pregnant women
Special cons iderations when wearing a
safety belt . .... .... .... ... .... . 143 Front
passenger . ...... ........... 131
Occupants .. ...... ...... ... .. .... 130
a
Quartz clock .. ...... ..... .. .... .... .. 13
quattro®
See All Wheel Drive ............... 191
Question
R
What happens to unbelted occupants? .
139
Why safety belts? ... .. .... .... .... 137
Radiator fan .... .... ..... .. .... .... . 229
Rain sensor defective ................. 36
Reading lights ... ... ..... ... .... .... . 77
Rear lid ........ ....... ...... .... .... 55
Emergency release ......... ...... . 56
Rear light
Defective . ................... .... . 36
Rear spoiler . .... .... ....... ........ 187
Rear window defoggeir ............... 103
Rearview mirror Inside rearview mirror .. .... .... ... . 82
See also Mirrors ........... ....... . 82
Red symbols . ... .... .... .... .... ... . 31
Programming the Homelink® universal re- Refuelling ............... .... .... ... 216
mote contro l ... .... .... ... .... . 121 Release lever for hood .. .... .... .... . 219
Proper occupant seating positions .. ... 130 Remote
control garage door opener
(Homelink®l .... .... .... .... ... 121
Remote control key Unlocking and locking ..... .... .... . 51
Remo te master key
Battery replacement ...... .... .... . 48
Check light .. ....... .. ...... ...... 48
Remote rear lid release .... ... .. ...... . 55
Repair manuals ...... .... .... .... ... 294
Repairs Airbag system ................... 160
Replacement parts ... .... ... .... .... 296
Replacing Wheel rims .... .... ... ....... 249, 251
Replacing a fuse .. ...... .... .... .... 273
Replacing light bulbs .. ... .. . .... .. . . 277
Replacing tires and wheels ...... ..... 250
Reporting safety defects .. ... .... 136, 293
Reset button . .... ........ .... ... .... . 14
Resetting remote control ......... .... . 52
Retractor .......... .. .... ...... .... . 141
Reverse Automatic transmission .... ... .... 115
Rims Cas t alloy ..... .... .... .... .... ... 207
Replacing .... .... ....... ... . 249, 251
Stee l rims . .... ... .... ...... ... .. 206
Controls and equip
ment Safety first Vehicle operation
Vehicle care Do-it-yourself service Technical data