2008 AUDI TT ROADSTER brake
[x] Cancel search: brakePage 118 of 316
....... _T _r_a _ n_ s_m _ i_s _s _i_o _n ______________________________________________________ _
N -Neutral
The transmission is in neutral in this position.
D -Normal position for driving forward
In this position, the forward gears are automatically shifted up and
down, depending on engine load and vehicle speed.
To engage S from N, the brake pedal must be depressed at speeds
below 5 km/h or when the vehicle is stationary=>&.
In certain circumstances (driving in the mountains for example) it
can be beneficial to switch temporarily to the manual shift program
=> page 118 in order to adjust the gear ratios to driving conditions
manually.
S -Sport setting
The S setting should be selected for sporting driving. The power
reserves of the engine can be fully exploited through later upshifts .
To engage S from N, the brake pedal must be depressed at speeds
below 5 km/h or when the vehicle is stationary=>&,.
& WARNING
• Never place the selector lever in the R or P position while the
vehicle is moving -risk of an accident!
• With the engine running, it is necessary to hold the vehicle with
the foot brake in all selector lever positions (except P and N), because even at idle speed the transfer of power is never
completely interrupted -the vehicle "creeps". If the vehicle is
stationary and the transmission is engaged, the engine should
never be speeded up unintentionally (e.g. manually from under the
hood). Otherwise the vehicle will immediately start to move -
sometimes even if the parking brake is firmly applied - risk of an
accident!
• Before you or other persons open the hood and work on a
running engine, the selector lever must be moved to P and the
& WARNING (continued)
parking brake applied firmly -risk of an accident! Follow the
warning stickers=>
page 212, "Engine compartment".
[ i] Tips
If you have inadvertently shifting into N while the vehicle is moving,
you should remove your foot from the accelerator and wait until the
engine speed has dropped to idle before shifting back to Dor S. •
Applies to vehicles : wi th S tronic ®
Selector lever lock
The selector lever lock prevents a gear from being
engaged accidentally and unintentionally setting the
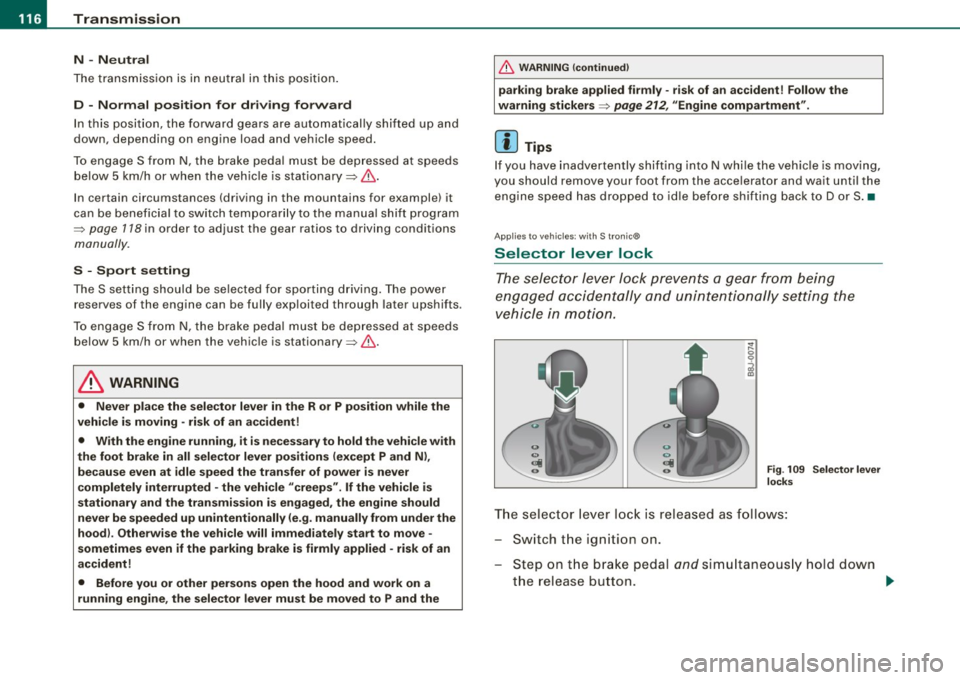
vehicle in motion.
Fig. 109 Selector lever
locks
The selector lever lock is released as follows:
Switch the ignition on.
Step on the brake pedal
and simultaneously hold down
the release button. _.,
Page 119 of 316
____________________________________________________ T_ r_a _n _ s_ m __ is_ s_ i _o _ n __ ftllll
A ut omat ic selec to r l ever lock <&
The se lector lever is locked in the P and N positions when the igni
tion is on . To move the lever from these positions the driver must
depress the brake pedal. As a reminder to the driver, the fol lowing
warning appears in the instrument cluster display when the selector is in P and N:
A PP LY BRAK E WHEN ENGAGING GEAR WITH VEHIC LE
S TATIONARY
In addition, the symbo l<& for the automat ic selector lever lock illu
minates in the shift gate.
T he selector lever lock is effective only when the vehicle is
stationary and at speeds below 5 km/h . At higher speeds, the lock in
the N position is automatically switched off .
The selecto r lever is not locked when rapid shifts are made through
the N position (e.g . from R to Dl. This allows you to "rock" the vehicle
if it becomes stuck. If the lever is in the N position for more than
1 second with the brake pedal not depressed, the selector lock
engages automatica lly.
R elease button
The release button in the selector lever handle prevents accidenta l
shifts into certain selector lever positions . When you press the
release button, the selector lever lock is cancelled. In the illustra
tion, the positions in wh ich the release button has to be pressed are
highlighted in color=>
page 116, fig. 109 .
I g nition key re m ova l lock
The ignition key can on ly be remove after the ignition is switched off
if the selector lever is in P. As long as the ignition key is removed, the
selector lever is locked in P. •
Controls and equip
ment
Ap plies to vehicles: with S tronic®
Kick -down feature
T he kick-down feature allows maximum acceleration.
If you depress the accelerator pedal ful ly beyond the ful l- th rott le
position, the transmission automatical ly downshifts one gear,
depending on vehicle speed a nd engine rpm . The upshi ft into the
next higher gear takes place as soon as the maximum specified
engine speed is reached.
& WARNING
Pl ease note that the driv e wheel s can sp in if the kick -do wn is used
o n a s mooth slipper y ro ad -ri sk of sk id d ing! •
Applies to vehicles: with S tronic®
Launch Control Program
The Launch Control Program permits maximum accelera
tion.
In order to use Launc h Control, t he ASR (Anti-Slip Regula
tion) must be disab led. When ASR is disabled, the ESP
warning/indicator light
f in t he instrument cluster illumi
nates . So that Launch Control can be used, the engine must
be at operat ing temperature and the steering wheel must
not be turned.
- With the engine running, briefly press the ES P button.
The message "ASR off" appears in the instrument cluster
display .
- Shift the gear lever to "S" or the tiptronic® position.
- Step on the brake peda l w ith yo ur left foo t an d keep the
brake peda l fully depressed for at least one second. ._
I • •
Page 120 of 316
• ..__T_ ra_ n_s_ m_ i_ s _s_ i_ o _n ___________________________________________________ _
- With your right foot, step on the accelerator to the wide
open throttle position or Kickdown. The engine speed
settles at about 3,200 rpm (6-cylinder engine) or about
2,600 rpm (4-cylinder engine).
- Take your left foot off the brake.
The S tronic® in your vehicle is electronically controlled. A special
Launch Control Program provides the best acceleration from a
standing start .
& WARNING
• Always adapt your driving to the traffic flow.
• Only use Launch Control when road and traffic conditions allow
it and other drivers will not be endangered or annoyed by your
driving and the acceleration of the vehicle.
• Make sure that ESP remains enabled. With the ESP disabled,
the vehicle could brake away, particularly on a slick and slippery
road -risk of skidding!
• Once acceleration is finished, switch ASR on again by briefly
pushing the ESP button. •
Applies to vehicles: wi ths tronic®
tiptronic operation
Tiptronic allows the driver to shift gears manually.
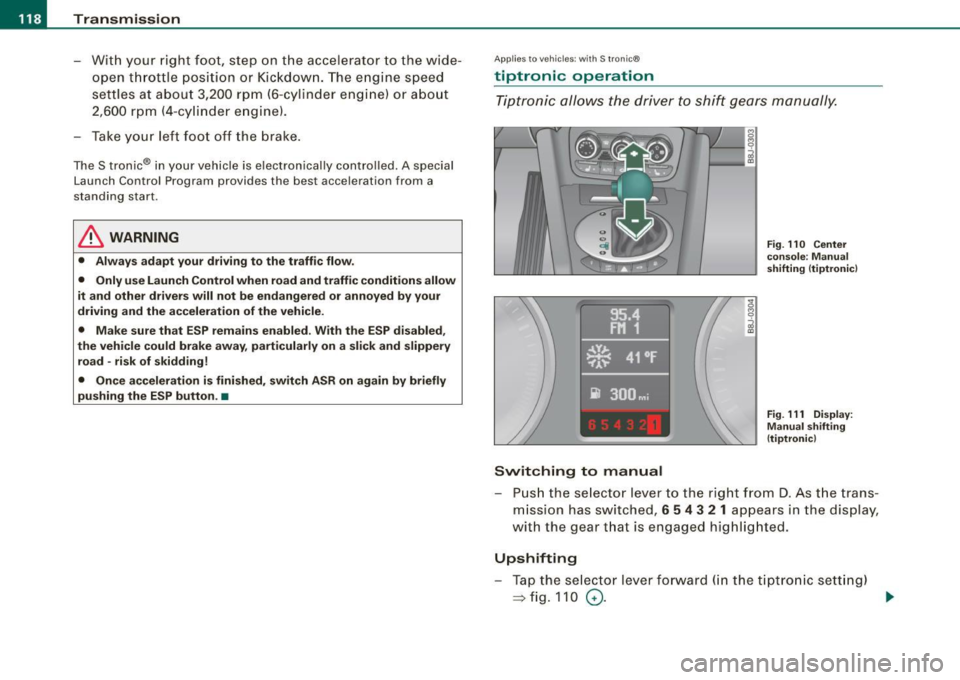
Switching to manual
Fig. 110 Center
console : Manual
shifting (tiptronicl
Fig . 111 Display:
Manual shifting
(tiptronicl
- Push the selector lever to the right from D. As the trans
mission has switched,
6 5 4 3 2 1 appears in the display,
with the gear that is engaged highlighted.
Upshifting
- Tap the selector lever forward (in the tiptronic setting)
=> fig. 110 0- ...
Page 122 of 316
• ..__T_ ra_ n_s_ m_ i_ s _s_ i_ o _n ___________________________________________________ _
Applies t o vehi cles: with S tr oni c®
Emergency release for selector lever
If the vehicle's power supply fails, the selector lever can
be released in an emergency.
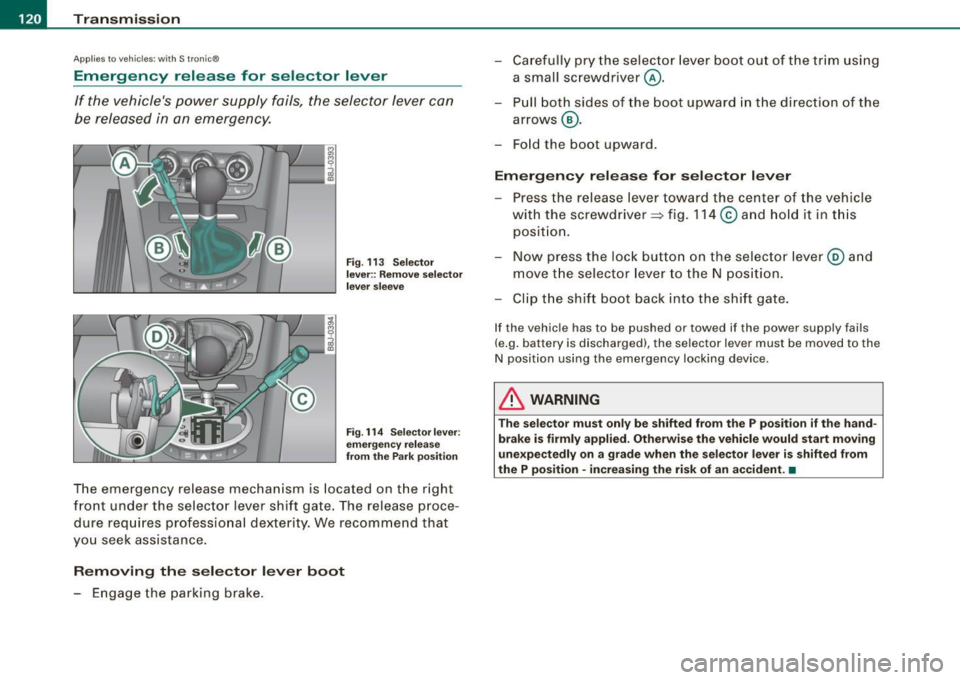
Fig. 113 Selector
lever:: Remove selector
lever sleeve
Fig. 114 Selector lever:
emergency release
from the Park position
The emergency release mechanism is located on the right
front under the selector lever shift gate. The release proce
dure requires professional dexterity. We recommend that
you seek assistance.
Removing the selector lever boot
- Engage the parking brake. -
Carefully pry the selector lever boot out of the trim using
a small screwdriver @.
- Pull both sides of the boot upward in the direct ion of the
arrows @.
- Fold the boot upward.
Emergency release for selector lever
- Press the release lever toward the center of the vehicle
with the screwdriver ~ fig. 114
© and hold it in this
position.
- Now press the lock button on the selector lever@ and
move the selector lever to the N position.
- Clip the shift boot back into the shift gate.
If the vehicle has to be pushed or towed if the power supply fails
(e.g. battery is discharged), the selector lever must be moved to the
N position using the emergency locking device .
& WARNING
The selector must only be shifted from the P position if the hand
brake is firmly applied. Otherwise the vehicle would start moving
unexpectedly on a grade when the selector lever is shifted from
the P position · increasing the risk of an accident. •
Page 123 of 316

HomeLink® -_______________ ___.
Homelink®
Universal remote control
Applies to veh icles: wit h Home link® unive rsa l rem ote cont rol
General information
The Homelink® feature can learn up to three radio
frequency codes for most current transmitters used for
operating garage doors, estate gates, home or outdoor
lighting systems, and other devices.
You must first program the Homelink® transmitter before you can
use the system~
page 121, "Programming the Homelink® trans
mitter" .
In order to program the Homelink® transmitte r for devices utili zing
rolling cod e, a second person on a ladder who can safely reach the
garage door opener motor is recommended. It is also necessary to
locate the "learn" button on your garage door opener motor . Refer
to the operating instructions for the opener, as the location and
color of this button may vary by manufacturer .
You can still use the original remote control for the device at any
time .
& WARNING
• Never use the Homelink"" transmitter with any garage door
opener that does have not the safety stop and reverse feature as
required by federal safety standards. This includes any garage
door opener model manufactured before April 1, 1982.
• A garage door opener which cannot detect an object, signaling
the door to stop and reverse does not meet current federal safety standards. Using a garage door opener without these features
increases risk of serious injury or death .
Con tro ls and eq uip
ment
& WARNING (continued)
• For safety reasons never release the parking brake or start the
engine while anyone is standing in front of the vehicle.
• A garage door or an estate gate may sometimes be set in
motion when the Homelink® remote control is being
programmed .
If the device is repeatedly activated, this can over
strain motor and damage its electrical components -an over
heated motor is a fire hazard!
• To avoid possible injuries or property damage, please always
make absolutely certain that no persons or objects are located in
the range of motion of any equipment being operated. •
Applies to vehi cles : wit h Home link ® un iv ers al re mote co ntrol
Programming the Homelink ® transmitter
The transmitter is programmed in two phases. For rolling
code transmitters, a third phase is also necessary.
0
Vehicle care I I
Fig. 115 Overhead
console: Homelink®
keypad ...
irechnical data
Page 124 of 316
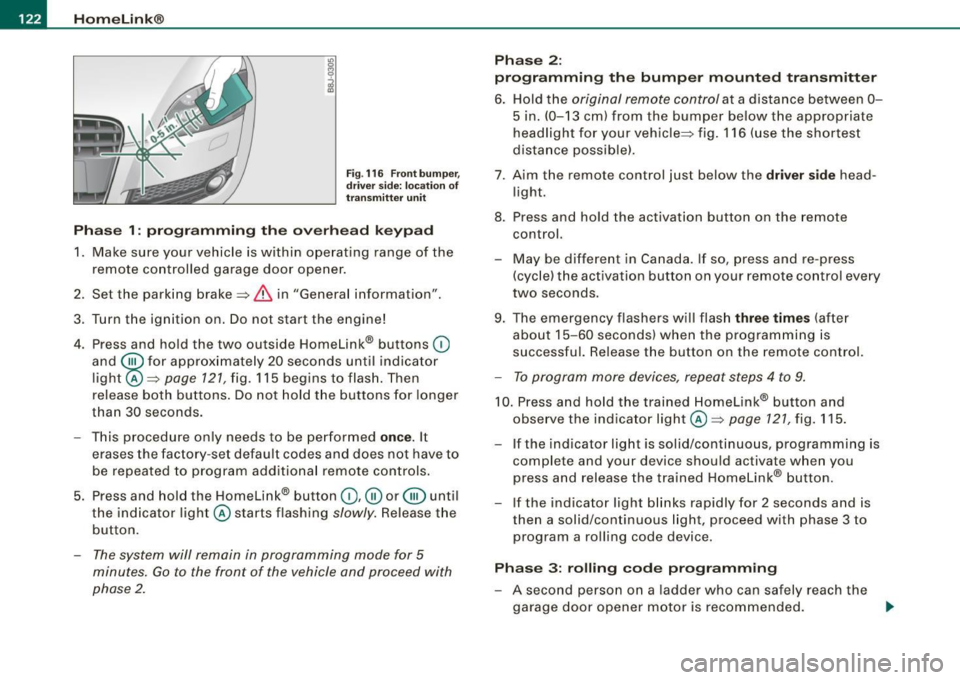
-L_!H~o~m~ e~L:!!in~ k~®~------------------------------------------------
Fig . 116 Front bumper ,
driver side: location of
transmitter unit
Phase 1: programming the overhead keypad
1. Make sure your vehicle is within operating range of the
remote controlled garage door opener.
2. Set the parking brake::::,
& in "Genera l information".
3. Turn the ignition on. Do not start the engine!
4. Press and hold the two outside Homelink® buttons
(D
and @f or approxim~tely 20 sec_onds until indicator
light@::::,
page 121, fig. 115 begins to flash. Then
release both buttons. Do not hold the buttons for longer
than
30 seconds.
- This procedure only needs to be performed
once. It
erases the factory-set default codes and does not have to
be repeated to program additional remote controls.
5. Press and hold the Homelink® button
(D , ® or @ until
the indicator light@starts flashing
slowly. Release the
button.
- The system will remain in programming mode for 5
minutes.
Go to the front of the vehicle and proceed with
phase 2.
Phase 2:
programming the bumper mounted transmitter
6. Hold the original remote control at a distance between 0-
5 in. (0-13 cm) from the bumper below the appropriate
headlight for your vehicle::::, fig.
116 (use the shortest
distance possible).
7 . Aim the remote control just below the driver side head
light.
8. Press and hold the activation button on the remote control.
- May be different in Canada. If so, press and re-press
(cycle) the activation button on your remote control every
two seconds.
9. The emergency flashers will flash three times (after
about
15-60 seconds) when the programming is
successful. Release the button on the remote control.
- To program more devices, repeat steps 4 to 9.
10. Press and hold the trained Homelink® button and
observe the indicator light @::::,
page 121, fig. 115.
If the indicator light is solid/continuous, programming is
complete and your device should activate when you
press and release the trained Homelink® button.
- If the indicator light blinks rapidly for 2 seconds and is
then a solid/continuous light, proceed with phase 3 to
program a rolling code device.
Phase 3: rolling code programming
- A second person on a ladder who can safely reach the
garage door opener motor is recommended.
~
Page 136 of 316
........ _o_ ri_v _i_n -=g .._ S_a_ f_ e_ l...:. y _______________________________________________ _
Driver and passenger side footwell
Important safety instructions
& WARNING
Always make sure that the knee airbag can inflate without inter
ference. Objects between yourself and the airbag can increase the risk of injury in an accident by interfering with the way the airbag
deploys or by being pushed into you as the airbag deploys.
• No persons (children) or animals should ride in the footwell in
front of the passenger seat. If the airbag deploys, this can result in
serious or fatal injuries.
• No objects of any kind should be carried in the footwell area in
front of the driver's or passenger's seat . Bulky objects (shopping
bags, for example) can hamper or prevent proper deployment of
the airbag. Small objects can be thrown through the vehicle if the
airbag deploys and injure you or your passengers. •
Pedal area
Pedals
The pedals must always be free to move and must never
be interfered with by a floor mat or any other object.
Make sure that all pedals move freely without interference and that
nothing prevents them from returning to their original positions.
Only use floor mats that leave the pedal area free and can be
secured with floor mat fasteners.
If a brake circuit fails, increased brake pedal travel is required to
bring the vehicle to a full stop.
& WARNING
Pedals that cannot move freely can cause loss of vehicle control
and increase the risk of serious injury.
• Never place any objects in the driver's footwell . An object could
get into the pedal area and interfere with pedal function. In case
of sudden braking or an accident, you would not be able to brake
or accelerate!
• Always make sure that nothing can fall or move into the
driver's footwell. •
Floor mats on the driver side
Always use floor mats that can be securely attached to
the floor mat fasteners and do not interfere with the free
movement of the pedals.
Make sure that the floor mats are properly secured and
cannot move and interfere with the pedals ::::>& .
Use only floor mats that leave the pedal area unobstructed and that
are firmly secured so that they cannot slip out of position. You can
obtain suitable floor mats from your authorized Audi Dealer.
Floor mat fasteners are installed in your Audi.
Floor mats used in your vehicle must be attached to these fasteners.
Properly securing the floor mats will prevent them from sliding into
positions that could interfere with the pedals or impair safe opera
tion of your vehicle in other ways.
& WARNING
Pedals that cannot move freely can result in a loss of vehicle
control and increase the risk of serious personal injury.
• Always make sure that floor mats are properly secured.
Page 137 of 316

Driving Safely ---------------=------------'-
& WARNING (continued)
• Never place or install floor mats or other floor coverings in the
vehicle that cannot be properly secured in place to prevent them
from slipping and interfering with the pedals or the ability to
control the vehicle .
• Never place or install floor mats or other floor coverings on top
of already installed floor mats. Additional floor mats and other
coverings will reduce the size of the pedal area and interfere with
the pedals.
• Always properly reinstall and secure floor mats that have been
taken out for cleaning.
• Always make sure that objects cannot fall into the driver foot
well while the vehicle is moving. Objects can become trapped
under the brake pedal and accelerator pedal causing a loss of
vehicle control . •
Stovving luggage
Loading the luggage compartment
All luggage and other objects must be properly stowed
and secured in the luggage compartment.
Loose items in the luggage compartment can shift
suddenly, changing vehicle handling characteristics. Loose items can also increase the risk of serious personal injury in
a sudden vehicle maneuver or in a collision.
- Distribute the load evenly in the lugg age compartment.
- Always place and properly secure heavy items in the
luggage compartment as far forward as possible.
Controls and equip
ment Safety first
Vehicle operation
& WARNING
Improperly stored luggage or other items can fly through the
vehicle causing serious personal injury in the event of hard braking or an accident. To help reduce the risk of serious personal injury:
• Always put objects, for example, luggage or other heavy items
in the luggage compartment .
• Always secure objects in the luggage compartment using the
tie-down eyelets and suitable straps.
& WARNING
Heavy loads will influence the way your vehicle handles. To help
reduce the risk of a loss of control leading to serious personal
injury :
• Always keep in mind when transporting heavy objects, that a
change in the center of gravity can also cause changes in vehicle
handling:
-Always distribute the load as evenly as possible.
- Place heavy objects as far forward in the luggage compart-
ment as possible.
• Never exceed the Gross Axle Weight Rating or the Gross
Vehicle Weight Rating specified on the safety compliance sticker on the left door jamb . Exceeding permissible weight standards
can cause the vehicle to slide and handle differently.
• Please observe information on safe driving=:>
page 128.
& WARNING
To help prevent poisonous exhaust gas from being drawn into the
vehicle, always keep the rear lid closed while driving .
• Never transport objects larger than those fitting completely
into the luggage area because the rear lid cannot be fully closed.
9J),
Vehicle care Do-it-yourself service Technical data