2008 AUDI TT ROADSTER lights
[x] Cancel search: lightsPage 38 of 316

Driver information system
Also see if the generator warning/indicator light illuminates
=> page 19. •
Defective light bulb warning
The defective light bulb warning tells you when a vehicle
light bulb has become defective.
If a defective bulb has been detected by the system or a light bulb
burns out, the symbol with a message appears in the display to
tell you which bulb is burnt out and where it is located. For example:
REAR LEFT TURN SIGNAL
After 5 seconds, the message disappears. If you want to recall the
message into the display, press the CHECK button.
There are three reasons why the defective bulb message would appear in the display:
• the light bulb has burnt out=> page 277.
• the fuse is "blown" => page 273, "Replacing a fuse".
• the wire connection to the light bulb is defective.
Have the bulb replaced or the connection repaired by your autho
rized Audi Service department.
& WARNING
• Light bulbs are pressurized and could explode while they are
being changed causing serious personal injury.
• Work with due care when handling the high-voltage section of
gas discharge (xenon) lamps*. Failing to do so could result in death
or serious injury! •
Brake light defective K: U (USA
models) / (Canada models)
In case of a malfunction or component failure, the acoustic warning
will sound and the symbol&;
l[ (USA models)/ (Canada
models) can appear.
The following electrical components should be checked, repaired or
replaced, as necessary :
• Brake light bulbs
• All wiring connections
• Brake light switch
Contact your authorized Audi dealer for assistance if necessary.
[ i] Tips
The brake light switch is only inspected as part of the functional
check after the engine is started. •
Applies to vehicles: with automat ic headlights and rain sensor
Light /rain sensor defective >
AUTOMATIC HEADLIGHTS/AUTOMATIC WIPERS DEFECTIVE
If the symbol illuminates, the light sensor has failed. For safety
reasons the low beams are turned on permanently with the switch
in
AUTO. However , you can continue to turn the lights on and off
using the light switch. In the case of a defect in the rain sensor, the
windshield wiper lever functions are still available. Have the
light /rain sensor checked as soon as possible at a dealership. •
Applies to veh ic le s: w ith Adaptive Light
Adaptive Light defective
ADAPTIVE LIGHT DEFECTIVE
•
'
Page 39 of 316
When this symbol ' illuminates, it means that Adaptive Light is
defective. Go to a qualified workshop to have the headlights or the
control unit for the Adaptive Light repaired. •
Applies to vehic les: w it h tir e p ressure monitor in g system
Tire pressure monitoring system J
Tire pressure that is too low must be corrected as soon as
possible .
If the 'symbol flashes for about one minute after the igni
tion is switched on and then remains on, there is a malfunc
tion in the system. Consult the nearest authorized Audi
dealer as soon as possible.
Additional information about the tire pressure monitoring system
can be found: => page 41. •
Speed warning system
Overview
The speed warning system helps you to keep your driving
speed below a set speed limit.
Controls and equip
ment
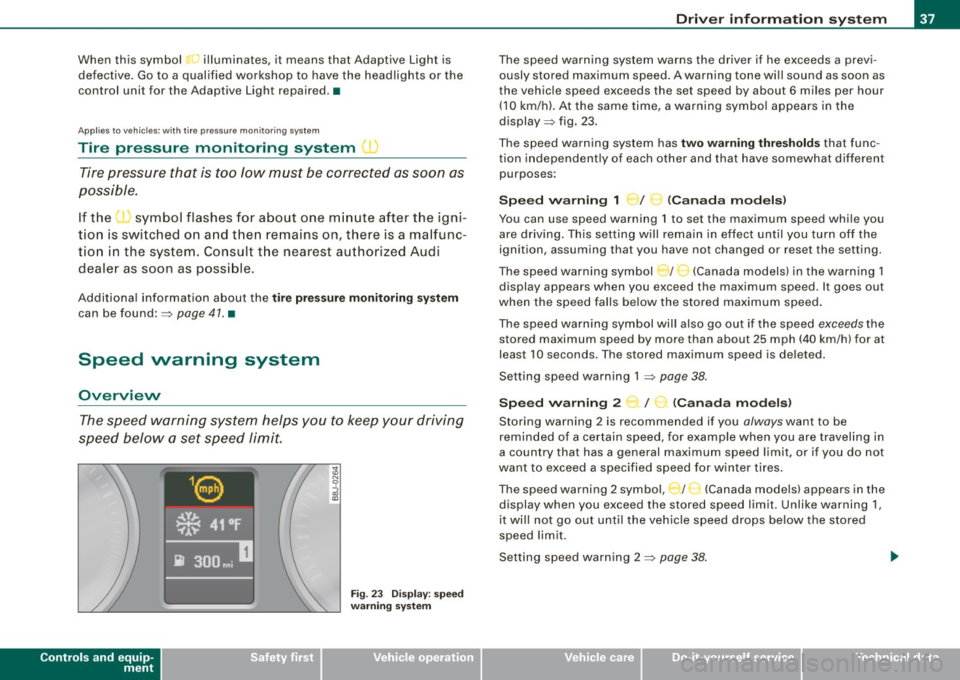
Fig . 23 Display: speed
warning system
Driver inform ation system
The speed warning system warns the driver if he exceeds a previ
ously stored maximum speed. A warning tone wi ll sound as soon as
the vehicle speed exceeds the set speed by about 6 miles per hour (10 km/h). At the same time, a warning symbol appears in the
display=> fig. 23.
The speed warning system has
two warning thresholds that func
tion independently of each other and that have somewhat different
purposes :
Speed warning 1 )f ..._ (Canada models)
You can use speed warning 1 to set the maximum speed while you
are driving . This setting will remain in effect until you turn off the
ignition, assuming that you have not changed or reset the setting.
The speed warning symbol
J I ,.... (Canada models) in the warning 1
display appears when you exceed the maximum speed . It goes out
when the speed falls below the stored maximum speed.
The speed warning symbol will also go out if the speed
exceeds the
stored maximum speed by more than about 25 mph (40 km/h) for at
least 10 seconds. The stored maximum speed is deleted .
Setting speed warning 1 =>
page 38.
Speed warning 2 ...,,, /
e!. (Canada models)
Storing warning 2 is recommended if you always want to be
reminded of a certain speed, for example when you are traveling in
a country that has a general maximum speed limit, or if you do not
want to exceed a specified speed for winter tires.
The speed warning 2 symbol, / ) (Canada models) appears in the
display when you exceed the stored speed limit. Unlike warning 1,
it wi ll not go out until the vehicle speed drops below the stored
speed limit .
Setting speed warning 2 =>
page 38 .
I • •
Page 52 of 316
Openin g a nd clo sin g
• Cana da mo dels: RSS-210 of Industry Canada .
Operation is subject to the following conditions:
• this device may not cause harmful interference, and
• this device must accept any interference received, including
interference that may cause undesired operation.
0 Note
The manufacturer is not responsible for ANY RADIO OR TV interfer ence caused by unauthorized modifications to this equipment.
Changes or modifications to this unit not express ly approved by the
party responsib le for comp liance could void the user's authority to
operate the equipment .•
Power locking system
General description
The power locking system Jocks or unlocks all doors
simultaneously.
The power locking system in your vehicle incorpora tes the following
functions:
• Central locking function
• Remote contro l feature
=> page 48 .
• Anti -Theft Alarm System
=> page 56.
You can lock and un lock the veh icle from outside either with the
k ey s or the remot e control transmitter inside the master key.
Act ivatin g the po wer loc king sy ste m lo ck s or unlo cks all doo rs
s im ult ane ously.
You can also open or close the windows when you lock or unlock the
driver's door using the key . For safety reasons, you cannot use the
remote contro l to open/close the windows . T
he selective unlock feature makes it possible to open just the
driver's door.
If the power locking system should malfunction, you can lock and
unlock each lock individually using the vehicle key.
A ut om atic lock ing*
The automatic locking feature locks all the vehicle doors and the rear lid when you drive faster than 9 mph (15 km/h) .
You can unlock the vehicle from the inside by:
• removing the key from the ignition switch (the vehicle wi ll auto
matically un lock itself) or
• pressing the unlock part of the power lock switch
oc:'i:l or
pulling the door handle (to open the door).
If you wish, you can have an authorized Audi dealer convert your
power door lock system to automatic loc king .
Unlo cking /locking t he vehi cle
When you unlo ck your vehicle:
• T he anti -theft alarm system is deactivated briefly .
• The vehicle interior lights illuminate for approximate ly 30
seconds.
When you
lo ck the vehicle:
• All doors are locked .
• The anti-theft alarm system is activated.
• The vehicle interior lights turn off.
• The anti-theft alarm system is activated . The horn of the anti
theft a larm system wi ll sound and the anti -theft alarm system readi
ness light, located in the center of the instrument panel below the
windshie ld on the right side of the air vent, will start to blink. .,_
Page 53 of 316
& WARNING
• When you lock your vehicle from outside, nobody -especially
children · should remain inside the vehicle. Remember, when you
lock the vehicle from the outside the windows cannot be opened
from the inside.
• When you leave the vehicle, always remove the ignition key and
take it with you. This will prevent passengers (children, for example) from accidentally being locked in the vehicle should they
accidentally press the power locking switch.
• Do not leave children inside the vehicle unsupervised. In an
emergency it would be impossible to open the doors from the
outside without the key.
[ i J Tips
• In the event of a crash with airbag deployment all locked doors
will be automatically unlocked to give access to the vehicle occu
pants from the outside .
• If the power locking system should malfunction, you can lock
each door individually using the vehicle key.
• If the power locking system should fail, you can still open the
fuel tank flap in an emergency=>
page 218.
• You are well advised not to keep valuables inside an unattended
vehicle, visible or not . Even a properly locked vehicle cannot provide
the security of a safe! •
Contro ls and eq uip
ment
Opening and closing
Unlocking and locking the vehicle with the
remote control
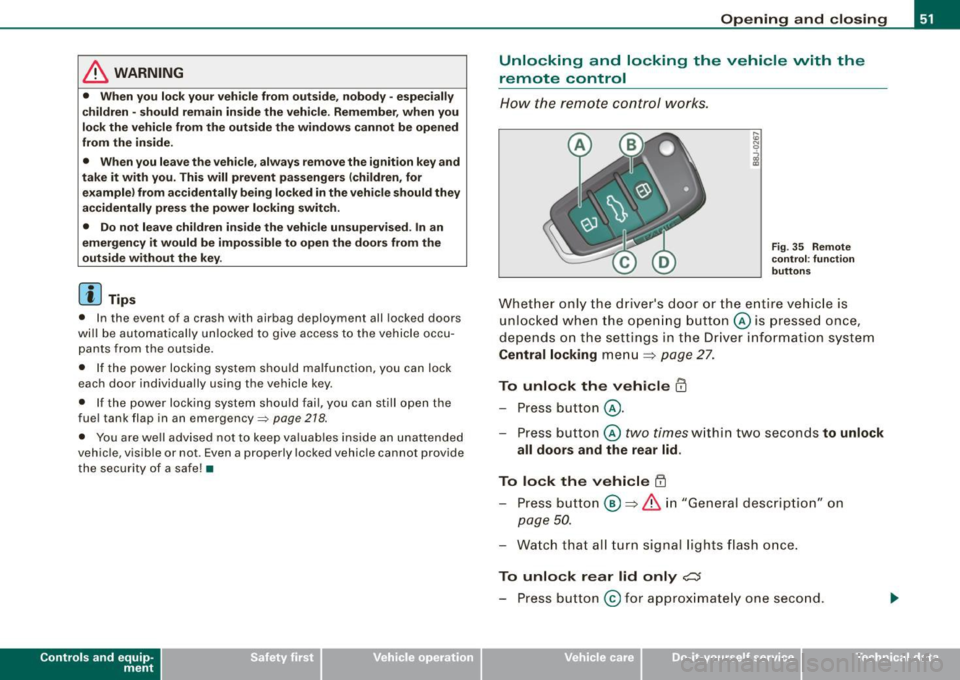
How the remote control works.
Fig. 35 Remote
control : function
buttons
Whether only the driver's door or the entire vehicle is
unlocked when the opening button@ is pressed once,
depends on the settings in the Driver information system
Central locking menu => page 27.
To unlock the vehicle m
-Press button @.
- Press button ©
two times within two seconds to unlock
all doors and the rear lid .
To lock the vehicle 63
-Press button @ => & in "General description" on
page 50.
-Watch that all turn signal lights flash once.
To unlock rear lid only e::5
-Press button @for approximately one second.
Vehicle care I I irechnical data
Page 71 of 316
Clear vision
Lights
Switching the headlights on and off ·'t!-·
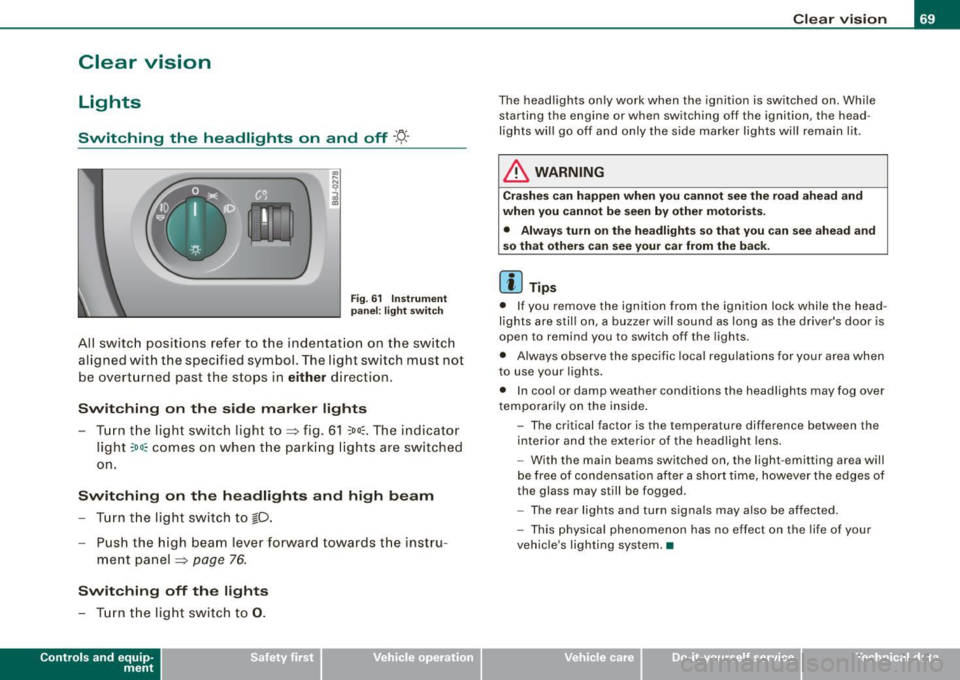
Fig. 6 1 Ins trum ent
p ane l: lig ht sw itch
All sw itc h positions refer to the indentat ion on the switch
aligned with the specified symbol. The light switch must not
be overturned past the stops in
either direction .
Switching on the side marker lights
-Tur n t he light switch ligh t to ==> fig. 61 ;oo; . The indi ca tor
light
; oo ~ comes o n when t he park ing lig hts are sw itched
on .
Switching on the headlights and high beam
- Turn t he light switch to lD.
- Push the high beam leve r fo rward towards t he instru -
ment panel ==> page
76.
Switching off the lights
-Tur n t he lig ht switch to 0 .
Con tro ls and eq uip
ment
Clear vision
The headlights only work when the ignition is switched on . While
starting the engine or when switching off the ignition, the head
lights will go off and only the side marker lights will remain lit .
& WARNING
Crashe s can happen when you cannot see the road ahead and
when you c annot be seen by other motori sts.
• Always tu rn on the headlight s so th at you can see ahead and
so that others can see your ca r from the ba ck.
[ i ] Tips
• I f you remove the ignition from the ignition lock wh ile the head
lights are still on, a buzzer will sound as long as the driver's doo r is
open to remind you to switch off the lights .
• Always observe the spec ific local regulations for your area when
to use your lights .
• I n coo l or damp weather conditions the headlights may fog over
tempo ra rily on the inside .
- The critical factor is the t emperature diff erence between the
interior and the ex te rior of the headlight lens .
- With the main beams switched on, the light -emitting area will
be free o f condensation after a short time, however the edges of
the glass may still be fogged .
- The rear lights and turn signa ls may also be affected.
- This physical phenomenon has no effect on the life of your
vehicle 's lighting system. •
Vehicle care I I irechnical data
Page 72 of 316

Clear vision
Ap plies to vehicles: with light senso r package
Sensor activated head and tail light control
In the "AU TO" position light sensors swit ch the he ad and
t a il lights on and off.
F ig . 62 Instru ment
pan el: light switch in
AUTO po siti on
T he se nsor-activated low beams have the same c haracteris
t ics as the headlig hts=>
page 69.
Activating
- Tur n th e lig ht s witch => fig. 62 t o p ositi on AUTO.
Deactivating
- Turn t he light swi tch to position 0 .
In the switch position AUTO the automatic head -and taillight
control
i s activated . The correspo nding symbol on the light swi tch
is lit .
With automatic head lights, the high -beam function is also avai lab le,
bu t with one restrict io n: If you have not switched the h ig h beams
back to low beams during automatic headlight operation (for
example, afte r driving through a tun nel), on ly the low beams come
on the next time automatic headlights are switched on. To use the
h igh beams, you first have to pull the high beam lever back and then
push the lever forward again. Parking
lights, headlights, fog lights and the rear fog light can be
swi tch ed on manually using the ligh t switch ~
page 69.
Light sensors located in the inside mirror housing and stem
constantly check the light conditions surrounding the vehicle. If
am bie nt brightness falls below a facto ry set value (e.g. wh en driv ing
into a tunnel), the head -and tai llights inc luding the license p late
ill um inat ion are automatica lly t urn ed on. When ambient br ightness
increases again, the external lights are turned off again~&.
Light sens or malfunction
If there is a light sensor malfunct ion, the symbol comes on in the
display . For sa fety reasons, the low beams are turned on perma
nent ly with the switch in
AUTO . However, you can continue to turn
the lights on and o ff using the light swi tch . Have the light sensor
checked as soon as possible at a dealership .
& WARNING
• Automatic head- and taillight control is only intended to ass ist
the driver . This feature doe s not relieve the dr iver of hi s re spon si
bil ity to check the headlights and to turn them on manually
ac cording to the current light and vi sibility conditions. For
e x ample , fog and rain cannot be detected by the light sensors .
Con sequently , always switch the headlights
io on under thes e
weather conditions and when driving
in the dark .
• Crashe s can happen when you cannot see the road ahead and
when you cannot be seen by other motor ists .
• Alway s turn on the headlights so that you can see ahead and
so that others can see your car from the ba ck .
[ i ] Tips
• I n the AUTO mode, the low beams are turned off when the igni
t ion is turned o ff. The remaining lights are turned o ff when the key
is taken out of the ignition lock. _.,
Page 73 of 316

• Do not attach stickers to the windshie ld in front of the sensors as
this can disable the automatic head -and tail light control and the
automatic glare -dimming of the rearview mirror(s) .
• Always o bserve the spec ific loca l regu la tions f or your area when
to use your lights .
• I n the event of a light sensor mal function, the d river informa tion
display will show the symbol . If a light sensor malfunct ion is indi
ca te d , you must use the ligh t switch to turn the low beams on and
off .•
Daytime running lights (DRL ) (USA models )
The daytime running ligh ts are tu rne d o n auto maticall y
w hen t he ignit ion is s witche d on.
Activating functions
Fig . 63 Sw itch for
daytime running lights
- Move the right thumbwhee l@ "D RL" ~ fig. 63 to posi
t io n
(D .
Deactivating functions
- Mov e th e rig ht thum bwh eel "DR L" to posi tion @ .
Con tro ls and eq uip
ment
Clear vision
T he daytime running lights can be turned on or off using this func
t ion. If the f unc tion is ac tive, the dayti me r unning ligh ts are turn ed
on automatically when the ignition is switched on .
The daytime running lights are activated
only when the light switch
=> fig . 63 @ is at the O or AUTO* position .
& WARNING
Never use daytime running lights to see where you are going . They
are not bright enough and will not let you see far enough ahead for
s afety , e speci ally at dusk o r when it is dark . Be aware of changes
in outside light conditions when you are driving and respond by
sw itching on your low beams
io.
0 Note
Alway s be aware of change s in outside light conditions while you
a re dr iving. Respond in time to fading daylight by turning the light
s witch to position
io (or "AUTO" if your car is equipped with this
feature)
to turn on your headlights .•
Daytime running lights (Canada models only)
W hen yo u turn on the ig nit io n the daytime running lights
will come on automatically.
The daytime running lights are activated only when the light switch
@ =>fig. 63 is e ither at the
O o r the :oo: position . Whe n the ignition
is switched on, there is a difference between vehicles with bi -xenon
lig hts and ha logen lamps :
• On vehicles with bi -xenon lights only the daytime running lamps
in the headlights will c ome on.
• On vehicles with halogen lights the front fog lights, side marker
lights and tail ligh ts come on automa tica lly
~
Vehicle care I I irechnical data
Page 74 of 316
Clear vision
& WARNING
Never use daytime running lights to see where you are going. They
are not bright enough and will not let you see far enough ahead for
safety , especially at dusk or when it is dark . Be aware of changes
in outside light conditions when you are driving and respond by
switching on your low beams
fD.
0 Note
• With the light switch at the O or ;:oo: position , only your front fog
lights remain turned on when it turns dark outside . Even though
your instruments appear well lit, the road ahead of you is not. The
light pattern provided by fog lights alone is not suffic ient for safe
driving in poor light or darknes s. Therefore:
• Always be aware of changes in outside light conditions while
you are driving. Respond in time to fading daylight by turning the
light swit ch to position @:D (or "AUTO" if your car is equipped with
th is feature) to turn on your headlights.
[ i ] Tips
The day tim e run ning lig ht s fu nct io n c annot b e tur ned off. •
Applies to vehicles: with Adap tive ligh t
Adaptive light
W he n dri vin g around be nds , the r eleva nt area of the road
is b ette r illumin ated.
Fig. 64 Adapt ive light
when driving
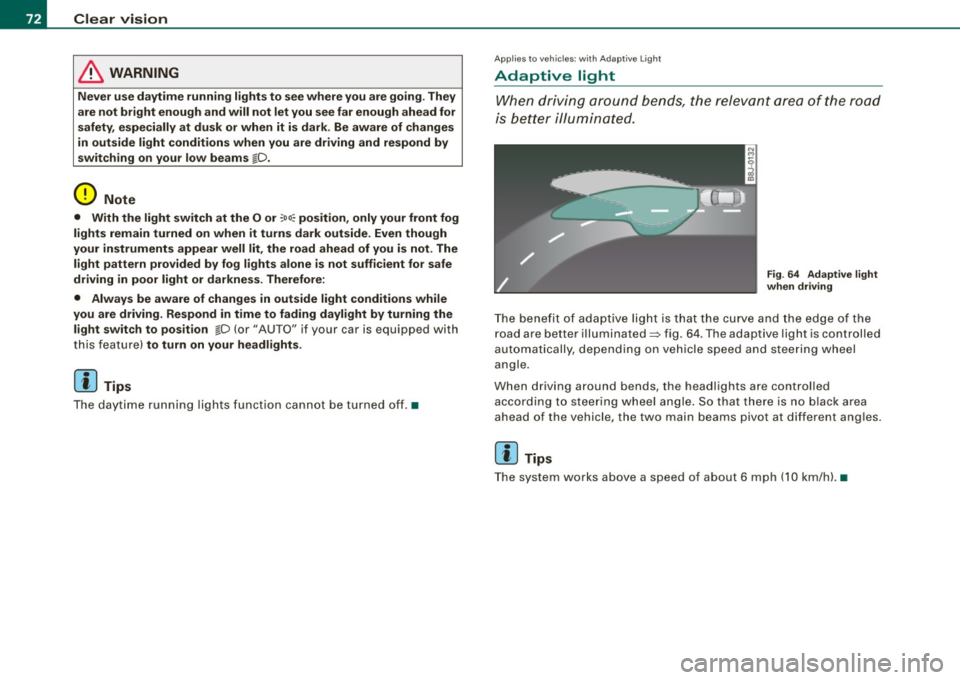
T he bene fit of ada ptive lig ht is th at t he cu rve a nd the e dge of the
road are b etter illuminated=> fig. 64 . The adaptive light is controlled
a uto ma tically, de pendin g on ve hicle speed a nd s tee rin g w heel
angle.
When d riving around bends , the headlights are controlled
according t o steeri ng w heel angle. S o that ther e is no blac k ar ea
ahead of the veh icle, the two main beams pivot at different angles.
[ i ] Tips
T he system wor ks above a speed of about 6 mp h (10 km/ h). •