2008 AUDI TT ROADSTER Folding top
[x] Cancel search: Folding topPage 67 of 316

The folding top's emergency operation basically consists of the
following steps:
• Depressurize the hydraulic system for operating the folding top:
The hydraulic system pump must be depressurized.
• Unlock the covers : The covers must be manually unlocked and
positioned.
• Raise the folding top: The folding top must be manually lifted out
of its well and raised.
• Lock the folding top: The latches for the folding top must be
locked with the emergency lock key.
• Close the hydraulic system's emergency operation bolt: Turn the
emergency operation bolt=> fig. 54 to the right to close the
hydraulic system that operates the folding top.
& WARNING
• When raising the folding top, take care not to reach into the
linkage that operates the folding top or any of its other moving
parts. Otherwise, your hands may be trapped in the mechanism -
risk of injury!
• Never drive while the folding top is not properly secured . Other
wise, it may be pulled open by the wind. This can cause injuries and damage to the vehicle -danger of an accident!
[ i] Tips
Get a second person help you to close the folding top. It is much
easier to raise the folding top with the help of a second person. •
Controls and equip
ment
Folding top
Ap plies to vehi cles: with po wer fo ldin g top
Step 1: Depressurizing the hydraulic system
-
Fig. 54 Hydraulic
pump: Emergency
operation bolt in the
trunk
- Open the trunk lid. If the rear lid cannot be opened, an
emergency release is provided
=> page 56.
- Swing the luggage compartment floor upwards.
- Take out the screwdriver and the crank. The crank is
located under the electric air pump for the tire repair kit*
=> page 264, fig. 168.
-Insert the screwdriver through the slit in the carpeting
=> fig. 54.
-Turn the emergency operation bolt to the left to depres
surize the hydraulics that operate the folding top.•
I • •
Page 68 of 316
Folding top
Applies to vehic le s: with powe r fo lding top
Step 2: Raising the covers
Fig. 55 Covers closed
Fig. 56 Covers open
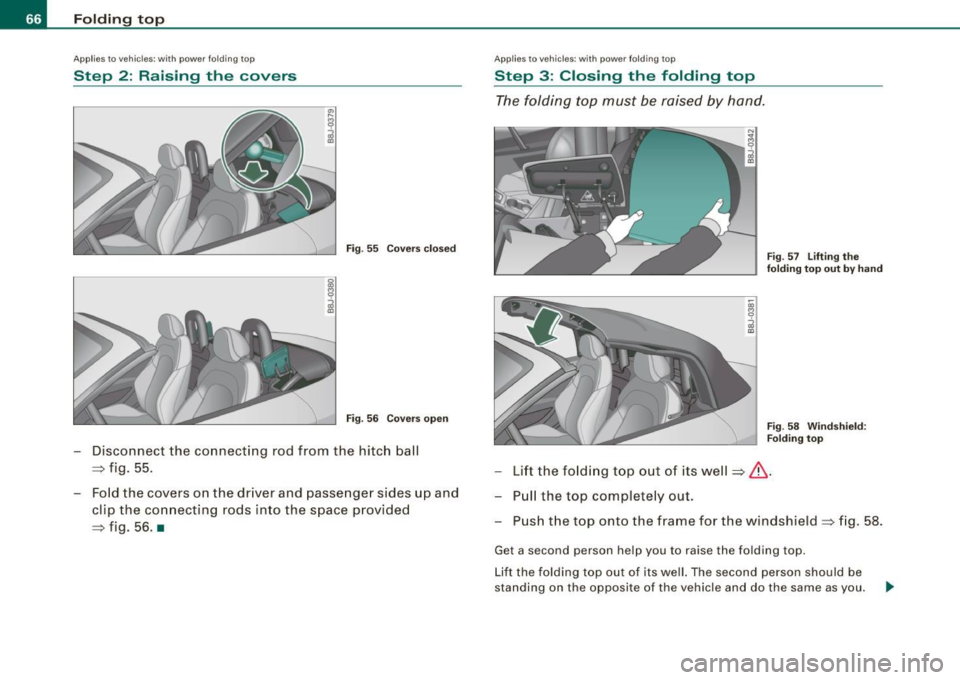
- Disconnect the connecting rod from the hitch ball
=> fig. 55.
- Fold the covers on the driver and passenger sides up and
clip the connecting rods into the space provided
=> fig. 56. •
Appl ies to vehic les : with power fo lding top
Step 3: Closing the folding top
The folding top must be raised by hand.
Fig. 57 Lifting the
folding top out
by hand
Fig . 58 Windshield :
Folding top
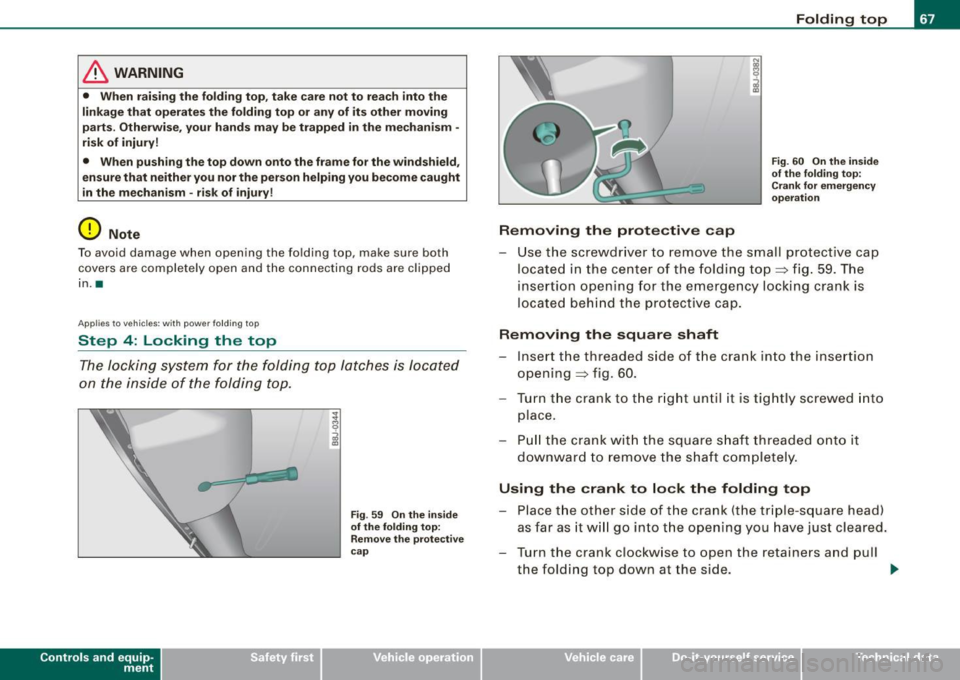
-Lift the folding top out of its well => /n..
Pull the top completely out.
- Push the top onto the frame for the windshield => fig. 58.
Get a second person help you to raise the folding top.
Lift the folding top out of its well. The second person should be
standing on the opposite of the vehicle and do the same as you.
Page 69 of 316
& WARNING
• When raising the folding top, take care not to reach into the
linkage that operates the folding top or any of its other moving
parts. Otherwise, your hands may be trapped in the mechanism -
risk of injury!
• When pushing the top down onto the frame for the windshield,
ensure that neither you nor the person helping you become caught
in the mechanism -risk of injury!
0 Note
To avoid damage when opening the folding top, make sure both
covers are completely open and the connecting rods are clipped
in. a
Appl ies to vehicles: with power folding top
Step 4: Locking the top
The locking system for the folding top latches is located
on the inside of the folding top.
Contro ls and eq uip
ment
Fig . 59 On the inside
of the folding top:
Remove the protective
cap
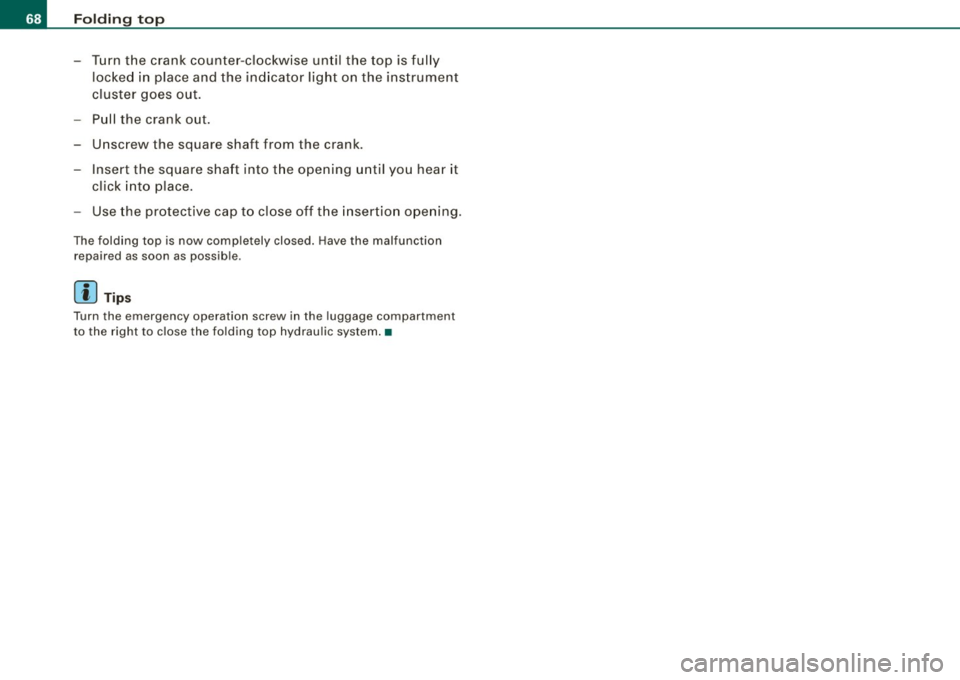
Removing the protective cap
Folding top
Fig . 60 On the inside
of the folding top:
Crank for emergency
operation
- Use the screwdriver to remove the small protective cap
located in the center of the foldin g top=> fig. 59. The
insertion opening for the emergency locking crank is
located behind the protective cap.
Removing the square shaft
-Inse rt the threaded side of the crank into the insertion
opening => fig. 60.
- Turn the crank to the right until it is tightly screwed into
place.
- Pull the crank with the square shaft threaded onto it
downward to remove the shaft completely.
Using the crank to lock the folding top
-Place the other side of the crank (the triple-square head)
as far as it will go into the opening you have just cleared.
- Turn the crank clockwise to open the retainers and pull the folding top down at the side. ..,_
Vehicle care I I irechnical data
Page 70 of 316
Folding top
-Turn the crank counter-clockwise until the top is fully
locked in place and the indicator light on the instrument
cluster goes out.
- Pull the crank out.
- Unscrew the square shaft from the crank.
- Insert the square shaft into the opening until you hear it
click into place.
- Use the protective cap to close off the insertion opening.
The folding top is now completely closed. Have the malfunction
repaired as soon as possible.
[ i) Tips
Turn the emergency operation screw in the luggage compartment
to the right to close the folding top hydraulic system.•
Page 138 of 316
• ....__D_ ri_v _i_n ..;;:g :;._ S_a_ f_ e_ l..:.y _______________________________________________ _
& WARNING (continued)
• If you absolutely must drive with the rear lid open, observe the
following notes to reduce the risk of poisoning:
-Close all windows,
- Close the folding top,
- Open all air outlets in the instrument panel,
- Switch off the air recirculation,
- Set the fresh air fan to the highest speed.
& WARNING
Always make sure that the doors, all windows, the folding top and
the rear lid are securely closed and locked to reduce the risk of
injury when the vehicle is not being used.
• After closing the rear lid, always make sure that it is properly
closed and locked .
• Never leave your vehicle unattended especially with the rear lid
left open. A child could crawl into the vehicle through the luggage
compartment and close the rear lid becoming trapped and unable
to get out. Being trapped in a vehicle can lead to serious personal
injury.
• Never let children play in or around the vehicle.
• Never let passengers ride in the luggage compartment. Vehicle
occupants must always be properly restrained in one of the
vehicle's seating positions.
[ i) Tips
• Air circulation helps to reduce window fogging. Stale air escapes
to the outside through vents in the trim panel, on the left side of the
luggage compartment. Be sure to keep these slots free and open.
• The tire pressure must correspond to the load -see the tire pres
sure sticker on driver 's side B-pillar. •
Reporting safety defects
If you believe that your vehicle has a defect
which could cause a crash or could cause
injury or death, you should immediately inform
the National Highway Traffic Safety Adminis
tration (NHTSA) in addition to notifying Audi of
America, Inc. If NHTSA receives similar complaints, it may open an investigation, and
if it finds that a safety defect exists in a group
of vehicles, it may order a recall and remedy
campaign. However, NHTSA cannot become involved in individual problems between you,
your dealer, or Audi of America, Inc.
To contact NHTSA, you may call the Vehicle
Safety Hotline toll-free at 1-888-327-4236 (TTY: 1-800-424-9153);
go to
http://www.safercar.gov;
or write to: Administrator, NHTSA, 400 Seventh Street, SW., Washington, DC 20590.
You can also obtain other information about motor vehicle safety from
http://www.safercar.gov. •
Page 205 of 316
_____________________________________________ C_ l_ e _a_ n_ in_ g_a _ n_d_ p_ r_ o_ t _e_ c_t _io _ n __ lftlll
•
0 Note
• Never use a power washer to clean the powe r top itself .
• To avoid damaging your vehicle, always make sure that there is
sufficien t distance between the spray head and soft materials like
rubber hoses, plastic parts and sound -deadening materials. Never
aim the spray head at the same point for a long time. This also
applies to cleaning headlights and painted bumpers. Remember:
the closer the nozzle is to the surface of the material, the greater the stress on the material. •
Folding top care
The folding top requires special care.
Keeping your top looking great and making certain that it lasts a
long time depend to a great extent on proper use and care. Remove
bird droppings as soon as possible, since the corrosive chemicals in
them will cause the rubber impregnation in your top to swell and
possibly allow the fabric to leak .
W ith normal soiling, all you need to do is clear the top with a soft
brush and clear water . Always brush in the direction of the fabric
from front to rear.
If the top is very dirty and has spotted areas clean it with a brush
using a convertible top cleaner. Always brush in the direction of the
fabric from front to rear . Rinse with plenty of clear water, and allow
the top to air-dry.
Chamois are not suitable for drying the top.
Never use gasoline, spot remover, benzene, paint thinner or
solvents to remove spots. We recommend that you only use
cleaners especially formulated for use on convertible tops, and that
you follow the produce use directions carefully . Authori zed Audi
deals can provide detailed information.
& WARNING
Always read and heed all WARNINGS and the information on
:=> page 200.
0 Note
Never use a high -pressure power washer to clean the folding top. •
Applies to ve hicles: w ith win d def le cto r
Wind deflector
Clear the wind deflector with water or, if it is heavily soiled, a chem
ically neutral cleaning solution.
& WARNING
Always read and heed all WARNINGS and the information on
=> page 200. •
Waxing
Wax protects the vehicle's paint.
-Use a manually applied car wax occasionally to protect
the paint.
A good wax coating protects the vehicle paint to a large extent
against the environmental factors listed under ~ page 200,
"Washing" and even against slight scratches.
You can use a liquid car wax to protect your paint as soon as one
week after your vehicle has been delivered.
Even if you regularly use a waxing process in automatic car washes ,
we recommend that you manually apply a coat of wax to give the .,_
Vehicle care
I t •
Page 303 of 316

______________________________________________ A_ l.:.. p _h_ a_ b_e _t_ic _ a _ l _in _ d_e _ x __ _
Automatic folding top
closing .. .... .... ....... ..... ... . 62
opening ... ... ... .... .... ... .... .. 62
Automatic headlight control .. ......... 70
Automatic transmission .. .... .... .... 113
Driving Notes ......... .... .. ..... 114
Emergency program .... ...... .... 119
Emergency release . . . . . . . . . . . . . . . 120
Ignition key safety lock . ...... ..... 106
Kick -down .. ... .. .... .... ...... .. 117
Launch Control Program ........... 117
Selector lever lock ........ .... .... 116
Selector lever positions .... ..... .. 115
Tiptronic ... .. .... .... ... .... .... 118
Tiptronic controls on the steering wheel
119
Average speed ... ... ..... ... .... .... . 39
Avoid damaging the vehicle ..... .... . 194
B
Battery .. ... .... .... .... ..... .. 231, 234
Battery location inside the engine
compartment . ...... .... .... 221, 222
Charging ........................ 235
Checking battery acid level .. .. 234, 235
Connecting ...................... 231
Disconnecting .... .... .... ...... . 231
Important warnings when working on the
battery ........................ 232
Replacing the battery .. .......... . 231
Winter operation ................. 231
Working on the battery ... .... .... . 232
Battery voltage . .... .... .... ... .... .. 35
Controls and equip
ment Safety first
Before
driving . .... . .. ... ... ........ 128
Bi -Xenon headlights .................. 75
Blended gasoline . ... .... .... .... .... 214
Body cavity sealing ...... ...... ... .. . 207
Booster seats .. ...... .... .... .... ... 175
How do I properly install a booster seat in
my vehicle? . .......... .... ... .. 175
Safety instructions . .... .... ... .... 175
Brake fluid Changing the brake fluid .. ........ 230
Checking the brake fluid level ...... 230
What is the correct brake fluid level? 230
What should I do if the brake fluid warning
light comes on? ... .. .... .... .... 230
Brake fluid reservoir . ...... ...... .... 230
Brake light defective ........ .... .... .. 36
Brake system ... ... .. .... ........ 32, 230
Anti-lock brake system .. ....... .... 20
Brake Assistant ........ ... .. .... . 189
Brake fluid ................... .... 230
Brake f luid specifications for refill and
replacement .... ...... ...... .... 230
Brake pads ... ... .... .... .... .... 193
General information .............. 188
How does the moisture or road sa lt affect
the brakes? ..... ...... ...... .... 188
Warning/indicator lights .. ...... .... 20
Break -in period ...... ...... ... .. .... 192
Brake pads ...................... 193
Tires .. .... .... ... .... .... .... ... 192
Bulbs .... ... .... .. . .. .............. 277
C
California Proposition 65 Warning . .... 221
Battery specific .... ... .... .... .... 234
Capacities ... .... ........ ... .... .... 291
Car care ... .... ... .. .... .... .... .... 200
Interior ..... .... .. .... ........... 208
Plastic and vinyl .................. 204
Weatherstrips ..... .... ...... ..... 206
Care of exterior .. .... ....... ........ 200
Cargo area
See Luggage compartment . ... .... . 135
Catalytic converter ...... .... .... .... 193
CD changer ..... .... .... .... .... ..... 96
Certification ...... ... .... ...... ...... 45
Changing a flat tire ... .... .... ....... 267
Changing engine oil ............. .... 226
Chassis Undercoating .... ..... ... .... .... 207
See also Audi magnetic ride .... .... 112
Check ing
Battery acid level ......... ... . 234, 235
Engine coolant level .............. 228
Checking tire pressure . ... .... .... ... 244
Child restraint
Danger of using child restraints in the front seat .... ... .... .... .... ... 147
Child restraints Where can I get additional information
about chi ld restraints? ... ........ 180
Child safety ...... .... ... .... ... 168, 173
Booster seats .... .... .... .... ... . 175
Convertible child safety seats ... ... 174
Vehicle operation Vehicle care Do-it-yourself service Technical data
Page 305 of 316
______________________________________________ A_ l_,_ p _h_ a_ b_e _t_i c_ a _ l _in _ d_e _ x __ lllll
Dimensions ... .. ...... . .... .. .. .... 290 Electronic differential lock (EDU
Dipstick Reading the dipstick properly
Direct Shift Gearbox 224
Emergency release . . . . . . . . . . . . . . . 120
Distance ........ .... ....... ...... ... 40
Driver information system . .... .... ... . 22
Digital speedometer ... .. .... ...... 24
Fuel filler cap ...... ..... .... .... .. 24
Menu button ..................... 28
Menu display ..................... 27
Open door or rear lid warning . ......
24
Outside temperature display .. .... .. 23
Parking brake warning ............. 30
red symbols .. ............. ....... 31
Setting ...... .... ... .... ..... .. .. 28
Sound system disp lay ............ .. 23
Text messages . .... .... .... .... ... 30
Driver seat See Seating position . ............. 130
Driving Run -flat tires . .... .... ....... .... . 258
Dr iving messages ... ..... .. ... .... ... 30
Driving safely . . . . . . . . . . . . . . . . . . . . . . . 128
Driving time ... .... ... ..... .... .... .. 39
Duplicate key .... .... ...... ....... ... 47
Dust filter . ....... .... .... ........ ... 99
E
Electro -mechanical power assist ... 21, 190 How the system works
............ 186
Warning/indicator lights ............ 20
Electronic immobilizer ...... ... .. .. 14, 49
Electronic power cont ro l
EPC warning/indicator light ..... .... 17
Electronic Stability Program .......... 184
Electronic stabilization program (ESP! Warning/indicator lights ........ .... 18
Emergency flasher Warning/ind icator lights .. .... ...... 19
Emergency flashers .................. 75
Emergency locking . ... .... .... ... .. .. 54
Emergency operation Folding top ....................... 64
Rear lid .. .... ....... .... .... .... . 56
Emergency release for selector lever ... 120
Emergency starting ........ ... .... ... 278
Emergency towing .. ............. .. . 281
Engine Cecking and filling locations ... ... . 222
Checking and filling locations ...... 221
Coolant ... .. .... .... ..... .. ... .. 227
Hood . ..... .. ... ... .. .... ..... .. 219
Starting ..................... 106, 107
Starting with jumper cables ........ 278
Stopping .... .... ...... ...... ... . 107
Engine compartment .... ...... ...... 221
Safety instructions ................ 220
Working in the engine compartment 220
Engine coolant sys tem ..... .... ...... 227
Adding coolant .... .... ..... ... ... 228
Checking the engine coolant leve l .. . 228 Radiator fan
... .. .. .. .... .... .... 229
Temperature gauge ................ 13
Engine cooling system Malfunction ... .. .... .... .... ..... 32
Engine data .. ............... .... ... 291
Engine hood Closing .. ... ........ .... ... ..... 220
How to release the hood ... ... ... .. 219
Engine oil . ...... .... .... ... .... .... 222
Adding .... ....... .... ... .... .... 225
Additives .. .... .... ... .... .... ... 225
Changing . .... .... .... ..... ..... . 226
Checking the engine oi l leve l ... .... 224
Indications and conditions requiring extra checking .... .... .... .... .... ... 224
Oil consumption . ...... ..... .. .... 224
Oil grades . ....... .... .... ....... 222
Pressure malfunction .............. 33
Recommended oil check intervals ... 224
Specification and viscosity ......... 222
Engine oi l leve l .. .... .... ... .... .... . 35
Engine oil sensor defective .... ...... .. 35
Environment Break-in period ..... .. ... .... .... . 192
Catalytic converter .......... ... .. . 193
Disposing of your vehic le battery .. . 231
Driving at high speeds . ...... .... . 194
Dr iving to minim ize pollution and noise .
194
Fuel .. .... .... .... ... .... .... ... 216
Fuel economy ......... ........ ... 194
Leakage from your vehicle . .... .... 220
Letting the vehicle stand and warm up ..
195
Controls and equip ment Safety first Vehicle operation
Vehicle care Do-it-yourself service Technical data