2008 AUDI S6 seats
[x] Cancel search: seatsPage 251 of 390
Lower anchorages and tether for
children (LATCH)
Location
LATCH is the acronym for Lower Anchor and Tethers for
Children and designates a special child safety seat
restraint system. In Canada, the terms "top tether" with
"lower universal anchorages" (or "lower universal
anchorage bars") are used to describe the system.
Fig . 215 Schematic
overview: LATCH
anchorage point loca
tions
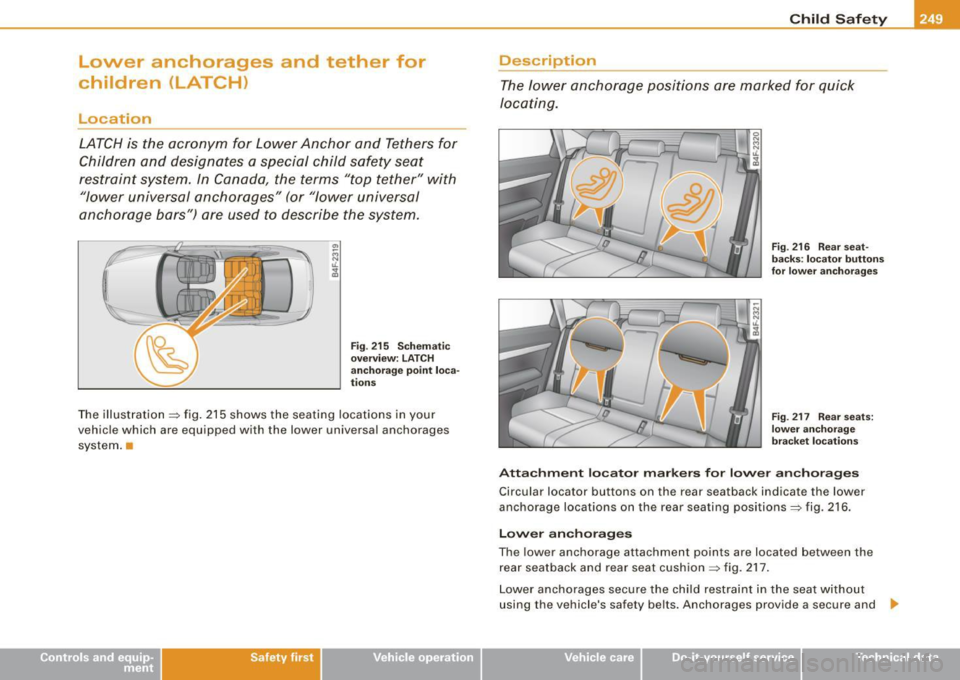
The illustration =:> fig. 215 shows the seating locations in your
vehicle which are equipped with the lower universal anchorages
system. •
Safety first
Child Safety
Description
The lower anchorage positions are marked for quick
locating.
Fig . 216 Rear seat
backs: locator buttons
for lower anchorages
Fig . 217 Rear seats:
lower anchorage
bracket locations
Attachment locator markers for lower anchorages
Circular locator buttons on the rear seatback indicate the lower
anchorage locations on the rear seating positions=:> fig. 216.
Lower anchorages
The lower anchorage attachment points are located between the
rear seatback and rear seat cushion=:> fig. 217.
Lower anchorages secure the child restraint in the seat without
using the vehicle's safety belts. Anchorages provide a secure and
~
Vehicle care I I Technical data
Page 252 of 390
___ C_h_ i_ld _ S_ a_ f_ e_ t-= y'------------------------------------------------
easy-to-use attachment and minimize the possibility of improper
child restraint installation.
All child restraints manufactured after September 1, 2002, must have lower anchorage attachments for the LATCH system.
Please remember that the lower anchorage points are only intended
for installation and attachment of child restraints specifically certi
fied for use with LATCH lower anchorages. Child restraints that are
not equipped with the lower anchorage attachments can still be
installed in compliance with the child restraint manufacturer's
instructions on using vehicle safety belts.
& WARNING
Improper installation of child restraints will increase the risk of
injury in a crash.
• Always carefully follow the child restraints manufacturer's
instructions for proper installation of the child restraint and
proper use of the lower anchorages or safety belts in your vehicle.
• Never secure or attach any luggage or other items to the
LATCH
lower anchorages.
• Always read and heed the important information about child
restraints in this chapter and WARNINGS
~ page 234, "Child
Safety". •
Guidance fixtures for lower anchorages
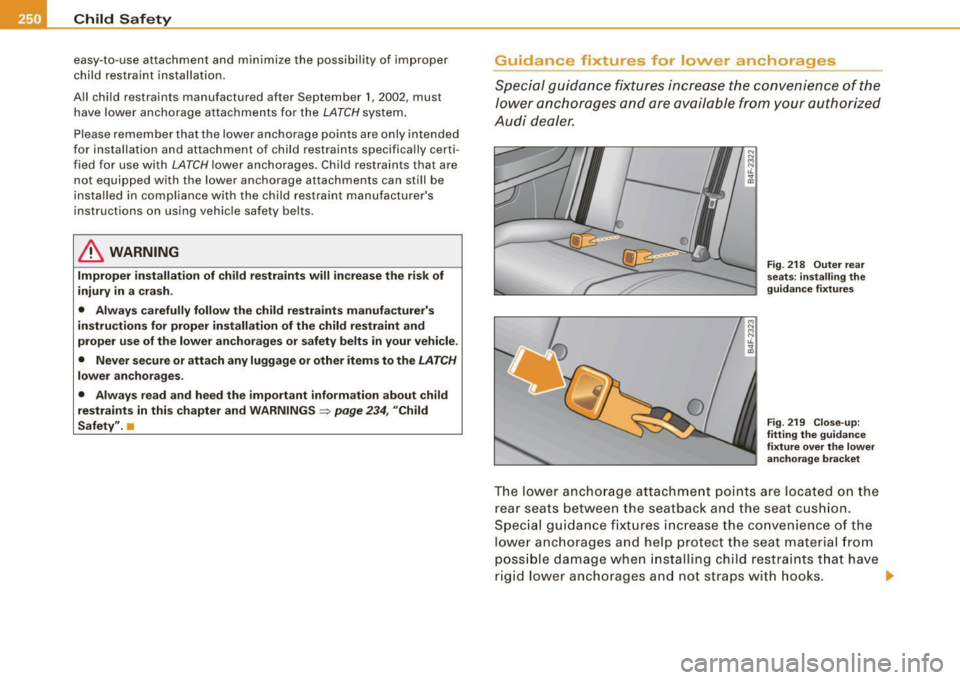
Special guidance fixtures increase the convenience of the
lower anchorages and are available from your authorized
Audi dealer.
Fig. 218 Outer rear
seats : installing the
guidance fixtures
Fig. 219 Close-up:
fitting the guidance
fixture over the lower
anchorage bracket
The lower anchorage attachment points are located on the
rear seats between the seatback and the seat cushion.
Special guidance fixtures increase the convenience of the
lower anchorages and help protect the seat material from
possible damage when installing child restraints that have
rigid lower anchorages and not straps with hooks. _,.
Page 253 of 390

--------------------------------------------~C=-- h :....:..:..:. il..:.:d _S.:... a _ fe_t~ Y:,___ _1111
Inst alling th e guidan ce fixtur es
- Push down on the seat cushion so t hat the lower anchor
ages are v isib le.
- Hold t he guidance fixt ure with the part number facing
downward and push it in the direction of the arrow on to
the anchorage => page
250, fig. 2 19.
- Make sure that each of the two guidance fixtures per seat
snaps into place.
Removing the guidance fixtures
- Remove the child restrai nt according the c hild restraint
m an ufacturer's instr uctions.
- Pu sh down on the seat cushion so t hat the lower anchor
ages are v isible.
- Pu ll off the gu idance fixtures from the lowe r anc horages.
- Always remove the guidance fixt ure s an d keep them in a
safe p lace when not in use.
You may find it easier to insta ll chi ld restraints equipped with hooks
attached to straps without the guidance fixtures in place. If this is
the case, remove the guidance fixtures by pu lling them off the
anchorages . However, the guidance fix tures can he lp you to locate
the
LATCH anchorages.
& WARNING
Improper use of teth er anchorage s or lowe r anchorages can caus e
s erio us personal inju ry
in a cra sh .
• Alway s carefully follow the child re straint manufa cturer' s
in struct ions for proper inst allati on a nd u se of ch ild restraint
sy stems .
Controls and equip ment Safety first Vehicle operation
& W
AR N IN G ( continued )
• Never use the LATCH or tether an chorage s to att ach safety
b elt s or other kinds of o ccup ant re str aints .
• Child restraint tether attachment s and lower atta chments are
onl y designed to secure a child re str aint th at h as been equipped
to u se these anchorages.
• Tether anchor age s a nd lower an chorages are de signed to with
s tand only those loads impos ed by correctly fitted child r estraints.
Unde r no circum stan ces can they be u sed safel y for adult or child
safety belt s or harne sses .
• Neve r mount more than one ch ild rest raint to a single tether or
to a lower anchorage point . Atta ching two child r estraints to a
s ingle an chorage point can cause the anchorage to fail and cause
s erio us per sonal injury in a crash .
0 Note
• Remove the guidance fixtures before folding the rear seatback to
prevent damaging the seat cushion.
• I f you leave the guidance fixtures insta lled for several days, they
cou ld leave a mark on the upholstery on the seat cushion and back
rest in the area that the guidance fi xtures were insta lled . The uphol
stery would also be permanently stretched around the guidance
fixtures. This applies especially to leather seats.
[ i ] Tip s
• Always remove the guidance fixtures when not in use.
• Please keep the guidance fixtures in a safe place with the vehicle
when not in use .•
Vehicle care Do-it-yourself service Technical data
Page 254 of 390
Ill Child Safety ___ ,.__ ____________ _
Installing a chi ld restraint using the lower
anc horages of the LA TCH system
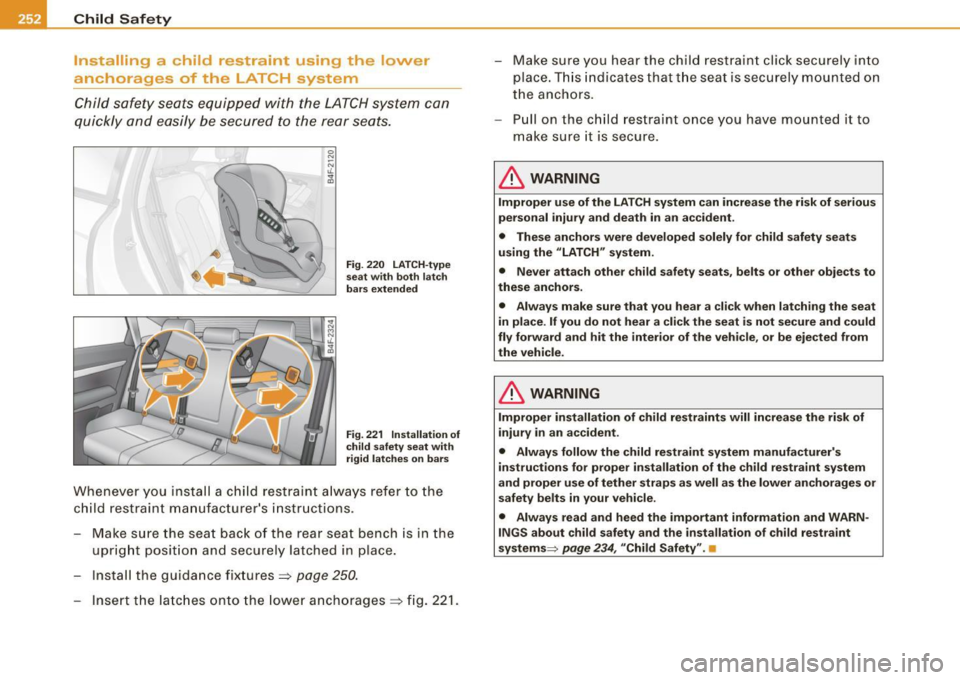
Child safety seats equipped with the LATCH system can
quickly and easily be secured to the rear seats.
0 N ;::; ,L
i
Fig. 220 LATCH-type
seat with both latch
bars extended
Fig. 221 Installation of
child safety seat with
rigid latches on bars
Whenever you install a child restraint always refer to the
child restraint manufacturer's instructions.
Make sure the seat back of the rear seat bench is in the
upright position and securely latched in place.
I nstall the guidance fixtures==>
page 250.
- Insert the latches onto the lower anchorages ==> fig. 221 . - Make sure you hear the child restra
int click securely into
place. This indicates that the seat is securely mounted on
the anchors.
- Pull on the child restraint once you have mounted it to
make sure it is secure .
& WARNING
Improper use of the LATCH system can increase the risk of serious
personal injury and death in an accident.
• These anchors were developed solely for child safety seats
using the "LATCH" system.
• Never attach other child safety seats, belts or other objects to
these anchors.
• Always make sure that you hear a click when latching the seat
in place. If you do not hear a click the seat is not secure and could
fly forward and hit the interior of the vehicle, or be ejected from
the vehicle.
& WARNING
Improper installation of child restraints will increase the risk of
injury in an accident.
• Always follow the child restraint system manufacturer's
instructions for proper installation of the child restraint system
and proper use of tether straps as well as the lower anchorages or
safety belts in your vehicle.
• Always read and heed the important information and WARN
INGS about child safety and the installation of child restraint
systems :::> page
234, "Child Safety". •
Page 256 of 390
___ C_h_ i_ld _ S_ a_ f_ e_ t-= y'------------------------------------------------
& W ARNING (continued )
• Never secure or attach any luggage or other items to the LATCH
lower anchorages or to the tether anchors.
• If a tether or other strap is used to attach a child restraint to the
front passenger seat, make sure that it is not so tight, that it
causes the weight-sensing mat to measure more weight than is
actually on the seat .
• The heavier weight registered can make the system work as
though an adult were on the seat and deploy the Advanced Airbag
when it must be suppressed causing serious or even fatal injury to
the child .•
T et her strap
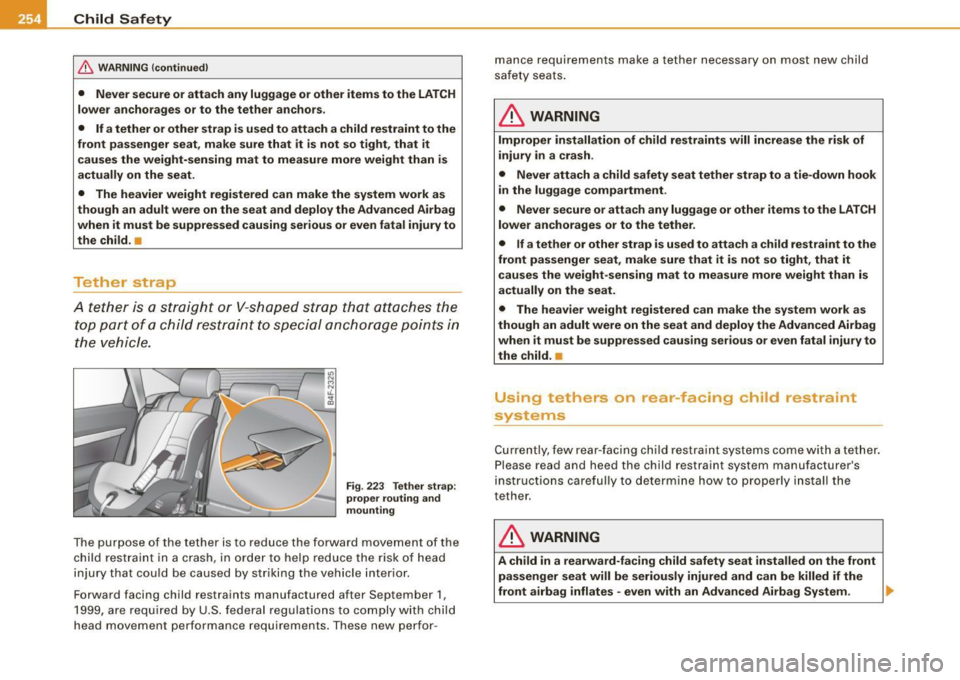
A tether is a stra ig h t or V-shape d strap that atta ches the
top part of a ch ild restraint to sp ecial anchorage po ints in
th e v ehicl e.
Fig . 223 Tether strap :
prope r routing and
mounting
T he purpose of the tether is to reduce the forward movement of t he
ch ild res trai nt in a cras h, in or der t o help re duce t he risk o f head
injury that cou ld b e caused by striking t he vehicle interior.
Forward facing child rest raints manufactured after September 1,
19 99, are require d b y U.S . f edera l reg ulatio ns to comp ly with c hild
head movement performance requirements . These new pe rfor- mance requirements ma
ke a tether necessary on most new child
sa fe ty seats .
& WARNING
Improper installation of child restraints will increase the risk of
injury in a crash .
• Never attach a child safety seat tether strap to a tie -down hook
in the luggage compartment .
• Never secure or attach any luggage or other items to the LATCH
lower anchorages or to the tether.
• If a tether or other strap is used to attach a child restraint to the
front passenger seat , make sure that it is not so tight , that it
causes the weight-sensing mat to measure more weight than is
actually on the seat.
• The heavier weight registered can make the system work as
though an adult were on the seat and deploy the Advanced Airbag
when it must be suppressed causing serious or even fatal injury to
the child .•
Us ing tethe rs on rear.facing chi ld restra int
systems
C ur ren tly , few r ear-faci ng child re stra int s ystems co me with a tether.
P lease read and heed the ch ild restra int system manufactur er's
i n str uct ions care full y to d ete rmin e ho w to prop erly i nsta ll th e
tether.
& WARNING
A child in a rearward-facing child safety seat installed on the front
passenger seat will be seriously injured and can be killed if the
front airbag inflates -even w ith an Advanced Airbag System . ._
Page 257 of 390
& WARNING !continued)
• The inflating airbag will hit the child safety seat or infant
carrier with great force and will smash the child safety seat and
child against the backrest, center arm rest, or door .
• A tight tether or other strap on a rearward-facing child restraint
attached to the front passenger seat can put too much pressure
on the weight -mat in the seat and register a heavier weight in the
Advanced Airbag System. The heavier weight registered can make
the system work as though an adult were on the seat and deploy
the Advanced Airbag when it must be suppressed causing serious
or even fatal injury to the child.
• If you must install a rearward facing child safety seat on the
front passenger seat because of exceptional circumstances and
the PASSENGER AIR BAG OFF light does not come on and stay on,
immediately install the rear-facing child safety seat in a rear
seating position and have the airbag system inspected by your
Audi dealer. •
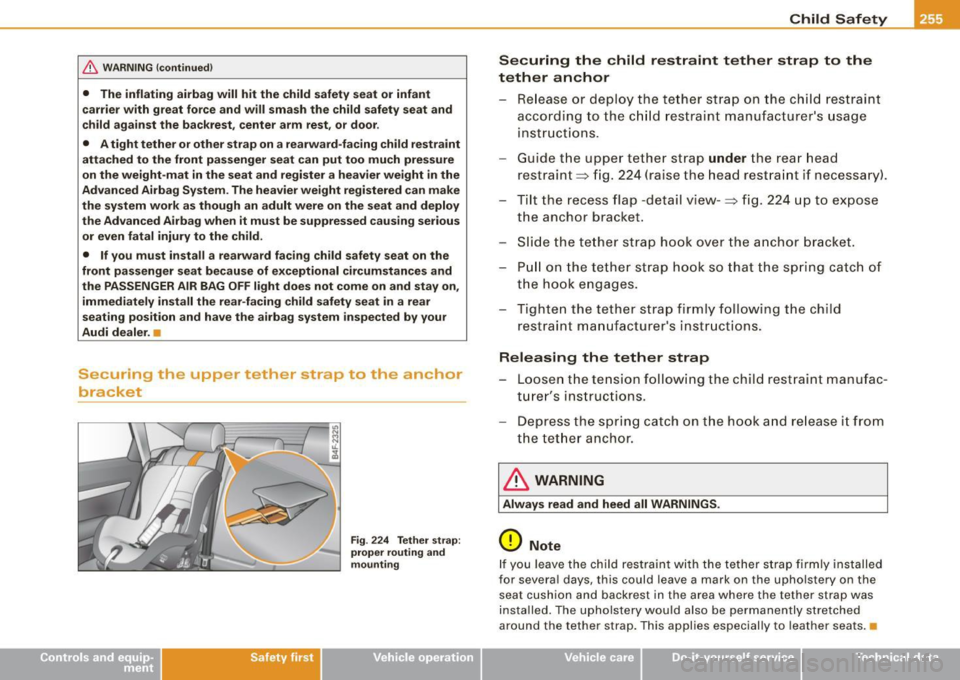
Securing the upper tether strap to the anchor
bracket
Safety first
Fig. 224 Tether strap:
proper routing and
mounting
Child Safety
Securing the child restraint tether strap to the
tether anchor
- Release or deploy the tether strap on the child restraint
according to the child restraint manufacturer's usage
instructions.
Guide the upper tether strap
under the rear head
restraint ~ fig. 224 (raise the head restraint if necessary) .
- Tilt the recess flap -detail view-:::;, fig. 224 up to expose
the anchor bracket .
- Slide the tether strap hook over the anchor bracket.
- Pull on the tether strap hook so that the spring catch of
the hook engages.
- Tighten the tether strap f irmly following the child
restraint manufacturer's instructions.
Releasing the tether strap
- Loosen the tension following the child restraint manufac
turer's instructions.
- Depress the spring catch on the hook and release it from
the tether anchor.
& WARNING
Always read and heed all WARNINGS.
0 Note
If you leave the child restraint with the tether strap firmly installed
for several days, this could leave a mark on the upholstery on the seat cushion and backrest in the area where the tether strap was
installed. The upholstery would also be permanently stretched
around the tether strap. This applies especially to leather seats.•
Vehicle care
I I irechnical data
Page 268 of 390

-Intelligent technology
----'""------- ~---------------------------------------
With the engine turned off
If you listen to the radio, for example, with the engine turned off or
use other MMI functions, the battery is being discharged.
If starting capability is jeopardized due to energy consumption , the
following warning appears in the MMI display:
Please start engine, otherwise system will switch off in
3 minutes.
The warning indicates that the system will be turned off automati
cally after 3 minutes. If you wish to continue using the functions,
you have to start the engine.
With the engine running
Although electrical energy is generated when the vehicle is being
driven, the battery can become discharged. This happens mostly
when little energy is being generated and a great deal consumed
and the battery's state of charge is not optimal.
To bring the energy balance back into equilibrium , consumers
which require especially large amounts of energy are temporarily cut back or switched off. Heating systems in particular require a
great deal of energy. If you notice, for example, that the heated
seats* or the heated rear window are not heating, they have been
temporarily cut back or switched off. These systems will be available
again as soon as the energy balance has been restored.
You will also notice that engine idle speed has been increased
slightly . This is normal and not a cause for concern. By increasing
engine idle speed the additional energy required is generated and
the battery is charged. •
Driver notification in the instrument cluster
d isplay
If battery power drops into the range where it can limit the ability of
the engine to start, this is shown in the instrument cluster display
with the following driver message:
'-' Low battery charge: battery will be charged while driving
This notification reminds you that the starting capability of the
engine may be limited. As soon as you start driving again, the
battery will be recharged and the notification will go out.
Driver notification appears and goes out again
If this driver notification appears after the ignition is turned on or
while driving and it goes out again after a while, the battery has
been adequately recharged.
Driver notification appears and does not go out again
If this driver notification appears after the ignition is turned on or
while driving and does not go out again, the battery's state of
charge is not in the optimal range. Starting ability is restricted . Have
the battery checked as soon as possible at a dealership. •
Page 287 of 390

_____________________________________________ C_ l_ e _a_ n_ in_ g_a _ n_d_ p_ r_ o_ t _e_ c_t _io _ n __ _
•
Care of interior
MMI display
-Clean th e MMI display with a soft c lean cloth and an LCD
cl eane r.
The MM I disp lay can be cleaned with a professional ly available "LCD
cleaner". The cloth should be s lightly dampened with the c leaning
fluid to clean the display.
0 Note
T o avoid scra tching the MMI display, you should never c lean it dry .•
MMI terminal
- First clean the MMI terminal with a brush to remove dust
from the housing.
- T hen wipe the MMI terminal wit h a clea n, soft, s lig htly
damp cloth .
The MMI terminal shou ld be c leaned with a brush first so that no
dirt is trapped between the buttons and the housing. We recom
mend giving the MM I terminal a final wipe with a c loth moistened
with water and dish washing dete rgent.
0 Note
To prevent damage, make sure that no flu id ever gets into the M MI
terminal. •
Aluminum trim
Use only neutral-pH products to remove spots and deposits from
a lum inum surfaces . C hro me care products an d alka line cleaners
wi ll attack aluminum surfaces and can damage them over time.
& WARNING
Always read and heed all WARNINGS and other information
~ page 278 .•
Fabrics and fabric coverings
Fabrics and fabric coverings (e.g . seats, door trim panels, etc.l
shou ld be c leaned at regular intervals with a vacuum cleaner . This
re moves surface dirt partic les which could become embedded in
the fabric through use. Steam cleaners shou ld not be used, because
t he steam tends to push the d irt deeper into the fabric and lock it
there.
Normal cl eaning
Genera lly, we recommend using a soft sponge or a lint -free
microf iber c loth to the clean fabric . Brushes should on ly be used for
carpets and floor mats, since other fabric surfaces could be harmed
by brushes.
Norma l surface stains can be cleaned using a commercially avail
able foam cleaner. Spread the foam on the surface of the fabric with
a soft sponge and work it in gent ly. Do not saturate the fabric . Then
pat the foam dry using absorbent, d ry cloths (e.g. microfiber cloth)
and vacuum it a fter it has dried completely .
Cleaning stains
Stains caused by beverages (e.g. coffee, fruit juice, etc.) can be
treated with a mild detergent so lution . Apply the detergent so lution
with a sponge. In the case of stubborn stains, a detergent paste can be applied direct ly to the stain and worked into the fabric. After -.,.
Vehicle care I t •