2008 AUDI S5 roof
[x] Cancel search: roofPage 4 of 294
Downloaded from www.Manualslib.com manuals search engine Contents 2ContentsNotes on this Owner's
Manual
. . . . . . . . . . . . . . . . . . . . . .
Controls
. . . . . . . . . . . . . . . . . . . . .
Controls and displays
. . . . . . . . . .
Overview . . . . . . . . . . . . . . . . . . . . . .
Instruments and
warning/indicator lamps
. . . . . . .
Instruments . . . . . . . . . . . . . . . . . . . .
Warning and indicator lamps . . . . .
Driver information system
. . . . . .
Introduction . . . . . . . . . . . . . . . . . . . .
On-board computer . . . . . . . . . . . . .
Speed warning function . . . . . . . . .
Auto-check control . . . . . . . . . . . . . .
Doors and windows
. . . . . . . . . . . .
Remote control keys . . . . . . . . . . . .
Central locking system . . . . . . . . . .
Boot lid . . . . . . . . . . . . . . . . . . . . . . . .
Electric windows . . . . . . . . . . . . . . .
Tilting panorama roof . . . . . . . . . . .
Lights and vision
. . . . . . . . . . . . . . .
Lights . . . . . . . . . . . . . . . . . . . . . . . . .
Interior lights . . . . . . . . . . . . . . . . . . .
Clear vision . . . . . . . . . . . . . . . . . . . .
Windscreen wipers . . . . . . . . . . . . . .Rear-view mirrors . . . . . . . . . . . . . .
Digital compass . . . . . . . . . . . . . . . .
Seats and storage
. . . . . . . . . . . . .
Electric adjustment of front seats
Easy-entry function . . . . . . . . . . . . .
Seat memory . . . . . . . . . . . . . . . . . .
Head restraints . . . . . . . . . . . . . . . .
Front armrest . . . . . . . . . . . . . . . . . .
Luggage compartment . . . . . . . . .
Roof carrier . . . . . . . . . . . . . . . . . . . .
Cup holders . . . . . . . . . . . . . . . . . . .
Ashtrays . . . . . . . . . . . . . . . . . . . . . .
Cigarette lighter and electrical
sockets . . . . . . . . . . . . . . . . . . . . . . .
On-board 230 Volt Euro socket . . .
Storage compartments . . . . . . . . .
Heating and cooling
. . . . . . . . . . .
Deluxe automatic air conditioner .
Deluxe automatic air conditioner -
basic settings . . . . . . . . . . . . . . . . . .
Deluxe automatic air conditioner
plus . . . . . . . . . . . . . . . . . . . . . . . . . .
Deluxe automatic air conditioner
plus - basic settings . . . . . . . . . . . .
Auxiliary heating and auxiliary
ventilation . . . . . . . . . . . . . . . . . . . . .
Seat heating . . . . . . . . . . . . . . . . . . .
Driving
. . . . . . . . . . . . . . . . . . . . . . . . .
Steering . . . . . . . . . . . . . . . . . . . . . . .
Ignition lock . . . . . . . . . . . . . . . . . . .
Starting and stopping the engine
with the advanced key . . . . . . . . . .
Electro-mechanical parking brake
Cruise control system . . . . . . . . . .
Audi parking system
. . . . . . . . . . .
Parking aid systems . . . . . . . . . . . .
parking system . . . . . . . . . . . . . . . . .
parking system plus . . . . . . . . . . . .
parking system advanced . . . . . . .
Towing bracket . . . . . . . . . . . . . . . . .
Settings . . . . . . . . . . . . . . . . . . . . . . .
Special parking situations . . . . . . .
Safety notes . . . . . . . . . . . . . . . . . . .
HomeLink
. . . . . . . . . . . . . . . . . . . . . .
Universal transmitter . . . . . . . . . . . .
Safety
. . . . . . . . . . . . . . . . . . . . . . .
Safe driving
. . . . . . . . . . . . . . . . . . . .
General notes . . . . . . . . . . . . . . . . . .
Correct sitting positions . . . . . . . . .
Pedal area . . . . . . . . . . . . . . . . . . . . .
Stowing luggage safely . . . . . . . . .
Seat belts
. . . . . . . . . . . . . . . . . . . . . .
Why is it so important to use seat
belts? . . . . . . . . . . . . . . . . . . . . . . . . .
Forces acting in a collision . . . . . .
How to wear seat belts properly .
Belt tensioners . . . . . . . . . . . . . . . . .
Airbag system
. . . . . . . . . . . . . . . . . .
Description of airbag system . . . .
Front airbags . . . . . . . . . . . . . . . . . . 5
7
9
9
11
11
15
20
20
25
28
29
38
38
42
48
49
51
54
54
59
60
6265
68
70
70
71
72
74
75
75
82
83
84
85
87
89
91
91
98
99
107
108
112
114
114
114
116
119
123128
128
128
129
131
138
139
141
143
145
145
151
152
152
154
157
158
160
160
161
163
165
166
166
168
document_0900452a81793dcc.book Seite 2 Mittwoch, 21. März 2007 5:42 17
Page 45 of 294
Downloaded from www.Manualslib.com manuals search engine Doors and windows43
Controls
Safety
Driving tips
General maintenance
Self-help
Technical data
WARNING
Do not leave anyone (especially children) in the car if it is locked
from the outside and the deadlock mechanism is activated: the
doors and windows cannot then be opened from the inside.
Locked doors could delay assistance in an emergency, potentially
putting lives at risk.
Note
•
Never leave any valuable items in the vehicle unattended. Even a
locked vehicle is not a safe.
•
If the diode on the driver's window sill lights up for about 30
seconds when the vehicle is locked, the central locking system or
anti-theft alarm* is not working properly. Please have the malfunc-
tion repaired by an Audi dealer or qualified workshop.
•
The interior monitor of the anti-theft alarm* system will only
function as intended if the windows and the tilting panorama roof*
are closed.
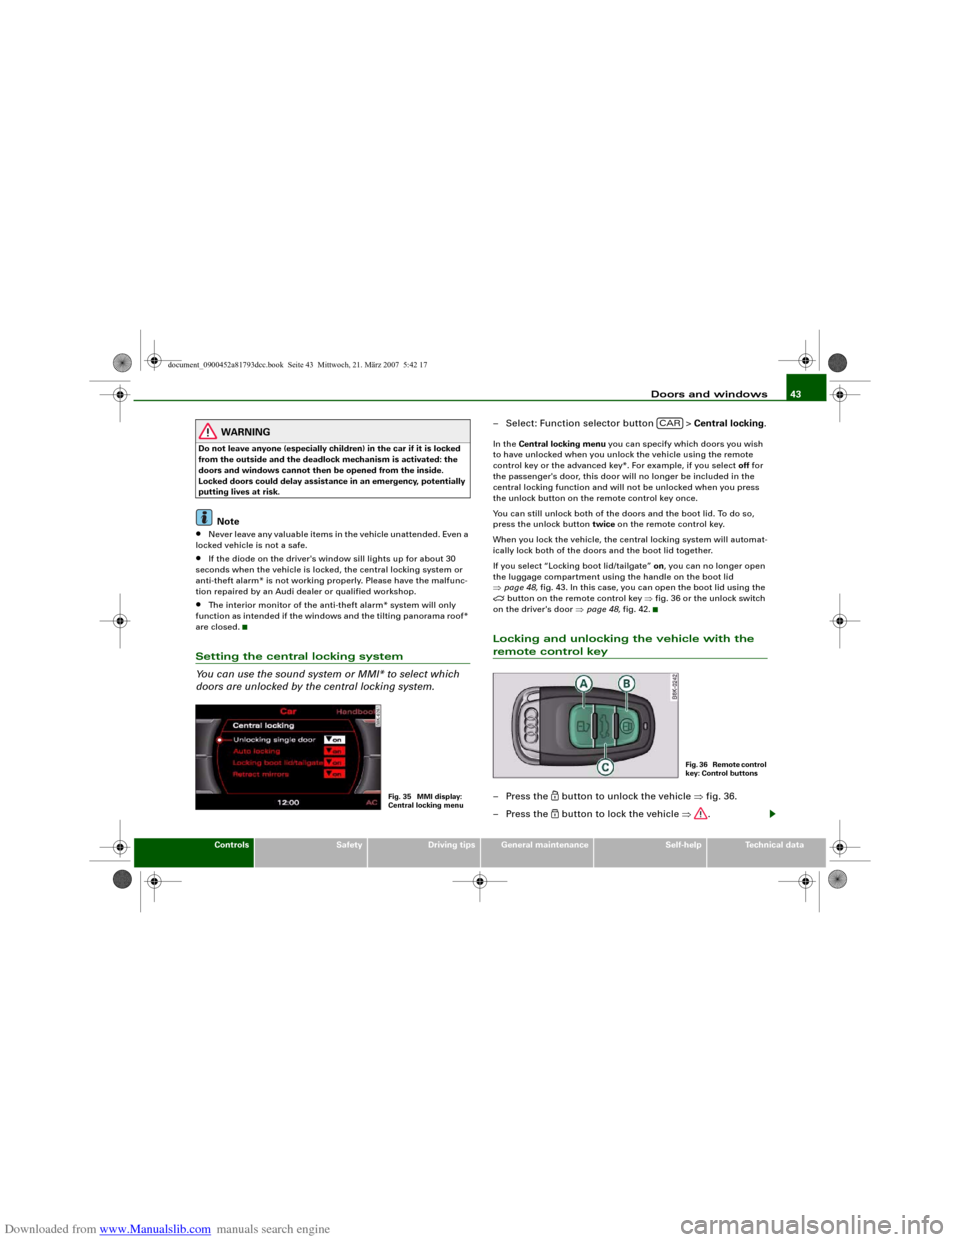
Setting the central locking system
You can use the sound system or MMI* to select which
doors are unlocked by the central locking system.
– Select: Function selector button > Central locking.In the Central locking menu you can specify which doors you wish
to have unlocked when you unlock the vehicle using the remote
control key or the advanced key*. For example, if you select off for
the passenger's door, this door will no longer be included in the
central locking function and will not be unlocked when you press
the unlock button on the remote control key once.
You can still unlock both of the doors and the boot lid. To do so,
press the unlock button twice on the remote control key.
When you lock the vehicle, the central locking system will automat-
ically lock both of the doors and the boot lid together.
If you select “Locking boot lid/tailgate” on, you can no longer open
the luggage compartment using the handle on the boot lid
⇒page 48, fig. 43. In this case, you can open the boot lid using the
button on the remote control key ⇒fig. 36 or the unlock switch
on the driver's door ⇒page 48, fig. 42.
Locking and unlocking the vehicle with the remote control key– Press the
button to unlock the vehicle ⇒fig. 36.
– Press the button to lock the vehicle ⇒.
Fig. 35 MMI display:
Central locking menu
CAR
F i g . 3 6 R e m o t e c o n t r o l
key: Control buttons
document_0900452a81793dcc.book Seite 43 Mittwoch, 21. März 2007 5:42 17
Page 52 of 294
Downloaded from www.Manualslib.com manuals search engine Doors and windows 50
WARNING
•
Always take the key with you when leaving the vehicle - even if
you only intend to be gone for a short time. This is especially
important if children are left in the car. They might otherwise be
able to start the engine or use power-operated equipment such as
the electric windows - this could lead to injuries. The window
switches are only deactivated when the driver's door or the front
passenger's door is opened.
•
Always be careful when closing the windows. Careless use of
the electric windows can cause severe injuries.
•
When locking the vehicle from the outside, make sure that
nobody is inside the vehicle, as the windows cannot be opened
from the inside in an emergency.Note
•
When the doors are opened the windows will automatically
come down approximately 10 mm.
•
The windows can be operated for about ten minutes after the
ignition has been switched off. The window switches are only deac-
tivated when the driver's door or the front passenger's door is
opened.
Convenience open/close function
The convenience open/close function allows you to open
and close the windows and tilting panorama roof* with
the remote control key.You can select which windows are opened in the settings on
the sound system or MMI* ⇒page 51.Convenience open function
– Press and hold the unlocking button
on the remote
control key until all the windows have reached the
desired position and the tilting panorama roof* is open.
Convenience close function
– Press and hold the locking button
on the remote
control key until the windows and the tilting panorama
roof* are closed ⇒.
Convenience close function with advanced key*
– Touch and keep your hand in contact with the locking
sensor on the door handle until the windows and the
tilting panorama roof* are closed.
The electric blind is opened and closed together with the tilting
panorama roof*.
WARNING
•
Take care when closing the windows and the tilting panorama
roof*. Careless or uncontrolled use can cause injuries.
•
For safety reasons, you should only use the remote control
open and close functions within about 2 metres of the vehicle. To
avoid injuries, always keep an eye on the windows when pressing
the button to close them. The windows and panorama roof stop
moving as soon as the button is released.
document_0900452a81793dcc.book Seite 50 Mittwoch, 21. März 2007 5:42 17
Page 53 of 294
Downloaded from www.Manualslib.com manuals search engine Doors and windows51
Controls
Safety
Driving tips
General maintenance
Self-help
Technical data
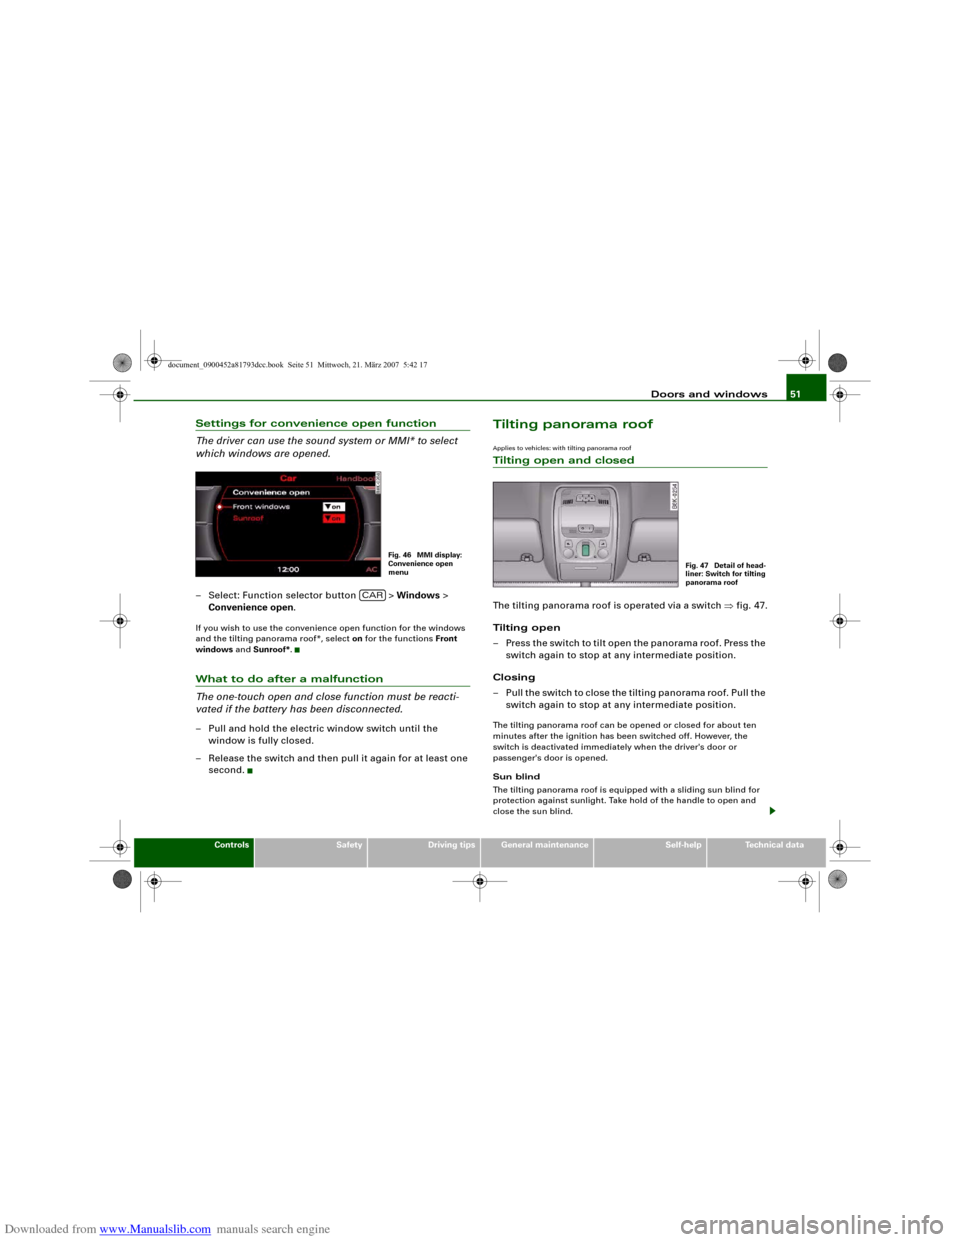
Settings for convenience open function
The driver can use the sound system or MMI* to select
which windows are opened.– Select: Function selector button > Windows >
Convenience open.If you wish to use the convenience open function for the windows
and the tilting panorama roof*, select on for the functions Front
windows and Sunroof*.What to do after a malfunction
The one-touch open and close function must be reacti-
vated if the battery has been disconnected.– Pull and hold the electric window switch until the
window is fully closed.
– Release the switch and then pull it again for at least one
second.
Tilting panorama roofApplies to vehicles: with tilting panorama roofTilting open and closedThe tilting panorama roof is operated via a switch ⇒fig. 47.
Tilting open
– Press the switch to tilt open the panorama roof. Press the
switch again to stop at any intermediate position.
Closing
– Pull the switch to close the tilting panorama roof. Pull the
switch again to stop at any intermediate position.The tilting panorama roof can be opened or closed for about ten
minutes after the ignition has been switched off. However, the
switch is deactivated immediately when the driver's door or
passenger's door is opened.
Sun blind
The tilting panorama roof is equipped with a sliding sun blind for
protection against sunlight. Take hold of the handle to open and
close the sun blind.
Fig. 46 MMI display:
Convenience open
menu
CAR
Fig. 47 Detail of head-
liner: Switch for tilting
panorama roof
document_0900452a81793dcc.book Seite 51 Mittwoch, 21. März 2007 5:42 17
Page 54 of 294
Downloaded from www.Manualslib.com manuals search engine Doors and windows 52
WARNING
Take care when closing the tilting panorama roof. Careless or
uncontrolled use can cause injuries. For this reason, always take
out the ignition key when leaving the vehicle.
Caution
You should always close the tilting panorama roof when leaving the
car. Sudden rain could seriously damage the upholstery and elec-
tronic equipment inside the vehicle.
Note
It is advisable to close the sun blind when the vehicle is left standing
in the sun.Applies to vehicles: with tilting panorama roofClosing the tilting panorama roof by overriding the safety cut-outThe tilting panorama roof mechanism is equipped with a
safety cut-out. If the force required to close the roof is too
high, the panorama roof will tilt up to the fully open posi-
tion. It can now be closed by overriding the safety cut-out.
– Immediately after the tilting panorama roof opens auto-
matically, pull and hold the switch ⇒page 51, fig. 47
until the panorama roof is closed ⇒.The safety cut-out tilts the panorama roof to the fully open position.
When this happens, it is possible to close the panorama roof within
approximately 5 seconds by overriding the safety cut-out.
WARNING
Take care when closing the tilting panorama roof. Careless or
uncontrolled use can cause injuries. For this reason, always take
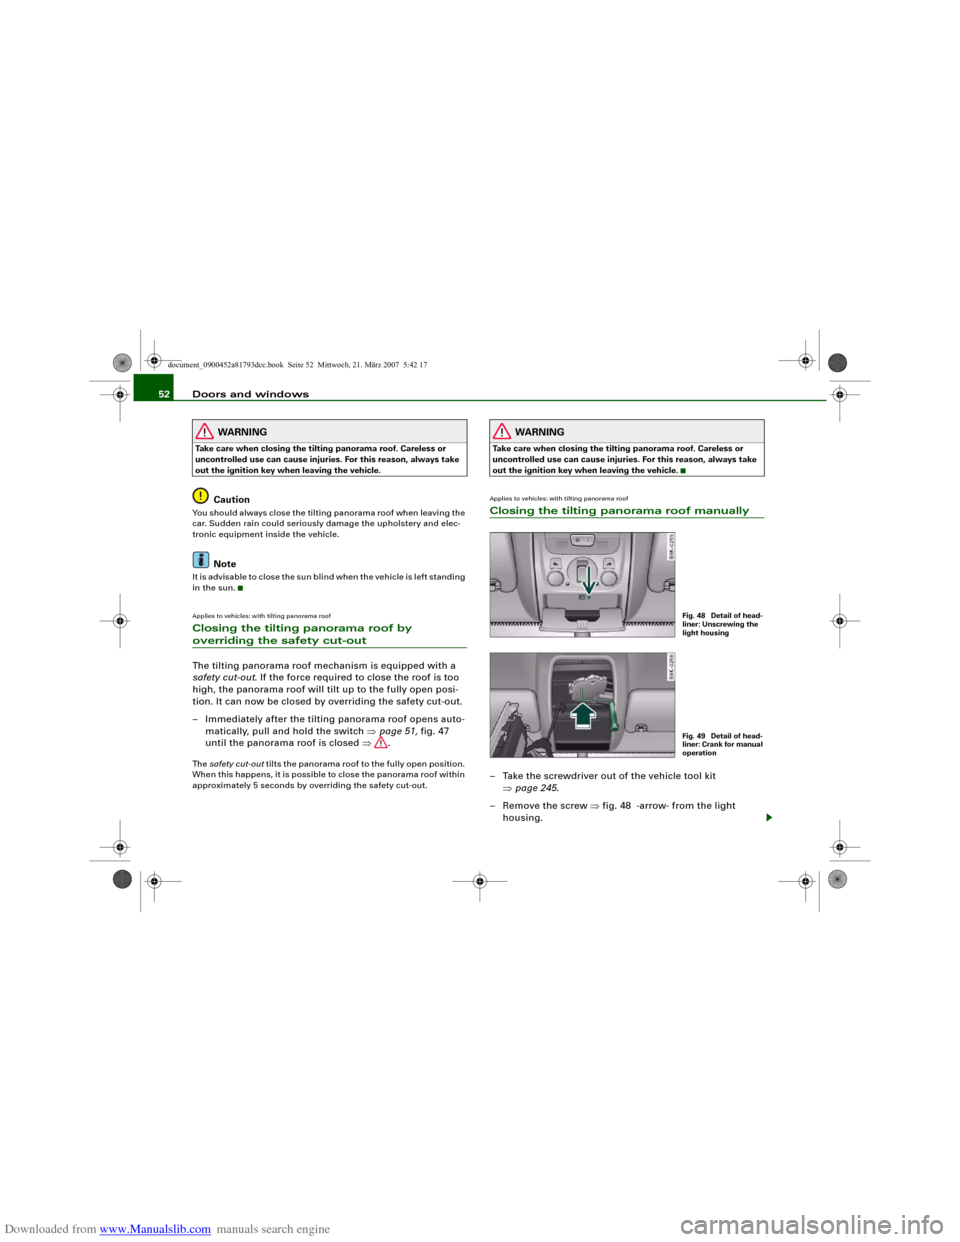
out the ignition key when leaving the vehicle.Applies to vehicles: with tilting panorama roofClosing the tilting panorama roof manually– Take the screwdriver out of the vehicle tool kit
⇒page 245.
– Remove the screw ⇒fig. 48 -arrow- from the light
housing.
Fig. 48 Detail of head-
liner: Unscrewing the
light housingFig. 49 Detail of head-
liner: Crank for manual
operation
document_0900452a81793dcc.book Seite 52 Mittwoch, 21. März 2007 5:42 17
Page 55 of 294
Downloaded from www.Manualslib.com manuals search engine Doors and windows53
Controls
Safety
Driving tips
General maintenance
Self-help
Technical data
– Carefully pull out the light housing.
– Remove the fuse box cover ⇒page 261 ⇒page 261,
fig. 241 on the driver's side.
– Take the crank handle from its mounting.
– Insert the crank handle all the way into the hexagonal
socket ⇒page 52, fig. 49.
– Hold the crank in position and turn it to close the sun
roof.
– Re-install the complete light housing.
– Have the fault rectified.
NoteTo make it easier to turn the crank, you can make use of the screw-
driver handle. Detach the handle from the screwdriver and then fit
the handle onto the crank.
document_0900452a81793dcc.book Seite 53 Mittwoch, 21. März 2007 5:42 17
Page 84 of 294
Downloaded from www.Manualslib.com manuals search engine Seats and storage 82
Securing the bag in the luggage compartment
– Two belts with hooks are attached to the bottom side of
the bag. Engage the hooks into the rear fastening rings
in the luggage compartment ⇒page 81, fig. 90.
Securing the objects in the bag
– Pull the free end of the belt tight to secure it ⇒fig. 91.
NoteIf the bag is damp or wet, allow it to dry before putting it away.Roof carrierDescription
Additional loads can be transported using the roof carrier.Note the following points if you intend to carry loads on the roof:•
The rain channels are moulded into the roof as part of the aero-
dynamic roof design. It is therefore not possible to mount conven-
tional roof luggage racks. We recommend using the carrier units
from the range of Audi Genuine accessories.
•
These carrier units form the basic elements of a complete roof
carrier system. Special fixtures must then be added in order to
safely transport luggage, bicycles, skis, surf boards or boats on the
roof. All the elements of this system are available from Audi dealers.Caution
Any damage to the vehicle caused by the use of other types of roof
rack or incorrect installation will not be covered by the factory
warranty. The roof carrier system must therefore be installed exactly
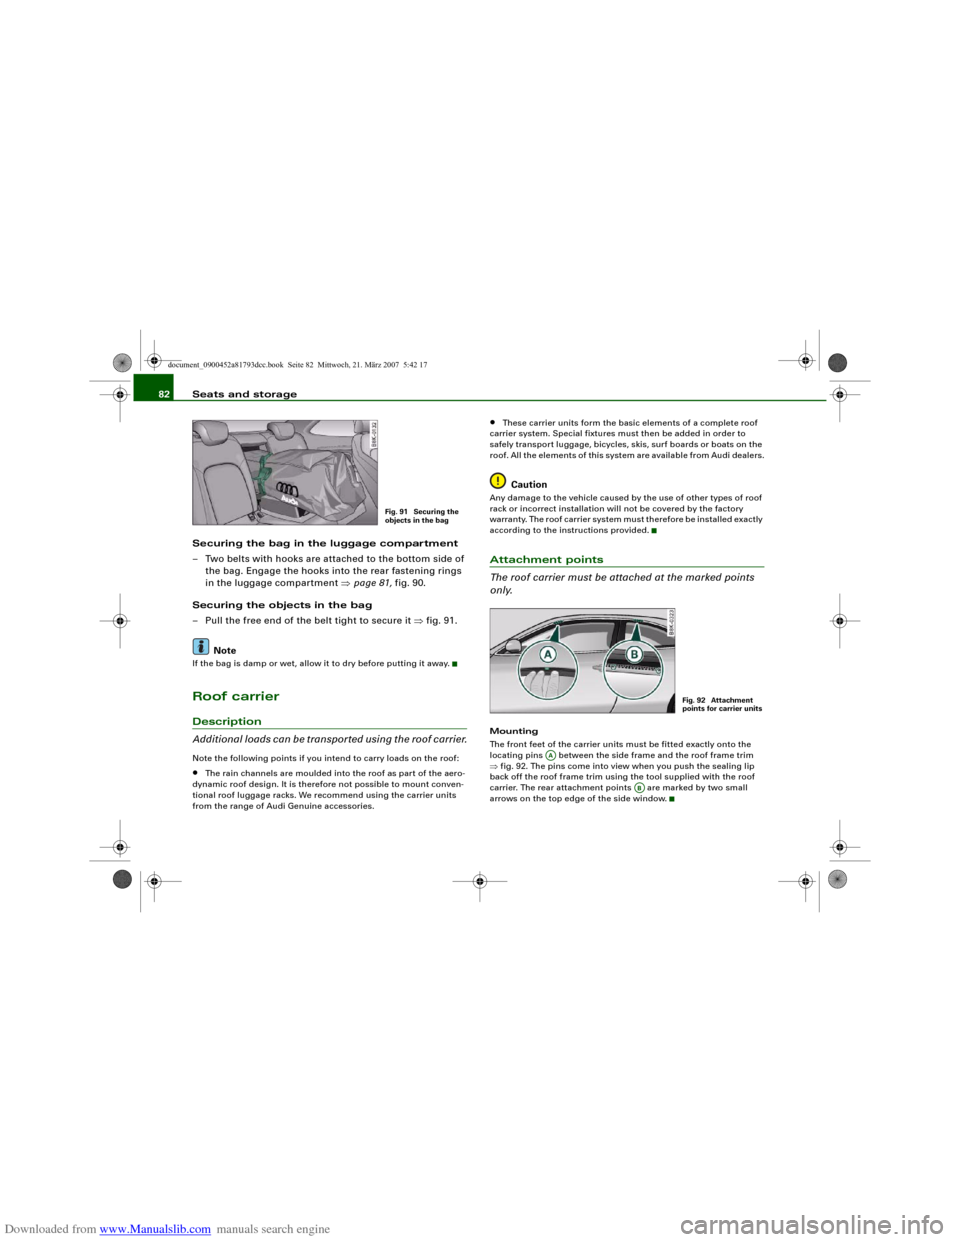
according to the instructions provided.Attachment points
The roof carrier must be attached at the marked points
only.Mounting
The front feet of the carrier units must be fitted exactly onto the
locating pins between the side frame and the roof frame trim
⇒fig. 92. The pins come into view when you push the sealing lip
back off the roof frame trim using the tool supplied with the roof
carrier. The rear attachment points are marked by two small
arrows on the top edge of the side window.
Fig. 91 Securing the
objects in the bag
Fig. 92 Attachment
points for carrier units
AA
AB
document_0900452a81793dcc.book Seite 82 Mittwoch, 21. März 2007 5:42 17
Page 85 of 294
Downloaded from www.Manualslib.com manuals search engine Seats and storage83
Controls
Safety
Driving tips
General maintenance
Self-help
Technical data
Roof load
Loads carried on the roof must be securely attached. The
car's handling is affected when transporting loads.The maximum permissible roof load for your vehicle is 75 kg. The
load limit applies to the combined weight of the carrier system and
the load itself.
It will not be possible to carry the full maximum load if the roof
carrier you are using is rated for a load which is less than this figure.
Do not exceed the maximum weight limit for the roof carrier, which
is listed in the fitting instructions.
WARNING
•
To prevent accidents, loads carried on the roof must be
securely attached.
•
Do not exceed the maximum roof load for the vehicle, the
maximum axle loads or the maximum gross vehicle weight, as this
could cause an accident.
•
When transporting heavy or bulky loads on the roof, bear in
mind that the car's handling is affected by the extra weight on the
roof and a possible susceptibility to cross winds. Adjust your
speed and driving style accordingly to avoid accidents.For the sake of the environment
The increased air resistance when the roof carrier is fitted means
that the vehicle uses more fuel. For this reason you should always
take off the roof carrier when it is not in use.
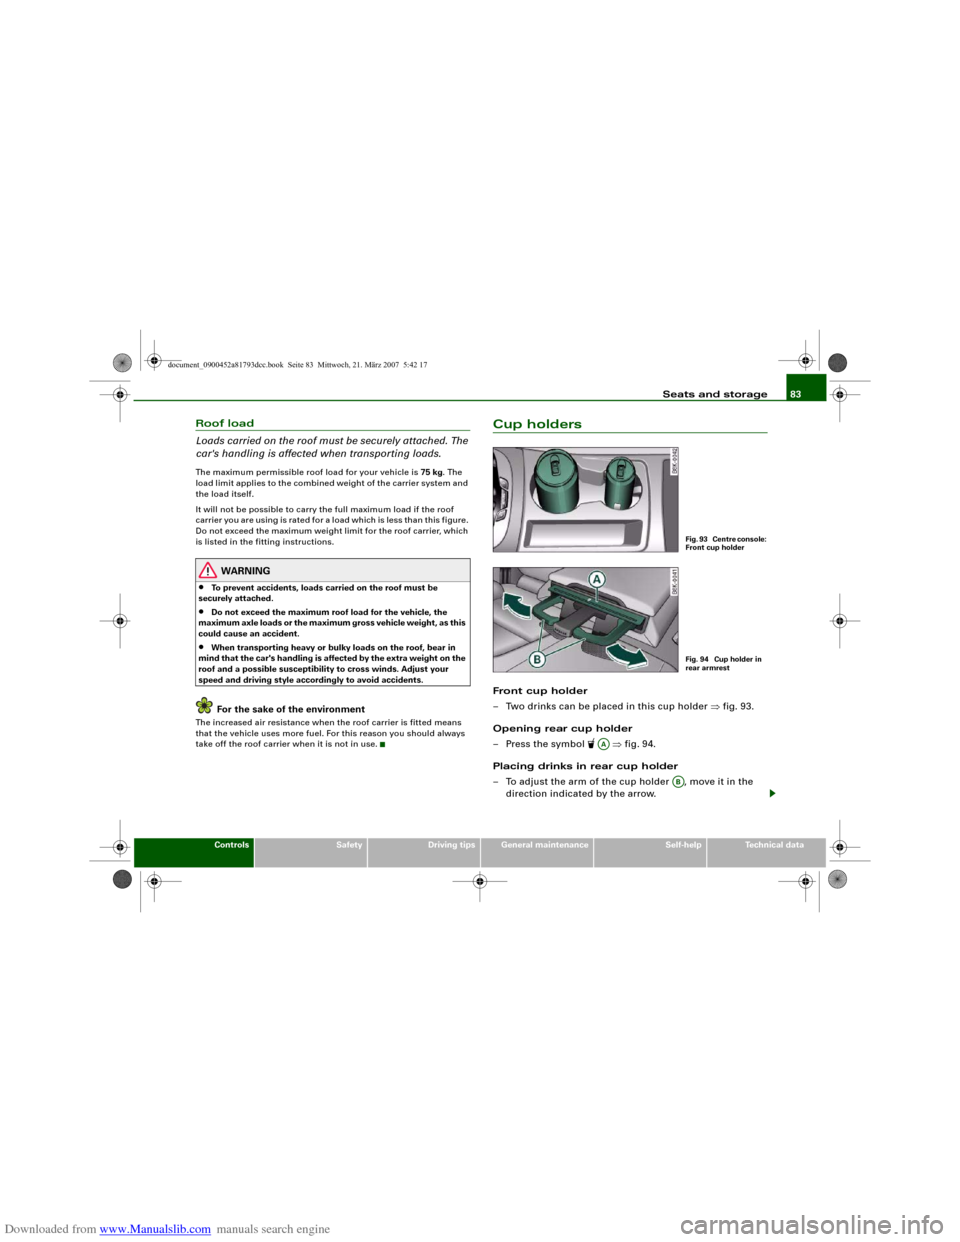
Cup holdersFront cup holder
– Two drinks can be placed in this cup holder ⇒fig. 93.
Opening rear cup holder
– Press the symbol
⇒fig. 94.
Placing drinks in rear cup holder
– To adjust the arm of the cup holder , move it in the
direction indicated by the arrow.
Fig. 93 Centre console:
Front cup holderFig. 94 Cup holder in
rear armrest
AA
AB
document_0900452a81793dcc.book Seite 83 Mittwoch, 21. März 2007 5:42 17