2008 AUDI S5 height adjustment
[x] Cancel search: height adjustmentPage 72 of 294
Downloaded from www.Manualslib.com manuals search engine Seats and storage 70Seats and storageElectric adjustment of front seatsApplies to vehicles: with electric seat adjustmentSeat adjuster controls
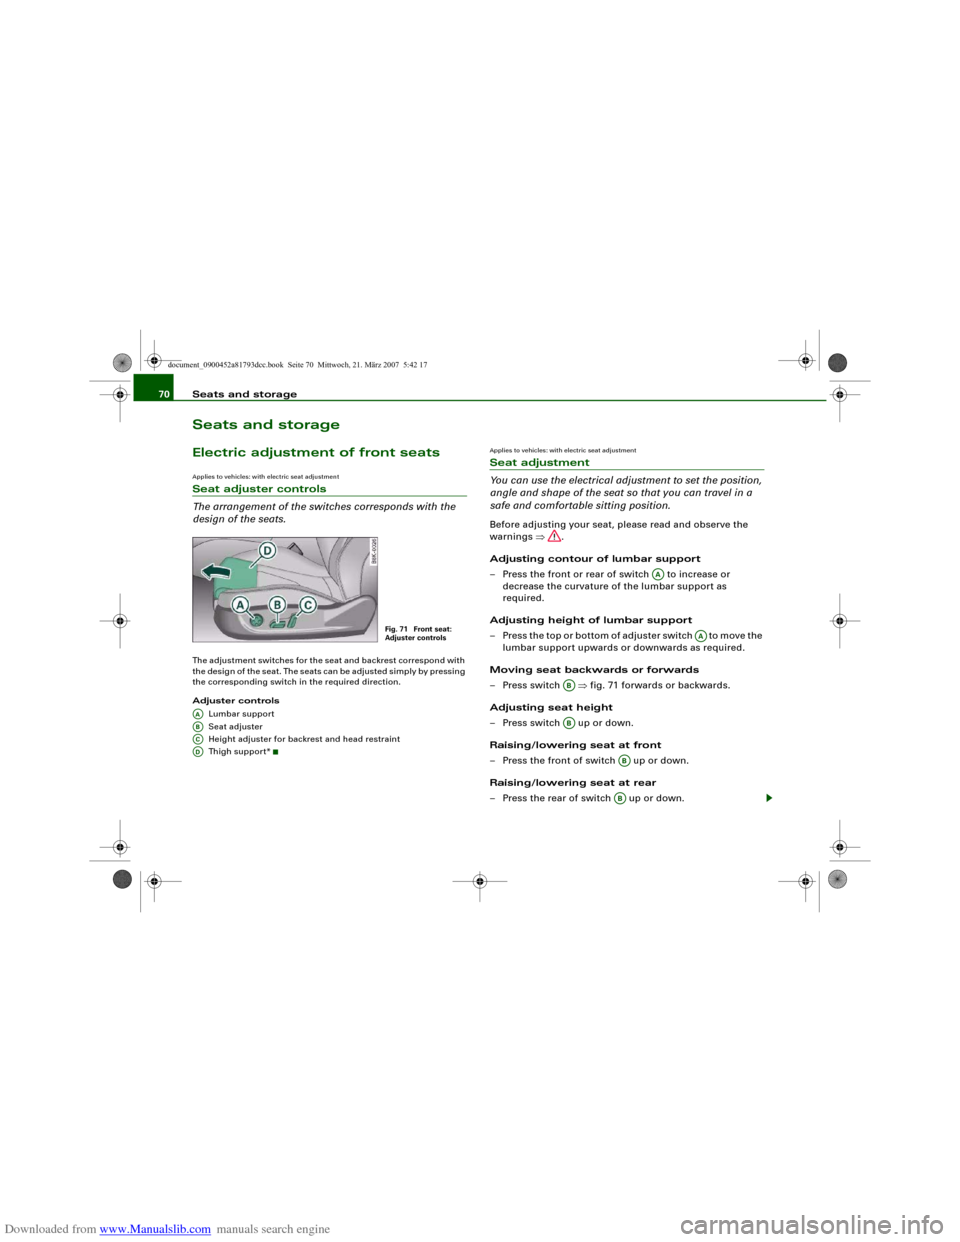
The arrangement of the switches corresponds with the
design of the seats.The adjustment switches for the seat and backrest correspond with
the design of the seat. The seats can be adjusted simply by pressing
the corresponding switch in the required direction.
Adjuster controls
Lumbar support
Seat adjuster
Height adjuster for backrest and head restraint
Thigh suppor t*
Applies to vehicles: with electric seat adjustmentSeat adjustment
You can use the electrical adjustment to set the position,
angle and shape of the seat so that you can travel in a
safe and comfortable sitting position.Before adjusting your seat, please read and observe the
warnings ⇒.
Adjusting contour of lumbar support
– Press the front or rear of switch to increase or
decrease the curvature of the lumbar support as
required.
Adjusting height of lumbar support
– Press the top or bottom of adjuster switch to move the
lumbar support upwards or downwards as required.
Moving seat backwards or forwards
– Press switch ⇒fig. 71 forwards or backwards.
Adjusting seat height
– Press switch up or down.
Raising/lowering seat at front
– Press the front of switch up or down.
Raising/lowering seat at rear
– Press the rear of switch up or down.
Fig. 71 Front seat:
Adjuster controls
AAABACAD
AA
AA
ABAB
ABAB
document_0900452a81793dcc.book Seite 70 Mittwoch, 21. März 2007 5:42 17
Page 73 of 294
Downloaded from www.Manualslib.com manuals search engine Seats and storage71
Controls
Safety
Driving tips
General maintenance
Self-help
Technical data
Adjusting backrest angle
– Press switch forwards or backwards.
Adjusting head restraint height
– Press switch up or down.
Extending or shortening the thigh support*
– Lift the control below the seat cushion. The front seat
cushion will spring forward.
– Slide the seat cushion back to the normal position after
each use.
WARNING
•
Never adjust the driver's seat when the vehicle is moving - this
could lead to an accident.
•
The electrical seat adjustment also works when the ignition is
off and when the key is not in the ignition. To avoid accidental inju-
ries, never leave children unattended in the vehicle.
•
Be careful when adjusting the seat height. Careless or uncon-
trolled use of the height adjustment can cause injuries.
•
Do not drive with the backrests of the front seats reclined too
far as otherwise the seat belt and airbag could fail to restrain the
wearer properly in an accident, possibly leading to injury.
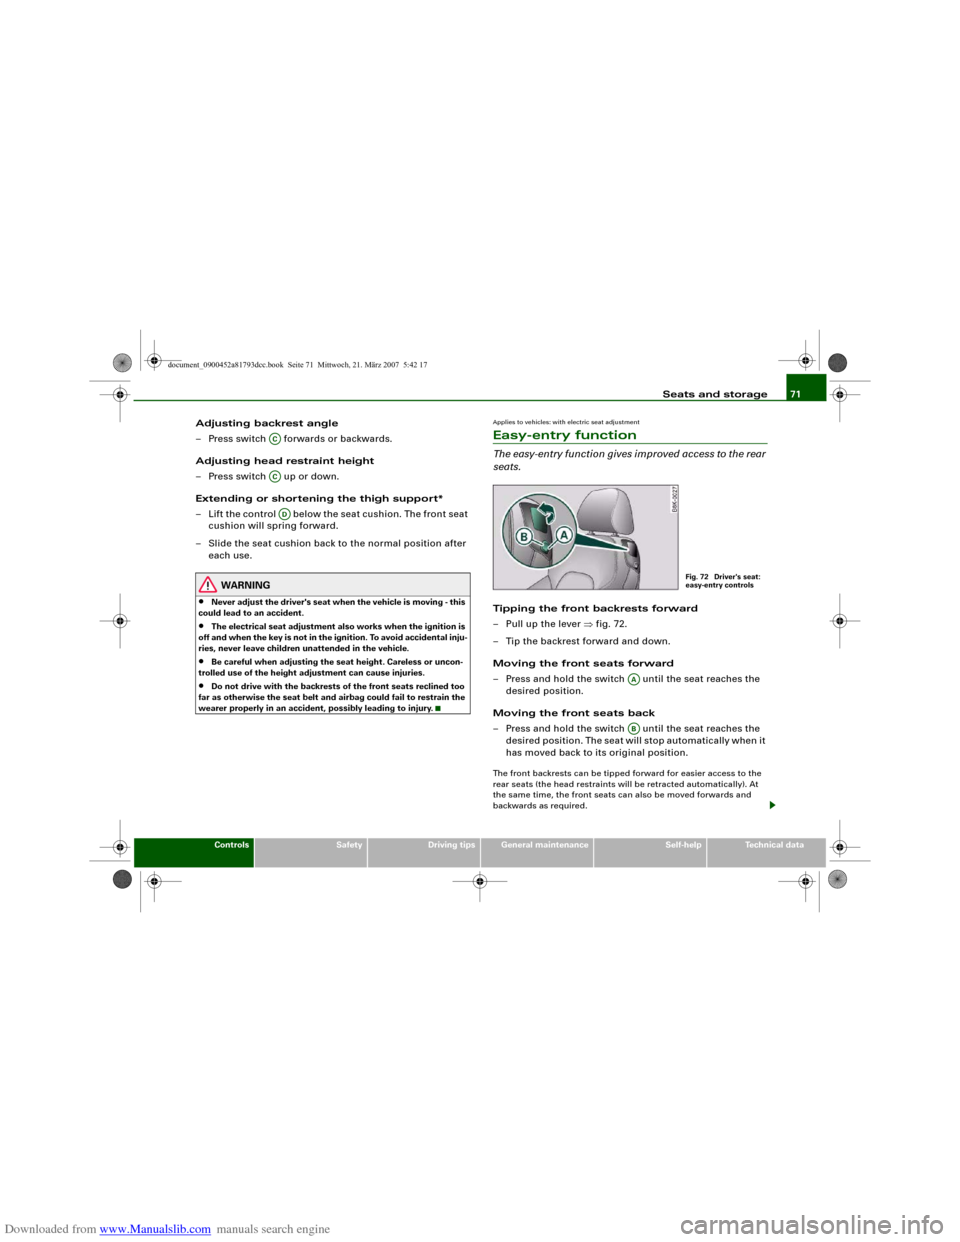
Applies to vehicles: with electric seat adjustmentEasy-entry functionThe easy-entry function gives improved access to the rear
seats.Tipping the front backrests forward
– Pull up the lever ⇒fig. 72.
– Tip the backrest forward and down.
Moving the front seats forward
– Press and hold the switch until the seat reaches the
desired position.
Moving the front seats back
– Press and hold the switch until the seat reaches the
desired position. The seat will stop automatically when it
has moved back to its original position.The front backrests can be tipped forward for easier access to the
rear seats (the head restraints will be retracted automatically). At
the same time, the front seats can also be moved forwards and
backwards as required.
ACACAD
Fig. 72 Driver's seat:
easy-entry controls
AAAB
document_0900452a81793dcc.book Seite 71 Mittwoch, 21. März 2007 5:42 17
Page 74 of 294
Downloaded from www.Manualslib.com manuals search engine Seats and storage 72When the front seats are moved forward, their original positions are
stored in a memory. The seats then stop automatically in this posi-
tion when they are moved back. If you want to move one of the seats
back further, release the switch and press it again.
The head restraints on the front seats retract automatically
(depending on the seat height setting) when the backrests are
tipped forward, and move back to their original positions when the
backrests are returned to the upright position.
Note
The easy-entry switches on the relevant seat are out of action when
the driver's or passenger's doors are closed.Seat memoryApplies to vehicles: with seat memoryMemory for driver's seat
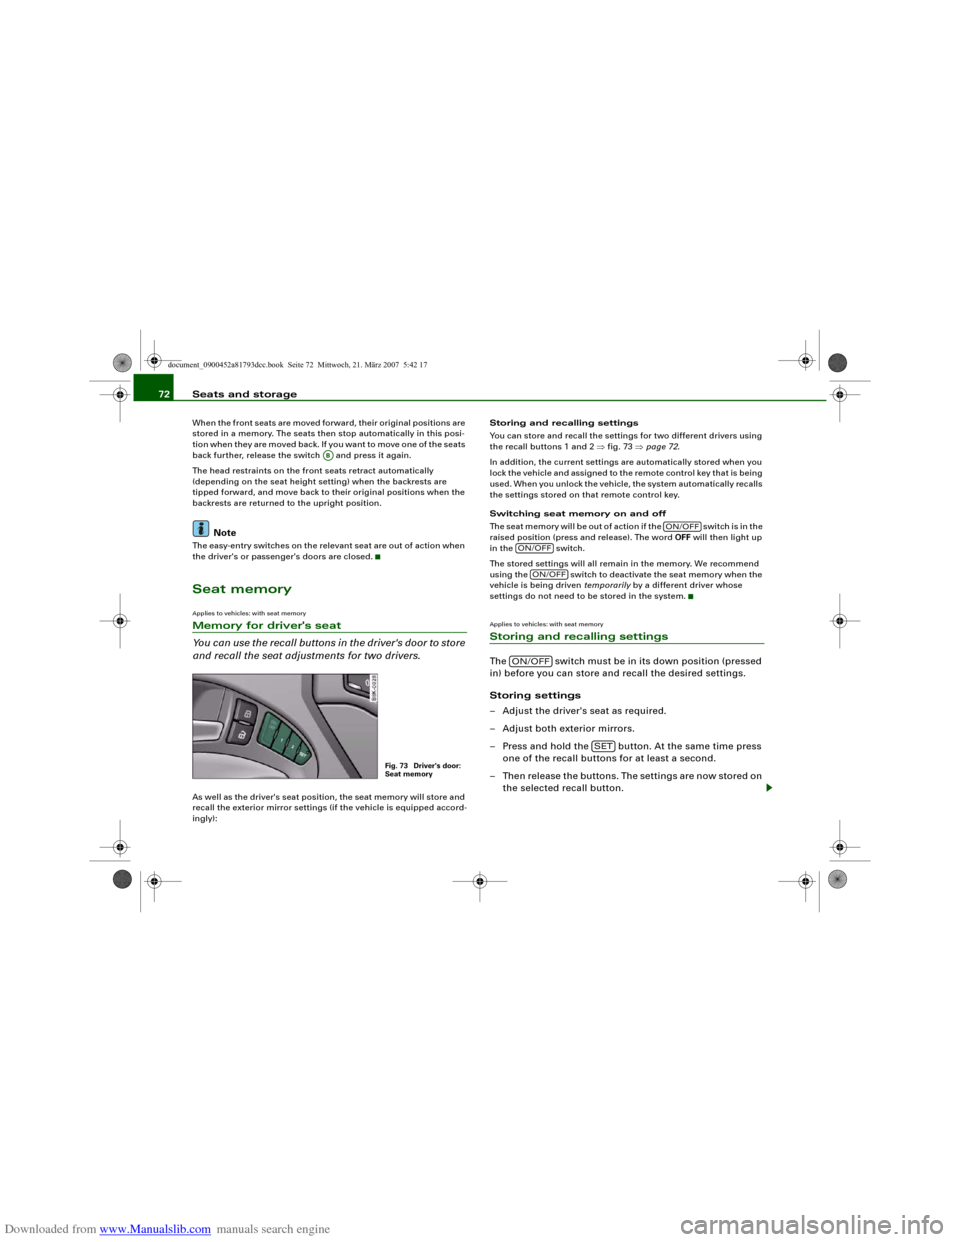
You can use the recall buttons in the driver's door to store
and recall the seat adjustments for two drivers.As well as the driver's seat position, the seat memory will store and
recall the exterior mirror settings (if the vehicle is equipped accord-
ingly):Storing and recalling settings
You can store and recall the settings for two different drivers using
the recall buttons 1 and 2 ⇒fig. 73 ⇒page 72.
In addition, the current settings are automatically stored when you
lock the vehicle and assigned to the remote control key that is being
used. When you unlock the vehicle, the system automatically recalls
the settings stored on that remote control key.
Switching seat memory on and off
Th e s e a t m e m o r y w i l l b e o u t o f a c t i o n i f t h e s w i t c h i s i n t h e
raised position (press and release). The word OFF will then light up
in the switch.
The stored settings will all remain in the memory. We recommend
using the switch to deactivate the seat memory when the
vehicle is being driven temporarily by a different driver whose
settings do not need to be stored in the system.
Applies to vehicles: with seat memoryStoring and recalling settingsThe switch must be in its down position (pressed
in) before you can store and recall the desired settings.
Storing settings
– Adjust the driver's seat as required.
– Adjust both exterior mirrors.
– Press and hold the button. At the same time press
one of the recall buttons for at least a second.
– Then release the buttons. The settings are now stored on
the selected recall button.
AB
Fig. 73 Driver's door:
Seat memory
ON/OFF
ON/OFF
ON/OFF
ON/OFF
SET
document_0900452a81793dcc.book Seite 72 Mittwoch, 21. März 2007 5:42 17
Page 76 of 294
Downloaded from www.Manualslib.com manuals search engine Seats and storage 74Head restraintsAdjusting the front head restraints
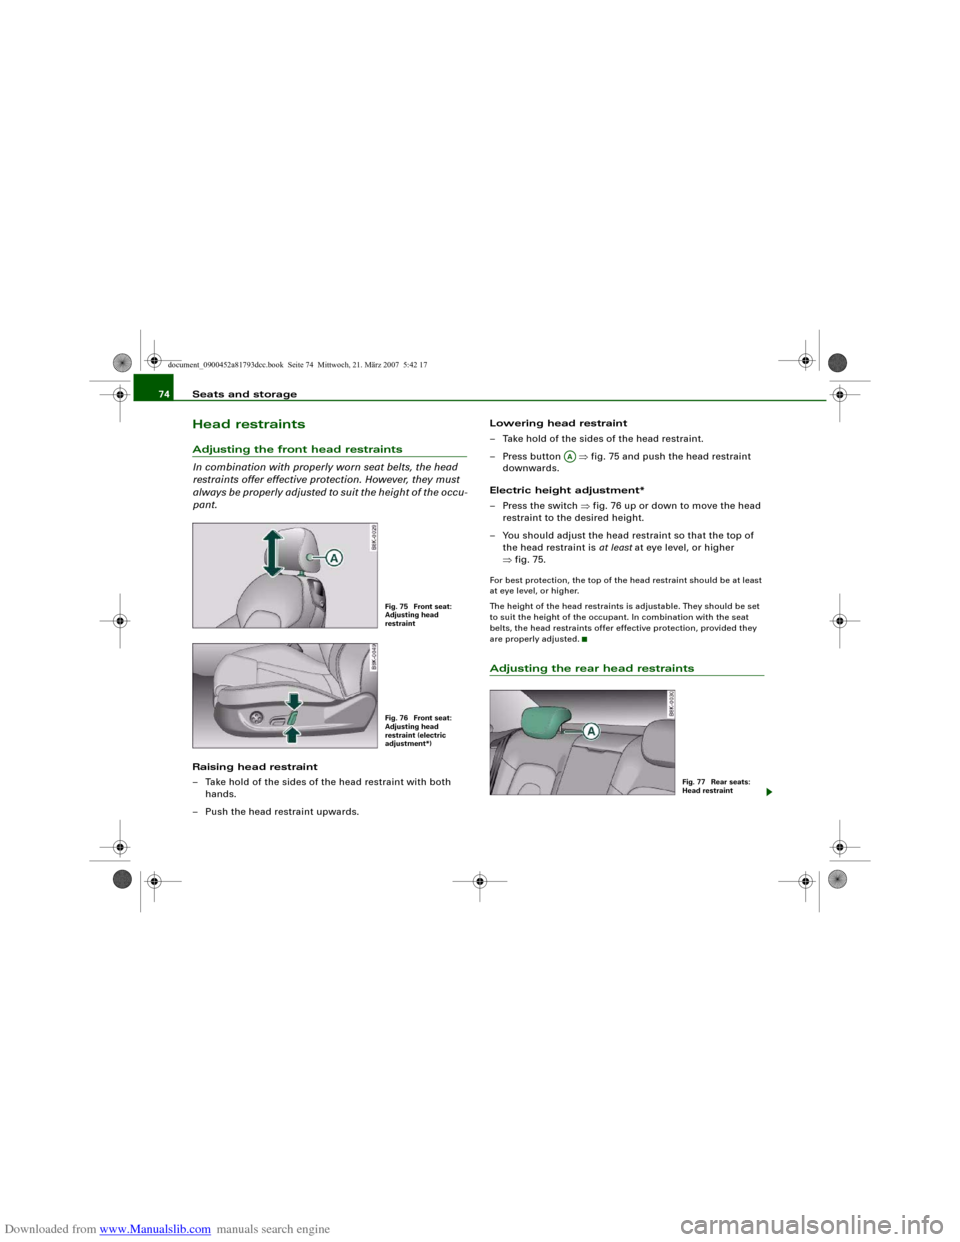
In combination with properly worn seat belts, the head
restraints offer effective protection. However, they must
always be properly adjusted to suit the height of the occu-
pant.Raising head restraint
– Take hold of the sides of the head restraint with both
hands.
– Push the head restraint upwards.Lowering head restraint
– Take hold of the sides of the head restraint.
– Press button ⇒fig. 75 and push the head restraint
downwards.
Electric height adjustment*
– Press the switch ⇒fig. 76 up or down to move the head
restraint to the desired height.
– You should adjust the head restraint so that the top of
the head restraint is at least at eye level, or higher
⇒fig. 75.
For best protection, the top of the head restraint should be at least
at eye level, or higher.
The height of the head restraints is adjustable. They should be set
to suit the height of the occupant. In combination with the seat
belts, the head restraints offer effective protection, provided they
are properly adjusted.Adjusting the rear head restraints
Fig. 75 Front seat:
Adjusting head
restraintFig. 76 Front seat:
Adjusting head
restraint (electric
adjustment*)
AA
Fig. 77 Rear seats:
Head restraint
document_0900452a81793dcc.book Seite 74 Mittwoch, 21. März 2007 5:42 17
Page 293 of 294
Downloaded from www.Manualslib.com manuals search engine Index291
Controls
Safety
Driving tips
General maintenance
Self-help
Technical data Safety notes . . . . . . . . . . . . . . . . . . . . . 161
Taking off . . . . . . . . . . . . . . . . . . . . . . . 164
Warning lamp . . . . . . . . . . . . . . . . . . . . 17
Seat heating
Front (deluxe automatic air conditioner)
112
Rear . . . . . . . . . . . . . . . . . . . . . . . . . . . . 113
Seat memory . . . . . . . . . . . . . . . . . . . . . . . . 72
Service interval display . . . . . . . . . . . . . . . 23
Service position for windscreen wipers . . 64
servotronic . . . . . . . . . . . . . . . . . . . . . . . . . 190
Side lights . . . . . . . . . . . . . . . . . . . . . . . . . . 54
Single journey memory . . . . . . . . . . . . . . . 26
Sitting position
Driver . . . . . . . . . . . . . . . . . . . . . . . . . . . 154
Front passenger . . . . . . . . . . . . . . . . . . 155
Incorrect sitting position . . . . . . . . . . 157
Rear passengers . . . . . . . . . . . . . . . . . 155
Snow chains . . . . . . . . . . . . . . . . . . . . . . . 237
Sockets
230 Volt . . . . . . . . . . . . . . . . . . . . . . . . . . 87
Spare key . . . . . . . . . . . . . . . . . . . . . . . . . . . 38
Starting the engine . . . . . . . . . . . . . . . . 41
Spare parts . . . . . . . . . . . . . . . . . . . . . . . . 239
Spare wheel . . . . . . . . . . . . . . . . . . . . . . . . 246
Speed warning . . . . . . . . . . . . . . . . . . . . . . 28
Speedometer . . . . . . . . . . . . . . . . . . . . . 14, 22
Starting the engine
Jump-starting . . . . . . . . . . . . . . . . . . . . 255
Spare key . . . . . . . . . . . . . . . . . . . . . . . . 41
Tow-starting . . . . . . . . . . . . . . . . . . . . . 257
Starting with jump leads . . . . . . . . . . . . . 255Steering
Locking the steering . . . . . . . . . . . . . . 114
Malfunction . . . . . . . . . . . . . . . . . . . . . . 33
Steering wheel height adjustment
(manual) . . . . . . . . . . . . . . . . . . . . . . . 114
Storage compartments . . . . . . . . . . . . . . . . 89
Front seats . . . . . . . . . . . . . . . . . . . . . . . 90
Stretch net . . . . . . . . . . . . . . . . . . . . . . . . . . 77
Sun blind . . . . . . . . . . . . . . . . . . . . . . . . . . . 61
Sun roof (tilting panorama roof) . . . . . . . . 51
Manual operation . . . . . . . . . . . . . . . . . 52
Tilting open and closed . . . . . . . . . . . . 51
Sun visors . . . . . . . . . . . . . . . . . . . . . . . . . . 60
Sunroof (tilting panorama roof)
Convenience open/close function . . . . 50
Switches on driver's door
Central locking system . . . . . . . . . . . . . 46
Switching off the engine . . . . . . . . . 116, 118
Symbols . . . . . . . . . . . . . . . . . . . . . . . . . . . . 15
TTailgate
SeeBoot lid . . . . . . . . . . . . . . . . . . . . . . . 48
Tank capacity . . . . . . . . . . . . . . . . . . . . . . . 279
Technical data . . . . . . . . . . . . . . . . . . . . . . 278
Text messages . . . . . . . . . . . . . . . . . . . . . . . 30
Tools . . . . . . . . . . . . . . . . . . . . . . . . . . . . . . 245
Total journey memory . . . . . . . . . . . . . . . . 26
Tow-away protection . . . . . . . . . . . . . . . . . 47
Towing
Automatic braking . . . . . . . . . . . . . . . . 199
Trailer stabilisation . . . . . . . . . . . . . . . 199Towing away . . . . . . . . . . . . . . . . . . . . . . . 257
Towing bracket
Parking system . . . . . . . . . . . . . . . . . . . 138
Towing bracket, removable . . . . . . . . . . . 201
Towing bracket, retrofitting . . . . . . . . . . . 206
Towline anchorage
Front . . . . . . . . . . . . . . . . . . . . . . . . . . . 258
Rear . . . . . . . . . . . . . . . . . . . . . . . . . . . . 259
Tow-starting . . . . . . . . . . . . . . . . . . . . . . . . 259
Traction control system
How the system works . . . . . . . . . . . . 188
Trailer . . . . . . . . . . . . . . . . . . . . . . . . . . . . . 198
Accessories . . . . . . . . . . . . . . . . . . . . . . 201
Notes on towing . . . . . . . . . . . . . . . . . . 200
Points to check before towing . . . . . . 198
Technical requirements . . . . . . . . . . . 198
Trailer stabilisation . . . . . . . . . . . . . . . . . . 199
Trailer turn signals
Indicator lamp . . . . . . . . . . . . . . . . . . . . 17
Trailer weights
SeePerformance, weights and
dimensions . . . . . . . . . . . . . . . . . . . . 281
Transport bag
SeeLoad-through hatch . . . . . . . . . . . . 81
Tread depth . . . . . . . . . . . . . . . . . . . . . . . . 234
Trip recorder . . . . . . . . . . . . . . . . . . . . . . . . 14
Trips, checklist . . . . . . . . . . . . . . . . . . . . . . 152
Turn signals . . . . . . . . . . . . . . . . . . . . . . . . . 58
Indicator lamp . . . . . . . . . . . . . . . . . . . . 16
Type plate . . . . . . . . . . . . . . . . . . . . . . . . . . 279
Tyre Mobility System . . . . . . . . . . . . . . . . 247
Tyre pressure . . . . . . . . . . . . . . . . . . . . . . . 232
document_0900452a81793dcc.book Seite 291 Mittwoch, 21. März 2007 5:42 17