2008 AUDI S5 light
[x] Cancel search: lightPage 235 of 294
Downloaded from www.Manualslib.com manuals search engine Wheels and tyres233
Controls
Safety
Driving tips
General maintenance
Self-help
Technical data
– The tyre pressures should only be checked when the
tyres are cold. The slightly raised pressures of warm tyres
must not be reduced.
– The pressures must be altered to suit major changes in
the load being carried.
– Avoid fast cornering and hard acceleration.
– Inspect the tyres for irregular wear from time to time.Tyre pressure and vehicle loading
The tyre pressure must be adjusted according to the load the vehicle
is carrying. We recommend adhering to the tyre pressure specifica-
tions for a maximum load. The tyre inflation pressures are listed on
a sticker on the end face of the driver's door ⇒page 232, fig. 219.
However, if you prefer an extra-smooth ride and the vehicle is not
fully loaded, you can select the tyre pressure for a normal load (no
more than three people travelling in the vehicle). However, should
you wish to drive with a full load you must increase the tyre pressure
to the specified maximum.
Under-inflation or over-inflation will reduce the life of the tyres
considerably and also impair the car's handling. Correct inflation
pressures are very important, especially at high speeds. The pres-
sures should therefore be checked at least once a month and before
starting a journey.
Do not forget the spare wheel* when checking the tyre pressures.
Keep the spare tyre inflated to the highest pressure required for the
road wheels.
Driving habits
Fast cornering, heavy acceleration and hard braking (squealing
tyres) all increase tyre wear.Wheel balancing
The wheels on new vehicles are balanced. However, various factors
encountered in normal driving can cause them to become unbal-
anced, which results in steering vibration.
Unbalanced wheels should be rebalanced, as they otherwise cause
excessive wear on steering, suspension and tyres. A wheel must
also be rebalanced when a new tyre is fitted or if a tyre is repaired.
Incorrect wheel alignment
Incorrect wheel alignment causes excessive tyre wear, impairing the
safety of the vehicle. If you notice excessive tyre wear, contact your
Audi dealer.
WARNING
•
Always adapt the tyre pressure accordingly when the vehicle
load changes.
•
Under-inflated tyres flex more and can overheat at continuous
high speeds. This can cause tread separation and tyre blow-out,
which could result in an accident.For the sake of the environment
Under-inflated tyres will increase the fuel consumption.
document_0900452a81793dcc.book Seite 233 Mittwoch, 21. März 2007 5:42 17
Page 251 of 294
Downloaded from www.Manualslib.com manuals search engine Self-help249
Controls
Safety
Driving tips
General maintenance
Self-help
Technical data
– Ensure that all passengers leave the vehicle and move
away from the danger area ⇒.
– Take the tyre sealant can and the electric compressor out
of the luggage compartment ⇒page 245.
– Fix the sticker “max. 80 km/h”, which is included with the
tyre sealant can, onto the instrument cluster where the
driver will see it.
Filling the tyre
– Shake the tyre sealant can well.
– Screw the enclosed filling hose onto the sealant can as
far as it will go. This will automatically pierce the foil
sealing the can.
– Take the valve cap off the tyre valve and use the enclosed
valve insert tool to unscrew the valve insert ⇒page 248,
fig. 228.
– Place the valve insert onto a clean surface.
– Remove the sealing plug from the filling hose and insert
the hose into the tyre valve.
– Hold the tyre sealant can upside down and fill the
complete contents of the can into the tyre.
– Then disconnect the hose and screw the valve insert
firmly back into the tyre valve.
Inflating the tyre
– Screw the filling hose of the electric compressor onto the
tyre valve and plug the connector into the cigarette
lighter.– Pump the tyre up to 2.0 to 2.5 bar and monitor the pres-
sure shown on the pressure gauge.
– If the tyre pressure remains lower than the value speci-
fied above drive the vehicle approx. 10 metres forwards
or backwards, so that the sealant can spread evenly in
the tyre. If the pressure is still lower than the specifica-
tion the tyre is too badly damaged and cannot be
repaired using the tyre sealant.
Final checks
– After about 10 minutes stop to check the tyre pressure.
– If tyre pressure is less than 1.3 bar, the tyre is too badly
damaged. Do not drive on. You should obtain profes-
sional assistance.
WARNING
•
If you have a puncture in moving traffic, switch on the hazard
warning lights and place the warning triangle in a visible location.
This is for your own safety and also warns other road users.
•
Make sure your passengers wait in a safe place (for instance
behind the roadside crash barrier).
•
Please observe the manufacturers' safety notes on the
compressor and the instructions supplied with the tyre sealant
can.
•
If it was not possible to build up a tyre pressure of 2.0 bar
within 6 minutes this means that the tyre is too badly damaged.
Do not drive on.
•
Seek professional assistance if the repair of a tyre puncture is
not possible with the sealing compound.
•
If tyre pressure is less than 1.3 bar after driving about 10
minutes, the tyre is too badly damaged. Do not drive on. You
should obtain professional assistance.
document_0900452a81793dcc.book Seite 249 Mittwoch, 21. März 2007 5:42 17
Page 252 of 294
Downloaded from www.Manualslib.com manuals search engine Self-help 250
CautionTake special care if you have to repair a tyre on a gradient.
Note
•
Do not use the compressor for longer than 6 minutes at a time,
as it could overheat. When the compressor has cooled down, you
can use it again.
•
If tyre sealant should leak out, leave it to dry and then pull it off
like foil.
•
After carrying out a tyre repair remember to buy a new tyre
sealant can at a qualified workshop. This will ensure that the Tyre
Mobility System is operative again.
•
Please observe the relevant regulations.
Changing a wheelPreparations
Some preparations are necessary before changing a
wheel.– If you have a flat tyre, stop the car well away from moving
traffic. Choose a location that is as level as possible.
– All passengers should leave the car. They should wait in
a safe place (for instance behind the roadside crash
barrier).
– Apply the parking brake to stop the vehicle moving acci-
dentally.
–Engage first gear (manual gearbox) or move selector
lever to position P (automatic gearbox).– When towing a trailer: unhitch the trailer from your
vehicle.
– Take the tools ⇒page 245 and the spare wheel*
⇒page 246 out of the luggage compartment.
WARNING
If you have a puncture in moving traffic, switch on the hazard
warning lights and place the warning triangle in a visible location.
This is for your own safety and also warns other road users.
Caution
If you have to change the tyre on a gradient, block the wheel oppo-
site the wheel being changed by placing a stone or similar object
under it to prevent the vehicle from rolling away.
Note
Please observe the relevant regulations.How to change a wheel
Change the wheel as described below.–Pull off the hub cap. Also refer to ⇒page 251, “Hub
caps”.
–Loosen the wheel bolts ⇒page 251.
–Raise the car with the jack* ⇒page 252.
–Ta k e o f f the wheel with the flat tyre and then put on the
spare wheel* ⇒page 253.
–Lower the vehicle to the ground.
document_0900452a81793dcc.book Seite 250 Mittwoch, 21. März 2007 5:42 17
Page 254 of 294
Downloaded from www.Manualslib.com manuals search engine Self-help 252
Loosening
–Fit the box spanner as far as it will go over the wheel
bolt
7).
– Grip the box spanner as close to the end as possible and
turn the wheel bolts about one turn anti-clockwise
⇒page 251, fig. 230 -arrow-.
Tightening
– Fit the box spanner as far as it will go over the wheel
bolt7).
– Grip the box spanner as close to the end as possible and
tighten the bolt firmly by turning clockwise.
WARNING
To avoid accidents, the wheel bolts should only be loosened
slightly (about one turn) before raising the vehicle with the jack*.
Note
•
Do not use the hexagonal socket in the screwdriver handle to
loosen or tighten the wheel bolts.
•
If the wheel bolt is very tight, it may be possible to loosen it by
pushing down the end of the spanner carefully with your foot. Hold
on to the car for support and take care not to slip.
Raising the vehicle
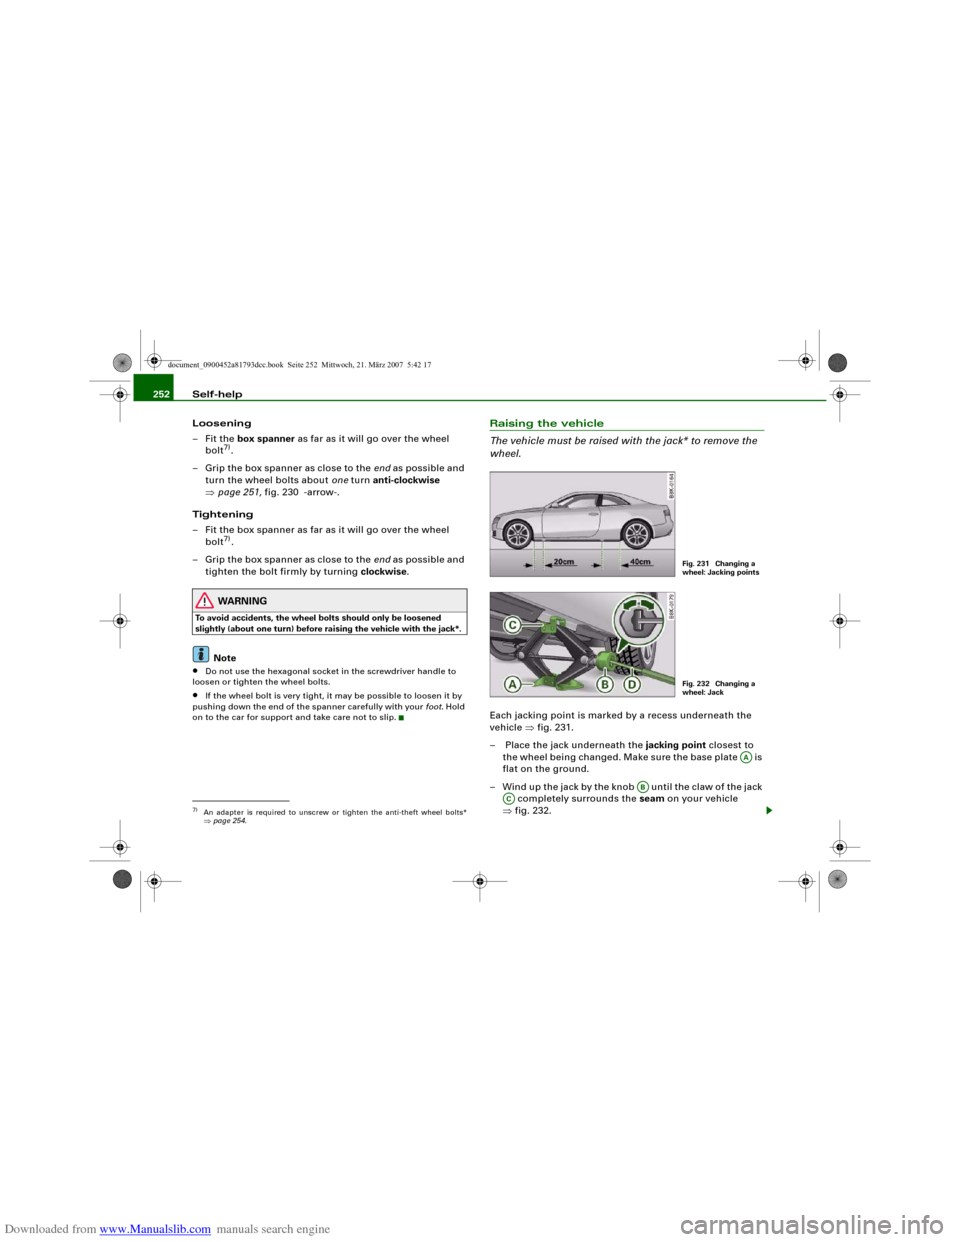
The vehicle must be raised with the jack* to remove the
wheel.Each jacking point is marked by a recess underneath the
vehicle ⇒fig. 231.
– Place the jack underneath the jacking point closest to
the wheel being changed. Make sure the base plate is
flat on the ground.
– Wind up the jack by the knob until the claw of the jack
completely surrounds the seam on your vehicle
⇒fig. 232.
7)An adapter is required to unscrew or tighten the anti-theft wheel bolts*
⇒page 254.
Fig. 231 Changing a
wheel: Jacking pointsFig. 232 Changing a
wheel: Jack
AA
AB
AC
document_0900452a81793dcc.book Seite 252 Mittwoch, 21. März 2007 5:42 17
Page 256 of 294
Downloaded from www.Manualslib.com manuals search engine Self-help 254
– Screw in the mounting pin (provided in the vehicle's tool
kit) by hand in place of the wheel bolt ⇒page 253,
fig. 234.
– Then unscrew the other wheel bolts as described above.
– Take off the wheel. The mounting pin stays where it is.
Putting on the spare wheel
– Put on the spare wheel, using the mounting pin to guide
it into place.
– Screw in the wheel bolts and tighten them lightly using
the hexagonal opening in the screwdriver handle.
– Then unscrew the mounting pin and tighten the
remaining wheel bolt lightly.
– Carry out the steps required after you have changed the
wheel ⇒page 251, “After changing a wheel”.The wheel bolts should be clean and turn easily. Before putting on
the spare wheel, inspect the condition of the wheel and hub
mounting surfaces. These surfaces must be clean before mounting
the wheel.
The wheel bolts are easier to remove from the wheel rim if you use
the hexagonal socket in the screwdriver handle. The reversible
screwdriver blade should be removed as a precautionary measure
when the tool is used for this purpose.
Note the direction of rotation when putting on a tyre with direc-
tional tread pattern ⇒page 254.
Note
Do not use the hexagonal socket in the screwdriver handle to loosen
or tighten the wheel bolts.
Tyres with directional tread pattern
Tyres with directional tread pattern must be mounted so
that they rotate in the correct direction.A directional tread pattern is identified by arrows on the sidewall
pointing in the forward running direction. Always note the direction
of rotation indicated when mounting the wheel. This is important so
that these tyres can give maximum grip and avoid excessive noise,
tread wear and aquaplaning.
Drive carefully should you ever have a puncture and have to mount
the spare wheel so it rotates in the wrong direction. This is because
the tyre will not give optimum performance. Bear this in mind
particularly when driving on wet roads.
To benefit from the advantages of tyres with this type of tread
pattern, the defective tyre should be replaced and refitted as soon
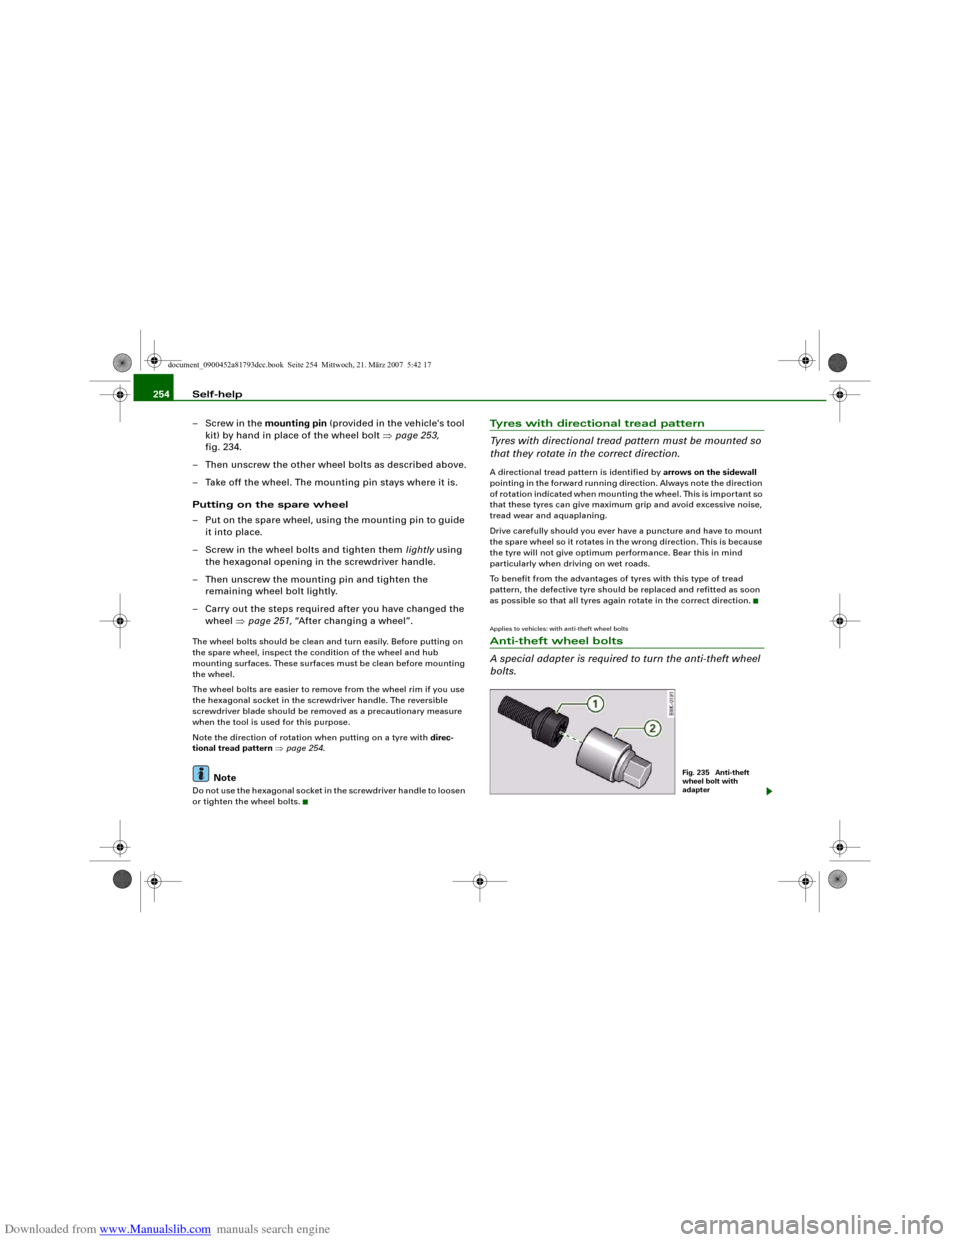
as possible so that all tyres again rotate in the correct direction.Applies to vehicles: with anti-theft wheel boltsAnti-theft wheel bolts
A special adapter is required to turn the anti-theft wheel
bolts.
Fig. 235 Anti-theft
wheel bolt with
adapter
document_0900452a81793dcc.book Seite 254 Mittwoch, 21. März 2007 5:42 17
Page 259 of 294
Downloaded from www.Manualslib.com manuals search engine Self-help257
Controls
Safety
Driving tips
General maintenance
Self-help
Technical data terminal must not touch metal parts of the vehicle: this can cause
short circuiting.
•
Do not bend over the batteries – risk of acid burns.
•
The screw plugs on the battery cells must be screwed in firmly.
•
Keep sparks, flame and lighted cigarettes away from batteries:
the gases given off can cause an explosion.
•
If jump-starting another vehicle, position the jump leads in
such a way that they cannot come into contact with any moving
parts in the engine compartment of the other vehicle.Caution
Please note that the above method of connecting the leads is meant
for jump-starting your vehicle. If jump-starting another vehicle, you
should not connect the negative lead (–) to the negative terminal of
the discharged battery, but directly to the engine block or a solid
metal part bolted to the engine block. If the battery of the other
vehicle does not have a gas vent, there is a risk that a mixture of
oxygen and hydrogen gas can accumulate and cause an
explosion.Tow-starting and towing awayGeneral notes
Points to observe when tow-starting or towing awayIf you use a towrope:
Notes for the driver of the towing vehicle
– The towrope must be taut before driving off.– Engage the clutch very gently when starting to move; on
vehicles with automatic gearbox press the accelerator
slowly.
Notes for the driver of the towed vehicle
– The ignition should be switched on so that the turn
signals, horn, windscreen wipers and washers can be
used. Please ensure that the steering wheel is unlocked
when you switch on the ignition, and that it moves freely.
–Put gear lever in neutral (manual gearbox) or move
selector lever to position N (automatic gearbox).
– The brake servo and power steering only work when the
engine is running. Considerably more effort is required
on the brake pedal and steering wheel when the engine
is switched off.
– Ensure that the towrope remains taut at all times when
towing.
Towrope or towbar
It is easier and safer to tow a vehicle with a towbar. You should only
use a towrope if you do not have a towbar.
A towrope should be slightly elastic to reduce the loading on both
vehicles. It is advisable to use a towrope made of synthetic fibre or
similar material.
Attach the tow-rope or tow-bar only to the towing anchorages
intended for this purpose ⇒page 258 or ⇒page 259.
Driving technique
Towing requires some experience – especially when using a
towrope. Both drivers should be familiar with the technique required
for towing. Inexperienced drivers should not attempt to tow-start or
tow away another vehicle.
WARNING (continued)
document_0900452a81793dcc.book Seite 257 Mittwoch, 21. März 2007 5:42 17
Page 260 of 294
Downloaded from www.Manualslib.com manuals search engine Self-help 258Do not pull too hard with the towing vehicle and take care to avoid
jerking the towrope. When towing on a loose surface there is always
a risk of overloading and damaging the anchorage points.
Caution
If there is no oil in the gearbox or no lubricant in the automatic
transmission the car may only be towed with the driven wheels
lifted clear of the road, or transported on a special car transporter
or trailer.
Note
•
Note the regulations concerning towing.
•
The hazard warning lights of both vehicles must normally be
switched on. However, observe any regulations to the contrary.
•
Make sure that the towrope is not twisted, as otherwise the front
towline anchorage on your vehicle could work itself loose.
Front towline anchorage
The front towline anchorage is only mounted if the vehicle
has to be towed.
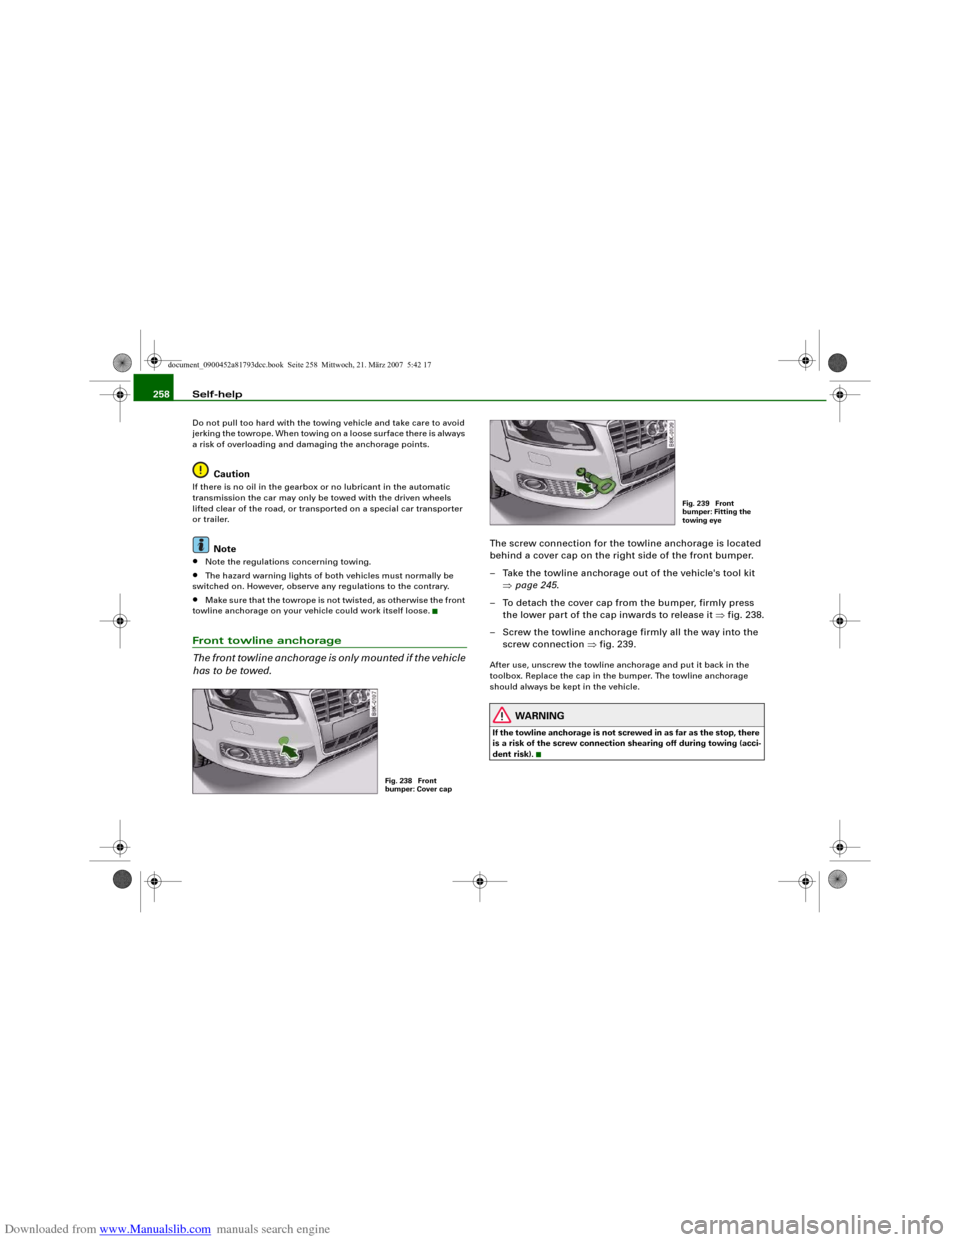
The screw connection for the towline anchorage is located
behind a cover cap on the right side of the front bumper.
– Take the towline anchorage out of the vehicle's tool kit
⇒page 245.
– To detach the cover cap from the bumper, firmly press
the lower part of the cap inwards to release it ⇒fig. 238.
– Screw the towline anchorage firmly all the way into the
screw connection ⇒fig. 239.After use, unscrew the towline anchorage and put it back in the
toolbox. Replace the cap in the bumper. The towline anchorage
should always be kept in the vehicle.
WARNING
If the towline anchorage is not screwed in as far as the stop, there
is a risk of the screw connection shearing off during towing (acci-
dent risk).
Fig. 238 Front
bumper: Cover cap
Fig. 239 Front
bumper: Fitting the
towing eye
document_0900452a81793dcc.book Seite 258 Mittwoch, 21. März 2007 5:42 17
Page 264 of 294
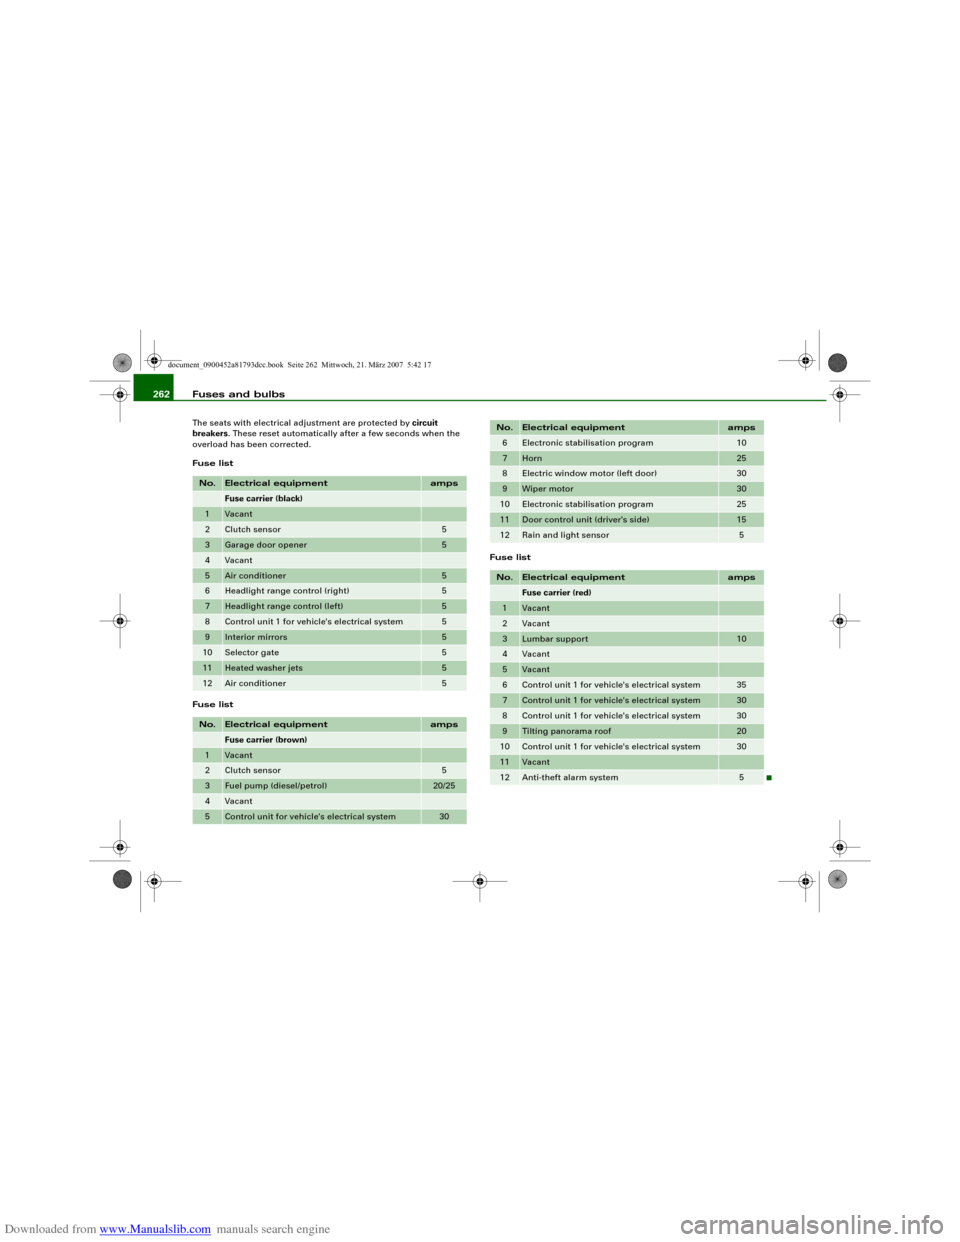
Downloaded from www.Manualslib.com manuals search engine Fuses and bulbs 262The seats with electrical adjustment are protected by circuit
breakers. These reset automatically after a few seconds when the
overload has been corrected.
Fuse list
Fuse listFuse listNo.
Electrical equipment
amps
Fuse carrier (black)
1
Vacant
2
Clutch sensor
5
3
Garage door opener
5
4
Vacant
5
Air conditioner
5
6
Headlight range control (right)
5
7
Headlight range control (left)
5
8
Control unit 1 for vehicle's electrical system
5
9
Interior mirrors
5
10
Selector gate
5
11
Heated washer jets
5
12
Air conditioner
5
No.
Electrical equipment
amps
Fuse carrier (brown)
1
Vacant
2
Clutch sensor
5
3
Fuel pump (diesel/petrol)
20/25
4
Vacant
5
Control unit for vehicle's electrical system
30
6
Electronic stabilisation program
10
7
Horn
25
8
Electric window motor (left door)
30
9
Wiper motor
30
10
Electronic stabilisation program
25
11
Door control unit (driver's side)
15
12
Rain and light sensor
5
No.
Electrical equipment
amps
Fuse carrier (red)
1
Vacant
2
Vacant
3
Lumbar support
10
4
Vacant
5
Vacant
6
Control unit 1 for vehicle's electrical system
35
7
Control unit 1 for vehicle's electrical system
30
8
Control unit 1 for vehicle's electrical system
30
9
Tilting panorama roof
20
10
Control unit 1 for vehicle's electrical system
30
11
Vacant
12
Anti-theft alarm system
5
No.
Electrical equipment
amps
document_0900452a81793dcc.book Seite 262 Mittwoch, 21. März 2007 5:42 17