2008 AUDI S4 warning
[x] Cancel search: warningPage 75 of 342

Seats and storage73
Controls
Safety
Driving tips
General maintenance
Self-help
Technical data
Seats and storageManual adjustment of front seatsApplies to vehicles: with manual seat adjustmentSeat adjuster controls
There are several seat adjustment functions for your
comfort and convenienceSome of the controls shown are only fitted on certain models or are
optional extras.
Adjuster controls
Moves seat backwards or forwards
Thigh suppor t*
Adjusts angle of seat cushion*
Adjusts lumbar support*
Adjusts seat height
Adjusts backrest angle
Applies to vehicles: with manual seat adjustmentSeat adjustment
It is possible to adjust the position and shape of the seat
manually so that you can travel in a safe and comfortable
sitting position.Before adjusting your seat, please read and observe the
warnings ⇒.
Moving seat backwards or forwards
– Lift the lever ⇒fig. 75 and move the seat to the
desired position.
– Then release the lever and move the seat further until the catch engages.
Extending or shortening the thigh support*
– Lift the control below the seat cushion. The front seat cushion will spring forward.
– Slide the seat cushion back to the normal position after each use.
Adjusting angle of seat cushion*
– Pull the lever ⇒fig. 75 up or down repeatedly (i.e.
pump the lever).
Adjusting contour of lumbar support*
– Press the front or rear part of the adjuster switch to
increase or decrease the curvature of the lumbar support
as required.
Fig. 75 Adjuster
controls on driver's
seat
A1A2A3A4A5A6
A1
A1
A2A3
A4
document_0900452a81b1b9de.book Seite 73 Donnerstag, 26. Juli 2007 9:16 09
--4 -
-T
-+ +-
•
Page 76 of 342

Seats and storage
74
Adjusting height of lumbar support*
– Press the top or bottom part of the adjuster switch to move the lumbar support upwards or downwards as
required.
Raising or lowering the seat
– Pull the lever ⇒page 73, fig. 75 up or down repeat-
edly (i.e. pump the lever).
Adjusting backrest angle
– Lean forwards to take your weight off the backrest.
– Turn the adjuster wheel ⇒ page 73, fig. 75 to set the
angle of the backrest as required.
WARNING
•
Never adjust the driver's seat wh en the vehicle is moving - this
could lead to an accident.
•
Be careful when adjusting the seat height. Careless or uncon-
trolled use of the seat adjustment can cause injuries.
•
Do not drive with the backrests of the front seats reclined too
far as otherwise the seat belt and airbag could fail to restrain the
wearer properly in an accident, possibly leading to injury.
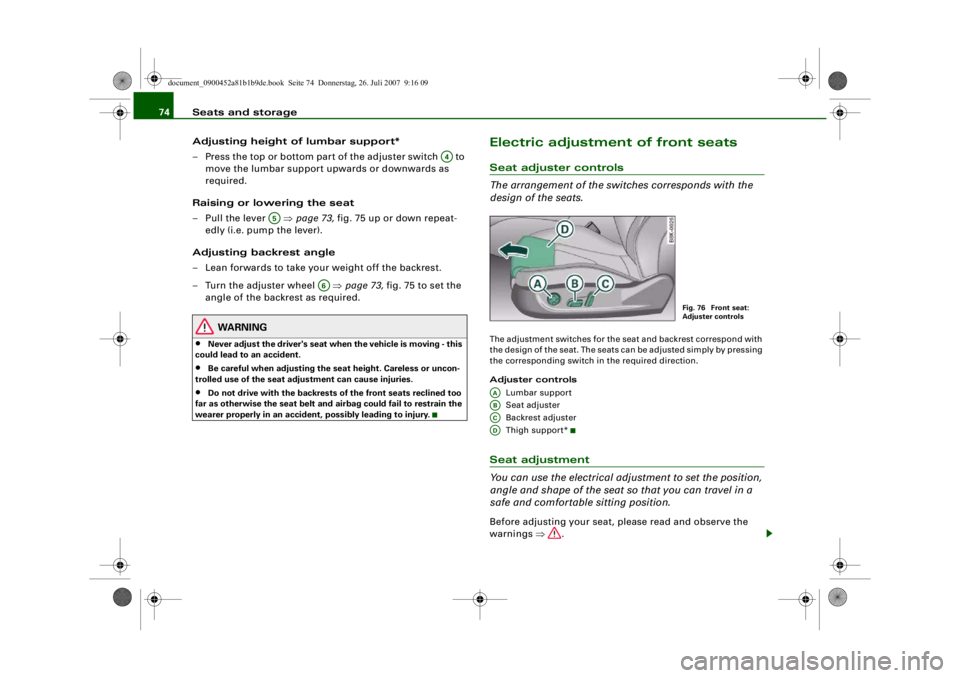
Electric adjustment of front seatsSeat adjuster controls
The arrangement of the switches corresponds with the
design of the seats.The adjustment switches for the se at and backrest correspond with
the design of the seat. The seats can be adjusted simply by pressing
the corresponding switch in the required direction.
Adjuster controls
Lumbar support
Seat adjuster
Backrest adjuster
Thigh suppor t*Seat adjustment
You can use the electrical adjustment to set the position,
angle and shape of the seat so that you can travel in a
safe and comfortable sitting position.Before adjusting your seat, please read and observe the
warnings ⇒.
A4
A5
A6
Fig. 76 Front seat:
Adjuster controls
AAABACAD
document_0900452a81b1b9de.book Seite 74 Donnerstag, 26. Juli 2007 9:16 09
--4 -
-T
-+ +-
•
•
Page 77 of 342

Seats and storage75
Controls
Safety
Driving tips
General maintenance
Self-help
Technical data
Adjusting contour of lumbar support
– Press the front or rear of switch to increase or
decrease the curvature of the lumbar support as
required.
Adjusting height of lumbar support
– Press the top or bottom of adjuster switch to move the lumbar support upwards or downwards as required.
Moving seat backwards or forwards
– Press switch ⇒page 74, fig. 76 forwards or back-
wards.
Adjusting seat height
– Press switch up or down.
Raising/lowering seat at front
– Press the front of switch up or down.
Raising/lowering seat at rear
– Press the rear of switch up or down.
Adjusting backrest angle
– Press switch forwards or backwards.
Extending or shortening the thigh support*
– Lift the control below the seat cushion. The front seat cushion will spring forward.
– Slide the seat cushion back to the normal position after each use.
WARNING
•
Never adjust the driver's seat wh en the vehicle is moving - this
could lead to an accident.
•
The electrical seat adjustment al so works when the ignition is
off and when the key is not in the ignition. To avoid accidental inju-
ries, never leave children unattended in the vehicle.
•
Be careful when adjusting the seat height. Careless or uncon-
trolled use of the height ad justment can cause injuries.
•
Do not drive with the backrests of the front seats reclined too
far as otherwise the seat belt and airbag could fail to restrain the
wearer properly in an accident, possibly leading to injury.
Seat memoryMemory for driver's seat
You can use the recall buttons in the driver's door to store
and recall the seat adjustments for two drivers.As well as the driver's seat position, the seat memory will store and
recall the exterior mirror settings (if the vehicle is equipped accord-
ingly):
AA
AA
ABAB
ABAB
ACAD
Fig. 77 Driver's door:
Seat memory
document_0900452a81b1b9de.book Seite 75 Donnerstag, 26. Juli 2007 9:16 09
--4 -
-T
•
-+ +-
Page 78 of 342

Seats and storage
76Storing and recalling settings
You can store and recall the settings for two different drivers using
the recall buttons 1 and 2 ⇒page 75, fig. 77 ⇒page 76 .
In addition, the current settings are automatically stored when you
lock the vehicle and assigned to th e remote control key that is being
used. When you unlock the vehicle, the system automatically recalls
the settings stored on th at remote control key.
Switching seat memory on and off
The seat memory will be out of action if the switch has been
pressed and the diode in the switch is lit. In this case, the setting
cannot be stored.
The stored settings will all remain in the memory. However, the seat
can now only be adjusted using the conventional electrical
adjustment.Applies to vehicles: with seat memoryStoring and recalling settingsStoring settings
– Adjust the driver's seat as required.
– Adjust both exterior mirrors.
– Press the button. The diode in the switch will light up to indicate that it is ready to store the settings. Now
press the desired recall button for at least a second.
– Release the button. The setting is now stored on the selected recall button.
Recalling settings
– If the driver's door is open, press the desired recall button briefly. – If the driver's door is closed, press and hold down the
desired recall button until the programmed settings are
reached.
A tone will sound and the diode in the button ⇒page 75,
fig. 77 will light up to confirm th at the settings have been stored.
When you lock the vehicle the current settings are automatically
stored and assigned to the remote control key. However, the
settings assigned to th e remote control key wi ll not overwrite the
settings stored on recall buttons 1 and 2. The settings stored on the
recall buttons can be called up at any time. When you unlock the
vehicle, the settings assigned to the remote control key are recalled
automatically.
If your vehicle is also driven by other persons using your remote
control key, it is advisable to store your personal settings on one of
the recall buttons. You can then re call your own settings at any time
simply by pressing the corresponding recall button. When you lock
the vehicle these settings are then stored automatically and
assigned once again to the remote control key.
WARNING
•
For safety reasons, never recall seat settings when the vehicle
is moving - this could lead to an accident.
•
In an emergency the recall fu nction can be stopped at any time
by pressing the switch, or by briefly pressing any of the
recall buttons.
OFF
SET
SET
ON/OFF
document_0900452a81b1b9de.book Seite 76 Donnerstag, 26. Juli 2007 9:16 09
--4 -
-T
•
-+ +-
•
Page 81 of 342

Seats and storage79
Controls
Safety
Driving tips
General maintenance
Self-help
Technical data
Luggage compar tmentLoading the luggage compartment
Loads in the luggage compartment should be safely
secured.To maintain safe handling on the road, please observe the
following points:
– Distribute the weight as evenly as possible.
– Position heavy items as far forward as possible ⇒fig. 82.
– Secure the load with the luggage net* or with non-elastic straps secured to the fastening rings* ⇒page 79 .
WARNING
•
Unsecured objects in the lugg age compartment can suddenly
shift and cause changes in the handling of the vehicle.
•
In an accident or a sudden ma noeuvre, loose objects in the
passenger compartment can be flung forward and possibly injure
vehicle occupants.
•
Always store objects in the luggage compartment and secure
with suitable straps. This is especially important for heavy
objects.
•
When you transport heavy objects, always keep in mind that a
change of the centre of gravity can also cause changes in vehicle
handling.
•
Please observe the impo rtant safety warnings ⇒page 186,
“Safe driving”.Note
Adjust the tyre pressure to match the vehicle loading - the correct
pressures are specified on the sticker on the end face of the driver's
door.Applies to vehicles: with fastening ringsFastening rings
There are four fastening rings in the luggage compart-
ment which can be used to secure loads.– Use the fastening rings to secure the load ⇒fig. 83
-arrows-.
Fig. 82 Heavy items
s h o u l d b e p l a c e d a s fa r
forwards as possible.
WARNING (continued)
Fig. 83 Location of
fastening rings in
luggage compartment
document_0900452a81b1b9de.book Seite 79 Donnerstag, 26. Juli 2007 9:16 09
--4 -
-T
! .,
[lJ
-+
•
+-
Page 82 of 342

Seats and storage
80
– Please refer to the safety notes ⇒page 193 .Applies to vehicles: with stretch netStretch net / retaining net
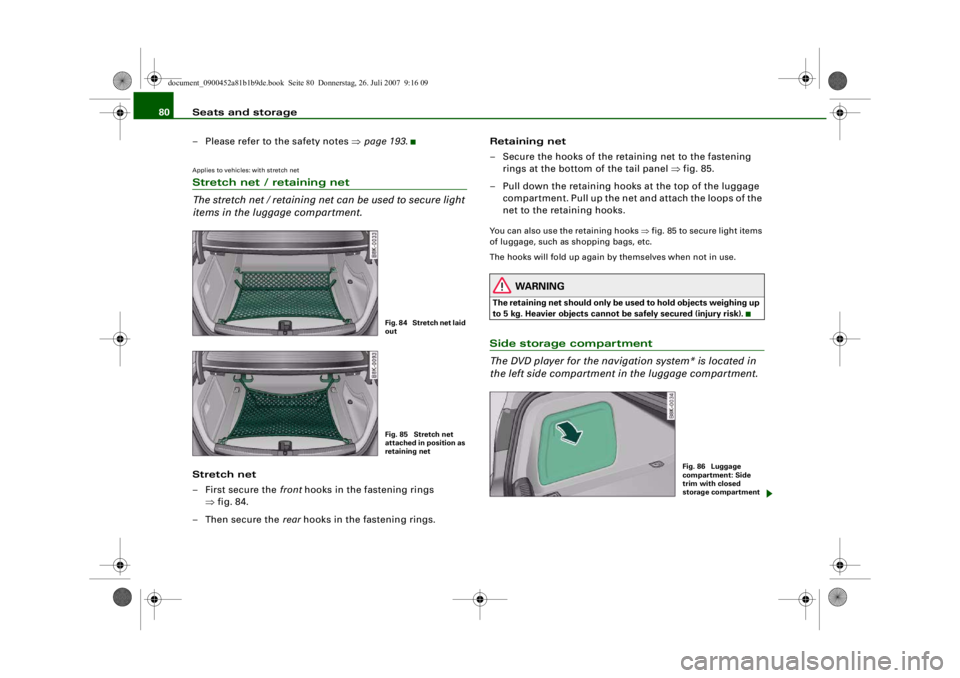
The stretch net / retaining net can be used to secure light
items in the luggage compartment.Stretch net
– First secure the front hooks in the fastening rings
⇒ fig. 84.
–Then secure the rear hooks in the fastening rings. Retaining net
– Secure the hooks of the retaining net to the fastening
rings at the bottom of the tail panel ⇒fig. 85.
– Pull down the retaining hooks at the top of the luggage compartment. Pull up the net and attach the loops of the
net to the retaining hooks.
You can also use the retaining hooks ⇒fig. 85 to secure light items
of luggage, such as shopping bags, etc.
The hooks will fold up again by themselves when not in use.
WARNING
The retaining net should only be used to hold objects weighing up
to 5 kg. Heavier objects cannot be safely secured (injury risk).Side storage compartment
The DVD player for the naviga tion system* is located in
the left side compartment in the luggage compartment.
Fig. 84 Stretch net laid
outFig. 85 Stretch net
attached in position as
retaining net
Fig. 86 Luggage
compartment: Side
trim with closed
storage compartment
document_0900452a81b1b9de.book Seite 80 Donnerstag, 26. Juli 2007 9:16 09
--4 -
-
•
T
-+
Page 83 of 342

Seats and storage81
Controls
Safety
Driving tips
General maintenance
Self-help
Technical data
– To open the storage compartment, pull the handle
⇒page 80, fig. 86.DVD player for navigation system*
The DVD player for the navigation system is located in this storage
compartment ⇒fig. 87 in the luggage compartment. For more
information, please refer to the Infotainment/MMI Operating
Manual.Extending the luggage compartment
The two sections of the backrest can be folded forwards
either together or separately to increase the capacity of
the luggage compartment.
Folding down backrest
– Press the release lever ⇒fig. 88 in the direction indi-
cated (arrow).
– Fold down the backrest.
Returning backrest to an upright position
– Push the backrest up until it engages securely ⇒. The
red marking on the tab shou ld no longer be visible
when the backrest is properly secured.When the backrest is properly engaged in its upright position, it can
be locked and unlocked with the key ⇒fig. 89. This prevents unau-
thorised access to the luggage compartment from inside the
vehicle.
WARNING
•
Make sure that the rear backrest is securely locked in position
so that the seat belt can provide proper protection on the centre
rear seat.
•
The rear backrest must always be securely latched so that
objects stored in the luggage co mpartment will not fly forward
during sudden braking.
Fig. 87 Luggage
compartment: DVD
player for navigation
systemFig. 88 Backrest
release lever
Fig. 89 Locking the
backrest
AAAB
document_0900452a81b1b9de.book Seite 81 Donnerstag, 26. Juli 2007 9:16 09
--4 -
-T
-+
•
+-
~
~---~
Page 84 of 342

Seats and storage
82
CautionWhen returning the backrest to an upright position, make sure that
the seat belts for the outer rear seats are in their guides so that they
cannot be caught up and damaged in the catches for the backrest.Storage shelf
The storage shelf behind the re ar backrest should only be
used to store light articles of clothing.
WARNING
Do not store any heavy or hard objects on the storage shelf. They
could cause injury if the brakes are applied suddenly.
Caution
Please note that hard objects co uld chafe against the wires of the
heating element in the rear window and cause damage.
Note
Make sure that the slots between the rear window and the storage
shelf are kept clear to ensure unimpaired ventilation.
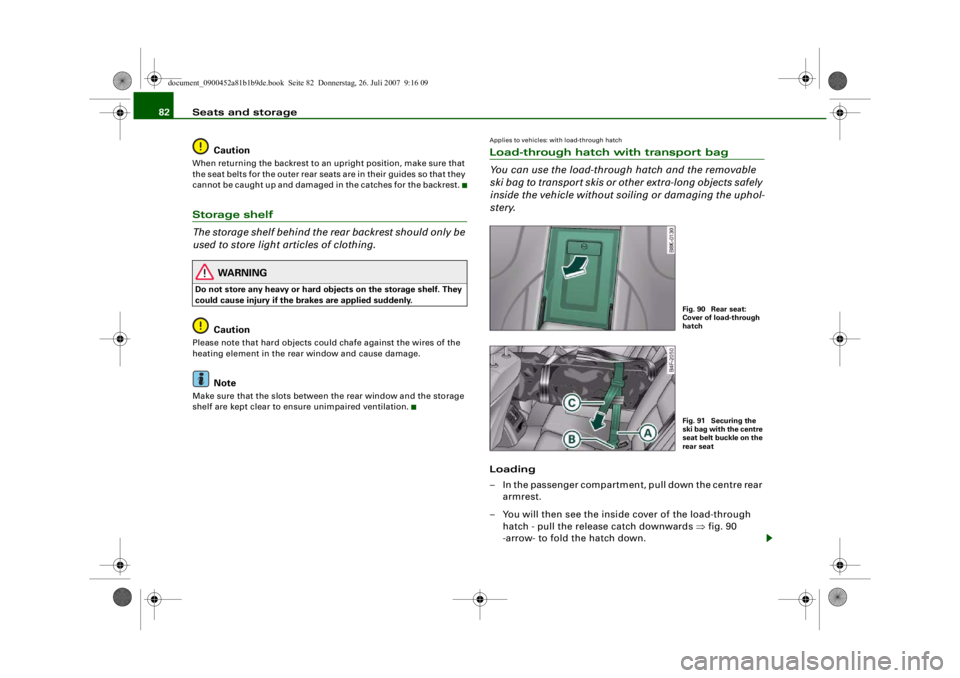
Applies to vehicles: with load-through hatchLoad-through hatch with transport bag
You can use the load-through hatch and the removable
ski bag to transport skis or other extra-long objects safely
inside the vehicle without soil ing or damaging the uphol-
stery.Loading
– In the passenger compartment, pull down the centre rear
armrest.
– You will then see the inside cover of the load-through
hatch - pull the release catch downwards ⇒fig. 90
-arrow- to fold the hatch down.
Fig. 90 Rear seat:
Cover of load-through
hatchFig. 91 Securing the
ski bag with the centre
seat belt buckle on the
rear seat
document_0900452a81b1b9de.book Seite 82 Donnerstag, 26. Juli 2007 9:16 09
--4 -
-
0
T
•
I&
-+
0
+-
rn
•