2008 AUDI S4 mirror
[x] Cancel search: mirrorPage 73 of 342

Lights and vision71
Controls
Safety
Driving tips
General maintenance
Self-help
Technical data
Applies to vehicles: with automatic anti-dazzle adjustment for exterior mirrorsAutomatic anti-dazzle adjustment for exterior mirrorsThe exterior mirrors darken t ogether with the automatically
adjusting interior mirror. When the ignition is on, the mirrors will
darken automatically according to th e amount of light received (for
example from the headlights of a vehicle behind).
When the interior lights are switched on, or when reverse gear is
engaged, the mirrors revert to thei r original (i.e. not darkened)
condition.
WARNING
Electrolyte fluid can leak from a broken mirror. This fluid can cause
irritation to the skin, eyes, and respiratory organs. Wash thor-
oughly with clean water should yo u come into contact with this
fluid. Seek medical assistance if needed.
Caution
Electrolyte fluid leaking from a broken mirror can cause damage to
the paintwork or plastic surfaces. Use a sponge or similar to remove
the fluid as soon as possible.
Note
•
If you switch off the anti-dazzle function for the interior mirror,
this will also deactivate the an ti-dazzle function for the exterior
mirrors.
•
The automatic anti-dazzle function will only work properly if the
sun blind* for the rear window is not in use and there are no other
objects preventing light from reaching the interior mirror.
Digital compassApplies to vehicles: with digital compassActivating and deactivating the compass
The compass direction will appear in the mirror.– To switch the compass on and off, press and hold button until the compass display in the mirror
⇒fig. 73 appears or disappears.The digital compass only works when the ignition is on. The points
of the compass are dis played as follows: N (North), NE (North East),
E (East), SE (South East), S (South), SW (South West), W (West), NW
(North West).
Note
To avoid inaccurate compass readings, do not hold any remote
controls or other electrical devices or metal objects near the interior
mirror.
Fig. 73 Interior mirror:
activated digital
compass
AA
document_0900452a81b1b9de.book Seite 71 Donnerstag, 26. Juli 2007 9:16 09
--4 -
-T
-+
CD
+-
[I]
[I]
•
•
Page 74 of 342

Lights and vision
72Applies to vehicles: with digital compassSetting the correct compass calibration zone
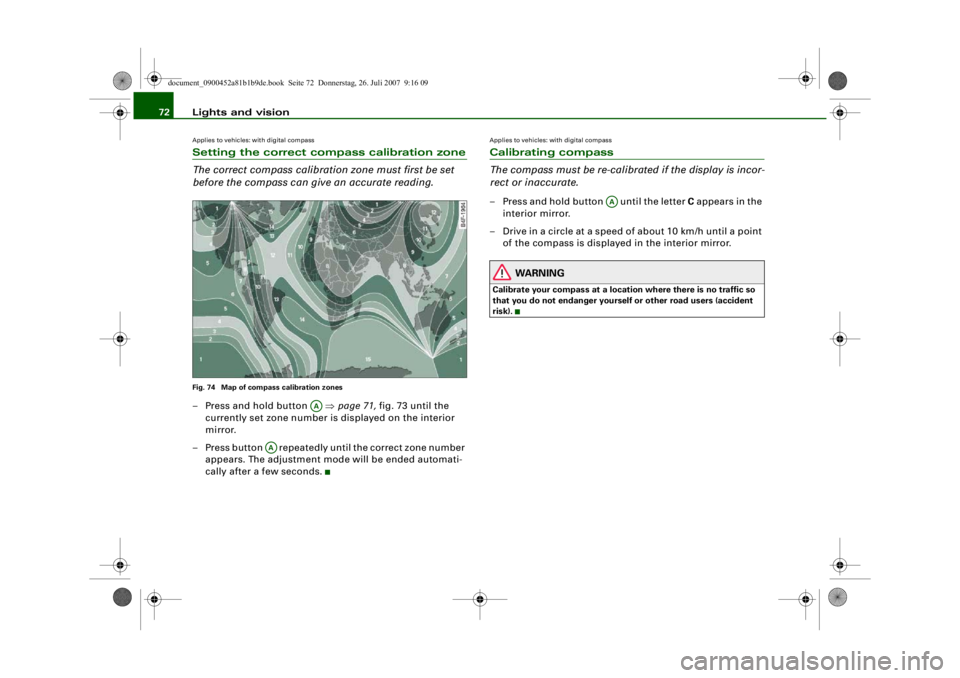
The correct compass calibration zone must first be set
before the compass can give an accurate reading.Fig. 74 Map of compass calibration zones– Press and hold button ⇒page 71, fig. 73 until the
currently set zone number is displayed on the interior
mirror.
– Press button repeatedly until the correct zone number appears. The adjustment mode will be ended automati-
cally after a few seconds.
Applies to vehicles: with digital compassCalibrating compass
The compass must be re-calibra ted if the display is incor-
rect or inaccurate.– Press and hold button until the letter C appears in the
interior mirror.
– Drive in a circle at a speed of about 10 km/h until a point of the compass is displayed in the interior mirror.
WARNING
Calibrate your compass at a location where there is no traffic so
that you do not endanger yourself or other road users (accident
risk).
AA
AA
AA
document_0900452a81b1b9de.book Seite 72 Donnerstag, 26. Juli 2007 9:16 09
--4 -
-T
-+
•
Page 77 of 342

Seats and storage75
Controls
Safety
Driving tips
General maintenance
Self-help
Technical data
Adjusting contour of lumbar support
– Press the front or rear of switch to increase or
decrease the curvature of the lumbar support as
required.
Adjusting height of lumbar support
– Press the top or bottom of adjuster switch to move the lumbar support upwards or downwards as required.
Moving seat backwards or forwards
– Press switch ⇒page 74, fig. 76 forwards or back-
wards.
Adjusting seat height
– Press switch up or down.
Raising/lowering seat at front
– Press the front of switch up or down.
Raising/lowering seat at rear
– Press the rear of switch up or down.
Adjusting backrest angle
– Press switch forwards or backwards.
Extending or shortening the thigh support*
– Lift the control below the seat cushion. The front seat cushion will spring forward.
– Slide the seat cushion back to the normal position after each use.
WARNING
•
Never adjust the driver's seat wh en the vehicle is moving - this
could lead to an accident.
•
The electrical seat adjustment al so works when the ignition is
off and when the key is not in the ignition. To avoid accidental inju-
ries, never leave children unattended in the vehicle.
•
Be careful when adjusting the seat height. Careless or uncon-
trolled use of the height ad justment can cause injuries.
•
Do not drive with the backrests of the front seats reclined too
far as otherwise the seat belt and airbag could fail to restrain the
wearer properly in an accident, possibly leading to injury.
Seat memoryMemory for driver's seat
You can use the recall buttons in the driver's door to store
and recall the seat adjustments for two drivers.As well as the driver's seat position, the seat memory will store and
recall the exterior mirror settings (if the vehicle is equipped accord-
ingly):
AA
AA
ABAB
ABAB
ACAD
Fig. 77 Driver's door:
Seat memory
document_0900452a81b1b9de.book Seite 75 Donnerstag, 26. Juli 2007 9:16 09
--4 -
-T
•
-+ +-
Page 78 of 342

Seats and storage
76Storing and recalling settings
You can store and recall the settings for two different drivers using
the recall buttons 1 and 2 ⇒page 75, fig. 77 ⇒page 76 .
In addition, the current settings are automatically stored when you
lock the vehicle and assigned to th e remote control key that is being
used. When you unlock the vehicle, the system automatically recalls
the settings stored on th at remote control key.
Switching seat memory on and off
The seat memory will be out of action if the switch has been
pressed and the diode in the switch is lit. In this case, the setting
cannot be stored.
The stored settings will all remain in the memory. However, the seat
can now only be adjusted using the conventional electrical
adjustment.Applies to vehicles: with seat memoryStoring and recalling settingsStoring settings
– Adjust the driver's seat as required.
– Adjust both exterior mirrors.
– Press the button. The diode in the switch will light up to indicate that it is ready to store the settings. Now
press the desired recall button for at least a second.
– Release the button. The setting is now stored on the selected recall button.
Recalling settings
– If the driver's door is open, press the desired recall button briefly. – If the driver's door is closed, press and hold down the
desired recall button until the programmed settings are
reached.
A tone will sound and the diode in the button ⇒page 75,
fig. 77 will light up to confirm th at the settings have been stored.
When you lock the vehicle the current settings are automatically
stored and assigned to the remote control key. However, the
settings assigned to th e remote control key wi ll not overwrite the
settings stored on recall buttons 1 and 2. The settings stored on the
recall buttons can be called up at any time. When you unlock the
vehicle, the settings assigned to the remote control key are recalled
automatically.
If your vehicle is also driven by other persons using your remote
control key, it is advisable to store your personal settings on one of
the recall buttons. You can then re call your own settings at any time
simply by pressing the corresponding recall button. When you lock
the vehicle these settings are then stored automatically and
assigned once again to the remote control key.
WARNING
•
For safety reasons, never recall seat settings when the vehicle
is moving - this could lead to an accident.
•
In an emergency the recall fu nction can be stopped at any time
by pressing the switch, or by briefly pressing any of the
recall buttons.
OFF
SET
SET
ON/OFF
document_0900452a81b1b9de.book Seite 76 Donnerstag, 26. Juli 2007 9:16 09
--4 -
-T
•
-+ +-
•
Page 151 of 342

Audi side assist149
Controls
Safety
Driving tips
General maintenance
Self-help
Technical data
Audi side assistLane change assist featureApplies to vehicles: with side assistDescription
The side assist function assists the driver when changing
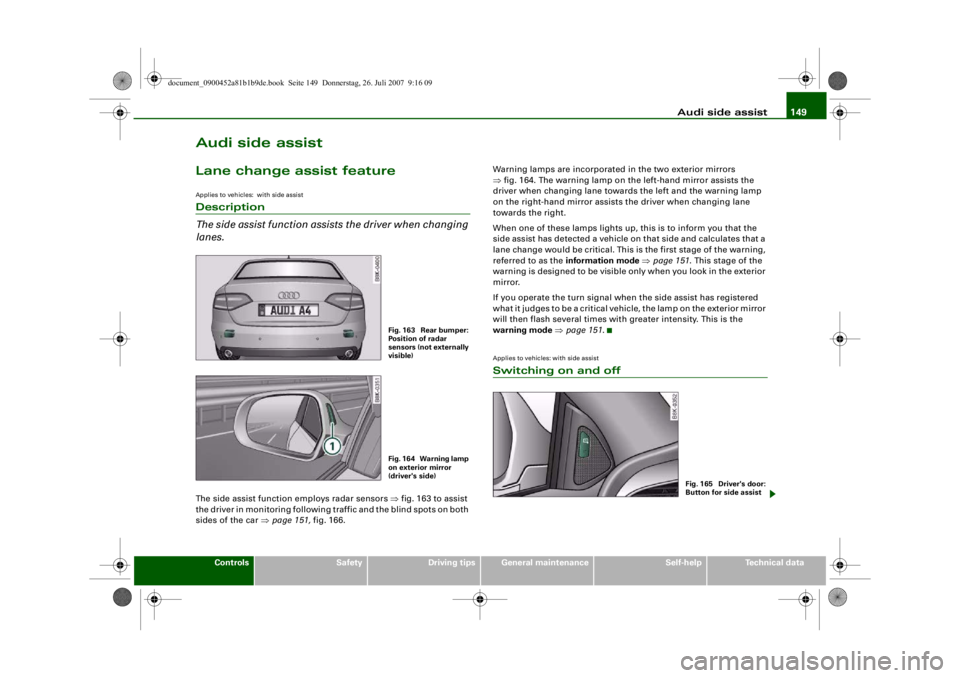
lanes.The side assist function employs radar sensors ⇒fig. 163 to assist
the driver in monitoring following traffic and the blind spots on both
sides of the car ⇒page 151, fig. 166. Warning lamps are incorporated in the two exterior mirrors
⇒
fig. 164. The warning lamp on the left-hand mirror assists the
driver when changing lane towards the left and the warning lamp
on the right-hand mirror assists the driver when changing lane
towards the right.
When one of these lamps lights up, this is to inform you that the
side assist has detected a vehicle on that side and calculates that a
lane change would be critical. This is the first stage of the warning,
referred to as the information mode ⇒ page 151 . This stage of the
warning is designed to be visible only when you look in the exterior
mirror.
If you operate the turn signal when the side assist has registered
what it judges to be a critical vehicle, the lamp on th e exterior mirror
will then flash several times with greater intensity. This is the
warning mode ⇒ page 151 .
Applies to vehicles: with side assistSwitching on and off
Fig. 163 Rear bumper:
Position of radar
sensors (not externally
visible)Fig. 164 Warning lamp
on exterior mirror
(driver's side)
Fig. 165 Driver's door:
Button for side assist
document_0900452a81b1b9de.book Seite 149 Donnerstag, 26. Juli 2007 9:16 09
--4 -
-T
-+
•
+-
Page 152 of 342

Audi side assist
150
Switching on
– Press the button ⇒page 149, fig. 165. The red indicator
lamp in the button will light up.
Switching off
– Press the button again. The indicator lamp in the button will go out.The system is designed to provide assistance on motorways and
other out-of-town roads, so it only operates at speeds above about
60 km/h.
WARNING
•
Please note that the sensors ar e not always able to detect all
vehicles which may represent a po tential hazard (accident risk).
•
Please note that the side assist is not able to give adequate
warning of vehicles approaching very fast from behind, or vehicles
that you are overtaking rapidly.
•
The radar sensor's "field of vision" can be impaired by rain,
snow or a lot of water on the road. This results in vehicles not
being reliably recognised or, in some circumstances, not being
detected at all by the side assist. Al ways give your full attention to
the position of your vehicle on the road and other nearby traffic.
•
The side assist only gives a warning of approaching vehicles
and vehicles in the blind spots when road speed is above 60 km/h.
•
Please note that the side assist does not operate in tight bends
(with a radius of less than 200 metres).
•
The side assist feature is not a su bstitute for the full concentra-
tion of the driver. The driver is al ways responsible for the safety of
lane changes and other manoeuvres. Always give your full atten-
tion to the position of your vehicle on the road and other nearby
traffic.
Caution
•
To avoid impairing the function of the side assist, do not attach
any objects (e.g. stickers or bicycle carriers) in such a way that they
might interfere with the radar sensors in the rear bumper.
•
Make sure that the warning lamps on the exterior mirrors are not
obscured by stickers or other objects.Note
•
To ensure that the side assist function works properly, do not
allow snow and ice to accumulate on the rear bumper near the radar
sensors. Please observe the additional notes on ⇒page 157 .
•
The side assist function will be switched off automatically when
the electrical connector for the trailer socket is plugged in on vehi-
cles with a factory-fitted towing bracket.
•
The side assist should be switched off manually when towing a
trailer if the vehicle is equipped with a towing bracket which was not
factory-fitted.
•
The side assist system will switch off automatically if it detects
an obstruction that impairs the function of the radar sensors.
•
The warning lamps on the exterior mirrors may not be properly
visible if tinted foil is affixed to the side windows on the driver's or
passenger's side.
document_0900452a81b1b9de.book Seite 150 Donnerstag, 26. Juli 2007 9:16 09
--4 -
-
CD
T
[I]
-+ +-
•
Page 153 of 342

Audi side assist151
Controls
Safety
Driving tips
General maintenance
Self-help
Technical data
Applies to vehicles: with side assistArea covered by the radar sensorsThe area covered by the radar sensors ⇒fig. 166 consists of:•
The rearward approach zone (light green area: up to about 50
metres) and
•
Blind spots (dark green area) .
The radar sensors monitor the lanes immediately to the left and
right of your vehicle. Other lanes are not covered by the sensors.Note
The side assist system is programmed for lanes of a fixed width, and
is not able to measure differing lane widths. It monitors a zone
equivalent to one normal lane width on either side. If the lanes are
narrower than this, or if vehicles are not travelling in the centre of
the lanes, the system may register vehicles that are not in fact trav-
elling in an adjacent lane ⇒page 156 .Applies to vehicles: with side assistHow the system worksWhen other vehicles are detected, the side assist system registers
their distance and how fast they are approaching. The warning lamp on the relevant exterior mirror will light up whenever the side assist
calculates that the distance and the speed differential of
approaching vehicles would be critical in the event of a lane change.
The warning lamp may light up when you are being overtaken and
when you are overtaking another vehicle.
If you are overtaking slowly, with a speed differential of less than
15 km/h, the warning lamp will light up as soon as the other vehicle
enters your blind spot and is detected by the sensors. If you are
overtaking with a speed differential which is greater than this the
lamp will not give a warning.
Applies to vehicles: with side assistInformation mode and warning modeThe side assist has two modes of operation•
The information mode and
•
The warning mode
The side assist will respond in the appropriate mode, depending on
whether or not you operate the turn signal to indicate an intended
lane change.
Information mode
As long as you do not operate the turn signal, the side assist will
merely inform you of the presence of vehicles that it has detected
and judges to be critical in the event of a lane change. The warning
lamp on the relevant exterior mirror will light up with low intensity
whenever the side assist calculates that the distance and the speed
differential of an approaching vehicle are critical.
The intensity of the warning lamp in this information mode is delib-
erately kept relatively low, so that it does not distract you while you
are looking at the road in front and do not intend to change to a
different lane. The information mode is clearly visible when you look
in the exterior mirror.
Fig. 166 Schematic
diagram: Area covered
by the radar sensors
A1
A2
document_0900452a81b1b9de.book Seite 151 Donnerstag, 26. Juli 2007 9:16 09
--4 -
-T
•
-+ +-
(I]
•
Page 154 of 342

Audi side assist
152Warning mode
If you operate the turn signal when the side assist has detected a
vehicle on that side that it judges to be critical in the event of a lane
change, the warning lamp on the relevant exterior mirror will flash
brightly several times. This is the warning mode: if the lamp flashes
brightly it warns you th at you should check the situation again in the
mirror and by looking back over your shoulder ⇒ in “Safety
notes” on page 157.
Note
You can adjust the brightness of the warning lamps on the exterior
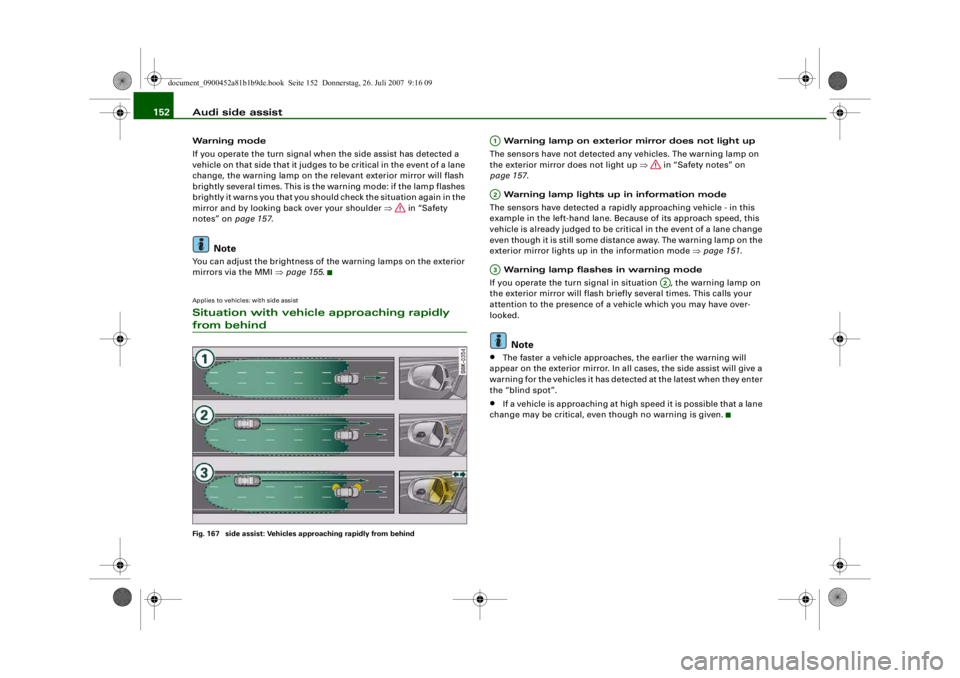
mirrors via the MMI ⇒ page 155.Applies to vehicles: with side assistSituation with vehicle approaching rapidly from behindFig. 167 side assist: Vehicles approaching rapidly from behind
Warning lamp on exterior mirror does not light up
The sensors have not detected any vehicles. The warning lamp on
the exterior mirror does not light up ⇒ in “Safety notes” on
page 157 .
Warning lamp lights up in information mode
The sensors have detected a rapidly approaching vehicle - in this
example in the left-hand lane. Because of its approach speed, this
vehicle is already judged to be critical in the event of a lane change
even though it is still some distance away. The warning lamp on the
exterior mirror lights up in the information mode ⇒page 151 .
Warning lamp flashes in warning mode
If you operate the turn signal in situation , the warning lamp on
the exterior mirror will flash briefly several times. This calls your
attention to the presence of a vehicle which you may have over-
looked.Note
•
The faster a vehicle approaches, the earlier the warning will
appear on the exterior mirror. In all cases, the side assist will give a
warning for the vehicles it has detected at the latest when they enter
the “blind spot”.
•
If a vehicle is approaching at high speed it is possible that a lane
change may be critical, even though no warning is given.
A1A2A3
A2
document_0900452a81b1b9de.book Seite 152 Donnerstag, 26. Juli 2007 9:16 09
--4 -
-T
[I]
•
-+
---
-
[I]
+-
t
=
IJll!II)
=~
~
~
•