Page 164 of 194
159
General operation
RADIO, CD
NAME, TEL
NAV, INFO
CAR, SETUP
– Press the function button �page 16 in the navi-
gation menu.
– Highlight the Intersection map with a check mark")
Navigation (NAV)159
General operation
RADIO, CD
NAME, TEL
NAV, INFO
CAR, SETUP
– Press the function button �page 16 in the navi-
gation menu.
– Highlight the Intersection map with a check mark
�
�page 158, fig.171 to activate the function.
The map is divided into two parts at intersections. The right half of
the display continues to show you the map display you selected.
Th e l e ft h a l f o f t he d i s p l a y s h o w s y o u a p a ra l l e l e n l a r g e d v i e w o f t h e
intersection area
�page 158, fig.172.
Next to the enlarged view, you are shown the changes in distance
until the turn-off point. At the same you are shown the name of the
street onto which you want to turn.
If you have activated the Auto intersection zoom function, the
Intersection map function cannot be activated.
If you would like to activate the Intersection map function, you first
have to deactivate the Auto intersection zoom function. These two
functions are mutually exclusive.
Tips
The map is oriented to driving direction
�page 153 when switching
to zoom mode.
Auto intersection zoom
The map displays in zoom mode at intersections.Fig. 173 Setup Navigation: Auto intersection zoom activated– Press the function button �page 16 in the navi-
gation menu.
– Highlight the Auto intersection zoom with a check mark
� �fig.173 to activate the function.
For a detailed display, the map automatically zooms in at street
intersections, enhancing the view of the route from street to street.
If you have activated the Itersection map function, the Auto
intersection zoom function cannot be activated.
If you would like to activate the Auto intersection zoom function,
you first have to deactivate the Intersection map function. These
two functions are mutually exclusive.
SETUP
SETUP
Page 165 of 194
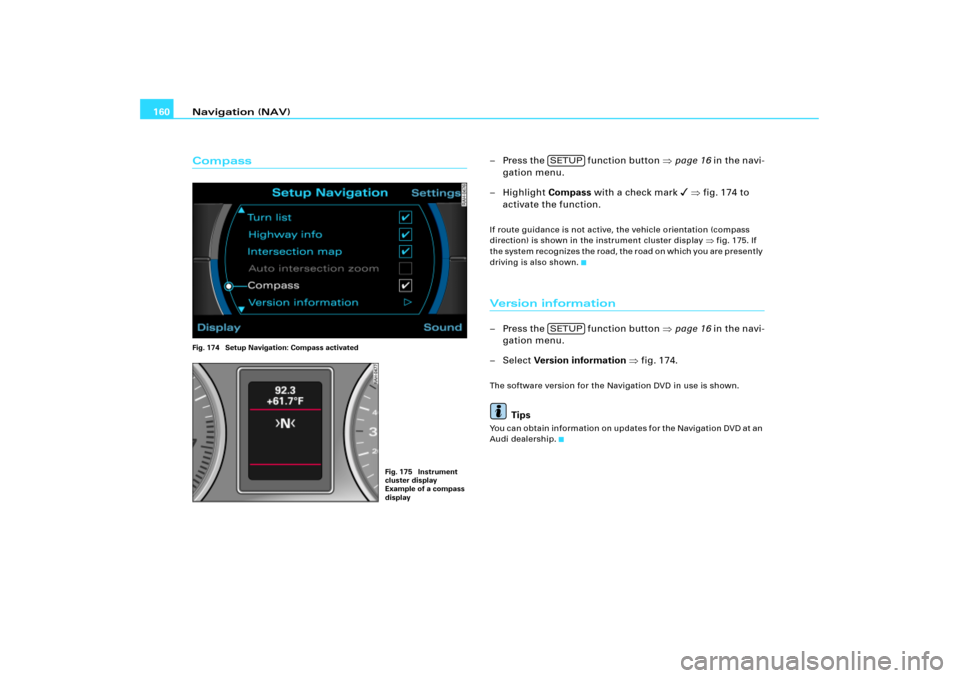
Navigation (NAV) 160CompassFig. 174 Setup Navigation: Compass activated
– Press the function button �page 16 in the navi-
gation menu.
– Highlight Compass with a check mark
� �fig.174 to
activate the function.
If route guidance is not active, the vehicle orientation (compass
direction) is shown in the instrument cluster display
�fig.175. If
the system recognizes the road, the road on which you are presently
driving is also shown.
Version information– Press the function button �page 16 in the navi-
gation menu.
– Select Version information �fig.174.The software version for the Navigation DVD in use is shown.
Tips
You can obtain information on updates for the Navigation DVD at an
Audi dealership.
Fig. 175 Instrument
cluster display
Example of a compass
display
SETUPSETUP
Page 166 of 194
Navigation (NAV)161
General operation
RADIO, CD
NAME, TEL
NAV, INFO
CAR, SETUP
Demo modeFig. 176 Setup Navigation: Activate demo mode– Press the function button �page 16 in the navi-
gation menu.
– Highlight Demo mode with a check mark
� �fig.176 to
activate the function.
The Demo mode provides a simulation of the route you entered. This
allows you to effectively plan and display your destination by
showing specific map content
�page 155 or route criteria
�page 141.
Map type “Position 3D”
�page 154 is not shown in Demo mode. If
you have selected map type “Position 3D”, the simulation is shown
in map type “current position”.
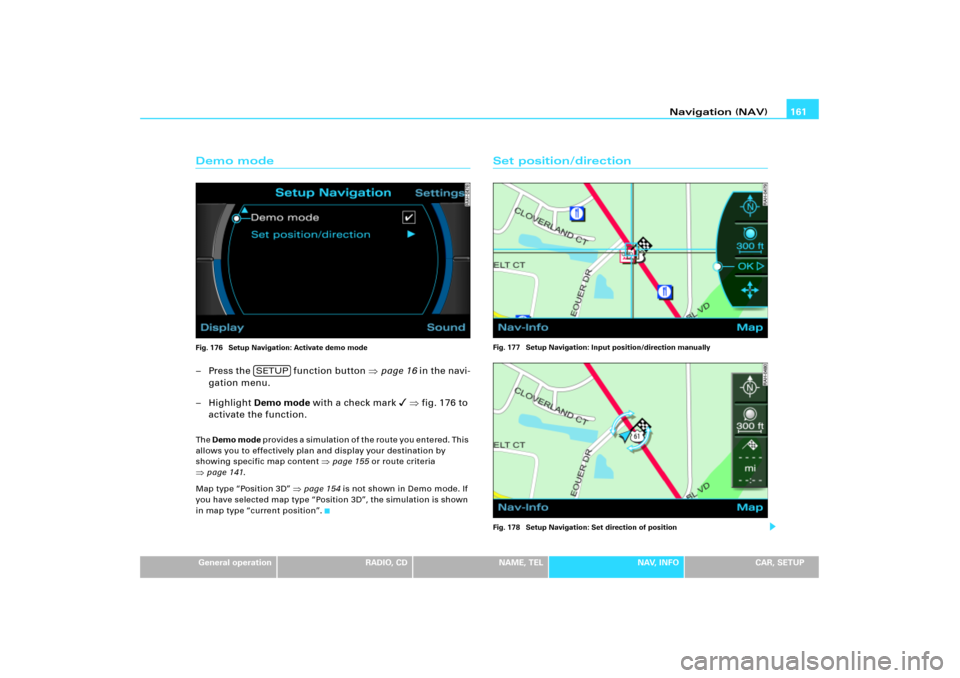
Set position/directionFig. 177 Setup Navigation: Input position/direction manually
Fig. 178 Setup Navigation: Set direction of position
SETUP
Page 167 of 194
 162
– In a destination input menu �page 117, fig.121, enter
the desired location data.
– Press the function button �page 16 in the navi-
gation menu.
– Select Set position/di")
Navigation (NAV) 162
– In a destination input menu �page 117, fig.121, enter
the desired location data.
– Press the function button �page 16 in the navi-
gation menu.
– Select Set position/direction �page 161, fig.176.
– Using the crosshairs �page 149 on the map, select the
desired starting point for route guidance on the map.
– In the active side meu, select OK �page 161, fig.177.
– Set the direction of the location �page 161, fig.178 by
rotating the control knob.
– When you press the control knob, the system automati-
cally jumps back to the the Setup Navigation menu.You can calculate the route from another position than the present
vehicle location.
We recommend entering the data for the starting point into a desti-
nation input menu
�page 117, fig.121 before you select the Set
position/direction. That way, the system will jump to the point
e n t e r e d i n t h e m a p d i s p l a y. I t i s e a s i e r t o s e t t h e l o c a t i o n o n t h e m a p
from this point.
You can search for the starting point using the crosshairs
�page 149.
You can enter the starting point manually to calculate future routes.
When you have set the location manually on the map, you can
switch to a destination input menu to enter the destination data.
Start route guidance in Demo mode to simulate route guidance �page 161.
Tips
It is only possible to set the location manually and to start route
guidance in Demo mode for a simulation if you vehicle is not
moving and GPS reception is not available
�page 110 (e.g. in an
underground parking garage).
SETUP
Page 168 of 194
Information (INFO)163
General operation
RADIO, CD
NAME, TEL
NAV, INFO
CAR, SETUP
Information (INFO)IntroductionSelecting information function
Navigation information can be selected using the
button.– Pr e s s t h e f u n c t i o n b u t t o n �page 16 t o d i s p l a y t h e
main information menu �fig.179.Th e m a i n i n f o r m a t i o n m e n u d i s p l a y s t h e s a m e i n fo r m a t i o n a s i n t h e
main function once the control button for the Nav-Info is
pressed.
Main information menuInformation data
Location and destination information can both be
displayed.Fig. 179 Info: Displaying the destination– Press the function button to display the main
information menu �fig.179. You are shown the destina-
tion or next stopover with address, estimated time of
arrival and distance.
– Rotate the control knob to the left. The data for the next
stopovers to the destination are displayed.
INFO
INFONAV
INFO
Page 169 of 194
Information (INFO) 164
– Rotate the control knob to the right. The data for your
current location with its geographical data and the
number of receivable satellites is displayed.The main information menu provides a display of your destination
with the following data:�
Destination
�
Stopovers
�
Estimated time of arrival
�
Distance to destination
�
Location of your vehicle
�
Geographic location of your vehicle (latitude, longitude)
�
Received satellites
The last navigation announcement will also be repeated.Tips
If you press the button within the Info function, you can
program sound and tuning settings using the control buttons and
adjust the brightness for the display
�page 169.
SETUP
Page 174 of 194

SETUP169
General operation
RADIO, CD
NAME, TEL
NAV, INFO
CAR, SETUP
SETUPIntroductionGeneral safety precautionsEnter vehicle settings only when the vehicle is stationary. The
procedures described below would distract your attention from
traffic if you performed them while driving. Please note
�page 9,
“Notes on Traffic Safety”.
Selecting Setup functionFig. 180 Display: Setup Radio
– Press the button in addition to a button already
pressed. The main Setup menu �fig.180 which is part
of the main function (e.g. radio) is displayed.
– Press one of the control buttons in a Setup main menu
�page 17 to go to the submenus for the Setup function
(in the example Radio to �fig.180).The Setup menu operates in conjunction with a function button
already pressed
�page 16 a n d o p e n s a d d i t i o n a l m e n u i t e m s f o r t h e
main function Radio, CD, MP3 and Navigation. By pressing the
control buttons, the Setup submenus Settings, Sound and Display
can be opened
�fig.180. These Setup submenus are always the
same, regardless of which Setup main function you are in.
SETUP
A1
A3
Page 175 of 194

SETUP 170The following submenus are available in the Setup
function:
Tips
You can read about system-specific Setup settings functions in the
description for each primary function.
Settings control buttonSetting the menu language
Display texts can be shown in different languages.Fig. 181 Setup: Menu language setting–Press the Settings control button in the Setup menu.
– Select Menu language �fig.181.
– Select the desired menu language.The display texts for the Navigation System are changed to the
selected language. The language for the audible navigation
commands are also changed.
The following languages can be selected:
Control button
functions �
page 169,
fig. 180
Setup submenus
Settings
Menu language
Distance unit
Time/Date format
Factory settings
Delete user data
Sound
Balance
Fader
Tr e b l e
Bass
DSP
a)b)
Volume settings (Navigation info)
a)Digital Signal Processingb)Vehicles with a BOSE® sound system in conjunction with an AudioPilot do
n o t h av e a D SP f un ct i o n. I n th is c as e y o ur v e hi cl e is equ ip p ed w i th d y n am ic
noise compensation �page 94.
Display
Switch off display
Brightness
A1A�A3
163
General operation
RADIO, CD
NAME, TEL
NAV, INFO
CAR, SETUP
Information (INFO)IntroductionSelecting information function
Navigation information can be selected using the
button.")
 164
– Rotate the control knob to the right. The data for your
current location with its geographical data and the
number of receivable satellites is displayed.The main informati")