2008 AUDI A5 engine
[x] Cancel search: enginePage 157 of 313
HomeLink155
Controls
Safety
Driving tips
General maintenance
Self-help
Technical data
At the operating unit
1. Switch on the ignition (do not start the engine).
2. Press and hold down the two outer HomeLink buttons
⇒page 154, fig. 171 until the indicator diode
⇒page 154, fig. 171 begins to flash after about
20 seconds. This procedure will delete the standard
factory settings and does not need to be repeated when
programming the other buttons.
3. Press the particular HomeLink button which you would
like to program.
4. Wait until the diode begins to flash. The HomeLink
module now remains in training mode for 5 minutes.
5. Now step in front of your vehicle with the original hand-
held transmitter for the garage door opener or any other
device you wish to assign to the HomeLink control
button.
At the radiator grille
6. Hold the original hand-held transmitter at or near the
centre of your car's radiator grille ⇒page 154, fig. 172.
7. Press the activator button on the original hand-held
transmitter.
8. As you do so, watch the turn signals on your vehicle.
HomeLink confirms successful programming by flashing
all four turn signals three times.
9. If the turn signals fail to flash three times, repeat the
procedure with the transmitter held at a different
distance from the radiator grille.
The proper distance between the hand-held transmitter and the
HomeLink module at the radiator grille depends on the system you
want to train. It may require several attempts.
The turn signals will flash once if the time limit for the programming
mode has been exceeded. In this case the programming procedure
needs to be performed again. Repeat the sequence at the operating
unit starting with step 3.
The programming instructions above also apply to the other control
buttons. Start with step 3 if you wish to proceed and program the
other two buttons.
If the garage door or other devices still fail to be activated with the
HomeLink control buttons after programming is completed, it is
possible that these systems might be working with a rolling code
instead of the normal fixed security code. If this is the case, a rolling
code programming is required in addition to the steps described
above. ⇒page 155Applies to vehicles: with HomeLinkRolling code programming
Some devices require rolling code programming of the
HomeLink universal transmitter.Identifying a rolling code
– Press the already programmed HomeLink button again
and hold it down.
–Watch HomeLink diode ⇒page 154, fig. 171. If the
diode starts flashing rapidly and turns into a constant
light after about 2 seconds, this indicates that the device
you wish to operate (e.g. a garage door opener) is
equipped with a rolling code.
– Program the rolling code as follows:
AA
AA
AA
document_0900452a8179700c.book Seite 155 Donnerstag, 22. März 2007 10:19 10
Page 158 of 313
HomeLink 156
Activating the garage door opener drive unit
– Locate the programming button on the garage door
drive. The exact location and colour of the button may
vary depending on the type of garage door opener.
– Press the programming button on the door drive unit
(this will normally cause a “programming mode indicator
lamp” on the unit to light up). You now have about 30
seconds to start and complete the programming of the
HomeLink control button on the operating unit.
Programming at the operating unit in the
headliner
– Press and release the already programmed HomeLink
button.
– Press the HomeLink button again to complete rolling
code programming.After programming at the operating unit in the headliner, the
garage door opener should recognize the HomeLink signal and
respond when the HomeLink button is pressed. Now the other
control buttons can be programmed as required.
Note
•
Having a second person assist you makes programming of the
rolling code easier and faster. For some makes of garage door
openers the HomeLink button may have to be pressed a third time
to complete the training sequence.
•
If you encounter problems programming the rolling code you
may find helpful information in the operating instructions of the
garage door opener or other device you wish to operate.
Applies to vehicles: with HomeLinkOperating HomeLink
The programmed devices are activated by means of the
HomeLink control buttons in the headliner.– Make sure that the ignition is on.
– Press the programmed HomeLink button ⇒page 154,
fig. 171. The device assigned to that button (e.g. garage
door) will be activated.The HomeLink indicator diode ⇒page 154, fig. 171 will light up
when you press the button.Applies to vehicles: with HomeLinkErasing the button programming
You can erase the complete HomeLink programming by
pressing the two outer buttons.– Switch on the ignition (do not start the engine).
– Press and hold down the two outer buttons until the indi-
cator diode starts to flash ⇒page 154, fig. 171.
– Then release the buttons.After the programming of the HomeLink buttons has been erased,
the system will return to the training mode and is ready to be re-
programmed at any time.
Note
•
Programmed buttons cannot be erased individually.
•
For security reasons it is advisable to erase the programming of
the HomeLink buttons prior to selling your vehicle.
document_0900452a8179700c.book Seite 156 Donnerstag, 22. März 2007 10:19 10
Page 198 of 313
Intelligent technology 196Intelligent technologyElectronic stabilisation program (ESP)General notes
The electronic stabilisation program increases the car's
stability on the road.The ESP is designed to enhance the control over the vehicle in crit-
ical handling situations, such as when accelerating and cornering.
It reduces the tendency to skid under all road conditions and
improves the stability and roadholding of the vehicle. The system
works at all speeds.The anti-lock brake system (ABS), the electronic differential lock
(EDL) and the traction control system (ASR) are all integrated into
the electronic stabilisation program.
How the system works
The ESP control unit processes data from the three integrated
systems. It also processes additional inputs provided by other high-
precision sensors. These register the vehicle's rotation about the
vertical axis (yaw rate), lateral acceleration, brake pressure and
steering wheel angle.
The system uses the steering wheel angle and road speed to calcu-
late the changes of direction intended by the driver, and constantly
compares them with the actual behaviour of the vehicle. If the
desired course is not being maintained (for instance, if the car is
starting to skid), then the ESP compensates automatically by
braking the appropriate wheel.
The forces acting on the braked wheel effectively bring the car back
to a stable condition. If the car is oversteering (rear wheels losing
grip first) the brake application is concentrated on the outside front
wheel; if the car is understeering (front wheels losing grip first), ESP
brakes the inside rear wheel. This automatic brake application is
accompanied by characteristic noises.
The ESP works in conjunction with the ABS ⇒page 197. If a
malfunction should occur in the ABS, the ESP will also be out of
action.
Switching on
The ESP is switched on automatically when the engine is started
and performs a self-test routine. As soon as this routine is complete,
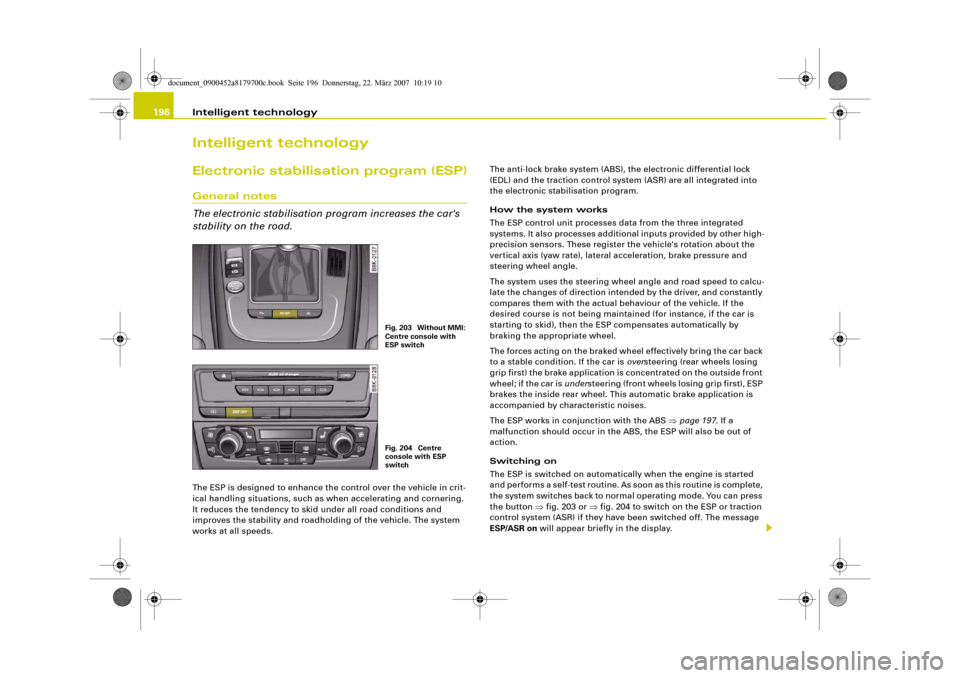
the system switches back to normal operating mode. You can press
the button ⇒fig. 203 or ⇒fig. 204 to switch on the ESP or traction
control system (ASR) if they have been switched off. The message
ESP/ASR on will appear briefly in the display.
Fig. 203 Without MMI:
Centre console with
ESP switchFig. 204 Centre
console with ESP
switch
document_0900452a8179700c.book Seite 196 Donnerstag, 22. März 2007 10:19 10
Page 200 of 313
Intelligent technology 198pedal very quickly, the brake assist system automatically boosts the
braking force to the maximum level, up to the point where the anti-
lock brake function (ABS) intervenes to stop the wheels from
locking. You should then keep the brake pedal pressed until the
vehicle has braked to the required speed. The brake assist system
switches itself off as soon as you release the brake pedal.
The brake assist system will not be operative if there is a malfunc-
tion in the ABS.
WARNING
Please remember that the accident risk always increases if you
drive too fast, especially in corners or on a slippery road, or if you
follow too close behind the vehicle in front of you. An increased
accident risk cannot be compensated even by the brake assist
system, so always be sure to maintain a safe speed.Traction control system (ASR)
The traction control system prevents the driven wheels
from spinning when the car is accelerating.General notes
The traction control system (ASR) is one of the functions incorpo-
rated in the electronic stabilisation program (ESP).
The traction control system (ASR) helps the car to start moving,
accelerate and climb a gradient in slippery conditions where this
may otherwise be difficult or even impossible.
How the system works
The ASR acts automatically i.e. without the driver's intervention.
With the aid of the ABS sensors ⇒page 197, the ASR monitors the
speed of the driven wheels. If the wheels start to spin, the engine
power is reduced automatically to match the amount of grip avail-
able. The system works at all speeds.The ASR works in conjunction with the ABS. If a malfunction should
occur in the ABS, the ASR will also be out of action.
Switching on
The ESP is switched on automatically when the engine is started
and performs a self-test routine. As soon as this routine is complete,
the system switches back to normal operating mode. If the traction
control system (ASR) has been deactivated (for one of the reasons
noted below) you can switch it back on manually by pressing the
switch ⇒page 196, fig. 203. The message ESP/ASR on will appear
briefly in the display. If the traction control system (ASR) has been
deactivated, it will switch back on automatically at a speed of about
70 km/h on vehicles with front-wheel drive.
You can switch the traction control system (ASR) on again if neces-
sary by pressing the switch ⇒page 196, fig. 203.
Switching off
If required, the ASR can also be switched off manually by pressing
the switch briefly ⇒page 196, fig. 203 (for less than 3 seconds). The
ESP warning lamp lights up when the traction control system (ASR)
is switched off, see ⇒page 16. The message ASR off will appear in
the display. For safety reasons, the system can only be switched off
at speeds below 50 km/h on vehicles with front-wheel drive. The
ASR can be deactivated at any speed on vehicles with four-wheel
drive.
The traction control system should normally remain switched on at
all times. It should only be switched off manually in particular
circumstances where a certain amount of wheel slip may be desir-
able. For example:
•
when driving with snow chains
•
when driving in deep snow or on loose surfaces
•
when rocking the car backwards and forwards to free it.
The ASR should be switched on again afterwards as soon as
possible.
document_0900452a8179700c.book Seite 198 Donnerstag, 22. März 2007 10:19 10
Page 201 of 313
Intelligent technology199
Controls
Safety
Driving tips
General maintenance
Self-help
Technical data
Note
To ensure that the ASR works properly, all four wheels must be fitted
with identical tyres. Any differences in the rolling radius of the tyres
can cause the system to reduce engine power when this is not
desired. Also refer to ⇒page 245, “Replacing wheels and tyres”.Electronic differential lock (EDL)
The electronic differential lock monitors the speed of the
driven wheels.General notes
The electronic differential lock (EDL) helps the car to start moving,
accelerate and climb a gradient in slippery conditions where this
may otherwise be difficult or even impossible.
How the system works
The EDL acts automatically. With the aid of the ABS sensors
⇒page 197, the system monitors the rotational speed of the driven
wheels on each axle. Whenever it detects a significant difference in
the speed of the driven wheels of one axle (for example, if the road is
slippery on one side) the system applies the brake to slow down the
spinning wheel so that more of the power is directed to the other
wheel of this axle (or to the three other wheels on vehicles with four-
wheel drive). This function is active up to about 100 km/h. The brake
system will make noises while it is working.
Driving away from a standstill
Sometimes one wheel has less grip and starts spinning, for
example, if one of the driven wheels is on ice. In this case, keep
pressing the accelerator gradually until the car starts moving, even
though the wheel with less grip will still spin.
Overheating of the brakes
To prevent the disc brake of the braked wheel from overheating, the
EDL cuts out automatically if subjected to excessive loads. The car remains operational and will behave in the same way as a car
without EDL.
The EDL will switch on again automatically when the brake has
cooled down.
WARNING
•
When accelerating on a uniformly slippery surface (for instance
all four wheels on ice or snow), press the accelerator gradually and
carefully. The driven wheels may otherwise start to spin (in spite
of the EDL), which would impair the car's stability and could lead
to an accident.
•
Even with EDL, you should always adjust your speed to suit the
conditions. Do not let the extra safety provided tempt you into
taking any risks when driving – this can cause accidents.Note
If the ABS warning lamp lights up, this can also mean there is a fault
in the EDL. Please contact a qualified workshop as soon as
possible.BrakesNew brake pads
New brake pads do not give full braking effect for the first 400 km,
they must first be “bedded in”. However, you can compensate for
the slightly reduced braking effect by applying more pressure on
the brake pedal. Avoid placing a heavy load on the brakes during the
running-in period.
We ar
The rate of wear on the brake pads depends a great deal on how you
drive and the conditions in which the vehicle is operated. Negative
document_0900452a8179700c.book Seite 199 Donnerstag, 22. März 2007 10:19 10
Page 202 of 313
Intelligent technology 200factors are, for instance, city traffic, frequent short trips or hard
driving with abrupt starts and stops.
Wet roads; road salt
When you are driving at a speed higher than 80 km/h and have the
windscreen wipers switched on the brake pads are very briefly
brought into contact with the brake discs. This automatic process
which goes unnoticed by the driver is carried out at regular intervals
and is intended to improve braking response in wet conditions.
In certain conditions, such as in heavy rain, or after washing the car
or driving through water, the full braking effect can be delayed by
moisture (or in winter by ice) on the discs and brake pads. The
brakes should be “dried” by pressing the pedal to restore full
braking effect.
The effectiveness of the brakes can also be temporarily reduced if
the car is driven for some distance without using the brakes when
there is a lot of salt on the road in winter. The layer of salt that accu-
mulates on the discs and pads can be removed with a few cautious
brake applications.
Corrosion
There may be a tendency for dirt to build up on the brake pads and
corrosion to form on the discs if the car is used infrequently, or if
you only drive low mileages without using the brakes very much.
If the brakes are not used frequently, or if corrosion has formed on
the discs, it is advisable to clean off the pads and discs by braking
firmly a few times from a moderately high speed ⇒.
Faults in the brake system
If the brake pedal travel should ever increase suddenly, this may
mean that one of the two brake circuits has failed. Drive immedi-
ately to the nearest qualified workshop and have the fault rectified.
On the way to the dealer, be prepared to use more pressure on the
brake pedal and allow for longer stopping distances.Low brake fluid level
Malfunctions can occur in the brake system if the brake fluid level is
too low. The brake fluid level is monitored electronically.
Brake servo
The brake servo amplifies the pressure you apply to the brake pedal.
It only works when the engine is running.
WARNING
•
When applying the brakes to clean off deposits on the pads and
discs, select a clear, dry road. Be sure not to inconvenience or
endanger other road users; do not risk an accident.
•
Never let the car coast with the engine switched off (this can
cause accidents).Caution
•
Never let the brakes “drag” by leaving your foot on the pedal
when you do not really intend to brake. This overheats the brakes,
resulting in longer stopping distances and greater wear.
•
Before driving down a long, steep gradient, it is advisable to
reduce speed and move the selector lever to a lower gear. In this
way you will make use of the engine braking effect and relieve the
load on the brakes. If you still have to use the brakes, it is better to
brake firmly at intervals than to apply the brakes continuously.Note
•
If the brake servo is out of action due to a malfunction, or if the
car has to be towed, you will have to press the brake pedal consid-
erably harder to make up for the lack of servo assistance.
•
If you wish to equip the car with accessories such as a front
spoiler or wheel covers, it is important that the flow of air to the
front wheels is not obstructed, otherwise the brakes can overheat.
document_0900452a8179700c.book Seite 200 Donnerstag, 22. März 2007 10:19 10
Page 203 of 313
Intelligent technology201
Controls
Safety
Driving tips
General maintenance
Self-help
Technical data
Power steering (servotronic)The power steering assists the driver when turning the
steering wheel (with the engine running).The power steering assists the driver by reducing the force needed
to turn the steering wheel. The degree of power assistance is
adapted electronically, depending on the speed.
If a fault should occur in the servotronic system the power steering
will still operate. The degree of power assistance will, however, no
longer adapt to different speeds. If the electronic regulating system
is not working properly, this is most noticeable when turning the
steering wheel at low speeds (for instance when parking) – more
effort will be required than usual. The fault should be corrected by
a qualified workshop as soon as possible.
The power steering does not function when the engine is switched
off. In this case the steering wheel is very hard to turn.
If the steering is held at its turning limit when the car is stationary,
this will place an excessive load on the power steering system. In
this case, the power steering system will make noises. It will also
reduce the idling speed of the engine.
Caution
Do not keep the steering in the full-lock position for longer than
15 seconds when the engine is running – this could cause damage
to the power steering system.
Note
•
If the power steering should fail at any time or the engine is
switched off (for instance when being towed), the car can still be
steered. However, more effort will be required to turn the steering
wheel.
•
If the system is leaking or malfunctioning, please take the car to
a qualified workshop as soon as possible.
•
The power steering requires a special hydraulic fluid. The fluid
reservoir is located at the front of the engine compartment on the
left ⇒page 232. The correct fluid level in the reservoir is important
for the power steering to function properly. The hydraulic fluid level
is checked at the Inspection Service.
Applies to vehicles: with four-wheel driveFour-wheel drive (quattro
®)
On quattro models the engine power is distributed to all
four wheelsGeneral notes
On four-wheel drive vehicles, the engine power is distributed to all
four wheels. The distribution of power is controlled automatically
according to your driving style and the road conditions. Also refer
to ⇒page 199, “Electronic differential lock (EDL)”.
The four-wheel drive is specially designed to complement the supe-
rior engine power of your Audi. This combination gives the car
exceptional handling and performance capabilities – both on
normal roads and in more difficult conditions, such as snow and ice.
Even so (or perhaps especially for this reason), it is important to
observe certain safety points ⇒.
Winter tyres
Thanks to its four-wheel drive, your car will have plenty of traction
in winter conditions, even with the standard tyres. Nevertheless, we
still recommend that winter tyres or all-season tyres should be fitted
on all four wheels when winter road conditions are expected, mainly
because this will give a better braking response.
Snow chains
On roads where snow chains are mandatory, this also applies to cars
with four-wheel drive ⇒page 248, “Snow chains”.
document_0900452a8179700c.book Seite 201 Donnerstag, 22. März 2007 10:19 10
Page 204 of 313
Intelligent technology 202Replacing tyres
On vehicles with four-wheel drive, all four tyres must have the same
rolling circumference. Also avoid using tyres with varying tread
depths ⇒page 245, “Replacing wheels and tyres”.
Off-roader?
Your Audi does not have enough ground clearance to be used as an
off-road vehicle. It is therefore best to avoid rough tracks and
uneven terrain as much as possible.
WARNING
•
Even with four-wheel drive, you should always adjust your
speed to suit the conditions. Do not let the extra safety provided
tempt you into taking any risks when driving – this can cause acci-
dents.
•
The braking ability of your car is limited by the grip of the tyres.
In this respect, your car is no different from a car without four-
wheel drive. So do not be tempted to drive too fast on icy or slip-
pery roads just because the car still has good acceleration in these
conditions (accident risk).
•
On wet roads bear in mind that the front wheels may start to
“aquaplane” and lose contact with the road if the car is driven too
fast. If this should happen, there will be no sudden increase in
engine speed to warn the driver, as with a front-wheel drive car. So
do not drive too fast in the wet: adjust your speed to suit the
conditions (accident risk).
Power managementThis system helps to ensure reliable starting
The power management controls the distribution of elec-
trical energy and thus helps to ensure that there is always
enough power available to start the engine.If a vehicle with a conventional electrical system is left parked for a
long time, the battery will gradually lose its charge because certain
electrical equipment (such as the immobiliser) continues to draw
current even when the ignition is off. In some cases there may not
be enough power available to start the engine.
Your vehicle is equipped with an intelligent power management
system to control the distribution of electrical energy. This signifi-
cantly improves reliability when starting the engine, and also
prolongs the life of the battery.
The main functions incorporated in the power management system
are battery diagnosis, residual current management and dynamic
power management.
Battery diagnosis
The battery diagnosis function constantly registers the condition of
the battery. Sensors detect the battery voltage, battery current and
battery temperature. This enables the system to calculate the
current power level and charge condition of the battery.
Residual current management
The residual current management reduces power consumption
while the vehicle is parked. It controls the supply of power to the
various electrical components while the ignition is switched off. The
system takes the battery diagnosis data into consideration.
Depending on the power level of the battery, the individual electrical
components are switched off one after the other to prevent the
battery from losing too much charge and to ensure that the engine
can be started reliably.
document_0900452a8179700c.book Seite 202 Donnerstag, 22. März 2007 10:19 10