2008 AUDI A5 tow
[x] Cancel search: towPage 207 of 313
Your vehicle and the environment205
Controls
Safety
Driving tips
General maintenance
Self-help
Technical data
Your vehicle and the environmentRunning inA new vehicle should be run in over a distance of 1,500 km. For the
first 1,000 km the engine speed should not exceed 2/3 of the
maximum permissible engine speed – do not use full throttle and do
not tow a trailer or caravan. From 1,000 to 1,500 km you can gradu-
ally increase the engine rpm and road speed.
During its first few hours of running, the internal friction in the
engine is greater than later on when all the moving parts have
bedded down.
How the vehicle is driven for the first 1,500 km also influences the
engine quality. After the first 1,500 km you should continue driving
at moderate engine speeds, in particular when the engine is cold.
This helps to reduce wear and tear on the engine and increases the
potential mileage which can be covered by the engine.
You should also avoid driving with the engine speed too low.
Change down to a lower gear when the engine no longer runs
“smoothly”. Excessively high engine speeds are prevented by an
automatic rev limiter.Emission control systemsCatalytic converter
Applies to vehicles with petrol engine: The vehicle must only be
used with unleaded petrol, otherwise the catalytic converter will be
destroyed.
Never run the tank completely dry. The irregular fuel supply can
cause misfiring, which would allow unburnt fuel to enter the
exhaust system, which could cause overheating and damage the
catalytic converter.Diesel particulate filter
Applies to vehicles with diesel engine: The diesel particulate filter
can filter out almost all soot particles contained in the exhaust gas.
In normal driving conditions the filter is self-cleaning. Should the
self-cleaning function of the filter not be able to operate, e.g. when
the vehicle is continuously used only for short trips, the filter
becomes obstructed with soot and the symbol
for the diesel
particulate filter lights up ⇒page 37.
WARNING
•
Because of the high temperatures which can occur in the emis-
sion control system (catalytic converter or diesel particulate
filter), do not park the vehicle where the exhaust can come into
contact with flammable materials under the car (e.g. on grass or
at the forest edge). - Fire hazard!
•
Do not apply any underseal agents in the area around the
exhaust system - fire hazard!
Driving abroadChanging over headlight dip settings
The asymmetric low beams of the headlights are designed to light
up the near side of the road more intensely. If you drive in a country
where traffic drives on the opposite side of the road to the home
country, this will dazzle oncoming traffic.
Headlights with halogen bulbs: To avoid dazzling oncoming traffic
you can apply opaque stickers to certain parts of the headlight
lenses.
Headlights with xenon gas-discharge bulbs*: The headlight dip
settings must be changed to avoid dazzling oncoming traffic. For
document_0900452a8179700c.book Seite 205 Donnerstag, 22. März 2007 10:19 10
Page 210 of 313
Towing a trailer 208Towing a trailerDriving the vehicle with a trailer or
caravanTechnical requirements
The towing bracket must comply with certain technical
requirements.Your car is intended mainly for transporting passengers and
luggage. However, if suitably equipped, it can also be used to tow a
trailer or caravan.
If the car is supplied with a factory-fitted towing bracket it will
already have the necessary technical modifications and meet the
statutory requirements.
A 13-pin socket is provided to make the electrical connection
between the car and the trailer. If the trailer has a 7-pin plug you can
use an adapter cable. This is available from Audi dealers.
WARNING
If a towing bracket is retrofitted, the installation should be carried
out by a qualified workshop.•
In particular in high outside temperatures it is not possible to
drive up long steep gradients without a suitable cooling system.
The engine would then overheat.
•
Incorrect installation can result in a safety risk.
Points to check before towingTrailer weights
Never exceed the maximum permitted trailer weights ⇒page 295.If you do not load the trailer up to the maximum permitted trailer
weight, you can then climb correspondingly steeper gradients.
The maximum trailer weights listed are only applicable for altitudes
up to 1000 m above sea level. With increasing altitude the engine
power and therefore the car's climbing ability are impaired because
of the reduced air density, so the maximum trailer weight has to be
reduced accordingly. The weight of the car and trailer must be
reduced by 10% for every further 1000 m (or part thereof). This
figure refers to the combined weight of the (loaded) vehicle and
(loaded) trailer.
The figures for the draw bar weight that appear on the identification
plate of the towing bracket are for certification purposes only. The
correct figures for your specific vehicle, which may be lower than
these figures for the towing bracket, are given in the registration
documents. Also refer to ⇒page 295.
Distributing the load
Distribute loads in the trailer so that heavy objects are as near to the
axle as possible. Loads carried in the trailer must be secured to
prevent them slipping.
Where possible, operate the trailer with the maximum permitted
draw bar weight on the ball joint of the towing bracket, but do not
exceed the specified limit.
Tyre pressure
Check the tyre pressures on your car and adjust for “full load” condi-
tions (refer to the sticker listing the tyre pressures on the end face
of the driver's door). It may also be necessary to adjust the tyre pres-
sures on the trailer according to the recommendations of the trailer
manufacturer.
Exterior mirrors
Check whether you can see enough of the road behind the trailer
with the standard mirrors. If this is not the case you should have
document_0900452a8179700c.book Seite 208 Donnerstag, 22. März 2007 10:19 10
Page 211 of 313
Towing a trailer209
Controls
Safety
Driving tips
General maintenance
Self-help
Technical data additional mirrors fitted. Both exterior mirrors should be mounted
on hinged extension brackets. Adjust the mirrors to give sufficient
vision to the rear.
Headlights
Before starting a journey, check the headlight beam settings with
the trailer hitched up. If necessary, alter the height of the headlight
beams by means of the headlight range control ⇒page 56.
Power supply
When you remove the ignition key the power supply to the trailer is
interrupted.
Removable ball joint coupling
Vehicles with a factory-fitted towing bracket are equipped with a
removable ball joint coupling. It is carried under the floor panel on
the left-hand side of the luggage compartment.
Note
We recommend having the car serviced between the normal inspec-
tion intervals if it used frequently for towing a trailer.Applies to vehicles: with towing bracketTrailer stabilisation system
Trailer stabilisation helps to reduce the risk of the vehicle
skidding when towing a trailer.When is the trailer stabilisation system activated?
Trailer stabilisation is active when the following requirements are
met:•
The ESP must NOT be switched off ⇒page 196,
•
The trailer connector must be properly secured in the vehicle
socket.
•
Vehicle speed must be higher than approx. 60 km/h.How trailer stabilisation works:
In many cases, the driver can stabilise a swaying trailer by manually
braking the vehicle.
However, if the ESP detects that the trailer is swaying and this is
affecting the towing vehicle, it will automatically brake the vehicle
to stabilise the trailer by slowing it down. The warning lamp
will
light up in the instrument cluster. If possible, do not turn the
steering wheel at this stage.
In order to warn traffic behind you, the brake lights will come on
during this automatic braking operation.
A trailer weighing less than 70% of the kerb weight of the towing
vehicle may sway quite considerably without the trailer stabilisation
system intervening. This can happen when the swaying movements
of the light-weight trailer are not or hardly passed on to the towing
vehicle and are therefore not detected by the ESP.
If the system for activating the trailer brake lights is defective, this
will be indicated in the instrument cluster display ⇒page 36, “Bulb
monitor ”.
Requirements for correct functioning of the trailer
stabilisation system
If these conditions are not met in full, the trailer stabilisation system
will only intervene to a limited extent or not at all ⇒.
•
The electrical connection between the towing vehicle and the
trailer must be functioning correctly, without any defects.
•
The load on the trailer must be properly secured.
•
The tyre pressures on both the vehicle and the trailer must be
adapted to the load that is being carried.
•
Where possible, operate the trailer with the maximum permitted
draw bar weight.
•
The trailer overrun brake must be set correctly. This is important
to ensure that the trailer can be braked correctly, to avoid the vehicle
and trailer “jack-knifing” and to prevent excess braking of the trailer.
document_0900452a8179700c.book Seite 209 Donnerstag, 22. März 2007 10:19 10
Page 212 of 313
Towing a trailer 210•
In low outside temperatures, both the towing vehicle and the
trailer should be fitted with winter tyres.
WARNING
It is essential that you adjust your speed to suit the weather, road
and traffic conditions. Do not let the trailer stabilisation system
tempt you into taking any risks when driving – this can cause acci-
dents.•
The ESP and trailer stabilisation system cannot defy the laws
of physics. This should be kept in mind, particularly on slippery
and wet roads and when towing a trailer with a light load.
•
The trailer stabilisation system is functional, regardless of
whether the trailer has a mechanical overrun brake or not.
•
The trailer stabilisation system is not always able to detect
swaying of trailers with a light load and will therefore not inter-
vene.
•
A trailer can still “jack-knife” on slippery roads with little grip,
even if the towing vehicle is equipped with the trailer stabilisation
system.
•
Trailers with a high centre of gravity may even tip over before
they start to sway sideways.
•
If you are not towing a trailer, but the trailer socket is being
used (e.g. for an illuminated bicycle rack), the trailer stabilisation
system may be activated in extreme driving conditions.
•
Please note the additional information and warnings
⇒page 210.
Notes on towing
Driving with a trailer always requires extra care.Weight distribution
Try to avoid towing a loaded trailer with an unladen vehicle. If this
cannot be avoided, drive extra slowly to allow for the unbalanced
weight distribution.
Speed
The stability of the car and trailer is reduced with increasing speed.
For this reason it is advisable not to drive at the maximum permis-
sible top speed in unfavourable road, weather or wind conditions.
This applies especially on a downhill gradient.
You should always reduce speed immediately if the trailer shows
the slightest sign of swaying. Never try to stop the swaying by accel-
erating further.
Always brake in good time. If the trailer has an overrun brake, apply
the brakes gently at first and then firmly. This will prevent the jerking
that can be caused by the trailer wheels locking. Change down in
good time before going down a steep hill so that you can use the
engine braking effect to slow down the vehicle.
Swaying and pitching can be reduced by stabiliser aids. We recom-
mend having stabiliser aids installed when towing trailers with a
high trailer weight. They can be purchased and installed at an Audi
dealer.
Overheating
When climbing long hills in hot weather with the engine running
fast in low gear, you should keep an eye on the coolant temperature
gauge ⇒page 11. Reduce speed immediately if the needle moves to
the top end of the scale. If the temperature warning lamp
in the
instrument cluster should start flashing, stop the car and let the
engine cool down by running it at idling speed for a few minutes.
document_0900452a8179700c.book Seite 210 Donnerstag, 22. März 2007 10:19 10
Page 213 of 313
Towing a trailer211
Controls
Safety
Driving tips
General maintenance
Self-help
Technical data
Accessories
Before mounting equipment and accessories (e.g. bicycle
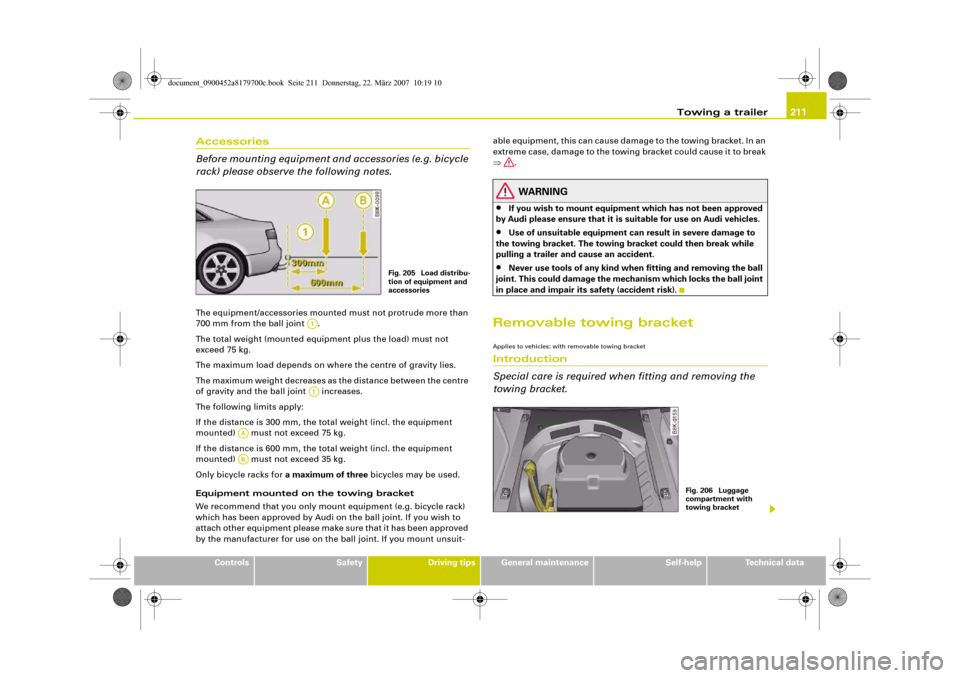
rack) please observe the following notes.The equipment/accessories mounted must not protrude more than
700 mm from the ball joint .
The total weight (mounted equipment plus the load) must not
exceed 75 kg.
The maximum load depends on where the centre of gravity lies.
The maximum weight decreases as the distance between the centre
of gravity and the ball joint increases.
The following limits apply:
If the distance is 300 mm, the total weight (incl. the equipment
mounted) must not exceed 75 kg.
If the distance is 600 mm, the total weight (incl. the equipment
mounted) must not exceed 35 kg.
Only bicycle racks for a maximum of three bicycles may be used.
Equipment mounted on the towing bracket
We recommend that you only mount equipment (e.g. bicycle rack)
which has been approved by Audi on the ball joint. If you wish to
attach other equipment please make sure that it has been approved
by the manufacturer for use on the ball joint. If you mount unsuit-able equipment, this can cause damage to the towing bracket. In an
extreme case, damage to the towing bracket could cause it to break
⇒.
WARNING
•
If you wish to mount equipment which has not been approved
by Audi please ensure that it is suitable for use on Audi vehicles.
•
Use of unsuitable equipment can result in severe damage to
the towing bracket. The towing bracket could then break while
pulling a trailer and cause an accident.
•
Never use tools of any kind when fitting and removing the ball
joint. This could damage the mechanism which locks the ball joint
in place and impair its safety (accident risk).
Removable towing bracketApplies to vehicles: with removable towing bracketIntroduction
Special care is required when fitting and removing the
towing bracket.
Fig. 205 Load distribu-
tion of equipment and
accessories
A1A1
AAAB
Fig. 206 Luggage
compartment with
towing bracket
document_0900452a8179700c.book Seite 211 Donnerstag, 22. März 2007 10:19 10
Page 214 of 313
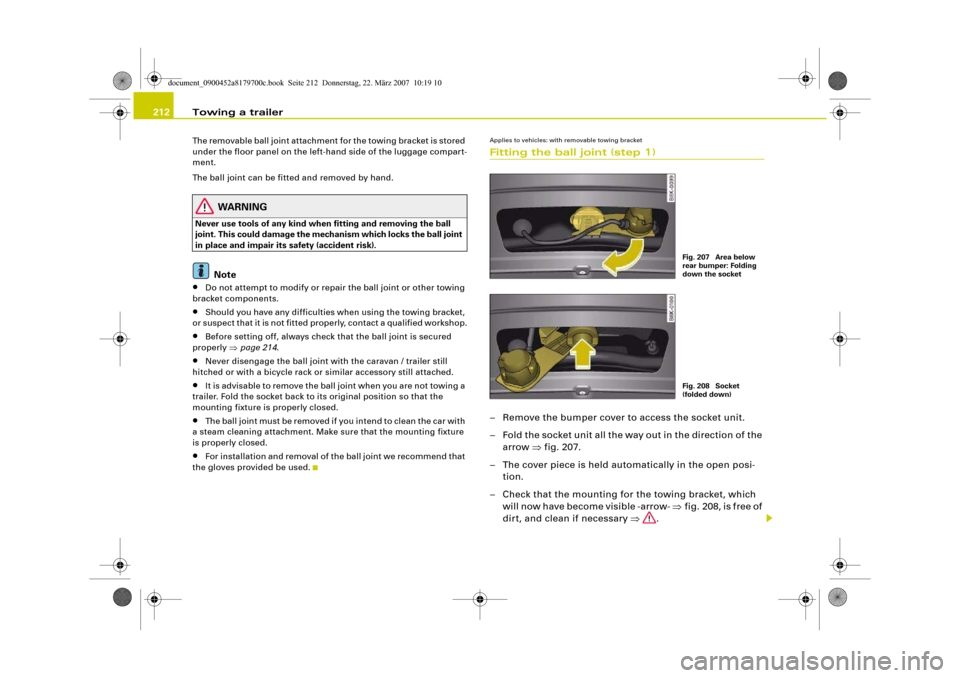
Towing a trailer 212The removable ball joint attachment for the towing bracket is stored
under the floor panel on the left-hand side of the luggage compart-
ment.
The ball joint can be fitted and removed by hand.
WARNING
Never use tools of any kind when fitting and removing the ball
joint. This could damage the mechanism which locks the ball joint
in place and impair its safety (accident risk).
Note
•
Do not attempt to modify or repair the ball joint or other towing
bracket components.
•
Should you have any difficulties when using the towing bracket,
or suspect that it is not fitted properly, contact a qualified workshop.
•
Before setting off, always check that the ball joint is secured
properly ⇒page 214.
•
Never disengage the ball joint with the caravan / trailer still
hitched or with a bicycle rack or similar accessory still attached.
•
It is advisable to remove the ball joint when you are not towing a
trailer. Fold the socket back to its original position so that the
mounting fixture is properly closed.
•
The ball joint must be removed if you intend to clean the car with
a steam cleaning attachment. Make sure that the mounting fixture
is properly closed.
•
For installation and removal of the ball joint we recommend that
the gloves provided be used.
Applies to vehicles: with removable towing bracketFitting the ball joint (step 1)– Remove the bumper cover to access the socket unit.
– Fold the socket unit all the way out in the direction of the
arrow ⇒fig. 207.
– The cover piece is held automatically in the open posi-
tion.
– Check that the mounting for the towing bracket, which
will now have become visible -arrow- ⇒fig. 208, is free of
dirt, and clean if necessary ⇒.
Fig. 207 Area below
rear bumper: Folding
down the socketFig. 208 Socket
(folded down)
document_0900452a8179700c.book Seite 212 Donnerstag, 22. März 2007 10:19 10
Page 215 of 313
Towing a trailer213
Controls
Safety
Driving tips
General maintenance
Self-help
Technical data
– Also check the shaft section of the ball joint and its asso-
ciated mechanical parts to make sure they are clean and
undamaged.Continued ⇒page 213, “Fitting the ball joint (step 2)”.
WARNING
It is important to keep the mounting fixture clean. Otherwise the
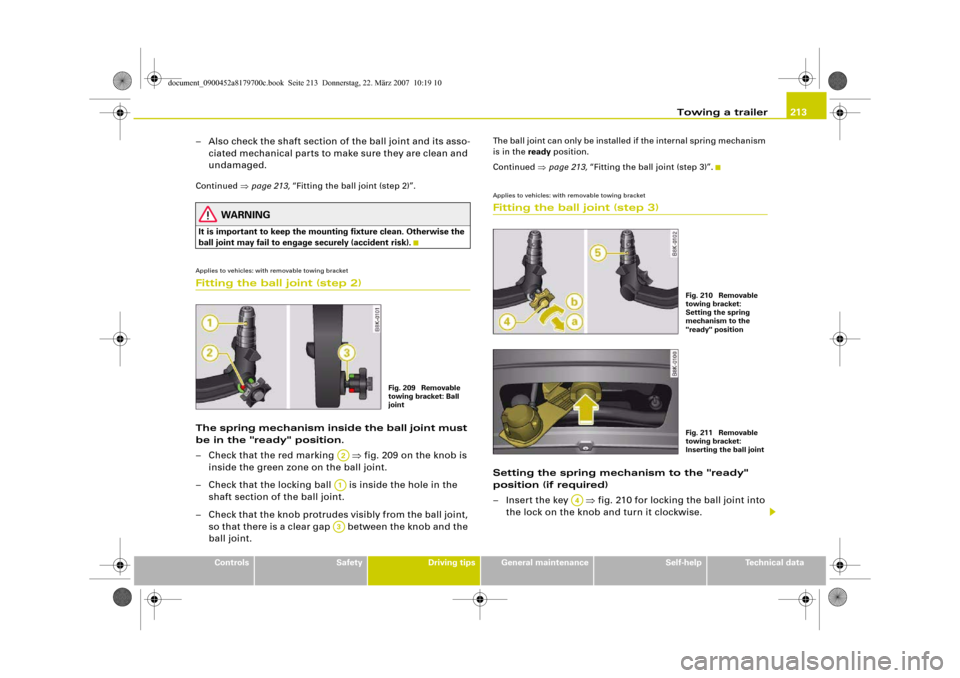
ball joint may fail to engage securely (accident risk).Applies to vehicles: with removable towing bracketFitting the ball joint (step 2)The spring mechanism inside the ball joint must
be in the "ready" position.
– Check that the red marking ⇒fig. 209 on the knob is
inside the green zone on the ball joint.
– Check that the locking ball is inside the hole in the
shaft section of the ball joint.
– Check that the knob protrudes visibly from the ball joint,
so that there is a clear gap between the knob and the
ball joint.
The ball joint can only be installed if the internal spring mechanism
is in the ready position.
Continued ⇒page 213, “Fitting the ball joint (step 3)”.Applies to vehicles: with removable towing bracketFitting the ball joint (step 3)Setting the spring mechanism to the "ready"
position (if required)
– Insert the key ⇒fig. 210 for locking the ball joint into
the lock on the knob and turn it clockwise.
Fig. 209 Removable
towing bracket: Ball
joint
A2A1A3
Fig. 210 Removable
towing bracket:
Setting the spring
mechanism to the
"ready" positionFig. 211 Removable
towing bracket:
Inserting the ball joint
A4
document_0900452a8179700c.book Seite 213 Donnerstag, 22. März 2007 10:19 10
Page 216 of 313
Towing a trailer 214
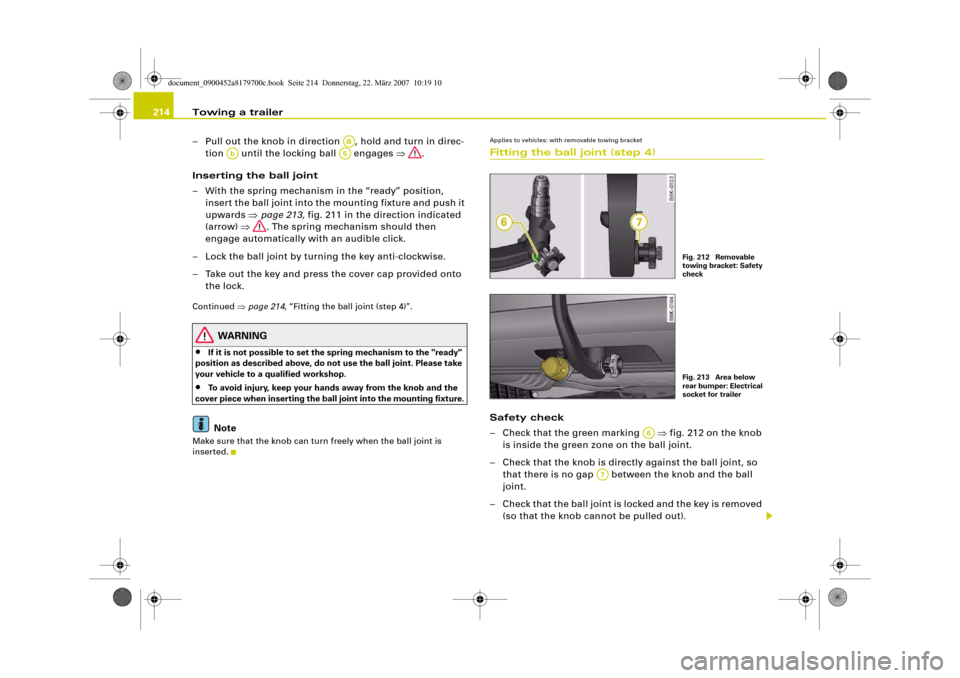
– Pull out the knob in direction , hold and turn in direc-
tion until the locking ball engages ⇒.
Inserting the ball joint
– With the spring mechanism in the “ready” position,
insert the ball joint into the mounting fixture and push it
upwards ⇒page 213, fig. 211 in the direction indicated
(arrow) ⇒. The spring mechanism should then
engage automatically with an audible click.
– Lock the ball joint by turning the key anti-clockwise.
– Take out the key and press the cover cap provided onto
the lock.Continued ⇒page 214, “Fitting the ball joint (step 4)”.
WARNING
•
If it is not possible to set the spring mechanism to the "ready"
position as described above, do not use the ball joint. Please take
your vehicle to a qualified workshop.
•
To avoid injury, keep your hands away from the knob and the
cover piece when inserting the ball joint into the mounting fixture.Note
Make sure that the knob can turn freely when the ball joint is
inserted.
Applies to vehicles: with removable towing bracketFitting the ball joint (step 4)Safety check
– Check that the green marking ⇒fig. 212 on the knob
is inside the green zone on the ball joint.
– Check that the knob is directly against the ball joint, so
that there is no gap between the knob and the ball
joint.
– Check that the ball joint is locked and the key is removed
(so that the knob cannot be pulled out).
Aa
Ab
A5
Fig. 212 Removable
towing bracket: Safety
checkFig. 213 Area below
rear bumper: Electrical
socket for trailer
A6
A7
document_0900452a8179700c.book Seite 214 Donnerstag, 22. März 2007 10:19 10