2008 AUDI A5 boot
[x] Cancel search: bootPage 274 of 313
Fuses and bulbs 272Fuses and bulbsFusesChanging a fuse
If a fuse has blown it must be replaced.– Identify the fuse for the failed component.
– Switch off the ignition and the component concerned.
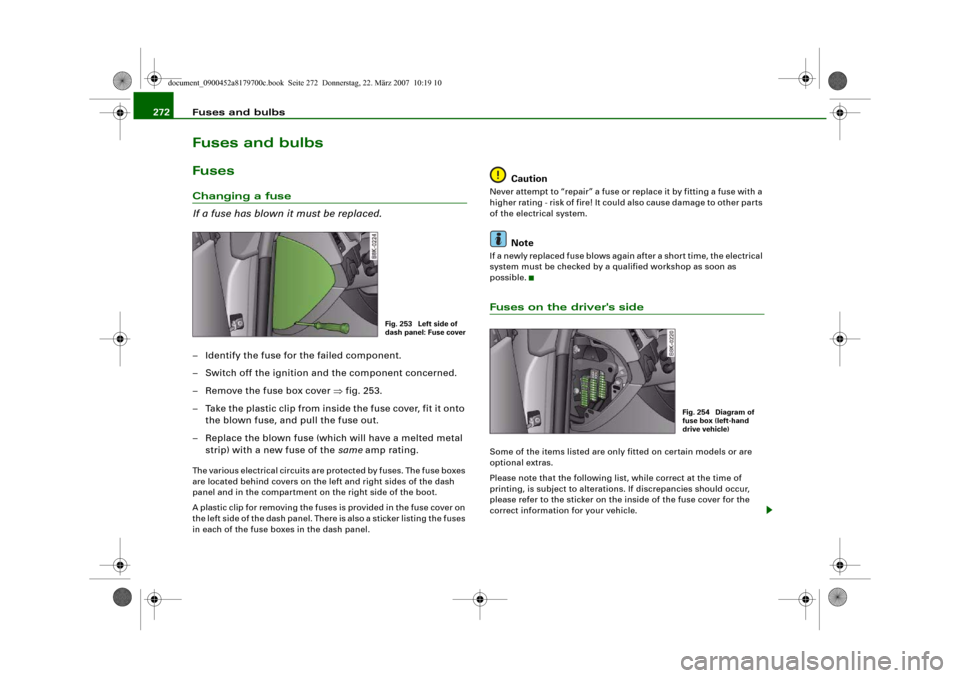
– Remove the fuse box cover ⇒fig. 253.
– Take the plastic clip from inside the fuse cover, fit it onto
the blown fuse, and pull the fuse out.
– Replace the blown fuse (which will have a melted metal
strip) with a new fuse of the same amp rating.The various electrical circuits are protected by fuses. The fuse boxes
are located behind covers on the left and right sides of the dash
panel and in the compartment on the right side of the boot.
A plastic clip for removing the fuses is provided in the fuse cover on
the left side of the dash panel. There is also a sticker listing the fuses
in each of the fuse boxes in the dash panel.
Caution
Never attempt to “repair” a fuse or replace it by fitting a fuse with a
higher rating - risk of fire! It could also cause damage to other parts
of the electrical system.
Note
If a newly replaced fuse blows again after a short time, the electrical
system must be checked by a qualified workshop as soon as
possible.Fuses on the driver's sideSome of the items listed are only fitted on certain models or are
optional extras.
Please note that the following list, while correct at the time of
printing, is subject to alterations. If discrepancies should occur,
please refer to the sticker on the inside of the fuse cover for the
correct information for your vehicle.
Fig. 253 Left side of
dash panel: Fuse cover
Fig. 254 Diagram of
fuse box (left-hand
drive vehicle)
document_0900452a8179700c.book Seite 272 Donnerstag, 22. März 2007 10:19 10
Page 278 of 313
Fuses and bulbs 276BulbsChanging bulbs
Changing bulbs requires a certain degree of practical
skill.You can change the following bulbs for exterior lights yourself:•
Halogen headlights: Bulb for dipped headlights
•
Halogen headlights: Bulb for main beam headlights
•
Halogen headlights: Bulb for side lights
•
Xenon headlights*: Bulb for turn signals
•
Bulb for fog light
•
Bulbs for rear lights in boot lid
•
Bulbs for rear lights in side panel
•
Bulbs for number plate light
The following bulbs should only be changed by a qualified work-
shop:
•
Halogen headlights: Bulb for turn signals
•
Xenon headlights*: Light source for daytime running
lights/parking lights
•
Bulb for headlights: Bi-xenon lights ⇒
•
Light source for turn signal in exterior mirror housing
•
Light source for high-level brake light
As a rule, you require a certain degree of practical skill to change
defective bulbs. This applies in particular to those bulbs which are
only accessible from the engine compartment.
If in doubt, we recommend that you have defective bulbs changed
by a qualified workshop or qualified mechanic.
If you do decide to change bulbs in the engine compartment your-
self, be aware of the safety risks involved ⇒page 231 ⇒.
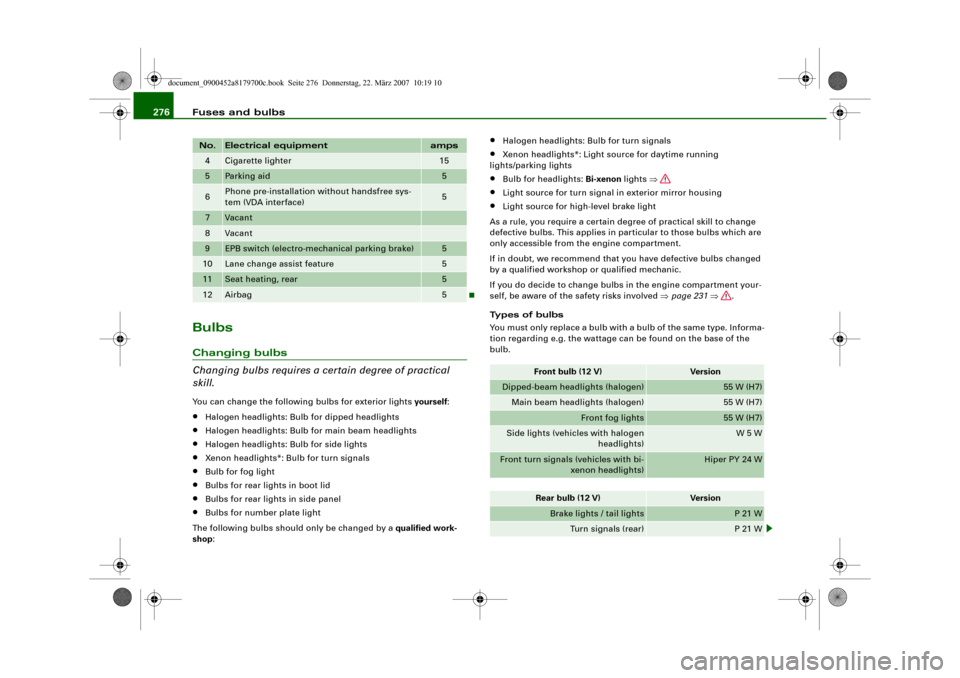
Types of bulbs
You must only replace a bulb with a bulb of the same type. Informa-
tion regarding e.g. the wattage can be found on the base of the
bulb.
4
Cigarette lighter
15
5
Parking aid
5
6
Phone pre-installation without handsfree sys-
tem (VDA interface)
5
7
Vacant
8
Vacant
9
EPB switch (electro-mechanical parking brake)
5
10
Lane change assist feature
5
11
Seat heating, rear
5
12
Airbag
5
No.
Electrical equipment
amps
Front bulb (12 V)
Vers io n
Dipped-beam headlights (halogen)
55 W (H7)
Main beam headlights (halogen)
55 W (H7)
Front fog lights
55 W (H7)
Side lights (vehicles with halogen
headlights)
W 5 W
Front turn signals (vehicles with bi-
xenon headlights)
Hiper PY 24 W
Rear bulb (12 V)
Vers io n
Brake lights / tail lights
P 21 W
Turn signals (rear)
P 21 W
document_0900452a8179700c.book Seite 276 Donnerstag, 22. März 2007 10:19 10
Page 286 of 313
Fuses and bulbs 284
– Insert the new bulb holder and turn it clockwise as far as
the stop ⇒page 278.After changing the bulb re-install all parts in the reverse sequence
and check that the bulb is working.Changing bulbs for rear lights in side
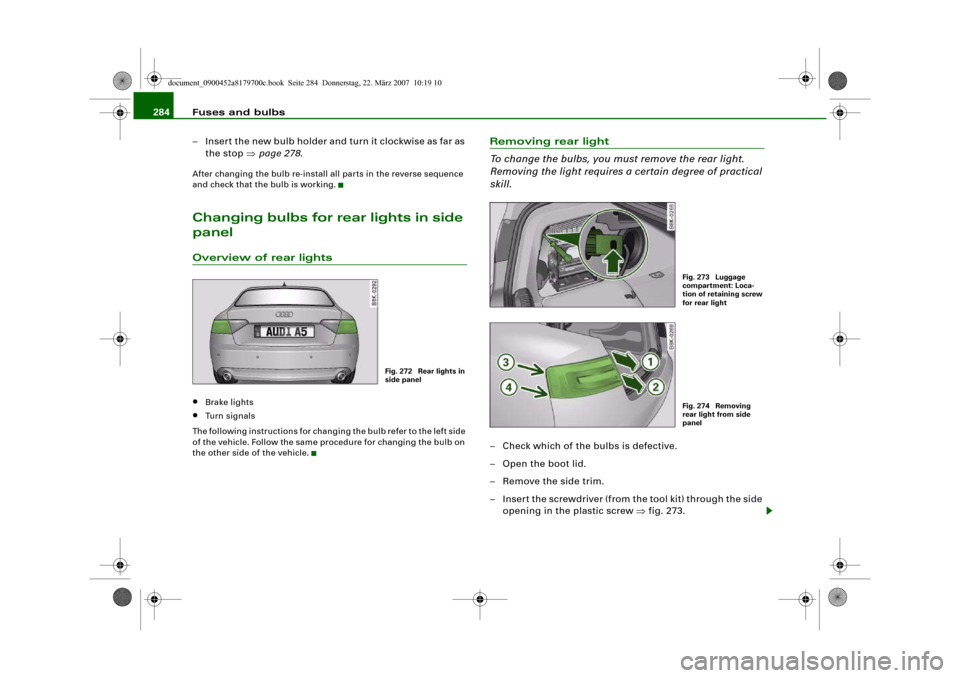
panelOverview of rear lights•
Brake lights
•
Turn signals
The following instructions for changing the bulb refer to the left side
of the vehicle. Follow the same procedure for changing the bulb on
the other side of the vehicle.
Removing rear light
To change the bulbs, you must remove the rear light.
Removing the light requires a certain degree of practical
skill.– Check which of the bulbs is defective.
– Open the boot lid.
– Remove the side trim.
– Insert the screwdriver (from the tool kit) through the side
opening in the plastic screw ⇒fig. 273.
Fig. 272 Rear lights in
side panel
Fig. 273 Luggage
compartment: Loca-
tion of retaining screw
for rear lightFig. 274 Removing
rear light from side
panel
document_0900452a8179700c.book Seite 284 Donnerstag, 22. März 2007 10:19 10
Page 288 of 313
Fuses and bulbs 286Installing rear light
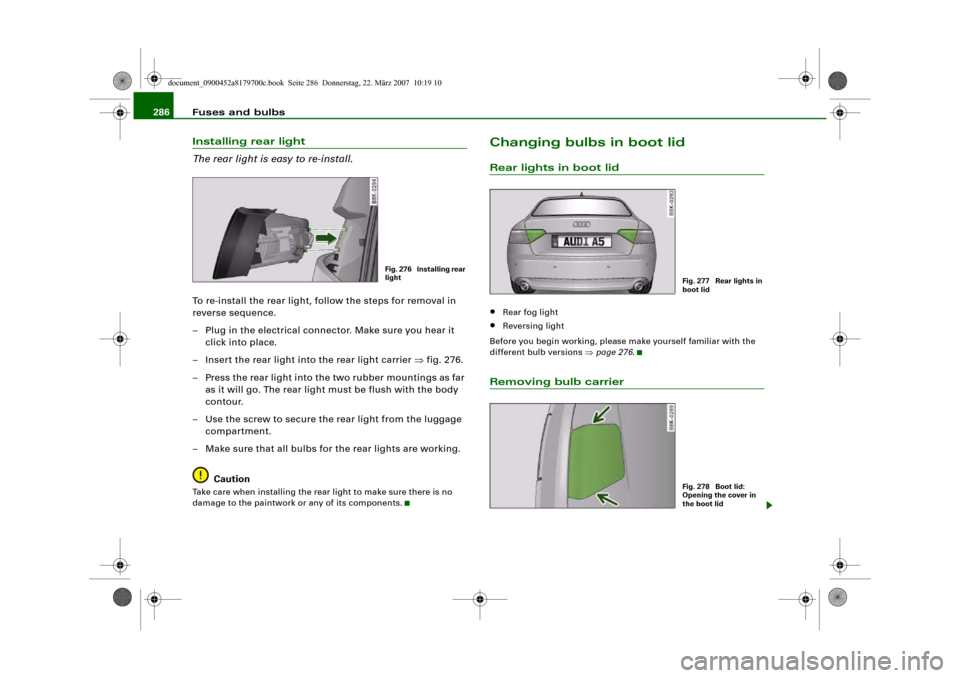
The rear light is easy to re-install.To re-install the rear light, follow the steps for removal in
reverse sequence.
– Plug in the electrical connector. Make sure you hear it
click into place.
– Insert the rear light into the rear light carrier ⇒fig. 276.
– Press the rear light into the two rubber mountings as far
as it will go. The rear light must be flush with the body
contour.
– Use the screw to secure the rear light from the luggage
compartment.
– Make sure that all bulbs for the rear lights are working.
CautionTake care when installing the rear light to make sure there is no
damage to the paintwork or any of its components.
Changing bulbs in boot lidRear lights in boot lid•
Rear fog light
•
Reversing light
Before you begin working, please make yourself familiar with the
different bulb versions ⇒page 276.
Removing bulb carrier
Fig. 276 Installing rear
light
Fig. 277 Rear lights in
boot lidFig. 278 Boot lid:
Opening the cover in
the boot lid
document_0900452a8179700c.book Seite 286 Donnerstag, 22. März 2007 10:19 10
Page 289 of 313
Fuses and bulbs287
Controls
Safety
Driving tips
General maintenance
Self-help
Technical data
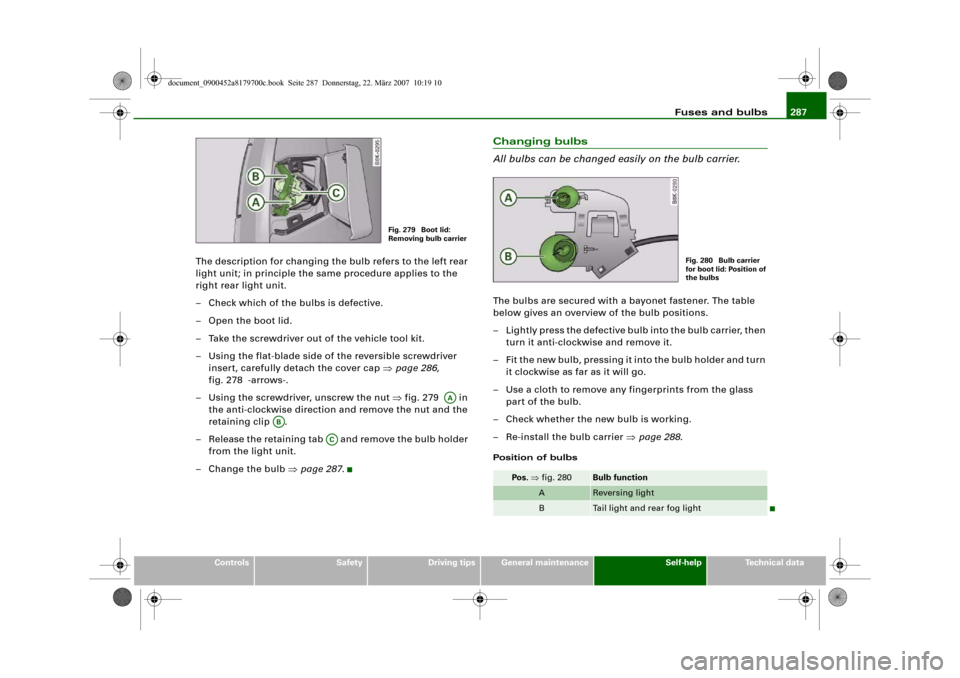
The description for changing the bulb refers to the left rear
light unit; in principle the same procedure applies to the
right rear light unit.
– Check which of the bulbs is defective.
– Open the boot lid.
– Take the screwdriver out of the vehicle tool kit.
– Using the flat-blade side of the reversible screwdriver
insert, carefully detach the cover cap ⇒page 286,
fig. 278 -arrows-.
– Using the screwdriver, unscrew the nut ⇒fig. 279 in
the anti-clockwise direction and remove the nut and the
retaining clip .
– Release the retaining tab and remove the bulb holder
from the light unit.
– Change the bulb ⇒page 287.
Changing bulbs
All bulbs can be changed easily on the bulb carrier.The bulbs are secured with a bayonet fastener. The table
below gives an overview of the bulb positions.
– Lightly press the defective bulb into the bulb carrier, then
turn it anti-clockwise and remove it.
– Fit the new bulb, pressing it into the bulb holder and turn
it clockwise as far as it will go.
– Use a cloth to remove any fingerprints from the glass
part of the bulb.
– Check whether the new bulb is working.
– Re-install the bulb carrier ⇒page 288.Position of bulbs
Fig. 279 Boot lid:
Removing bulb carrier
AA
AB
AC
Pos. ⇒fig. 280
Bulb function
A
Reversing light
B
Tail light and rear fog light
Fig. 280 Bulb carrier
for boot lid: Position of
the bulbs
document_0900452a8179700c.book Seite 287 Donnerstag, 22. März 2007 10:19 10
Page 290 of 313
Fuses and bulbs 288Installing bulb carrier
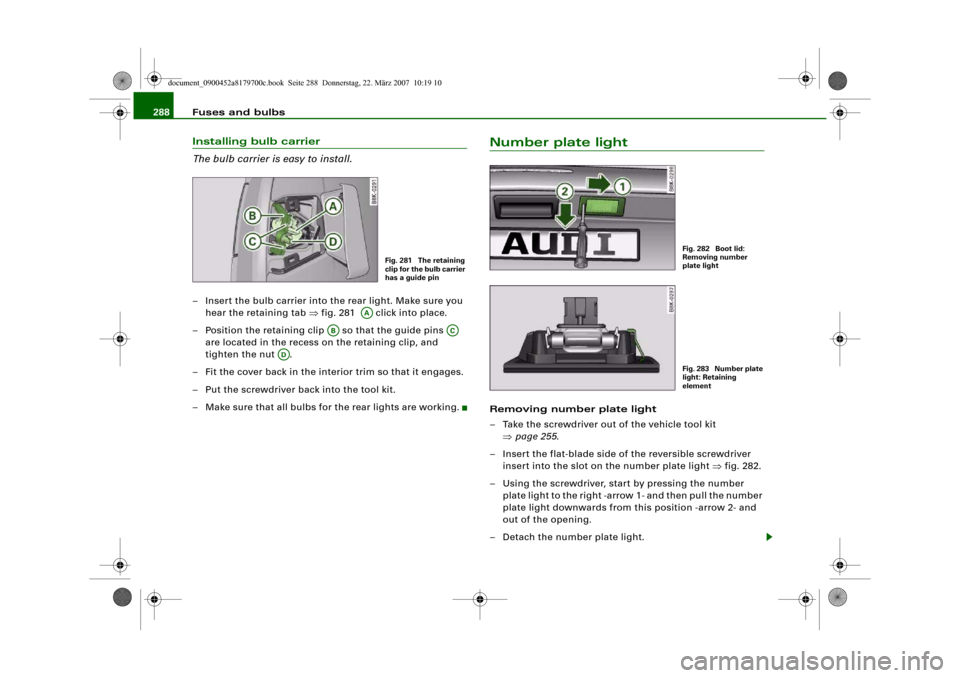
The bulb carrier is easy to install.– Insert the bulb carrier into the rear light. Make sure you
hear the retaining tab ⇒fig. 281 click into place.
– Position the retaining clip so that the guide pins
are located in the recess on the retaining clip, and
tighten the nut .
– Fit the cover back in the interior trim so that it engages.
– Put the screwdriver back into the tool kit.
– Make sure that all bulbs for the rear lights are working.
Number plate lightRemoving number plate light
– Take the screwdriver out of the vehicle tool kit
⇒page 255.
– Insert the flat-blade side of the reversible screwdriver
insert into the slot on the number plate light ⇒fig. 282.
– Using the screwdriver, start by pressing the number
plate light to the right -arrow 1- and then pull the number
plate light downwards from this position -arrow 2- and
out of the opening.
– Detach the number plate light.
Fig. 281 The retaining
clip for the bulb carrier
has a guide pin
AA
AB
AC
AD
Fig. 282 Boot lid:
Removing number
plate lightFig. 283 Number plate
light: Retaining
element
document_0900452a8179700c.book Seite 288 Donnerstag, 22. März 2007 10:19 10
Page 305 of 313
Index303
Controls
Safety
Driving tips
General maintenance
Self-help
Technical data Bicycle rack
Trailer . . . . . . . . . . . . . . . . . . . . . . . . . . 211
Biodiesel . . . . . . . . . . . . . . . . . . . . . . . . . . . 227
Bioethanol fuel . . . . . . . . . . . . . . . . . . . . . 227
Blower
Deluxe automatic air conditioner . . . . 96
Deluxe automatic air conditioner plus . .
105
Bonnet
Closing . . . . . . . . . . . . . . . . . . . . . . . . . 232
Opening . . . . . . . . . . . . . . . . . . . . . . . . 230
Releasing . . . . . . . . . . . . . . . . . . . . . . . 230
Boot
SeeLoading luggage compartment . 168
SeeLuggage compartment . . . . . . . . . 77
Boot lid
Central locking system . . . . . . . . . . . . . 48
Manual release . . . . . . . . . . . . . . . . . . . . 49
Brake system
Brake assist system . . . . . . . . . . . . . . . 197
Brake fluid . . . . . . . . . . . . . . . . . . . . . . 238
Brake light defective . . . . . . . . . . . . . . . 36
Brake pads worn . . . . . . . . . . . . . . . . . . 36
Brake servo . . . . . . . . . . . . . . . . . . . . . . 199
Electro-mechanical parking brake . . . 121
General notes . . . . . . . . . . . . . . . . . . . . 199
Malfunction . . . . . . . . . . . . . . . . . . . . . . 31
Warning lamp . . . . . . . . . . . . . . . . . . . . 19
Bulb holder
Bayonet fastener . . . . . . . . . . . . . . . . . 278
Bulb monitor . . . . . . . . . . . . . . . . . . . . . . . . 36Bulbs
Bayonet fastener . . . . . . . . . . . . . . . . . 277
Changing (general notes) . . . . . . . . . . 276
Bulbs, changing . . . . . . . . . . . . . . . . . . . . . 276
Brake lights . . . . . . . . . . . . . . . . . . . . . . 284
Bulb holder with bayonet fastener . 277,
278
Dipped headlights . . . . . . . . . . . . . . . . 280
Front fog lights . . . . . . . . . . . . . . . . . . 283
Main beam headlights . . . . . . . . . . . . 279
Number plate light . . . . . . . . . . . . . . . 288
Rear fog light . . . . . . . . . . . . . . . . . . . . 286
Rear lights . . . . . . . . . . . . . . . . . . . . . . 284
Reversing light . . . . . . . . . . . . . . . . . . . 286
Turn signals (rear) . . . . . . . . . . . . . . . . 284
Business equipment . . . . . . . . . . . . . . . . . 251
CCapacities . . . . . . . . . . . . . . . . . . . . . . . . . . 293
Car keys . . . . . . . . . . . . . . . . . . . . . . . . . . . . 39
Care of vehicle . . . . . . . . . . . . . . . . . . . . . . 220
Catalytic converter . . . . . . . . . . . . . . . . . . 205
Central locking system . . . . . . . . . . . . . . . . 42
Boot lid . . . . . . . . . . . . . . . . . . . . . . . . . . 48
Deadlock mechanism . . . . . . . . . . . . . . 46
Fuel tank flap . . . . . . . . . . . . . . . . . . . . 228
Locking . . . . . . . . . . . . . . . . . . . . . . . . . . 46
Locking and unlocking the vehicle from
inside . . . . . . . . . . . . . . . . . . . . . . . . . . 47
Manual locking . . . . . . . . . . . . . . . . . . . . 48
Opening and closing windows . . . . . . . 50
Switches on driver's door . . . . . . . . . . . 47
Unlocking . . . . . . . . . . . . . . . . . . . . . . . . 46Cetane number . . . . . . . . . . . . . . . . . . . . . 227
Changing a wheel . . . . . . . . . . . . . . . . . . . 260
Changing bulbs
SeeBulbs . . . . . . . . . . . . . . . . . . . . . . . . 276
Chassis number . . . . . . . . . . . . . . . . . . . . . 293
Child safety . . . . . . . . . . . . . . . . . . . . . . . . 185
Child safety seat . . . . . . . . . . . . . . . . . . . . 186
Child seat categories . . . . . . . . . . . . . . 186
Fitting . . . . . . . . . . . . . . . . . . . . . . . . . . 189
ISOFIX system . . . . . . . . . . . . . . . . . . . . 191
On front passenger's seat . . . . . . . . . . 186
Safety notes . . . . . . . . . . . . . . . . . . . . . 185
Cigarette lighter . . . . . . . . . . . . . . . . . . . . . . 87
Cleaning . . . . . . . . . . . . . . . . . . . . . . . . . . . 220
Cleaning Alcantara . . . . . . . . . . . . . . . . . . 226
Cleaning seat covers
Alcantara . . . . . . . . . . . . . . . . . . . . . . . . 226
Natural leather . . . . . . . . . . . . . . . . . . . 225
Textile covers . . . . . . . . . . . . . . . . . . . . 223
Cleaning textile covers and trim parts . . 223
Clock, setting . . . . . . . . . . . . . . . . . . . . . . . . 13
Closing
Bonnet . . . . . . . . . . . . . . . . . . . . . . . . . . 232
Coat hooks . . . . . . . . . . . . . . . . . . . . . . . . . . 92
Colour code . . . . . . . . . . . . . . . . . . . . . . . . 293
Compact temporary spare wheel
SeeSpare wheel . . . . . . . . . . . . . . . . . . 256
Compartment for (sun)glasses . . . . . . . . . 91
Compass in mirror . . . . . . . . . . . . . . . . . . . . 68
Controls and displays
Overview . . . . . . . . . . . . . . . . . . . . . . . . . . 9
Convenience close function . . . . . . . . . . . . 50
document_0900452a8179700c.book Seite 303 Donnerstag, 22. März 2007 10:19 10
Page 306 of 313
Index 304Convenience open function . . . . . . . . . . . 50
Cooling system
Anti-freeze additive . . . . . . . . . . . . . . . 235
Checking coolant level . . . . . . . . . . . . 236
Coolant . . . . . . . . . . . . . . . . . . . . . . . . . 235
Coolant temperature gauge . . . . . . . . . 11
Malfunction . . . . . . . . . . . . . . . . . . . . . . 32
Radiator fan . . . . . . . . . . . . . . . . . . . . . 237
Topping up coolant . . . . . . . . . . . . . . 236
Cruise control system
Adjusting speed . . . . . . . . . . . . . . . . . 127
Control lever on steering wheel . . . . 125
Cruise mode . . . . . . . . . . . . . . . . . . . . 126
Indicator lamp . . . . . . . . . . . . . . . . . . . . 17
Introduction . . . . . . . . . . . . . . . . . . . . . 125
Pre-selecting a speed . . . . . . . . . . . . . 128
Resuming cruise control . . . . . . . . . . 128
Safety notes . . . . . . . . . . . . . . . . . . . . . 125
Switching off . . . . . . . . . . . . . . . . . . . . 129
Switching off temporarily . . . . . . . . . 128
Cup holders . . . . . . . . . . . . . . . . . . . . . . . . . 85
Current fuel consumption . . . . . . . . . . . . . 25DDate display . . . . . . . . . . . . . . . . . . . . . . . . 13
Daytime running lights . . . . . . . . . . . . . . . 56
DCP
SeeDynamic gear control program . 133
Deactivating front passenger's airbag . . 183
Deadlock mechanism . . . . . . . . . . . . . . 43, 46
Defrosting windows . . . . . . . . . . . . . . 98, 107Deluxe automatic air conditioner . . . . . . . 93
Air distribution . . . . . . . . . . . . . . . . . . . 97
Air outlets . . . . . . . . . . . . . . . . . . . . . . . . 99
Air outlets for rear passengers . . . . . . 99
Air recirculation mode . . . . . . . . . . . . . 97
Automatic mode . . . . . . . . . . . . . . . . . . 95
Basic settings . . . . . . . . . . . . . . . . . . . 100
Blower . . . . . . . . . . . . . . . . . . . . . . . . . . 96
Controls . . . . . . . . . . . . . . . . . . . . . . . . . 94
Defrosting . . . . . . . . . . . . . . . . . . . . . . . 98
Description . . . . . . . . . . . . . . . . . . . . . . . 93
Economical operation . . . . . . . . . . . . . 100
Heated rear window . . . . . . . . . . . . . . . 98
Seat heating, front . . . . . . . . . . . . . . . 115
Supplementary heater . . . . . . . . . . . . 101
Switching on and off . . . . . . . . . . . . . . 95
Temperature . . . . . . . . . . . . . . . . . . . . . 96
Deluxe automatic air conditioner plus . . 101
AC mode . . . . . . . . . . . . . . . . . . . . . . . . 107
Air distribution . . . . . . . . . . . . . . . . . . 106
Air outlets . . . . . . . . . . . . . . . . . . . . . . . 108
Air outlets for rear passengers . . . . . 108
Air recirculation mode . . . . . . . . . . . . 106
Automatic mode . . . . . . . . . . . . . . . . . 104
Automatic recirculation . . . . . . . . . . . 110
Auxiliary heating . . . . . . . . . . . . . . . . . 111
Auxiliary heating - remote control . . 114
Auxiliary heating - running time . . . . 113
Basic settings . . . . . . . . . . . . . . . . . . . 109
Blower . . . . . . . . . . . . . . . . . . . . . . . . . 105
Controls . . . . . . . . . . . . . . . . . . . . . . . . 103
Defrosting . . . . . . . . . . . . . . . . . . . . . . 107
Description . . . . . . . . . . . . . . . . . . . . . . 101
Economical operation . . . . . . . . . . . . . 109Heated rear window . . . . . . . . . . . . . . 107
Supplementary heater . . . . . . . . . . . . 110
Switching on and off . . . . . . . . . . . . . . 104
Synchronisation . . . . . . . . . . . . . . . . . 110
Temperature . . . . . . . . . . . . . . . . . . . . 104
Diesel . . . . . . . . . . . . . . . . . . . . . . . . . . . . . 227
Diesel particulate filter . . . . . . . . . . . . 37, 205
Engine oil . . . . . . . . . . . . . . . . . . . . . . . 233
Digital clock . . . . . . . . . . . . . . . . . . . . . . . . . 13
Digital compass . . . . . . . . . . . . . . . . . . . . . 68
Digital speedometer . . . . . . . . . . . . . . . . . . 22
Dimensions . . . . . . . . . . . . . . . . . . . . . . . . 292
Dipped headlights . . . . . . . . . . . . . . . . . . . 54
Defective . . . . . . . . . . . . . . . . . . . . . . . . . 36
DIS
SeeDriver information system . . . . . . 20
Door catches/boot lid warning . . . . . . . . . 23
Doors
Manual locking . . . . . . . . . . . . . . . . . . . 48
Driver
SeeSitting position . . . . . . . . . . . . . . . 164
Driver information system . . . . . . . . . . . . . 20
Auto-check control . . . . . . . . . . . . . . . . 29
Bulb monitor . . . . . . . . . . . . . . . . . . . . . 36
CD and radio display . . . . . . . . . . . . . . . 21
Digital speedometer . . . . . . . . . . . . . . . 22
Door catches/boot lid warning . . . . . . 23
Driver messages . . . . . . . . . . . . . . . . . . 30
On-board computer . . . . . . . . . . . . . . . . 25
Outside temperature display . . . . . . . . 21
Red symbols . . . . . . . . . . . . . . . . . . . . . 30
Service interval display . . . . . . . . . . . . . 23
document_0900452a8179700c.book Seite 304 Donnerstag, 22. März 2007 10:19 10