2008 AUDI A5 ECO mode
[x] Cancel search: ECO modePage 135 of 313
Automatic gearbox133
Controls
Safety
Driving tips
General maintenance
Self-help
Technical data
– Press the brake pedal and at the same time press in the
interlock button.Automatic selector lever lock
The selector lever is locked in the P and N positions when the igni-
tion is on. The brake pedal must be depressed before the lever can
be moved out of either of these positions. The following message
appears in the instrument display as a reminder for the driver when
the selector lever is in position P or N:
WHEN STATIONARY APPLY FOOTBRAKE WHILE SELECTING GEAR.
The selector lever lock only works if the vehicle is stationary or
driving at speeds up to 5 km/h. At higher speeds the selector lever
lock in the N position is disengaged automatically.
The selector lever lock is not engaged if the selector lever is moved
quickly through position N (e.g. when shifting from R to D). This
makes it possible, for instance, to “rock” the vehicle backwards and
forwards if it is stuck in snow or mud. The selector lever lock
engages automatically if the brake pedal is not depressed and the
lever is in position N for more than about a second.
Interlock button
The interlock button on the selector lever handle prevents the driver
from inadvertently engaging particular gears. Press the button in to
disengage the selector lever lock. The illustration shows the selector
lever positions in which the button has to be pressed, highlighted in
colour ⇒page 132, fig. 146.
Safety interlock for ignition key
The key can only be withdrawn with the ignition switched off and
the selector lever in position P. When the ignition key is removed,
the selector lever is locked in position P.
Applies to vehicles: with multitronic®Kick-down feature
The kick-down feature is designed to give maximum
acceleration.When the accelerator pedal is pressed right down past the point of
resistance at full throttle, the gearbox will select a lower gear,
depending on road speed and engine speed. While you keep the
accelerator depressed the engine speed is automatically controlled
to give your vehicle maximum acceleration.
WARNING
Please note that if the road surface is slippery or wet, the kick-
down feature could cause the driving wheels to spin, which could
result in skidding.Applies to vehicles: with multitronic®Dynamic gear control program (DCP)
The multitronic
® gearbox is controlled electronically.
The vehicle is equipped with an electronically controlled gearbox.
The gear ratios are selected automatically according to preset gear-
shift programmes.
When you drive at moderate speeds the gearbox will select the most
economical shift programme. It will then change up early and delay
the downshifts to give better fuel economy.
If you drive at higher speeds with heavy acceleration, if you open the
throttle quickly, or if you use the kick-down or the car's maximum
speed, the gearbox will automatically select the more “sporty” shift
programmes.
The gearbox is self-adapting, and continuously selects the most
suitable shift programme. At the same time, the driver can also
make the gearbox switch to a more "sporty" programme by pressing
document_0900452a8179700c.book Seite 133 Donnerstag, 22. März 2007 10:19 10
Page 150 of 313
Audi parking system 148parking aid are NO LONGER activated when reverse gear is engaged.
This results in the following restrictions:
parking system:
There is no distance warning.
parking system plus*:
There is no rear distance warning ⇒page 138. However, the system
will still give a warning when obstacles are detected while driving
forwards. The graphic display ⇒page 138, fig. 153 will switch over
to towing mode.
parking system advanced*:
There is no rear distance warning ⇒page 140. However, the system
will still give a warning when obstacles are detected while driving
forwards. The graphic display ⇒page 141, fig. 155 will switch over
to towing mode. The image of the reversing camera will then be
shown without orientation lines and blue area markings.
SettingsApplies to vehicles: with parking systemAdjusting warning beeps
The volume and frequency (pitch) of the beeps can be
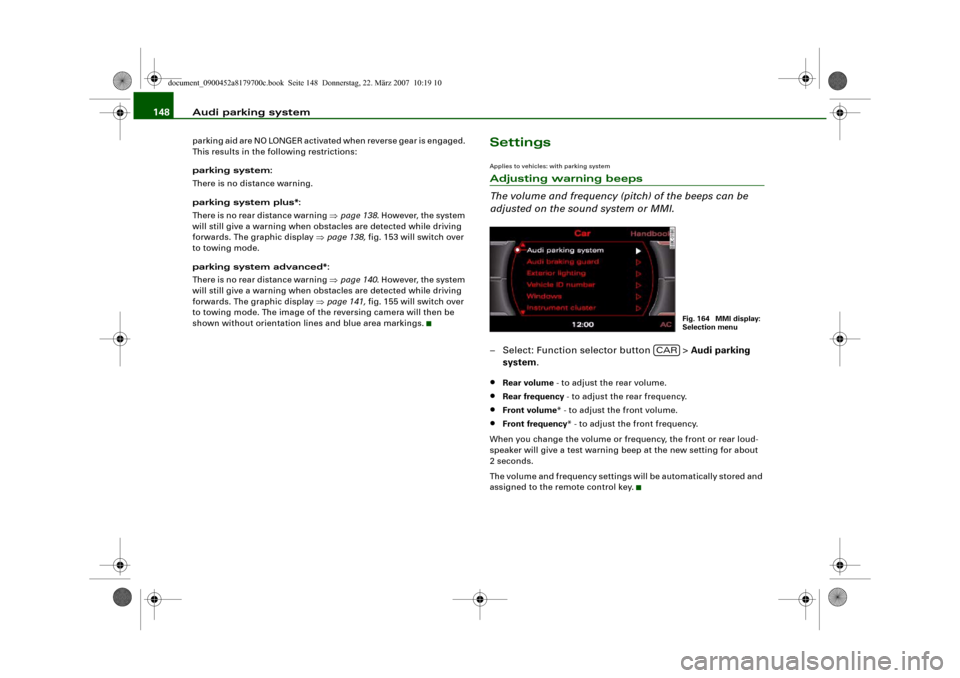
adjusted on the sound system or MMI.– Select: Function selector button > Audi parking
system.•
Rear volume - to adjust the rear volume.
•
Rear frequency - to adjust the rear frequency.
•
Front volume* - to adjust the front volume.
•
Front frequency* - to adjust the front frequency.
When you change the volume or frequency, the front or rear loud-
speaker will give a test warning beep at the new setting for about
2 seconds.
The volume and frequency settings will be automatically stored and
assigned to the remote control key.
Fig. 164 MMI display:
Selection menu
CAR
document_0900452a8179700c.book Seite 148 Donnerstag, 22. März 2007 10:19 10
Page 157 of 313
HomeLink155
Controls
Safety
Driving tips
General maintenance
Self-help
Technical data
At the operating unit
1. Switch on the ignition (do not start the engine).
2. Press and hold down the two outer HomeLink buttons
⇒page 154, fig. 171 until the indicator diode
⇒page 154, fig. 171 begins to flash after about
20 seconds. This procedure will delete the standard
factory settings and does not need to be repeated when
programming the other buttons.
3. Press the particular HomeLink button which you would
like to program.
4. Wait until the diode begins to flash. The HomeLink
module now remains in training mode for 5 minutes.
5. Now step in front of your vehicle with the original hand-
held transmitter for the garage door opener or any other
device you wish to assign to the HomeLink control
button.
At the radiator grille
6. Hold the original hand-held transmitter at or near the
centre of your car's radiator grille ⇒page 154, fig. 172.
7. Press the activator button on the original hand-held
transmitter.
8. As you do so, watch the turn signals on your vehicle.
HomeLink confirms successful programming by flashing
all four turn signals three times.
9. If the turn signals fail to flash three times, repeat the
procedure with the transmitter held at a different
distance from the radiator grille.
The proper distance between the hand-held transmitter and the
HomeLink module at the radiator grille depends on the system you
want to train. It may require several attempts.
The turn signals will flash once if the time limit for the programming
mode has been exceeded. In this case the programming procedure
needs to be performed again. Repeat the sequence at the operating
unit starting with step 3.
The programming instructions above also apply to the other control
buttons. Start with step 3 if you wish to proceed and program the
other two buttons.
If the garage door or other devices still fail to be activated with the
HomeLink control buttons after programming is completed, it is
possible that these systems might be working with a rolling code
instead of the normal fixed security code. If this is the case, a rolling
code programming is required in addition to the steps described
above. ⇒page 155Applies to vehicles: with HomeLinkRolling code programming
Some devices require rolling code programming of the
HomeLink universal transmitter.Identifying a rolling code
– Press the already programmed HomeLink button again
and hold it down.
–Watch HomeLink diode ⇒page 154, fig. 171. If the
diode starts flashing rapidly and turns into a constant
light after about 2 seconds, this indicates that the device
you wish to operate (e.g. a garage door opener) is
equipped with a rolling code.
– Program the rolling code as follows:
AA
AA
AA
document_0900452a8179700c.book Seite 155 Donnerstag, 22. März 2007 10:19 10
Page 158 of 313
HomeLink 156
Activating the garage door opener drive unit
– Locate the programming button on the garage door
drive. The exact location and colour of the button may
vary depending on the type of garage door opener.
– Press the programming button on the door drive unit
(this will normally cause a “programming mode indicator
lamp” on the unit to light up). You now have about 30
seconds to start and complete the programming of the
HomeLink control button on the operating unit.
Programming at the operating unit in the
headliner
– Press and release the already programmed HomeLink
button.
– Press the HomeLink button again to complete rolling
code programming.After programming at the operating unit in the headliner, the
garage door opener should recognize the HomeLink signal and
respond when the HomeLink button is pressed. Now the other
control buttons can be programmed as required.
Note
•
Having a second person assist you makes programming of the
rolling code easier and faster. For some makes of garage door
openers the HomeLink button may have to be pressed a third time
to complete the training sequence.
•
If you encounter problems programming the rolling code you
may find helpful information in the operating instructions of the
garage door opener or other device you wish to operate.
Applies to vehicles: with HomeLinkOperating HomeLink
The programmed devices are activated by means of the
HomeLink control buttons in the headliner.– Make sure that the ignition is on.
– Press the programmed HomeLink button ⇒page 154,
fig. 171. The device assigned to that button (e.g. garage
door) will be activated.The HomeLink indicator diode ⇒page 154, fig. 171 will light up
when you press the button.Applies to vehicles: with HomeLinkErasing the button programming
You can erase the complete HomeLink programming by
pressing the two outer buttons.– Switch on the ignition (do not start the engine).
– Press and hold down the two outer buttons until the indi-
cator diode starts to flash ⇒page 154, fig. 171.
– Then release the buttons.After the programming of the HomeLink buttons has been erased,
the system will return to the training mode and is ready to be re-
programmed at any time.
Note
•
Programmed buttons cannot be erased individually.
•
For security reasons it is advisable to erase the programming of
the HomeLink buttons prior to selling your vehicle.
document_0900452a8179700c.book Seite 156 Donnerstag, 22. März 2007 10:19 10
Page 191 of 313
Child safety189
Controls
Safety
Driving tips
General maintenance
Self-help
Technical data
Fitting child safety seatsGeneral information
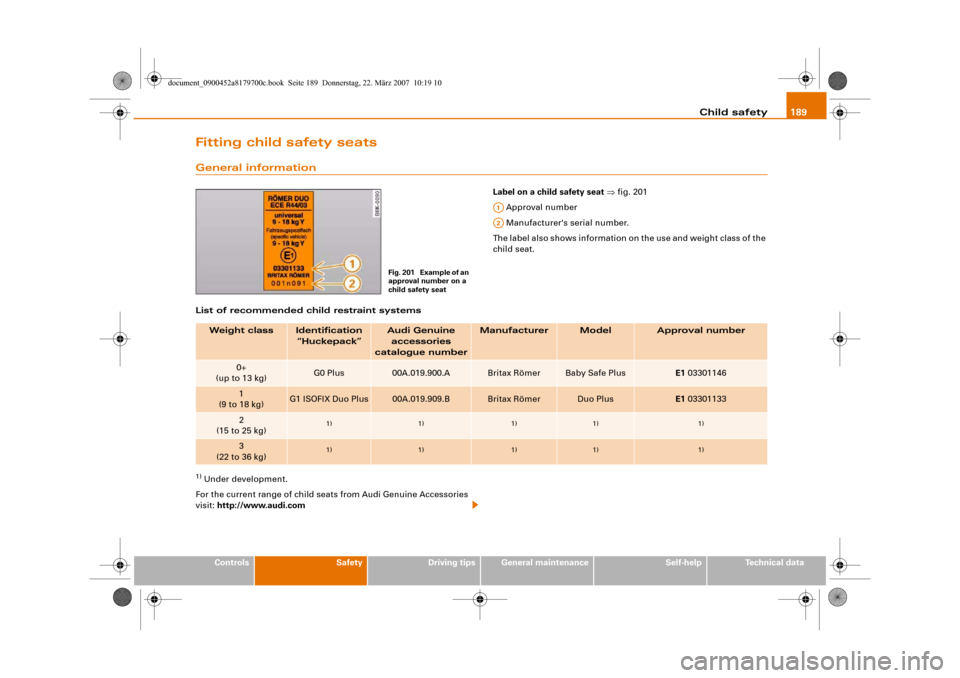
Label on a child safety seat ⇒fig. 201
Approval number
Manufacturer's serial number.
The label also shows information on the use and weight class of the
child seat.
List of recommended child restraint systems
1) Under development.
For the current range of child seats from Audi Genuine Accessories
visit: http://www.audi.com
Fig. 201 Example of an
approval number on a
child safety seat
A1A2
Weight class
Identification
“Huckepack”
Audi Genuine
accessories
catalogue number
Manufacturer
Model
Approval number
0+
(up to 13 kg)
G0 Plus
00A.019.900.A
Britax Römer
Baby Safe Plus
E1 03301146
1
(9 to 18 kg)
G1 ISOFIX Duo Plus
00A.019.909.B
Britax Römer
Duo Plus
E1 03301133
2
(15 to 25 kg)
1)
1)
1)
1)
1)
3
(22 to 36 kg)
1)
1)
1)
1)
1)
document_0900452a8179700c.book Seite 189 Donnerstag, 22. März 2007 10:19 10
Page 192 of 313
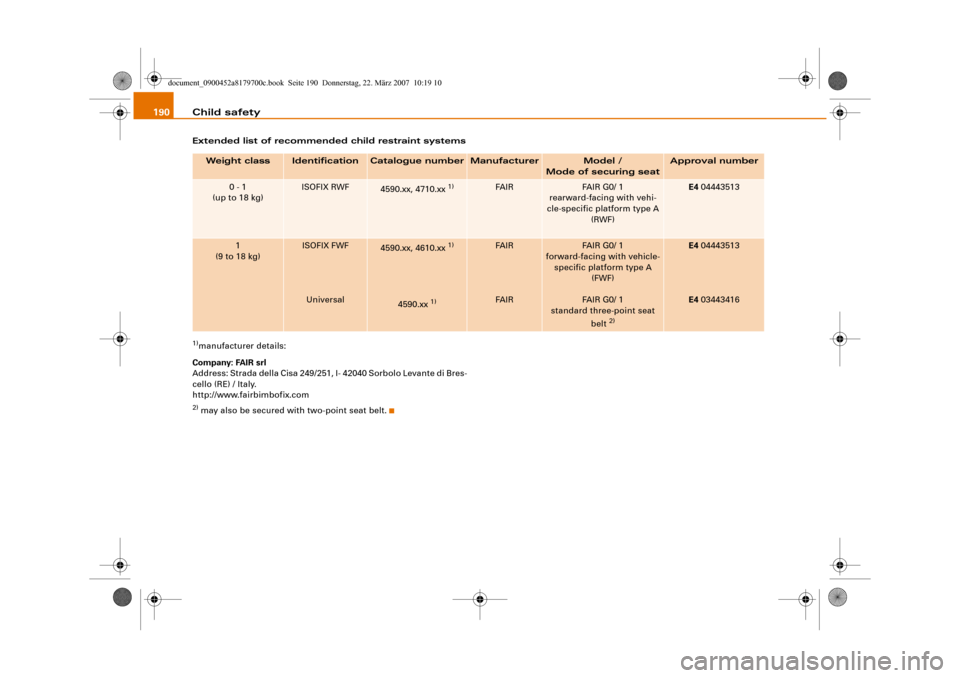
Child safety 190Extended list of recommended child restraint systems1)manufacturer details:
Company: FAIR srl
Address: Strada della Cisa 249/251, I- 42040 Sorbolo Levante di Bres-
cello (RE) / Italy.
http://www.fairbimbofix.com2) may also be secured with two-point seat belt.Weight class
Identification
Catalogue number
Manufacturer
Model /
Mode of securing seat
Approval number
0 - 1
(up to 18 kg)
ISOFIX RWF
4590.xx, 4710.xx
1)
FA I R
FAIR G0/ 1
rearward-facing with vehi-
cle-specific platform type A
(RWF)
E4 04443513
1
(9 to 18 kg)
ISOFIX FWF
Universal
4590.xx, 4610.xx
1)
4590.xx
1)
FA I R
FA I R
FAIR G0/ 1
forward-facing with vehicle-
specific platform type A
(FWF)
FAIR G0/ 1
standard three-point seat
belt
2)
E4 04443513
E4 03443416
document_0900452a8179700c.book Seite 190 Donnerstag, 22. März 2007 10:19 10
Page 200 of 313
Intelligent technology 198pedal very quickly, the brake assist system automatically boosts the
braking force to the maximum level, up to the point where the anti-
lock brake function (ABS) intervenes to stop the wheels from
locking. You should then keep the brake pedal pressed until the
vehicle has braked to the required speed. The brake assist system
switches itself off as soon as you release the brake pedal.
The brake assist system will not be operative if there is a malfunc-
tion in the ABS.
WARNING
Please remember that the accident risk always increases if you
drive too fast, especially in corners or on a slippery road, or if you
follow too close behind the vehicle in front of you. An increased
accident risk cannot be compensated even by the brake assist
system, so always be sure to maintain a safe speed.Traction control system (ASR)
The traction control system prevents the driven wheels
from spinning when the car is accelerating.General notes
The traction control system (ASR) is one of the functions incorpo-
rated in the electronic stabilisation program (ESP).
The traction control system (ASR) helps the car to start moving,
accelerate and climb a gradient in slippery conditions where this
may otherwise be difficult or even impossible.
How the system works
The ASR acts automatically i.e. without the driver's intervention.
With the aid of the ABS sensors ⇒page 197, the ASR monitors the
speed of the driven wheels. If the wheels start to spin, the engine
power is reduced automatically to match the amount of grip avail-
able. The system works at all speeds.The ASR works in conjunction with the ABS. If a malfunction should
occur in the ABS, the ASR will also be out of action.
Switching on
The ESP is switched on automatically when the engine is started
and performs a self-test routine. As soon as this routine is complete,
the system switches back to normal operating mode. If the traction
control system (ASR) has been deactivated (for one of the reasons
noted below) you can switch it back on manually by pressing the
switch ⇒page 196, fig. 203. The message ESP/ASR on will appear
briefly in the display. If the traction control system (ASR) has been
deactivated, it will switch back on automatically at a speed of about
70 km/h on vehicles with front-wheel drive.
You can switch the traction control system (ASR) on again if neces-
sary by pressing the switch ⇒page 196, fig. 203.
Switching off
If required, the ASR can also be switched off manually by pressing
the switch briefly ⇒page 196, fig. 203 (for less than 3 seconds). The
ESP warning lamp lights up when the traction control system (ASR)
is switched off, see ⇒page 16. The message ASR off will appear in
the display. For safety reasons, the system can only be switched off
at speeds below 50 km/h on vehicles with front-wheel drive. The
ASR can be deactivated at any speed on vehicles with four-wheel
drive.
The traction control system should normally remain switched on at
all times. It should only be switched off manually in particular
circumstances where a certain amount of wheel slip may be desir-
able. For example:
•
when driving with snow chains
•
when driving in deep snow or on loose surfaces
•
when rocking the car backwards and forwards to free it.
The ASR should be switched on again afterwards as soon as
possible.
document_0900452a8179700c.book Seite 198 Donnerstag, 22. März 2007 10:19 10
Page 203 of 313
Intelligent technology201
Controls
Safety
Driving tips
General maintenance
Self-help
Technical data
Power steering (servotronic)The power steering assists the driver when turning the
steering wheel (with the engine running).The power steering assists the driver by reducing the force needed
to turn the steering wheel. The degree of power assistance is
adapted electronically, depending on the speed.
If a fault should occur in the servotronic system the power steering
will still operate. The degree of power assistance will, however, no
longer adapt to different speeds. If the electronic regulating system
is not working properly, this is most noticeable when turning the
steering wheel at low speeds (for instance when parking) – more
effort will be required than usual. The fault should be corrected by
a qualified workshop as soon as possible.
The power steering does not function when the engine is switched
off. In this case the steering wheel is very hard to turn.
If the steering is held at its turning limit when the car is stationary,
this will place an excessive load on the power steering system. In
this case, the power steering system will make noises. It will also
reduce the idling speed of the engine.
Caution
Do not keep the steering in the full-lock position for longer than
15 seconds when the engine is running – this could cause damage
to the power steering system.
Note
•
If the power steering should fail at any time or the engine is
switched off (for instance when being towed), the car can still be
steered. However, more effort will be required to turn the steering
wheel.
•
If the system is leaking or malfunctioning, please take the car to
a qualified workshop as soon as possible.
•
The power steering requires a special hydraulic fluid. The fluid
reservoir is located at the front of the engine compartment on the
left ⇒page 232. The correct fluid level in the reservoir is important
for the power steering to function properly. The hydraulic fluid level
is checked at the Inspection Service.
Applies to vehicles: with four-wheel driveFour-wheel drive (quattro
®)
On quattro models the engine power is distributed to all
four wheelsGeneral notes
On four-wheel drive vehicles, the engine power is distributed to all
four wheels. The distribution of power is controlled automatically
according to your driving style and the road conditions. Also refer
to ⇒page 199, “Electronic differential lock (EDL)”.
The four-wheel drive is specially designed to complement the supe-
rior engine power of your Audi. This combination gives the car
exceptional handling and performance capabilities – both on
normal roads and in more difficult conditions, such as snow and ice.
Even so (or perhaps especially for this reason), it is important to
observe certain safety points ⇒.
Winter tyres
Thanks to its four-wheel drive, your car will have plenty of traction
in winter conditions, even with the standard tyres. Nevertheless, we
still recommend that winter tyres or all-season tyres should be fitted
on all four wheels when winter road conditions are expected, mainly
because this will give a better braking response.
Snow chains
On roads where snow chains are mandatory, this also applies to cars
with four-wheel drive ⇒page 248, “Snow chains”.
document_0900452a8179700c.book Seite 201 Donnerstag, 22. März 2007 10:19 10