2008 AUDI A5 clutch
[x] Cancel search: clutchPage 166 of 313
Safe driving 164Correct sitting positionsCorrect sitting position for driver
The correct driving position is important for safe and
fatigue-free driving.For your own safety, and to reduce the risk of injury in the
event of an accident, we recommend the following driving
position.
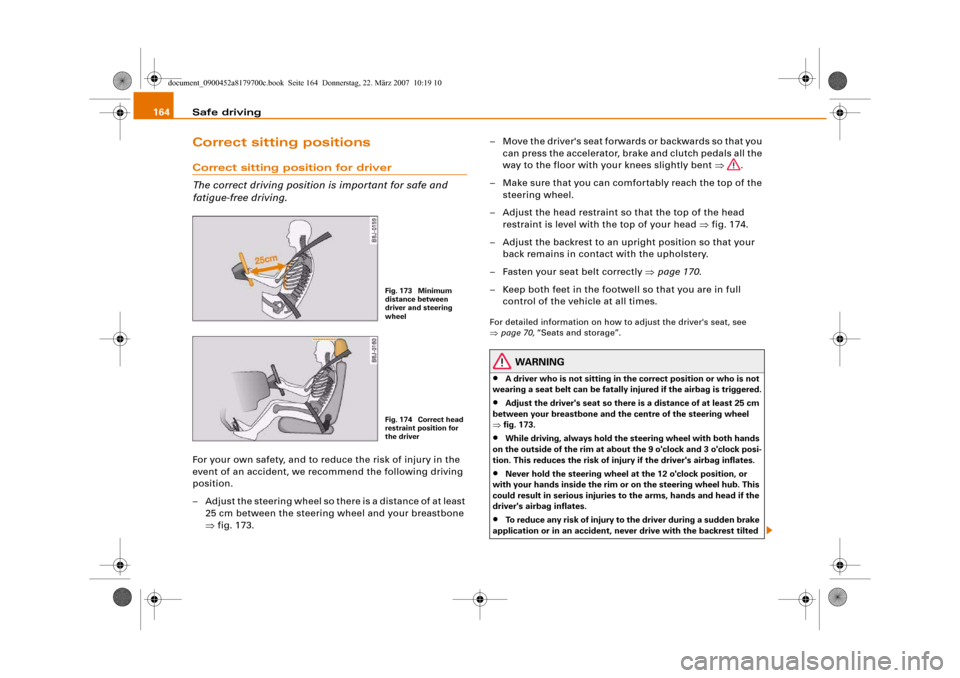
– Adjust the steering wheel so there is a distance of at least
25 cm between the steering wheel and your breastbone
⇒fig. 173.– Move the driver's seat forwards or backwards so that you
can press the accelerator, brake and clutch pedals all the
way to the floor with your knees slightly bent ⇒.
– Make sure that you can comfortably reach the top of the
steering wheel.
– Adjust the head restraint so that the top of the head
restraint is level with the top of your head ⇒fig. 174.
– Adjust the backrest to an upright position so that your
back remains in contact with the upholstery.
– Fasten your seat belt correctly ⇒page 170.
– Keep both feet in the footwell so that you are in full
control of the vehicle at all times.
For detailed information on how to adjust the driver's seat, see
⇒page 70, “Seats and storage”.
WARNING
•
A driver who is not sitting in the correct position or who is not
wearing a seat belt can be fatally injured if the airbag is triggered.
•
Adjust the driver's seat so there is a distance of at least 25 cm
between your breastbone and the centre of the steering wheel
⇒fig. 173.
•
While driving, always hold the steering wheel with both hands
on the outside of the rim at about the 9 o'clock and 3 o'clock posi-
tion. This reduces the risk of injury if the driver's airbag inflates.
•
Never hold the steering wheel at the 12 o'clock position, or
with your hands inside the rim or on the steering wheel hub. This
could result in serious injuries to the arms, hands and head if the
driver's airbag inflates.
•
To reduce any risk of injury to the driver during a sudden brake
application or in an accident, never drive with the backrest tilted
Fig. 173 Minimum
distance between
driver and steering
wheelFig. 174 Correct head
restraint position for
the driver
document_0900452a8179700c.book Seite 164 Donnerstag, 22. März 2007 10:19 10
Page 169 of 313
Safe driving167
Controls
Safety
Driving tips
General maintenance
Self-help
Technical data
Examples of incorrect sitting positions
Occupants can suffer severe or fatal injuries injuries if
they sit in an incorrect position while the vehicle is
moving.Seat belts can only provide maximum protection if the belt
webbing is positioned correctly. Sitting out of position
greatly reduces the effectiveness of the seat belts and
increases the risk of injury since the belt webbing is not
worn in the position for which it is designed. The driver is
responsible for the safety of all vehicle occupants, espe-
cially for children.
– Never allow anyone to sit out of position while the
vehicle is moving ⇒.The following list shows just some examples of incorrect sitting
positions which can be dangerous to all occupants. The list is not
complete, but will help to make you aware of possible dangers
which can be avoided.
Therefore, whenever the vehicle is moving:•
never stand up in the vehicle,
•
never stand on the seats,
•
never kneel on the seats,
•
never travel with the backrest reclined too far,
•
never lean against the dash panel,
•
never lie down on the rear seat,
•
never sit on the front edge of a seat,
•
never sit sideways,
•
never lean out of the window,
•
never put your feet out of the window,
•
never put your feet on the dash panel,
•
never put your feet on the seat cushion,
•
never ride in the footwell,
•
never travel on a seat without wearing the seat belt,
•
never climb into the luggage compartment.
WARNING
Sitting out of position increases the risk of severe injuries.•
Sitting out of position exposes the occupants to potentially
fatal injuries: if the airbags inflate they can strike any occupant
who is not in one of the designed seat positions.
•
Before starting a trip, sit in the correct position and stay in this
position as long as the vehicle is moving. Before every trip, make
sure all passengers are sitting in the correct positions and remain
correctly seated at all times ⇒page 70, “Seats and storage”.
Pedal are aPedal s
The pedals must always be free to move and must never
be obstructed by floor mats or any objects in the footwell.– Make sure that the accelerator, brake and clutch pedals
are not obstructed and can be pressed all the way down
to the floor.
– Make sure that all pedals are able to return freely to their
original positions.Only use floor mats which leave the pedal area free and can be
securely fastened in the footwell.
If one of the brake circuits should fail, increased brake pedal travel
will be required to bring the vehicle safely to a stop.
document_0900452a8179700c.book Seite 167 Donnerstag, 22. März 2007 10:19 10
Page 239 of 313
Checking and topping up fluids237
Controls
Safety
Driving tips
General maintenance
Self-help
Technical data
– Add coolant.
– Screw the cap on again tightly.Make sure that the coolant meets the required specifications
⇒page 235, “Coolant”. Do not use a different type of additive if anti-
freeze additive G12+, G12 or G11 is not available. In this case use
only water and bring the coolant concentration back up to the
correct level as soon as possible by putting in the specified additive.
Always top up with fresh, unused coolant.
Do not fill above the “MAX” mark. Excess coolant is forced out of the
system through the valve in the filler cap when the engine gets hot.
If a lot of coolant has been lost, wait for the engine to cool down
before putting in cold coolant. Failure to do so could result in
serious engine damage.
WARNING
•
The cooling system is under pressure. Do not unscrew the cap
on the expansion tank when the engine is hot: you could be
scalded by escaping steam
•
The coolant and coolant additive can be a health hazard. Store
the coolant additive in the original container in a safe place out of
reach of children – risk of poisoning.For the sake of the environment
Drained off coolant should not be used again. Drain off the used
coolant into a suitable container and dispose of it in the proper
manner (observe environmental regulations).
Radiator fan
The radiator fan can start running spontaneously.The radiator fan is driven by the engine via a poly V-belt. The speed
of the fan is varied by a viscous clutch according to the temperature.
There is also an auxiliary electric fan, which cuts in automatically
whenever the temperature of the coolant and the engine compart-
ment rises above a certain level.
The auxiliary fan can continue to run for as long as 10 minutes after
stopping the engine – even after the ignition is switched off. It may
also start running suddenly ⇒ after a while if•
residual heat raises the coolant temperature, or
•
the hot engine compartment is additionally heated up by the
sun.
WARNING
When working in the engine compartment be aware that the radi-
ator fan may start running suddenly – risk of injury.
document_0900452a8179700c.book Seite 237 Donnerstag, 22. März 2007 10:19 10
Page 269 of 313
Self-help267
Controls
Safety
Driving tips
General maintenance
Self-help
Technical data terminal must not touch metal parts of the vehicle: this can cause
short circuiting.
•
Do not bend over the batteries – risk of acid burns.
•
The screw plugs on the battery cells must be screwed in firmly.
•
Keep sparks, flame and lighted cigarettes away from batteries:
the gases given off can cause an explosion.
•
If jump-starting another vehicle, position the jump leads in
such a way that they cannot come into contact with any moving
parts in the engine compartment of the other vehicle.Caution
Please note that the above method of connecting the leads is meant
for jump-starting your vehicle. If jump-starting another vehicle, you
should not connect the negative lead (–) to the negative terminal of
the discharged battery, but directly to the engine block or a solid
metal part bolted to the engine block. If the battery of the other
vehicle does not have a gas vent, there is a risk that a mixture of
oxygen and hydrogen gas can accumulate and cause an
explosion.Tow-starting and towing awayGeneral notes
Points to observe when tow-starting or towing awayIf you use a towrope:
Notes for the driver of the towing vehicle
– The towrope must be taut before driving off.– Engage the clutch very gently when starting to move; on
vehicles with automatic gearbox press the accelerator
slowly.
Notes for the driver of the towed vehicle
– The ignition should be switched on so that the turn
signals, horn, windscreen wipers and washers can be
used. Please ensure that the steering wheel is unlocked
when you switch on the ignition, and that it moves freely.
–Put gear lever in neutral (manual gearbox) or move
selector lever to position N (automatic gearbox).
– The brake servo and power steering only work when the
engine is running. Considerably more effort is required
on the brake pedal and steering wheel when the engine
is switched off.
– Ensure that the towrope remains taut at all times when
towing.
Towrope or towbar
It is easier and safer to tow a vehicle with a towbar. You should only
use a towrope if you do not have a towbar.
A towrope should be slightly elastic to reduce the loading on both
vehicles. It is advisable to use a towrope made of synthetic fibre or
similar material.
Attach the tow-rope or tow-bar only to the towing anchorages
intended for this purpose ⇒page 268 or ⇒page 269.
Driving technique
Towing requires some experience – especially when using a
towrope. Both drivers should be familiar with the technique required
for towing. Inexperienced drivers should not attempt to tow-start or
tow away another vehicle.
WARNING (continued)
document_0900452a8179700c.book Seite 267 Donnerstag, 22. März 2007 10:19 10
Page 271 of 313
Self-help269
Controls
Safety
Driving tips
General maintenance
Self-help
Technical data
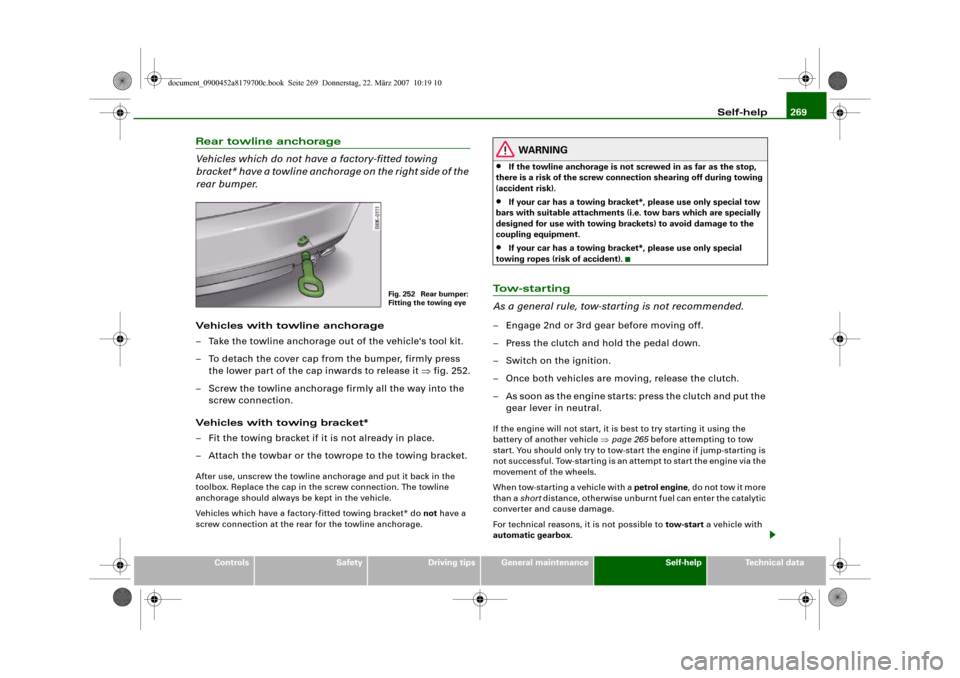
Rear towline anchorage
Vehicles which do not have a factory-fitted towing
bracket* have a towline anchorage on the right side of the
rear bumper.Vehicles with towline anchorage
– Take the towline anchorage out of the vehicle's tool kit.
– To detach the cover cap from the bumper, firmly press
the lower part of the cap inwards to release it ⇒fig. 252.
– Screw the towline anchorage firmly all the way into the
screw connection.
Vehicles with towing bracket*
– Fit the towing bracket if it is not already in place.
– Attach the towbar or the towrope to the towing bracket.After use, unscrew the towline anchorage and put it back in the
toolbox. Replace the cap in the screw connection. The towline
anchorage should always be kept in the vehicle.
Vehicles which have a factory-fitted towing bracket* do not have a
screw connection at the rear for the towline anchorage.
WARNING
•
If the towline anchorage is not screwed in as far as the stop,
there is a risk of the screw connection shearing off during towing
(accident risk).
•
If your car has a towing bracket*, please use only special tow
bars with suitable attachments (i.e. tow bars which are specially
designed for use with towing brackets) to avoid damage to the
coupling equipment.
•
If your car has a towing bracket*, please use only special
towing ropes (risk of accident).
To w - s t a r t i n g
As a general rule, tow-starting is not recommended.– Engage 2nd or 3rd gear before moving off.
– Press the clutch and hold the pedal down.
– Switch on the ignition.
– Once both vehicles are moving, release the clutch.
– As soon as the engine starts: press the clutch and put the
gear lever in neutral.If the engine will not start, it is best to try starting it using the
battery of another vehicle ⇒page 265 before attempting to tow
start. You should only try to tow-start the engine if jump-starting is
not successful. Tow-starting is an attempt to start the engine via the
movement of the wheels.
When tow-starting a vehicle with a petrol engine, do not tow it more
than a short distance, otherwise unburnt fuel can enter the catalytic
converter and cause damage.
For technical reasons, it is not possible to tow-start a vehicle with
automatic gearbox.
Fig. 252 Rear bumper:
Fitting the towing eye
document_0900452a8179700c.book Seite 269 Donnerstag, 22. März 2007 10:19 10
Page 275 of 313
Fuses and bulbs273
Controls
Safety
Driving tips
General maintenance
Self-help
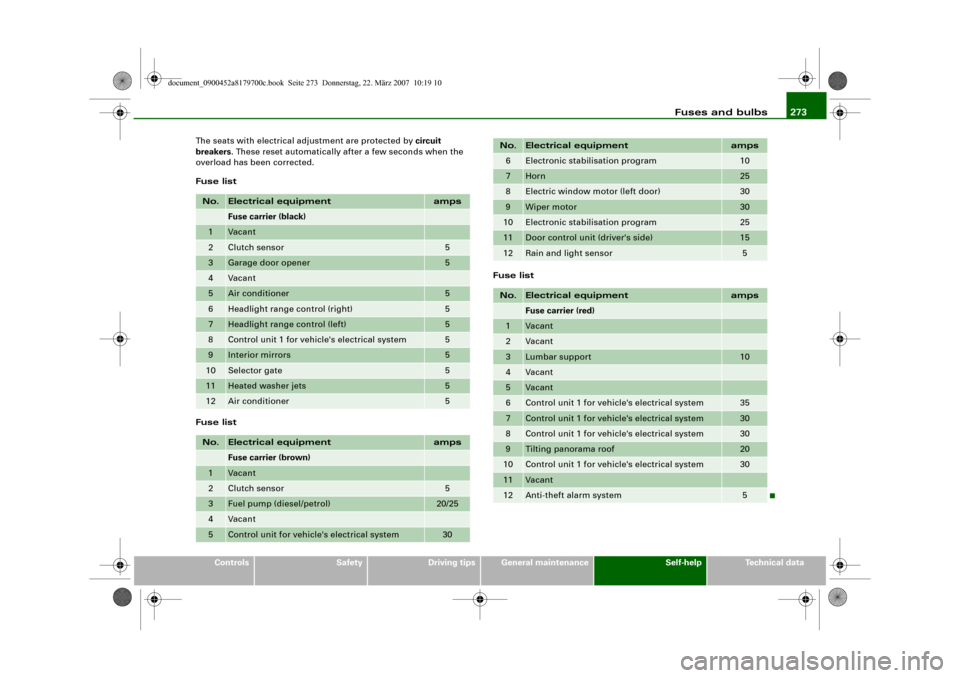
Technical data The seats with electrical adjustment are protected by circuit
breakers. These reset automatically after a few seconds when the
overload has been corrected.
Fuse list
Fuse listFuse list
No.
Electrical equipment
amps
Fuse carrier (black)
1
Vacant
2
Clutch sensor
5
3
Garage door opener
5
4
Vacant
5
Air conditioner
5
6
Headlight range control (right)
5
7
Headlight range control (left)
5
8
Control unit 1 for vehicle's electrical system
5
9
Interior mirrors
5
10
Selector gate
5
11
Heated washer jets
5
12
Air conditioner
5
No.
Electrical equipment
amps
Fuse carrier (brown)
1
Vacant
2
Clutch sensor
5
3
Fuel pump (diesel/petrol)
20/25
4
Vacant
5
Control unit for vehicle's electrical system
30
6
Electronic stabilisation program
10
7
Horn
25
8
Electric window motor (left door)
30
9
Wiper motor
30
10
Electronic stabilisation program
25
11
Door control unit (driver's side)
15
12
Rain and light sensor
5
No.
Electrical equipment
amps
Fuse carrier (red)
1
Vacant
2
Vacant
3
Lumbar support
10
4
Vacant
5
Vacant
6
Control unit 1 for vehicle's electrical system
35
7
Control unit 1 for vehicle's electrical system
30
8
Control unit 1 for vehicle's electrical system
30
9
Tilting panorama roof
20
10
Control unit 1 for vehicle's electrical system
30
11
Vacant
12
Anti-theft alarm system
5
No.
Electrical equipment
amps
document_0900452a8179700c.book Seite 273 Donnerstag, 22. März 2007 10:19 10