2008 AUDI A5 technical data
[x] Cancel search: technical dataPage 267 of 313
Self-help265
Controls
Safety
Driving tips
General maintenance
Self-help
Technical data
– Insert the hook (provided in the vehicle's tool kit) in the
hole in the hub cap.
–Pull off the hub cap ⇒page 261, fig. 241.
– Insert the adapter completely into the wheel bolt .
– F i t t h e b o x s p a n n e r as f a r as i t w i l l g o o v e r t h e a d a p t e r .
– Loosen or tighten the wheel bolt ⇒page 261.It is advisable to carry the wheel bolt adapter in the vehicle. The
adapter is normally stored in the vehicle tool kit, underneath the
towline anchorage. It should be put back there after use.
The code number of the anti-theft wheel bolt is stamped on the front
o f t h e a d a p t e r. Yo u r A u d i d e a l e r w i l l n e e d t h i s n u m b e r t o r e p l a c e t h e
adapter if lost.
Note
Note the code number of the anti-theft wheel bolt and keep it in a
safe place – not in your vehicle.Jump-startingBefore starting the engine
If necessary, the engine can be started by connecting it to
the battery of another vehicle.If the engine should ever fail to start because of a discharged
battery, the battery can be connected to the battery of another
vehicle to start the engine. Suitable jump leads are required.
Both batteries must be rated at 12 Volts. The capacity (Ah) of the
booster battery should not be significantly lower than that of the
discharged battery.Jump leads
The jump leads must be heavy enough to carry the starter current.
Refer to the details given by the manufacturer.
Only use jump leads with insulated battery clamps.
Positive cable – usually red
Negative cable – usually black
WARNING
•
When it is discharged the battery can freeze at temperatures
around 0°C. A frozen battery must first be thawed out before
connecting the jump leads, as it could otherwise explode.
•
Please note the safety warnings referring to working in the
engine compartment ⇒page 231.Note
•
There must be no contact between the two vehicles as otherwise
current could flow as soon as the positive terminals are connected.
•
The discharged battery must be properly connected to the
vehicle's electrical system.
•
Switch off the car telephone if necessary. Details will be given in
the manufacturer's instructions for the car telephone.
A2
A1A2
document_0900452a8179700c.book Seite 265 Donnerstag, 22. März 2007 10:19 10
Page 269 of 313
Self-help267
Controls
Safety
Driving tips
General maintenance
Self-help
Technical data terminal must not touch metal parts of the vehicle: this can cause
short circuiting.
•
Do not bend over the batteries – risk of acid burns.
•
The screw plugs on the battery cells must be screwed in firmly.
•
Keep sparks, flame and lighted cigarettes away from batteries:
the gases given off can cause an explosion.
•
If jump-starting another vehicle, position the jump leads in
such a way that they cannot come into contact with any moving
parts in the engine compartment of the other vehicle.Caution
Please note that the above method of connecting the leads is meant
for jump-starting your vehicle. If jump-starting another vehicle, you
should not connect the negative lead (–) to the negative terminal of
the discharged battery, but directly to the engine block or a solid
metal part bolted to the engine block. If the battery of the other
vehicle does not have a gas vent, there is a risk that a mixture of
oxygen and hydrogen gas can accumulate and cause an
explosion.Tow-starting and towing awayGeneral notes
Points to observe when tow-starting or towing awayIf you use a towrope:
Notes for the driver of the towing vehicle
– The towrope must be taut before driving off.– Engage the clutch very gently when starting to move; on
vehicles with automatic gearbox press the accelerator
slowly.
Notes for the driver of the towed vehicle
– The ignition should be switched on so that the turn
signals, horn, windscreen wipers and washers can be
used. Please ensure that the steering wheel is unlocked
when you switch on the ignition, and that it moves freely.
–Put gear lever in neutral (manual gearbox) or move
selector lever to position N (automatic gearbox).
– The brake servo and power steering only work when the
engine is running. Considerably more effort is required
on the brake pedal and steering wheel when the engine
is switched off.
– Ensure that the towrope remains taut at all times when
towing.
Towrope or towbar
It is easier and safer to tow a vehicle with a towbar. You should only
use a towrope if you do not have a towbar.
A towrope should be slightly elastic to reduce the loading on both
vehicles. It is advisable to use a towrope made of synthetic fibre or
similar material.
Attach the tow-rope or tow-bar only to the towing anchorages
intended for this purpose ⇒page 268 or ⇒page 269.
Driving technique
Towing requires some experience – especially when using a
towrope. Both drivers should be familiar with the technique required
for towing. Inexperienced drivers should not attempt to tow-start or
tow away another vehicle.
WARNING (continued)
document_0900452a8179700c.book Seite 267 Donnerstag, 22. März 2007 10:19 10
Page 271 of 313
Self-help269
Controls
Safety
Driving tips
General maintenance
Self-help
Technical data
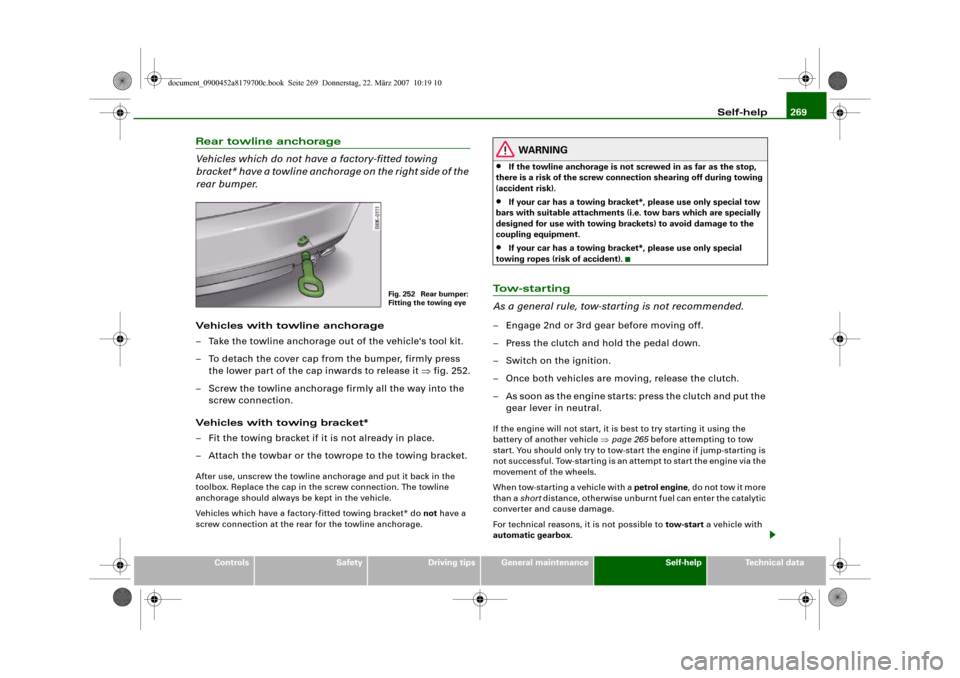
Rear towline anchorage
Vehicles which do not have a factory-fitted towing
bracket* have a towline anchorage on the right side of the
rear bumper.Vehicles with towline anchorage
– Take the towline anchorage out of the vehicle's tool kit.
– To detach the cover cap from the bumper, firmly press
the lower part of the cap inwards to release it ⇒fig. 252.
– Screw the towline anchorage firmly all the way into the
screw connection.
Vehicles with towing bracket*
– Fit the towing bracket if it is not already in place.
– Attach the towbar or the towrope to the towing bracket.After use, unscrew the towline anchorage and put it back in the
toolbox. Replace the cap in the screw connection. The towline
anchorage should always be kept in the vehicle.
Vehicles which have a factory-fitted towing bracket* do not have a
screw connection at the rear for the towline anchorage.
WARNING
•
If the towline anchorage is not screwed in as far as the stop,
there is a risk of the screw connection shearing off during towing
(accident risk).
•
If your car has a towing bracket*, please use only special tow
bars with suitable attachments (i.e. tow bars which are specially
designed for use with towing brackets) to avoid damage to the
coupling equipment.
•
If your car has a towing bracket*, please use only special
towing ropes (risk of accident).
To w - s t a r t i n g
As a general rule, tow-starting is not recommended.– Engage 2nd or 3rd gear before moving off.
– Press the clutch and hold the pedal down.
– Switch on the ignition.
– Once both vehicles are moving, release the clutch.
– As soon as the engine starts: press the clutch and put the
gear lever in neutral.If the engine will not start, it is best to try starting it using the
battery of another vehicle ⇒page 265 before attempting to tow
start. You should only try to tow-start the engine if jump-starting is
not successful. Tow-starting is an attempt to start the engine via the
movement of the wheels.
When tow-starting a vehicle with a petrol engine, do not tow it more
than a short distance, otherwise unburnt fuel can enter the catalytic
converter and cause damage.
For technical reasons, it is not possible to tow-start a vehicle with
automatic gearbox.
Fig. 252 Rear bumper:
Fitting the towing eye
document_0900452a8179700c.book Seite 269 Donnerstag, 22. März 2007 10:19 10
Page 273 of 313
Self-help271
Controls
Safety
Driving tips
General maintenance
Self-help
Technical data
Note
If it is not possible to tow the vehicle as described above, or if it has
to be towed further than 50 km, it must be transported on a special
car transporter or trailer.Towing a vehicle with automatic gearbox and four-wheel drive
Certain restrictions must be observed when towing your
vehicle.Please observe the notes ⇒page 267.
The vehicle can be towed with a towbar or towrope in the normal
way, with all four wheels on the ground. When doing so, please note
the following points:•
Release the parking brake ⇒page 121.
•
Make sure the selector lever is in the N position.
•
The vehicle must not be towed faster than 50 km/h.
•
The vehicle must not be towed further than 50 km. The reason
for this is: when the engine is not running, the gearbox oil pump
does not work and the gearbox is not adequately lubricated for
higher speeds or longer distances.
The vehicle must not be towed with the wheels lifted at either the
front or rear.Note
If it is not possible to tow the vehicle as described above, or if it has
to be towed further than 50 km, it must be transported on a special
car transporter or trailer.
document_0900452a8179700c.book Seite 271 Donnerstag, 22. März 2007 10:19 10
Page 275 of 313
Fuses and bulbs273
Controls
Safety
Driving tips
General maintenance
Self-help
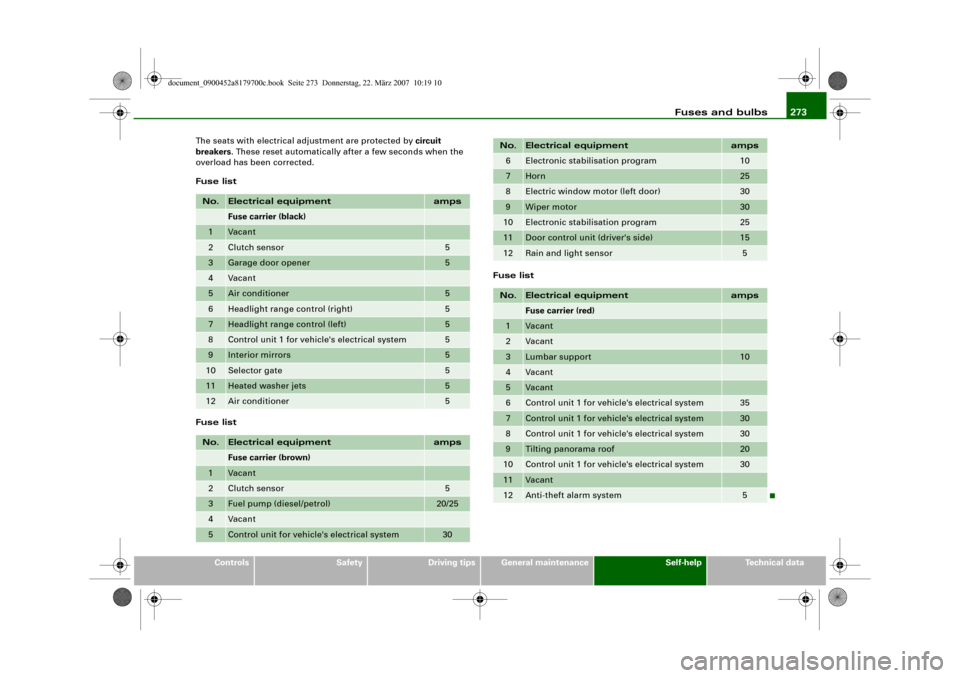
Technical data The seats with electrical adjustment are protected by circuit
breakers. These reset automatically after a few seconds when the
overload has been corrected.
Fuse list
Fuse listFuse list
No.
Electrical equipment
amps
Fuse carrier (black)
1
Vacant
2
Clutch sensor
5
3
Garage door opener
5
4
Vacant
5
Air conditioner
5
6
Headlight range control (right)
5
7
Headlight range control (left)
5
8
Control unit 1 for vehicle's electrical system
5
9
Interior mirrors
5
10
Selector gate
5
11
Heated washer jets
5
12
Air conditioner
5
No.
Electrical equipment
amps
Fuse carrier (brown)
1
Vacant
2
Clutch sensor
5
3
Fuel pump (diesel/petrol)
20/25
4
Vacant
5
Control unit for vehicle's electrical system
30
6
Electronic stabilisation program
10
7
Horn
25
8
Electric window motor (left door)
30
9
Wiper motor
30
10
Electronic stabilisation program
25
11
Door control unit (driver's side)
15
12
Rain and light sensor
5
No.
Electrical equipment
amps
Fuse carrier (red)
1
Vacant
2
Vacant
3
Lumbar support
10
4
Vacant
5
Vacant
6
Control unit 1 for vehicle's electrical system
35
7
Control unit 1 for vehicle's electrical system
30
8
Control unit 1 for vehicle's electrical system
30
9
Tilting panorama roof
20
10
Control unit 1 for vehicle's electrical system
30
11
Vacant
12
Anti-theft alarm system
5
No.
Electrical equipment
amps
document_0900452a8179700c.book Seite 273 Donnerstag, 22. März 2007 10:19 10
Page 277 of 313

Fuses and bulbs275
Controls
Safety
Driving tips
General maintenance
Self-help
Technical data
Fuse list for luggage compartment– Remove the trim.
– Open the fuse cover.Fuse listFuse list
Fuse listNo.
Electrical equipment
amps
Fuse carrier (black)
1
Vacant
2
Control unit for trailer
15
3
Control unit for trailer
20
4
Control unit for trailer
20
5
Electronic parking brake
5
6
Electronic suspension control
15
7
Electronic parking brake
30
8
Control unit 2 for vehicle's electrical system
30
9
Vacant
Fig. 256 Diagram of
fuse panel
10
Control unit 2 for vehicle's electrical system
30
11
Control unit 2 for vehicle's electrical system
20
12
Vacant
No.
Electrical equipment
amps
Fuse carrier (brown)
1
Electrical socket
15
2
Vacant
3
Radio/navigation
7.5
4
Control unit for digital sound system
30
5
MMI
5
6
Door control unit (driver's side)
30
7
Electronic parking brake
30
8
Seat heating, rear
30
9
Electric window (right)
30
10
Remote control receiver for auxiliary heating
5
11
Door control unit (passenger side)
15
12
Control unit for reversing camera
5
No.
Electrical equipment
amps
Fuse carrier (red)
1
Socket, centre console, rear
15
2
Socket, centre console, front
15
3
Socket, luggage compartment
15
No.
Electrical equipment
amps
document_0900452a8179700c.book Seite 275 Donnerstag, 22. März 2007 10:19 10
Page 279 of 313
Fuses and bulbs277
Controls
Safety
Driving tips
General maintenance
Self-help
Technical data
WARNING
•
Take particular care when working on components in the
engine compartment if the engine is warm - risk of burns!
•
Bulbs are sensitive to pressure. The glass can break when you
touch the bulb, causing injury.
•
Incorrect handling of the high-voltage element of xenon gas-
discharge bulbs* can have potentially fatal consequences.
•
When changing bulbs, please take care not to injure yourself on
sharp edges, in particular on the headlight housing.Caution
•
Always remove the ignition key before carrying out any work on
the electrical system - danger of short circuiting!
•
Switch off the lights or parking lights before you change a bulb.
•
Take good care to avoid damaging any components.
•
Removing the lights in particular can lead to the paintwork
becoming damaged. This is another reason why we recommend
having the bulbs changed by a qualified workshop.For the sake of the environment
Please ask your specialist retailer how to dispose of used bulbs in
the proper manner.
Note
Place the parts you have removed on a soft cloth so that they do not
become scratched.
•
Please check at regular intervals that all lighting (especially the
exterior lighting) on your vehicle is functioning properly. This is not
only in the interest of your own safety, but also in that of all other
road users.
•
Before changing a bulb, make sure you have the correct new
bulb.
•
Do not touch the glass part of the bulb with your bare hands, use
a cloth or paper towel instead. Otherwise, the fingerprints left on
the glass will vaporise as a result of the heat generated by the bulb,
be deposited on the reflector and impair its surface.
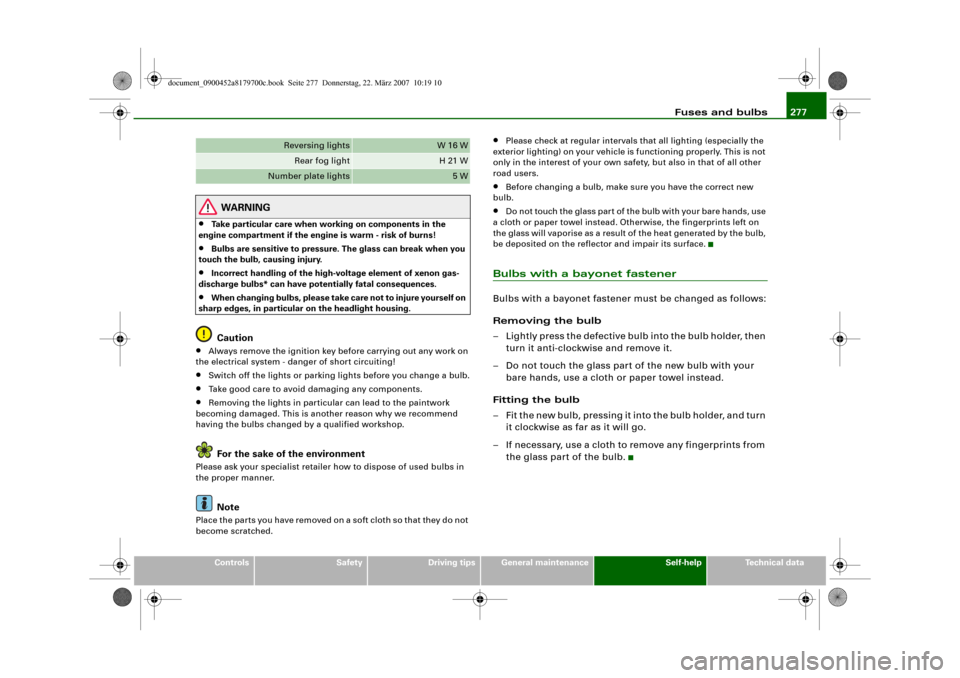
Bulbs with a bayonet fastenerBulbs with a bayonet fastener must be changed as follows:
Removing the bulb
– Lightly press the defective bulb into the bulb holder, then
turn it anti-clockwise and remove it.
– Do not touch the glass part of the new bulb with your
bare hands, use a cloth or paper towel instead.
Fitting the bulb
– Fit the new bulb, pressing it into the bulb holder, and turn
it clockwise as far as it will go.
– If necessary, use a cloth to remove any fingerprints from
the glass part of the bulb.
Reversing lights
W 16 W
Rear fog light
H 21 W
Number plate lights
5 W
document_0900452a8179700c.book Seite 277 Donnerstag, 22. März 2007 10:19 10
Page 281 of 313
Fuses and bulbs279
Controls
Safety
Driving tips
General maintenance
Self-help
Technical data
– Take the screwdriver and the interchangeable Torx socket
out of the vehicle tool kit.
– Remove the screws ⇒page 278, fig. 258 that secure the
trim panel to the lock carrier and detach the trim panel.
– Slacken the two screws that secure the headlight to the
lock carrier and the screw at the underside of the head-
light (this screw is located between the cover and the
rubber cap and should not be slackened more than ten
turns) ⇒page 278, fig. 259.
– Carefully pull the headlight forward about 60 mm.
– Release and unplug the electrical connector.
– Carefully take the headlight out towards the front (swivel
it slightly if necessary).
Installing
– Perform all of the above steps in reverse sequence.The headlight must be inserted in two guides (on the underside of
the headlight). This is the only way to ensure that the headlight is
installed in the correct position. To determine whether the headlight
is correctly installed, check that it is aligned flush with adjacent
body parts (such as the wing panel).
Do not interchange the securing screws.
Caution
Please take particular care not to damage or scratch the adjacent
parts of the body when removing or installing the headlights.
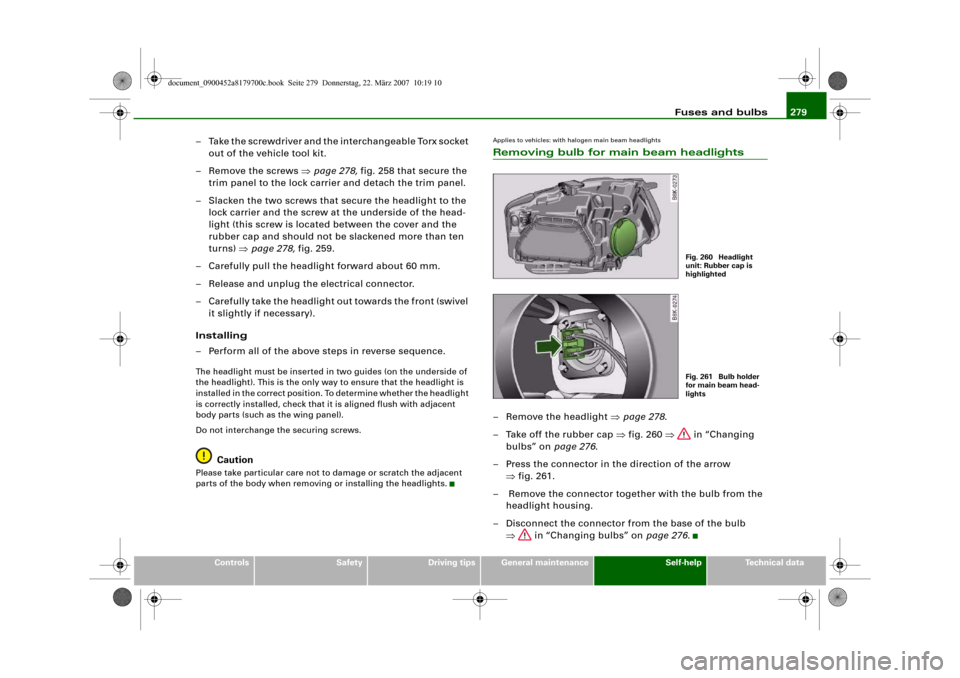
Applies to vehicles: with halogen main beam headlightsRemoving bulb for main beam headlights– Remove the headlight ⇒page 278.
– Take off the rubber cap ⇒fig. 260 ⇒ in “Changing
bulbs” on page 276.
– Press the connector in the direction of the arrow
⇒fig. 261.
– Remove the connector together with the bulb from the
headlight housing.
– Disconnect the connector from the base of the bulb
⇒ in “Changing bulbs” on page 276.
Fig. 260 Headlight
unit: Rubber cap is
highlightedFig. 261 Bulb holder
for main beam head-
lights
document_0900452a8179700c.book Seite 279 Donnerstag, 22. März 2007 10:19 10