2008 AUDI A5 wheel bolts
[x] Cancel search: wheel boltsPage 225 of 313
Care of vehicle and cleaning223
Controls
Safety
Driving tips
General maintenance
Self-help
Technical data After washing, the wheels should only be cleaned with an "acid-
free" cleaning agent for alloy wheels. This is available from Audi
dealers and specialist retailers. Never leave the cleaning agent on
the rims for any longer than specified in the instructions before
rinsing it off. If the wheel cleaner fluid contains acid it can attack the
surfaces of the wheel bolts.
Car polish or other abrasive agents should not be used. If the
protective paint coating is damaged by stone chips etc., the
damaged area should be touched up immediately.
WARNING
Please note when cleaning the wheels that water, ice and road salt
can impair the effectiveness of the brakes – this can cause an
accident.Care of interiorMMI display screen and control consoleThe MMI display screen can be cleaned with a soft cloth and a
special “LCD cleaner” (available from retailers of electrical goods).
Moisten the cloth with a small amount of the cleaning fluid.
Clean the MMI control console with a fine brush first to prevent any
dirt from getting in between the control buttons and the housing.
We then recommend wiping the MMI control console using a cloth
moistened with washing-up liquid and water.
Caution
To avoid scratching the screen, do not wipe the MMI display with a
dry cloth.•
To avoid any possibility of damage, do not let any liquid get
inside the control console.
Plastic parts and leatherettePlastic parts and leatherette can be cleaned with a damp cloth. If
this is not sufficient, plastic parts and leatherette should only be
treated with a special solvent-free plastic cleaner.Textile covers and trim partsTextile covers and trim parts (e.g. seats, door trim) should be
cleaned regularly with a vacuum cleaner. This will remove surface
dirt which could otherwise be rubbed into the textile material
during use. Do not use steam cleaners, as the steam could carry the
dirt deeper into the textile material.
Normal cleaning
We recommend that you use a soft sponge or lint-free, micro-fibre
cloth for normal cleaning. Only use brushes on floor coverings and
mats, as other textile surfaces could become damaged.
In the case of normal surface dirt you can use a foam cleaner. Use a
sponge to spread the foam on the textile surface and to work it into
the material lightly. However, make sure that the textile material
does not become soaking wet. Then dab off the foam with a dry and
absorbent cloth (e.g. a micro-fibre cloth) and vacuum off any
residue once the surface is completely dry.
Removal of stains
To treat stains caused by spilled drinks (coffee, fruit juice or similar)
make up a solution with a mild detergent for sensitive fabrics and
apply it with a sponge. If the stains are difficult to remove, a
washing paste can be applied directly onto the stain and worked
into the fabric. The surface will then have to be wiped with clear
water to remove any residue left by the paste. To do so, use a damp
cloth or sponge and then dab the stain with an absorbent cloth.
Treat chocolate or make-up stains with a washing paste and then
rinse off with water (using a damp sponge).
document_0900452a8179700c.book Seite 223 Donnerstag, 22. März 2007 10:19 10
Page 249 of 313
Wheels and tyres247
Controls
Safety
Driving tips
General maintenance
Self-help
Technical data replacement parts, trained personnel and facilities for disposing of
the old tyres.
WARNING
•
It is very important to ensure that the tyres you have chosen
have adequate clearance. When selecting replacement tyres, do
not rely entirely on the nominal tyre size marked on the tyre; with
some makes of tyre the effective tyre size can differ significantly
from the nominal dimensions, even though the tyres have the
same size designation. Inadequate tyre clearance can result in
damage to the tyres or the vehicle, causing a serious safety risk. It
may also invalidate the vehicle's type approval for use on public
roads.
•
Please ask your Audi dealer or qualified workshop whether run
flat tyres can be used on your vehicle. Unauthorised use of these
tyres can invalidate the vehicle's type approval for use on public
roads. Furthermore, this could cause damage to your vehicle and
possibly also result in an accident.
•
Avoid running the car on tyres that are more than 6 years old.
If you have no alternative, you should drive slowly and with extra
care at all times.For the sake of the environment
Old tyres must be disposed of according to the laws in the country
concerned.
Note
•
Never mount used tyres if you are not sure of their previous
history.
•
For technical reasons it is not normally possible to use wheel
rims from other vehicles. In some cases this also applies to rims
from other vehicles of the same model.
Wheel bolts
The wheel bolts are designed to suit the rims on your car.The wheel bolts are matched to the rims. When installing different
wheels (for instance wheels with winter tyres) it is important to use
the correct wheel bolts with the right length and correctly shaped
bolt heads. This is essential for the secure fit of the wheels and for
the proper function of the brake system.
Audi dealers have full information on the technical requirements
when installing or changing tyres, rims or wheel trims.
The wheel bolts should be clean and turn easily.
A special adapter is required to turn the anti-theft wheel bolts*
⇒page 264.Winter tyres
Winter tyres will significantly improve the car's handling
in winter road conditions.–Use only radial ply winter tyres.
– Winter tyres must be fitted on all four wheels.
– Only use winter tyres of the correct type approved for
your vehicle.
– Please note that the maximum permissible speed for
winter tyres may be lower than for summer tyres.
– Also note that winter tyres are no longer effective when
the tread is worn down.
– After fitting the wheels you must always check the tyre
pressures. The correct tyre pressures are listed on the
sticker on the end face of the driver's door.
document_0900452a8179700c.book Seite 247 Donnerstag, 22. März 2007 10:19 10
Page 258 of 313
Self-help 256If you need the tools, the Tyre Mobility System or the jack*, you will
have to open the floor panel and take out the spare wheel*
⇒page 256.
The tool kit includes:•
A hook for removing hub caps
•
Pin for mounting a wheel
•
Screwdriver with reversible blade
•
Tool for changing bulbs
•
Interchangeable socket (Torx socket for changing bulbs)
•
Crank handle for jack
•
Adapter for anti-theft wheel bolts*
•
Jack*
•
Box spanner for wheel bolts
•
Towline anchorage
Some of the parts listed are only fitted on certain models or are
optional extras.
Before stowing the jack* again, wind down the arm of the jack as far
as it will go.
WARNING
•
Do not use the hexagonal socket in the screwdriver handle to
tighten the wheel bolts. It is not possible to tighten the bolts with
the required torque – risk of accident.
•
The jack supplied by the factory is only designed for changing
wheels on this model. On no account attempt to use it for lifting
heavier vehicles or other loads – risk of injury.
•
Never start the engine when the vehicle is on the jack - risk of
accident.
•
If work has to be done under the veh i cl e , e n su re t h a t i t is sa fe l y
supported on stands designed for the purpose, otherwise there is
a risk of injury.
Applies to vehicles: with compact temporary spare wheelCompact temporary spare wheel*The spare wheel is carried in the wheel well under the
floor panel in the luggage compartment. It is only
intended for temporary use over short distances.Taking out the spare wheel
– Lift the floor panel by the plastic handle ⇒fig. 238.
– Hook the handle onto the luggage compartment weath-
erstrip.
– Turn the centre plastic knob ⇒fig. 238 anti-clockwise.
– Take out the spare wheel.
– Unhook the floor panel before closing the boot lid.
Securing the defective wheel in the spare wheel
well
– Place the wheel in the spare wheel well and secure it with
the plastic knob.
– Unhook the floor panel before closing the boot lid.
Fig. 238 Spare wheel
document_0900452a8179700c.book Seite 256 Donnerstag, 22. März 2007 10:19 10
Page 263 of 313
Self-help261
Controls
Safety
Driving tips
General maintenance
Self-help
Technical data
–Loosen the wheel bolts ⇒page 261.
–Raise the car with the jack* ⇒page 262.
–Ta k e o f f the wheel with the flat tyre and then put on the
spare wheel* ⇒page 263.
–Lower the vehicle to the ground.
– Tighten the wheel bolts firmly i n d i a g o n a l s e qu e n c e w i t h
the box spanner ⇒page 261.
–Fit the hub cap back on.After changing a wheel
What you must do after changing a wheel.– Place the wheel with the defective tyre in the spare wheel
well and secure it.
– Put the tools and the jack* back in the luggage compart-
ment.
–The inflation pressure of the newly fitted spare tyre must
be checked as soon as possible.
–Have the tightening torque of the wheel bolts checked as
soon as possible with a torque wrench. The correct tight-
ening torque is 120 Nm.
– Have the flat tyre replaced as quickly as possible.
Note•
If you notice that the wheel bolts are corroded and difficult to
turn when changing a wheel, they must be replaced before having
the tightening torque checked.
•
In the interest of safety, drive at moderate speeds until the tight-
ening torque of the wheel bolts has been checked.
Hub caps
The hub caps must be removed for access to the wheel
bolts.Removing
– Insert the hook (provided in the vehicle's tool kit) in the
hole in the hub cap.
–Pull off the hub cap ⇒fig. 241.Loosening and tightening the wheel bolts
The wheel bolts must be loosened before raising the
vehicle.
Fig. 241 Changing a
wheel: Removing a hub
capFig. 242 Changing a
wheel: Loosening
wheel bolts
document_0900452a8179700c.book Seite 261 Donnerstag, 22. März 2007 10:19 10
Page 264 of 313
Self-help 262
Loosening
–Fit the box spanner as far as it will go over the wheel
bolt
7).
– Grip the box spanner as close to the end as possible and
turn the wheel bolts about one turn anti-clockwise
⇒page 261, fig. 242 -arrow-.
Tightening
– Fit the box spanner as far as it will go over the wheel
bolt7).
– Grip the box spanner as close to the end as possible and
tighten the bolt firmly by turning clockwise.
WARNING
To avoid accidents, the wheel bolts should only be loosened
slightly (about one turn) before raising the vehicle with the jack*.
Note
•
Do not use the hexagonal socket in the screwdriver handle to
loosen or tighten the wheel bolts.
•
If the wheel bolt is very tight, it may be possible to loosen it by
pushing down the end of the spanner carefully with your foot. Hold
on to the car for support and take care not to slip.
Raising the vehicle
The vehicle must be raised with the jack* to remove the
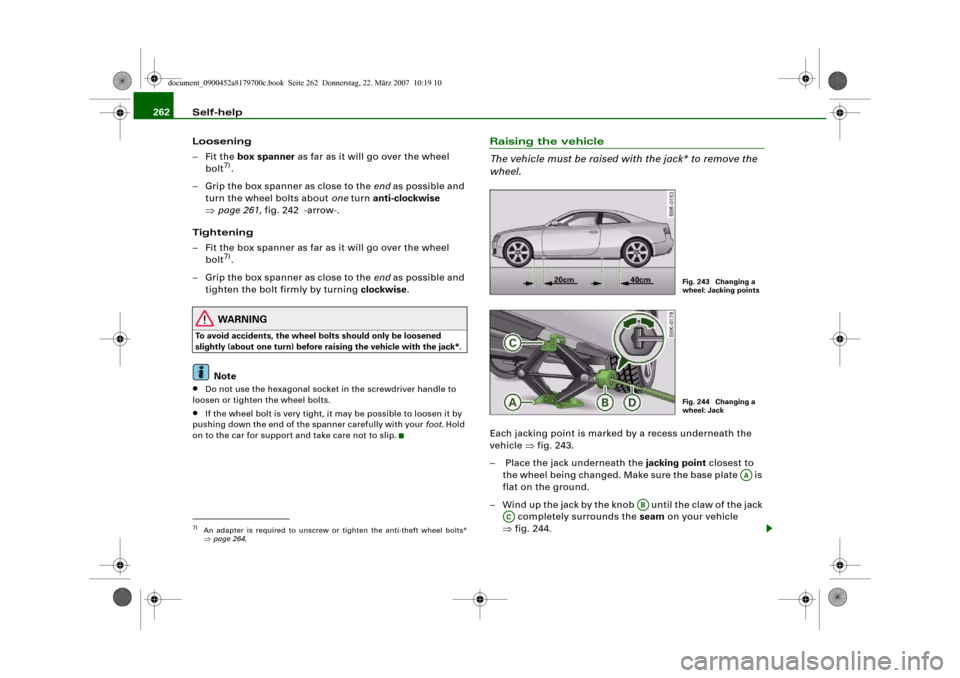
wheel.Each jacking point is marked by a recess underneath the
vehicle ⇒fig. 243.
– Place the jack underneath the jacking point closest to
the wheel being changed. Make sure the base plate is
flat on the ground.
– Wind up the jack by the knob until the claw of the jack
completely surrounds the seam on your vehicle
⇒fig. 244.
7)An adapter is required to unscrew or tighten the anti-theft wheel bolts*
⇒page 264.
Fig. 243 Changing a
wheel: Jacking pointsFig. 244 Changing a
wheel: Jack
AA
AB
AC
document_0900452a8179700c.book Seite 262 Donnerstag, 22. März 2007 10:19 10
Page 265 of 313
Self-help263
Controls
Safety
Driving tips
General maintenance
Self-help
Technical data
– Now fit the crank handle onto the jack by inserting it
in the opening on the knob ⇒page 262, fig. 244. Turn the
crank handle clockwise or anti-clockwise to secure it in
place.
– Raise the vehicle by winding the crank handle until the
defective wheel is clear of the ground.Recesses at the front and rear of the door sills mark the jacking
points ⇒page 262, fig. 243. There is one jacking point for each
wheel. The distance from the jacking points to the wheel arches is
approximately 20 cm at the front and 40 cm at the rear. The jack may
only be applied at the seam of the jacking points shown.
An unstable surface under the jack may cause the vehicle to slip off
the jack. Always provide a firm base for the jack on the ground. If
necessary use a large, strong board or similar support. On a hard,
slippery surface (such as tiles) use a rubber mat or similar to prevent
the jack from slipping.
WARNING
•
Prevent the base of the jack from slipping – risk of injury.
•
The car can be damaged if the jack is not applied at the correct
jacking points. There is also a risk of injury since the jack can slip
off suddenly if it is not properly engaged.
Taking off the wheel and putting on the spare wheel
Step-by-step instructions for taking off the wheel and
putting on the spare wheel.Change the wheel as described below after loosening the
wheel bolts and raising the vehicle with the jack*.
Taking off the wheel
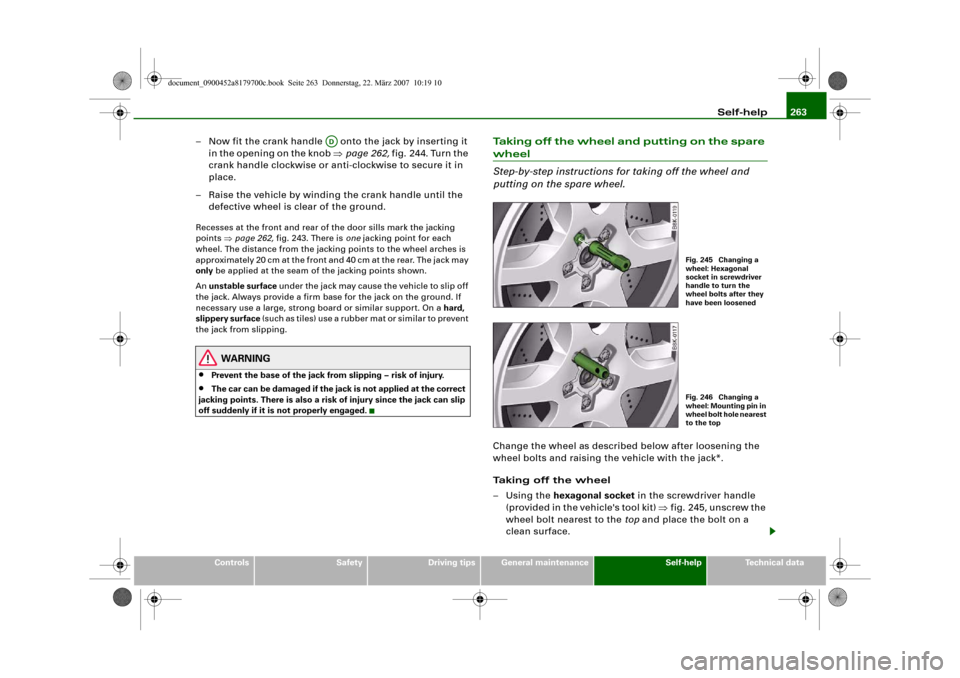
–Using the hexagonal socket in the screwdriver handle
(provided in the vehicle's tool kit) ⇒fig. 245, unscrew the
wheel bolt nearest to the top and place the bolt on a
clean surface.
AD
Fig. 245 Changing a
wheel: Hexagonal
socket in screwdriver
handle to turn the
wheel bolts after they
have been loosenedFig. 246 Changing a
wheel: Mounting pin in
wheel bolt hole nearest
to the top
document_0900452a8179700c.book Seite 263 Donnerstag, 22. März 2007 10:19 10
Page 266 of 313
Self-help 264
– Screw in the mounting pin (provided in the vehicle's tool
kit) by hand in place of the wheel bolt ⇒page 263,
fig. 246.
– Then unscrew the other wheel bolts as described above.
– Take off the wheel. The mounting pin stays where it is.
Putting on the spare wheel
– Put on the spare wheel, using the mounting pin to guide
it into place.
– Screw in the wheel bolts and tighten them lightly using
the hexagonal opening in the screwdriver handle.
– Then unscrew the mounting pin and tighten the
remaining wheel bolt lightly.
– Carry out the steps required after you have changed the
wheel ⇒page 261, “After changing a wheel”.The wheel bolts should be clean and turn easily. Before putting on
the spare wheel, inspect the condition of the wheel and hub
mounting surfaces. These surfaces must be clean before mounting
the wheel.
The wheel bolts are easier to remove from the wheel rim if you use
the hexagonal socket in the screwdriver handle. The reversible
screwdriver blade should be removed as a precautionary measure
when the tool is used for this purpose.
Note the direction of rotation when putting on a tyre with direc-
tional tread pattern ⇒page 264.
Note
Do not use the hexagonal socket in the screwdriver handle to loosen
or tighten the wheel bolts.
Tyres with directional tread pattern
Tyres with directional tread pattern must be mounted so
that they rotate in the correct direction.A directional tread pattern is identified by arrows on the sidewall
pointing in the forward running direction. Always note the direction
of rotation indicated when mounting the wheel. This is important so
that these tyres can give maximum grip and avoid excessive noise,
tread wear and aquaplaning.
Drive carefully should you ever have a puncture and have to mount
the spare wheel so it rotates in the wrong direction. This is because
the tyre will not give optimum performance. Bear this in mind
particularly when driving on wet roads.
To benefit from the advantages of tyres with this type of tread
pattern, the defective tyre should be replaced and refitted as soon
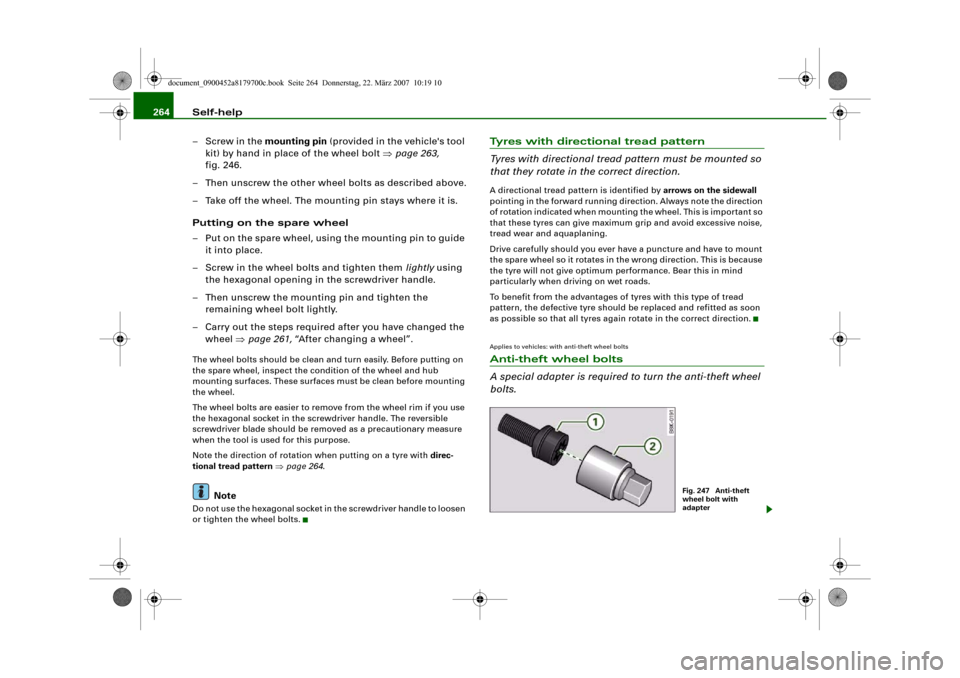
as possible so that all tyres again rotate in the correct direction.Applies to vehicles: with anti-theft wheel boltsAnti-theft wheel bolts
A special adapter is required to turn the anti-theft wheel
bolts.
Fig. 247 Anti-theft
wheel bolt with
adapter
document_0900452a8179700c.book Seite 264 Donnerstag, 22. März 2007 10:19 10
Page 304 of 313

Index 302AABS
SeeAnti-lock brake system . . . . . . . . . 18
AC mode . . . . . . . . . . . . . . . . . . . . . . . 98, 107
Acceleration figures
SeePerformance, weights and
dimensions . . . . . . . . . . . . . . . . . . . . 295
Accessories . . . . . . . . . . . . . . . . . . . . . . . . 250
Trailer . . . . . . . . . . . . . . . . . . . . . . . . . . 211
Adapter for anti-theft wheel bolts . . . . . 264
adaptive light . . . . . . . . . . . . . . . . . . . . . . . 58
Defective . . . . . . . . . . . . . . . . . . . . . . . . 37
advanced key
Locking and unlocking the vehicle . . . 45
START ENGINE STOP button . . . . . . . 118
Starting the engine . . . . . . . . . . . . . . . 118
Switching on the ignition . . . . . . . . . . 118
Air conditioner . . . . . . . . . . . . . . . . . . 93, 101
AC mode . . . . . . . . . . . . . . . . . . . . . . . . . 98
See alsoDeluxe automatic air conditioner
93
Air recirculation mode
Deluxe automatic air conditioner . . . . 97
Deluxe automatic air conditioner plus . . .
106
Airbag . . . . . . . . . . . . . . . . . . . . . . . . . . . . 176
Deactivating . . . . . . . . . . . . . . . . . . . . . 183
Front airbags . . . . . . . . . . . . . . . . . . . . 178
Head-protection airbag . . . . . . . . . . . 181
Key-operated switch for front passenger's
airbag . . . . . . . . . . . . . . . . . . . . . . . . 183
Side airbags . . . . . . . . . . . . . . . . . . . . . 180Triggering . . . . . . . . . . . . . . . . . . . . . . 177
Warning lamp . . . . . . . . . . . . . . . . . . . . 16
Alterations to the vehicle . . . . . . . . . . . . . 250
Alternator
Fault . . . . . . . . . . . . . . . . . . . . . . . . . . . . 31
Anti-dazzle interior mirror . . . . . . . . . . . . . 66
Anti-freeze additive . . . . . . . . . . . . . . . . . 235
Anti-knock properties of petrol . . . . . . . . 227
Anti-lock brake system
How the system works . . . . . . . . . . . . 197
Warning lamp . . . . . . . . . . . . . . . . . . . . 18
Anti-theft alarm . . . . . . . . . . . . . . . . . . . . . . 42
Interior monitor . . . . . . . . . . . . . . . . . . . 47
Tow-away protection . . . . . . . . . . . . . . 47
Anti-theft wheel bolts . . . . . . . . . . . . . . . . 264
Armrest (front)
Adjusting . . . . . . . . . . . . . . . . . . . . . . . . 77
Storage compartment . . . . . . . . . . . . . 77
Ashtrays
Front . . . . . . . . . . . . . . . . . . . . . . . . . . . . 86
Rear . . . . . . . . . . . . . . . . . . . . . . . . . . . . . 87
Audi hold assist . . . . . . . . . . . . . . . . . . . . 124
Warning lamp . . . . . . . . . . . . . . . . . . . . 18
Auto Lock . . . . . . . . . . . . . . . . . . . . . . . . . . . 42
Auto-check control . . . . . . . . . . . . . . . . . . . 29
Automatic air conditioner plus
SeeDeluxe automatic air conditioner plus
101
Automatic gearbox
Manual release (multitronic®) . . . . . . 136
multitronic® . . . . . . . . . . . . . . . . . . . . 130
Safety interlock for ignition key . . . . 116Selector lever positions (multitronic®) . . .
131
Steering wheel with tiptronic controls . . .
135
Automatic headlight control . . . . . . . . . . . 54
Auxiliary heating
Deluxe automatic air conditioner plus . . .
111
Description . . . . . . . . . . . . . . . . . . . . . . 111
Remote control . . . . . . . . . . . . . . . . . . 114
Running time . . . . . . . . . . . . . . . . . . . . 113
Switching on/off immediately . . . . . . 112
Timer . . . . . . . . . . . . . . . . . . . . . . . . . . . 112
Average fuel consumption . . . . . . . . . . . . . 25
Average speed . . . . . . . . . . . . . . . . . . . . . . . 25
Axle weights
SeePerformance, weights and
dimensions . . . . . . . . . . . . . . . . . . . . 295
BBattery
Charging . . . . . . . . . . . . . . . . . . . . . . . . 241
Low charge . . . . . . . . . . . . . . . . . . . . . . 202
Power level . . . . . . . . . . . . . . . . . . . . . . 202
Power management . . . . . . . . . . . . . . 202
Replacing . . . . . . . . . . . . . . . . . . . . . . . 242
Winter conditions . . . . . . . . . . . . . . . . 239
Battery power . . . . . . . . . . . . . . . . . . . . . . . 36
Bayonet fastener
Bulb . . . . . . . . . . . . . . . . . . . . . . . . . . . . 277
Bulb holder . . . . . . . . . . . . . . . . . . . . . . 278
Belt tensioners . . . . . . . . . . . . . . . . . . . . . 175
document_0900452a8179700c.book Seite 302 Donnerstag, 22. März 2007 10:19 10