2008 AUDI A4 fuel
[x] Cancel search: fuelPage 255 of 342
Fuel and filling the tank253
Controls
Safety
Driving tips
General maintenance
Self-help
Technical data −Insert the filler nozzle as far as possible into the spare fuel
canister.
−If the spare fuel canister is made of metal, the filler nozzle
must be in contact with the canister during filling. This helps
prevent an electrostatic charge building up.
−Make sure you never spill fuel in the vehicle or in the luggage
compartment. Fuel vapour is explosive. Risk of fatal accident!
Caution
•
If any fuel is spilt onto the vehicle, it should be removed immedi-
ately, as it could otherwise damage the paintwork.
•
Never run the tank completely dry. If there is an irregular fuel
supply, misfiring can occur. As a result unburnt fuel can enter the
exhaust system and cause damage to the catalytic converter(s).
•
When filling the fuel tank after having run it completely dry on a
vehicle with a diesel engine the ignition must be switched on for at
least 30 seconds without starting the engine. When you then start
the engine it may take longer than normal (up to one minute) for the
engine to start firing. This is because air needs to be bled from the
fuel system while starting.For the sake of the environment
Do not try to put in more fuel after the automatic filler nozzle has
switched off; this may cause the fuel to overflow if it becomes warm.
Note
The tank flap is not locked when you lock the vehicle from the
inside.
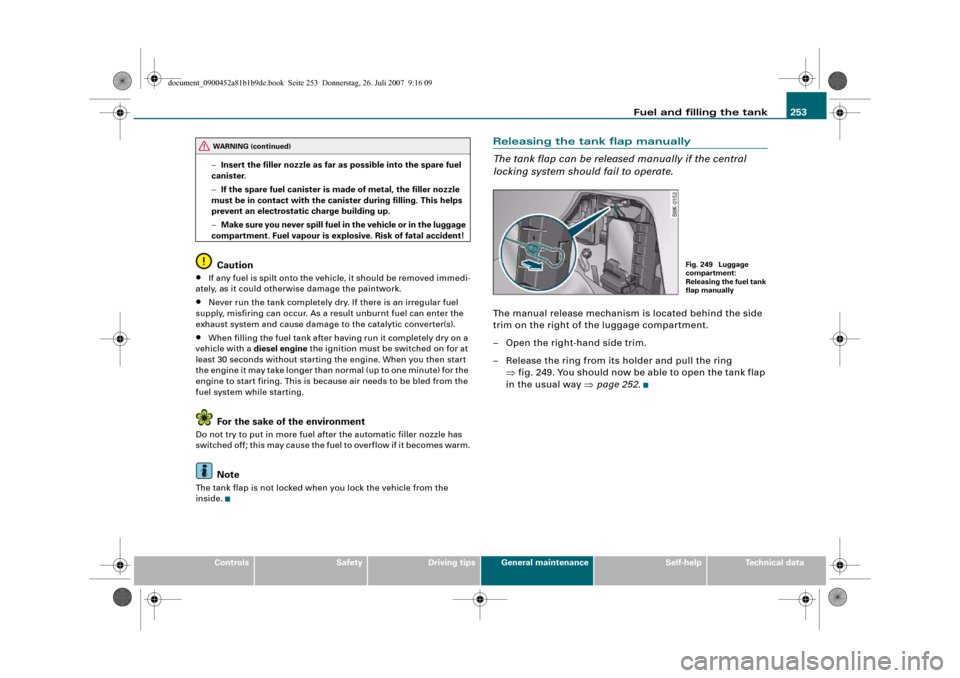
Releasing the tank flap manually
The tank flap can be released manually if the central
locking system should fail to operate.The manual release mechanism is located behind the side
trim on the right of the luggage compartment.
– Open the right-hand side trim.
– Release the ring from its holder and pull the ring
⇒fig. 249. You should now be able to open the tank flap
in the usual way ⇒page 252.
WARNING (continued)
Fig. 249 Luggage
compartment:
Releasing the fuel tank
flap manually
document_0900452a81b1b9de.book Seite 253 Donnerstag, 26. Juli 2007 9:16 09
Page 257 of 342
Checking and topping up fluids255
Controls
Safety
Driving tips
General maintenance
Self-help
Technical data
Working on components in the engine compartment
Extra caution is necessary when working on components
in the engine compartment.Always be aware of the danger of injury and scalding as well as the
risk of accident or fire when working in the engine compartment
(e.g. when checking and refilling fluids). Always observe the warn-
ings listed below and follow all normal safety precautions. The
engine compartment of any motor vehicle is a potentially
hazardous area. ⇒.
WARNING
•
Switch off the engine.
•
Remove the ignition key.
•
Apply the parking brake.
•
Put the gear lever in neutral or selector in P.
•
Wait for the engine to cool down.
•
Keep children away from engine compartment.
•
Never spill fluids on hot engine components. These fluids can
cause a fire (e.g. radiator anti-freeze).
•
Take care not to cause short circuits in the electrical system,
especially when working on the battery.
•
Do not touch the radiator fan when the engine is hot. The fan
may start running suddenly.
•
Do not unscrew the cap on the expansion tank when the engine
is hot. The cooling system is under pressure.
•
Protect face, hands and arms by covering the cap with a large,
thick rag to protect against escaping coolant and steam.
•
If any tests have to be performed with the engine running,
there is an extra safety risk from the rotating parts, such as the
drive belts, alternator and radiator fan, etc., and from the high-
voltage ignition system.
•
Vehicles with automatic gearbox: Never open the throttle inad-
vertently (for instance by hand from the engine compartment) if a
gear is engaged while the vehicle is stationary with the engine
running. The vehicle could otherwise start moving immediately
and possibly cause an accident.
•
Observe the following additional warnings if work on the fuel
system or the electrical system is necessary:
−Always disconnect the battery.
−Do not smoke.
−Never work near naked flames.
−Always keep an approved fire extinguisher immediately
available.Caution
When topping up fluids make sure the correct fluid is put into the
correct filler opening. This can otherwise cause serious malfunc-
tions or engine damage.
For the sake of the environment
Inspect the ground underneath your vehicle regularly so that any
leaks are detected at an early stage. If you find oil spots or other
fluids, have your vehicle inspected by a qualified workshop.
Note
On right-hand drive vehicles* some of the containers / reservoirs
mentioned below are located on the other side of the engine
compartment.
WARNING (continued)
document_0900452a81b1b9de.book Seite 255 Donnerstag, 26. Juli 2007 9:16 09
Page 270 of 342
Wheels and tyres 268Wheels and tyresWheelsGeneral notes–When driving with new tyres, be especially careful during
the first 500 km.
– If you have to drive over a kerb or similar obstacle, drive
very slowly and as near as possible at a right angle to the
kerb.
– Inspect the tyres regularly for damage (cuts, cracks or
blisters, etc.). Remove any foreign bodies embedded in
the treads.
– Damaged wheels and tyres must be replaced immedi-
ately.
– Keep grease, oil and fuel off the tyres.
– Replace any missing valve caps as soon as possible.
– Mark the wheels before taking them off so that they
rotate in the same direction when put back.
– When removed, the wheels or tyres should be stored in a
cool, dry and preferably dark place.New tyres
New tyres do not give maximum grip straight away and should
therefore be “run in” by driving carefully and at moderate speeds for
about the first 500 km. This will also help to make the tyres last
longer.
The tread depth of new tyres may vary, according to the type and
make of tyre and the tread pattern.Concealed damage
Damage to tyres and rims is often not readily visible. If you notice
unusual vibration or the car pulling to one side, this may indicate
that one of the tyres is damaged. Reduce speed immediately if there
is any reason to suspect that damage may have occurred. Inspect
the tyres for damage. If no external damage is visible, drive slowly
and carefully to the nearest qualified workshop and have the car
inspected.
Tyres with directional tread pattern
An arrow on the tyre sidewall indicates the direction of rotation on
tyres with directional tread. Always note the direction of rotation
indicated when mounting the wheel. This guarantees optimum grip
and helps to avoid aquaplaning, excessive noise and wear.
Tyre service life
Correct inflation pressures and sensible driving habits
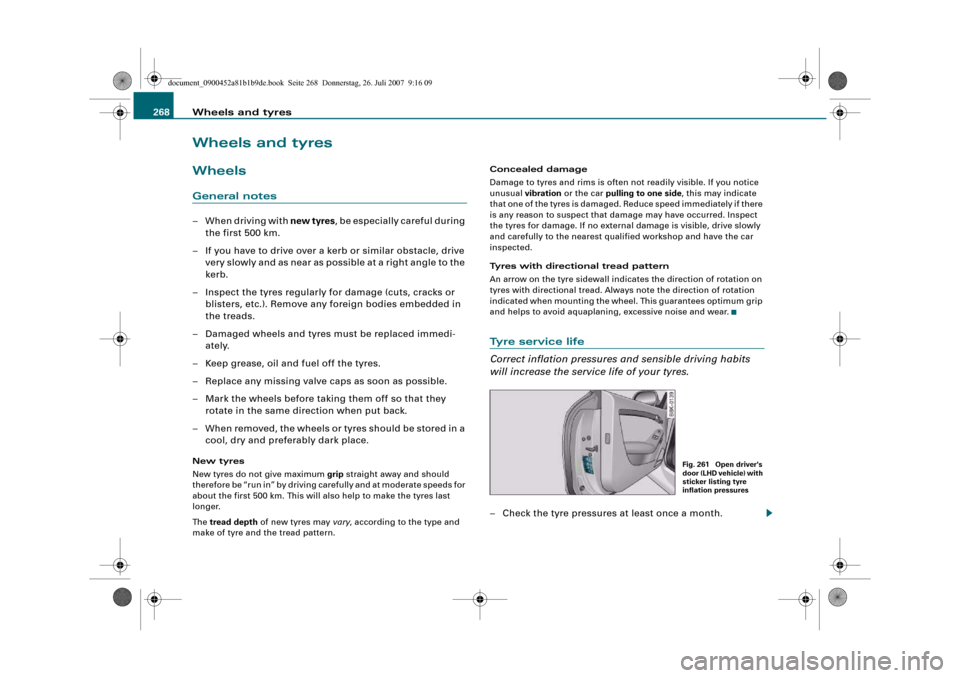
will increase the service life of your tyres.– Check the tyre pressures at least once a month.
Fig. 261 Open driver's
door (LHD vehicle) with
sticker listing tyre
inflation pressures
document_0900452a81b1b9de.book Seite 268 Donnerstag, 26. Juli 2007 9:16 09
Page 271 of 342
Wheels and tyres269
Controls
Safety
Driving tips
General maintenance
Self-help
Technical data
– The tyre pressures should only be checked when the
tyres are cold. The slightly raised pressures of warm tyres
must not be reduced.
– The pressures must be altered to suit major changes in
the load being carried.
– Avoid fast cornering and hard acceleration.
– Inspect the tyres for irregular wear from time to time.Tyre pressure and vehicle loading
The tyre pressure must be adjusted according to the load the vehicle
is carrying. We recommend adhering to the tyre pressure specifica-
tions for a maximum load. The tyre inflation pressures are listed on
a sticker on the end face of the driver's door ⇒page 268, fig. 261.
However, if you prefer an extra-smooth ride and the vehicle is not
fully loaded, you can select the tyre pressure for a normal load (no
more than three people travelling in the vehicle). However, should
you wish to drive with a full load you must increase the tyre pressure
to the specified maximum.
Under-inflation or over-inflation will reduce the life of the tyres
considerably and also impair the car's handling. Correct inflation
pressures are very important, especially at high speeds. The pres-
sures should therefore be checked at least once a month and before
starting a journey.
Do not forget the spare wheel* when checking the tyre pressures.
Keep the spare tyre inflated to the highest pressure required for the
road wheels.
Driving habits
Fast cornering, heavy acceleration and hard braking (squealing
tyres) all increase tyre wear.Wheel balancing
The wheels on new vehicles are balanced. However, various factors
encountered in normal driving can cause them to become unbal-
anced, which results in steering vibration.
Unbalanced wheels should be rebalanced, as they otherwise cause
excessive wear on steering, suspension and tyres. A wheel must
also be rebalanced when a new tyre is fitted or if a tyre is repaired.
Incorrect wheel alignment
Incorrect wheel alignment causes excessive tyre wear, impairing the
safety of the vehicle. If you notice excessive tyre wear, contact your
Audi dealer.
WARNING
•
Always adapt the tyre pressure accordingly when the vehicle
load changes.
•
Under-inflated tyres flex more and can overheat at continuous
high speeds. This can cause tread separation and tyre blow-out,
which could result in an accident.For the sake of the environment
Under-inflated tyres will increase the fuel consumption.
document_0900452a81b1b9de.book Seite 269 Donnerstag, 26. Juli 2007 9:16 09
Page 275 of 342
Wheels and tyres273
Controls
Safety
Driving tips
General maintenance
Self-help
Technical data In winter road conditions winter tyres will considerably improve the
car's handling. Due to their type of construction (width, rubber
compound, tread pattern), summer tyres give less grip on ice and
snow. This applies particularly to vehicles equipped with wide
section tyres or high speed tyres (code letters H, V or Y on the side-
wall).
Only use winter tyres of the correct type approved for your vehicle.
The sizes of the winter tyres approved for your vehicle are listed in
the vehicle's documents (e.g. EC Certificate of Conformity or COC
document
4)). The vehicle documents vary depending on the
country of residence. Also refer to ⇒page 270, ⇒page 270.
Winter tyres are no longer fully effective when the tread is worn
down to a depth of 4 mm.
The performance of winter tyres is also severely impaired by ageing,
even if the tread is still much deeper than 4 mm.
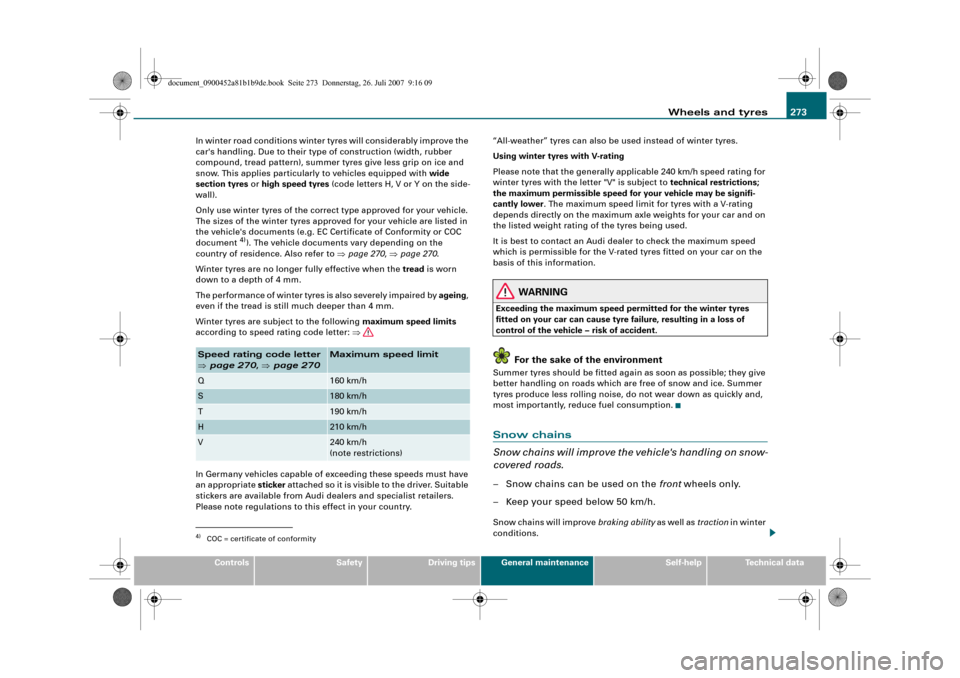
Winter tyres are subject to the following maximum speed limits
according to speed rating code letter: ⇒
In Germany vehicles capable of exceeding these speeds must have
an appropriate sticker attached so it is visible to the driver. Suitable
stickers are available from Audi dealers and specialist retailers.
Please note regulations to this effect in your country.“All-weather” tyres can also be used instead of winter tyres.
Using winter tyres with V-rating
Please note that the generally applicable 240 km/h speed rating for
winter tyres with the letter "V" is subject to technical restrictions;
the maximum permissible speed for your vehicle may be signifi-
cantly lower. The maximum speed limit for tyres with a V-rating
depends directly on the maximum axle weights for your car and on
the listed weight rating of the tyres being used.
It is best to contact an Audi dealer to check the maximum speed
which is permissible for the V-rated tyres fitted on your car on the
basis of this information.
WARNING
Exceeding the maximum speed permitted for the winter tyres
fitted on your car can cause tyre failure, resulting in a loss of
control of the vehicle – risk of accident.
For the sake of the environment
Summer tyres should be fitted again as soon as possible; they give
better handling on roads which are free of snow and ice. Summer
tyres produce less rolling noise, do not wear down as quickly and,
most importantly, reduce fuel consumption.Snow chains
Snow chains will improve the vehicle's handling on snow-
covered roads.– Snow chains can be used on the front wheels only.
– Keep your speed below 50 km/h.Snow chains will improve braking ability as well as traction in winter
conditions.
4)COC = certificate of conformitySpeed rating code letter
⇒page 270, ⇒page 270
Maximum speed limit
Q
160 km/h
S
180 km/h
T
190 km/h
H
210 km/h
V
240 km/h
(note restrictions)
document_0900452a81b1b9de.book Seite 273 Donnerstag, 26. Juli 2007 9:16 09
Page 276 of 342
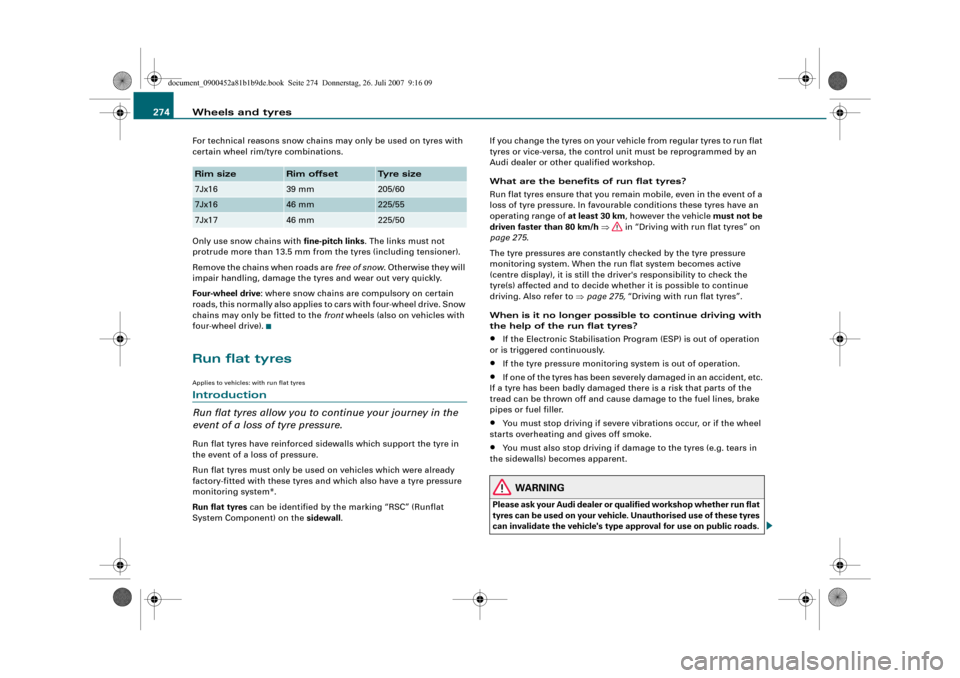
Wheels and tyres 274For technical reasons snow chains may only be used on tyres with
certain wheel rim/tyre combinations.
Only use snow chains with fine-pitch links. The links must not
protrude more than 13.5 mm from the tyres (including tensioner).
Remove the chains when roads are free of snow. Otherwise they will
impair handling, damage the tyres and wear out very quickly.
Four-wheel drive: where snow chains are compulsory on certain
roads, this normally also applies to cars with four-wheel drive. Snow
chains may only be fitted to the front wheels (also on vehicles with
four-wheel drive).Run flat tyresApplies to vehicles: with run flat tyresIntroduction
Run flat tyres allow you to continue your journey in the
event of a loss of tyre pressure.Run flat tyres have reinforced sidewalls which support the tyre in
the event of a loss of pressure.
Run flat tyres must only be used on vehicles which were already
factory-fitted with these tyres and which also have a tyre pressure
monitoring system*.
Run flat tyres can be identified by the marking “RSC” (Runflat
System Component) on the sidewall.If you change the tyres on your vehicle from regular tyres to run flat
tyres or vice-versa, the control unit must be reprogrammed by an
Audi dealer or other qualified workshop.
What are the benefits of run flat tyres?
Run flat tyres ensure that you remain mobile, even in the event of a
loss of tyre pressure. In favourable conditions these tyres have an
operating range of at least 30 km, however the vehicle must not be
driven faster than 80 km/h ⇒ in “Driving with run flat tyres” on
page 275.
The tyre pressures are constantly checked by the tyre pressure
monitoring system. When the run flat system becomes active
(centre display), it is still the driver's responsibility to check the
tyre(s) affected and to decide whether it is possible to continue
driving. Also refer to ⇒page 275, “Driving with run flat tyres”.
When is it no longer possible to continue driving with
the help of the run flat tyres?
•
If the Electronic Stabilisation Program (ESP) is out of operation
or is triggered continuously.
•
If the tyre pressure monitoring system is out of operation.
•
If one of the tyres has been severely damaged in an accident, etc.
If a tyre has been badly damaged there is a risk that parts of the
tread can be thrown off and cause damage to the fuel lines, brake
pipes or fuel filler.
•
You must stop driving if severe vibrations occur, or if the wheel
starts overheating and gives off smoke.
•
You must also stop driving if damage to the tyres (e.g. tears in
the sidewalls) becomes apparent.
WARNING
Please ask your Audi dealer or qualified workshop whether run flat
tyres can be used on your vehicle. Unauthorised use of these tyres
can invalidate the vehicle's type approval for use on public roads.
Rim size
Rim offset
Tyre size
7Jx16
39 mm
205/60
7Jx16
46 mm
225/55
7Jx17
46 mm
225/50
document_0900452a81b1b9de.book Seite 274 Donnerstag, 26. Juli 2007 9:16 09
Page 299 of 342
Self-help297
Controls
Safety
Driving tips
General maintenance
Self-help
Technical data
Rear towline anchorage
Vehicles which do not have a factory-fitted towing
bracket* have a towline anchorage on the right side of the
rear bumper.Vehicles with towline anchorage
– Take the towline anchorage out of the vehicle's tool kit.
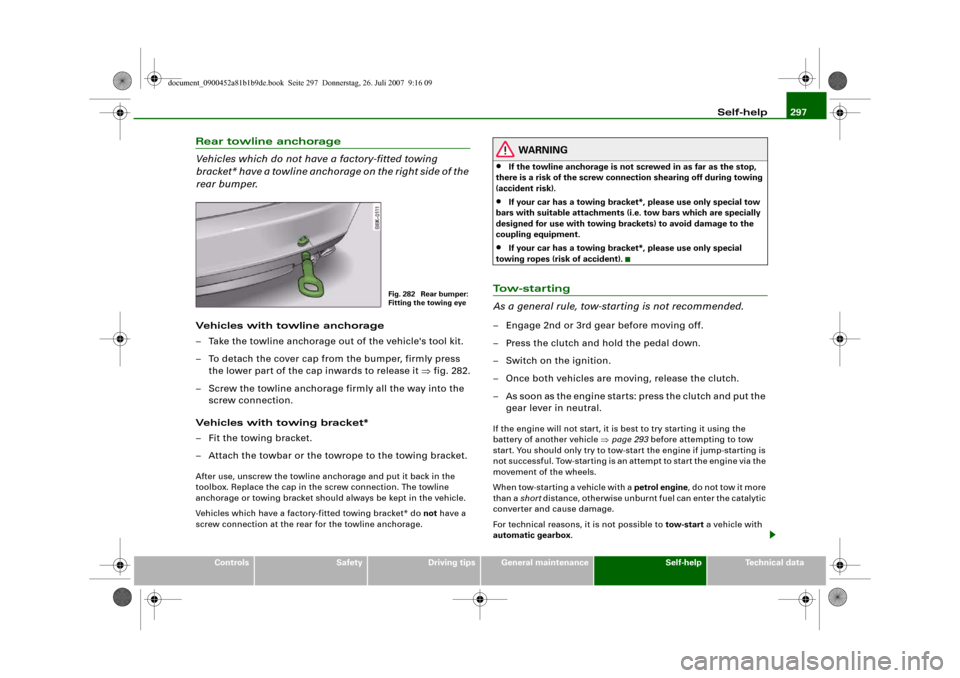
– To detach the cover cap from the bumper, firmly press
the lower part of the cap inwards to release it ⇒fig. 282.
– Screw the towline anchorage firmly all the way into the
screw connection.
Vehicles with towing bracket*
– Fit the towing bracket.
– Attach the towbar or the towrope to the towing bracket.After use, unscrew the towline anchorage and put it back in the
toolbox. Replace the cap in the screw connection. The towline
anchorage or towing bracket should always be kept in the vehicle.
Vehicles which have a factory-fitted towing bracket* do not have a
screw connection at the rear for the towline anchorage.
WARNING
•
If the towline anchorage is not screwed in as far as the stop,
there is a risk of the screw connection shearing off during towing
(accident risk).
•
If your car has a towing bracket*, please use only special tow
bars with suitable attachments (i.e. tow bars which are specially
designed for use with towing brackets) to avoid damage to the
coupling equipment.
•
If your car has a towing bracket*, please use only special
towing ropes (risk of accident).
To w - s t a r t i n g
As a general rule, tow-starting is not recommended.– Engage 2nd or 3rd gear before moving off.
– Press the clutch and hold the pedal down.
– Switch on the ignition.
– Once both vehicles are moving, release the clutch.
– As soon as the engine starts: press the clutch and put the
gear lever in neutral.If the engine will not start, it is best to try starting it using the
battery of another vehicle ⇒page 293 before attempting to tow
start. You should only try to tow-start the engine if jump-starting is
not successful. Tow-starting is an attempt to start the engine via the
movement of the wheels.
When tow-starting a vehicle with a petrol engine, do not tow it more
than a short distance, otherwise unburnt fuel can enter the catalytic
converter and cause damage.
For technical reasons, it is not possible to tow-start a vehicle with
automatic gearbox.
Fig. 282 Rear bumper:
Fitting the towing eye
document_0900452a81b1b9de.book Seite 297 Donnerstag, 26. Juli 2007 9:16 09
Page 303 of 342
Fuses and bulbs301
Controls
Safety
Driving tips
General maintenance
Self-help
Technical data The seats with electrical adjustment are protected by circuit
breakers. These reset automatically after a few seconds when the
overload has been corrected.
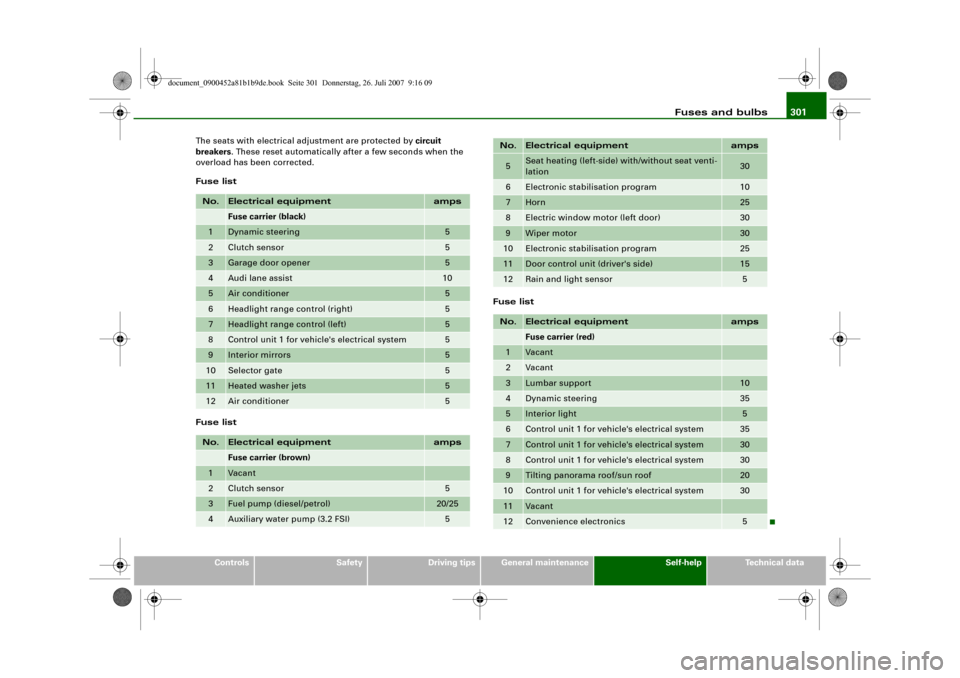
Fuse list
Fuse listFuse list
No.
Electrical equipment
amps
Fuse carrier (black)
1
Dynamic steering
5
2
Clutch sensor
5
3
Garage door opener
5
4
Audi lane assist
10
5
Air conditioner
5
6
Headlight range control (right)
5
7
Headlight range control (left)
5
8
Control unit 1 for vehicle's electrical system
5
9
Interior mirrors
5
10
Selector gate
5
11
Heated washer jets
5
12
Air conditioner
5
No.
Electrical equipment
amps
Fuse carrier (brown)
1
Vacant
2
Clutch sensor
5
3
Fuel pump (diesel/petrol)
20/25
4
Auxiliary water pump (3.2 FSI)
5
5
Seat heating (left-side) with/without seat venti-
lation
30
6
Electronic stabilisation program
10
7
Horn
25
8
Electric window motor (left door)
30
9
Wiper motor
30
10
Electronic stabilisation program
25
11
Door control unit (driver's side)
15
12
Rain and light sensor
5
No.
Electrical equipment
amps
Fuse carrier (red)
1
Vacant
2
Vacant
3
Lumbar support
10
4
Dynamic steering
35
5
Interior light
5
6
Control unit 1 for vehicle's electrical system
35
7
Control unit 1 for vehicle's electrical system
30
8
Control unit 1 for vehicle's electrical system
30
9
Tilting panorama roof/sun roof
20
10
Control unit 1 for vehicle's electrical system
30
11
Vacant
12
Convenience electronics
5
No.
Electrical equipment
amps
document_0900452a81b1b9de.book Seite 301 Donnerstag, 26. Juli 2007 9:16 09