2008 AUDI A4 technical data
[x] Cancel search: technical dataPage 279 of 342
Accessories and modifications to the vehicle277
Controls
Safety
Driving tips
General maintenance
Self-help
Technical data
Accessories and modifications to the vehicleAccessories and replacement partsAlways ask your dealer or specialist retailer for advice
before purchasing accessories and replacement parts.Your car is designed to offer a high standard of active and passive
safety. For this reason, we recommend that you ask an Audi dealer
for advice before fitting accessories or replacement parts. Audi
dealers have the latest information from the manufacturer and can
recommend accessories and replacement parts which are suitable
for your requirements. They can also answer any questions you
might have regarding official regulations.
We recommend you to use only Audi accessories and Audi Genuine
parts
®. Audi has tested these parts and accessories for suitability,
reliability and safety. Audi dealers have the necessary experience
and facilities to ensure that the parts are installed properly.
Although the market is constantly scrutinised, Audi cannot judge or
assume responsibility for the reliability, safety and suitability of
non-genuine products - even though in some instances, these parts
may have been approved by an officially recognised technical
testing authority or accompanied by an official approval certificate.
Any retro-fitted equipment which has a direct effect on the vehicle
and/or the way it is driven (e.g. cruise control system or electroni-
cally-controlled suspension) must be approved for use in your
vehicle and bear the e mark (the European Union's approval
symbol).
If any additional electrical components are fitted which do not serve
to control the vehicle itself (for instance a refrigerator box, laptop or
ventilator fan, etc.), these must bear the CE mark (manufacturer
conformity declaration in the European Union).
WARNING
Never attach accessories (such as cup holders or telephone
brackets) to the surfaces covering the airbag units or the areas
around the airbags: this could cause injury if the airbag is
triggered.ModificationsModifications must always be carried out according to
our specifications.Unauthorised modifications to the electronic components or soft-
ware in the vehicle may cause malfunctioning. Due to the way the
electronic components are linked together in networks, other
systems may be affected by the faults. This can seriously impair
safety, lead to excessive wear of components, and also invalidate
the type approval for your vehicle.
You will appreciate that your Audi dealer cannot be held liable for
any damage caused by modifications and/or work performed incor-
rectly.
We recommend that all work should be performed by an Audi work-
shop using Audi Genuine parts
®.
WARNING
Incorrectly performed modifications or other work on your vehicle
can lead to malfunctions and cause accidents.
document_0900452a81b1b9de.book Seite 277 Donnerstag, 26. Juli 2007 9:16 09
Page 281 of 342
Accessories and modifications to the vehicle279
Controls
Safety
Driving tips
General maintenance
Self-help
Technical data
document_0900452a81b1b9de.book Seite 279 Donnerstag, 26. Juli 2007 9:16 09
Page 285 of 342
Self-help283
Controls
Safety
Driving tips
General maintenance
Self-help
Technical data
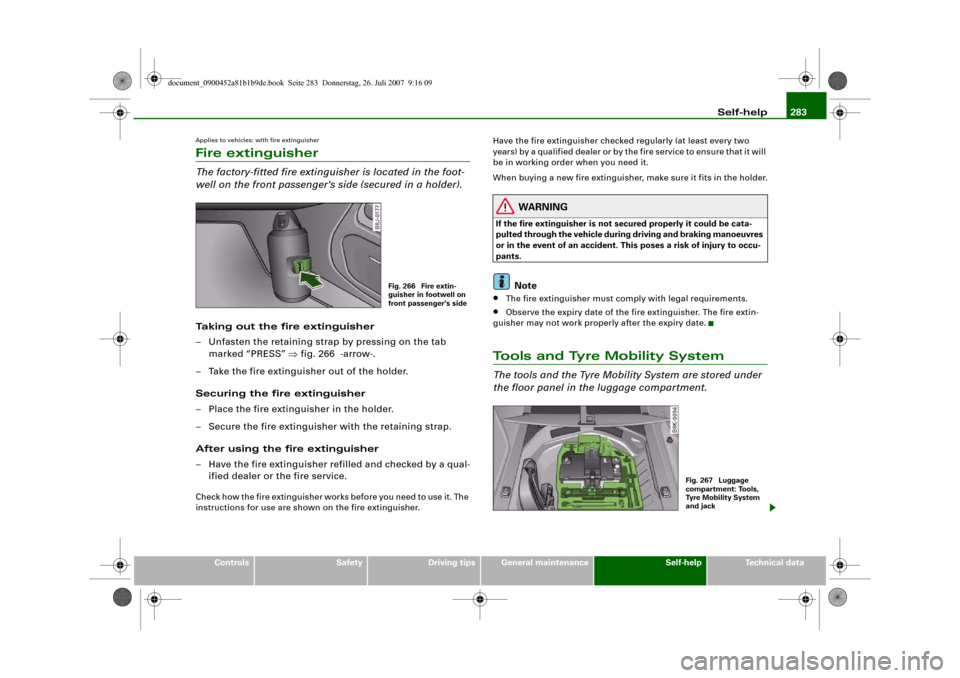
Applies to vehicles: with fire extinguisherFire extinguisherThe factory-fitted fire extinguisher is located in the foot-
well on the front passenger's side (secured in a holder).Taking out the fire extinguisher
– Unfasten the retaining strap by pressing on the tab
marked “PRESS” ⇒fig. 266 -arrow-.
– Take the fire extinguisher out of the holder.
Securing the fire extinguisher
– Place the fire extinguisher in the holder.
– Secure the fire extinguisher with the retaining strap.
After using the fire extinguisher
– Have the fire extinguisher refilled and checked by a qual-
ified dealer or the fire service.Check how the fire extinguisher works before you need to use it. The
instructions for use are shown on the fire extinguisher.Have the fire extinguisher checked regularly (at least every two
years) by a qualified dealer or by the fire service to ensure that it will
be in working order when you need it.
When buying a new fire extinguisher, make sure it fits in the holder.
WARNING
If the fire extinguisher is not secured properly it could be cata-
pulted through the vehicle during driving and braking manoeuvres
or in the event of an accident. This poses a risk of injury to occu-
pants.
Note
•
The fire extinguisher must comply with legal requirements.
•
Observe the expiry date of the fire extinguisher. The fire extin-
guisher may not work properly after the expiry date.
Tools and Tyre Mobility SystemThe tools and the Tyre Mobility System are stored under
the floor panel in the luggage compartment.
Fig. 266 Fire extin-
guisher in footwell on
front passenger's side
Fig. 267 Luggage
compartment: Tools,
Tyre Mobility System
and jack
document_0900452a81b1b9de.book Seite 283 Donnerstag, 26. Juli 2007 9:16 09
Page 287 of 342
Self-help285
Controls
Safety
Driving tips
General maintenance
Self-help
Technical data How to use the compact temporary spare wheel
Should you ever have a punctured tyre, the compact temporary
spare wheel is only intended for temporary use until you can reach
a workshop. The standard-size road wheel should be refitted as
soon as possible.
Please note the following restrictions when using the compact
temporary spare wheel. The compact temporary spare wheel is
designed specifically for this model. For this reason, do not use a
temporary spare from a different type of vehicle.
Snow chains
For technical reasons, snow chains must not be used on the
compact temporary spare wheel.
If you should have a puncture on one of the front wheels when using
snow chains, fit the compact temporary spare in place of one of the
rear wheels. You can then attach the snow chains to the wheel taken
from the rear and use this wheel to replace the punctured front
wheel.
WARNING
•
The tyre pressures must be checked and corrected as soon as
possible. The tyre pressure of the compact temporary spare wheel
must be 4.2 bar – an incorrectly inflated tyre can cause an acci-
dent.
•
Do not drive faster than 80 km/h - higher speeds can cause an
accident.
•
Avoid heavy acceleration, hard braking and fast cornering – risk
of accident.
•
Never use two or more compact spare tyres at the same time –
risk of accident.
•
No other type of tyre (normal summer or winter tyres) may be
fitted on the compact temporary spare wheel.
Ty r e r e p a i r sGeneral information and safety notes
Repaired tyres are only suitable for temporary use.Your vehicle is equipped with a tyre repair kit: the Tyre Mobility
System (TMS).
In the event of a puncture you will find the TMS, which consists of a
sealing compound and an electric compressor, located under the
floor panel in the luggage compartment.
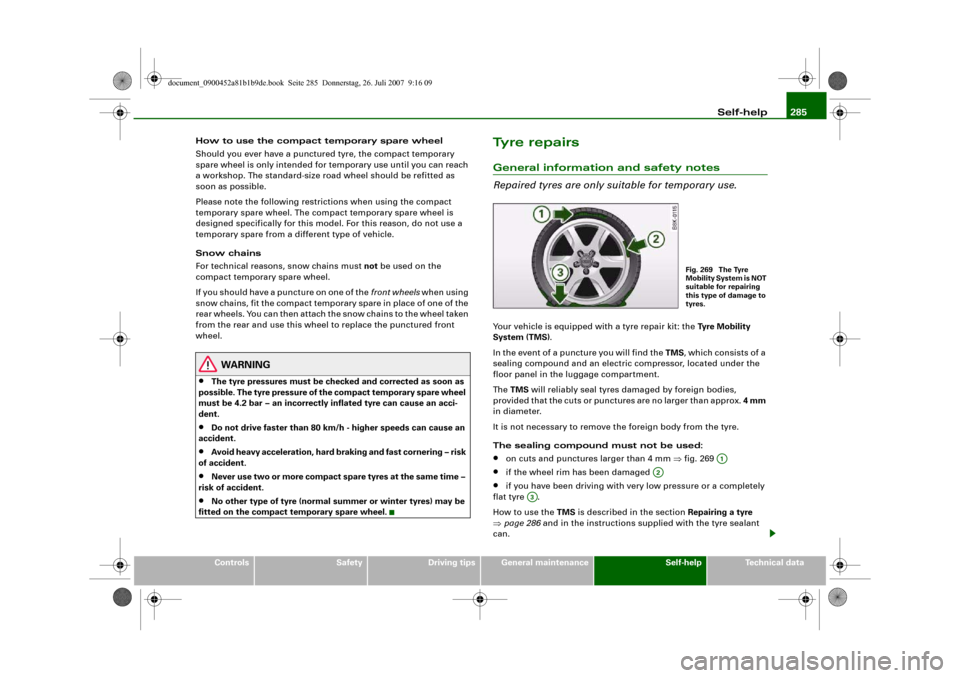
The TMS will reliably seal tyres damaged by foreign bodies,
provided that the cuts or punctures are no larger than approx. 4 mm
in diameter.
It is not necessary to remove the foreign body from the tyre.
The sealing compound must not be used:•
on cuts and punctures larger than 4 mm ⇒fig. 269
•
if the wheel rim has been damaged
•
if you have been driving with very low pressure or a completely
flat tyre .
How to use the TMS is described in the section Repairing a tyre
⇒page 286 and in the instructions supplied with the tyre sealant
can.
Fig. 269 The Tyre
Mobility System is NOT
suitable for repairing
this type of damage to
tyres.
A1
A2
A3
document_0900452a81b1b9de.book Seite 285 Donnerstag, 26. Juli 2007 9:16 09
Page 289 of 342

Self-help287
Controls
Safety
Driving tips
General maintenance
Self-help
Technical data
– Check whether a repair is possible using the Tyre
Mobility System ⇒page 285.
– Ensure that all passengers leave the vehicle and move
away from the danger area ⇒.
– Take the tyre sealant can and the electric compressor out
of the luggage compartment ⇒page 283.
– Fix the sticker “max. 80 km/h”, which is included with the
tyre sealant can, onto the instrument cluster where the
driver will see it.
Filling the tyre
– Shake the tyre sealant can well.
– Screw the enclosed filling hose onto the sealant can as
far as it will go. This will automatically pierce the foil
sealing the can.
– Take the valve cap off the tyre valve and use the enclosed
valve insert tool to unscrew the valve insert ⇒page 286,
fig. 270.
– Place the valve insert onto a clean surface.
– Remove the sealing plug from the filling hose and insert
the hose into the tyre valve.
– Hold the tyre sealant can upside down and fill the
complete contents of the can into the tyre.
– Then disconnect the hose and screw the valve insert
firmly back into the tyre valve.Inflating the tyre
– Screw the filling hose of the electric compressor onto the
tyre valve and plug the connector into the cigarette
lighter.
– Pump the tyre up to 2.0 to 2.5 bar and monitor the pres-
sure shown on the pressure gauge.
– If the tyre pressure remains lower than the value speci-
fied above drive the vehicle approx. 10 metres forwards
or backwards, so that the sealant can spread evenly in
the tyre. If the pressure is still lower than the specifica-
tion the tyre is too badly damaged and cannot be
repaired using the tyre sealant.
Final checks
– After about 10 minutes stop to check the tyre pressure.
– If tyre pressure is less than 1.3 bar, the tyre is too badly
damaged. Do not drive on. You should obtain profes-
sional assistance.
WARNING
•
If you have a puncture in moving traffic, switch on the hazard
warning lights and place the warning triangle in a visible location.
This is for your own safety and also warns other road users.
•
Make sure your passengers wait in a safe place (for instance
behind the roadside crash barrier).
•
Please observe the manufacturers' safety notes on the
compressor and the instructions supplied with the tyre sealant
can.
•
If it was not possible to build up a tyre pressure of 2.0 bar
within 6 minutes this means that the tyre is too badly damaged.
Do not drive on.
document_0900452a81b1b9de.book Seite 287 Donnerstag, 26. Juli 2007 9:16 09
Page 291 of 342
Self-help289
Controls
Safety
Driving tips
General maintenance
Self-help
Technical data
–Loosen the wheel bolts ⇒page 289.
–Raise the car with the jack* ⇒page 290.
–Ta k e o f f the wheel with the flat tyre and then put on the
spare wheel* ⇒page 291.
–Lower the vehicle to the ground.
– Tighten the wheel bolts firmly i n d i a g o n a l s e qu e n c e w i t h
the box spanner ⇒page 289.
–Fit the hub cap back on.After changing a wheel
What you must do after changing a wheel.– Place the wheel with the defective tyre in the spare wheel
well and secure it.
– Put the tools and the jack* back in the luggage compart-
ment.
–The inflation pressure of the newly fitted spare tyre must
be checked as soon as possible.
–Have the tightening torque of the wheel bolts checked as
soon as possible with a torque wrench. The correct tight-
ening torque is 120 Nm.
– Have the flat tyre replaced as quickly as possible.
Note•
If you notice that the wheel bolts are corroded and difficult to
turn when changing a wheel, they must be replaced before having
the tightening torque checked.
•
In the interest of safety, drive at moderate speeds until the tight-
ening torque of the wheel bolts has been checked.
Hub caps
The hub caps must be removed for access to the wheel
bolts.Removing
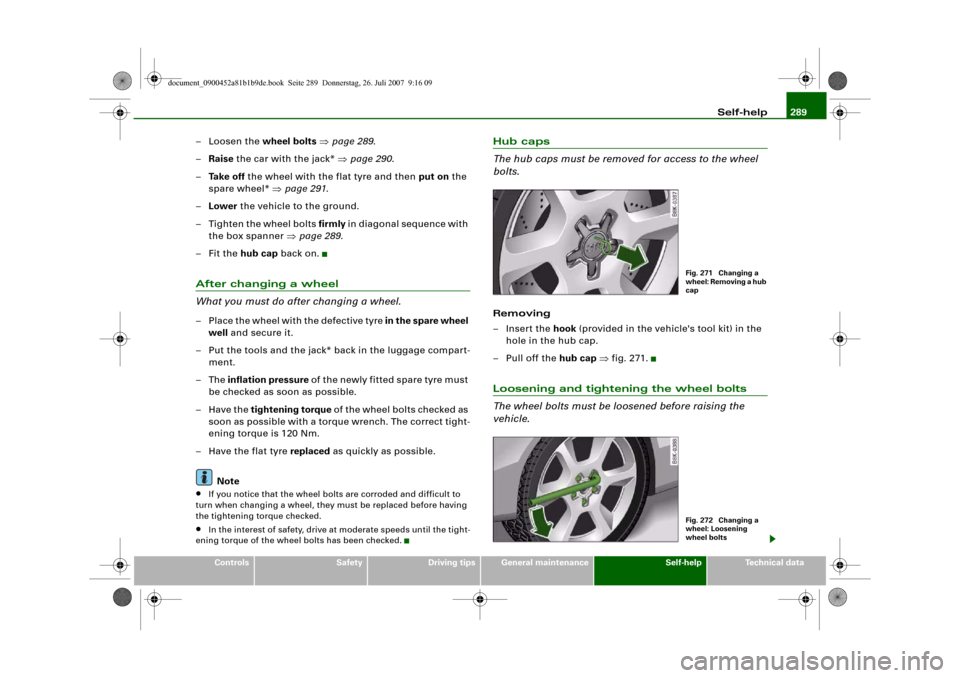
– Insert the hook (provided in the vehicle's tool kit) in the
hole in the hub cap.
–Pull off the hub cap ⇒fig. 271.Loosening and tightening the wheel bolts
The wheel bolts must be loosened before raising the
vehicle.
Fig. 271 Changing a
wheel: Removing a hub
capFig. 272 Changing a
wheel: Loosening
wheel bolts
document_0900452a81b1b9de.book Seite 289 Donnerstag, 26. Juli 2007 9:16 09
Page 293 of 342
Self-help291
Controls
Safety
Driving tips
General maintenance
Self-help
Technical data
– Now fit the crank handle onto the jack by inserting it
in the opening on the knob ⇒page 290, fig. 274. Turn the
crank handle clockwise or anti-clockwise to secure it in
place.
– Raise the vehicle by winding the crank handle until the
defective wheel is clear of the ground.Recesses at the front and rear of the door sills mark the jacking
points ⇒page 290, fig. 273. There is one jacking point for each
wheel. The distance from the jacking points to the wheel arches is
approximately 20 cm at the front and 40 cm at the rear. The jack may
only be applied at the seam of the jacking points shown.
An unstable surface under the jack may cause the vehicle to slip off
the jack. Always provide a firm base for the jack on the ground. If
necessary use a large, strong board or similar support. On a hard,
slippery surface (such as tiles) use a rubber mat or similar to prevent
the jack from slipping.
WARNING
•
Prevent the base of the jack from slipping – risk of injury.
•
The car can be damaged if the jack is not applied at the correct
jacking points. There is also a risk of injury since the jack can slip
off suddenly if it is not properly engaged.
Taking off the wheel and putting on the spare wheel
Step-by-step instructions for taking off the wheel and
putting on the spare wheel.Change the wheel as described below after loosening the
wheel bolts and raising the vehicle with the jack*.
Taking off the wheel
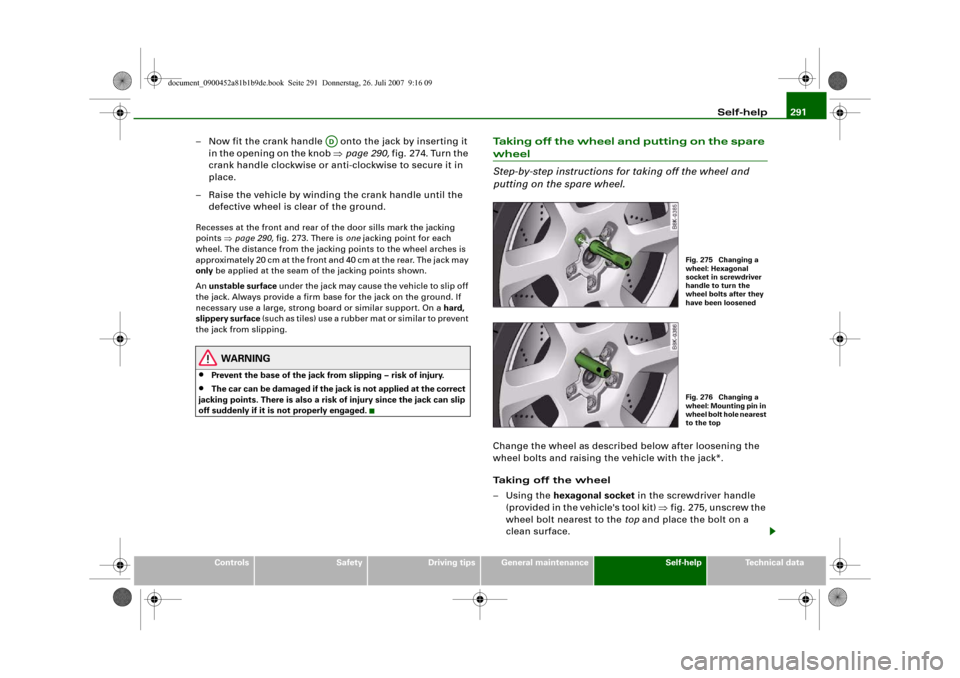
–Using the hexagonal socket in the screwdriver handle
(provided in the vehicle's tool kit) ⇒fig. 275, unscrew the
wheel bolt nearest to the top and place the bolt on a
clean surface.
AD
Fig. 275 Changing a
wheel: Hexagonal
socket in screwdriver
handle to turn the
wheel bolts after they
have been loosenedFig. 276 Changing a
wheel: Mounting pin in
wheel bolt hole nearest
to the top
document_0900452a81b1b9de.book Seite 291 Donnerstag, 26. Juli 2007 9:16 09
Page 295 of 342
Self-help293
Controls
Safety
Driving tips
General maintenance
Self-help
Technical data
– Insert the hook (provided in the vehicle's tool kit) in the
hole in the hub cap.
–Pull off the hub cap ⇒page 289, fig. 271.
– Insert the adapter completely into the wheel bolt .
– F i t t h e b o x s p a n n e r as f a r as i t w i l l g o o v e r t h e a d a p t e r .
– Loosen or tighten the wheel bolt ⇒page 289.It is advisable to carry the wheel bolt adapter in the vehicle. The
adapter is normally stored in the vehicle tool kit, underneath the
towline anchorage. It should be put back there after use.
The code number of the anti-theft wheel bolt is stamped on the front
o f t h e a d a p t e r. Yo u r A u d i d e a l e r w i l l n e e d t h i s n u m b e r t o r e p l a c e t h e
adapter if lost.
Note
Note the code number of the anti-theft wheel bolt and keep it in a
safe place – not in your vehicle.Jump-startingBefore starting the engine
If necessary, the engine can be started by connecting it to
the battery of another vehicle.If the engine should ever fail to start because of a discharged
battery, the battery can be connected to the battery of another
vehicle to start the engine. Suitable jump leads are required.
Both batteries must be rated at 12 Volts. The capacity (Ah) of the
booster battery should not be significantly lower than that of the
discharged battery.Jump leads
The jump leads must be heavy enough to carry the starter current.
Refer to the details given by the manufacturer.
Only use jump leads with insulated battery clamps.
Positive cable – usually red
Negative cable – usually black
WARNING
•
When it is discharged the battery can freeze at temperatures
around 0°C. A frozen battery must first be thawed out before
connecting the jump leads, as it could otherwise explode.
•
Please note the safety warnings referring to working in the
engine compartment ⇒page 255.Note
•
There must be no contact between the two vehicles as otherwise
current could flow as soon as the positive terminals are connected.
•
The discharged battery must be properly connected to the
vehicle's electrical system.
•
Switch off the car telephone if necessary. Details will be given in
the manufacturer's instructions for the car telephone.
A2
A1A2
document_0900452a81b1b9de.book Seite 293 Donnerstag, 26. Juli 2007 9:16 09